display MITSUBISHI MIRAGE G4 2020 (in English) Owner's Guide
[x] Cancel search | Manufacturer: MITSUBISHI, Model Year: 2020, Model line: MIRAGE G4, Model: MITSUBISHI MIRAGE G4 2020Pages: 253, PDF Size: 36.39 MB
Page 136 of 253
Multi-information display
Features and controls 5-71
5
3. With this indicator
flashing, if you lightly
press the multi-information meter switch,the display switches from “---” to “cLEAr”. After that, the time until the next periodic inspection is shown.
N00556801267
The “Average fuel c
onsumption reset mode”,
“Fuel consumption uni
t” and “Temperature
unit” setting can be m
odified as desired,
when the ignition switch or the operation mode is ON.
N00575501032
You can change the mode condition for theaverage fuel consumpt
ion display to “Auto
reset” or “Manual reset”.
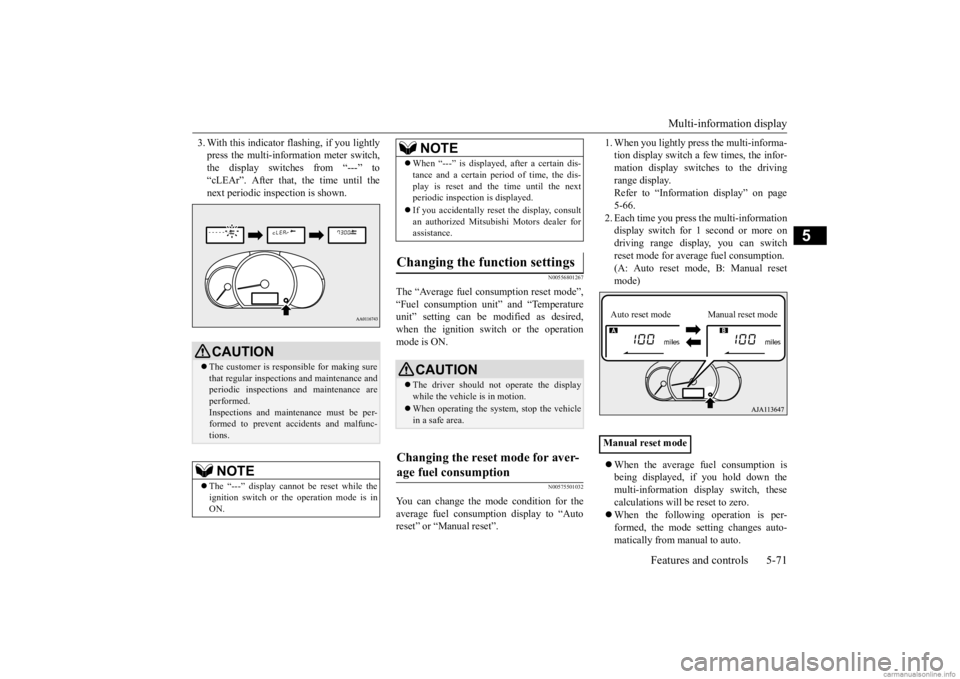
1. When you lightly press the multi-informa- tion display switch a few times, the infor-mation display switches to the driving range display. Refer to “Information display” on page5-66. 2. Each time you press th
e multi-information
display switch for 1 second or more ondriving range disp
lay, you can switch
reset mode for average fuel consumption. (A: Auto reset mode, B: Manual reset mode) When the average fuel consumption is being displayed, if you hold down themulti-information display switch, these calculations will be reset to zero. When the following operation is per- formed, the mode setting changes auto- matically from manual to auto.
CAUTION The customer is responsible for making sure that regular inspections and maintenance and periodic inspections
and maintenance are
performed.Inspections and mainte
nance must be per-
formed to prevent accidents and malfunc- tions.NOTE
The “---” display cannot
be reset while the
ignition switch or the operation mode is inON.
When “---” is displayed, after a certain dis- tance and a certain pe
riod of time, the dis-
play is reset and th
e time until the next
periodic inspection is displayed. If you accidentally reset
the display, consult
an authorized Mitsubishi Motors dealer for assistance.
Changing the function settings
CAUTION The driver should not operate the display while the vehicle is in motion. When operating the system, stop the vehicle in a safe area.
Changing the reset mode for aver- age fuel consumption
NOTE
Manual reset modeAuto reset mode Manual reset mode
BK0284300US.book 71 ページ 2019年5月23日 木曜日 午後12時22分
Page 137 of 253
![MITSUBISHI MIRAGE G4 2020 (in English) Owners Guide Multi-information display 5-72 Features and controls
5
[Except for vehicles
equipped with the
F. A . S . T. - k e y ]Turn the ignition switch to the “ON” posi- tion from the “ACC” or “OFF MITSUBISHI MIRAGE G4 2020 (in English) Owners Guide Multi-information display 5-72 Features and controls
5
[Except for vehicles
equipped with the
F. A . S . T. - k e y ]Turn the ignition switch to the “ON” posi- tion from the “ACC” or “OFF](/img/19/34857/w960_34857-136.png)
Multi-information display 5-72 Features and controls
5
[Except for vehicles
equipped with the
F. A . S . T. - k e y ]Turn the ignition switch to the “ON” posi- tion from the “ACC” or “OFF” position. [For vehicles equipped
with the F.A.S.T.-
key]Change the operation mode to ON from ACC or OFF. When the average fuel consumption is being displayed, if you hold down the multi-information display switch, these calculations will
be reset to zero.
When the engine switch or the operation mode is in the following conditions, the average fuel consumption display willautomatically reset. [Except for vehicles
equipped with the
F. A . S . T. - k e y ] The ignition switch has been set to the“ACC” or “OFF” position for about 4 hours or more. [For vehicles equipped
with the F.A.S.T.-
key]The operation mode has been set to ACC or OFF for about 4 hours or more.
N00557100156
The fuel consumption display unit can bechanged. The distance
and amount units are
also switched to match the selected fuel con-sumption unit. 1. When you lightly press the multi-informa- tion display switch a few times, the infor- mation display switches to the averagefuel consumption display. Refer to “Information display” on page 5-66.2. Press and hold the mu
lti-information dis-
play switch for about 5 seconds or more until buzzer sound is heard twice.
3. Press and hold the multi-information dis- play switch to switch in sequence from“km/L”
“L/100 km”
“mpg”
“km/L”.
The distance units is al
so changed in the fol-
lowing combinations to match the selected fuel consumption unit.
Auto reset mode
NOTE
The average fuel cons
umption display can be
reset separately for the auto reset mode andfor the manual reset mode. Disconnecting th
e battery cable will erase
from memory the manual reset mode or autoreset mode setting for the average fuel con- sumption display. The initial (default) setting is “Auto reset mode”.
Changing the fuel consumption display unit
NOTE
The display units for the driving range, the average fuel consumption are changed, but the units for the indicating needle (speedom- eter), the odometer, the trip odometer and theservice reminder will
remain unchanged.
If the battery is disconnected, the memory of the unit setting is erased and it returns auto- matically to factory setting.
BK0284300US.book 72 ページ 2019年5月23日 木曜日 午後12時22分
Page 138 of 253
Multi-information display
Features and controls 5-73
5
N00557201268
The temperature display unit can be switched. 1. When you lightly press the multi-informa- tion display switch a few times, the infor- mation display switches to the outsidetemperature display. Refer to “Information display” on page 5-66. 2. Each time you press the multi-information display switch for 5 seconds or more onoutside temperature display, you can switch from °F to °C or from °C to °F unit of outside temperature display.Fuel consumption
Distance
(driving range)
km/L km L/100 km km mpg mile (s)
Changing the temperature unit
NOTE
The temperature value on air conditioning panel is switched in
conjunction with outside
temperature display unit of the multi-infor-mation display. However, “°F” or “°C” are not shown to tem- perature display of an air conditioning.
BK0284300US.book 73 ページ 2019年5月23日 木曜日 午後12時22分
Page 139 of 253
Indicator and warning light package 5-74 Features and controls
5
N00519801950
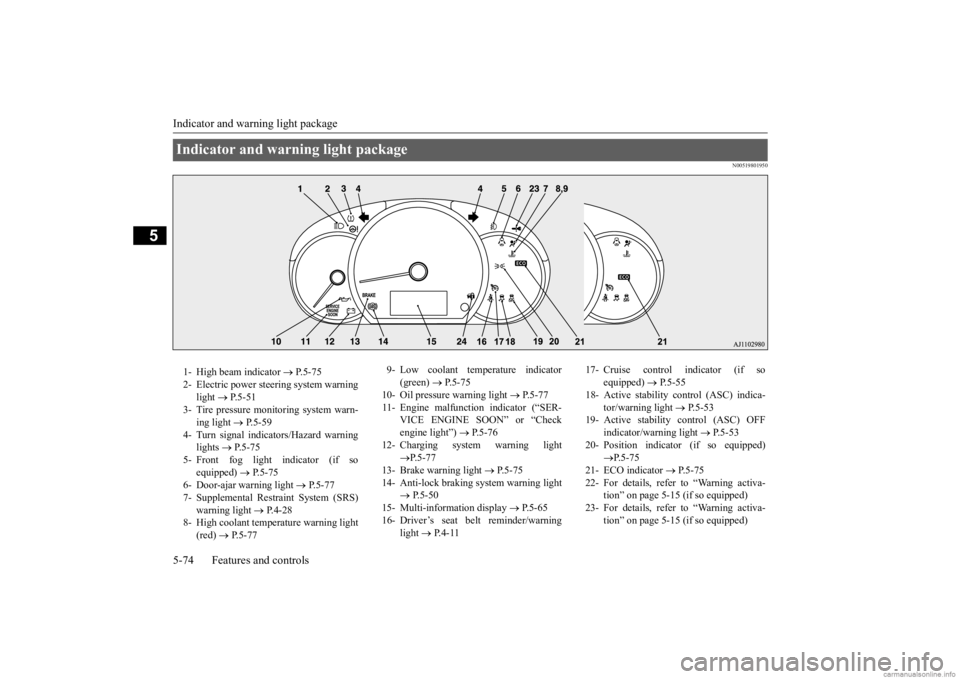
Indicator and warning light package 1- High beam indicator
P.5-75
2- Electric power steering system warning
light
P.5-51
3- Tire pressure moni
toring system warn-
ing light
P.5-59
4- Turn signal indicators/Hazard warning
lights
P.5-75
5- Front fog light indicator (if so
equipped)
P.5-75
6- Door-ajar warning light
P.5-77
7- Supplemental Restraint System (SRS)
warning light
P.4-28
8- High coolant temperature warning light
(red)
P.5-77
9- Low coolant temperature indicator
(green)
P. 5 - 7 5
10- Oil pressure warning light
P.5-77
11- Engine malfunction indicator (“SER-
VICE ENGINE SOON” or “Check engine light”)
P.5-76
12- Charging system warning light
P.5-77
13- Brake warning light
P.5-75
14- Anti-lock braking system warning light
P.5-50
15- Multi-information display
P. 5 - 6 5
16- Driver’s seat belt reminder/warning
light
P. 4 - 1 1
17- Cruise control indicator (if so
equipped)
P.5-55
18- Active stability c
ontrol (ASC) indica-
tor/warning light
P. 5 - 5 3
19- Active stability control (ASC) OFF
indicator/warning light
P.5-53
20- Position indicator (if so equipped)
P.5-75
21- ECO indicator
P.5-75
22- For details, refer
to “Warning activa-
tion” on page 5-15 (if so equipped)
23- For details, refer
to “Warning activa-
tion” on page 5-15 (if so equipped)
BK0284300US.book 74 ページ 2019年5月23日 木曜日 午後12時22分
Page 158 of 253
Vehicle preparatio
n before driving
Driving safety 6-3
6
N00629001868
For a safer and more enjoyable trip, always check for the following:
Before starting the ve
hicle, make certain
that you and all passengers are seated and wearing their seat belts properly (with children in the rear seat, in appropriaterestraints), and that all the doors are locked. Move the driver’s seat as far backward as possible, while keeping good visibility, and good control of the steering wheel, brakes, accelerator, and controls. Check the instrument panel indicators and multi- information display for any possible prob-lem. Similarly, the front
passenger seat should
also be moved as fa
r back as possible.
Make sure that infants and small children are properly restrained in accordance with all laws and regulations.
Check these by selectin
g the defroster mode,
and set the blower switch on high. You shouldbe able to feel the air blowing against the windshield. Refer to “Defrosti
ng or defogging (wind-
shield, door windows)” on page 7-9.
NOTE
The shape of the mat and the number of retaining clips may
vary depending on the
vehicle model.WA R N I N G If a floor mat is the
wrong size or is not
properly installed, it can interfere with the operation of the pedals. Interference with the pedals can cause unintended accelera-tion and/or increase
d stopping distances
resulting in a cras
h and injury. Always
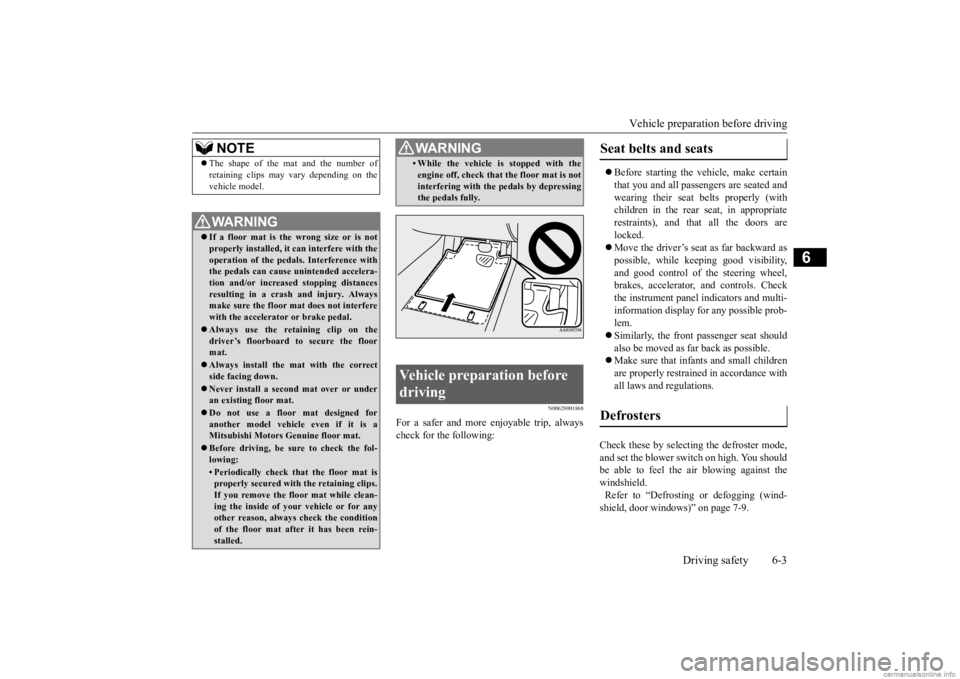
make sure the floor mat does not interferewith the accelerator or brake pedal. Always use the retaining clip on the driver’s floorboard to secure the floor mat. Always install the mat with the correct side facing down. Never install a second mat over or under an existing floor mat. Do not use a floor mat designed for another model vehicle even if it is a Mitsubishi Motors Genuine floor mat. Before driving, be sure to check the fol- lowing:• Periodically check that the floor mat is properly secured with the retaining clips. If you remove the fl
oor mat while clean-
ing the inside of you
r vehicle or for any
other reason, always
check the condition
of the floor mat afte
r it has been rein-
stalled.
• While the vehicle is stopped with theengine off, check that the floor mat is notinterfering with the pedals by depressingthe pedals fully.
Vehicle preparation before driving
WA R N I N G
Seat belts and seats Defrosters
BK0284300US.book 3 ページ 2019年5月23日 木曜日 午後12時22分
Page 171 of 253
Automatic air conditioning 7-4 Comfort controls
7
N00731501500
The air conditioning can only be used
while the engine is running.
N00711801624
Automatic air conditioning
CAUTIONThe engine speed may increase wh
en the air conditioning is operating.
With an increased engine speed, a CVT vehicle will creep to a gr
eater degree than with a lower
engine speed. Fully depress the
brake pedal to prevent the
vehicle from creeping.
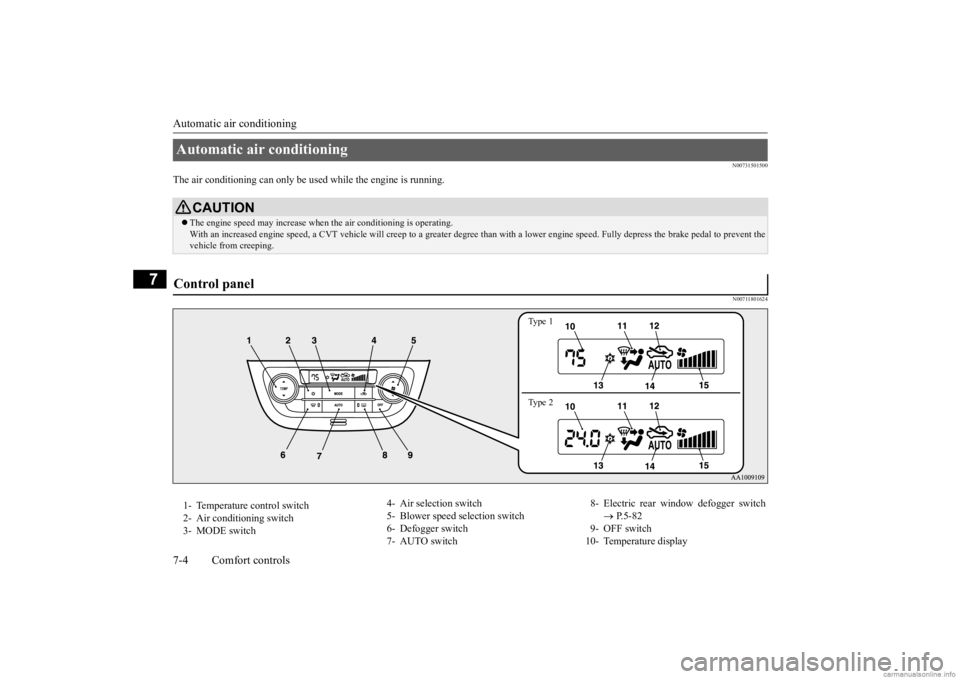
Control panel
Ty p e 1 Ty p e 2
1- Temperature control switch 2- Air conditioning switch 3- MODE switch
4- Air selection switch 5- Blower speed selection switch 6- Defogger switch 7- AUTO switch
8- Electric rear window defogger switch
P.5-82
9- OFF switch 10- Temperature display
BK0284300US.book 4 ページ 2019年5月23日 木曜日 午後12時22分
Page 172 of 253
Automatic air conditioning Comfort controls 7-5
7
N00736901307
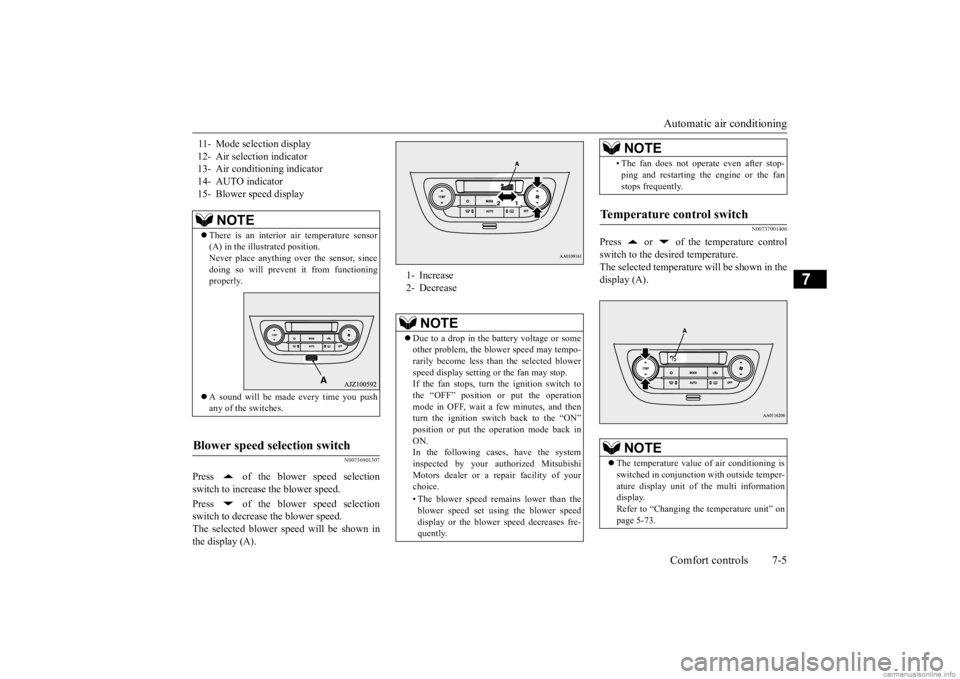
Press of the blower speed selection switch to increase the blower speed. Press of the blower speed selection switch to decrease the blower speed. The selected blower speed will be shown in the display (A).
N00737001406
Press or of the temperature controlswitch to the desired temperature.The selected temperature will be shown in the display (A).
11- Mode selection display 12- Air selecti
on indicator
13- Air conditioning indicator14- AUTO indicator 15- Blower speed display
NOTE
There is an interior air temperature sensor (A) in the illustrated position. Never place anything ove
r the sensor, since
doing so will prevent it from functioning properly. A sound will be made every time you push any of the switches.
Blower speed selection switch
1- Increase 2- Decrease
NOTE
Due to a drop in the battery voltage or some other problem, the blower speed may tempo-rarily become less than the selected blower speed display setting or the fan may stop. If the fan stops, turn the ignition switch tothe “OFF” position or put the operation mode in OFF, wait a
few minutes, and then
turn the ignition switch back to the “ON”position or put the ope
ration mode back in
ON. In the following cases, have the systeminspected by your authorized Mitsubishi Motors dealer or a repair facility of your choice. • The blower speed remains lower than the blower speed set using the blower speeddisplay or the blower
speed decreases fre-
quently.
• The fan does not opera
te even after stop-
ping and restarting the engine or the fanstops frequently.
Temperature control switch
NOTE
The temperature value
of air conditioning is
switched in conjunction
with outside temper-
ature display unit of the multi information display. Refer to “Changing the
temperature unit” on
page 5-73.NOTE
BK0284300US.book 5 ページ 2019年5月23日 木曜日 午後12時22分
Page 173 of 253

Automatic air conditioning 7-6 Comfort controls
7
The above indicates the
factory settings. You
can personalize the air
selection switch and
air conditioning switch to match your per-sonal preferences. Contact your Mitsubishi
Motors dealer or a
repair facility of your choice for assistance.Refer to “Personalizi
ng the air conditioning
switch (Changing the function setting)” on
page7-8. Refer to “Personalizing the air selection(Changing the function setting)” on page7-7.
N00737101247
To change air flow direction, press theMODE switch. Each time the MODE switch is pressed, the mode ch
anges to the next one
in the following sequence: “ ”
“”
“”
“”
“ ”. The selected mode
is shown in the displa
y (A). Refer to “Chang-
ing the mode selection” on page 7-3.
N00703400015
When this switch is pressed, the mode changes to the “ ” mode. The indicator light (A) will come on.
The selected mode is
shown in the display (B). Refer to “Changing the mode selection” on page 7-3.
N00737200368
Normally, use the outside air position to keepthe windshield and side windows clear and toquickly remove fog or frost from the wind- shield. To change the air selection, simply press the air selection switch.
While the engine coolant temperature is low, the temperature of the air from the heaterwill be cool/cold until
the engine warms up,
even if you have selected warm air with the switch. To prevent the windshield and windows fromfogging up, the vent mode
will be changed to
“ ” and the blower sp
eed will be reduced.
When the temperature is set to the highest or the lowest setting under the AUTO opera- tion, the air selection
and the air conditioning
will be automatically changed as follows. • Quick Heating (When th
e temperature is set
to the highest setting) Outside air will be introduced and the air conditioning will stop.If the air selection
and the air conditioning
are operated ma
nually after an automatic
changeover, manual
operation will be
selected. • Quick Cooling (When th
e temperature is set
to the lowest setting) Inside air will be recirculated and the air conditioning wi
ll operate.
NOTE
MODE switch Defogger switch
NOTE
When the defogger switch is pressed, the air conditioning system au
tomatically operates
and outside air (as oppos
ed to recirculated
air) is selected. Refer to “Defrosting or defogging (wind- shield, door windows)” on page 7-9.
Air selection switch
BK0284300US.book 6 ページ 2019年5月23日 木曜日 午後12時22分
Page 174 of 253
Automatic air conditioning Comfort controls 7-7
7
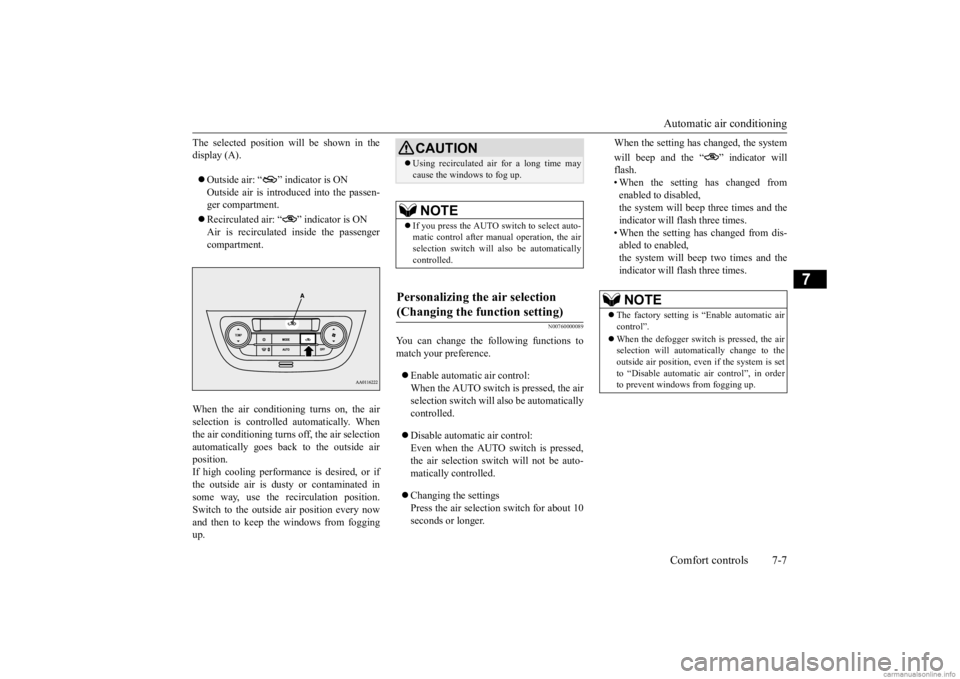
The selected position will be shown in the display (A). Outside air: “ ” indicator is ON Outside air is introduced into the passen-ger compartment. Recirculated air: “ ” indicator is ON Air is recirculated
inside the passenger
compartment.
When the air conditioning turns on, the air selection is controlled automatically. When the air conditioning turns off, the air selection automatically goes back to the outside airposition. If high cooling performan
ce is desired, or if
the outside air is dusty or contaminated insome way, use the recirculation position. Switch to the outside
air position every now
and then to keep the windows from foggingup.
N00760000089
You can change the following functions tomatch your preference. Enable automatic air control: When the AUTO switch is pressed, the air selection switch will also be automatically controlled. Disable automatic air control: Even when the AUTO switch is pressed, the air selection switch will not be auto- matically controlled. Changing the settings Press the air selection switch for about 10 seconds or longer.
When the setting has changed, the system will beep and the “ ” indicator will flash.• When the setting has changed from enabled to disabled, the system will beep three times and theindicator will flash three times. • When the setting has changed from dis- abled to enabled, the system will beep two times and the indicator will flash three times.
CAUTION Using recirculated air for a long time may cause the windows to fog up.NOTE
If you press the AUTO switch to select auto- matic control after ma
nual operation, the air
selection switch will also be automatically controlled.
Personalizing the air selection (Changing the function setting)
NOTE
The factory setting is
“Enable automatic air
control”. When the defogger switch
is pressed, the air
selection will automatically change to the outside air position, even if the system is setto “Disable automatic air control”, in order to prevent windows from fogging up.
BK0284300US.book 7 ページ 2019年5月23日 木曜日 午後12時22分
Page 175 of 253
Automatic air conditioning 7-8 Comfort controls
7
N00737301409
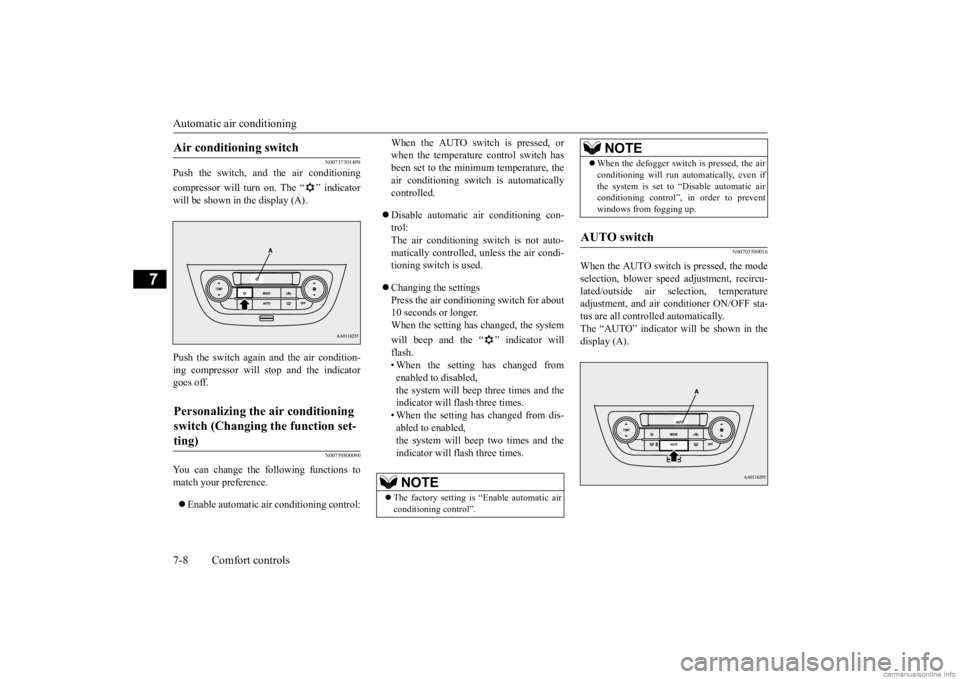
Push the switch, and the air conditioning compressor will turn on. The “ ” indicator will be shown in the display (A). Push the switch again and the air condition- ing compressor will stop and the indicator goes off.
N00759800090
You can change the following functions tomatch your preference. Enable automatic air conditioning control:
When the AUTO switch is pressed, or when the temperature control switch hasbeen set to the minimum temperature, the air conditioning switch
is automatically
controlled. Disable automatic air conditioning con- trol: The air conditioning switch is not auto- matically controlled, unless the air condi-tioning switch is used. Changing the settings Press the air conditi
oning switch for about
10 seconds or longer. When the setting has changed, the system will beep and the “ ” indicator will flash.• When the setting has changed from enabled to disabled, the system will beep three times and theindicator will flash three times. • When the setting has changed from dis- abled to enabled,the system will beep two times and the indicator will flash three times.
N00703500016
When the AUTO switch is pressed, the modeselection, blower spee
d adjustment, recircu-
lated/outside air sele
ction, temperature
adjustment, and air conditioner ON/OFF sta- tus are all controlled automatically. The “AUTO” indicator
will be shown in the
display (A).
Air conditioning switch Personalizing the air conditioning switch (Changing the function set- ting)
NOTE
The factory setting is
“Enable automatic air
conditioning control”.
When the defogger switch is pressed, the air conditioning will run au
tomatically, even if
the system is set to “Disable automatic airconditioning control”, in order to prevent windows from fogging up.
AUTO switch
NOTE
BK0284300US.book 8 ページ 2019年5月23日 木曜日 午後12時22分