display MITSUBISHI MIRAGE G4 2020 (in English) User Guide
[x] Cancel search | Manufacturer: MITSUBISHI, Model Year: 2020, Model line: MIRAGE G4, Model: MITSUBISHI MIRAGE G4 2020Pages: 253, PDF Size: 36.39 MB
Page 119 of 253
Cruise control (if so equipped) 5-54 Features and controls
5
N00546600119
If an abnormal condition occurs in the sys- tem, the following indicator will turn on.
N00546300031
N00518300573
Cruise control is an automatic speed control system that keeps a set speed. It can be acti-vated at speeds from about 25 mph (40 km/h). Cruise cont
rol does not work at
speeds below about 25 mph (40 km/h).
NOTE
The indicator may turn on when you start the engine. This means
that the battery volt-
age momentarily dropped when the enginewas started. It does not
indicate a malfunc-
tion, provided that
the display goes out
immediately. When a compact spare tire has been put on your vehicle, the grippi
ng ability of the tire
will be lower, making it
more likely that the
indicator will blink.
ASC warning indicator
-
ASC indicator
-
ASC OFF indicator
CAUTION The system may be malfunctioning. Park your vehicle in a
safe place and stop the
engine.Restart the engine and check whether the indicator goes out. If th
ey go out, there is no
abnormal condition. If
they do not go out or
appear frequently, it is
not necessary to stop
the vehicle imme
diately, but you should have
your vehicle inspected by an authorizedMitsubishi Motors dealer or a repair facility of your choice as soon as possible.
To w i n g
CAUTION When towing the vehicle with only the front wheels or only the rear wheels raised off theground, do not place th
e ignition switch in
the “ON” position or
do not put the operation
mode in ON. Placing
the ignition switch in
the “ON” position or
putting the operation
mode in ON could cause the ASC to operate, resulting in an accident.Note that the correct towing method dependson the transmission type
and the vehicle’s
drive configuration. For details, refer to
“Towing” on page 8-12.
Cruise control
(if so equipped)
CAUTIONWhen you do not wish to drive at a set speed, turn off the cruise control for safety. Do not use cruise control when driving con- ditions will not allow
you to stay at the same
speed, such as in heavy traffic or on roads that are winding, icy, snow-covered, wet,slippery, on a steep downhill slope. On vehicles equipped
with manual transaxle,
do not move the gearshift lever to the “N” (Neutral) position whil
e driving at a set
speed without depressi
ng the clutch pedal.
The engine will run too fast and might be damaged.NOTE
Cruise control may not
be able to keep your
speed on uphills or downhills. Your speed may decr
ease on a steep uphill.
You may use the accelerator pedal if you want to stay at your set speed.
BK0284300US.book 54 ページ 2019年5月23日 木曜日 午後12時22分
Page 127 of 253
Rear-view camera 5-62 Features and controls
5
N00533001275
Your TPMS operates
on a radio frequency
subject to Federal Communications Commis- sion (FCC) Rules. This device complies withpart 15 of FCC Rules. Operation is subject to the following two con- ditions. This device may not
cause harmful inter-
ference. This device must ac
cept any interference
received, including interference that may cause undesired operation.
N00546201385
When the gearshift lever or the selector lever is in the “R” position with the ignition switchor the operation mode is in ON, the rear-view image will be displayed on the screen of the DISPLAY AUDIO or the Smartphone LinkDisplay Audio.
When the gearshift lever or the selector lever is shifted out of the “R” position, the rear-view image will go off.
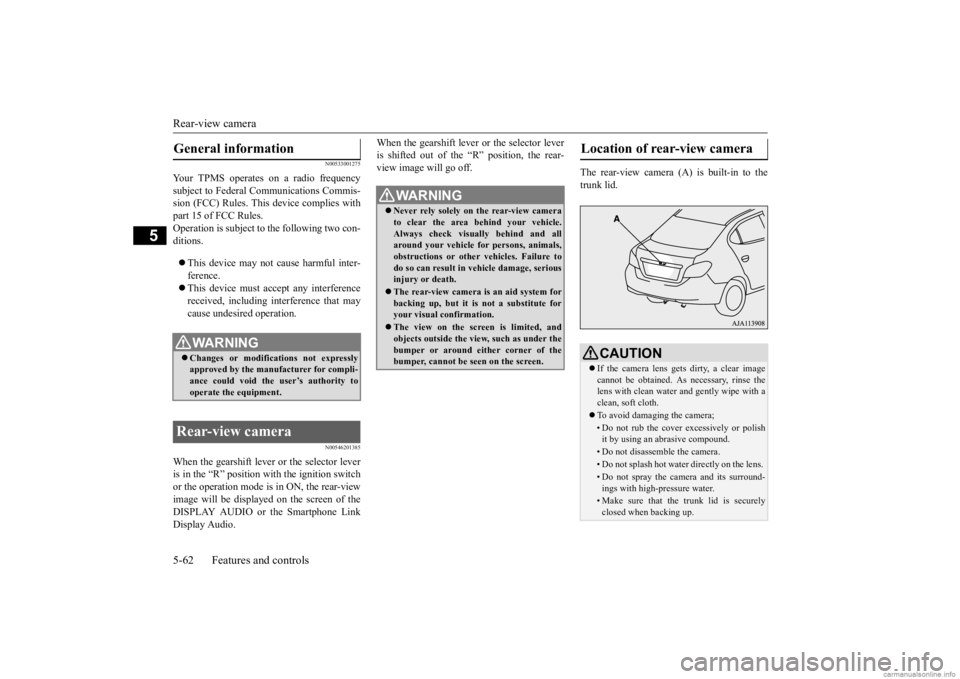
The rear-view camera (A) is built-in to the trunk lid.
General information
WA R N I N G Changes or modifications not expressly approved by the manufacturer for compli-ance could void the
user’s authority to
operate the equipment.
Rear-view camera
WA R N I N G Never rely solely on the rear-view camera to clear the area behind your vehicle.Always check visually behind and all around your vehicle fo
r persons, animals,
obstructions or other vehicles. Failure todo so can result in
vehicle damage, serious
injury or death. The rear-view camera is an aid system for backing up, but it is not a substitute for your visual confirmation. The view on the screen is limited, and objects outside the view, such as under thebumper or around either corner of the bumper, cannot be seen on the screen.
Location of rear-view camera
CAUTION If the camera lens gets
dirty, a clear image
cannot be obtained. As
necessary, rinse the
lens with clean water a
nd gently wipe with a
clean, soft cloth. To avoid damaging the camera;• Do not rub the cover excessively or polish it by using an abrasive compound. • Do not disassemble the camera.• Do not splash hot wate
r directly on the lens.
• Do not spray the camera and its surround- ings with high-pressure water.• Make sure that the trunk lid is securelyclosed when backing up.
BK0284300US.book 62 ページ 2019年5月23日 木曜日 午後12時22分
Page 128 of 253
Rear-view camera
Features and controls 5-63
5
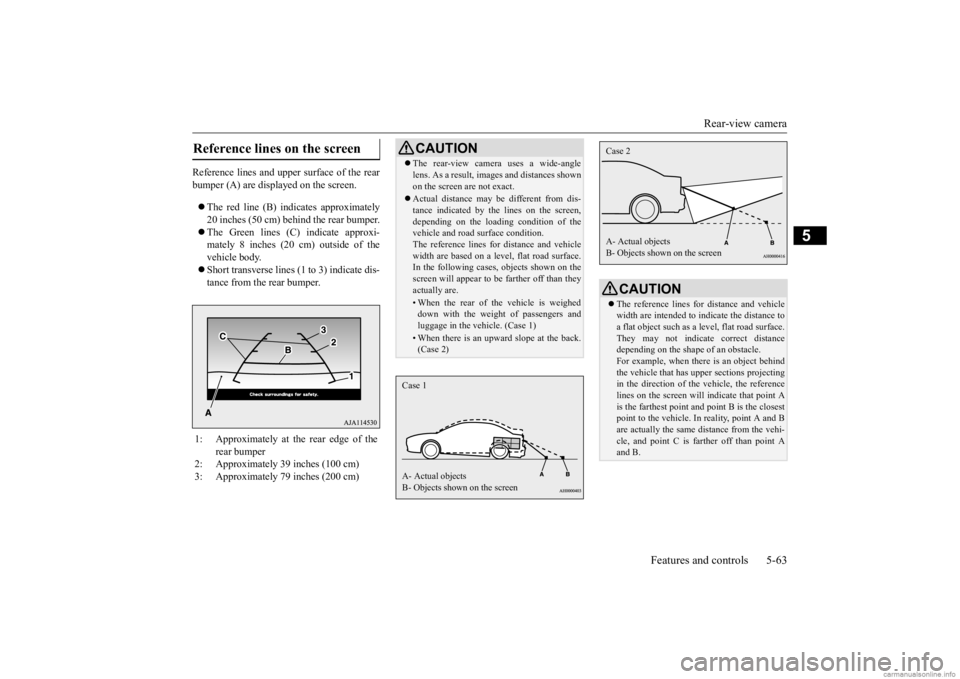
Reference lines and upper surface of the rear bumper (A) are displayed on the screen. The red line (B) i
ndicates approximately
20 inches (50 cm) behind the rear bumper. The Green lines (C) indicate approxi- mately 8 inches (20 cm) outside of the vehicle body. Short transverse lines (1 to 3) indicate dis- tance from the rear bumper.
Reference lines on the screen 1: Approximately at the rear edge of the
rear bumper
2: Approximately 39 inches (100 cm) 3: Approximately 79 inches (200 cm)
CAUTION The rear-view camera uses a wide-angle lens. As a result, imag
es and distances shown
on the screen are not exact. Actual distance may
be different from dis-
tance indica
ted by the lines on the screen,
depending on the loading condition of the vehicle and road
surface condition.
The reference lines for
distance and vehicle
width are based on a level, flat road surface. In the following cases, objects shown on the screen will appear to be farther off than theyactually are.• When the rear of the vehicle is weigheddown with the weight of passengers and luggage in the ve
hicle. (Case 1)
• When there is an upward slope at the back. (Case 2)
Case 1 A- Actual objects B- Objects shown on the screen
CAUTION The reference lines for distance and vehicle width are intended to i
ndicate the distance to
a flat object such as a level, flat road surface. They may not indica
te correct distance
depending on the shape of an obstacle.For example, when ther
e is an object behind
the vehicle that has uppe
r sections projecting
in the direction of the vehicle, the referencelines on the screen will
indicate that point A
is the farthest point a
nd point B is the closest
point to the vehicle. In
reality, point A and B
are actually the same distance from the vehi- cle, and point C is fa
rther off than point A
and B.Case 2 A- Actual objects B- Objects shown on the screen
BK0284300US.book 63 ページ 2019年5月23日 木曜日 午後12時22分
Page 129 of 253
Instrument cluster 5-64 Features and controls
5
N00519001428 N00519101328
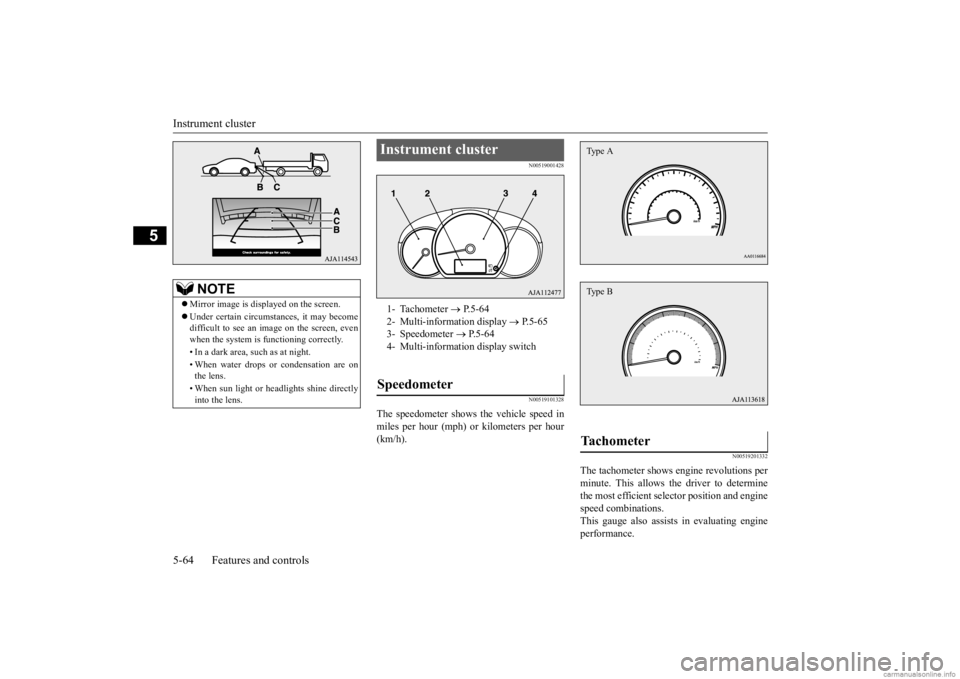
The speedometer shows the vehicle speed in miles per hour (mph) or kilometers per hour (km/h).
N00519201332
The tachometer shows e
ngine revolutions per
minute. This allows the driver to determine the most efficient selector position and engine speed combinations.This gauge also assists in evaluating engine performance.
NOTE
Mirror image is displayed on the screen. Under certain circumst
ances, it may become
difficult to see an image on the screen, even when the system is functioning correctly. • In a dark area, such as at night. • When water drops or condensation are on the lens. • When sun light or he
adlights shine directly
into the lens.
Instrument cluster 1- Tachometer
P.5-64
2- Multi-information display
P.5-65
3- Speedometer
P.5-64
4- Multi-information display switchSpeedometer
Tachometer Type AType B
BK0284300US.book 64 ページ 2019年5月23日 木曜日 午後12時22分
Page 130 of 253
Multi-information display
Features and controls 5-65
5
N00555001507
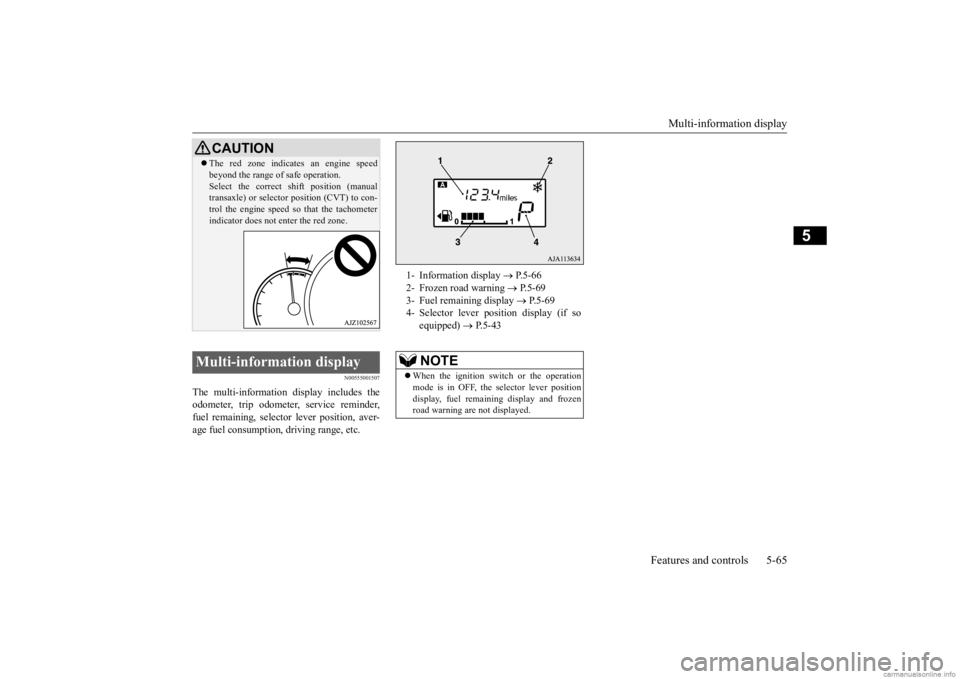
The multi-information display includes the odometer, trip odometer, service reminder, fuel remaining, selector lever position, aver- age fuel consumption, driving range, etc.
CAUTION The red zone indicates an engine speed beyond the range of safe operation.Select the correct sh
ift position (manual
transaxle) or selector position (CVT) to con- trol the engine speed
so that the tachometer
indicator does not en
ter the red zone.
Multi-information display
1- Information display
P.5-66
2- Frozen road warning
P. 5 - 6 9
3- Fuel remaining display
P.5-69
4- Selector lever po
sition display (if so
equipped)
P.5-43
NOTE
When the ignition swit
ch or the operation
mode is in OFF, the
selector lever position
display, fuel remaining display and frozen road warning are not displayed.
BK0284300US.book 65 ページ 2019年5月23日 木曜日 午後12時22分
Page 131 of 253
Multi-information display 5-66 Features and controls
5
N00574801096
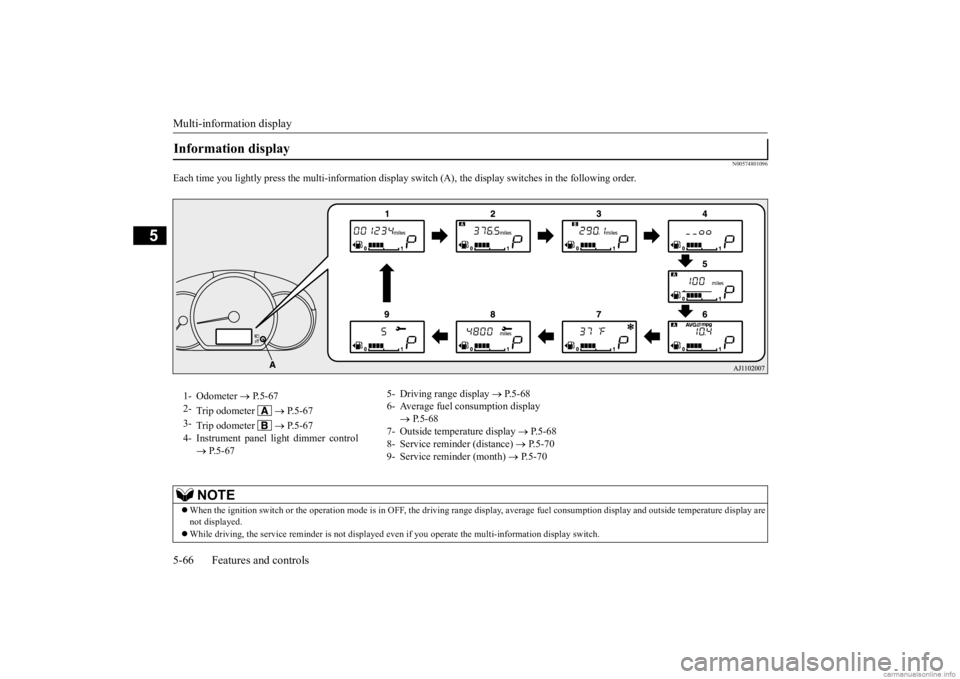
Each time you lightly press th
e multi-information display switch (A), th
e display switches in the following order.
Information display 1- Odometer
P.5-67
2-
Trip odometer
P. 5 - 6 7
3-
Trip odometer
P. 5 - 6 7
4- Instrument panel li
ght dimmer control
P.5-67
5- Driving range display
P.5-68
6- Average fuel consumption display
P.5-68
7- Outside temperature display
P.5-68
8- Service reminder (distance)
P.5-70
9- Service reminder (month)
P.5-70
NOTE
When the ignition switch or th
e operation mode is in OFF, the driving range di
splay, average fuel consumption display and outsi
de temperature display are
not displayed. While driving, the service reminder is
not displayed even if you operate th
e multi-information display switch.
BK0284300US.book 66 ページ 2019年5月23日 木曜日 午後12時22分
Page 132 of 253
Multi-information display
Features and controls 5-67
5
N00574900016
The odometer indicates the total distance the vehicle has traveled.
N00575000014
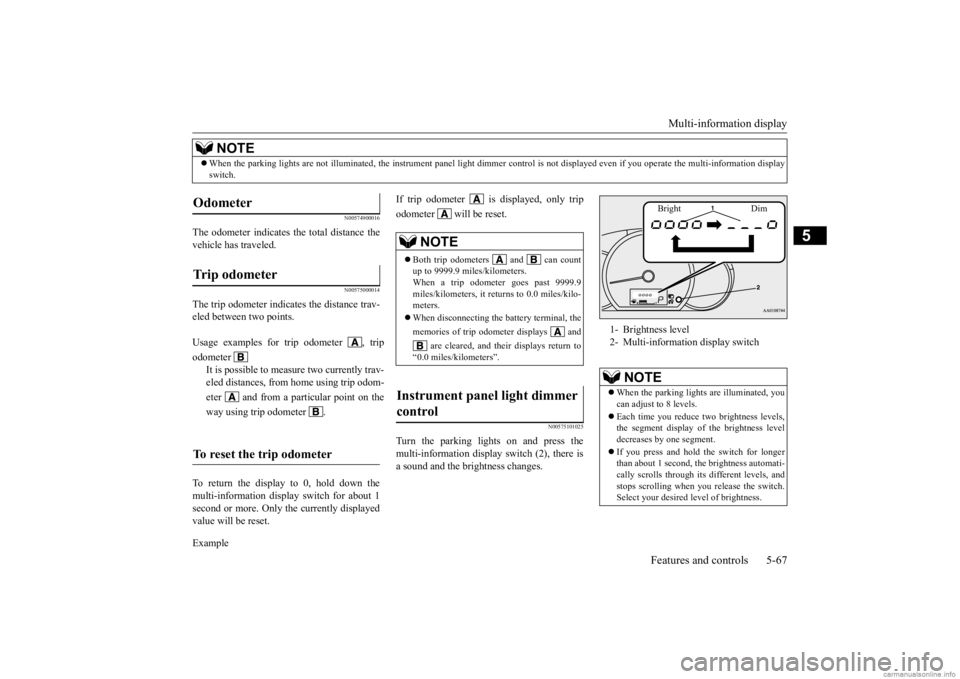
The trip odometer indicates the distance trav-eled between two points. To return the display to 0, hold down the multi-information display switch for about 1 second or more. Only the currently displayed value will be reset. Example
If trip odometer is
displayed, only trip
odometer wi
ll be reset.
N00575101025
Turn the parking lights on and press the multi-information display switch (2), there is a sound and the brightness changes.
When the parking lights are not il
luminated, the instrument pane
l light dimmer control is not di
splayed even if you operate the
multi-information display
switch.NOTE
Odometer Trip odometer Usage examples for trip odometer , trip odometer
It is possible to measure two currently trav- eled distances, from home using trip odom- eter and from a particular point on theway using trip odometer .
To reset the trip odometer
NOTE
Both trip odometers and can count up to 9999.9 miles/kilometers. When a trip odometer goes past 9999.9miles/kilometers, it returns to 0.0 miles/kilo- meters. When disconnecting the battery terminal, the memories of trip odometer displays and
are cleared, and their displays return to
“0.0 miles/kilometers”.
Instrument panel light dimmer control
1- Brightness level 2- Multi-information display switch
NOTE
When the parking light
s are illuminated, you
can adjust to 8 levels. Each time you reduce tw
o brightness levels,
the segment display of
the brightness level
decreases by one segment. If you press and hold the switch for longer than about 1 second, th
e brightness automati-
cally scrolls through its different levels, and stops scrolling when
you release the switch.
Select your desired
level of brightness.
Bright Dim
BK0284300US.book 67 ページ 2019年5月23日 木曜日 午後12時22分
Page 133 of 253

Multi-information display 5-68 Features and controls
5
N00575201042
This displays the approximate driving range (how many more miles
or kilometers you can
drive). When the driving range falls below approximately 30 miles
(50 km), “---” is dis-
played.
N00575300017
This displays the average fuel consumptionfrom the last reset to the present. The reset mode conditions for the average fuel consumption display can be switchedbetween “Auto reset”
and “Manual reset”.
For information on how to change the aver- age fuel consumption di
splay setting, refer to
“Changing the function settings” on page 5-71.
N00556501150
Shows the temperature outside the vehicle.
The brightness level
of the instruments is
stored when the ignition switch is turned tothe “OFF” position or the operation mode isput in OFF.
Driving range display
NOTE
The driving range is determined based on the fuel consumption data. This may vary depending on the drivi
ng conditions and hab-
its. Treat the distance
displayed as just a
rough guideline. When you refuel, the driving range display is updated. However, if you only add a small amount offuel, the correct value
will not be displayed.
Fill to a full tank whenever possible. When your vehicle is stopped on an extremely steep hill, th
e driving range value
may change. This is due to the movement of fuel in the tank and does not indicate anybreakdown.NOTE
The display setting can be changed to the preferred units (miles or km).Refer to “Changing the
function settings” on
page 5-71.
Average fuel consumption dis- play
NOTE
The average fuel cons
umption display can be
reset separately in both auto reset mode andmanual reset mode. “---” is displayed when the average fuel con- sumption cannot be measured. The initial (default) setting is “Auto reset mode”.NOTE
Average fuel consumption may vary depend on the driving conditi
ons (road conditions,
how you drive, etc.).The actual fuel consum
ption may differ from
the fuel consumption displayed, so treat the fuel consumption displayed as just a roughguideline. Disconnecting the batt
ery cable will erase
from memory the manual reset mode or auto reset mode setting for the average fuel con- sumption display. The display setting ca
n be changed to the
preferred units {mpg, km/L, L/100 km}.Refer to “Changing th
e function settings” on
page 5-71.
Outside temperature display
NOTE
The display setting ca
n be changed to the
preferred units (°F or °C). Refer to “Changing th
e function settings” on
page 5-71. Depending on factors such as the driving conditions, the displa
yed temperature may
vary from the actual outside temperature.NOTE
BK0284300US.book 68 ページ 2019年5月23日 木曜日 午後12時22分
Page 134 of 253
Multi-information display
Features and controls 5-69
5
N00579000067
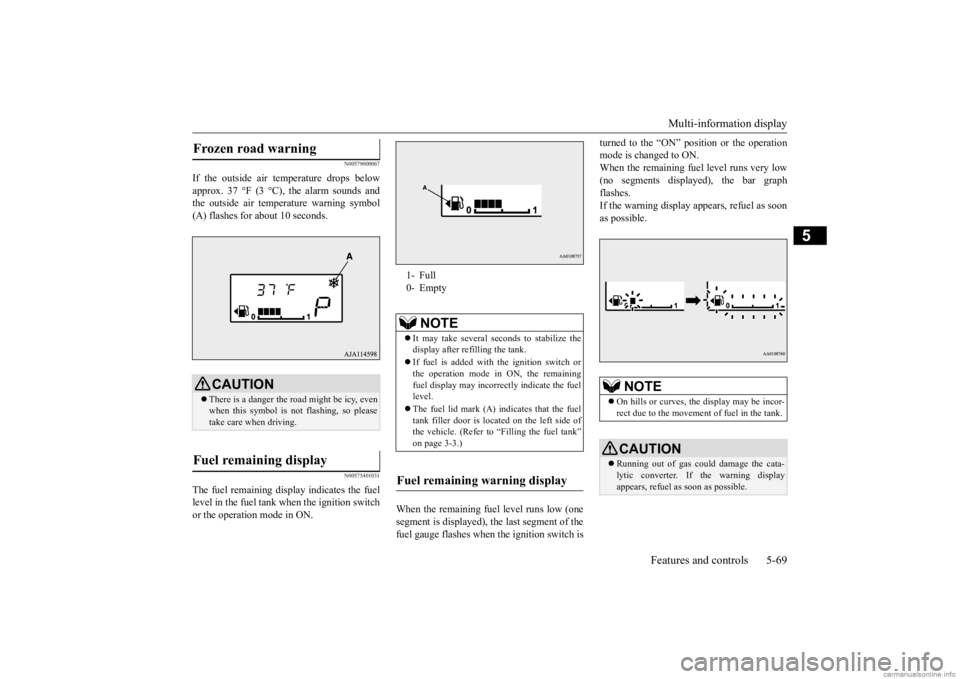
If the outside air temperature drops below approx. 37 °F (3 °C), the alarm sounds and the outside air temperature warning symbol(A) flashes for about 10 seconds.
N00575401031
The fuel remain
ing display indicates the fuel
level in the fuel tank when the ignition switch or the operation mode in ON.
When the remaining fuel level runs low (one segment is displayed), th
e last segment of the
fuel gauge flashes when
the ignition switch is
turned to the “ON” position or the operation mode is changed to ON.When the remaining fuel level runs very low (no segments displayed), the bar graph flashes.If the warning display appears, refuel as soon as possible.
Frozen road warning
CAUTION There is a danger the road might be icy, even when this symbol is not flashing, so please take care when driving.
Fuel remaining display
1- Full 0- Empty
NOTE
It may take several se
conds to stabilize the
display after refilling the tank. If fuel is added with
the ignition switch or
the operation mode in ON, the remainingfuel display may incorr
ectly indicate the fuel
level. The fuel lid mark (A) indicates that the fuel tank filler door is located on the left side of the vehicle. (Refer to “Filling the fuel tank”on page 3-3.)
Fuel remaining warning display
NOTE
On hills or curves, the display may be incor- rect due to the movement of fuel in the tank.CAUTION Running out of gas could damage the cata- lytic converter. If the warning displayappears, refuel as soon as possible.
BK0284300US.book 69 ページ 2019年5月23日 木曜日 午後12時22分
Page 135 of 253
Multi-information display 5-70 Features and controls
5
N00556701312
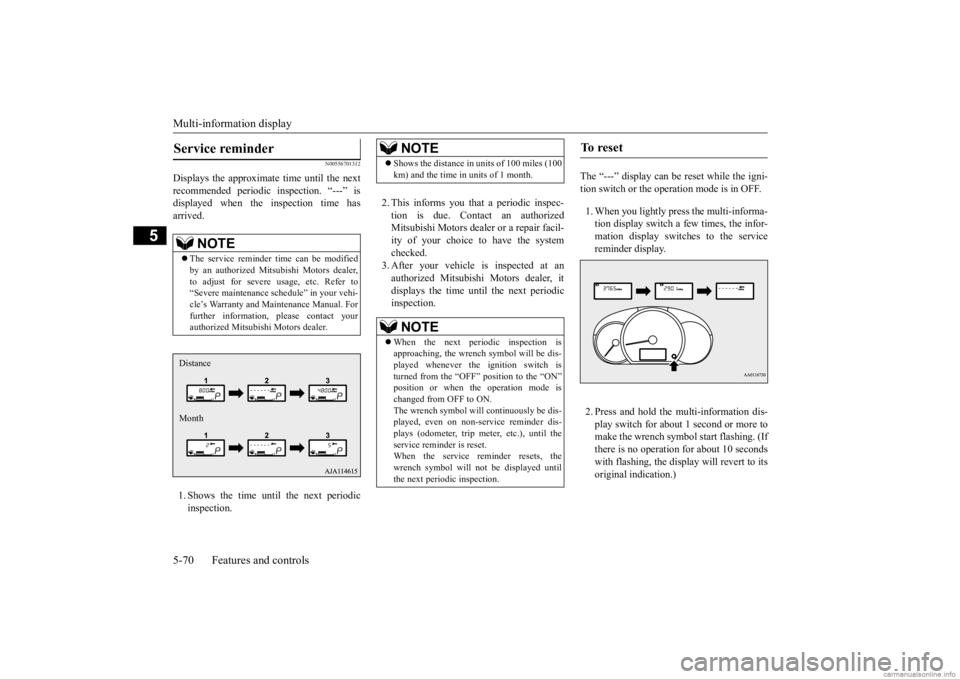
Displays the approximate time until the next recommended periodic
inspection. “---” is
displayed when the inspection time hasarrived. 1. Shows the time until the next periodic inspection.
2. This informs you that a periodic inspec- tion is due. Contact an authorized Mitsubishi Motors dealer
or a repair facil-
ity of your choice to have the system checked. 3. After your vehicle
is inspected at an
authorized Mitsubishi Motors dealer, it displays the time unt
il the next periodic
inspection.
The “---” display can be
reset while the igni-
tion switch or the opera
tion mode is in OFF.
1. When you lightly press the multi-informa- tion display switch a few times, the infor-mation display switches to the service reminder display. 2. Press and hold the multi-information dis- play switch for about 1 second or more tomake the wrench symbol start flashing. (If there is no operation for about 10 seconds with flashing, the displa
y will revert to its
original indication.)
Service reminder
NOTE
The service reminder time can be modified by an authorized Mitsubishi Motors dealer,to adjust for severe usage, etc. Refer to “Severe maintenance sc
hedule” in your vehi-
cle’s Warranty and Ma
intenance Manual. For
further information, please contact your authorized Mitsubishi Motors dealer.Distance Month
NOTE
Shows the distance in
units of 100 miles (100
km) and the time in units of 1 month.NOTE
When the next periodic inspection is approaching, the wrench symbol will be dis-played whenever the ignition switch is turned from the “OFF” position to the “ON” position or when the operation mode ischanged from OFF to ON. The wrench symbol will continuously be dis- played, even on non-service reminder dis-plays (odometer, trip meter, etc.), until the service reminder is reset. When the service reminder resets, thewrench symbol will not be displayed untilthe next periodic inspection.
To r e s e t
BK0284300US.book 70 ページ 2019年5月23日 木曜日 午後12時22分