Drive MITSUBISHI MIRAGE G4 2020 (in English) Manual PDF
[x] Cancel search | Manufacturer: MITSUBISHI, Model Year: 2020, Model line: MIRAGE G4, Model: MITSUBISHI MIRAGE G4 2020Pages: 253, PDF Size: 36.39 MB
Page 133 of 253

Multi-information display 5-68 Features and controls
5
N00575201042
This displays the approximate driving range (how many more miles
or kilometers you can
drive). When the driving range falls below approximately 30 miles
(50 km), “---” is dis-
played.
N00575300017
This displays the average fuel consumptionfrom the last reset to the present. The reset mode conditions for the average fuel consumption display can be switchedbetween “Auto reset”
and “Manual reset”.
For information on how to change the aver- age fuel consumption di
splay setting, refer to
“Changing the function settings” on page 5-71.
N00556501150
Shows the temperature outside the vehicle.
The brightness level
of the instruments is
stored when the ignition switch is turned tothe “OFF” position or the operation mode isput in OFF.
Driving range display
NOTE
The driving range is determined based on the fuel consumption data. This may vary depending on the drivi
ng conditions and hab-
its. Treat the distance
displayed as just a
rough guideline. When you refuel, the driving range display is updated. However, if you only add a small amount offuel, the correct value
will not be displayed.
Fill to a full tank whenever possible. When your vehicle is stopped on an extremely steep hill, th
e driving range value
may change. This is due to the movement of fuel in the tank and does not indicate anybreakdown.NOTE
The display setting can be changed to the preferred units (miles or km).Refer to “Changing the
function settings” on
page 5-71.
Average fuel consumption dis- play
NOTE
The average fuel cons
umption display can be
reset separately in both auto reset mode andmanual reset mode. “---” is displayed when the average fuel con- sumption cannot be measured. The initial (default) setting is “Auto reset mode”.NOTE
Average fuel consumption may vary depend on the driving conditi
ons (road conditions,
how you drive, etc.).The actual fuel consum
ption may differ from
the fuel consumption displayed, so treat the fuel consumption displayed as just a roughguideline. Disconnecting the batt
ery cable will erase
from memory the manual reset mode or auto reset mode setting for the average fuel con- sumption display. The display setting ca
n be changed to the
preferred units {mpg, km/L, L/100 km}.Refer to “Changing th
e function settings” on
page 5-71.
Outside temperature display
NOTE
The display setting ca
n be changed to the
preferred units (°F or °C). Refer to “Changing th
e function settings” on
page 5-71. Depending on factors such as the driving conditions, the displa
yed temperature may
vary from the actual outside temperature.NOTE
BK0284300US.book 68 ページ 2019年5月23日 木曜日 午後12時22分
Page 136 of 253
Multi-information display
Features and controls 5-71
5
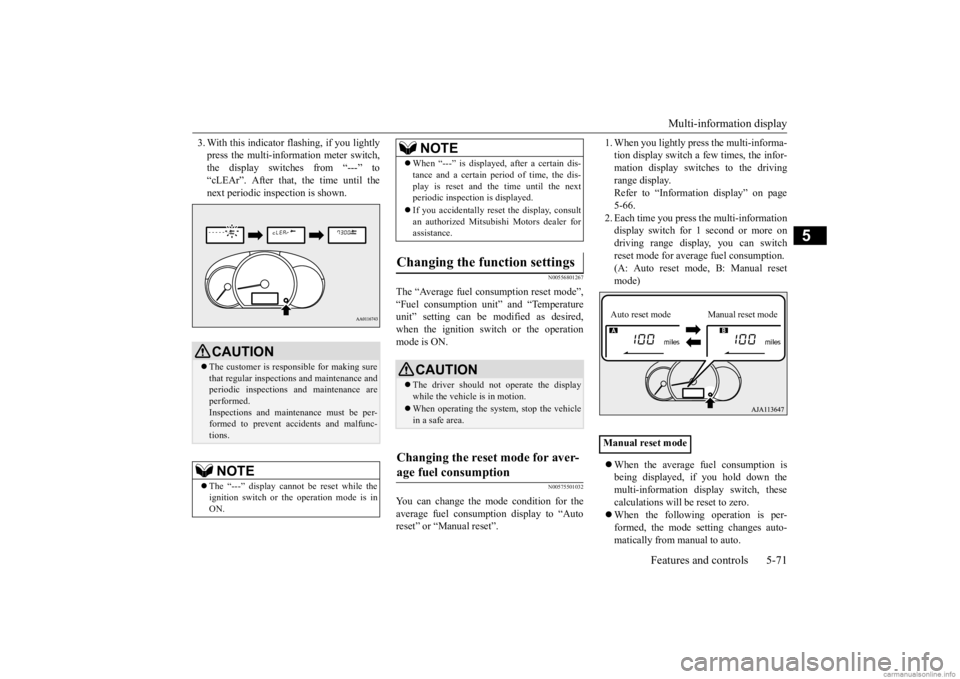
3. With this indicator
flashing, if you lightly
press the multi-information meter switch,the display switches from “---” to “cLEAr”. After that, the time until the next periodic inspection is shown.
N00556801267
The “Average fuel c
onsumption reset mode”,
“Fuel consumption uni
t” and “Temperature
unit” setting can be m
odified as desired,
when the ignition switch or the operation mode is ON.
N00575501032
You can change the mode condition for theaverage fuel consumpt
ion display to “Auto
reset” or “Manual reset”.
1. When you lightly press the multi-informa- tion display switch a few times, the infor-mation display switches to the driving range display. Refer to “Information display” on page5-66. 2. Each time you press th
e multi-information
display switch for 1 second or more ondriving range disp
lay, you can switch
reset mode for average fuel consumption. (A: Auto reset mode, B: Manual reset mode) When the average fuel consumption is being displayed, if you hold down themulti-information display switch, these calculations will be reset to zero. When the following operation is per- formed, the mode setting changes auto- matically from manual to auto.
CAUTION The customer is responsible for making sure that regular inspections and maintenance and periodic inspections
and maintenance are
performed.Inspections and mainte
nance must be per-
formed to prevent accidents and malfunc- tions.NOTE
The “---” display cannot
be reset while the
ignition switch or the operation mode is inON.
When “---” is displayed, after a certain dis- tance and a certain pe
riod of time, the dis-
play is reset and th
e time until the next
periodic inspection is displayed. If you accidentally reset
the display, consult
an authorized Mitsubishi Motors dealer for assistance.
Changing the function settings
CAUTION The driver should not operate the display while the vehicle is in motion. When operating the system, stop the vehicle in a safe area.
Changing the reset mode for aver- age fuel consumption
NOTE
Manual reset modeAuto reset mode Manual reset mode
BK0284300US.book 71 ページ 2019年5月23日 木曜日 午後12時22分
Page 139 of 253
Indicator and warning light package 5-74 Features and controls
5
N00519801950
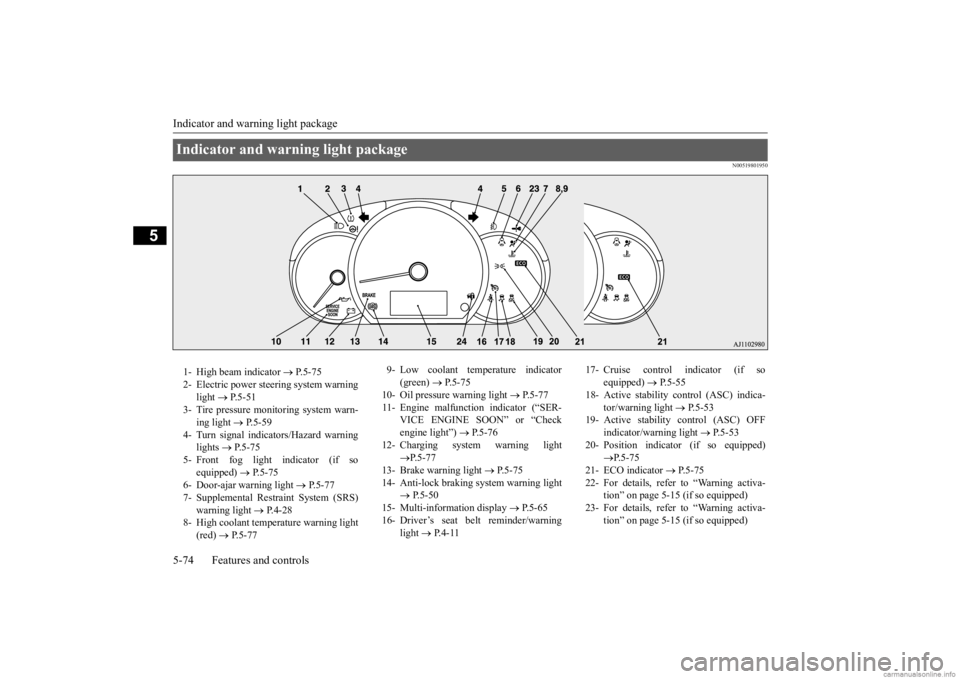
Indicator and warning light package 1- High beam indicator
P.5-75
2- Electric power steering system warning
light
P.5-51
3- Tire pressure moni
toring system warn-
ing light
P.5-59
4- Turn signal indicators/Hazard warning
lights
P.5-75
5- Front fog light indicator (if so
equipped)
P.5-75
6- Door-ajar warning light
P.5-77
7- Supplemental Restraint System (SRS)
warning light
P.4-28
8- High coolant temperature warning light
(red)
P.5-77
9- Low coolant temperature indicator
(green)
P. 5 - 7 5
10- Oil pressure warning light
P.5-77
11- Engine malfunction indicator (“SER-
VICE ENGINE SOON” or “Check engine light”)
P.5-76
12- Charging system warning light
P.5-77
13- Brake warning light
P.5-75
14- Anti-lock braking system warning light
P.5-50
15- Multi-information display
P. 5 - 6 5
16- Driver’s seat belt reminder/warning
light
P. 4 - 1 1
17- Cruise control indicator (if so
equipped)
P.5-55
18- Active stability c
ontrol (ASC) indica-
tor/warning light
P. 5 - 5 3
19- Active stability control (ASC) OFF
indicator/warning light
P.5-53
20- Position indicator (if so equipped)
P.5-75
21- ECO indicator
P.5-75
22- For details, refer
to “Warning activa-
tion” on page 5-15 (if so equipped)
23- For details, refer
to “Warning activa-
tion” on page 5-15 (if so equipped)
BK0284300US.book 74 ページ 2019年5月23日 木曜日 午後12時22分
Page 140 of 253
Indicators
Features and controls 5-75
5
N00519900127 N00520000216
The arrows will flash in time with the corre- sponding exterior turn signals when the turnsignal lever is used. Both arrows will flash when the hazard warn- ing flasher switch is pressed.
N00520100086
A blue light comes on when the headlightsare on high beam.
N00520200175
This indicator comes on while the front foglights are on.
N00551301049
This indicator light illuminates while theparking lights are on.
N00575600010
This indicator comes on in green while thecoolant temperature is low.
N00568800036
This indicator comes on while fuel-efficientdriving is achieved.
N00520300147 N00520400526
This light comes on when the ignition switch is turned to the “ON” position (engine off) or the operation mode is put in ON.When the engine is st
arted, the light should
go off a few seconds later. The warning light also illuminates after start- ing the engine under the following condi- tions. When the parking brake is still applied. When the brake fluid level is low. When the brake system circuit is not working properly.
When the vehicle is moving at more than 5 mph (8 km/h) and the parking brake applied, a buzzer will sound to inform the driver that the parking brake is not properly release. Before driving, be sure that the parking brake is fully released and the brake warning light is off.
Indicators Turn signal indicators/Hazard warning lights
NOTE
If the indicator flashes faster than usual or if the indicator stays on wi
thout flashing, check
for a malfunctioning turn signal light bulb orturn signal connection.
High beam indicator
Front fog light indicator
(if so
equipped)Position indicator
(if so equipped)
Low coolant temperature indi- cator - green
NOTE
When the indicator goes out, this should be used as a rough indication of when the heat- ing starts working.
ECO indicator
Warning lights Brake warning light and buzzer
BK0284300US.book 75 ページ 2019年5月23日 木曜日 午後12時22分
Page 142 of 253
Warning lights
Features and controls 5-77
5
N00520601365
This light comes on in the event of a malfunc- tion in the charging system or when the igni-tion switch is turned to the “ON” position (engine off) or the operation mode is put in ON. When the engine is started, the lightshould go out. Check to make sure that the light has gone out before driving.
N00520700170
This light comes on when the engine oil pres-sure is below normal. If the light stays on while driving, stop the engine as soon as pos-sible. Do not run the engine until the cause of the low oil pressure is corrected.
N00575700011
This light comes on in red if the coolant tem- perature becomes excessively high.
N00520901342
This light comes on when any door is open ornot completely closed. When the vehicle is moving at more than 5 mph (8 km/h) and any door is open or ajar, atone will sound 4 times to inform the driver that any door is not properly shut.
NOTE
Do not disconnect the battery cable when the engine malfunction i
ndicator (“SERVICE
ENGINE SOON” or “Che
ck engine light”) is
on. The engine electronic control module stores critical OBD information (especially exhaustemission data), which ma
y be lost if the bat-
tery cable is disconne
cted while the engine
malfunction indicator is
on. This will make it
difficult to diagnose the cause of future prob- lems.
Charging system warning light
CAUTION If the warning light stays on while the engine is running, park your ve
hicle in a safe place
immediately and
contact an authorized Mit-
subishi Motors dealer or
a repair facility of
your choice to have the system checked.
Oil pressure warning light
CAUTION If this light comes on when the engine oil level is not low, have
your vehicle checked at
an authorized Mitsubish
i Motors dealer or a
repair facility
of your choice.
This warning light does not show the amount of oil in the crankcase. This can only be determined by checking the oil level with the dipstick with the engine turned off.
High coolant temperature warning light - red
CAUTION If the light comes on
during vehicle opera-
tion, it indicates that
the engine is possibly
overheating. Continue
d driving could make
the engine fail. Immedi
ately stop the vehicle
in a safe place and ta
ke appropriate action.
(Refer to “Engine overheating” on page 8-4.)NOTE
The high coolant temp
erature warning light
may illuminate when
the vehicle has been
driven at high speeds or on hilly roads. This illuminating does not ne
cessarily indicate a
problem. It should stop if you keep the engine running for a whil
e or continue driv-
ing the vehicle.
Door-ajar warning light and buzzer
CAUTION Before driving, make sure that the door-ajar warning light is off.
BK0284300US.book 77 ページ 2019年5月23日 木曜日 午後12時22分
Page 143 of 253

Combination headlights and dimmer switch 5-78 Features and controls
5
N00522501977
Rotate the switch to operate the lights. The combinations of
switch operations and
illuminated lights differ in accordance with the following conditions.
N00532600570
If the following operation is performed with the combination headlights and dim- mer switch in the “ ” or “ ” position, the lights automatically turn off. [Except for vehicles equipped with the F. A . S . T. - k e y ]
The ignition switch is turned to the “OFF” or “ACC” position or the key is removedfrom the ignition switch and the driver’s door is opened. [For vehicles equipped
with the F.A.S.T.-
key]The operation mode is changed to OFF or ACC and the driver’s door is opened. If the following operation is performed with the combination headlights and dim- mer switch in the “ ” or “ ” position, the lights automatically turn off after about 3 minutes. [Except for vehicles
equipped with the
F. A . S . T. - k e y ] The ignition switch is turned to the “OFF” or “ACC” position or the key is removedfrom the ignition switch and the driver’s door is not opened. [For vehicles equipped
with the F.A.S.T.-
key]The operation mode is changed to OFF or ACC and the driver’s door is not opened.
NOTE
When the auto cut-out function of the doom light is been activated, the light goes outautomatically after
about 30 minutes.
Refer to “Dome light” on page 5-86.
Combination headlights and dimmer switch Headlights OFF All lights off
Parking, tail, front
and rear side-
marker lights, license plate and instrument panel lights on Headlights and other lights onNOTE
Do not leave the head
lights and ot
her lights
on for a long period of time when the engine is not running. The battery will run down. When it rains, or wh
en the vehicle has been
washed, the inside of the lens sometimesbecomes foggy. This is the same as when window glass mists up
on a humid day, and
does not indicate a problem. When the lightis switched on, the heat
will dry out the fog.
However, if water collects inside the light, have it checked by an authorized MitsubishiMotors dealer or a repair facility of your choice.
Light auto-cutout function (headlights and other lights)
NOTE
The light auto-cutout
function can be deacti-
vated.See your authorized Mitsubishi Motors dealer for details.
BK0284300US.book 78 ページ 2019年5月23日 木曜日 午後12時22分
Page 144 of 253
Turn signal lever
Features and controls 5-79
5
If the combination
headlights and dimmer
switch is turned to the “ ” or “ ” posi- tion again after the engine is turned off, the about 3-minute auto
-cutout function
described above will not
work. The lights (the
parking lights, tail lig
hts and license plate
lights) will stay on and will not turn off auto-matically.
N00549800226
[When using a key to start the engine]If the driver’s door is opened with the key in the “OFF” or “ACC” position or removed from the ignition switch while the lights areon, the tone will sound to remind you to turn off the lights. [When using the F.A.S.T.-key to start the engine]If the driver’s door is opened with the opera- tion mode is put in OFF or ACC, or if the operation mode is changed to OFF while thelights are on, the tone will sound to remind you to turn off the lights. In either case, the lights will turn off automat- ically and so will the tone. Or you can turn
the light switch to the “OFF” position to stop the tone.
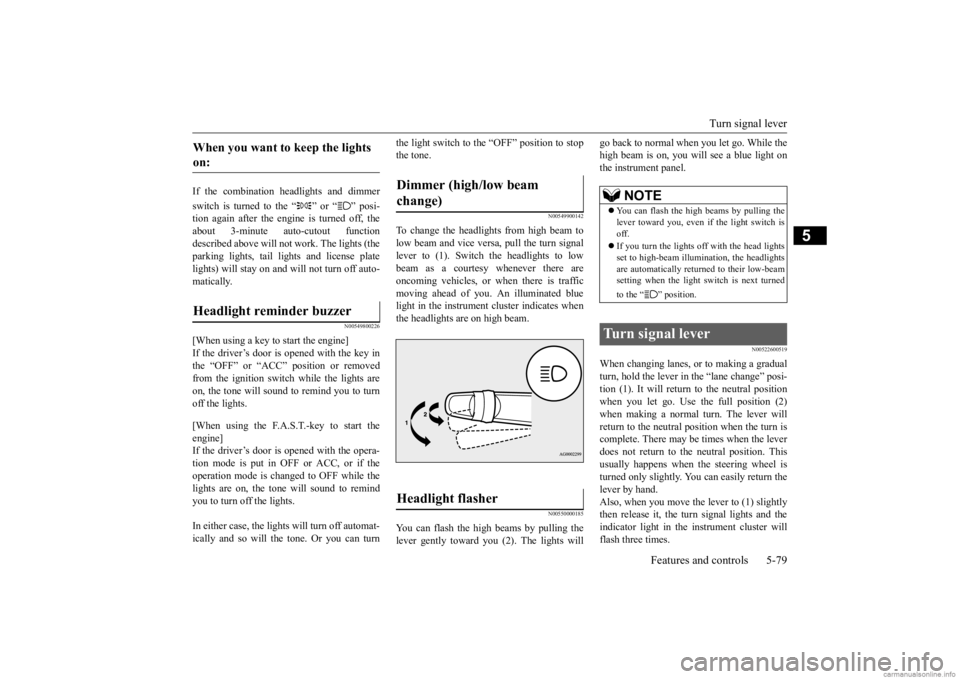
N00549900142
To change the headlights from high beam tolow beam and vice vers
a, pull the turn signal
lever to (1). Switch the headlights to low beam as a courtesy whenever there are oncoming vehicles, or when there is traffic moving ahead of you. An illuminated bluelight in the instrument
cluster indicates when
the headlights are on high beam.
N00550000185
You can flash the high beams by pulling the lever gently toward you (2). The lights will
go back to normal when you let go. While the high beam is on, you will see a blue light onthe instrument panel.
N00522600519
When changing lanes, or to making a gradual turn, hold the lever in the “lane change” posi- tion (1). It will return to the neutral positionwhen you let go. Use the full position (2) when making a normal turn. The lever will return to the neutral position when the turn iscomplete. There may be times when the lever does not return to th
e neutral position. This
usually happens when
the steering wheel is
turned only slightly. You can easily return the lever by hand. Also, when you move the lever to (1) slightlythen release it, the turn signal lights and the indicator light in the instrument cluster will flash three times.
When you want to keep the lights on: Headlight reminder buzzer
Dimmer (high/low beam change) Headlight flasher
NOTE
You can flash the high beams by pulling the lever toward you, even if the light switch isoff. If you turn the lights off with the head lights set to high-beam illumi
nation, the headlights
are automatically returned to their low-beam setting when the light
switch is next turned
to the “ ” position.
Turn signal lever
BK0284300US.book 79 ページ 2019年5月23日 木曜日 午後12時22分
Page 146 of 253
Wiper and washer switch
Features and controls 5-81
5
N00523001748
The windshield wiper and washer can be operated with the ignition switch or the oper- ation mode is in ON or ACC.If the blades are frozen to the windshield, do not operate the wipers
until the ice has melted
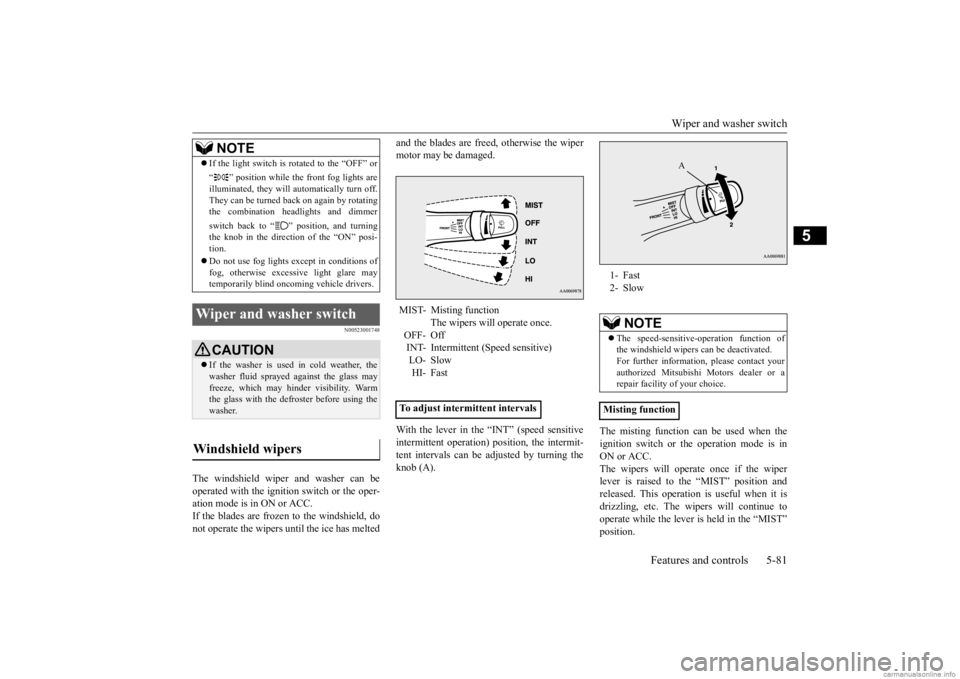
and the blades are freed, otherwise the wiper motor may be damaged. With the lever in the “INT” (speed sensitive intermittent operation) position, the intermit- tent intervals can be adjusted by turning theknob (A).
The misting function can be used when the ignition switch or the
operation mode is in
ON or ACC. The wipers will operate once if the wiper lever is raised to the “MIST” position andreleased. This operation
is useful when it is
drizzling, etc. The wi
pers will continue to
operate while the lever is held in the “MIST”position.
If the light switch is rotated to the “OFF” or “ ” position while the
front fog lights are
illuminated, they will automatically turn off.They can be turned back on again by rotating the combination headlights and dimmer switch back to “ ” position, and turning the knob in the direction of the “ON” posi-tion. Do not use fog lights ex
cept in conditions of
fog, otherwise excessive light glare may temporarily blind oncoming vehicle drivers.
Wiper and washer switch
CAUTION If the washer is used
in cold weather, the
washer fluid sprayed against the glass mayfreeze, which may hinder visibility. Warm the glass with the defroster before using the washer.
Windshield wipers
NOTE
MIST- Misting function
The wipers will operate once.
OFF- OffINT- Intermittent (Speed sensitive) LO- Slow HI- Fast
To adjust intermittent intervals
1- Fast 2- Slow
NOTE
The speed-sensitive-
operation function of
the windshield wipers
can be de
activated.
For further informati
on, please contact your
authorized Mitsubishi Motors dealer or a repair facility of your choice.
Misting function
A
BK0284300US.book 81 ページ 2019年5月23日 木曜日 午後12時22分
Page 157 of 253
Fuel economy 6-2 Driving safety
6
N00628800178
Fuel economy is depe
ndent on many factors.
Your personal driving habits can have a sig- nificant effect on your
fuel consumption.
Several recommendations
for achieving the
greatest fuel economy are listed below. Whenever accelerating from a stop, always accelerate
slowly and smoothly.
When parked for even a short period, do not idle the engine. Shut it off. Plan your trips to avoid unnecessary stops. Keep your tires inflated to the recom- mended pressures. For freeway driving, maintain a speed of approximately 50 mph (80 km/h) whentraffic, roadway and weather conditions safely permit. Keep your air filter clean and your vehicle lubricated according
to the recommenda-
tions in this manual. Always keep your ve
hicle well main-
tained. A poorly maintained engine wastes fuel and costs money. Never overload your vehicle.
N00628900049
Drunk driving is one of the most frequent causes of accidents. Your driving ability can be seriously impairedeven with blood alcohol levels far below the legal minimum. If you have been drinking, don’t drive. Ride with a designated non-drinking driver, call a cab or a friend, or use public transportation. Drinking coffee or tak- ing a cold shower will not make you sober. Similarly, prescription and nonprescription drugs affect your alertness, perception andreaction time. Consu
lt with your doctor or
pharmacist before driving while under the influence of any of these medications.
N00628601069
The original equipment floor mat providedwith your vehicle was specifically designed for your vehicle. Al
ways properly position
the floor mat and assure it does not interferewith operation of the pedals. Always use the
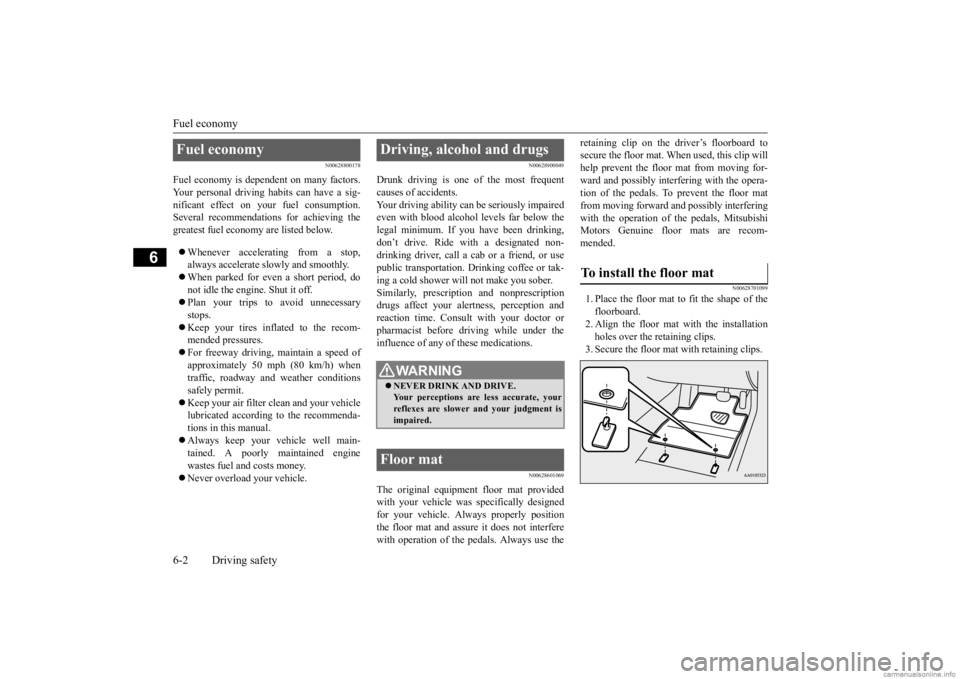
retaining clip on the driver’s floorboard to secure the floor mat. When used, this clip willhelp prevent the floor mat from moving for- ward and possibly interfering with the opera- tion of the pedals. To prevent the floor matfrom moving forward and possibly interfering with the operation of the pedals, Mitsubishi Motors Genuine floor mats are recom-mended.
N00628701099
1. Place the floor mat to fit the shape of the floorboard. 2. Align the floor mat with the installationholes over the retaining clips. 3. Secure the floor mat with retaining clips.
Fuel economy
Driving, alcohol and drugs
WA R N I N G NEVER DRINK AND DRIVE. Your perceptions are
less accurate, your
reflexes are slower and your judgment isimpaired.
Floor mat
To install the floor mat
BK0284300US.book 2 ページ 2019年5月23日 木曜日 午後12時22分
Page 158 of 253
Vehicle preparatio
n before driving
Driving safety 6-3
6
N00629001868
For a safer and more enjoyable trip, always check for the following:
Before starting the ve
hicle, make certain
that you and all passengers are seated and wearing their seat belts properly (with children in the rear seat, in appropriaterestraints), and that all the doors are locked. Move the driver’s seat as far backward as possible, while keeping good visibility, and good control of the steering wheel, brakes, accelerator, and controls. Check the instrument panel indicators and multi- information display for any possible prob-lem. Similarly, the front
passenger seat should
also be moved as fa
r back as possible.
Make sure that infants and small children are properly restrained in accordance with all laws and regulations.
Check these by selectin
g the defroster mode,
and set the blower switch on high. You shouldbe able to feel the air blowing against the windshield. Refer to “Defrosti
ng or defogging (wind-
shield, door windows)” on page 7-9.
NOTE
The shape of the mat and the number of retaining clips may
vary depending on the
vehicle model.WA R N I N G If a floor mat is the
wrong size or is not
properly installed, it can interfere with the operation of the pedals. Interference with the pedals can cause unintended accelera-tion and/or increase
d stopping distances
resulting in a cras
h and injury. Always
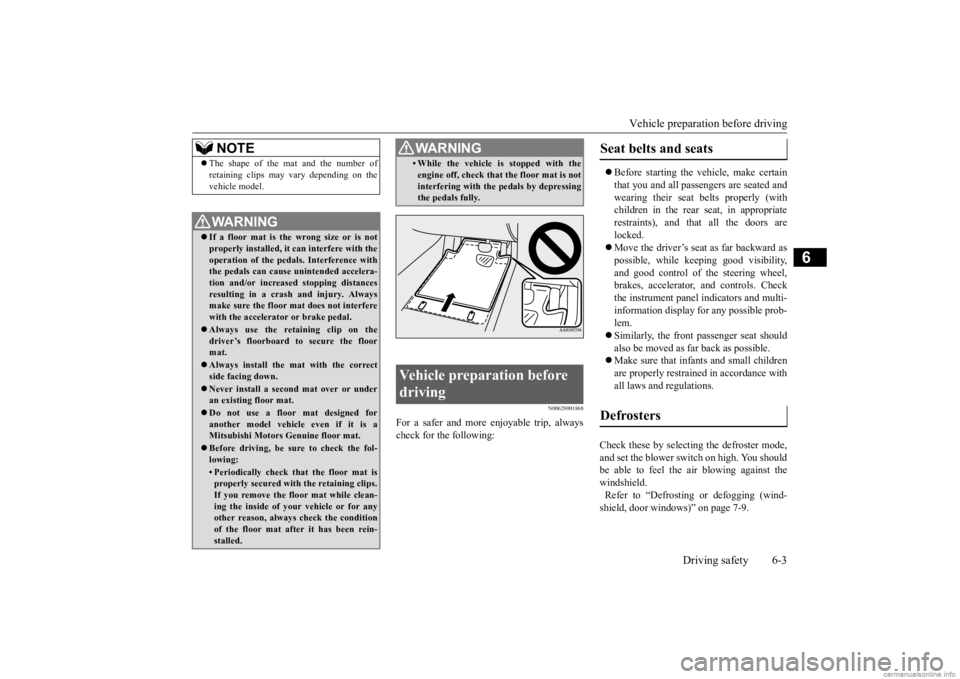
make sure the floor mat does not interferewith the accelerator or brake pedal. Always use the retaining clip on the driver’s floorboard to secure the floor mat. Always install the mat with the correct side facing down. Never install a second mat over or under an existing floor mat. Do not use a floor mat designed for another model vehicle even if it is a Mitsubishi Motors Genuine floor mat. Before driving, be sure to check the fol- lowing:• Periodically check that the floor mat is properly secured with the retaining clips. If you remove the fl
oor mat while clean-
ing the inside of you
r vehicle or for any
other reason, always
check the condition
of the floor mat afte
r it has been rein-
stalled.
• While the vehicle is stopped with theengine off, check that the floor mat is notinterfering with the pedals by depressingthe pedals fully.
Vehicle preparation before driving
WA R N I N G
Seat belts and seats Defrosters
BK0284300US.book 3 ページ 2019年5月23日 木曜日 午後12時22分