height MITSUBISHI MIRAGE G4 2020 Owner's Manual (in English)
[x] Cancel search | Manufacturer: MITSUBISHI, Model Year: 2020, Model line: MIRAGE G4, Model: MITSUBISHI MIRAGE G4 2020Pages: 253, PDF Size: 36.39 MB
Page 5 of 253
Instruments and controls 1-1
1
Overview
N00100202964
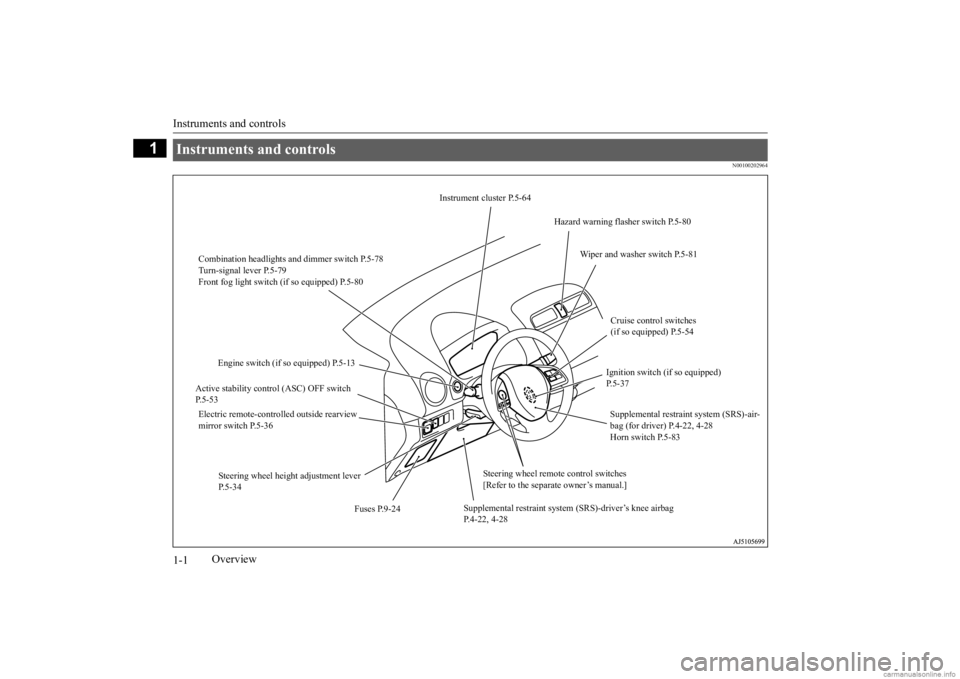
Instruments and controls
Instrument cluster P.5-64
Hazard warning flasher switch P.5-80
Combination headlights and dimmer switch P.5-78 Turn-signal lever P.5-79 Front fog light switch (if so equipped) P.5-80
Wiper and washer switch P.5-81
Cruise control switches (if so equipped) P.5-54
Engine switch (if so equipped) P.5-13
Ignition switch (if so equipped) P.5-37
Active stability control (ASC) OFF switch P.5-53 Electric remote-controlled outside rearview mirror switch P.5-36
Supplemental restraint system (SRS)-air- bag (for driver) P.4-22, 4-28 Horn switch P.5-83
Steering wheel height adjustment lever P.5-34
Steering wheel remote control switches [Refer to the separate owner’s manual.]
Supplemental restraint system (SRS)-driver’s knee airbag P.4-22, 4-28
Fuses P.9-24
BK0284300US.book 1 ページ 2019年5月23日 木曜日 午後12時22分
Page 29 of 253
Seats 4-2 Seat and restraint systems
4
N00408401593
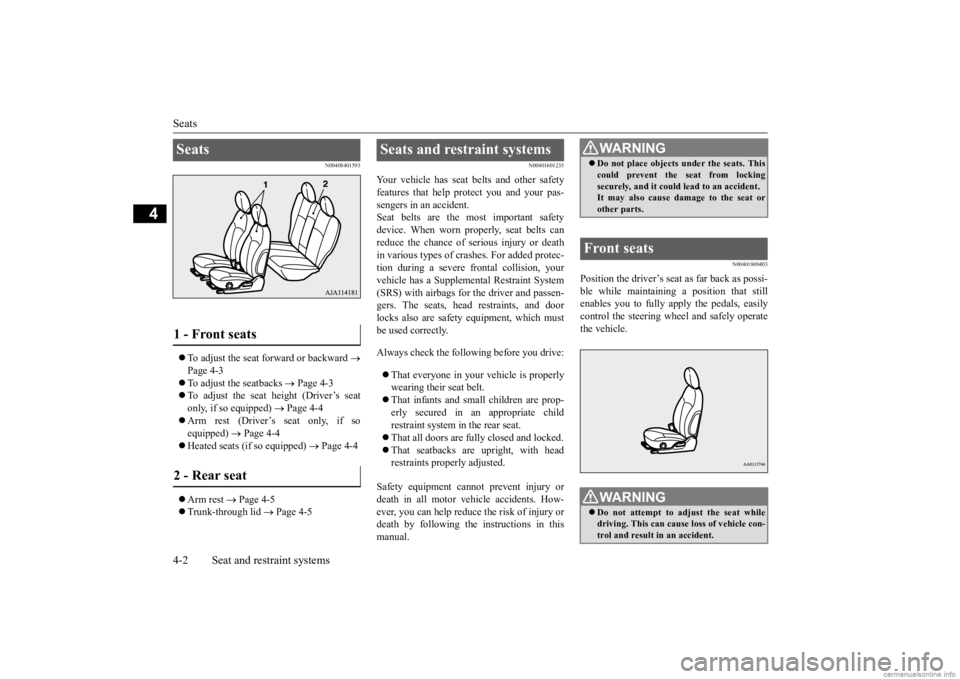
To adjust the seat forward or backward
Page 4-3 To adjust the seatbacks
Page 4-3
To adjust the seat height (Driver’s seat only, if so equipped)
Page 4-4
Arm rest (Driver’s seat only, if so equipped)
Page 4-4
Heated seats (if so equipped)
Page 4-4
Arm rest
Page 4-5
Trunk-through lid
Page 4-5
N00401601235
Your vehicle has seat
belts and other safety
features that help
protect you and your pas-
sengers in an accident.Seat belts are the most important safety device. When worn properly, seat belts can reduce the chance of serious injury or deathin various types of cras
hes. For added protec-
tion during a severe fr
ontal collision, your
vehicle has a Supplemen
tal Restraint System
(SRS) with airbags for the driver and passen- gers. The seats, head restraints, and doorlocks also are safety equipment, which must be used correctly. Always check the follow
ing before you drive:
That everyone in your vehicle is properly wearing their seat belt. That infants and small children are prop- erly secured in an appropriate child restraint system in
the rear seat.
That all doors are fully closed and locked. That seatbacks are upright, with head restraints properly adjusted.
Safety equipment cannot prevent injury or death in all motor ve
hicle accidents. How-
ever, you can help reduce the risk of injury or death by following the
instructions in this
manual.
N00401800403
Position the driver’s seat as far back as possi-ble while maintaining a position that stillenables you to fully a
pply the pedals, easily
control the steering wheel and safely operate the vehicle.
Seats 1 - Front seats 2 - Rear seat
Seats and restraint systems
WA R N I N G Do not place objects under the seats. This could prevent the seat from lockingsecurely, and it could lead to an accident.It may also cause damage to the seat or other parts.
Front seats
WA R N I N G Do not attempt to adjust the seat while driving. This can cause loss of vehicle con- trol and result
in an ac
cident.
BK0284300US.book 2 ページ 2019年5月23日 木曜日 午後12時22分
Page 31 of 253
Front seats 4-4 Seat and restraint systems
4
N00402100243
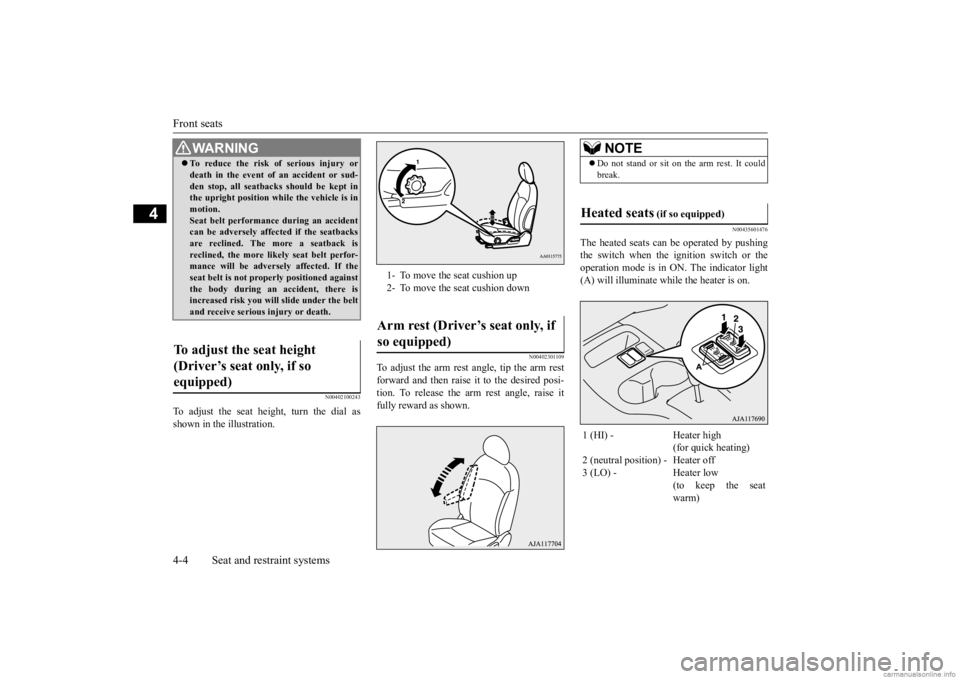
To adjust the seat height, turn the dial as shown in the illustration.
N00402301109
To adjust the arm rest angle, tip the arm rest forward and then raise it to the desired posi- tion. To release the arm rest angle, raise it fully reward as shown.
N00435601476
The heated seats can
be operated by pushing
the switch when the ignition switch or theoperation mode is in ON. The indicator light (A) will illuminate while the heater is on.
WA R N I N G To reduce the risk of serious injury or death in the event of
an accident or sud-
den stop, all seatbacks should be kept inthe upright position while the vehicle is in motion. Seat belt performance during an accidentcan be adversely affect
ed if the seatbacks
are reclined. The more a seatback is reclined, the more likely seat belt perfor-mance will be adversely affected. If the seat belt is not proper
ly positioned against
the body during an accident, there isincreased risk you will slide under the belt and receive serious
injury or death.
To adjust the seat height (Driver’s seat only, if so equipped)
1- To move the seat cushion up 2- To move the seat cushion downArm rest (Driver’s seat only, if so equipped)
NOTE
Do not stand or sit on the arm rest. It could break.
Heated seats
(if so equipped)
1 (HI) - Heater high
(for quick heating)
2 (neutral position) - Heater off 3 (LO) - Heater low
(to keep the seat warm)
BK0284300US.book 4 ページ 2019年5月23日 木曜日 午後12時22分
Page 33 of 253
Head restraints 4-6 Seat and restraint systems
4
upright position and the head restraint to the proper position. Sit back
against the seatback
with your head close to the head restraint.
To reduce the risk of injury in an accident, adjust the head restraint height so that thecenter of the restrain
t is at your ear level
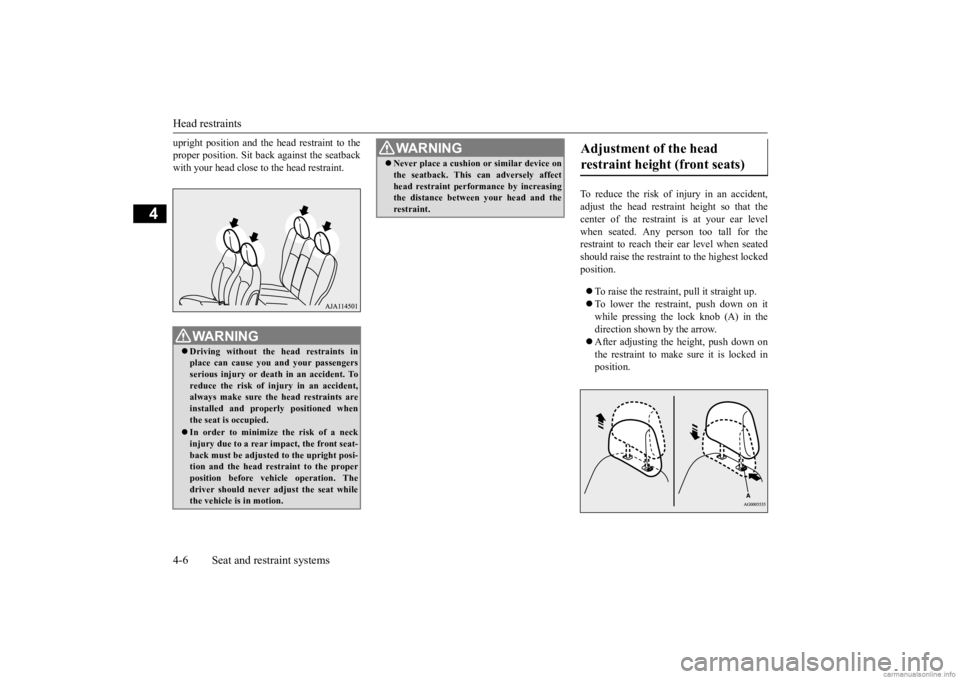
when seated. Any person too tall for the restraint to reach their ear level when seatedshould raise the restraint to the highest locked position. To raise the restraint, pull it straight up. To lower the restraint, push down on it while pressing the lock knob (A) in the direction shown by the arrow. After adjusting the height, push down on the restraint to make sure it is locked in position.
WA R N I N G Driving without the
head restraints in
place can cause you and your passengers serious injury or deat
h in an accident. To
reduce the risk of injury in an accident,always make sure the head restraints are installed and proper
ly positioned when
the seat is occupied. In order to minimize the risk of a neck injury due to a rear impact, the front seat-back must be adjusted to the upright posi- tion and the head restraint to the proper position before vehi
cle operation. The
driver should never ad
just the seat while
the vehicle is in motion.
Never place a cushion
or similar device on
the seatback. This can adversely affecthead restraint performance by increasingthe distance between your head and the restraint.WA R N I N G
Adjustment of the head restraint height (front seats)
BK0284300US.book 6 ページ 2019年5月23日 木曜日 午後12時22分
Page 34 of 253
Seat belts
Seat and restraint systems 4-7
4
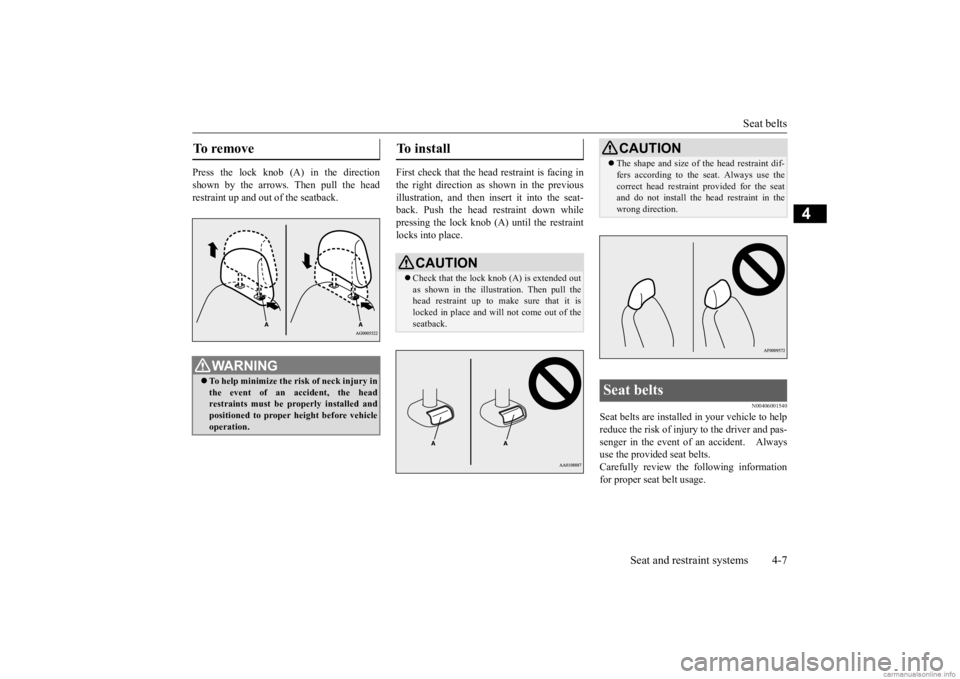
Press the lock knob (A) in the direction shown by the arrows. Then pull the head restraint up and out of the seatback.
First check that the head restraint is facing in the right direction as
shown in the previous
illustration, and then insert it into the seat- back. Push the head restraint down whilepressing the lock knob (A) until the restraint locks into place.
N00406001540
Seat belts are installed in your vehicle to help reduce the risk of injury to the driver and pas- senger in the event of an accident. Always use the provided seat belts.Carefully review the
following information
for proper seat belt usage.
To remove
WA R N I N G To help minimize the risk of neck injury in the event of an accident, the headrestraints must be properly installed and positioned to proper height before vehicle operation.
To install
CAUTION Check that the lock knob (A) is extended out as shown in the illustration. Then pull the head restraint up to make sure that it islocked in place and will
not come out of the
seatback.
CAUTION The shape and size of the head restraint dif- fers according to the seat. Always use thecorrect head restrain
t provided for the seat
and do not install the he
ad restraint in the
wrong direction.
Seat belts
BK0284300US.book 7 ページ 2019年5月23日 木曜日 午後12時22分
Page 39 of 253
Seat belts 4-12 Seat and restraint systems
4
N00406300357
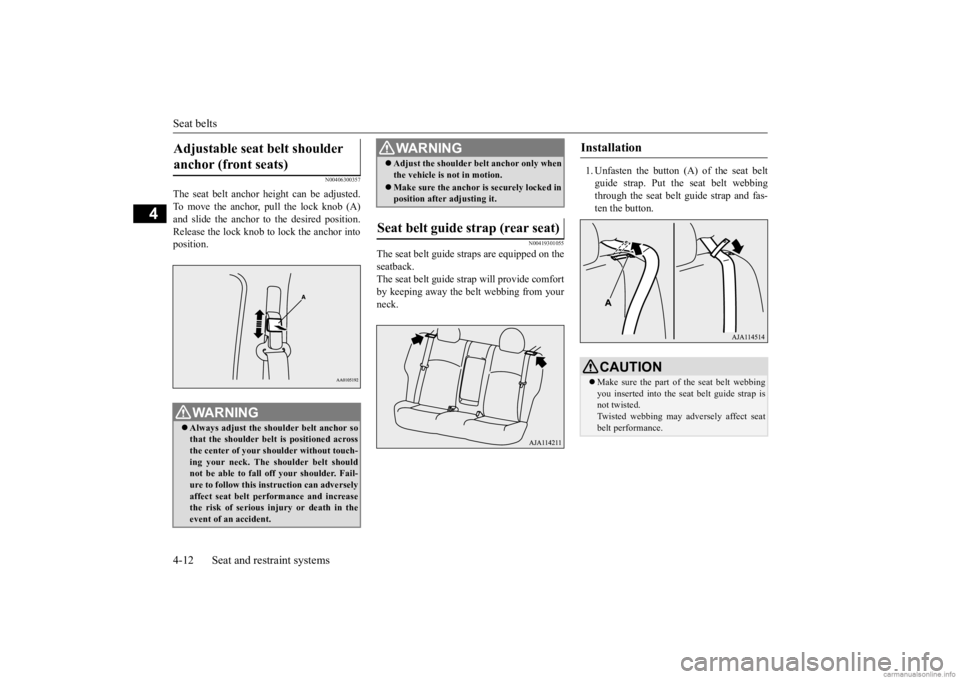
The seat belt anchor height can be adjusted. To move the anchor, pull the lock knob (A)and slide the anchor to the desired position. Release the lock knob to lock the anchor into position.
N00419301055
The seat belt guide st
raps are equipped on the
seatback. The seat belt guide strap will provide comfortby keeping away the belt webbing from your neck.
1. Unfasten the button (A) of the seat belt guide strap. Put the seat belt webbing through the seat belt guide strap and fas- ten the button.
Adjustable seat belt shoulder anchor (front seats)
WA R N I N G Always adjust the shou
lder belt anchor so
that the shoulder belt
is positioned across
the center of your shoulder without touch-ing your neck. The sh
oulder belt should
not be able to fall off your shoulder. Fail- ure to follow this instruction can adverselyaffect seat belt performance and increase the risk of serious in
jury or death in the
event of an accident.
Adjust the shoulder be
lt anchor only when
the vehicle is not in motion. Make sure the anchor is securely locked in position after adjusting it.
Seat belt guide strap (rear seat)
WA R N I N G
Installation
CAUTION Make sure the part of the seat belt webbing you inserted into the seat belt guide strap is not twisted. Twisted webbing may a
dversely affect seat
belt performance.
BK0284300US.book 12 ページ 2019年5月23日 木曜日 午後12時22分
Page 42 of 253
Child restraint systems
Seat and restraint systems 4-15
4
Child restraint systems specifically designed for infants and small children are offered byseveral manufacturers. Choose only a child restraint system with a label certifying that it complies with Federal Motor Vehicle SafetyStandard 213 (FMVSS 213) or Motor Vehicle Restraint Systems and
Booster Seats Safety
Regulations (RSSR).
Look for the manufac-
turer’s statement of compliance on the box and child restraint system itself. The child restraint syst
em should be appropri-
ate for your child’s weight and height, and should properly fit your
vehicle’s seat.
For detailed information, refer to the instruc-tion manual accompanying the child restraint system. All children should be
properly restrained in
a restraint device that offers the maximumprotection for their size and age as specified by local, state, or provincial laws. Be sure to check local, state, or provincialrequirements for child si
ze and age that may
vary from the recommendations listed below.
Children less than 2 years old and who weigh 22 pounds (10 kg) or less MUSTride in a rear-facing child safety seat that MUST ONLY be used in the rear seat. Children older than 2 years of age and who weigh less than 40 pounds (18 kg) or who are less than 40 inches (100 cm) tall must be in a forwar
d-facing restraint used
only in the rear seat. Children who weigh more than 40 pounds (18 kg) or who are more than 40 inches (100 cm) tall, regard
less of age, should
use a suitable child seat or a booster seatin the rear seat until
the vehicle’s lap-and-
shoulder belt fits
them properly.
Recommendations for child restraint system selection
WA R N I N G All children must be seated in the rear seat, and properly restrained.Accident statistics show that children of all sizes and ages are
safer when properly
restrained in the rear seat, rather than inthe front seat. Be sure to select a child restraint system that is appropriate not only for the child’s size and age but also for your vehicle. Some child restraint systems may not fityour vehicle properly.
Any child who is too large to use a child restraint system should ride in the rearseat and wear the lap-and-shoulder beltproperly. The shoulder belt must be posi- tioned over the should
er and across the
chest, not across their neck, and with thelap belt positioned low on the child’s hips, not across their stomach. If necessary, a booster seat should be
used to help achieve
a proper seat belt fit. Follow the booster seat manufacturer’s instructions. Only use a booster seat that is
certified as comply-
ing with Federal Motor Vehicle Safety Standards or Motor Vehicle Restraint Sys- tems and Booster Seats Safety Regula-tions. Never hold an infant
or child in your arms
or on your lap when ri
ding in this vehicle,
even when you are wearing your seat belt. Never place any part of the seat belt youare wearing around an infant or child. Failure to follow these simple instructions creates a risk of serious injury or death toyour child in the even
t of an accident or
sudden stop.WA R N I N G
BK0284300US.book 15 ページ 2019年5月23日 木曜日 午後12時22分
Page 66 of 253
5
Features and controlsBreak-in recommendations ..............................................................5-2 Keys .................................................................................................5-2 Electronic immobilizer (Anti-theft starting system) ........................5-3Keyless entry system (if so equipped) ..............................................5-6 Free-hand Advanced Security
Transmitter (F.A.S.T.-key)
(if so equipped) ............................................................................5-9Door locks ......................................................................................5-25 Power door locks ......
...........
...........
...........
...........
...........
.........
.....5-27
Child safety locks for rear door ..........
...........
.........
.........
.........
.....5-28
Trunk lid ................
............
...........
...........
...........
...........
...........
.....5-28
Inside emergency trunk lid release ................................................5-29 Power window control ...................................................................5-30Parking brake .................................................................................5-33 Steering wheel height adjustment ..................................................5-34 Inside rearview mirror ...................................................................5-34Outside rearview mirrors ...............................................................5-36 Ignition switch ...............................................................................5-37 Starting the engine .........................................................................5-38Manual transaxle (if so equipped) ..................................................5-40 Continuously variable transmission
(CVT) (if so equipped)..........5-41
Service brake .................................................................................5-46Hill start assist ................................................................................5-47 Brake assist system ........................................................................5-49 Anti-lock braking system ...............................................................5-49Electric power steering system (EPS) ............................................5-51 Active stability control (ASC) .......................................................5-52 Cruise control (if so equipped) .......................................................5-54Tire pressure monitoring system (TPMS) .....................................5-58
Rear-view camera .......................................................................... 5-62 Instrument cluster .......................................................................... 5-64 Multi-information display ............................................................. 5-65Indicator and warning light package ............................................. 5-74 Indicators ....................................................................................... 5-75 Warning lights ................................................................................ 5-75Combination headlights and dimmer switch ................................. 5-78 Turn signal lever ............................................................................ 5-79 Hazard warning flasher switch ...................................................... 5-80Front fog light switch (if so equipped) .......................................... 5-80 Wiper and washer switch ............................................................... 5-81 Electric rear window defogger switch ....
...........
...........
...........
...... 5-82
Horn switch ................................................................................... 5-83 Link System (if so equipped) ......................................................... 5-83 USB input terminal ....
...........
...........
...........
...........
...........
............. 5-83
Sun visors ...................................................................................... 5-84 12 V power outlets ......................................................................... 5-85 Interior lights ................................................................................. 5-86Storage spaces ................................................................................ 5-87 Cup holders .................................................................................... 5-87 Bottle holders ................................................................................. 5-88Convenience hook ............
...........
...........
...........
...........
...........
...... 5-88
Assist grips .................................................................................... 5-89
BK0284300US.book 1 ページ 2019年5月23日 木曜日 午後12時22分
Page 99 of 253
Steering wheel height adjustment 5-34 Features and controls
5
N00511500231
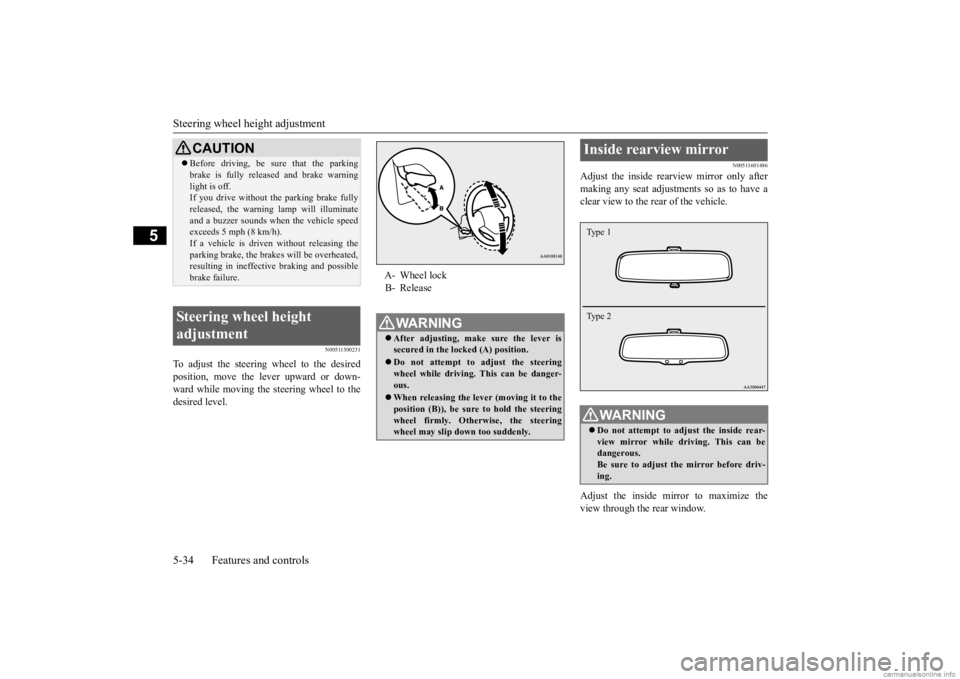
To adjust the steering wheel to the desired position, move the lever upward or down-ward while moving the steering wheel to the desired level.
N00511601486
Adjust the inside rearview mirror only aftermaking any seat adjustme
nts so as to have a
clear view to the rear of the vehicle. Adjust the inside mirror to maximize the view through the rear window.
CAUTION Before driving, be sure that the parking brake is fully released and brake warninglight is off.If you drive without the parking brake fully released, the warning lamp will illuminate and a buzzer sounds when the vehicle speedexceeds 5 mph (8 km/h). If a vehicle is driven without releasing the parking brake, the brakes will be overheated,resulting in ineffectiv
e braking and possible
brake failure.
Steering wheel height adjustment
A- Wheel lock B- ReleaseWA R N I N G After adjusting, make sure the lever is secured in the locked (A) position. Do not attempt to adjust the steering wheel while driving. This can be danger-ous. When releasing the leve
r (moving it to the
position (B)), be sure to hold the steering wheel firmly. Otherwise, the steering wheel may slip down too suddenly.
Inside rearview mirror
WA R N I N G Do not attempt to adjust the inside rear- view mirror while driving. This can bedangerous. Be sure to adjust the mirror before driv- ing.Type 1 Type 2
BK0284300US.book 34 ページ 2019年5月23日 木曜日 午後12時22分
Page 211 of 253
Tires 9-14 Vehicle care and maintenance
9
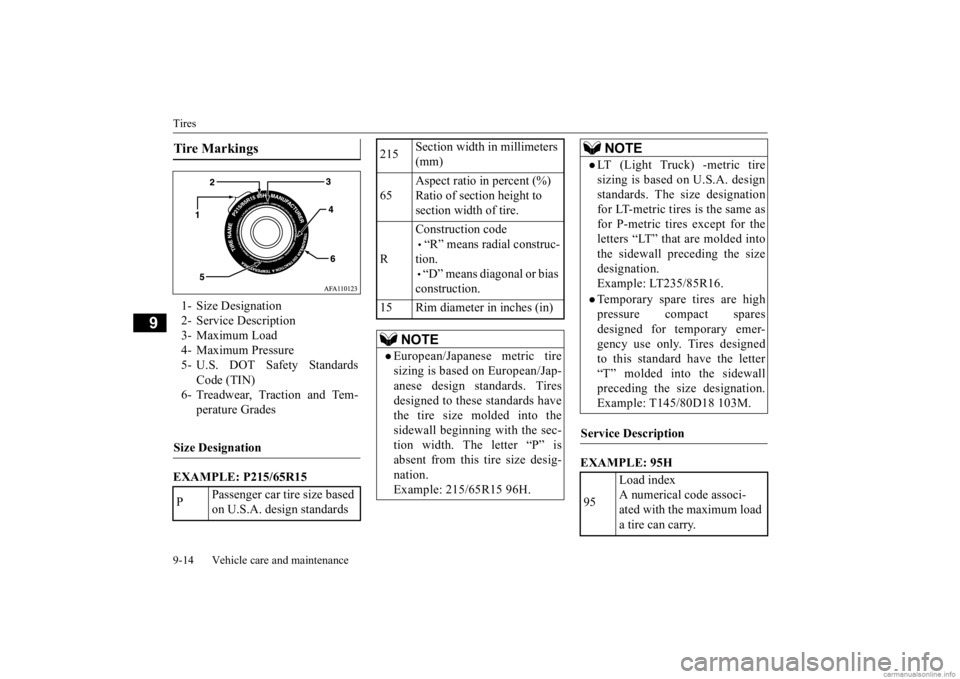
EXAMPLE: P215/65R15
EXAMPLE: 95H
Tire Markings 1- Size Designation 2- Service Description3- Maximum Load 4- Maximum Pressure 5- U.S. DOT Safety Standards
Code (TIN)
6- Treadwear, Traction and Tem-
perature Grades
Size Designation P
Passenger car tire size based on U.S.A. design standards
215
Section width in millimeters (mm)
65
Aspect ratio in percent (%) Ratio of section height to section width of tire.
R
Construction code • “R” means radial construc- tion. • “D” means diagonal or bias construction.
15 Rim diameter in inches (in)
NOTE
European/Japanese metric tire sizing is based on European/Jap- anese design standards. Tiresdesigned to these standards have the tire size molded into the sidewall beginning with the sec-tion width. The letter “P” is absent from this tire size desig- nation.Example: 215/65R15 96H.
LT (Light Truck) -metric tiresizing is based on U.S.A. design standards. The size designation for LT-metric tires is the same asfor P-metric tires except for the letters “LT” that are molded into the sidewall preceding the sizedesignation. Example: LT235/85R16.Temporary spare tires are highpressure compact spares designed for temporary emer-gency use only. Tires designed to this standard have the letter “T” molded into the sidewallpreceding the si
ze designation.
Example: T145/80D18 103M.
Service Description 95
Load index A numerical code associ- ated with the maximum load a tire can carry.
NOTE
BK0284300US.book 14 ページ 2019年5月23日 木曜日 午後12時22分