Ignition MITSUBISHI MONTERO 1987 1.G Manual PDF
[x] Cancel search | Manufacturer: MITSUBISHI, Model Year: 1987, Model line: MONTERO, Model: MITSUBISHI MONTERO 1987 1.GPages: 284, PDF Size: 14.74 MB
Page 210 of 284
8-190 ACCESSORY; - Cigarette Lighter
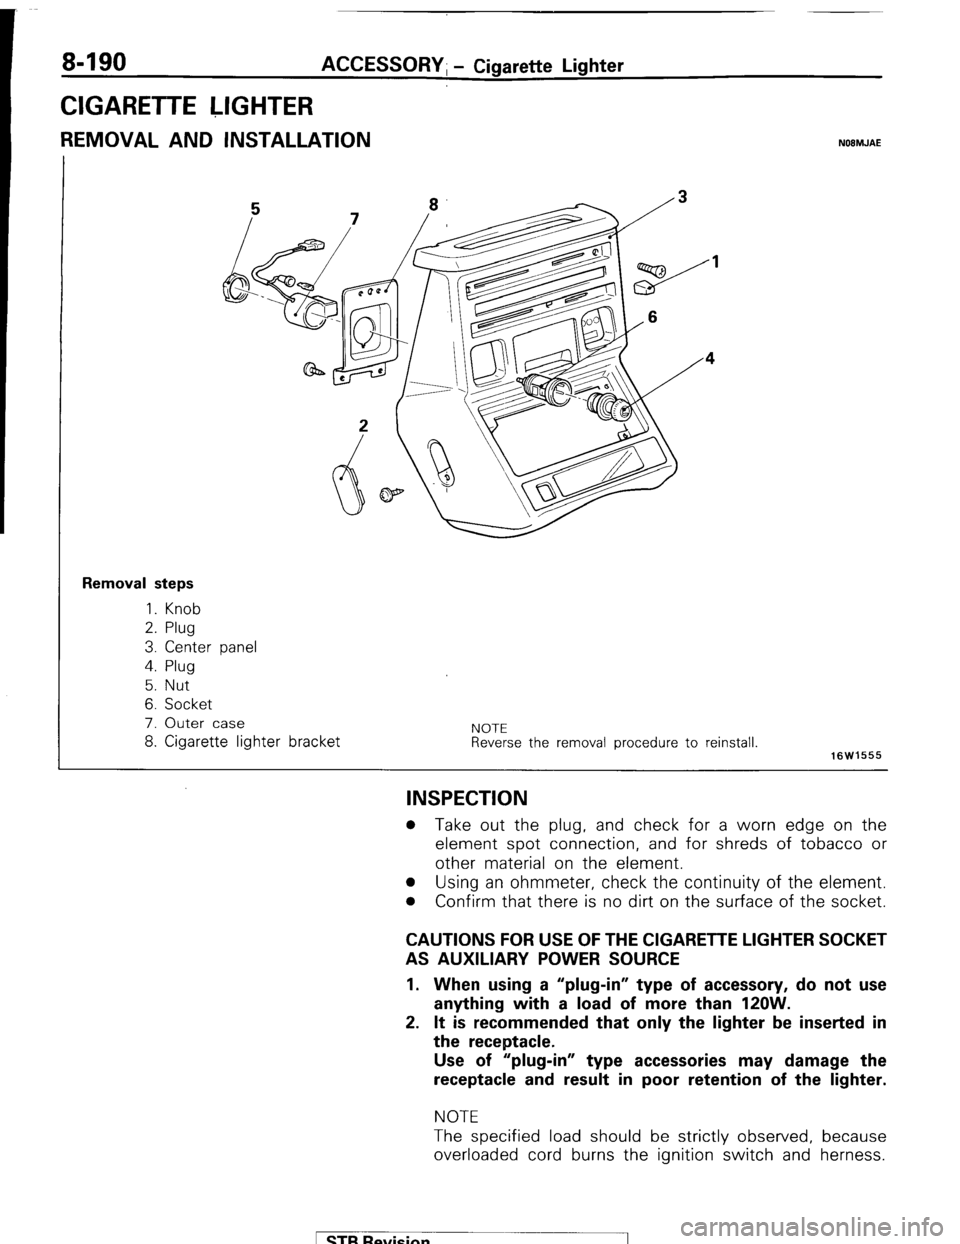
CIGARETTE LIGHTER
REMOVAL AND INSTALLATION NOEMJAE
Removal steps
1. Knob
2. Plug
3. Center panel
4. Plug
5. Nut
6. Socket
7. Outer case
8. Cigarette lighter bracket NOTE
Reverse the removal procedure to reinstall.
16W1555
INSPECTION
l Take out the plug, and check for a worn edge on the
element spot connection, and for shreds of tobacco or
other material on the element.
l Using an ohmmeter, check the continuity of the element.
l Confirm that there is no dirt on the surface of the socket.
CAUTIONS FOR USE OF THE CIGARETTE LIGHTER SOCKET
AS AUXILIARY POWER SOURCE
1. When using a “plug-in” type of accessory, do not use
anything with a load of more than 120W.
2. It is recommended that only the lighter be inserted in
the receptacle.
Use of “plug-in” type accessories may damage the
receptacle and result in poor retention of the lighter.
NOTE
The specified load should be strictly observed, because
overloaded cord burns the ignition switch and herness.
1 STB Revision
Page 213 of 284
AUDIO SYSTEM - Specifications 8-193
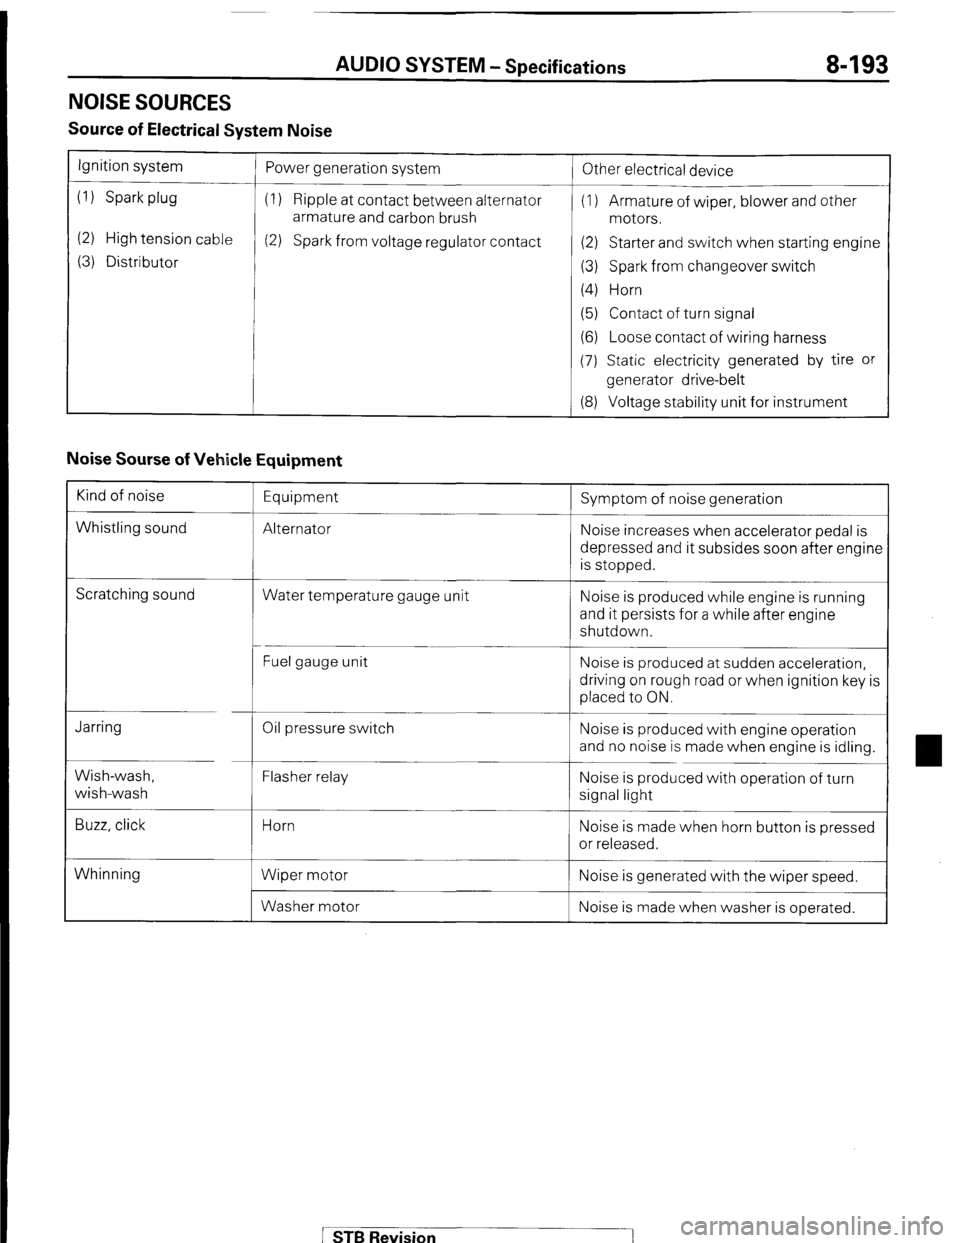
NOISE SOURCES
Source of Electrical System Noise
Ignition system
(1) Spark plug
(2) High tension cable
(3) Distributor Power generation system
(1) Ripple at contact between alternator
armature and carbon brush
(2) Spark from voltage regulator contact
!
Other electrical device
(1) Armature of wiper, blower and other
motors.
(2) Starter and switch when starting engine
(3) Spark from changeover switch
(4) Horn
(5) Contact of turn signal
(6) Loose contact of wiring harness
(7) Static electricity generated by tire or
generator drive-belt
(8) Voltage stability unit for instrument
Noise Sourse of Vehicle Equipment
Kind of noise
Whistling sound Equipment
Alternator Symptom of noise generation
Noise increases when accelerator pedal is
depressed and it subsides soon after engine
is stopped.
Scratching sound
Water temperature gauge unit Noise is produced while engine is running
and it persists for a while after engine
shutdown.
Fuel gauge unit Noise is produced at sudden acceleration,
driving on rough road or when ignition key is
placed to ON.
Jarring
Wish-wash,
wish-wash
Buzz, click Oil pressure switch
Flasher relay
Horn
Wiper motor
Washer motor Noise is produced with engine operation
and no noise is made when engine is idling.
Noise is produced with operation of turn
signal light
Noise is made when horn button is pressed
or released.
Whinning Noise is generated with the wiper speed.
Noise is made when washer is operated.
STB Revision
Page 214 of 284
8-194 AUDIO SYSTEM - Circuit Diagram
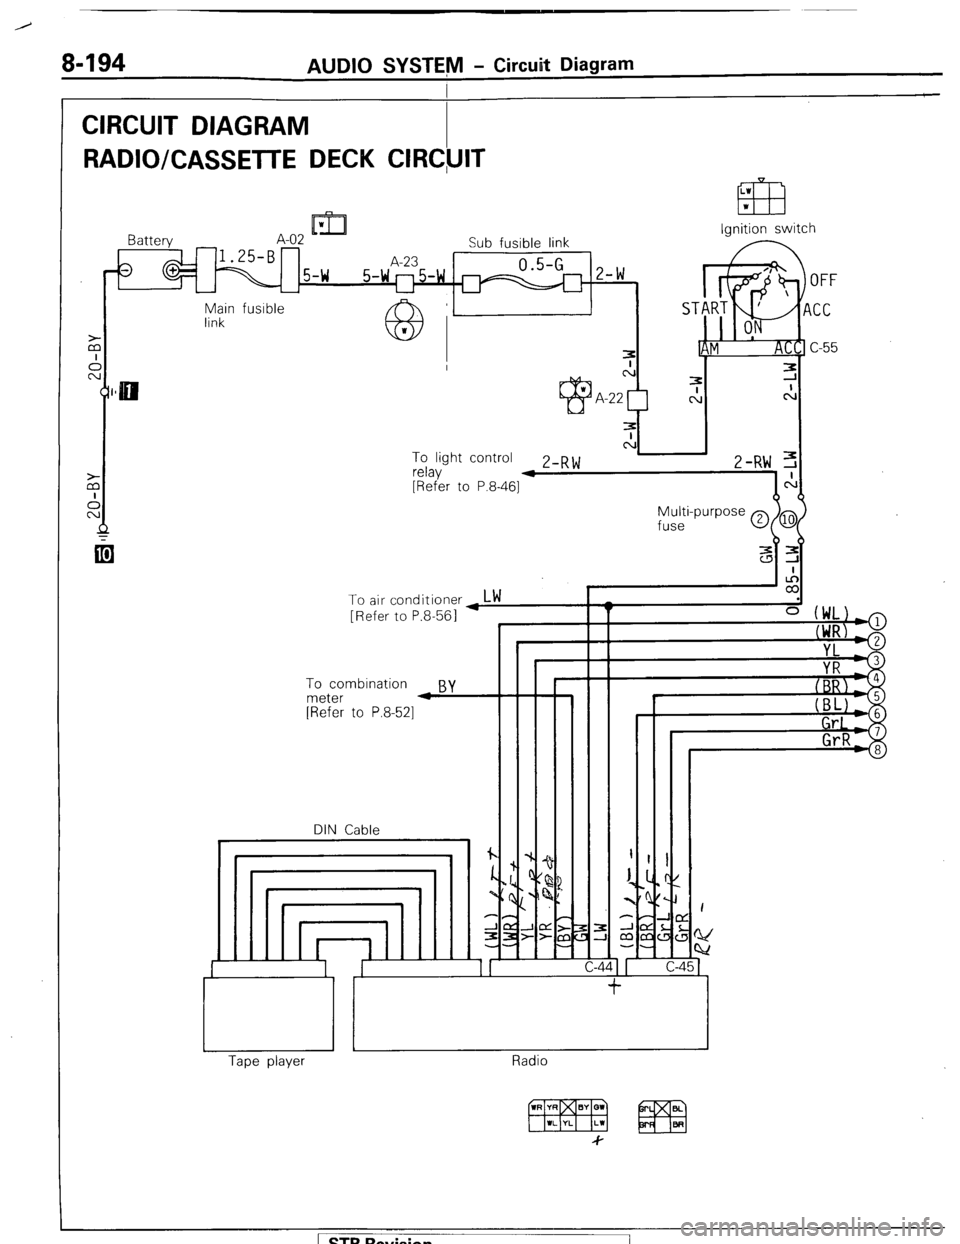
CIRCUIT DIAGRAM
I
RADIO/CASSETTE DECK CIRC,UIT
LW
033 w
Ignition switch
Battery A-02 IL-
Sub fusible link
0 1.25-B A-23 0.5-G 2 w
1 5-w 5-w ll5-w m -
u
Main fusible
link
N To light control
relav Z-RW 3 4
[Refer to P.8-461
Z-RW,,:
To air conditioner,LW
[Refer to P.8-561
To combination
By meter 4
[Refer to P.8-521
DIN Cable
I
/
J
I Y
=z
I
c- 45 -
It, /II
1 L
Radio Tape player
[ STB Revision
Page 216 of 284
8-196 AUDIO SYSTEM - Service Adjustment Procedures
SERVICE ADJUSTMENT PROCEDURES
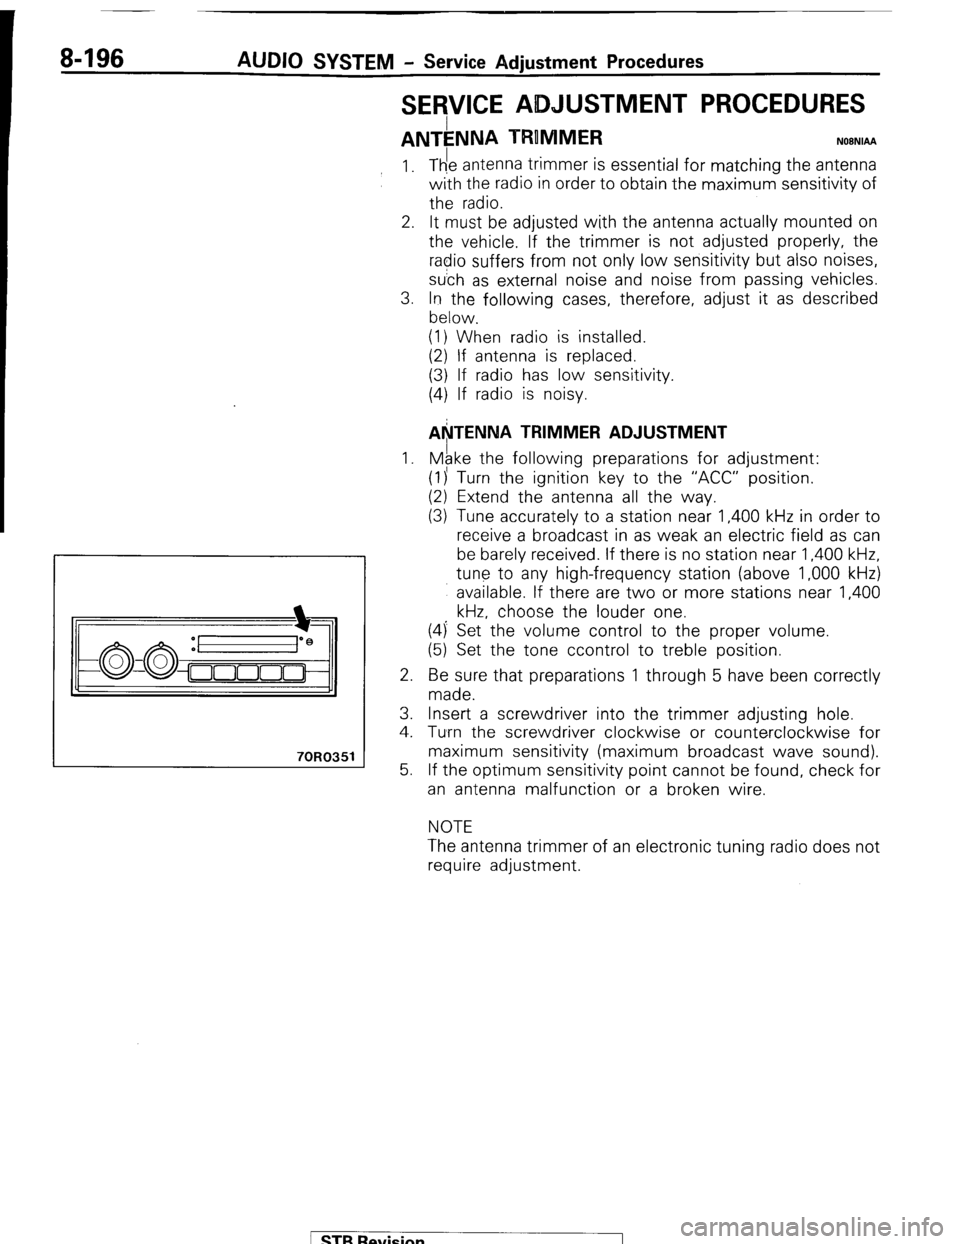
ANTkNNA TRUMMER NOBNIAA
70R0351
1.
2.
3.
1.
2.
3.
4.
5. The antenna trimmer is essential for matching the antenna
with the radio in order to obtain the maximum sensitivity of
the radio.
It must be adjusted with the antenna actually mounted on
the vehicle. If the trimmer is not adjusted properly, the
radio suffers from not only low sensitivity but also noises,
su’ch as external noise and noise from passing vehicles.
In the following cases, therefore, adjust it as described
below.
(1) When radio is installed.
(2) If antenna is replaced.
(3) If radio has low sensitivity.
(4) If radio is noisy.
AkTENNA TRIMMER ADJUSTMENT
Mgke the following preparations for adjustment:
(1)’ Turn the ignition key to the “ACC” position.
(2) Extend the antenna all the way.
(3) Tune accurately to a station near 1,400 kHz in order to
receive a broadcast in as weak an electric field as can
be barely received. If there is no station near 1,400 kHz,
tune to any high-frequency station (above 1,000 kHz)
available. If there are two or more stations near 1,400
kHz, choose the louder one.
(4) Set the volume control to the proper volume.
(5) Set the tone ccontrol to treble position.
Be sure that preparations 1 through 5 have been correctly
made.
Insert a screwdriver into the trimmer adjusting hole.
Tumrn the screwdriver clockwise or counterclockwise for
maximum sensitivity (maximum broadcast wave sound).
If the optimum sensitivity point cannot be found, check for
an antenna malfunction or a broken wire.
NOTE
The antenna trimmer of an electronic tuning radio does not
require adjustment.
/ STB Revision
Page 220 of 284
8-200 AUDIO SYSTEM - Antenna/Noise Suppression
3. REMOVAL OF FRONT FENDER PANEL
Refer to GROUP 23 Body-Front Fender
SEFiVlCE ff OINTS OF INSTALLATION
3. IbSTALLATION OF FRONT FENDER PANEL
Refer to GROUP 23 Body-Front Fender.
NOISE SWPRESSION N08NOAA
I. Noise interfering with radio reception may be roughly
classified as follows:
(1) Noise produced by the vehicle itself
Noise from the ignition circuit, alternator circuit, etc
(2) Noise generated in the radio itself
Thermal noise from transistors, IC, resistor, etc.
(3) Atmospheric noise
Noise from other cars, neon signs, etc.
2. The radio has devices to suppress noise of the radio itsel f
3. and atmospheric noise, but it is difficult to eliminate them
completely. Noise produced by the vehicle includes whin-
ing from the alternator system, and a strong, impulsive,
fast popping noise from the ignition system.
Before performing any checking or adjustments, first
confirm the following points.
Adjust the antenna trimmer completely.
Set the push buttons (tuning) properly.
Extend the antenna all the way.
PREVENTION OF IGNITION CIRCUIT NOISE
A resistance-equipped cable is used for the high-tension cable
in order to prevent noise; however, if any noise from the
ignition circuit does occur, check the tightness and ground
connection of the positive (+) terminal of the noise filter, and,
if necessary, check the noise filter.
Caution
Be careful not to connect the noise filter to the hightension
cable; doing so could damage the noise filter.
PREVENTION OF OTHER CIRCUIT NOISE
1. For other noises, take necessary corrective actions in
accordance with the following items and the NOISE
SUPPRESSION CHART.
2. Polish the grounding cable terminal, and connect it proper-
ly.
3. Polish the pillar antenna ground terminal, and connect it
properly.
4. Ground electric parts completely.
5. Keep the antenna cable and speaker lead wire away from
other electric wiring.
STB Revision
Page 225 of 284
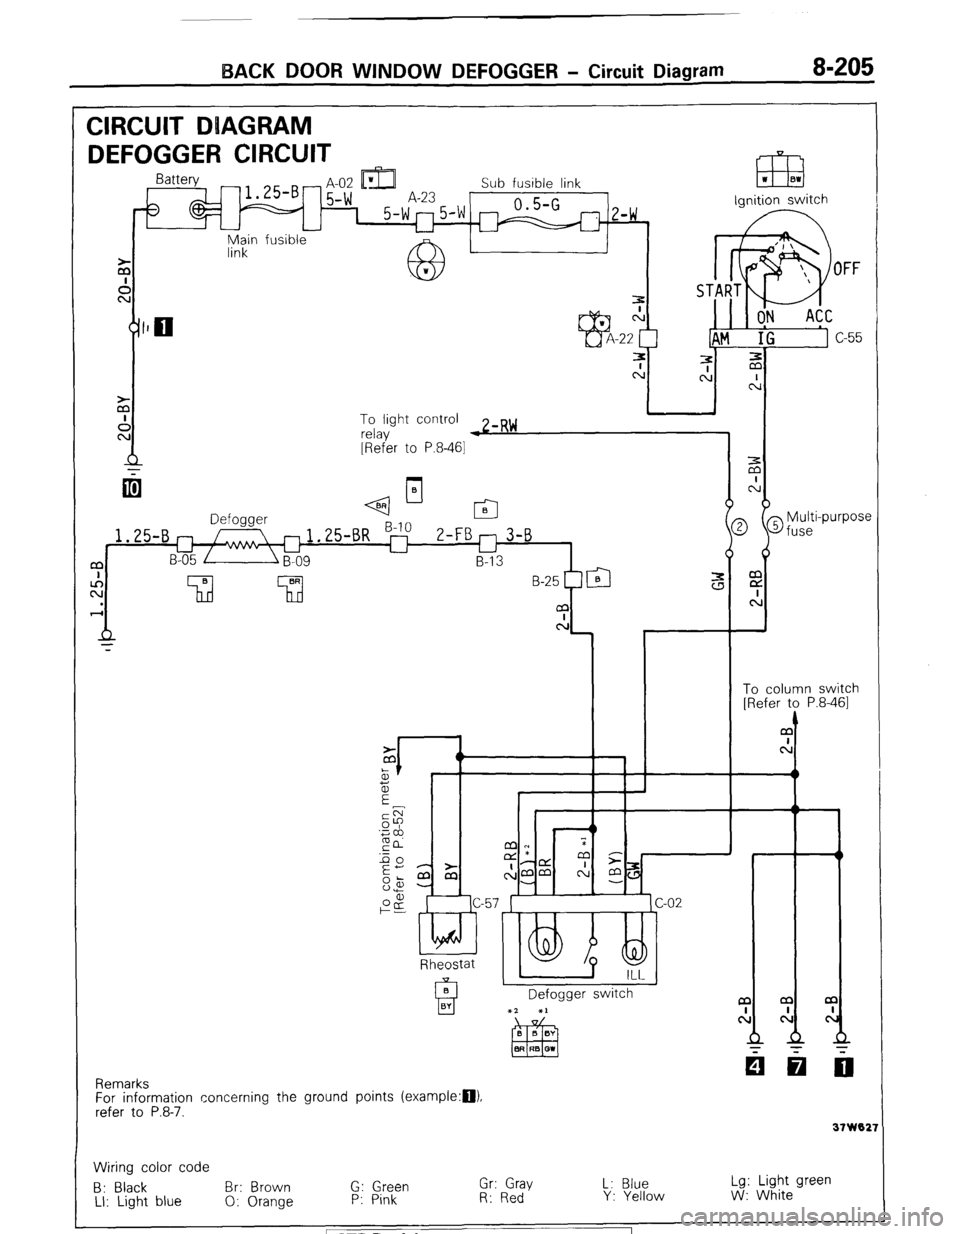
BACK DOOR WINDOW DEFOGGER - Circuit Diagram 8-205
CIRCUIT DUAGRAM
DEFOGGER CIRCUIT -t IDI L
m
- H-UL Ll&J Sub fusible link
5-w A-23 0.5-G 1 5-w"5'w m
z-w ,
u
fusible ignition switch
Main
link
To light control
relay w zmR~
[Refer to P.8-461
q--l-
2 @fuse
i
Multi-purpose m
E
c:
t
To column switch
[Refer to P.8-461
1.25-B
a
c!
Rheostat
Defogger switch a
cl
31 W02:
Remarks
For information concerning the ground points (example:D).
refer to P.8-7.
Wiring color code
B: Black Br: Brown G: Green Gr: Gray L: Blue Lg: Light green
LI: Light blue 0: Orange P: Pink R: Red Y: Yellow W: White STB Revision
Page 229 of 284
AUTOMATIC FREE-WHEELING HUB INDICATOR SYSTEM - General Information 8-209
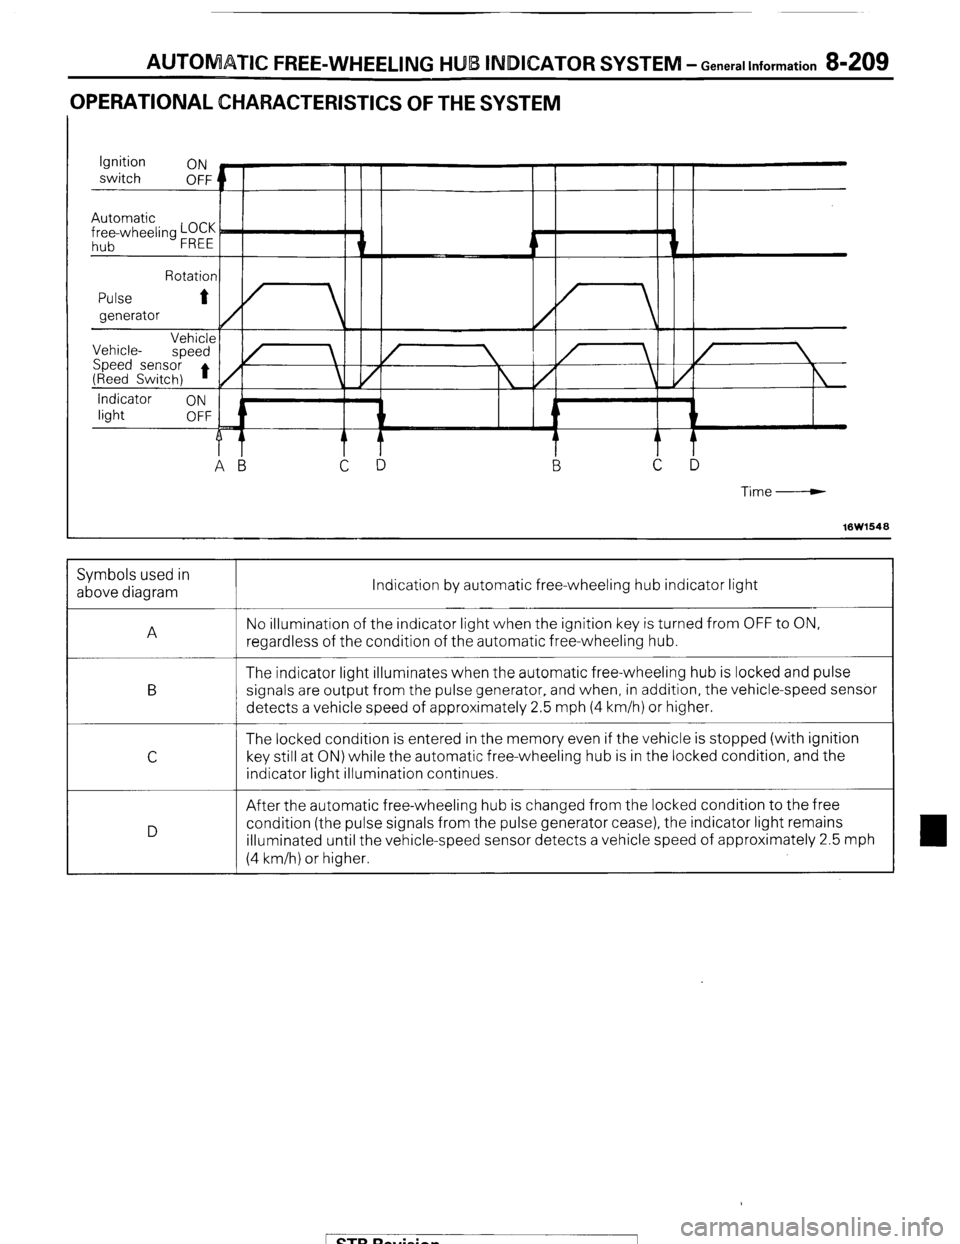
OPERATIONAL CHARACTERISTICS OF THE SYSTEM
Time-----w
16W1548 Indication by automatic free-wheeling hub indicator light
No illumination of the indicator light when the ignition key is turned from OFF to ON,
regardless of the condition of the automatic free-wheeling hub.
The indicator light illuminates when the automatic free-wheeling hub is locked and pulse
signals are output from the pulse generator, and when, in addition, the vehicle-speed sensor
detects a vehicle speed of approximately 2.5 mph (4 km/h) or higher.
The locked condition is entered in the memory even if the vehicle is stopped (with ignition
key still at ON) while the automatic free-wheeling hub is in the locked condition, and the
indicator light illumination continues.
After the automatic free-wheeling hub is changed from the locked condition to the free
condition (the pulse signals from the pulse generator cease), the indicator light remains
illuminated until the vehicle-speed sensor detects a vehicle speed of approximately 2.5 mph
(4 km/h) or higher. Symbols used in
above diagram
A
B
C
D
1 STB Revision
Page 230 of 284
8-210 AUTOMATIC FREE-WHEELING HUB INDICATOR SYSTEM - General Information
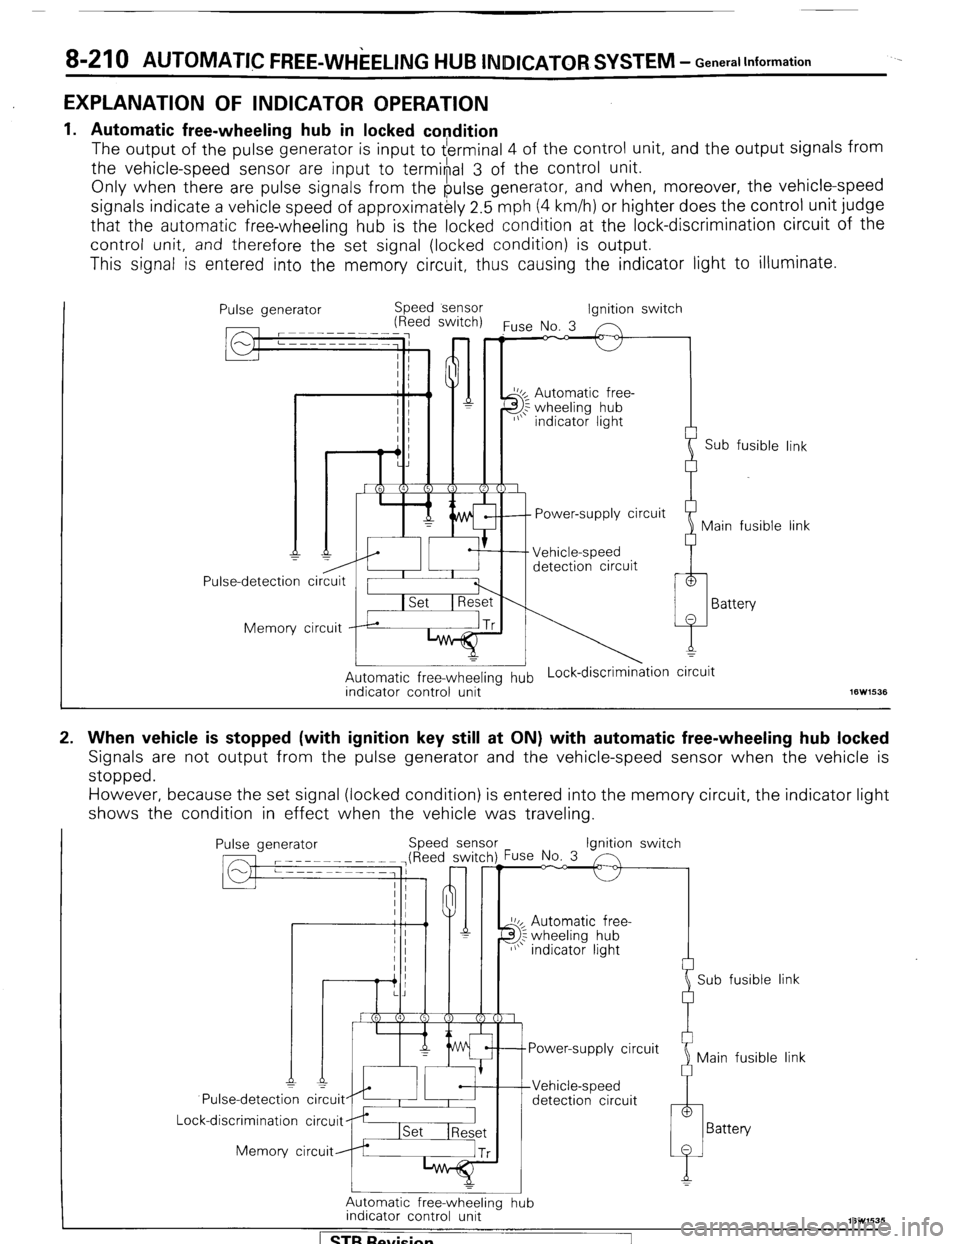
EXPLANATION OF INDICATOR OPERATION
.
1.
2. Automatic free-wheeling hub in locked condition
The
output of the pulse generator is input to $ertninal 4 of the control unit, and the output signals from
the vehicle-speed sensor are input
to termi#al 3 of the control unit.
Only when there are pulse signals from the pulse generator, and when, moreover, the vehicle-speed
signals indicate a vehicle speed of approximatkly 2.5 mph (4 km/h) or highter does the control unit judge
that the automatic free-wheeling hub is the locked condition at the lock-discrimination circuit of the
control unit, and therefore the set signal (locked condition) is output.
This signal is entered into the memory circuit, thus causing the indicator light to illuminate.
Pulse generator Speed sensor
(Reed switch)
Pulse-detection circuit / I I
Memory circuit rp*
I
Automatic free-wheeling hub Lock-discrimin&ion circuit
indicator control unit 16W1535 Ignition switch
‘use No. 3 n
J 2
I_
Power-supply circuit
Vehicle-speed
detection circuit 1
Sub fusible link 1
Main fusible link 1
)
1
Battery
When vehicle is stopped (with ignition key still at ON) with automatic free-wheeling hub locked
Signals are not output from the pulse generator and the vehicle-speed sensor when the vehicle is
stopped.
However, because the set signal (locked condition) is entered into the memory circuit, the indicator light
shows the condition in effect when the vehicle was traveling.
Pulse generator Speed sense
Pulse-detecti: ci~uit~~I~ #
Lock-discrimination circuit
Memory circuit ‘use No. 3 Ignition switch
10~ Automatic free-
3; wheeling hub
I/\’ indicator light
Sub fusible link
Power-supply circuit
Main fusible link
detection circuit
Automatic free-wheeling hub
indicator control unit
[ STB Revision
Page 231 of 284
AUTOMATIC FREE-WHEELING HUB INDICATOR SYSTEM - Generallnformation 8-211
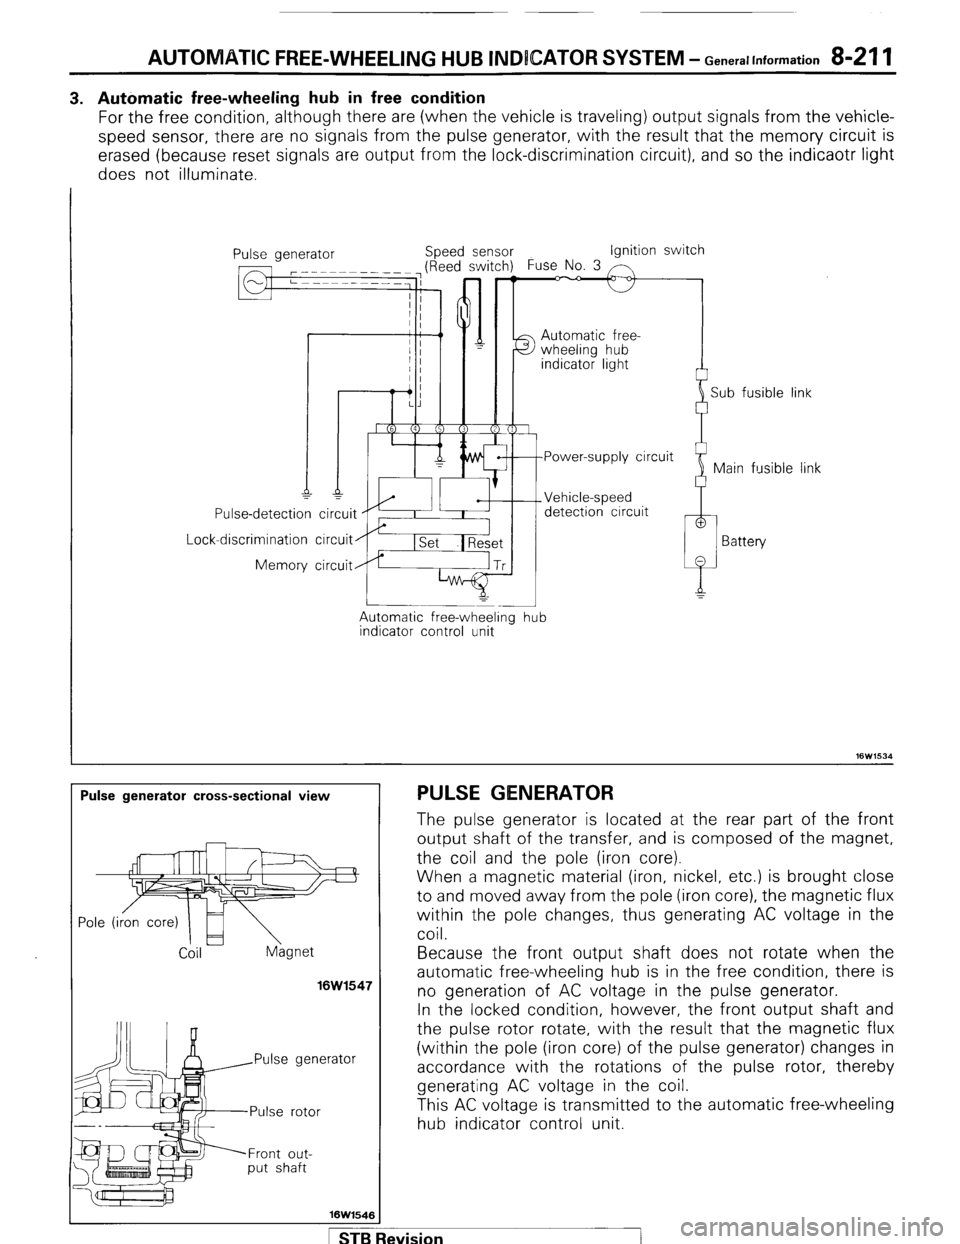
3. Automatic free-wheeling hub in free condition
For the free condition, although there are (when the vehicle is traveling) output signals from the vehicle-
speed sensor, there are no signals from the pulse generator, with the result that the memory circuit is
erased (because reset signals are output from the lock-discrimination circuit), and so the indicaotr light
does not illuminate.
I
Lock Use-detection
-discrimination
Memory ipeed sensor Ignition switch
Automatic free-
detection circuit
circuit
circuit
Automatic free-wheeling
indicator control unit -
hub i
Sub fusible link
link
Pulse generator cross-sectional view PULSE GENERATOR
Coil hgnet
16W1547
rator
Front out-
put shaft
16W1546 The pulse generator is located at the rear part of the front
output shaft of the transfer, and is composed of the magnet,
the coil and the pole (iron core).
When a magnetic material (iron, nickel, etc.) is brought close
to and moved away from the pole (iron core), the magnetic flux
within the pole changes, thus generating AC voltage in the
coil.
Because the front output shaft does not rotate when the
automatic free-wheeling hub is in the free condition, there is
no generation of AC voltage in the pulse generator.
In the locked condition, however, the front output shaft and
the pulse rotor rotate, with the result that the magnetic flux
(within the p o e I (’ Iron core) of the pulse generator) changes in
accordance with the rotations of the pulse rotor, thereby
generating AC voltage in the coil.
This AC voltage is transmitted to the automatic free-wheeling
hub indicator control unit.
STB Revision
Page 233 of 284
AUTOMATIC FREE-WHEELING HUB INDICATOR SYSTEM -Troubleshooting 8-213
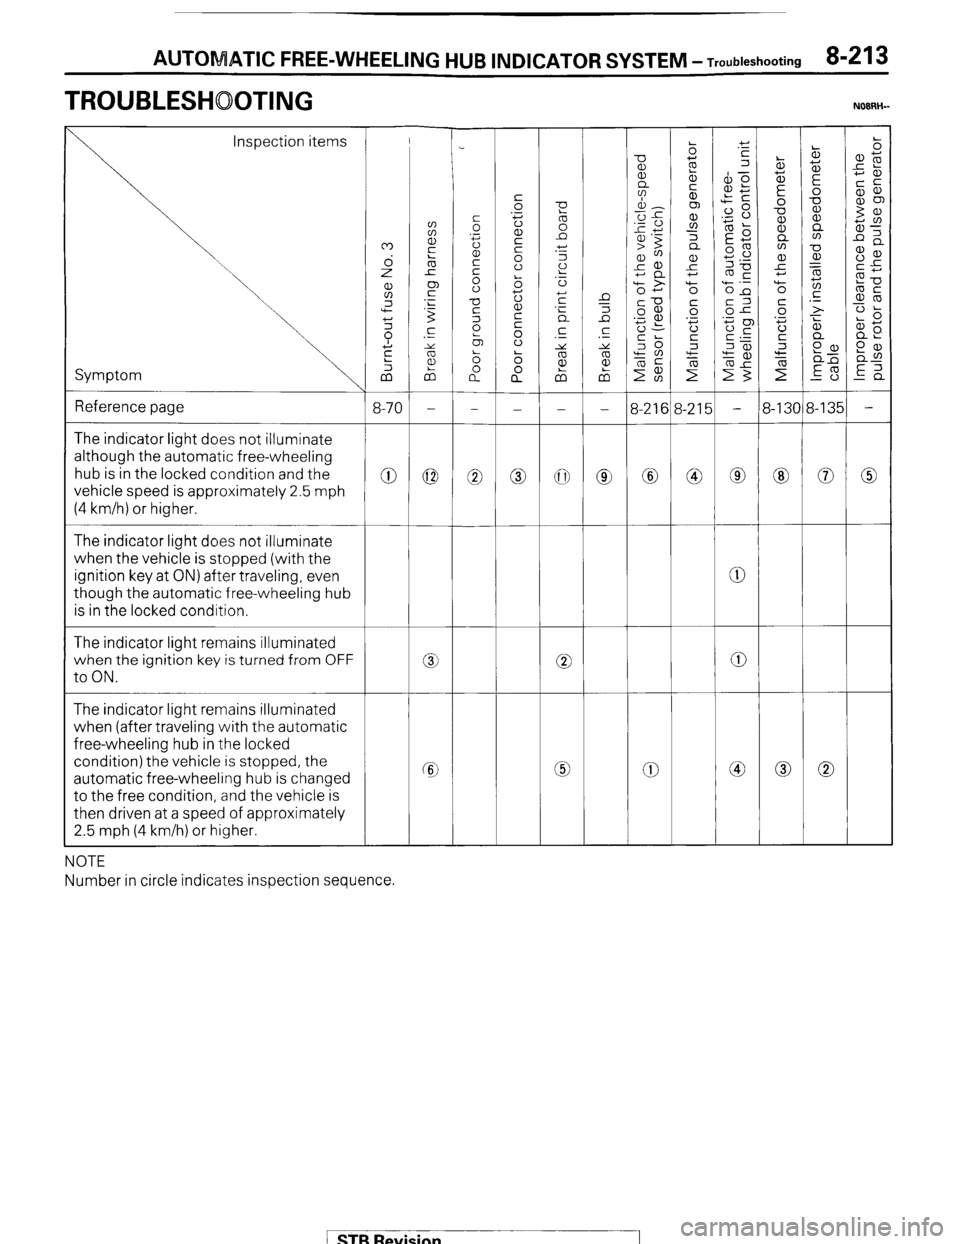
TROUBLESHOOTING NOIRH-
Inspection items
Symptom
Reference page
3-21E
0 The indicator light does not illuminate
although the automatic free-wheeling
hub is in the locked condition and the
vehicle speed is approximately 2.5 mph
(4 km/h) or higher.
0 0 0
0
The indicator light does not illuminate
when the vehicle is stopped (with the
ignition key at ON) after traveling, even
though the automatic free-wheeling hub
is in the locked condition.
The indicator light remains illuminated
when the ignition key is turned from OFF
to ON.
0
0 0 0
a 0
The indicator light remains illuminated
when (after traveling with the automatic
free-wheeling hub in the locked
condition) the vehicle is stopped, the
automatic free-wheeling hub is changed
to the free condition, and the vehicle is
then driven at a speed of approximately
2.5 mph (4 km/h) or higher.
0 Cc 0
NOTE
Number in circle indicates inspection sequence.
/ STB Revision