change time MITSUBISHI MONTERO 1987 1.G Workshop Manual
[x] Cancel search | Manufacturer: MITSUBISHI, Model Year: 1987, Model line: MONTERO, Model: MITSUBISHI MONTERO 1987 1.GPages: 284, PDF Size: 14.74 MB
Page 1 of 284

Service Manual
MONTERO
1987 : Volume 2
FOREWORD
This Service Manual has been prepared with the
latest service information available at the time of
publication. It is subdivided into various group
categories and each section contains diagnosis,
disassembly, repair, and installation procedures
along with complete specifications and tightening
references. Use of this manual will aid in properly
performing any servicing necessary to maintain or
restore the high levels of performance and reliability
designed into these outstanding vehicles.
WE SUPPORT
VOLUNTARY TECHNICIAN
CERTIFICATION THROUGH
MITSUBISHI MOTOR SALES OF AMERICA. Inc.
Mitsubishi Motors corporation reserves the right to make changes in
design or to make additions to or improvements in its products without
imposing any obligations upon itself to install them on its products
previously manufactured.
I
GROUP/SECTION INDEX ‘kme-.
INTRODUCTION ..............................
Electrical ...........................................
Electrical System Parts
Location .........................................
Relays, Control Units, Sensors,
Fuses, Groundings
Inspection of Harness
Connector ......................................
Wiring Harness .............................
Charging System ..........................
Starting System ............................
Ignition System .............................
Meters and Gauges ......................
Lighting System .............................
Wiper and Washer System ..........
Horn ...............................................
Accessory ......................................
Audio System ................................
Back Door Window Defogger ......
Automatic Free-wheeling Hub
Indicator System ..........................
Heaters and Air-conditioning .........
Heaters ..........................................
Air-conditioning ............................
**, For Engine Chassis & Body refer to
0 1986 Mitsubishi Motors Corporation Printed in Japan
Page 37 of 284

Normal close INC) type
Deenergized state
Energized state
I
WIRING HARNESS - Troubleshooting 8-17
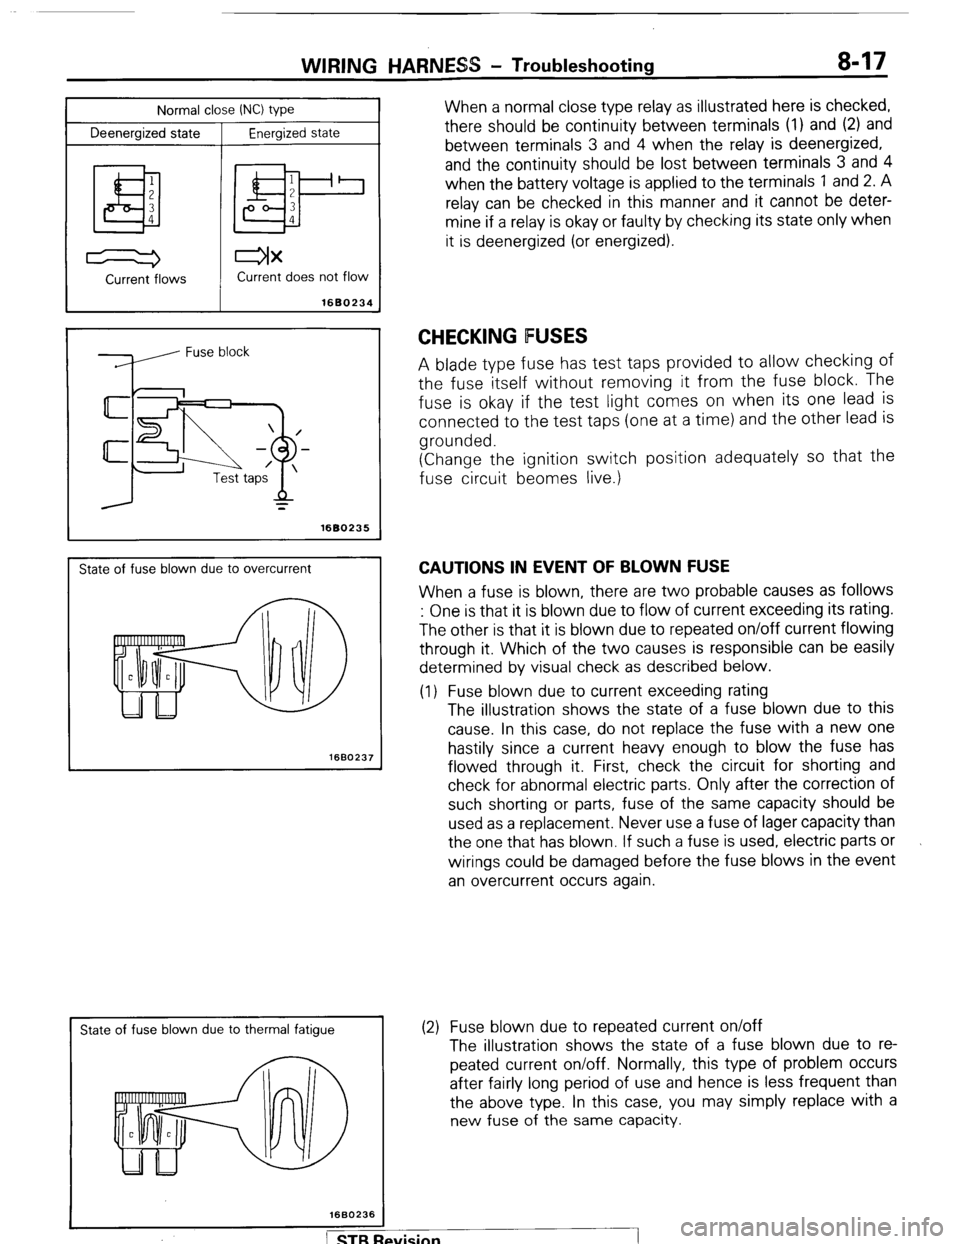
When a normal close type relay as illustrated here is checked,
there should be continuity between terminals (1) and (2) and
between terminals 3 and 4 when the relay is deenergized,
and the continuity should be lost between terminals 3 and 4
when the battery voltage is applied to the terminals 1 and 2. A
relay can be checked in this manner and it cannot be deter-
mine if a relay is okay or faulty by checking its state only when
it is deenergized (or energized).
Current -flows Current does not flow
1680234
=
1680235
State of fuse blown due to overcurrent
1660237
I
State of fuse blown due to thermal fatigue
CHECKING FUSES
A blade type fuse has test taps provided to allow checking of
the fuse itself without removing it from the fuse block. The
fuse is okay if the test light comes on when its one lead is
connected to the test taps (one at a time) and the other lead is
grounded.
(Change the ignition switch position adequately so that the
fuse circuit beomes live.)
CAUTIONS IN EVENT OF BLOWN FUSE
When a fuse is blown, there are two probable causes as follows
: One is that it is blown due to flow of current exceeding its rating.
The other is that it is blown due to repeated on/off current flowing
through it. Which of the two causes is responsible can be easily
determined by visual check as described below.
(1) Fuse blown due to current exceeding rating
The illustration shows the state of a fuse blown due to this
cause. In this case, do not replace the fuse with a new one
hastily since a current heavy enough to blow the fuse has
flowed through it. First, check the circuit for shorting and
check for abnormal electric parts. Only after the correction of
such shorting or parts, fuse of the same capacity should be
used as a replacement. Never use a fuse of lager capacity than
the one that has blown. If such a fuse is used, electric parts or
wirings could be damaged before the fuse blows in the event
an overcurrent occurs again.
(2) Fuse blown due to repeated current on/off
The illustration shows the state of a fuse blown due to re-
peated current on/off. Normally, this type of problem occurs
after fairly long period of use and hence is less frequent than
the above type. In this case, you may simply replace with a
new fuse of the same capacity.
Page 99 of 284

CHARGING SYSTEM - Service Adjustment Procedures 8-79
Result
(1) The ammeter reading must be higher than the limit value. If it
is lower but the alternator output wire is normal, remove the
alternator from the vehicle and check it.
Limit value : 31 A min.
Caution
1. The nominal output current value is shown on the
nameplate affixed to the alternator body.
2. The output current value changes with the electrical
load and the temperature of the alternator itself.
Therefore, the nominal output current may not be ob-
tained if the vehicle electrical load at the time of test is
small. In such a case, keep the headlights on to cause
discharge of the battery or use lights of another vehi-
cle as a load to increase the electrical load. The nom-
inal output current may not be obtained if the temper-
ature of the alternator itself or abmient temperature is
too high. In such a case, reduce the temperature be-
fore testing again.
(2) Upon completion of the output current test, lower the engine
speed to the idle speed and turn off the ignition switch.
(3) Disconnect the battery ground cable.
(4) Remove the test ammeter and voltmeter and the engine ta-
chometer.
(5) connect the alternator output wire to the alternator “B” ter-
minal.
(6) Connect the battery ground cable.
REGULATED VOLTAGE TEST
The purpose of this test is to check that the electronic voltage
regulator controls the voltage correctly.
Preparation
(1) Prior to the test, check the following items and correct if nec-
essary.
(a) Check the battery installed on the vehicle to see that it is
fully charged. For battery checking method, see “BAT-
TERY”.
(b) Check the alternator drive belt tension. For belt tension
check, see “GROUP 7 COOLING - Service Adjustment
Procedures”.
(2) Turn the ignition switch to “OFF”.
(3) Disconnect the battery ground cable.
(4) Connect a digital voltmeter between the “S” terminal of the
alternator and ground. Connect the (+) lead of the voltmeter to
the “S” terminal of the alternator, inserting from the wire side
of the 2-way connector and connect the (-1 lead to sound
ground or battery (-) terminal.
1 ST6 Revision
Page 229 of 284

AUTOMATIC FREE-WHEELING HUB INDICATOR SYSTEM - General Information 8-209
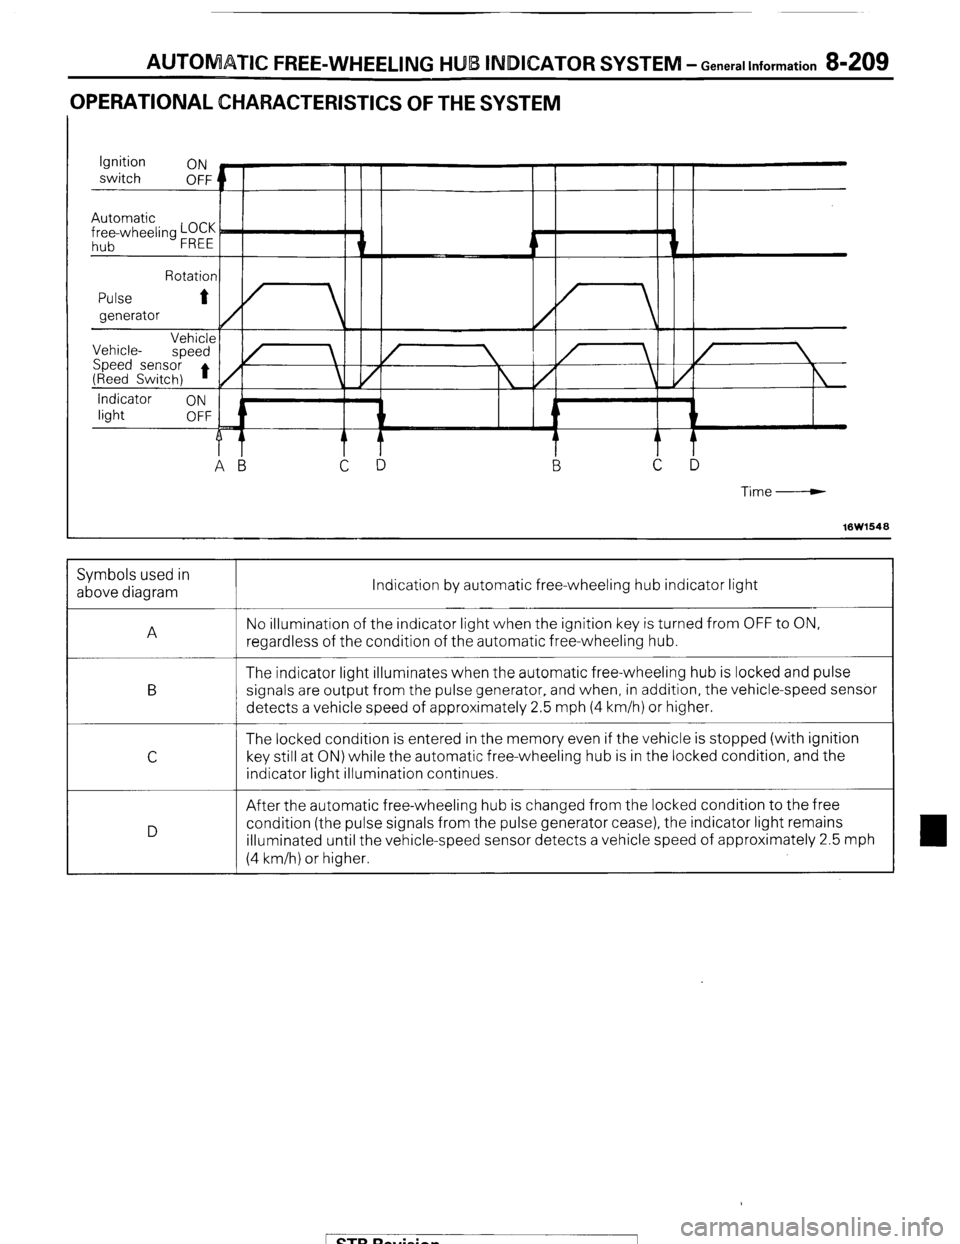
OPERATIONAL CHARACTERISTICS OF THE SYSTEM
Time-----w
16W1548 Indication by automatic free-wheeling hub indicator light
No illumination of the indicator light when the ignition key is turned from OFF to ON,
regardless of the condition of the automatic free-wheeling hub.
The indicator light illuminates when the automatic free-wheeling hub is locked and pulse
signals are output from the pulse generator, and when, in addition, the vehicle-speed sensor
detects a vehicle speed of approximately 2.5 mph (4 km/h) or higher.
The locked condition is entered in the memory even if the vehicle is stopped (with ignition
key still at ON) while the automatic free-wheeling hub is in the locked condition, and the
indicator light illumination continues.
After the automatic free-wheeling hub is changed from the locked condition to the free
condition (the pulse signals from the pulse generator cease), the indicator light remains
illuminated until the vehicle-speed sensor detects a vehicle speed of approximately 2.5 mph
(4 km/h) or higher. Symbols used in
above diagram
A
B
C
D
1 STB Revision