fog light MITSUBISHI MONTERO 1987 1.G Workshop Manual
[x] Cancel search | Manufacturer: MITSUBISHI, Model Year: 1987, Model line: MONTERO, Model: MITSUBISHI MONTERO 1987 1.GPages: 284, PDF Size: 14.74 MB
Page 1 of 284
Service Manual
MONTERO
1987 : Volume 2
FOREWORD
This Service Manual has been prepared with the
latest service information available at the time of
publication. It is subdivided into various group
categories and each section contains diagnosis,
disassembly, repair, and installation procedures
along with complete specifications and tightening
references. Use of this manual will aid in properly
performing any servicing necessary to maintain or
restore the high levels of performance and reliability
designed into these outstanding vehicles.
WE SUPPORT
VOLUNTARY TECHNICIAN
CERTIFICATION THROUGH
MITSUBISHI MOTOR SALES OF AMERICA. Inc.
Mitsubishi Motors corporation reserves the right to make changes in
design or to make additions to or improvements in its products without
imposing any obligations upon itself to install them on its products
previously manufactured.
I
GROUP/SECTION INDEX ‘kme-.
INTRODUCTION ..............................
Electrical ...........................................
Electrical System Parts
Location .........................................
Relays, Control Units, Sensors,
Fuses, Groundings
Inspection of Harness
Connector ......................................
Wiring Harness .............................
Charging System ..........................
Starting System ............................
Ignition System .............................
Meters and Gauges ......................
Lighting System .............................
Wiper and Washer System ..........
Horn ...............................................
Accessory ......................................
Audio System ................................
Back Door Window Defogger ......
Automatic Free-wheeling Hub
Indicator System ..........................
Heaters and Air-conditioning .........
Heaters ..........................................
Air-conditioning ............................
**, For Engine Chassis & Body refer to
0 1986 Mitsubishi Motors Corporation Printed in Japan
Page 21 of 284
8-1
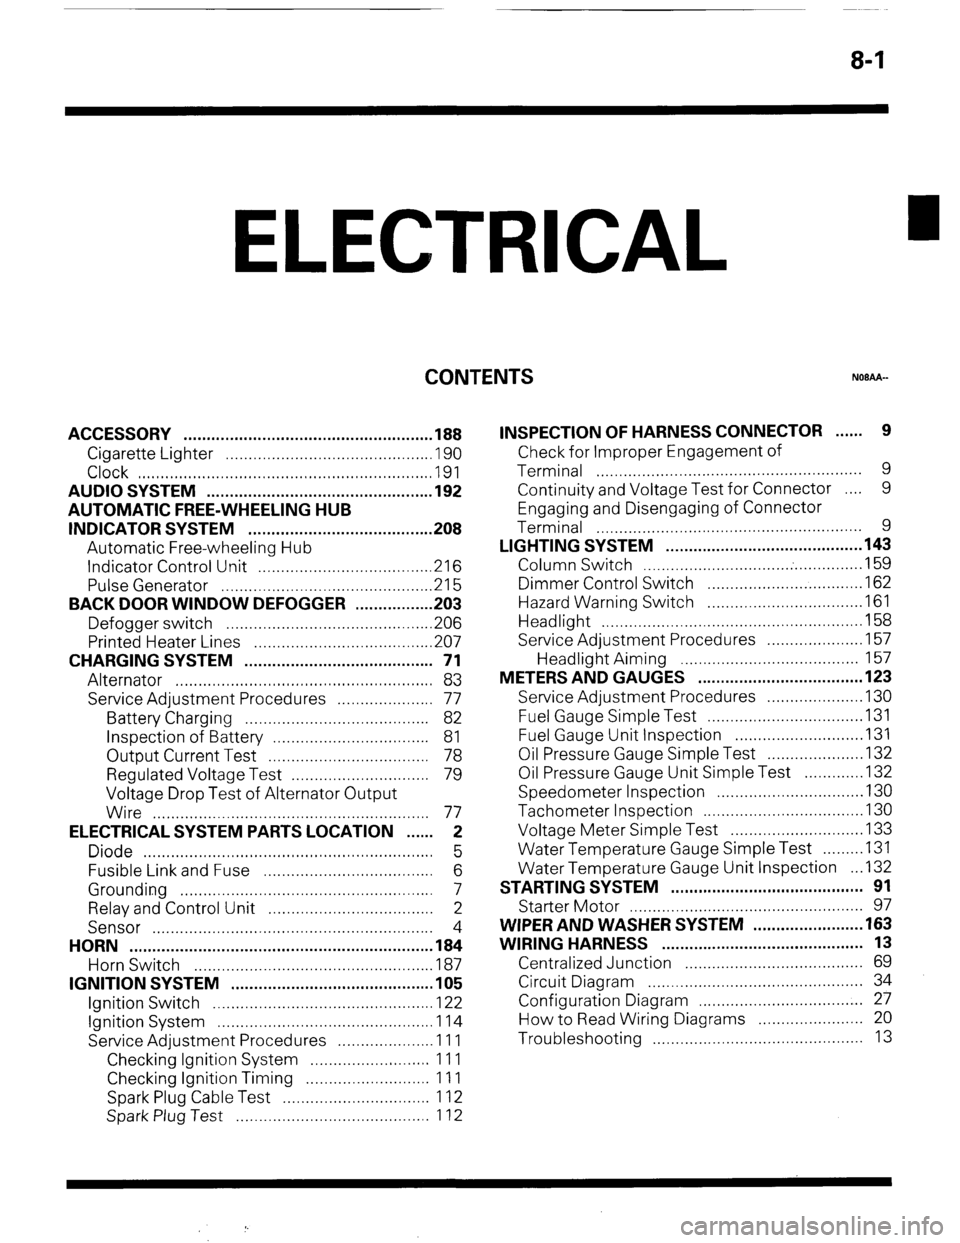
ELECTRICAL
CONTENTS
NOBAA-
ACCESSORY ......................................................
188
Cigarette Lighter ............................................
,190
Clock ...............................................................
,191
AUDIO SYSTEM ................................................
.192
AUTOMATIC FREE-WHEELING HUB
INDICATOR SYSTEM ........................................
208
Automatic Free-wheeling Hub
Indicator Control Unit
..................................... ,216
Pulse Generator ..............................................
215
BACK DOOR WINDOW DEFOGGER
................ .203
Defogger switch ............................................
,206
Printed Heater Lines
...................................... ,207
CHARGING SYSTEM .........................................
71
Alternator ........................................................
83
Service Adjustment Procedures
..................... 77
Battery Charging ........................................
82
Inspection of Battery ..................................
81
Output Current Test ...................................
78
Regulated Voltage Test ..............................
79
Voltage Drop Test of Alternator Output
Wire ............................................................
77
ELECTRICAL SYSTEM PARTS LOCATION
...... 2
Diode ...............................................................
5
Fusible Link and Fuse
..................................... 6
Grounding .......................................................
7
Relay and Control Unit ....................................
2
Sensor .............................................................
4
HORN ..................................................................
184
Horn Switch
.................................................... 187
IGNITION SYSTEM ............................................
105
Ignition Switch
................................................ 122
Ignition System ...............................................
1 14
Service Adjustment Procedures
.................... .l 1 1
Checking Ignition System
..........................
11 1
Checking Ignition Timing
...........................
11 1
Spark Plug Cable Test
................................
1 12
Spark Plug Test
.......................................... 1 12 INSPECTION OF HARNESS CONNECTOR ...... 9
Check for Improper Engagement of
Terminal .......................................................... 9
Continuity and Voltage Test for Connector .... 9
Engaging and Disengaging of Connector
Terminal ..........................................................
9
LIGHTING SYSTEM ........................................... 143
Column Switch
................................ .
.............. .I59
Dimmer Control Switch
................................. .I62
Hazard Warning Switch
................................. .I61
Headlight ........................................................ ,158
Service Adjustment Procedures
.................... .I57
Headlight Aiming .......................................
157
METERS AND GAUGES .................................... 123
Service Adjustment Procedures
.................... .I30
Fuel Gauge Simple Test ................................. .I31
Fuel Gauge Unit Inspection ........................... .I31
Oil Pressure Gauge Simple Test
.................... .I32
Oil Pressure Gauge Unit Simple Test
............ ,132
Speedometer Inspection
............................... .I30
Tachometer Inspection .................................. ,130
Voltage Meter Simple Test
............................ .I33
Water Temperature Gauge Simple Test
....... ..I3 1
Water Temperature Gauge Unit Inspection
. ..I3 2
STARTING SYSTEM .......................................... 91
Starter Motor ............ ....................................... 97
WIPER AND WASHER SYSTEM
....................... .163
WIRING HARNESS ............................................ 13
Centralized Junction ....................................... 69
Circuit Diagram ............................................... 34
Configuration Diagram .................................... 27
How to Read Wiring Diagrams ....................... 20
Troubleshooting .............................................. 13
Page 51 of 284
WIRING HARNESS - Interior and Frame 8-31
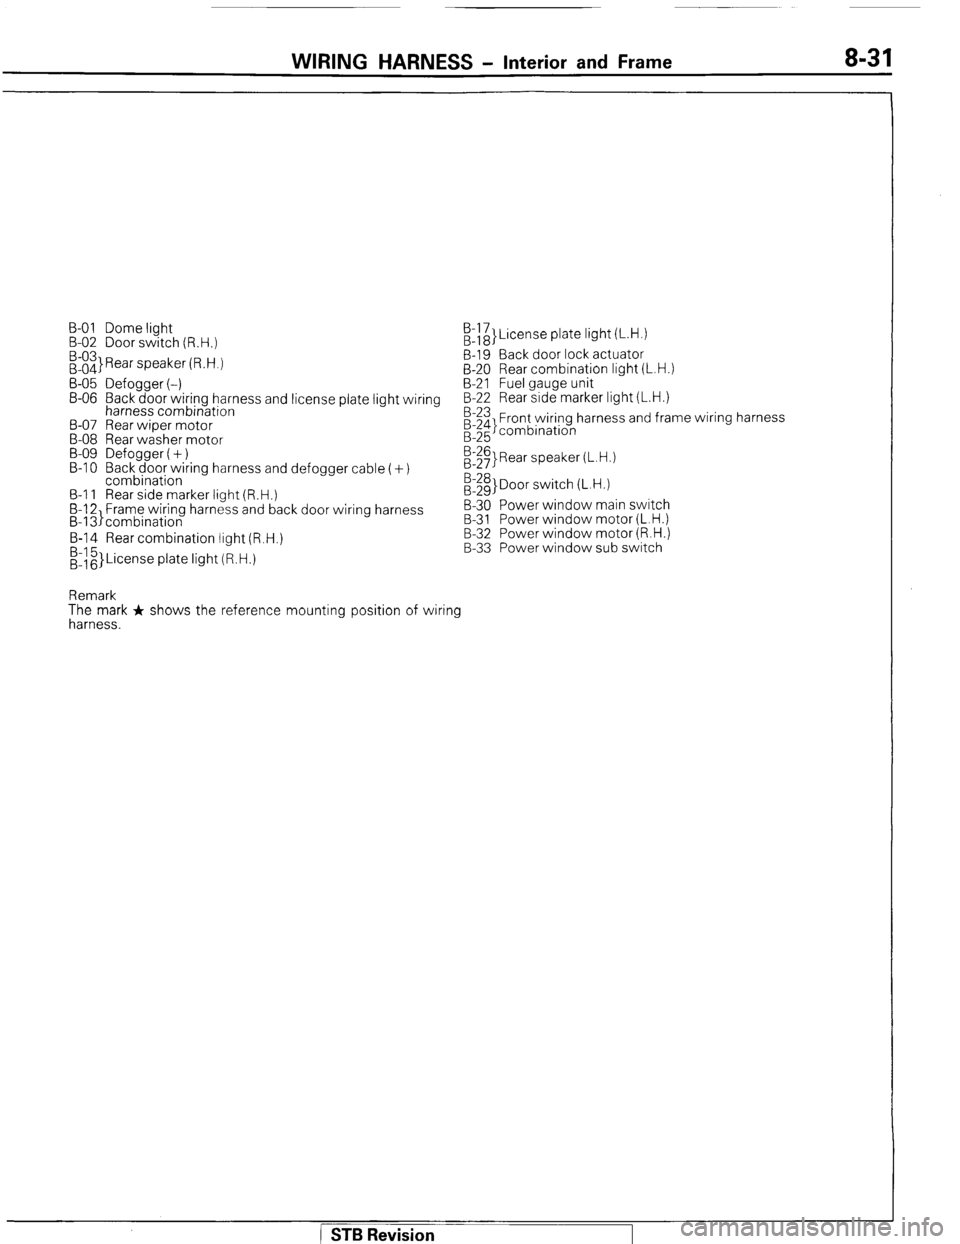
B-01 Dome light
B-02 Door switch (R.H.)
:::3 Rear speaker (R.H.) /&}License plate light (L.H.)
B-19 Back door lock actuator
B-20 Rear combination light (L.H.)
B-05 Defogger (-) B-21 Fuel gauge unit
B-06 Back door wiring harness and license plate light wiring B-22 Rear side marker light (L.H.)
harness combination
B-07 Rear wiper motor
B-08 Rear washer motor
B-09 Defogger (+)
B-l 0 Back door wiring harness and defogger cable (+)
combination
B-l 1 Rear side marker light (R.H.)
B-12 Frame wiring harness and back door wiring harness
B-13)combination B-23 Front wiring harness and frame wiring harness
;:g combination
E$ Rear speaker (L.H.)
:::g> Door switch (L.H.)
B-30 Power window main switch
B-31 Power window motor (L.H.)
B-14 Rear combination light (R.H.)
&z}License plate light (R.H.) B-32 Power window motor (R.H.)
B-33 Power window sub switch
Remark
The mark + shows the reference mounting position of wiring
harness.
STB Revision
Page 52 of 284
8-32 WIRING HARNESS - Instrument Panel
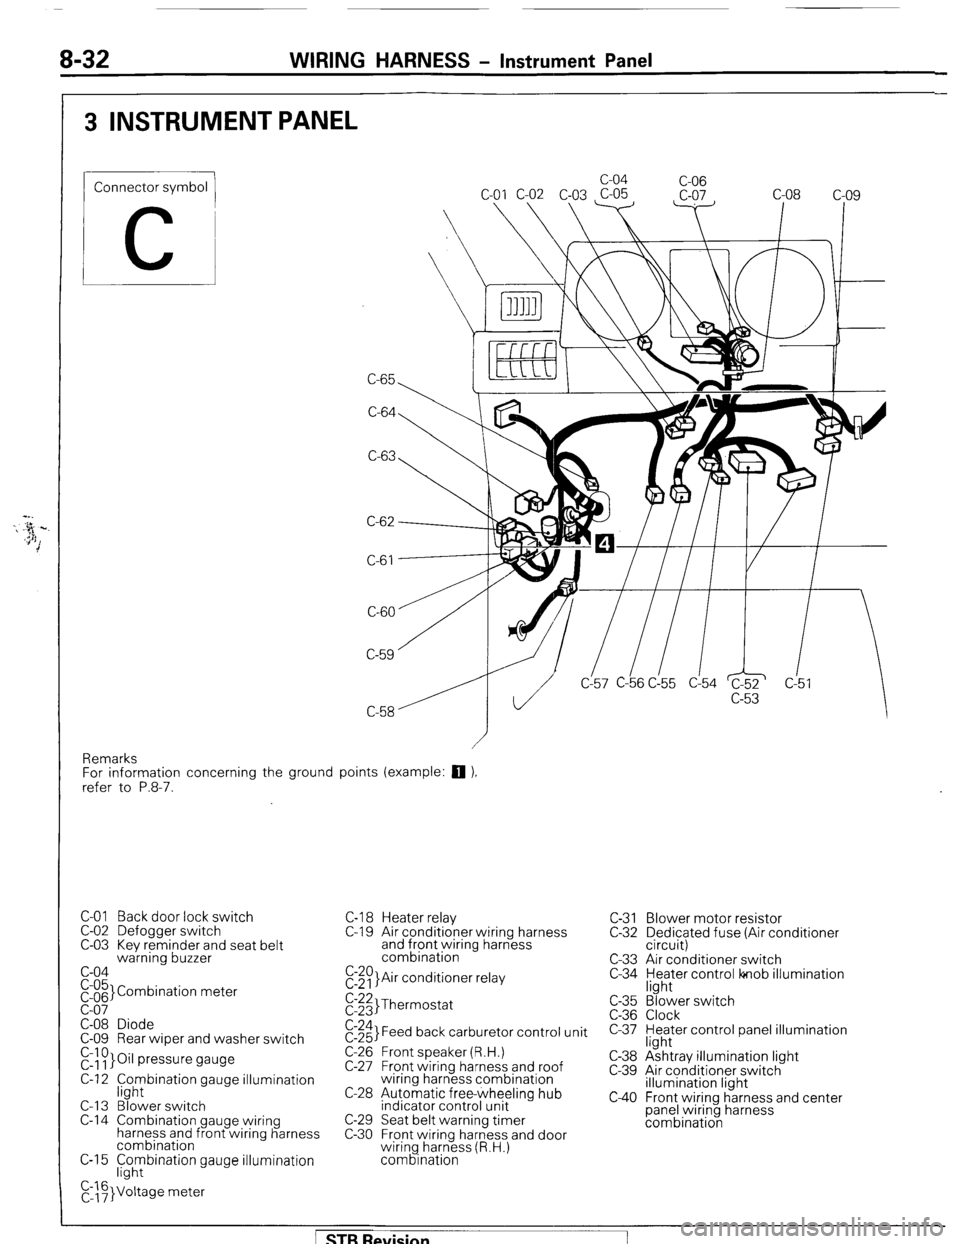
3 INSTRUMENT PANEL
Connector symbol
C
C-65 c-04
C-06
C-64
C-63
C-61
CL57 C-b6 C!55 d54 c!5
Remarks
For information concerning the ground points (example:
q ),
refer to P.8-7.
C-01 Back door lock switch
C-02 Defogger switch
C-03 Kev reminder and seat belt
warning buzzer
c-04
pi;’ Combination meter
C-08 Diode
C-09 Rear wiper and washer switch
r&~}Oil pressure gauge
C-12 f;hybination gauge illumination
C-l 3 Blower switch
C-14 Combination gauge wiring
harness and front wiring harness
combination
C-15 F;hybination gauge illumination
C,::F}Voltage meter C-l 8 Heater relay
C-l 9 Air conditioner wiring harness
and front wiring harness
combination
E:$)}Air conditioner relay C-31 Blower motor resistor
C-32 Dedicated fuse (Air conditioner
circuit)
C-33 Air conditioner switch
C-34 yl;Jer control lonob illumination
$:;;I Thermostat
$:;;I Feed back carburetor control unit
C-26 Front speaker (R.H.)
C-27 Front wiring harness and roof
wiring harness combination
C-28 Automatic free-wheeling hub
indicator control unit
C-29 Seat belt warning timer
C-30 Front wiring harness and door
wiring harness (R.H.)
combination c-35
C-36
c-37
C-38
c-39
c40
“3’ ‘. Blower switch
Clock
Heater control panel illumination
light
Ashtray illumination light
Air conditioner switch
illumination light
Front wiring harness and center
panel wiring harness
combination
[ STB Revision
Page 83 of 284
WIRING HARNESS - Defogger Circuit 8-63
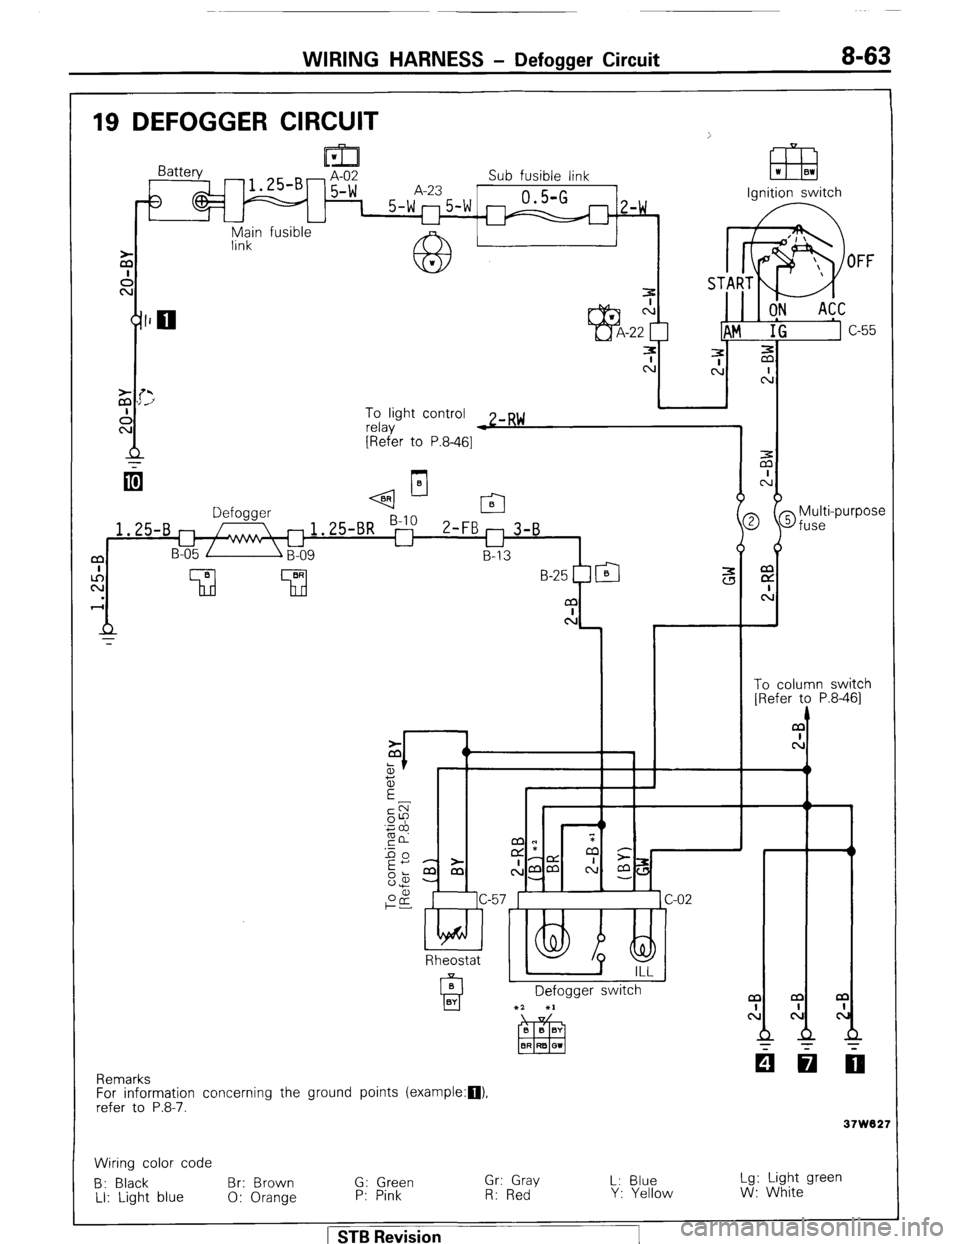
19 DEFOGGER CIRCUIT
Sub fusible link
A-23
0.5-G
5-wn5-w I
U z-w ,
ynlin fusible
1
z
I
l%
7
(#IO N
-22
EEH I ml
Ignition switch
A
To light control
u
relay ~-RN
w
[Refer to P.8-461
+!I0 pFJ 0 Defogger
1.25-B m / 1.25-BR
Bg 2-FB m 3-B
B-05 / L-l U m B-13
I
Ki B
Q BR
Q
.
4
37W62’ ?
Wiring color code
B: Black
LI: Light blue Br: Brown G: Green Gr: Gray
L: Blue Lg: Light green
0: Orange P: Pink R: Red Y: Yellow W: White 1 STB Revision
LY!ii!T Rheostat
Detogger switch
x7. *I
z
A
i
Multi-purpose
D @fuse m
of
A
To column switch
[Refer to P.8-461
Remarks
For information concerning the ground points (example:a),
refer to P.8-7.
Page 90 of 284
WIRING HARNESS - Centralized Junction
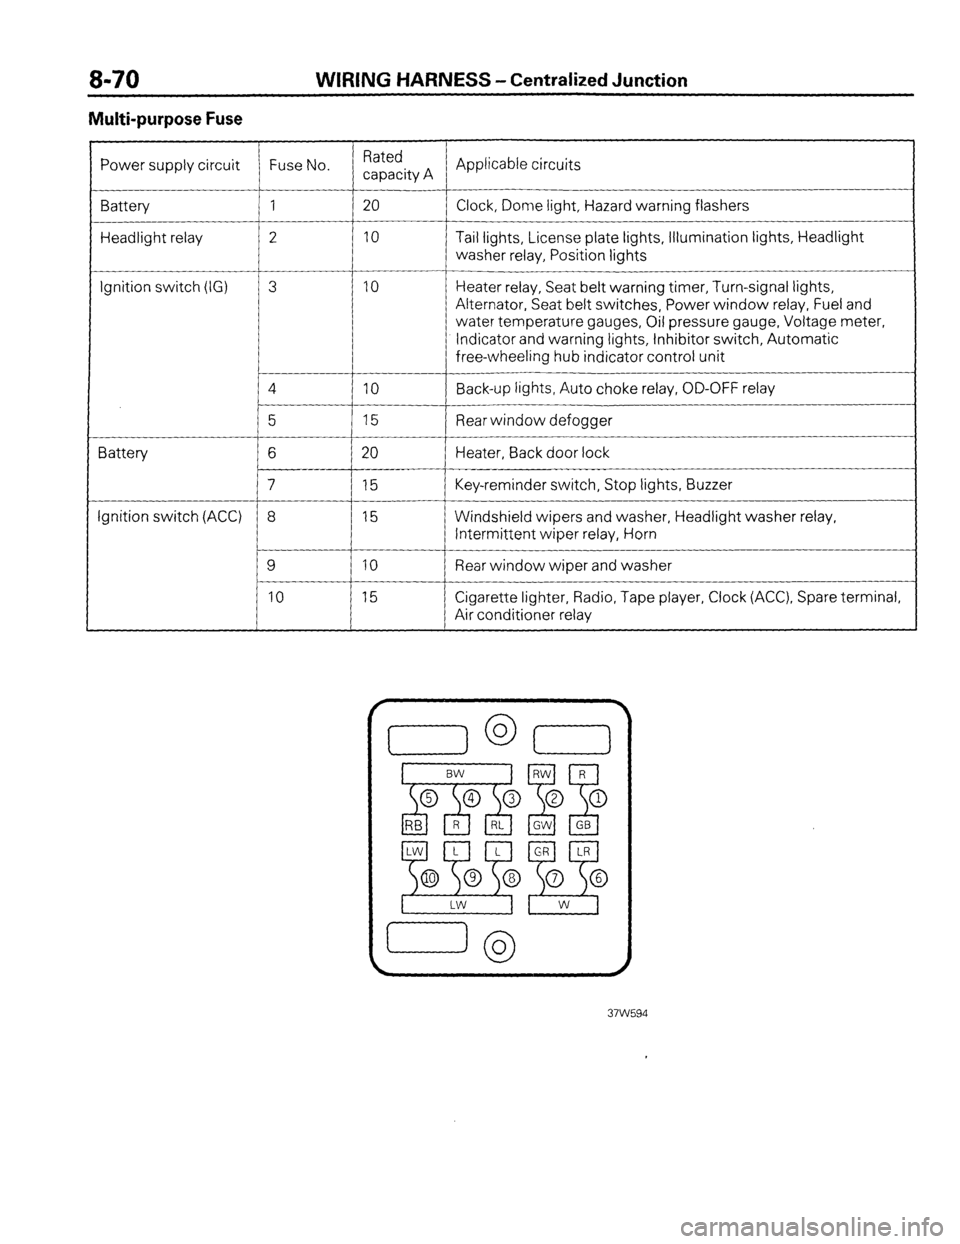
Multi-purpose Fuse
Power supply circuit Fuse No. Rated
capacity A Applicable circuits
Battery 1 20
Clock, Dome light, Hazard warning flashers
Headlight relay 2 10 Tail lights, License plate lights, Illumination lights, Headlight
washer relay, Position lights
__-
Ignition switch (IG) 3 10 Heater relay, Seat belt warning timer, Turn-signal lights,
Alternator, Seat belt switches, Power window relay, Fuel and
water temperature gauges, Oil pressure gauge, Voltage meter,
Indicator and warning lights, Inhibitor switch, Automatic
free-wheeling hub indicator control unit
4
IO Back-up lights, Auto choke relay, OD-OFF relay
__-
5 15 Rear window defogger
Battery 6 20 Heater, Back door lock
7 15 Key-reminder switch, Stop lights, Buzzer
Ignition switch (ACC) 8 15 Windshield wipers and washer, Headlight washer relay,
Intermittent wiper relay, Horn
9 10 Rear window wiper and washer
10 15 Cigarette lighter, Radio, Tape player, Clock (ACC), Spare terminal,
Air conditioner relay
Page 225 of 284
BACK DOOR WINDOW DEFOGGER - Circuit Diagram 8-205
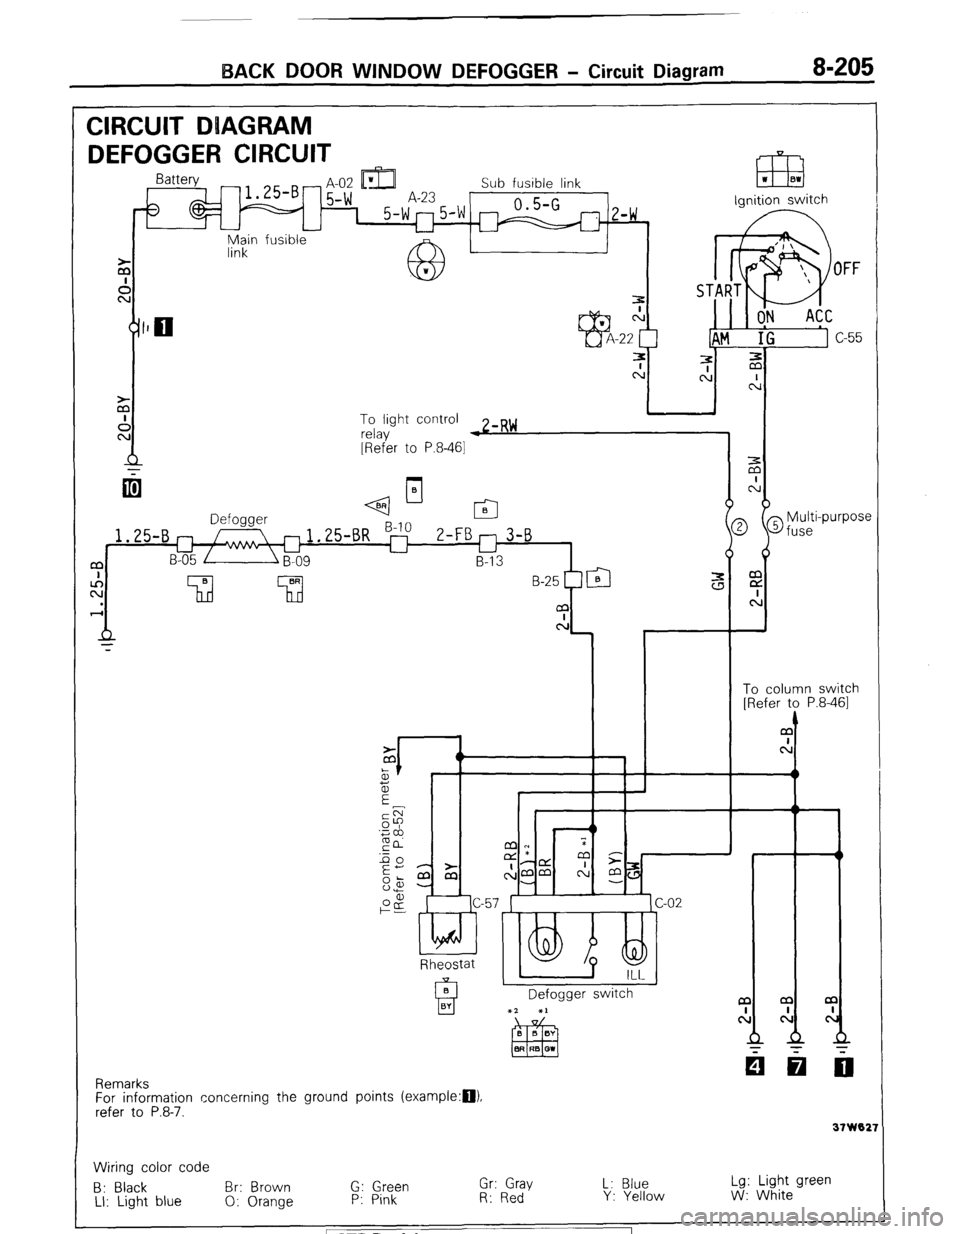
CIRCUIT DUAGRAM
DEFOGGER CIRCUIT -t IDI L
m
- H-UL Ll&J Sub fusible link
5-w A-23 0.5-G 1 5-w"5'w m
z-w ,
u
fusible ignition switch
Main
link
To light control
relay w zmR~
[Refer to P.8-461
q--l-
2 @fuse
i
Multi-purpose m
E
c:
t
To column switch
[Refer to P.8-461
1.25-B
a
c!
Rheostat
Defogger switch a
cl
31 W02:
Remarks
For information concerning the ground points (example:D).
refer to P.8-7.
Wiring color code
B: Black Br: Brown G: Green Gr: Gray L: Blue Lg: Light green
LI: Light blue 0: Orange P: Pink R: Red Y: Yellow W: White STB Revision
Page 226 of 284
DEFOGGER SWITCH
1
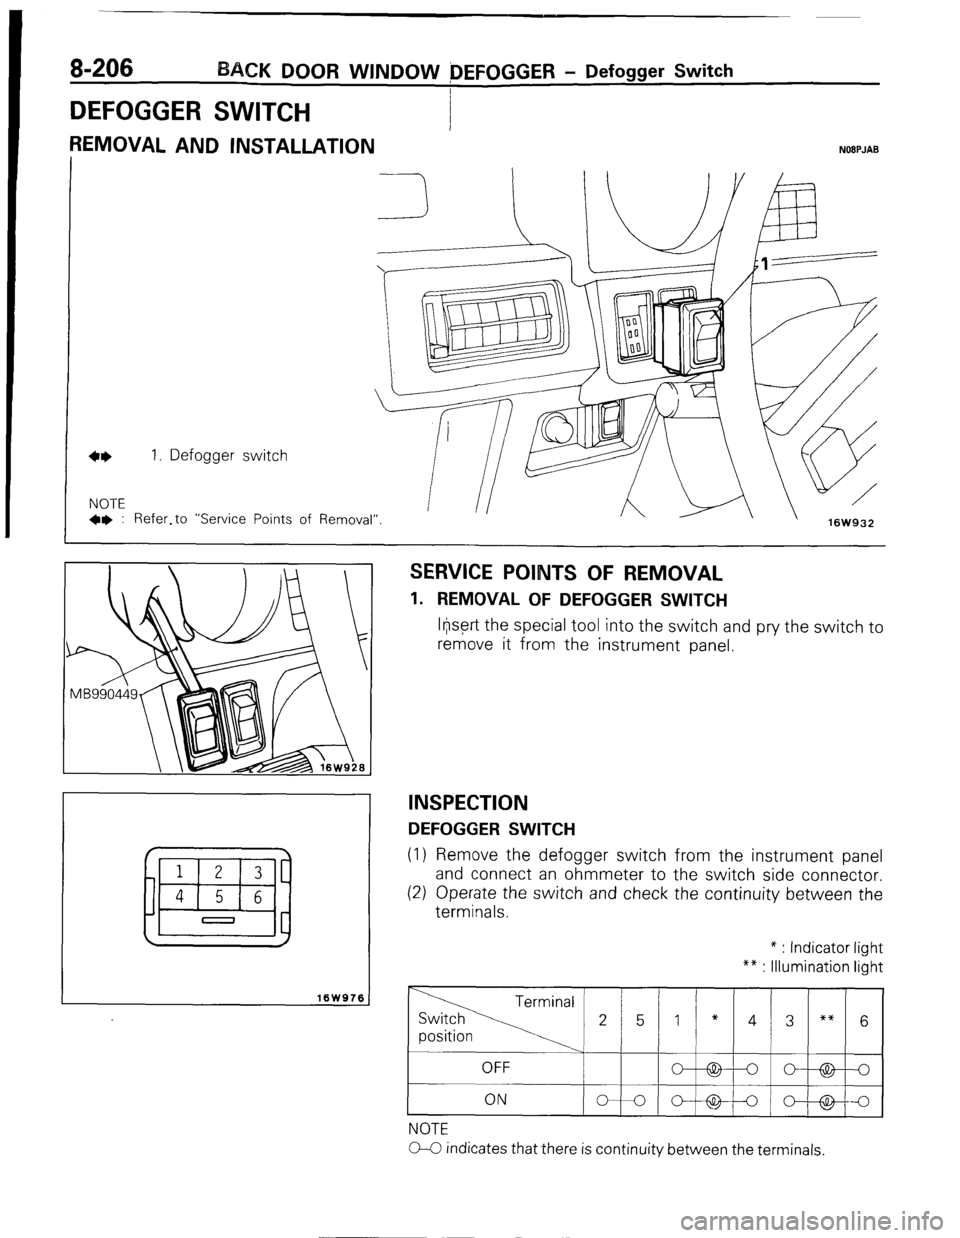
REMOVAL AND INSTALLATION
8-206 BACK DOOR WINDOW OEFOGGER - Defogger Switch
I
NOEPJAB
1. Defogger switch
NOTE
+* : Refer.to “Service Points . ^
I_ A w
ot Kernoval” 16W932
I
16W976 J
SERVICE POINTS OF REMOVAL
1. REMOVAL OF DEFOGGER SWITCH
lr@rt the special tool into the switch and pry the switch to
remove it from the instrument panel.
INSPECTION
DEFOGGER SWITCH
(1) Remove the defogger switch from the instrument panel
and connect an ohmmeter to the switch side connector.
(2) Operate the switch and check the continuity between the
terminals. * : Indicator light
** : Illumination light
NOTE
0-C indicates that there is continuity between the terminals.
1 STB Revision
~-E
Page 227 of 284
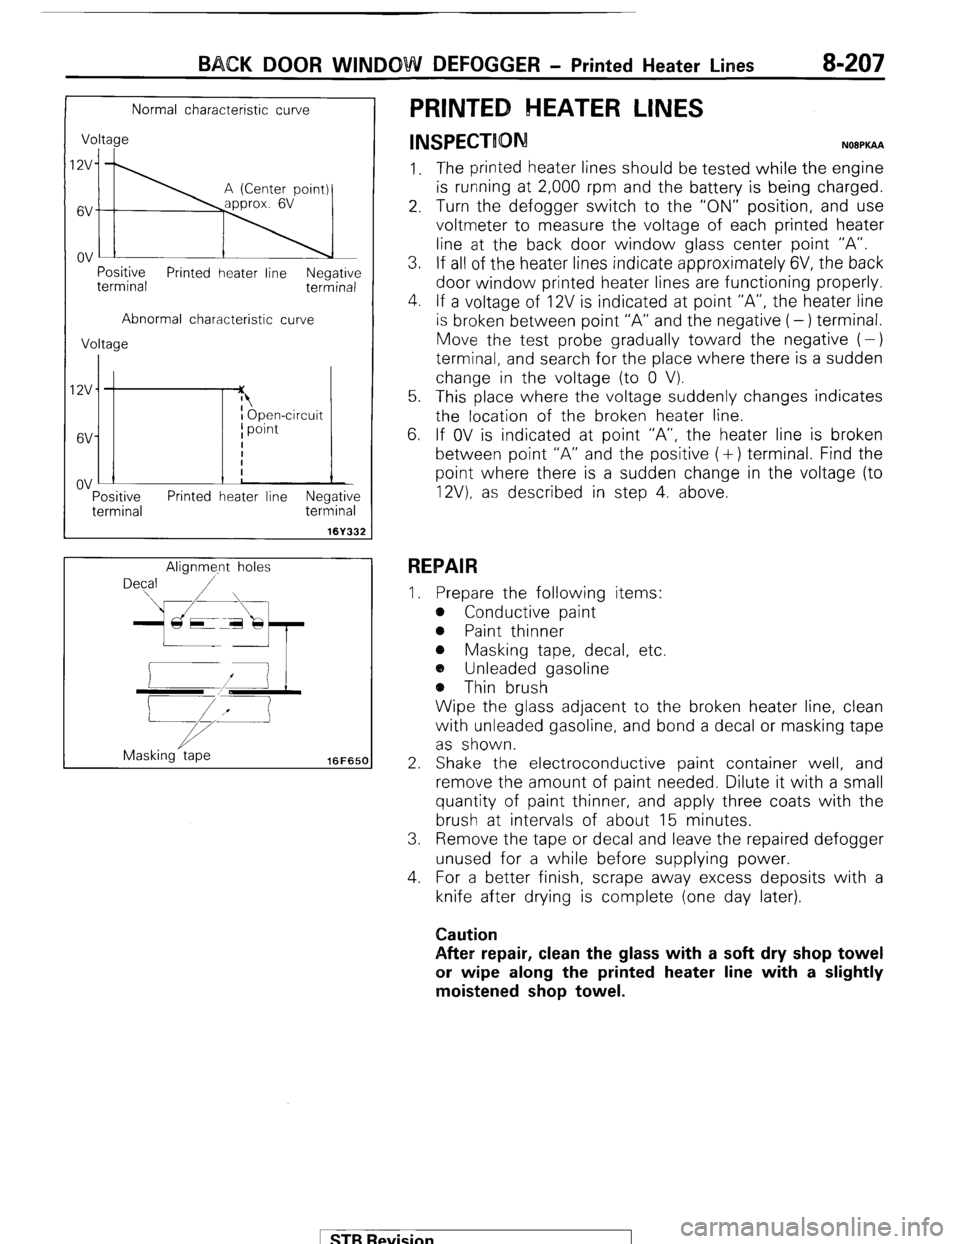
BACK DOOR WINDOW DEFOGGER - Printed Heater Lines B-207
Normal characteristic curve
Voltage
I;\
Positive
terminal Printed heater line Negative
terminal
Abnormal characteristic curve
Voltage
IZV
6V
ov :-
Tf I Open-circuit
I point
I
i
!
Positive Printed heater line Negative
terminal terminal
161332
Alignme.nt holes
Masking tape
16FfiSCl
PRINTED HEATER LINES
INSPECTION N08PKAA
1. The printed heater lines should be tested while the engine
is running at 2,000 rpm and the battery is being charged.
2. Turn the defogger switch to the “ON” position, and use
voltmeter to measure the voltage of each printed heater
line at the back door window glass center point “A”.
3. If all of the heater lines indicate approximately 6V, the back
door window printed heater lines are functioning properly.
4. If a voltage of 12V is indicated at point “A”, the heater line
is broken between point “A” and the negative (-) terminal.
Move the test probe gradually toward the negative (-)
terminal, and search for the place where there is a sudden
change in the voltage (to 0 V).
5. This place where the voltage suddenly changes indicates
the location of the broken heater line.
6. If OV is indicated at point “A”, the heater line is broken
between point “A” and the positive (+) terminal. Find the
point where there is a sudden change in the voltage (to
12V). as described in step 4. above.
REPAIR
I. Prepare the following items:
e Conductive paint
@ Paint thinner
e Masking tape, decal, etc.
a, Unleaded gasoline
@ Thin brush
Wipe the glass adjacent to the broken heater line, clean
with unleaded gasoline, and bond a decal or masking tape
as shown.
2. Shake the electroconductive paint container well, and
remove the amount of paint needed. Dilute it with a small
quantity of paint thinner, and apply three coats with the
brush at intervals of about 15 minutes.
3. Remove the tape or decal and leave the repaired defogger
unused for a while before supplying power.
4. For a better finish, scrape away excess deposits with a
knife after drying is complete (one day later).
Caution
After repair, clean the glass with a soft dry shop towel
or wipe along the printed heater line with a slightly
moistened shop towel.
1 STB Revision