clock MITSUBISHI MONTERO 1998 Owner's Manual
[x] Cancel search | Manufacturer: MITSUBISHI, Model Year: 1998, Model line: MONTERO, Model: MITSUBISHI MONTERO 1998Pages: 1501, PDF Size: 25.81 MB
Page 319 of 1501

CRUISE CONTROL INDICATOR TEST under COMPONENT TESTS. If cruise control
indicator is defective, replace indicator. If indicator checks okay,
go to next step.
2) If cruise control indicator illuminates when cruise
control connector C-50 terminal No. 23 is grounded at harness side,
replace cruise control ECU. If indicator does not illuminate, check
combination meter connector C-12 and cruise control ECU connector C-
50. Repair as necessary. If connectors are okay and malfunction
remains, check harness between combination meter and cruise control
ECU. Repair as necessary.
Test No. 13
1) Perform stoplight switch test. See
BRAKELIGHT/STOPLIGHT SWITCH TEST under COMPONENT TESTS. If switch is
okay, go to next step. If switch is defective, replace brakelight
switch.
2) Check cruise control ECU connector C-50, stoplight switch
connector C-55 and joint connector C-131. Repair as necessary. See
Figs. 13 , 14, 16 and 29. If connectors are okay and malfunction
remains, check harness between joint connector C-131 and cruise
control ECU.
Test No. 14 (A/T)
1) Perform park/neutral switch test. See
PARK/NEUTRAL SWITCH TEST under COMPONENT TESTS. If switch is okay, go
to next step. If switch is defective, replace switch.
2) Check starter relay. Replace if defective. If relay is
okay, check cruise control ECU connector C-50 and joint connector C-
130. Repair as necessary. See Figs. 13, 16 and 28. If connectors are
okay and malfunction remains, check harness between cruise control ECU
and power supply.
COMPONENT TESTS
ACTUATOR TEST
Remove actuator. Apply vacuum to actuator. Actuator linkage
holder should move more than 1.38" (35 mm). Actuator diaphragm should
hold vacuum. Replace actuator if actuator does not test as specified.
BRAKELIGHT/STOPLIGHT SWITCH TEST
Disconnect stoplight switch connector C-55. When brake pedal
is pressed, continuity should be present between terminals No. 2 and
3. See Fig. 14. When brake pedal is released, continuity should be
present between terminals No. 1 and 4. Replace switch if it does not
test as specified.
CLOCKSPRING TEST
WARNING: Deactivate air bag system before performing any service
operation. See AIR BAG RESTRAINT SYSTEMS article. Do not
apply electrical power to any component on steering column
without first deactivating air bag system. Air bag may
deploy.
If clockspring fails any check, replace with a NEW
clockspring.
1) Check connectors and protective tube for damage and
deformities.
2) Visually check case for damage or deformities.
Page 320 of 1501

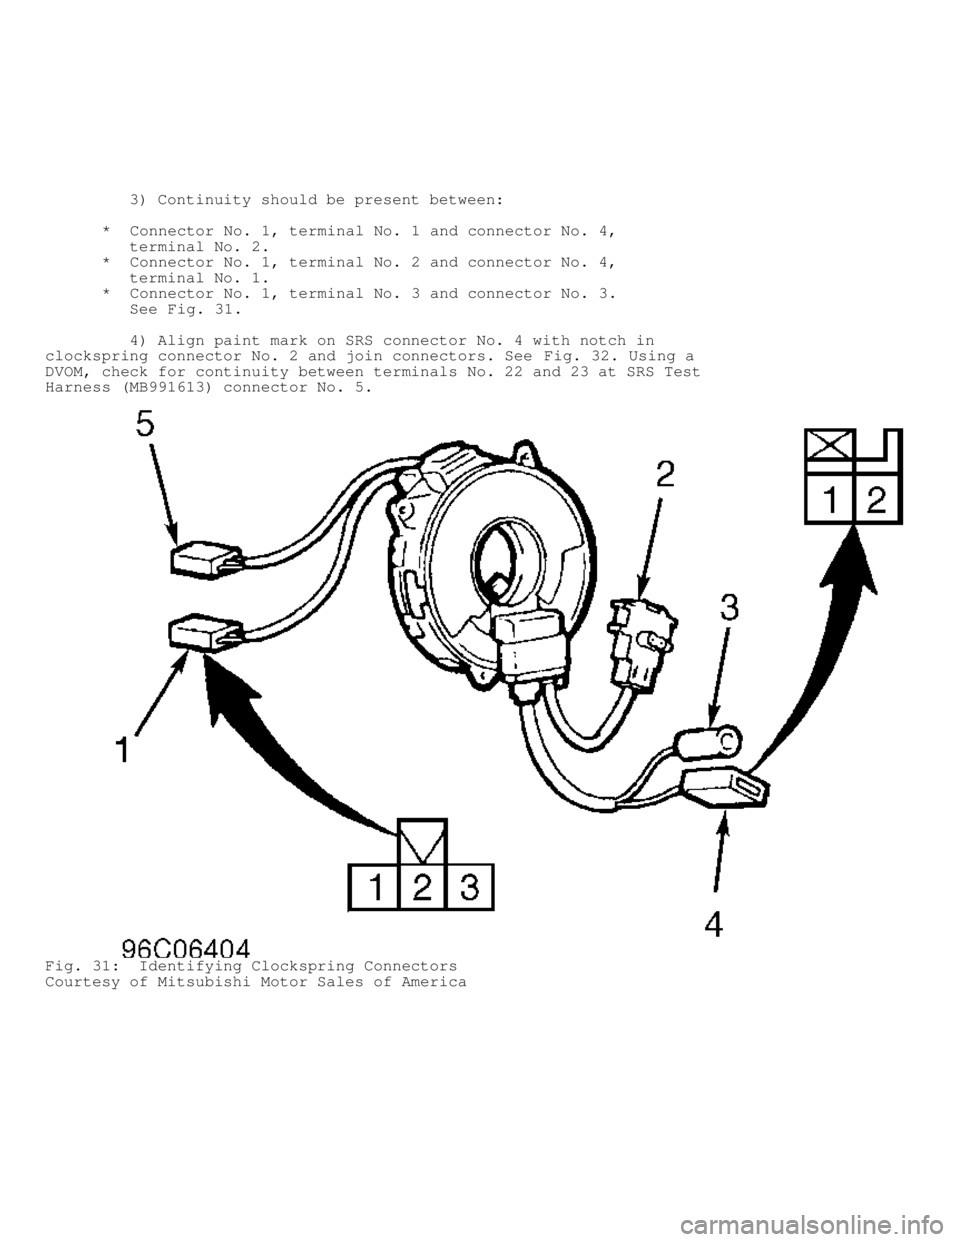
3) Continuity should be present between:
* Connector No. 1, terminal No. 1 and connector No. 4,
terminal No. 2.
* Connector No. 1, terminal No. 2 and connector No. 4,
terminal No. 1.
* Connector No. 1, terminal No. 3 and connector No. 3.
See Fig. 31.
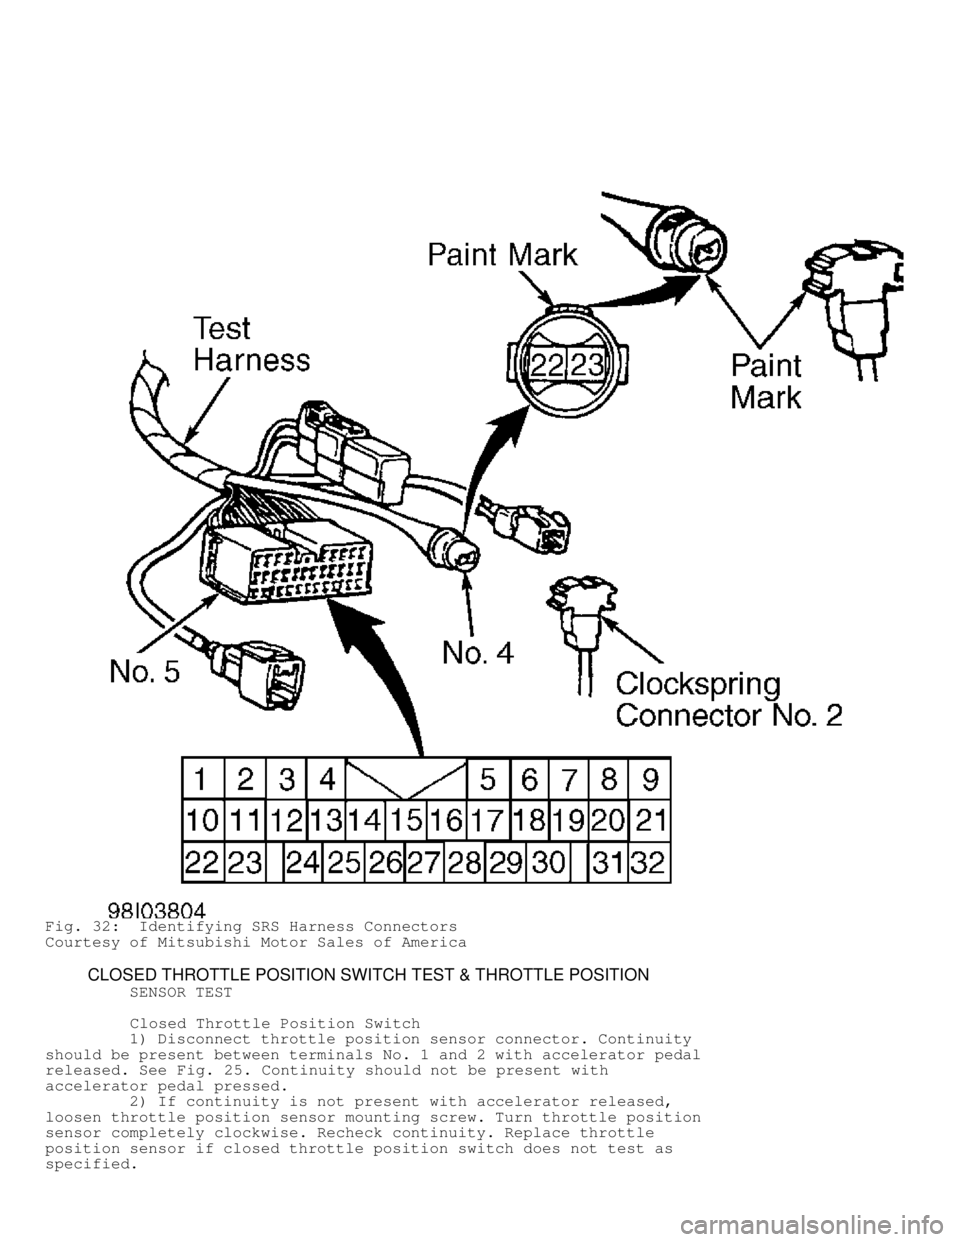
4) Align paint mark on SRS connector No. 4 with notch in
clockspring connector No. 2 and join connectors. See Fig. 32. Using a
DVOM, check for continuity between terminals No. 22 and 23 at SRS Test
Harness (MB991613) connector No. 5.
Fig. 31: Identifying Clockspring Connectors
Courtesy of Mitsubishi Motor Sales of America
Page 321 of 1501

Fig. 32: Identifying SRS Harness Connectors
Courtesy of Mitsubishi Motor Sales of America
CLOSED THROTTLE POSITION SWITCH TEST & THROTTLE POSITION
SENSOR TEST
Closed Throttle Position Switch
1) Disconnect throttle position sensor connector. Continuity
should be present between terminals No. 1 and 2 with accelerator pedal
released. See Fig. 25. Continuity should not be present with
accelerator pedal pressed.
2) If continuity is not present with accelerator released,
loosen throttle position sensor mounting screw. Turn throttle position
sensor completely clockwise. Recheck continuity. Replace throttle
position sensor if closed throttle position switch does not test as
specified.
Page 339 of 1501

manufacturer's original setting has been changed.
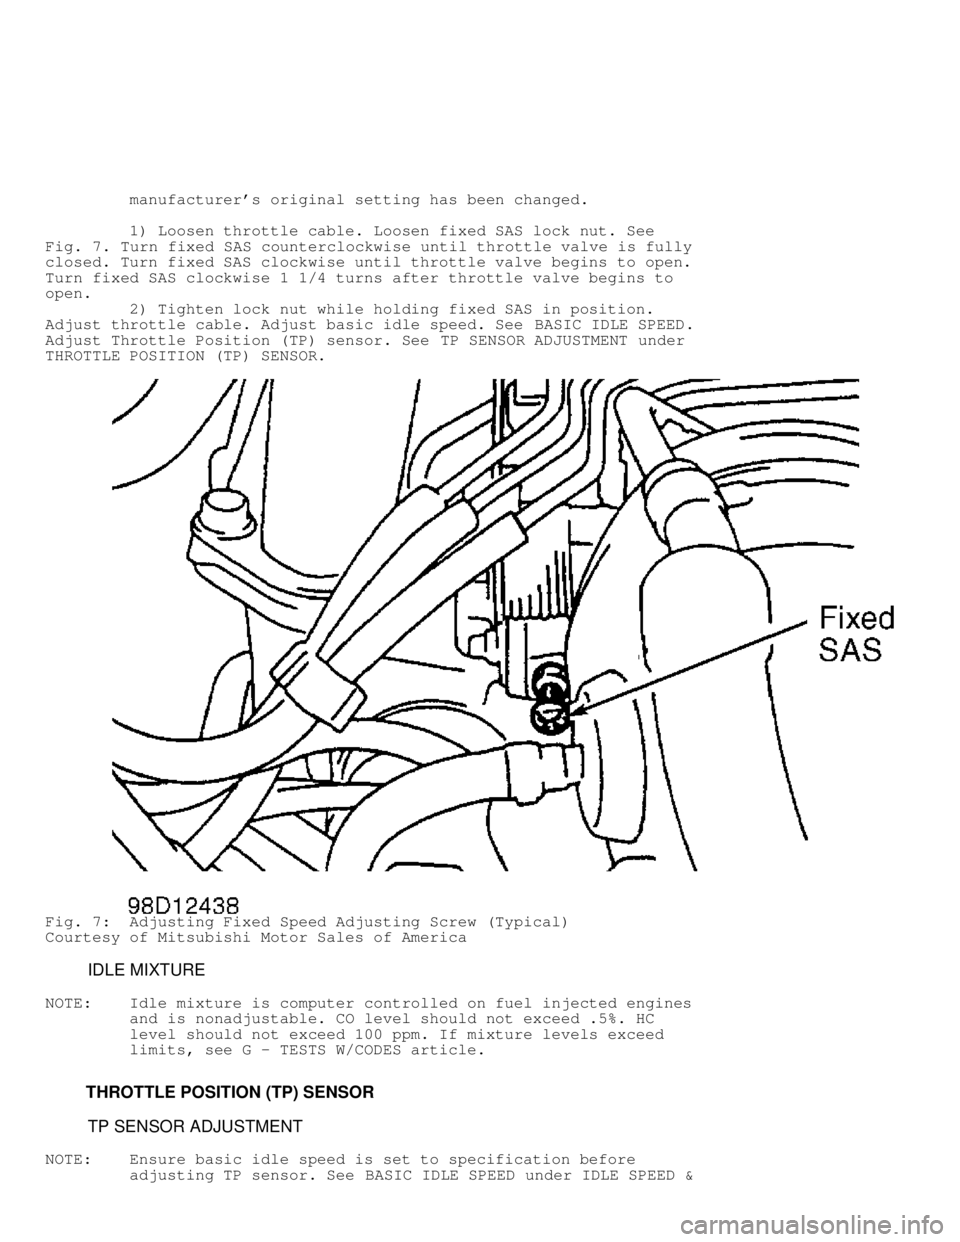
1) Loosen throttle cable. Loosen fixed SAS lock nut. See
Fig. 7. Turn fixed SAS counterclockwise until throttle valve is fully
closed. Turn fixed SAS clockwise until throttle valve begins to open.
Turn fixed SAS clockwise 1 1/4 turns after throttle valve begins to
open.
2) Tighten lock nut while holding fixed SAS in position.
Adjust throttle cable. Adjust basic idle speed. See BASIC IDLE SPEED.
Adjust Throttle Position (TP) sensor. See TP SENSOR ADJUSTMENT under
THROTTLE POSITION (TP) SENSOR.
Fig. 7: Adjusting Fixed Speed Adjusting Screw (Typical)
Courtesy of Mitsubishi Motor Sales of America
IDLE MIXTURE
NOTE: Idle mixture is computer controlled on fuel injected engines
and is nonadjustable. CO level should not exceed .5%. HC
level should not exceed 100 ppm. If mixture levels exceed
limits, see G - TESTS W/CODES article.
THROTTLE POSITION (TP) SENSOR
TP SENSOR ADJUSTMENT
NOTE: Ensure basic idle speed is set to specification before
adjusting TP sensor. See BASIC IDLE SPEED under IDLE SPEED &
Page 340 of 1501

MIXTURE. Perform all adjustments with engine at normal
operating temperature, front wheels in straight-ahead
position, cooling fan and all accessories off, and
transmission in Park or Neutral.
Eclipse 2.0L Non-Turbo
1) TP sensor is not adjustable. Disconnect TP sensor
connector. Using external ohmmeter, measure resistance between TP
sensor terminals No. 1 and 3. See Fig. 8. If resistance is not 3500-
6500 ohms, replace TP sensor.
2) While slowly rotating throttle valve from idle to full
open, measure resistance between TP sensor terminals No. 2 and 3. If
resistance does not change smoothly in proportion to throttle opening,
replace TP sensor.
Montero
1) Disconnect TP sensor connector. Using jumper wires,
connect an external ohmmeter between TP sensor terminals No. 1 and 2.
See Fig. 9 . Insert .025" (.65 mm) feeler gauge between fixed speed
adjusting screw and throttle lever.
2) Loosen TP sensor mounting screws and rotate TP sensor
fully clockwise. Ensure there is continuity between terminals No. 1
and 2. Rotate TP sensor counterclockwise until there is no continuity,
and tighten screws. Install Test Harness (MB991348) between TP sensor
and harness connector.
3) Turn ignition on. Using external voltmeter, measure TP
sensor output voltage between terminals No. 1 and 3. If voltage is not
.4-1.0 volt, check harness and sensor. See DTC P0120 in G - TESTS
W/CODES article.
All Other Models
1) Disconnect TP sensor connector. Using jumper wires,
connect an external ohmmeter between TP sensor terminals No. 1 and 2
on Diamante or No. 3 and 4 on all other models. See Fig. 9. On
Diamante and Mirage 1.8L with cruise control, insert .055" (1.40mm)
feeler gauge between fixed speed adjusting screw and throttle lever.
On Galant, insert .025" (.65 mm) feeler gauge between fixed speed
adjusting screw and throttle lever. On all other models, insert .018"
(.45 mm) feeler gauge between fixed speed adjusting screw and throttle\
lever.
2) Loosen TP sensor mounting screws and rotate TP sensor
fully counterclockwise. Ensure there is continuity between terminals
No. 1 and 2 on Diamante, or No. 3 and 4 on all other models. Rotate TP
sensor clockwise until there is no continuity and tighten screws.
Install Test Harness (MB991348) between TP sensor and harness
connector.
3) Turn ignition on. Using external voltmeter, measure TP
sensor output voltage between terminals No. 1 and 3 on Diamante, or
No. 2 and 4 on all other models. If voltage is not .4-1.0 volt, check
harness and sensor. See DTC P0120 in G - TESTS W/CODES article.
Fig. 8: TP Sensor Connector Terminals (Eclipse 2.0L Non-Turbo)
Courtesy of Mitsubishi Motor Sales of America
Page 370 of 1501

TESTING & INSPECTION
AXLE SHAFT END PLAY
Montero & Montero Sport
Using dial indicator, check axle shaft end play. End play
should be .010" (.25 mm). If end play is not within specification,
replace axle bearing. See AXLE SHAFT OVERHAUL under OVERHAUL.
AXLE TOTAL BACKLASH
1) Raise and support rear axle. Place transmission in
Neutral. Apply parking brake. Rotate drive shaft clockwise. Place
reference marks on pinion dust cover and differential housing.
2) Rotate drive shaft counterclockwise, and measure distance
between reference marks. Differential must be removed and backlash
adjusted if distance exceeds 0.2" (5 mm). See RING GEAR BACK-LASH
procedure under DIFFERENTIAL ASSEMBLY (LIMITED SLIP) under OVERHAUL.
LIMITED SLIP DIFFERENTIAL PRELOAD
1) Place transmission in Neutral. Block front wheels. Raise
one rear wheel off ground and remove wheel. Release parking brake.
2) Using torque wrench and axle puller adapter, measure
starting torque while rotating wheel in forward direction. See Fig. 1.
Differential must be repaired if torque is less than 18 ft. lbs. (25
N.m).
Fig. 1: Testing Limited Slip Differential Preload
Courtesy of Mitsubishi Motor Sales of America.
LOCKING DIFFERENTIAL (MONTERO)
Air Pump
Page 802 of 1501

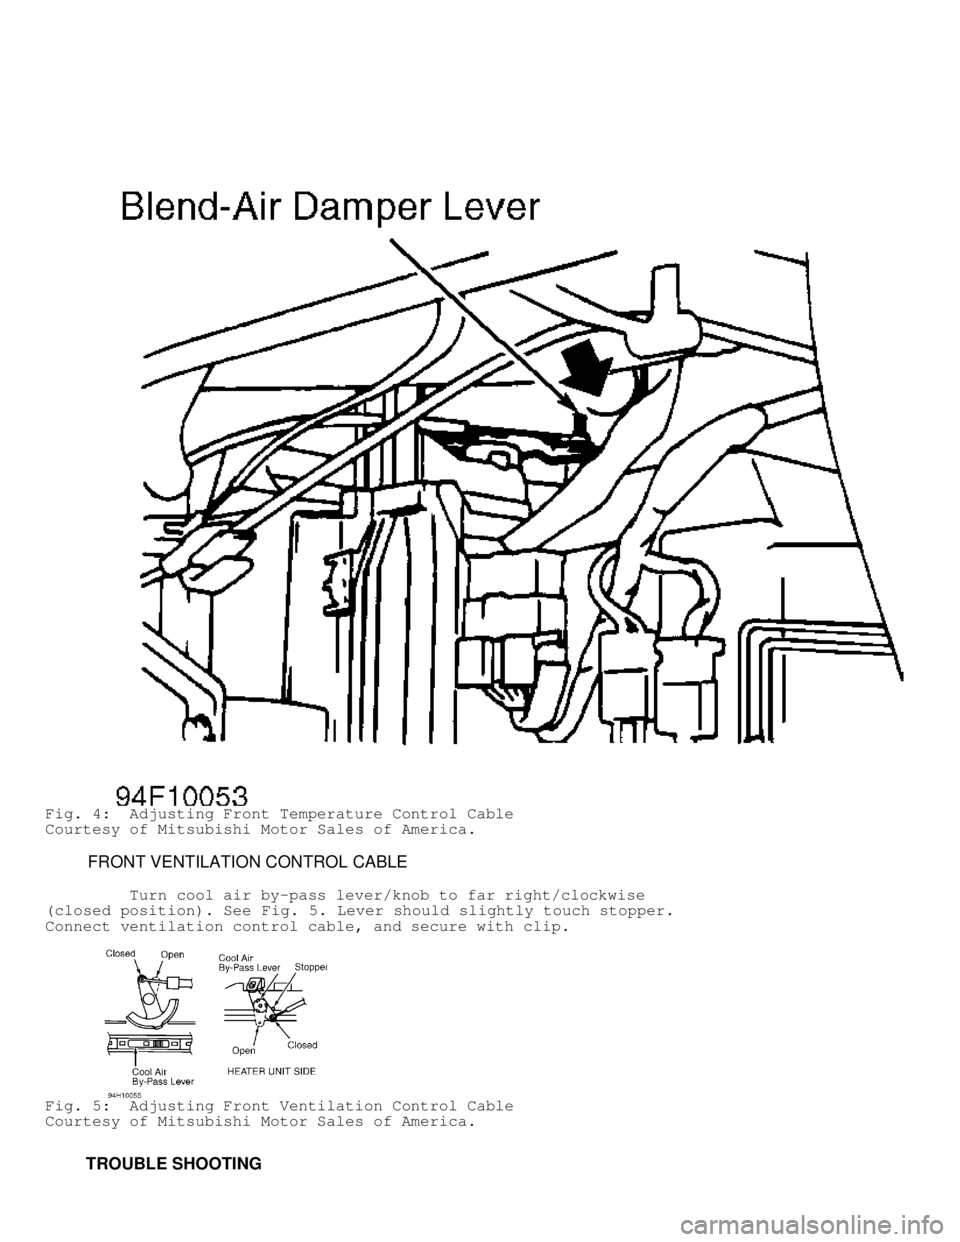
Fig. 4: Adjusting Front Temperature Control Cable
Courtesy of Mitsubishi Motor Sales of America.
FRONT VENTILATION CONTROL CABLE
Turn cool air by-pass lever/knob to far right/clockwise
(closed position). See Fig. 5. Lever should slightly touch stopper.
Connect ventilation control cable, and secure with clip.
Fig. 5: Adjusting Front Ventilation Control Cable
Courtesy of Mitsubishi Motor Sales of America.
TROUBLE SHOOTING
Page 806 of 1501

* PLEASE READ THIS FIRST *
WARNING: To avoid injury from accidental air bag deployment, read and
carefully follow all SERVICE PRECAUTIONS and DISABLING &
ACTIVATING AIR BAG SYSTEM procedures in AIR BAG RESTRAINT
SYSTEM article.
CAUTION: When removing or installing floor console, DO NOT allow any
impact or shock to Supplemental Restraint System Electronic
Control Unit (SRS-ECU).
FRONT HEATER UNIT & HEATER CORE
Removal
1) Deactivate air bag system. See AIR BAG RESTRAINT SYSTEM
article. Remove front and rear floor consoles. Remove hood release
handle. Remove fuel door release handle. Remove knee protector and
support brackets. Remove speaker covers.
NOTE: On A/T models, when removing front floor console, set A/T
selector lever in "L" position.
2) Remove glove box door stop, glove box and glove box frame.
Remove passenger-side air bag module. Remove heater control panel
cover. Remove heater control panel and radio. Remove plug from
instrument cluster cover. Remove instrument cluster cover and
instrument cluster.
3) Remove steering column cover. Remove clock or plug. Remove
side defroster covers. Remove side mirror control switch. Remove front
speakers.
4) Remove rheostat, rear wiper/washer switch, and door lock
switch. Disconnect ventilation control cable and harness connector.
See Fig. 9. Remove instrument panel. See INSTRUMENT PANEL. Drain
coolant and disconnect heater hoses from heater unit.
5) Remove shower ducts, lap duct, joint duct and center duct.
See Fig. 1 . Remove center reinforcement. Remove heater unit. Remove
distribution duct. Remove heater core.
Installation
Install heater core, distribution duct, heater unit and
center reinforcement. Install remaining ducts in reverse order of
removal. Install instrument panel. Tighten steering column bolts to 16
ft. lbs. (22 N.m). Install and adjust ventilation control cable. See
ADJUSTMENTS . To complete installation, reverse removal procedure. Add
coolant and check for leaks.
INSTRUMENT PANEL
Removal & Installation
Remove instrument panel components and then instrument panel,
in order listed on appropriate illustration. See Fig. 9. To install,
reverse removal procedures.
Page 813 of 1501

Brake On/Off (BOO) Switch ................... Cruise Control Systems\
Engine Performance
Shift Interlock Systems
Buzzer Module ...................................... Warning Systems
Camshaft Position (CMP) Sensor .................. Engine Performance\
Central Control Module ........................... Anti-Theft System
Clockspring ............................... Air Bag Restraint System
Cruise Control Systems
Steering Column Switches
Clutch Pedal Position Switch .............................. Starters
Clutch Start Switch ....................................... Starters
Combination Meter ......................... Analog Instrument Panels
Constant Control Relay Module (CCRM) ............ Engine Performance\
Electric Cooling Fans
Convenience Center .............................. Power Distribution
Illumination/Interior Lights
Convertible Top Motor ........................ Power Convertible Top
Convertible Top Switch ....................... Power Convertible Top
Crankshaft Position (CKP) Sensor ................ Engine Performance\
Cruise Control Module ....................... Cruise Control Systems
Cruise Control Switch ....................... Cruise Control Systems
Condenser Fan Relay(s) ....................... Electric Cooling Fans\
Data Link Connector (DLC) ....................... Engine Performance\
Daytime Running Lights Module ............... Daytime Running Lights
Exterior Lights
Defogger Relay ................................ Rear Window Defogger
Diagnostic Energy Reserve Module (DERM) ... Air Bag Restraint System\
Discriminating Sensor (Air Bag) ........... Air Bag Restraint System\
Distributor ..................................... Engine Performance
Door Lock Actuators ............................... Power Door Locks
Remote Keyless Entry
Door Lock Relay(s) ................................ Power Door Locks\
Electrochromic Mirror ................................ Power Mirrors
Electronic Level Control (ELC)
Height Sensor .............................. Electronic Suspension
Electronic Level Control (ELC) Module ........ Electronic Suspension\
Engine Coolant Temperature (ECT)
Sending Unit ............................ Analog Instrument Panels
Engine Coolant Temperature (ECT) Sensor ......... Engine Performance\
Engine Control Module ........................... Engine Performance
Generators & Regulators
Starters
ETACS ECU .......................................... Warning Systems
Power Windows
Remote Keyless Entry
Evaporative (EVAP) Emissions Canister ........... Engine Performance\
EVAP Canister Purge Solenoid .................... Engine Performance
EVAP Canister Vent Solenoid ..................... Engine Performance
Exhaust Gas Recirculation (EGR) Valve ........... Engine Performance\
Fuel Tank Vacuum Sensor ......................... Engine Performance
Fog Lights ....................................... Headlight Systems
Daytime Running Lights
Fog Light Relay .................................. Headlight Systems
Daytime Running Lights
Fuel Door Release Solenoid ................. Power Fuel Door Release
Fuel Gauge Sending Unit ................... Analog Instrument Panels
Fuel Injectors .................................. Engine Performance
Fuel Pump ....................................... Engine Performance
Fuel Pump Relay ................................. Engine Performance
Power Distribution
Fuse/Relay Block ................................ Power Distribution
Fusible Links ................................... Power Distribution
Generators & Regulators
Page 815 of 1501

Parking Brake Switch ...................... Analog Instrument Panels
Park Lights ........................................ Exterior Lights
Park/Neutral Position Switch .............................. Starters
Engine Performance
Anti-Theft System
Body Control Module
Perimeter Lighting Control Relay ................... Exterior Lights
Power Amplifier ..................................... Power Antennas
Power Antenna Module ................................ Power Antennas
Power Antenna Motor ................................. Power Antennas
Power Distribution Center ....................... Power Distribution
Generators & Regulators
Starters
Power Door Lock Motors ............................ Power Door Locks
Power Mirror Motors .................................. Power Mirrors
Memory Systems
Power Sliding Door Controller .............. Power Sliding Side Door
Power Seat Motors ...................................... Power Seats
Memory Systems
Power Steering Pressure Switch .................. Engine Performance
Power Top Motor .............................. Power Convertible Top
Power Top Relay(s) ........................... Power Convertible Top\
Powertrain Control Module ....................... Engine Performance
Analog Instrument Panels
Cruise Control Systems
Data Link Connectors
Generators & Regulators
Starters
Power Window Motors .................................. Power Windows
Power Window Relay(s) ................................ Power Windows\
Radiator Fan Motor(s) ........................ Electric Cooling Fans\
Radiator Fan Relay(s) ........................... Engine Performance\
Electric Cooling Fans
Rainsense Module .............................. Wiper/Washer Systems
Raise Relay .................................. Power Convertible Top
Remote Anti-Theft Personality (RAP) Module ....... Anti-Theft System\
Starters
Warning Systems
Seat Belt Pretensioners ................... Air Bag Restraint System
Seat Belt Retractor Solenoid .................... Passive Restraints
Seat Belt Switch .......................... Air Bag Restraint System
Passive Restraints
Shift Interlock Solenoid ................... Shift Interlock Systems
Shift Lock Actuator ........................ Shift Interlock Systems
Side Marker Lights ................................. Exterior Lights
SIR Coil Assembly (Clockspring) ........... Air Bag Restraint System\
Slip Ring (Clockspring) ................... Air Bag Restraint System\
Steering Column Switches
SRS Control Module ........................ Air Bag Restraint System
Starter Motor ............................................. Starters
Starter Interrupt Relay ................................... Starters
Starter Solenoid .......................................... Starters
Starter Relay ............................................. Starters
Steering Wheel Position Sensor .................... Anti-Lock Brakes
Stoplights ......................................... Exterior Lights
Stoplight Switch ................................ Engine Performance
Cruise Control Systems
Anti-Lock Brakes
Sun Roof ECU ........................................ Power Sun Roof
Sun Roof Motor ...................................... Power Sun Roof
Sun Roof Position Sensor ............................ Power Sun Roof
Taillights ......................................... Exterior Lights
Throttle Position (TP) Sensor ................... Engine Performance\