turn signal MITSUBISHI OUTLANDER 2016 3.G Owner's Manual
[x] Cancel search | Manufacturer: MITSUBISHI, Model Year: 2016, Model line: OUTLANDER, Model: MITSUBISHI OUTLANDER 2016 3.GPages: 464, PDF Size: 60.77 MB
Page 247 of 464
Indicator and warning light package (multi information display - Type 2)
Features and controls 5-171
5
N00519801891
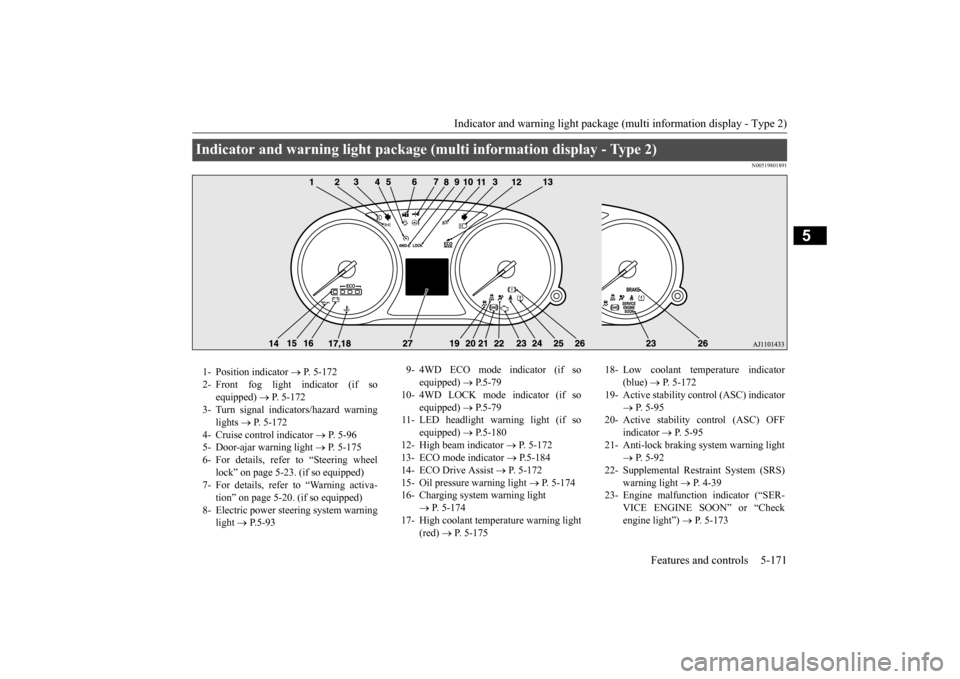
Indicator and warning light package (mu
lti information display - Type 2)
1- Position indicator
P. 5-172
2- Front fog light indicator (if so
equipped)
P. 5-172
3- Turn signal indicators/hazard warning
lights
P. 5-172
4- Cruise control indicator
P. 5-96
5- Door-ajar warning light
P. 5-175
6- For details, refer to “Steering wheel
lock” on page 5-23. (if so equipped)
7- For details, refer to “Warning activa-
tion” on page 5-20. (if so equipped)
8- Electric power stee
ring system warning
light
P. 5 - 9 3
9- 4WD ECO mode indicator (if so
equipped)
P.5-79
10- 4WD LOCK mode indicator (if so
equipped)
P.5-79
11- LED headlight warning light (if so
equipped)
P.5-180
12- High beam indicator
P. 5-172
13- ECO mode indicator
P.5-184
14- ECO Drive Assist
P. 5-172
15- Oil pressure warning light
P. 5-174
16- Charging system warning light
P. 5-174
17- High coolant temperature warning light
(red)
P. 5-175
18- Low coolant temp
erature indicator
(blue)
P. 5-172
19- Active stability control (ASC) indicator
P. 5-95
20- Active stability control (ASC) OFF
indicator
P. 5-95
21- Anti-lock braking system warning light
P. 5-92
22- Supplemental Restra
int System (SRS)
warning light
P. 4 - 3 9
23- Engine malfuncti
on indicator (“SER-
VICE ENGINE SOON” or “Check engine light”)
P. 5-173
BK0223400US.book 171 ページ 2015年2月13日 金曜日 午後12時15分
Page 248 of 464
Indicators 5-172 Features and controls
5
N00519900127 N00520000216
The arrows will flash in time with the corre- sponding exterior turn signals when the turnsignal lever is used. Both arrows will flash
when the hazard warn-
ing flasher swit
ch is pressed.
N00520100086
A blue light comes on when the headlights are on high beam.
N00520200175
This indicator comes on while the front foglights are on.
N00551300026
This indicator light illuminates while the position lights are on.
N00575601020
This indicator comes on in blue while thecoolant temperature is low.
N00579200030
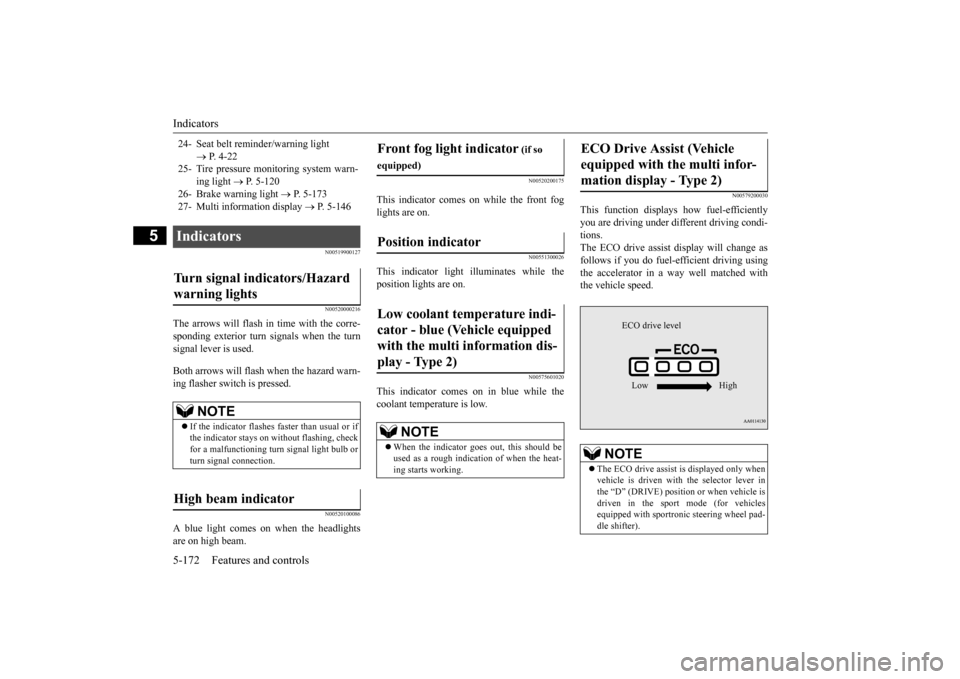
This function displays
how fuel-efficiently
you are driving under different driving condi- tions. The ECO drive assist di
splay will change as
follows if you do fuel-efficient driving using the accelerator in a way well matched with the vehicle speed.
24- Seat belt remi
nder/warning light
P. 4-22
25- Tire pressure moni
toring system warn-
ing light
P. 5-120
26- Brake warning light
P. 5-173
27- Multi information display
P. 5-146
Indicators Turn signal indicators/Hazard warning lights
NOTE
If the indicator flashes faster than usual or if the indicator stays on wi
thout flashing, check
for a malfunctioning turn signal light bulb or turn signal connection.
High beam indicator
Front fog light indicator
(if so
equipped)Position indicator Low coolant temperature indi- cator - blue (Vehicle equipped with the multi information dis- play - Type 2)
NOTE
When the indicator goes out, this should be used as a rough indication of when the heat-ing starts working.
ECO Drive Assist (Vehicle equipped with the multi infor-mation display - Type 2)
NOTE
The ECO drive assist is displayed only when vehicle is driven with
the selector lever in
the “D” (DRIVE) positi
on or when vehicle is
driven in the sport mode (for vehicles equipped with sportroni
c steering wheel pad-
dle shifter).
ECO drive level Low High
BK0223400US.book 172 ページ 2015年2月13日 金曜日 午後12時15分
Page 256 of 464
Combination headlights and dimmer switch 5-180 Features and controls
5
If the combination headlights and dimmer switch is turned to the “ ” or “ ” posi- tion again after the engine is turned off, the about 3-minute auto-cutout function described above will not
work. The lights (the
parking lights, tail li
ghts and license plate
lights) will stay on and will not turn off auto- matically.
N00584500028
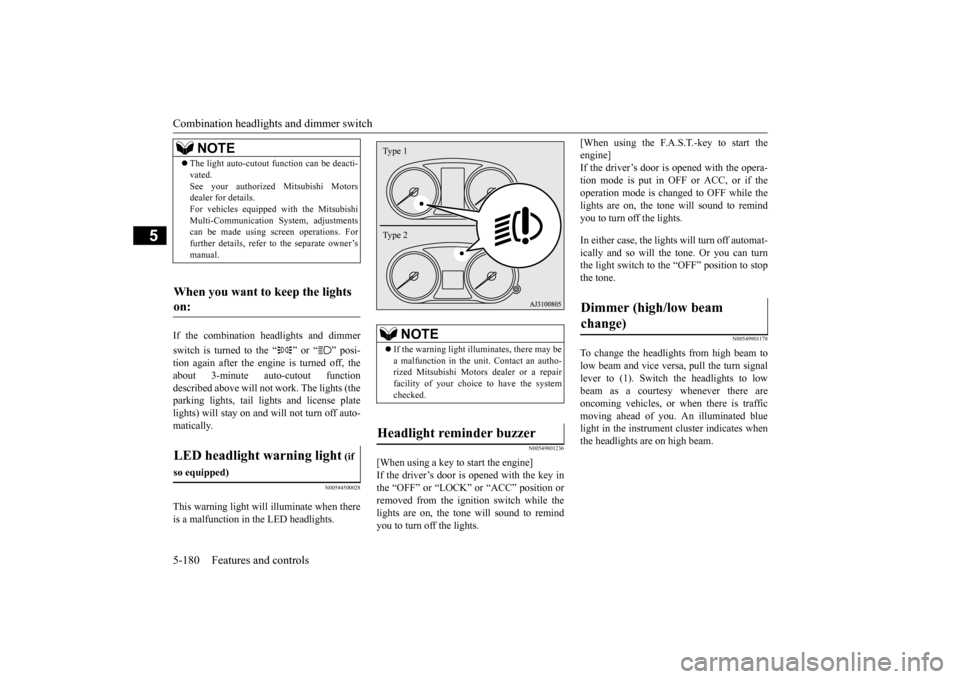
This warning light will illuminate when there is a malfunction in the LED headlights.
N00549801236
[When using a key to start the engine] If the driver’s door is opened with the key in the “OFF” or “LOCK” or “ACC” position or removed from the ignition switch while thelights are on, the tone will sound to remind you to turn off the lights.
[When using the F.A.S.T.-key to start the engine]If the driver’s door is opened with the opera- tion mode is put in OFF or ACC, or if the operation mode is changed to OFF while thelights are on, the tone
will sound to remind
you to turn off the lights. In either case, the lights will turn off automat- ically and so will the tone. Or you can turnthe light switch to the “OFF” position to stop the tone.
N00549901178
To change the headlights from high beam to low beam and vice vers
a, pull the turn signal
lever to (1). Switch the headlights to low beam as a courtesy whenever there areoncoming vehicles, or when there is traffic moving ahead of you. An illuminated blue light in the instrument
cluster indicates when
the headlights are on high beam.
NOTE
The light auto-cutout
function can be deacti-
vated.See your authorized Mitsubishi Motorsdealer for details. For vehicles equipped
with the Mitsubishi
Multi-Communication System, adjustmentscan be made using sc
reen operations. For
further details, refer to the separate owner’s manual.
When you want to keep the lights on: LED headlight warning light
(if
so equipped)
NOTE
If the warning light il
luminates, there may be
a malfunction in the unit. Contact an autho- rized Mitsubishi Motors dealer or a repairfacility of your choice to have the systemchecked.
Headlight reminder buzzer Type 1 Type 2
Dimmer (high/low beam change)
BK0223400US.book 180 ページ 2015年2月13日 金曜日 午後12時15分
Page 257 of 464
Combination headlights and dimmer switch
Features and controls 5-181
5
N00550001209
You can flash the high beams by pulling the lever gently toward you (2). The lights will go back to normal when you let go. While the high beam is on, you will see a blue light onthe instrument panel.
N00563201117
This function turns on the front side-marker and parking lights for about 30 seconds after the UNLOCK button on the remote controltransmitter is pressed when the combination headlights and dimmer swit
ch is in the “OFF”
or “AUTO” position (fo
r vehicles equipped
with the automatic light control). On vehicles equipped with the automatic light control (except for vehicles equipped with LDW), the welcome light functi
on will operate only
when it is dark outside the vehicle.
N00547301110
This function turns on the headlights in thelow beam setting for about 30 seconds afterthe ignition switch is turned to the “OFF” or “LOCK” position or the operation mode is put in OFF. 1. Turn the combination headlights and dim- mer switch to the “OFF” or “AUTO” position (for vehicles
equipped with the
automatic light control).2. Turn the ignition switch to the “OFF” or “LOCK” position or put the operation mode in OFF. Also, if a key was used tostart the engine, rem
ove the key from the
ignition switch. 3. Within 60 seconds of turning the ignitionswitch to the “OFF” or “LOCK” position or putting the operation mode in OFF, pull the turn signal lever toward you.
Headlight flasher
NOTE
You can flash the high beams by pulling the lever toward you, even if the light switch is off. If you turn the lights off with the head lights set to high-beam illumi
nation, the headlights
are automatically returned to their low-beamsetting when the light
switch is next turned
to the “ ” position.
Welcome light
NOTE
While the welcome light function is operat- ing, perform one of
the following operations
to cancel the function. • Push the LOCK button on the remote con- trol transmitter. • Turn the combination headlights and dim- mer switch to the “ ” or “ ” position. • Turn the ignition switch to the “ON” posi- tion or put the operation mode in ON.
It is possible to modify functions as follows: • The headlights can be set to come on in the low beam setting. • The welcome light f
unction can be deacti-
vated.
For details, consult a Mitsubishi Motorsdealer.On vehicles equipped
with Mitsubishi Multi-
Communication System
, screen operations
can be used to make the adjustment. Refer to the separate owner’s manual fordetails.
Coming home light
NOTE
BK0223400US.book 181 ページ 2015年2月13日 金曜日 午後12時15分
Page 258 of 464
Headlight leveling swit
ch (if so equipped)
5-182 Features and controls
5
4. The headlights will come on in the low beam setting for about
30 seconds. After
the headlights go off, the headlights canbe turned on again in the low beam setting for about 30 seconds by pulling the turn signal lever toward you within 60 secondsof turning the ignition switch to the “OFF” or “LOCK” pos
ition or putting the
operation mode in OFF. To turn on the headlights again after 60 seconds of turn- ing the ignition switch to the “OFF” or“LOCK” position or putting the operation mode in OFF, repeat the process from step 1.
N00537101115
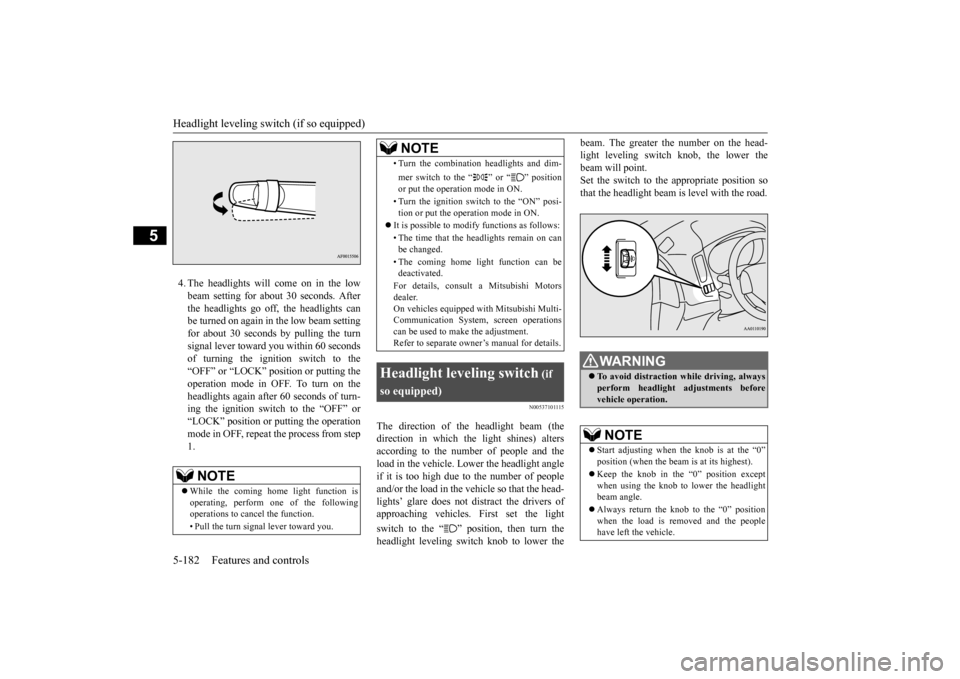
The direction of the headlight beam (thedirection in which th
e light shines) alters
according to the number of people and the load in the vehicle. Lo
wer the headlight angle
if it is too high due to the number of peopleand/or the load in the vehicle so that the head- lights’ glare does not distract the drivers of approaching vehicles
. First set the light
switch to the “ ” position, then turn the headlight leveling switch knob to lower the
beam. The greater the number on the head- light leveling switch knob, the lower thebeam will point. Set the switch to the appropriate position so that the headlight beam is level with the road.
NOTE
While the coming home light function is operating, perform one of the following operations to cancel the function. • Pull the turn signal lever toward you.
• Turn the combination headlights and dim- mer switch to the “ ” or “ ” position or put the operation mode in ON. • Turn the ignition switch to the “ON” posi- tion or put the opera
tion mode in ON.
It is possible to modify functions as follows: • The time that the headlights remain on can be changed. • The coming home light function can be deactivated. For details, consult a Mitsubishi Motors dealer. On vehicles equipped
with Mitsubishi Multi-
Communication System,
screen operations
can be used to make the adjustment. Refer to separate owne
r’s manual for details.
Headlight leveling switch
(if
so equipped)
NOTE
WA R N I N G To avoid distraction wh
ile driving, always
perform headlight adjustments before vehicle operation.NOTE
Start adjusting when the knob is at the “0” position (when the beam
is at its highest).
Keep the knob in the “0” position except when using the knob to lower the headlightbeam angle. Always return the knob to the “0” position when the load is removed and the people have left the vehicle.
BK0223400US.book 182 ページ 2015年2月13日 金曜日 午後12時15分
Page 259 of 464
Turn signal lever
Features and controls 5-183
5
N00522601529
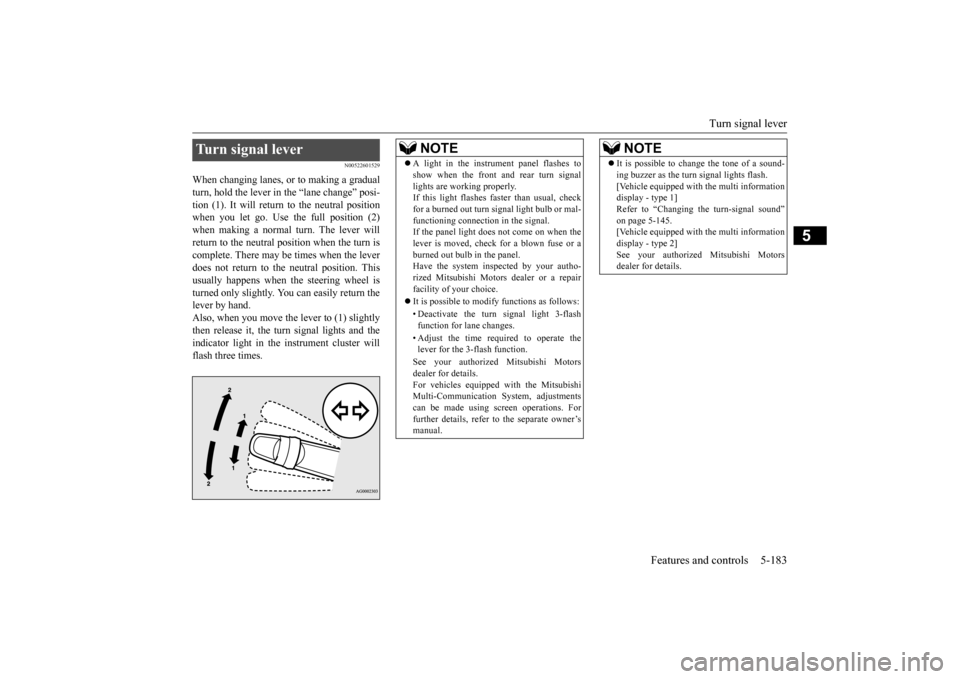
When changing lanes, or to making a gradual turn, hold the lever in the “lane change” posi- tion (1). It will return to the neutral positionwhen you let go. Use the full position (2) when making a normal turn. The lever will return to the neutral position when the turn iscomplete. There may be times when the lever does not return to th
e neutral position. This
usually happens when
the steering wheel is
turned only slightly. You
can easily return the
lever by hand.Also, when you move the lever to (1) slightly then release it, the turn signal lights and the indicator light in the instrument cluster willflash three times.Turn signal lever
NOTE
A light in the instrument panel flashes to show when the front and rear turn signallights are working properly.If this light flashes fast
er than usual, check
for a burned out turn signal light bulb or mal- functioning connecti
on in the signal.
If the panel light does not come on when the lever is moved, check
for a blown fuse or a
burned out bulb in the panel.Have the system inspected by your autho- rized Mitsubishi Motors
dealer or a repair
facility of your choice. It is possible to modify functions as follows: • Deactivate the turn signal light 3-flash function for lane changes. • Adjust the time required to operate the lever for the 3-flash function. See your authorized Mitsubishi Motors dealer for details. For vehicles equipped
with the Mitsubishi
Multi-Communication System, adjustments can be made using sc
reen operations. For
further details, refer to the separate owner’smanual.
It is possible to change the tone of a sound- ing buzzer as the turn signal lights flash.[Vehicle equipped with the multi informationdisplay - type 1] Refer to “Changing the turn-signal sound” on page 5-145.[Vehicle equipped with the multi information display - type 2] See your authorized Mitsubishi Motorsdealer for details.NOTE
BK0223400US.book 183 ページ 2015年2月13日 金曜日 午後12時15分
Page 260 of 464
Hazard warning flasher switch 5-184 Features and controls
5
N00522701328
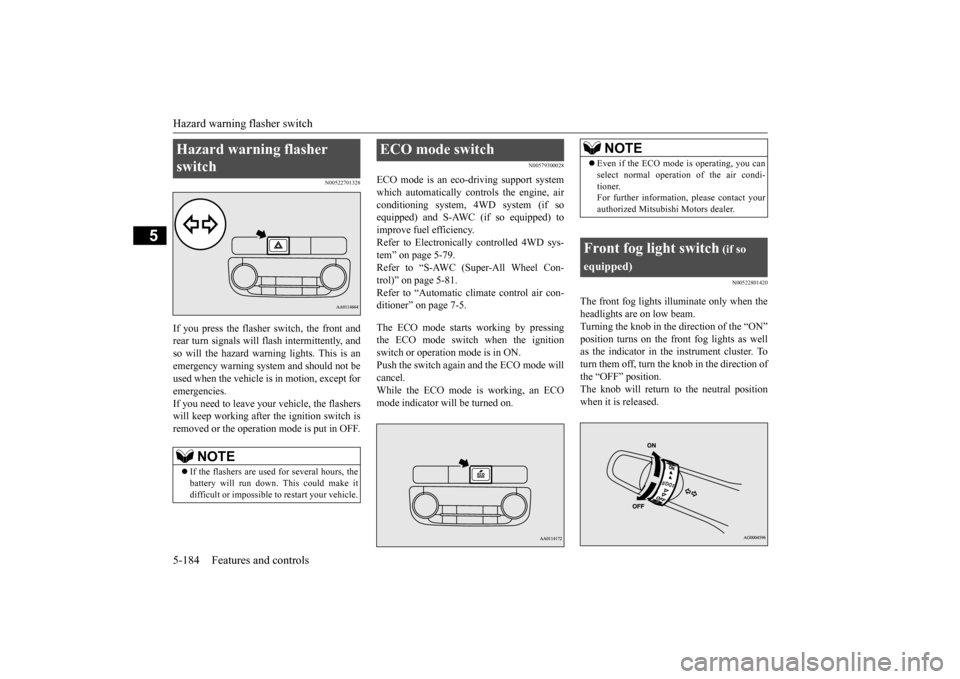
If you press the flasher switch, the front and rear turn signals will flash intermittently, and so will the hazard warn
ing lights. This is an
emergency warning syst
em and should not be
used when the vehicle is in motion, except for emergencies. If you need to leave your vehicle, the flasherswill keep working afte
r the ignition switch is
removed or the operation mode is put in OFF.
N00579300028
ECO mode is an eco-driving support systemwhich automatically cont
rols the engine, air
conditioning system,
4WD system (if so
equipped) and S-AWC (if so equipped) to improve fuel efficiency. Refer to Electronically
controlled 4WD sys-
tem” on page 5-79. Refer to “S-AWC (Super-All Wheel Con- trol)” on page 5-81. Refer to “Automatic cl
imate control air con-
ditioner” on page 7-5. The ECO mode starts
working by pressing
the ECO mode switch when the ignition switch or operation mode is in ON. Push the switch again and the ECO mode willcancel. While the ECO mode is working, an ECO mode indicator will be turned on.
N00522801420
The front fog lights illuminate only when theheadlights are on low beam. Turning the knob in the direction of the “ON” position turns on the front fog lights as wellas the indicator in the instrument cluster. To turn them off, turn the knob in the direction of the “OFF” position.The knob will return to the neutral position when it is released.
Hazard warning flasher switch
NOTE
If the flashers are used for several hours, the battery will run down.
This could make it
difficult or impossible
to restart your vehicle.
ECO mode switch
NOTE
Even if the ECO mode is operating, you can select normal operati
on of the air condi-
tioner.For further information, please contact your authorized Mitsubishi Motors dealer.
Front fog light switch
(if so
equipped)
BK0223400US.book 184 ページ 2015年2月13日 金曜日 午後12時15分
Page 298 of 464

HomeLink® Wireless Control System (if so equipped) 5-222 Features and controls
5
4. Press the HomeLink
® button that was just
programmed and observe the indicator light.• If the indicator light continuously illumi- nates green, programming is complete and your device shoul
d operate when the
HomeLink
® button is pressed and
released. • If the indicator light rapidly flashes green, firmly press, hold for 2 seconds and release the programmed HomeLink
®
button. Repeat the
“press/hold/release”
sequence a second tim
e, and, depending
on the brand of the garage door opener(or other rolling code equipped device), repeat this sequence a third time to com- plete the programming
process. At this
point if your device operates, program- ming is complete.
• If the device does not operate, continue with “Programming a new HomeLink
®”
steps 5 to 7 to complete the program- ming of a rolling code equipped device.
5. At the garage door opener receiver(motor-head unit) in the garage, locate the “Learn” or “Smart” but
ton. This can usu-
ally be found where the hanging antennawire is attached to the motor-head unit (see the garage
door opener manual to
identify the “Learn” button.) 6. Firmly press and release the “Learn” or “Smart” button. (The name and color ofthe button may vary by manufacturer.) There are typically 30 seconds to initiate step 7.7. Return to the vehicle and firmly press, hold for 2 seconds and release the pro- grammed HomeLink
® button. Repeat the
“press/hold/release”
sequence a second
time, and, depending
on the brand of the
garage door opener (or other rolling codeequipped device), repe
at this sequence a
third time to complete the programming process. HomeLink
® should now activate your
rolling code e
quipped device.
N00584800021
Canadian radio-frequenc
y laws require trans-
mitter signals to “time-out” (or quit) afterseveral seconds of tr
ansmission - which may
not be long enough for HomeLink
® to pick
up the signal during programming. Similar to this Canadian law, some U.S. gate operators are designed to “time-
out” in the same man-
ner. The indicator LED on the hand-held transmit- ter will go off when the device times out indi-cating that it has fi
nished transmitting.
If you live in Canada or you are having diffi- culties programming a gate operator orgarage door opener by using the “Program- ming” procedures, replace “Programming a new HomeLink
®” step 3 with the following:
NOTE
Some devices may requi
re you to replace this
“Programming a new HomeLink
®” step 3
with procedures noted in the “Gate operator / Canadian programming”
section. If the indi-
cator light does not ch
ange to rapidly flash-
ing green or continuously lit green after performing these step
s, contact HomeLink
®
at www.homelink.com
NOTE
In the event that there are still programming difficulties or questi
ons, additional Home-
Link
® information and programming videos
can be found online at www.homelink.com,www.youtube.com/HomeL
inkGentex, or by
calling the HomeLink
® Hotline.
Gate operator/Canadian pro- gramming
BK0223400US.book 222 ページ 2015年2月13日 金曜日 午後12時15分
Page 316 of 464
Vehicle preparation before driving 6-4 Driving safety
6
N00629001709
For a safer and more enjoyable trip, always check for the following: Before starting the vehicle, make certain that you and all passengers are seated and wearing their seat
belts properly (with
children in the rear seat, in appropriate restraints), and that all the doors and the liftgate are locked. Move the driver’s seat as far backward as possible, while keep
ing good visibility,
and good control of the steering wheel,brakes, accelerator,
and controls. Check
the instrument panel
indicators and multi-
information display for any possible prob-lem. Similarly, the front
passenger seat should
also be moved as far back as possible. Make sure that infa
nts and small children
are properly restrained in accordance with all laws and regulations.
Check these by selecting the defroster mode, and set the blower swit
ch on high. You should
be able to feel the air blowing against thewindshield. Refer to “Defrosti
ng or defogging (wind-
shield, door windows)” on page 7-13 Check all the tires for heavy tread wear or uneven wear patterns. Look for stones, nails, glass, or other objects
stuck in the tread. Look
for any tread cuts or
sidewall cracks. Check
the wheel nuts for tightness, and the tires (including spare tire) for proper pressure. Replace your tires before they are heavilyworn out. As your vehicle is equi
pped with a tire pres-
sure monitoring system, there is a risk ofdamage to the tire inflation pressure sensors when the tire is replaced on the rim. Tire replacement should, only, be performed by anauthorized Mitsubishi Motors dealer. Have someone watch while you turn all the exterior lights on and off. Also check the turn
signal indicators and hi
gh-beam indicators on
the instrument panel. Check the ground under the vehicle after parking overnight, for
fuel, water, oil, or
other leaks. Make sure
all the fluid levels are
correct. Also, if you
can smell fuel, you need
to find out why imme
diately and have it
fixed.
N00629201134
Even this vehicle’s sa
fety equipment, and
your safest driving, ca
nnot guarantee that you
can avoid an accident or injury. However, ifyou give extra attention to the following areas, you can better protect yourself and your passengers: Drive defensively. Be aware of traffic, road and weather conditions. Leave plenty of stopping distance between your vehicle and the vehicle ahead. Before changing lanes, check your mir- rors, blind spots, and use your turn-signal light. While driving, watch the behavior of other drivers, bicyc
lists, and pedestrians.
Vehicle preparation before driving Seat belts and seats
Defrosters Tires Lights
Fluid leaks Safe driving techniques
BK0223400US.book 4 ページ 2015年2月13日 金曜日 午後12時15分
Page 327 of 464
Trailer towing
Driving safety 6-15
6
You’ll need more passing distance up ahead when you’re towing a trailer. And, because you’re a good deal longer, you’ll need to gomuch farther beyond the passed vehicle before you can return to your lane. Hold the bottom of the steering wheel with one hand. Then, to move the trailer to the left,just move that hand to the left. To move the trailer to the right, move your hand to the right. Always back up sl
owly and, if possible,
have someone guide you. When you’re turning with a trailer, make wider than normal turns to help prevent the trailer from striking shoulders, curbs, roadsigns, trees or other objects.
Avoid jerky or sudden maneuvers. Signal well in advance. Towing a trailer puts additional burden on the engine and transaxle,
which may cause over-
heating. Following ar
e some suggestions to
reduce overheating: When towing at high al
titudes, engine coolant
and automatic transaxle oil will overheat at a lower temperature than at normal altitudes. If you turn your engine off immediately aftertowing at high altitude
on steep uphill grades,
your vehicle may show
signs similar to over-
heating. To avoid this
, let the engine run
while parked (preferably on level ground) with the automatic transaxle in the “P” (PARK) position for a few minutes beforeturning the engine off.
If the engine coolant temperature indica- tor flashes on the information screen in the multi-information display or the engine power drops suddenly, refer to “Engine overheati
ng” on page 8-4.
If the warning display or warning display illuminates, re
fer to “Warning dis-
play” on page 5-66, 5-74.
Reduce speed and downshift before you start down a long or steep downgrade. If you don’t downshift, over using the brakes can cause reduced brake efficiency. You can tow in “D” (DRIVE) position. You may want to shift the selector lever to the 3rd or a lower position, under heavy loads or hilly conditions. Always place chocks or blocks under both the vehicle and trailer wheels when parking. Besure that the parking brake is firmly set and that the selector lever is in the “P” (PARK) position. Avoid parki
ng on a hill with a
trailer, but if it cannot be avoided, do so only after performing the following:
Passing Backing up Making turns
CAUTION Making sharp turns while towing a trailer could cause the
trailer to come in contact
with the vehicle. Your
vehicle could be dam-
aged. Avoid making sharp turns while tow- ing a trailer.
Overheating Cause of overheating
Solution
Air conditioning on Turn off Highway speeds Reduce speed Going up hills Select lower gear posi-
tion
Stop-and-go city traf- fic
With the vehicle stopped, shift to the “N” (NEUTRAL) position and idle the engine at high idle.
Driving on hills Parking
BK0223400US.book 15 ページ 2015年2月13日 金曜日 午後12時15分