stop start MITSUBISHI OUTLANDER 2017 3.G Owner's Guide
[x] Cancel search | Manufacturer: MITSUBISHI, Model Year: 2017, Model line: OUTLANDER, Model: MITSUBISHI OUTLANDER 2017 3.GPages: 521, PDF Size: 14.91 MB
Page 304 of 521
![MITSUBISHI OUTLANDER 2017 3.G Owners Guide Combination headlights and dimmer switch
Features and controls 5-223
5
[For vehicles equipped with the F.A.S.T.- key]The operation mode is changed to OFF or ACC and the driver’s door is not opened. MITSUBISHI OUTLANDER 2017 3.G Owners Guide Combination headlights and dimmer switch
Features and controls 5-223
5
[For vehicles equipped with the F.A.S.T.- key]The operation mode is changed to OFF or ACC and the driver’s door is not opened.](/img/19/7536/w960_7536-303.png)
Combination headlights and dimmer switch
Features and controls 5-223
5
[For vehicles equipped with the F.A.S.T.- key]The operation mode is changed to OFF or ACC and the driver’s door is not opened.
If the combination
headlights and dimmer
switch is turned to the “ ” or “ ” posi- tion again after the engine is turned off, the about 3-minute auto
-cutout function
described above will not
work. The lights (the
parking lights, tail lig
hts and license plate
lights) will stay on and will not turn off auto- matically.
N00584500028
This warning light will illuminate when thereis a malfunction in the LED headlights.
N00549801236
[When using a key to
start the engine]
If the driver’s door is opened with the key in the “OFF” or “LOCK” or “ACC” position orremoved from the ignition switch while the lights are on, the tone will sound to remind you to turn off the lights. [When using the F.A.S.T.-key to start the engine] If the driver’s door is opened with the opera-tion mode is put in OFF or ACC, or if the operation mode is changed to OFF while the lights are on, the tone will sound to remindyou to turn off the lights. In either case, the lights will turn off automat- ically and so will the tone. Or you can turn the light switch to th
e “OFF” position to stop
the tone.
N00549901178
To change the headlights from high beam to low beam and vice vers
a, pull the turn signal
lever to (1). Switch the headlights to lowbeam as a courtesy whenever there are oncoming vehicles, or when there is traffic moving ahead of you. An illuminated blue
NOTE
The light auto-cutout f
unction can be deacti-
vated. See your authorized Mitsubishi Motorsdealer for details. For vehicles equipped
with the Mitsubishi
Multi-Communication System, adjustmentscan be made using screen operations. For further details, refer to the separate owner’s manual.
When you want to keep the lights on:
LED headlight warning light
(if
so equipped)
NOTE
If the warning light illuminates, there may be a malfunction in the unit. Contact an autho- rized Mitsubishi Motors
dealer or a repair
facility of your choice
to have the system
checked.Type 1 Type 2
Headlight reminder buzzer Dimmer (high/low beam change)
BK0239700US.book 223 ページ 2016年6月16日 木曜日 午前10時58分
Page 318 of 521
Wiper deicer switch (if so equipped)
Features and controls 5-237
5
N00523501277
N00584400027
The electric rear window
defogger switch can
be operated when the engine is running.When the front wipers have frozen to the windshield at the parked
positions, turning on
this switch will heat the windshield to makethe wipers operable. Press the electric rear window defogger switch and the deicer will operate.
N00523701468
The rear window defogger can be used when the engine is running. The indicator light (A) will come on whenyou press the electric rear window defogger switch. Electric current will flow through the heating wires on the rear window to helpclear away moisture or frost.
If the knob is in the “OFF” position, turn the knob to the “INT” position twice quickly tooperate the rear window
wiper continuously.
(continuous operation mode) Turn the knob to the “OFF” position to stop the rear window wipe
r continuous operation.
The wiper intermittent
operation time can be
adjusted.See your authorized Mitsubishi Motors dealer for details. For vehicles equipped
with the Mitsubishi
Multi-Communication System, adjustments can be made using screen operations. For further details, refer to the separate owner’smanual. The washer fluid reservoir is located in the engine compartment. Check the fluid level re
gularly and refill if
necessary. (Refer to
“Washer fluid” on page
9-12.)
Precautions to observe when using wipers and washers
CAUTION If the washer is used
in cold weather, the
washer fluid sprayed onto the glass might freeze, blocking your vi
ew. Heat the glass
with the defroster befo
re using the washer.
NOTE
NOTE
Do not use the wipers when the windshield is dry. This could scratch the glass and wear thewiper blades prematurely. Before using the wipe
rs in cold weather,
check to be sure that the wiper blades are notfrozen to the windshield or rear window. Using the wipers while the blades are frozen could cause the wiper motor to burn out. If the moving wipers be
come blocked part-
way through a sweep by ic
e or other deposits
on the glass, the wipers may temporarily stop operating to prevent the motor from over- heating. In this case, park the vehicle in asafe place, turn the ignition switch to the “OFF” position or put
the operation mode in
OFF, and then remove
the ice or other depos-
its. Because the wipers will
start operating again
after the wiper motor cools down, check thatthe wipers operate
before using them.
Avoid using the washer for more than 20 sec- onds at a time. Do not operate the washer when the washer fluid reservoir is empty or the pump may fail. During cold weather, add a recommended washer solution that will not freeze in thewasher fluid reservoir. Otherwise the washer may not work or may be damaged. Replace the wiper blades when they are worn. Use the proper size replacement blades. For further info
rmation, please con-
tact your authorized
Mitsubishi Motors
dealer.
Wiper deicer switch
(if so
equipped)
NOTE
The wiper deicer is
activated/de
activated,
depending on the operation of the rear win- dow defogger. Refer to
“Electric rear win-
dow defogger switch
” on page 5-237.
Electric rear window defog- ger switch
BK0239700US.book 237 ページ 2016年6月16日 木曜日 午前10時58分
Page 326 of 521

Bluetooth® 2.0 interface
Features and controls 5-245
5
7. When the registration of the passcode is completed, the voice
guide will say “Pass-
code is enabled” and the system will return to the main menu.
If a passcode has been
set and the security
function is enabled, the voice guide will say “Hands-free system is
locked. State the pass-
code to continue” when the SPEECH button (except for vehicles with Mitsubishi Multi- Communication System) or PICK-UP button(for vehicles with Mitsubishi Multi-Commu- nication System) is pres
sed to enter voice rec-
ognition mode. Say th
e 4-digit passcode
number to enter the passcode. If the entered passcode is wrong, the voice guide will say “<4-digit passcode>, Incorrect
passcode. Please try again.” Enter the correct passcode. Use the following procedure to turn off the security function by di
sabling the passcode.
1. Press the SPEECH button (except for vehicles with Mitsubishi Multi-Commu- nication System) or
PICK-UP button (for
vehicles with Mitsubishi Multi-Commu-nication System). 2. Say “Setup.” 3. Say “Passcode.”4. The voice guide will say “Passcode is enabled. Would you like to disable it?” Answer “Yes.” the passcode and return to the main menu.
5. When the disabling of the passcode is completed, the voice
guide will say “Pass-
code is disabled”
and the system will
return to the main menu.
N00564700011
The Bluetooth
® 2.0 interface can use the
speaker enrollment function to create a voice model for one person per language. This makes it easier for the Bluetooth
® 2.0
interface to recognise
voice commands said
by you. You can turn a voice model registered with the speaker enrollment function on and offwhenever you want.
N00564801181
It takes about 2 to 3 mi
nutes to complete the
speaker enrollment process. To ensure the best results, run through the process while in the driver’s seat, in an envi-ronment that is as quiet as possible (when there is no rain or strong winds and the vehi- cle windows are closed).
Please turn off your
phone while in speaker enrollment to prevent interruption of the process. Use the following procedure for speakerenrollment.
NOTE
Passcode will be requi
red to access the sys-
tem after the next ignition cycle. It is required for a little time after engine stop that the entered
passcode is actually
recorded in the system.If the ignition switch
or the operation mode
is made to ACC or
ON or the engine is
started immediately afte
r engine stop, there
is a case when the entered passcode is not recorded in the system. At this time, please try to enter the passcode again.
Entering the passcode
NOTE
You can reenter the passcode as many times as you want. If you have forgotten your passcode, say “Cancel” to quit the voice input mode and then check with an authorized Mitsubishi Motors dealer.
Disabling the passcode
NOTE
System must be unlocked to disable the pass- code.
Speaker enrollment function Speaker enrollment
BK0239700US.book 245 ページ 2016年6月16日 木曜日 午前10時58分
Page 327 of 521

Bluetooth® 2.0 interface 5-246 Features and controls
5
1. Stop your vehicle in a safe area, put the selector lever in the “P” (PARK) positionand apply the parking brake. 2. Press the SPEECH button (except for vehicles with Mitsubishi Multi-Commu-nication System) or
PICK-UP button (for
vehicles with Mitsubishi Multi-Commu- nication System).3. Say “Voice training.”
say “This operation
must be performed in
a quiet environment
while the vehicle is stopped. See the owner’s manual for th
e list of required
training phrases. Press and release theSPEECH button when you are ready to begin. Press the HANG-UP button to can- cel at any time.” speaker enrollment process.
5. The voice guide will prompt for phrase 1. Repeat the correspondi
ng phrase listed in
table “Enrollment commands” on page 5-263.The system will register your voice and then move on to the registration of the next command. Continue the process untilall phrases have been registered. 6. When all enrollment commands have been read out, the voice guide will say “Speaker enrollment is complete.” Thesystem will then end the speaker enroll- ment process and return to the main menu.
N00564901078
You can turn a voice model registered with the speaker enrollment function on and off whenever you want.You can also retrain the system. Use the following procedure to perform these actions. 1. Press the SPEECH button (except for vehicles with Mitsubishi Multi-Commu- nication System) or
PICK-UP button (for
vehicles with Mitsubishi Multi-Commu-nication System). 2. Say “Voice training.”ment process once already, the voice guide will say eith
er “Enrollment is
enabled. Would you like to disable orretrain?” or “Enrol
lment is disabled.
Would you like to enable or retrain?”
NOTE
Speaker enrollment is not possible unless the vehicle is parked. Make sure you park the vehicle in a safe area before attempting speaker enrollment.
NOTE
If you do not start the speaker enrollment process within 3 minut
es after pressing the
SPEECH button, the speaker enrollmentfunction will time out. The voice guide will say “Speaker enroll- ment has timed out.” The system will thenbeep and the voice reco
gnition mode will be
deactivated. NOTE
To repeat the most re
cent voice training com-
mand, press and release the SPEECH button. If you press the HANG-UP button anytime during the process, the
system will beep and
stop the speaker enrollment process.
NOTE
Completing the speaker enrollment process will turn on the voice model automatically. The commands “Help”
and “Cancel” will not
work in this mode.
Enabling and disabling the voice model and retraining
BK0239700US.book 246 ページ 2016年6月16日 木曜日 午前10時58分
Page 328 of 521

Bluetooth® 2.0 interface
Features and controls 5-247
5
4. When enrollment is “enabled,” the voice model is on; when enrollment is “dis-abled,” the voice model is off. Say the command that fits your needs. Say “Retrain” to start the speaker enroll-ment process and re
create a new voice
model. (Refer to “Speaker enrollment” on page 5-245.)
N00565001395
Before you can make
or receive hands-free
calls or play music using the Bluetooth
® 2.0
interface function, you must pair the Blue- tooth
® device and Bluetooth
® 2.0 interface.
Up to 7 Bluetooth
® devices can be paired
with the Bluetooth
® 2.0 interface.
If multiple paired Bluetooth
® devices are
available in the vehicle,
the cellular phone or
music player most recently connected is auto- matically connected
to the Bluetooth
® 2.0
interface. You can also change a Bluetooth
® device to
be connected. To pair a Bluetooth
® device with the Blue-
tooth
® 2.0 interface, use either one of the fol-
lowing 2 methods (Type 1 or Type 2). 1. Stop your vehicle in a safe area, put the selector lever in the “P” (PARK) position and apply the parking brake.
2. Press the SPEECH button (except for vehicles with Mitsubishi Multi-Commu-nication System) or PICK-UP button (for vehicles with Mitsubishi Multi-Commu- nication System).3. Say “Setup.” 4. Say “Pairing Options.” 5. The voice guide will
say “Select one of
the following: pair, edit, delete, or list.”
say “Please say a 4-
digit pairing code.” Say a 4-digit number. When the confirmation function is on, the system will confirm
whether the number
said is acceptable. Answer “Yes.” selection.
Connecting the Bluetooth
® 2.0
interface and Bluetooth
® device
NOTE
Pairing is required only when the device is used for the first time. Once the device has been paired with
the Bluetooth
® 2.0 inter-
face, all you need is to
bring the device into
the vehicle next time
and the device will
connect to the Bluetooth
® 2.0 interface auto-
matically (if supported by the device). The device must have Bluetooth
® turned ON to
connect.
To p a i r
Pairing procedure- Type 1
(if so
equipped)NOTE
You cannot pair any Bluetooth
® device with
the Bluetooth
® 2.0 interface unless the vehi-
cle is parked. Before pairing a Bluetooth
®
device with the Bluetooth
® 2.0 interface,
confirm that the vehicle is parked in a safe location.
NOTE
If 7 devices have alre
ady been paired, the
voice guide will sa
y “Maximum devices
paired” and then the system will end the pairing process. To re
gister a ne
w device,
delete one device and th
en repeat the pairing
process. (Refer to
Page 329 of 521

Bluetooth® 2.0 interface 5-248 Features and controls
5
7. The voice guide will say “Start pairing procedure on the device. See the device manual for instructions.” Enter in the Bluetooth
® device the 4-digit number you
have registered in Step 6.
8. The voice guide will
say “Please say the
name of the device after the beep.” You can assign a desired name for the Blue- tooth
® device and register it as a device
tag. Say the name you want to register after the beep. 9. The voice guide will say “Pairing com- plete,” and the pairing process will end.
1. Stop your vehicle in a safe area, put the selector lever in the “P” (PARK) position and apply the parking brake. 2. Press the SPEECH button (except for vehicles with Mitsubishi Multi-Commu-nication System) or
PICK-UP button (for
vehicles with Mitsubishi Multi-Commu- nication System).3. Say “Pair Device.”
Some Bluetooth
® devices requi
re a specific
pairing code. Please re
fer to the device man-
ual for pairing code requirements. The pairing code ente
red here is only used
for the Bluetooth
® connection ce
rtification.
It is any 4-digit numbe
r the user would like
to select. Remember the pairing c
ode as it needs to be
keyed into the Bluetooth
® device later in the
pairing process. Depending on the connecti
on settings of the
Bluetooth
® device, this code may have to be
entered each time you connect the Blue- tooth
® device to the Bluetooth
® 2.0 inter-
face. For the default
connection settings,
refer to the instructions for the device.NOTE
Depending on the Bluetooth
® device, it may
take a few minutes to pair it with the Blue- tooth
® 2.0 interface.
If the Bluetooth
® 2.0 interface cannot recog-
nize the Bluetooth
® device, the voice guide
will say “Pairing has tim
ed out” and the pair-
ing process will be cancelled. Confirm that the devi
ce you are pairing sup-
ports Bluetooth
®, and try pairing it again.
If you enter the wrong number, the voice guide will say “Pairing
failed” and the pair-
ing process will be cancelled. Confirm the number is right, and try pairingit again.NOTE
When the confirmation function is on, after repeating the device
tag you have said, the
voice guide will ask “Is this correct?” Answer “Yes.”
tag, answer “No” and
then say the device tag again.NOTE
Pairing procedure- Type 2
(if so
equipped)NOTE
You cannot pair any Bluetooth
® device with
the Bluetooth
® 2.0 interface unless the vehi-
cle is parked. Before pairing a Bluetooth
®
device with the Bluetooth
® 2.0 interface,
confirm that the vehicle is parked in a safelocation.
BK0239700US.book 248 ページ 2016年6月16日 木曜日 午前10時58分
Page 367 of 521
Driving precaution 6-2 Driving safety
6
N00629301092
Your vehicle has been designed for both nor- mal and occasional off-road use. However, avoid driving the vehicle through areas wherethe tires may get stuck in deep sand or mud as your vehicle is designe
d primarily for use on
pavement, unlike a conventional off-roadvehicle. Keep in mind that 2-wheel drive vehicles are less capable than 4-wh
eel drive vehicles for
driving on muddy, slippery, wet or snow-cov- ered roads. Utility vehicles have
higher ground clearance
and a narrower track, which enables them toperform in a wide variety of off-road situa- tions. Because of the higher ground clear- ance, these vehicles have a higher center ofgravity, which makes them handle differently than ordinary vehicles when driving on pave- ment. They are not designed to maneuver orcorner at the same speed on pavement as con- ventional 2-wheel driv
e passenger cars any
more than low-slung sports cars are designed
to perform satisfactorily in off-road condi- tions.Always drive safely
and steer the vehicle
carefully. Avoid operating the vehicle in a manner that might require sharp turns orabrupt maneuvers. As wi
th other vehicles of
this type, failure to operate this vehicle cor- rectly can result in lo
ss of control or vehicle
rollover. In a rollover crash, an unbelted person is sig- nificantly more likely to die than a person wearing a seat belt. Be
fore starting the vehi-
cle, always make cert
ain that you and all your
passengers are properly wearing their seat belts (with children in the rear seat, in appro- priate restraints).
N00628801191
Fuel economy is depe
ndent on many factors.
Your personal driving habits can have a sig-nificant effect on your fuel consumption. Several recommendations
for achieving the
greatest fuel economy are listed below. Whenever accelerating from a stop, always accelerate
slowly and smoothly.
When parked for even a short period, do not idle the engine. Shut it off. Plan your trips to avoid unnecessary stops.
Keep your tires inflated to the recom- mended pressures. When driving a 4-wheel drive vehicle on highways or dry improved roads, set the drive mode to “4WD ECO” or “4WDAUTO” (Electronically controlled 4WD), or “AWC ECO” or “NORMAL” (S- AW C ) . For freeway driving, maintain a speed of approximately 50 mph (80 km/h) when traffic, roadway and weather conditions safely permit. Keep your air filter clean and your vehicle lubricated according
to the recommenda-
tions in this manual. Always keep your ve
hicle well main-
tained. A poorly maintained engine wastes fuel and costs money. Never overload your vehicle.
N00628900049
Drunk driving is one of the most frequent causes of accidents.Your driving ability ca
n be seriously impaired
even with blood alcohol levels far below the legal minimum. If you
have been drinking,
don’t drive. Ride with a designated non- drinking driver, call a cab or a friend, or use public transportation. Drinking coffee or tak-ing a cold shower will not make you sober.
Driving precaution
WA R N I N G Utility vehicles have
a significantly higher
rollover rate than othe
r types of vehicles.
Avoid abrupt maneuvers and excessive speed. Always buckle up.
Fuel economy
Driving, alcohol and drugs
BK0239700US.book 2 ページ 2016年6月16日 木曜日 午前10時58分
Page 370 of 521
Driving during cold weather
Driving safety 6-5
6
you give extra attention to the following areas, you can better protect yourself andyour passengers: Drive defensively. Be aware of traffic, road and weather c
onditions. Leave plenty
of stopping distance
between your vehicle
and the vehicle ahead. Before changing lanes, check your mir- rors, blind spots, a
nd use your turn-signal
light. While driving, watch the behavior of other drivers, bicycl
ists, and pedestrians.
Always obey applicab
le laws and regula-
tions. Be a polite and alert driver. Alwaysleave room for unexpected events, such as sudden braking. If you plan to drive in another country, obey their vehicle re
gistration laws and
make sure you will be able to get the right fuel.
N00629400445
Check the battery. At the same time, check the terminals and wiring. Duringextremely cold weather, the battery will not be as strong. Also, the battery power level may drop beca
use more power is
used for cold starting and driving.
Before driving the vehicle, check to see if the engine runs at the proper speed and ifthe headlights are as bright as normally. Charge or replace the battery if necessary. During extreme cold weather, it is possi-ble that a very low battery could freeze. Warm the engine sufficiently. After start- ing the engine, allow a short warm-up time to distribute oil to all cylinders. Then drive your vehicle slowly.Stay at low speeds at first so that the transaxle, transfer case and rear axle oil have time to spread to all lubricationpoints. Check the engine antifreeze. If there is not enough coolant because of aleak or from engine
overheating, add Mit-
subishi Motors Genuine Super Long Life Coolant Premium or equivalent.Please read this section in conjunction with the “Engine coolant” on page 9-8.
N00629501528
All the parts of the brake system are criticalto safety. Have the
vehicle serviced by an
authorized Mitsubishi Motors dealer or arepair facility of your
choice at regular inter-
vals according to the “WARRANTY AND MAINTENANCE MANUAL”. Check the brake system while driving at a low speed immediately
after starting, espe-
cially when the brakes are wet, to confirm they work normally. A film of water can be formed on the brakediscs and prevent normal braking after driv- ing in heavy rain or through large puddles, or after the vehicle is washed. If this occurs, drythe brakes out by drivi
ng slowly while lightly
depressing the brake pedal.
Driving during cold weather
WA R N I N G The battery gives off explosive hydrogen gas. Any spark or flame can cause the bat- tery to explode, which could cause serious injury or death.Always wear protecti
ve clothes and a face
mask when working with your battery, or let a skilled mechanic do it.
WA R N I N G Never open the radiator cap when the radiator is hot. You could be seriouslyburned.
Braking When brakes are wet
BK0239700US.book 5 ページ 2016年6月16日 木曜日 午前10時58分
Page 380 of 521
Trailer towing
Driving safety 6-15
6
You’ll need more passing distance up ahead when you’re towing a trailer. And, because you’re a good deal longer, you’ll need to gomuch farther beyond the passed vehicle before you can return to your lane. Hold the bottom of the steering wheel with one hand. Then, to move the trailer to the left,just move that hand to the left. To move the trailer to the right, move your hand to the right. Always back up sl
owly and, if possible,
have someone guide you. When you’re turning with a trailer, make wider than normal turns to help prevent the trailer from striking shoulders, curbs, roadsigns, trees or other objects.
Avoid jerky or sudden maneuvers. Signal well in advance. Towing a trailer puts additional burden on the engine and transaxle,
which may cause over-
heating. Following ar
e some suggestions to
reduce overheating: When towing at high al
titudes, engine coolant
and automatic transaxle oil will overheat at a lower temperature than at normal altitudes. If you turn your engine off immediately aftertowing at high altitude
on steep uphill grades,
your vehicle may show
signs similar to over-
heating. To avoid this
, let the engine run
while parked (preferably on level ground) with the automatic transaxle in the “P”turning the engine off.
If the engine coolant temperature indica- tor flashes on the information screen in the multi-information display or the engine power drops suddenly, refer to “Engine overheati
ng” on page 8-4.
If the warning display or warning display illuminates, re
fer to “Warning dis-
play” on page 5-70, 5-78.
Reduce speed and downshift before you start down a long or steep downgrade. If you don’t downshift, over using the brakes can cause reduced brake efficiency. You can tow in “D” (DRIVE) position. You may want to shift the selector lever to the 3rd or a lower position, under heavy loads or hilly conditions. Always place chocks or blocks under both the vehicle and trailer wheels when parking. Besure that the parking brake is firmly set and that the selector lever is in the “P” (PARK) position. Avoid parki
ng on a hill with a
trailer, but if it cannot be avoided, do so only after performing the following:
Passing Backing up Making turns
CAUTION Making sharp turns while towing a trailer could cause the
trailer to come in contact
with the vehicle. Your
vehicle could be dam-
aged. Avoid making sharp turns while tow- ing a trailer.
Overheating Cause of overheating
Solution
Air conditioning on Turn off Highway speeds Reduce speed Going up hills Select lower gear posi-
tion
Stop-and-go city traf- fic
With the vehicle stopped, shift to the “N” (NEUTRAL) position and idle the engine at high idle.
Driving on hills Parking
BK0239700US.book 15 ページ 2016年6月16日 木曜日 午前10時58分
Page 407 of 521
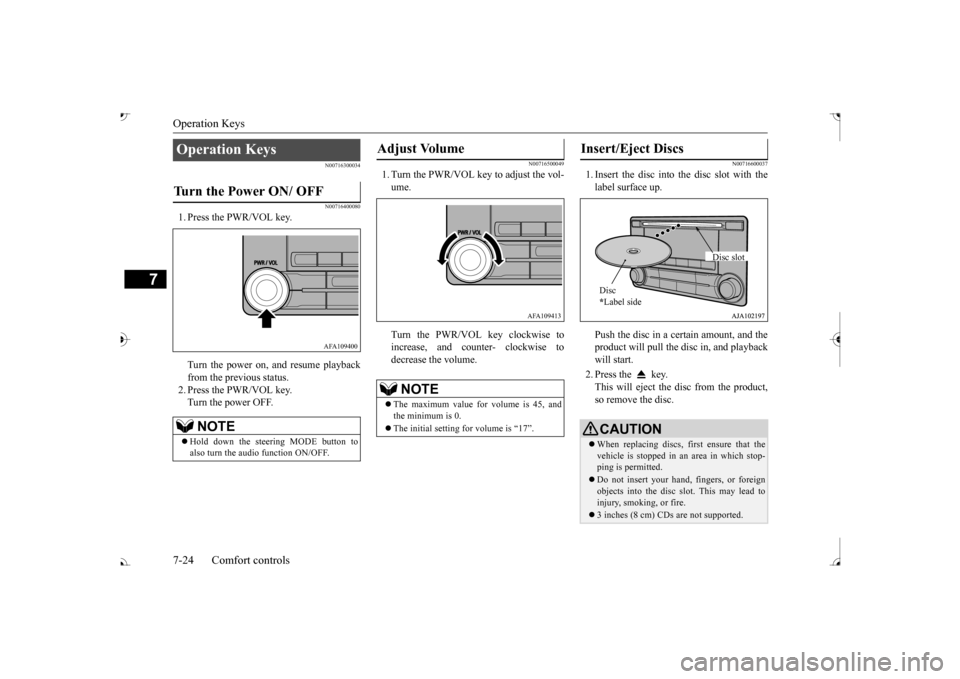
Operation Keys 7-24 Comfort controls
7
N00716300034 N00716400080
1. Press the PWR/VOL key. Turn the power on,
and resume playback
from the previous status. 2. Press the PWR/VOL key.Turn the power OFF.
N00716500049
1. Turn the PWR/VOL key to adjust the vol- ume. Turn the PWR/VOL key clockwise to increase, and count
er- clockwise to
decrease the volume.
N00716600037
1. Insert the disc into
the disc slot with the
label surface up. Push the disc in a certain amount, and the product will pull the disc in, and playbackwill start. 2. Press the key. This will eject the disc from the product, so remove the disc.
Operation Keys Turn the Power ON/ OFF
NOTE
Hold down the steering MODE button to also turn the audio function ON/OFF.
AFA109400
Adjust Volume
NOTE
The maximum value for volume is 45, and the minimum is 0. The initial setting for volume is “17”.
AFA109413
Insert/Eject Discs
CAUTIONWhen replacing discs, first ensure that the vehicle is stopped in an
area in which stop-
ping is permitted. Do not insert your hand, fingers, or foreign objects into the disc
slot. This may lead to
injury, smoking, or fire. 3 inches (8 cm) CDs are not supported.Disc * Label side
Disc slot
BK0239700US.book 24 ページ 2016年6月16日 木曜日 午前10時58分