buttons MITSUBISHI OUTLANDER 2019 Owner's Manual (in English)
[x] Cancel search | Manufacturer: MITSUBISHI, Model Year: 2019, Model line: OUTLANDER, Model: MITSUBISHI OUTLANDER 2019Pages: 451, PDF Size: 58.02 MB
Page 89 of 451
Keyless entry system (if so equipped)
Features and controls 5-7
5
N00562301094
Your electronic immo
bilizer operates on a
radio frequency subject to Federal Communi- cations Commission (FCC)
Rules (For vehi-
cles sold in U.S.A.
) and Industry Canada
Rules (For vehicles so
ld in Canada). This
device complies with part 15 of FCC Rulesand Industry Canada
licence-exempt RSS
standard(s). Operation is subject to the following two con- ditions. This device may not
cause harmful inter-
ference. This device must ac
cept any interference
received, including interference that may cause undesired operation.
N00509002099
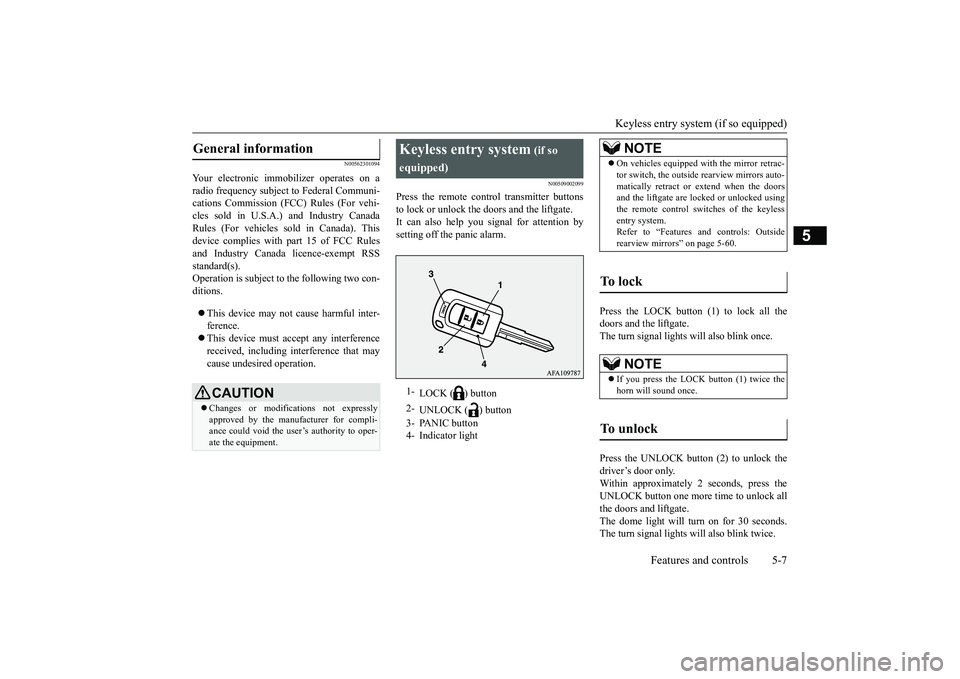
Press the remote control transmitter buttons to lock or unlock the doors and the liftgate. It can also help you signal for attention bysetting off the panic alarm.
Press the LOCK button (1) to lock all the doors and the liftgate.The turn signal lights
will also blink once.
Press the UNLOCK button (2) to unlock the driver’s door only. Within approximately 2 seconds, press theUNLOCK button one more time to unlock all the doors and liftgate. The dome light will turn on for 30 seconds.The turn signal lights will also blink twice.
General information
CAUTION Changes or modifica
tions not expressly
approved by the manufacturer for compli- ance could void the user’s authority to oper-ate the equipment.
Keyless entry system
(if so
equipped)1-
LOCK ( ) button
2-
UNLOCK ( ) button
3- PANIC button 4- Indicator light
NOTE
On vehicles equipped wi
th the mirror retrac-
tor switch, the outside rearview mirrors auto-matically retract or extend when the doorsand the liftgate are locked or unlocked using the remote control swit
ches of the keyless
entry system.Refer to “Features and controls: Outside rearview mirrors” on page 5-60.
To l o c k
NOTE
If you press the LOCK button (1) twice the horn will sound once.
To unlock
BK0264300US.book 7 ページ 2018年2月28日 水曜日 午後5時16分
Page 90 of 451
Keyless entry system (if so equipped) 5-8 Features and controls
5
The front side-marker and parking lights will also turn on for approximately 30 seconds.Refer to “Welcome light” on page 5-217. The horn and turn signal lights of the keyless entry system answerback function can be changed as required. This is done with thekey removed from the ignition switch.
The answerback function can be set in the following three ways. Each time the answerback function is set, achime will sound to tell you the condition of the answerback function. 1. Remove the key from the ignition switch. 2. Open the driver’s door and turn the com- bination headlights and dimmer switch to the “OFF” position.3. Press the LOCK button (1) for 4 to 10 sec- onds and press the UNLOCK button (2) during this time.4. Release in sequence the UNLOCK and LOCK buttons within 5 seconds of press- ing the UNLOCK button in step 3.
The answerback function can be turned ON or OFF separately. 1. Remove the key from
the ignition switch.
2. Open the driver’s door and turn the com- bination headlights a
nd dimmer switch to
the “OFF” position. 3. Press the UNLOCK button (2) for 4 to 10 seconds and press the LOCK button (1) during this time. 4. Release in sequence the UNLOCK andLOCK buttons within 5 seconds of press- ing the LOCK button in step 3.
NOTE
If the UNLOCK button (2) is pressed and no doors or the liftgate are opened withinapproximately 30 seconds, the doors and the liftgate will automatically re-lock. On a vehicle equippe
d with the Smartphone
Link Display Audio, the functions can be adjusted on the screen. For details, refer to the separate owner’s manual. The door and liftgate
unlock function can be
set so that all doors a
nd liftgate unlock when
the UNLOCK button (2) is pressed once. Refer to “Setting of door
and liftgate unlock
function” on page 5-9.
Answerback function
NOTE
The answerback functi
on will not operate if
any of the doors are open.
Horn deactivation/reactivation
One chime: The horn will not sound. Two chimes: The horn will sound. Four chimes: The horn will sound if the
LOCK button is pressed twice within 1 second.
NOTE
On a vehicle equipped with the Smartphone Link Display Audio, the functions can beadjusted on the screen. For details, refer to the separate owner’s manual.
Turn signal lights deactiva- tion/reactivation
Number of chimes
To l o c k
To u n l o c k
One chime One flash Two flashes Two chimes One flash No flash Three chimes No flash Two flashes Four chimes Two flashes One flash Five chimes No flash One flash Six chimes Two flashes No flash Seven chimes
No flash No flash
BK0264300US.book 8 ページ 2018年2月28日 水曜日 午後5時16分
Page 91 of 451
Keyless entry system (if so equipped)
Features and controls 5-9
5
N00543601199
The door and liftgate unlock function can be set to the following two conditions. Each time the door and
liftgate unlock func-
tion is set, a chime will
sound to tell you the
condition of the door and liftgate unlock function.
1. Remove the key from
the ignition switch.
2. Open the driver’s door and turn the com-bination headlights a
nd dimmer switch to
the “OFF” position. 3. Press the LOCK button (1) for 4 to 10 sec-onds and press the UNLOCK button (2) during this time. 4. Release in sequence the LOCK andUNLOCK buttons within 10 seconds of pressing the LOCK button in step 3.
N00543701060
If you are near your vehicle and feel threat- ened, you may activate the alarm to call atten- tion as follows: 1. Press the PANIC button (3) for more than 1 second.2. The headlights will blink on and off and the horn will sound intermittently for about 3 minutes.3. To turn off the alarm, press any button on the remote control transmitter.
N00543801087
Only remote control transmitters pro- grammed with the vehicle’s electronics canlock or unlock all doors and the liftgate. If you lose the remote control transmitter, you can order a remote control transmitter from your authorized Mitsubishi Motors dealer by referring to the key number. To prevent vehicle theft, the ID code for theremote control transmitter must be changed. Take your vehicle and
all remote control
transmitters to your authorized MitsubishiMotors dealer to have your ID code changed.
N00543900049
To add a remote control transmitter, you must already have 1 regist
ered remote control
transmitter.Registering the ID code can be done by your- self or by your authorized Mitsubishi Motors dealer. For you to regist
er the ID code your-
self, follow the “Customer remote control transmitter programming” procedure below. If you choose to have your authorizedMitsubishi Motors dealer register the ID code, take your vehi
cle and any remaining
NOTE
On a vehicle equipped with the Smartphone Link Display Audio, the functions can beadjusted on the screen. For details, refer tothe separate owner’s manual.
Setting of door and liftgate unlock function
Number of chimes
Condition
One chime [Factory set- ting]
When the UNLOCK button is pressed one time, all doors and the liftgate unlock.
Two chimes
When the UNLOCK button is pressed one time, only the driver’s door unlocks.When the UNLOCK button is pressed two times in suc- cession, all doors and the lift-gate unlock.
NOTE
On a vehicle equipped with the Smartphone Link Display Audio, the functions can be adjusted on the screen. For details, refer tothe separate owner’s manual.
Using the panic alarm
Replacement remote control transmitters
Additional remote control transmitters
BK0264300US.book 9 ページ 2018年2月28日 水曜日 午後5時16分
Page 92 of 451
Keyless entry system (if so equipped) 5-10 Features and controls
5
keys to your authorized Mitsubishi Motors dealer.
N00544001220
You can program new re
mote control trans-
mitters to the system
if you have one valid
(already registered) re
mote control transmit-
ter by doing the following: 1. Have available al
l (current and new)
remote control transmitters you wish to register.2. With a valid (already registered) remote control transmitter, press the UNLOCK button (2) for 4 to 10 seconds. Then pressand hold the LOCK button (1). 3. Within 10 seconds of pressing the LOCK button, release the LOCK and UNLOCKbuttons in sequence.
At this time, ID code
s for all remote con-
trol transmitters except for the transmitterused in steps 2 and 3 are erased and the answerback function (door is locked and unlocked) informs you that the registra-tion mode has been activated. 4. Within 60 seconds after step 3, complete the following ID code
registration opera-
tion using the next remote control trans- mitter you wish to register within 4 seconds. i) Press both the LOCK and UNLOCK buttons for 2 seconds.ii) Release both the LOCK and UNLOCK buttons for 1 second. iii) Press the UNLOCK button. Theanswerback function informs you that the ID code registration of the transmitter is completed.5. To register the ID
codes of additional
remote control transmitters, repeat step 4 within 60 seconds after step 4.6. If no ID code of a remote control trans- mitter is registered within 60 seconds after step 4, the regi
stration mode is can-
celed and the normal mode returns.
NOTE
You are provided with 2 remote control transmitters, but you may register up to 8 remote control transmitters.
Customer remote control trans- mitter programming (Except for vehicles sold in Canada)
NOTE
For verification purposes, try to lock and unlock the doors after the registration is completed.
The indicator light (4) comes on each time a button is pressed. The keyless entry system does not work if the key is in the ignition switch. The remote control transmitter can be used from approximately 40
feet (12 m) away.
However, this distance
may change if your
vehicle is near a TV
transmitting tower, a
power station, or
a radio station.
If the following conditi
ons are observed after
pressing the LOCK (1) or UNLOCK (2) but- ton on the remote control transmitter, thebattery in the remote control transmitter may need to be replaced. • The doors and the lift
gate cannot be locked
or unlocked. • The panic alarm
cannot be operated.
• The indicator light
(4) is dim or does not
come on.
If you lose your remote control transmitter, please contact an au
thorized Mitsubishi
Motors dealer for a replacement. If you wish to obtain
an additional remote
control transmitter, please contact an autho- rized Mitsubishi Moto
rs dealer. A maximum
of 8 remote control tr
ansmitters can be pro-
grammed for your vehicle.NOTE
BK0264300US.book 10 ページ 2018年2月28日 水曜日 午後5時16分
Page 93 of 451
Keyless entry system (if so equipped)
Features and controls 5-11
5
N00546101124
Your keyless entry system operates on a radio frequency subject to
Federal Communica-
tions Commission (FCC)
Rules (For vehicles
sold in U.S.A.) and Industry Canada Rules (For vehicles sold in Canada). This devicecomplies with Part 15 of FCC Rules and Industry Canada licenc
e-exempt RSS stan-
dard(s).Operation is subject to the following two con- ditions. This device may not
cause harmful inter-
ference. This device must ac
cept any interference
received, including interference that may cause undesired operation.
N00544101205
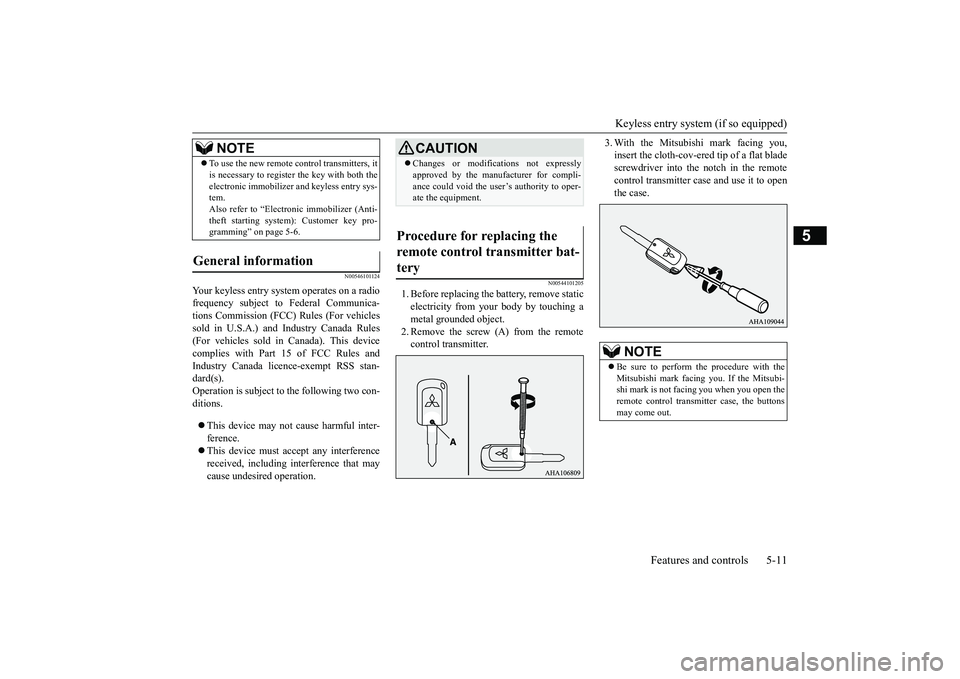
1. Before replacing the
battery, remove static
electricity from your body by touching ametal grounded object. 2. Remove the screw (A) from the remote control transmitter.
3. With the Mitsubishi mark facing you, insert the cloth-cov-ered tip of a flat bladescrewdriver into the notch in the remote control transmitter ca
se and use it to open
the case.
To use the new remote control transmitters, it is necessary to register the key with both theelectronic immobilizer
and keyless entry sys-
tem. Also refer to “Electr
onic immobilizer (Anti-
theft starting system): Customer key pro-gramming” on page 5-6.
General information
NOTE
CAUTION Changes or modifica
tions not expressly
approved by the manufacturer for compli-ance could void the user’s authority to oper-ate the equipment.
Procedure for replacing the remote control transmitter bat- tery
NOTE
Be sure to perform the procedure with the Mitsubishi mark facing you. If the Mitsubi- shi mark is not facing you when you open the remote control transmitter case, the buttonsmay come out.
BK0264300US.book 11 ページ 2018年2月28日 水曜日 午後5時16分
Page 110 of 451
Free-hand Advanced
Security Transmitter (F.A.S
.T.-key) (if so equipped)
5-28 Features and controls
5
N00561100014
To add a F.A.S.T.-key, you must already have 2 registered F.A.S.T.-keys. You need to regis- ter the ID code to the vehicle.Registering the ID code can be done by your authorized Mitsubishi Motors dealer. Or it can be done by yourself (except for vehiclessold in Canada). For you to register the ID code yourself, fol- low the “Customer F.A.S.T.-key program- ming” procedure below. If you choose to have your authorizedMitsubishi Motors dealer register the ID code, take your vehicle and all remaining F.A.S.T.-keys to your authorized MitsubishiMotors dealer.
N00561201227
You can program new F.A.S.T.-keys to thesystem if you have tw
o valid (already regis-
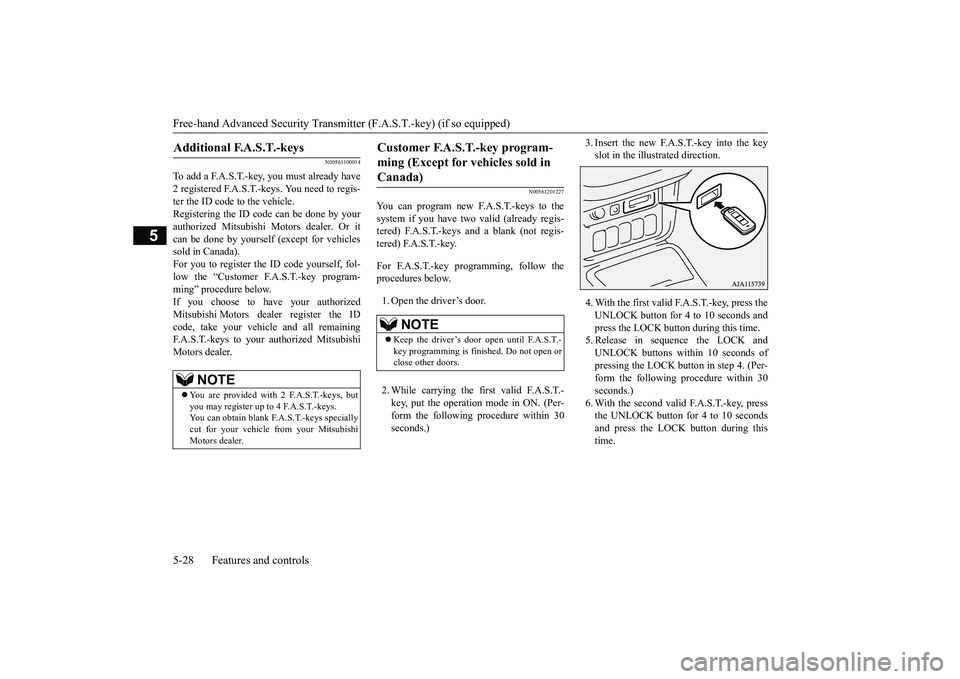
tered) F.A.S.T.-keys and a blank (not regis- tered) F.A.S.T.-key. For F.A.S.T.-key programming, follow the procedures below. 1. Open the driver’s door. 2. While carrying the fi
rst valid F.A.S.T.-
key, put the operation mode in ON. (Per- form the following procedure within 30 seconds.)
3. Insert the new F.A.S.T.-key into the key slot in the illustrated direction. 4. With the first valid F.A.S.T.-key, press the UNLOCK button for 4 to 10 seconds and press the LOCK button during this time. 5. Release in sequence the LOCK andUNLOCK buttons within 10 seconds of pressing the LOCK button in step 4. (Per- form the following procedure within 30seconds.) 6. With the second valid F.A.S.T.-key, press the UNLOCK button for 4 to 10 secondsand press the LOCK button during this time.
Additional F.A.S.T.-keys
NOTE
You are provided with 2 F.A.S.T.-keys, but you may register up to 4 F.A.S.T.-keys. You can obtain blank F.
A.S.T.-keys specially
cut for your vehicle from your MitsubishiMotors dealer.
Customer F.A.S.T.-key program- ming (Except for vehicles sold in Canada)
NOTE
Keep the driver’s door open until F.A.S.T.- key programming is finished. Do not open or close other doors.
BK0264300US.book 28 ページ 2018年2月28日 水曜日 午後5時16分
Page 111 of 451
Free-hand Advanced Securi
ty Transmitter (F.A.S.T.-key) (if so equipped)
Features and controls 5-29
5
7. Release in sequence the LOCK and UNLOCK buttons within 10 seconds ofpressing the LOCK button in step 6. The immobilizer display on the information screen in the multi-information displaywill blink. When registration of ID code is complete, the buzzer will s
ound 3 times and the
immobilizer display will come on for 30seconds. If an error occurs, F.A.S.T.-key program- ming will be terminated and the buzzerwill sound for 3 seconds. 8. If you wish to register another F.A.S.T.- key, repeat the proc
ess from step 1 after
the operation mode is put in OFF.9. When all F.A.S.T.-keys are registered, remove the F.A.S.T.-key from the key slot.
N00515501337
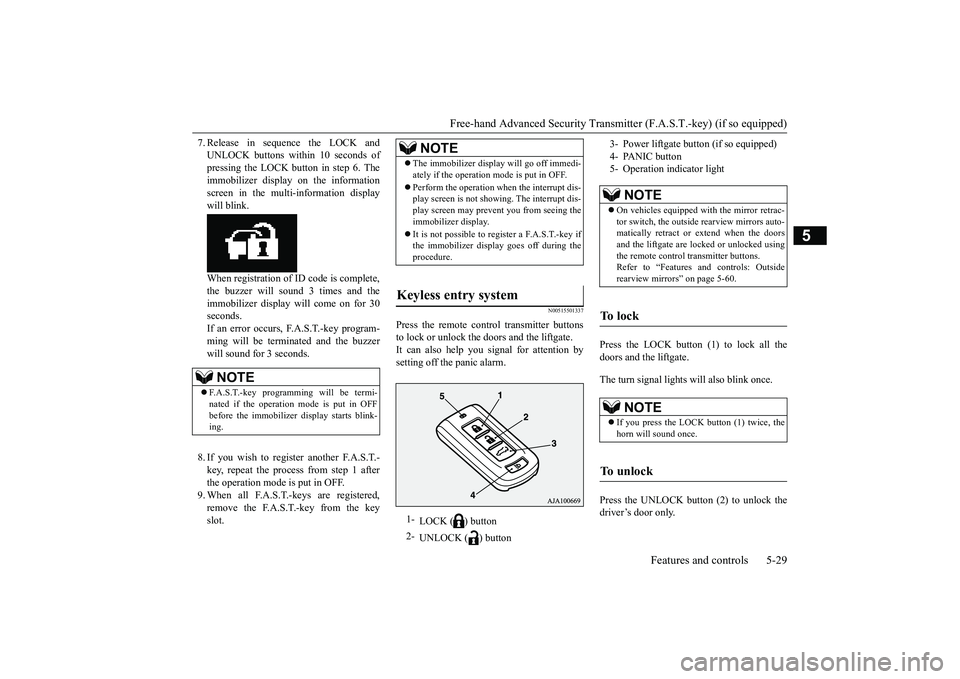
Press the remote control transmitter buttonsto lock or unlock the doors and the liftgate.It can also help you signal for attention by setting off the panic alarm.
Press the LOCK button (1) to lock all the doors and the liftgate. The turn signal lights
will also blink once.
Press the UNLOCK button (2) to unlock the driver’s door only.
NOTE
F.A.S.T.-key programming will be termi- nated if the operation mode is put in OFF before the immobilizer
display starts blink-
ing.
NOTE
The immobilizer displa
y will go off immedi-
ately if the operation
mode is put in OFF.
Perform the operation when the interrupt dis- play screen is not show
ing. The interrupt dis-
play screen may prevent you from seeing theimmobilizer display. It is not possible to register a F.A.S.T.-key if the immobilizer displa
y goes off during the
procedure.
Keyless entry system
1-
LOCK ( ) button
2-
UNLOCK ( ) button
3- Power liftgate button (if so equipped) 4- PANIC button 5- Operation indicator light
NOTE
On vehicles equipped wi
th the mirror retrac-
tor switch, the outside rearview mirrors auto- matically retract or extend when the doors and the liftgate are locked or unlocked usingthe remote control transmitter buttons. Refer to “Features and controls: Outside rearview mirrors” on page 5-60.
To l o c k
NOTE
If you press the LOCK button (1) twice, the horn will sound once.
To u n l o c k
BK0264300US.book 29 ページ 2018年2月28日 水曜日 午後5時16分
Page 112 of 451
Free-hand Advanced
Security Transmitter (F.A.S
.T.-key) (if so equipped)
5-30 Features and controls
5
Within approximately 2 seconds, press the UNLOCK button one more time to unlock allthe doors and liftgate. The dome light will turn on for 30 seconds. The turn signal lights will also blink twice.The front side-marker and parking lights will also turn on for approximately 30 seconds. Refer to “Welcome light” on page 5-217. The horn and turn signal lights of the keyless entry system answerback function can be changed as required. This is done with the operation mode in OFF.
The answerback function can be set in the following three ways. 1. Put the operation mode in OFF. 2. Open the driver’s door and turn the com- bination headlights and dimmer switch tothe “OFF” position. 3. Press the LOCK button (1) for 4 to 10 sec- onds and press the UNLOCK button (2)during this time. 4. Release in sequence the UNLOCK and LOCK buttons within 10 seconds ofpressing the UNLOCK button in step 3.
The answerback function from the turn signal lights can be turned ON or OFF separately. 1. Put the operation mode in OFF. 2. Open the driver’s door and turn the com- bination headlights a
nd dimmer switch to
the “OFF” position. 3. Press the UNLOCK button (2) for 4 to 10 seconds and press the LOCK button (1) during this time. 4. Release in sequence the UNLOCK andLOCK buttons within 10 seconds of pressing the LOCK button in step 3.
NOTE
If the UNLOCK button (2) is pressed and no doors or the liftgate are opened within approximately 30 seconds, the doors and the liftgate will automatically re-lock.On a vehicle equippe
d with the Smartphone
Link Display Audio, the functions can be adjusted on the screen. For details, refer tothe separate owner’s manual. The door and liftgate
unlock function can be
set so that all doors a
nd liftgate unlock when
the UNLOCK button (2) is pressed once. Refer to “Setting of door
and liftgate unlock
function” on page 5-31.
Answerback function
Horn deactivation/reactivation One chime: The horn will not sound. Two chimes: The horn will sound.Four chimes: The horn will sound if the
LOCK button is pressed twice within 1 second.
NOTE
On a vehicle equipped with the Smartphone Link Display Audio, the functions can be adjusted on the screen. For details, refer tothe separate owner’s manual.
Turn signal light
deactivation/reactiva-
tionNumber of chimes
To l o c k
To unlock
One chime One flash Two flashes Two chimes One flash No flash Three chimes No flash Two flashes Four chimes Two flashes One flash Five chimes No
flash One flash
Six chimes Two flashes No flash Seven chimes No flash No flash
BK0264300US.book 30 ページ 2018年2月28日 水曜日 午後5時16分
Page 113 of 451
Free-hand Advanced Securi
ty Transmitter (F.A.S.T.-key) (if so equipped)
Features and controls 5-31
5
The buzzer answerback function can be turned ON or OFF as required.
N00544601196
The door and liftgate unlock function can beset to the following two conditions. Each time the door and
liftgate unlock func-
tion is set, a chime will
sound to tell you the
condition of the door and liftgate unlock function.
1. Put the operation mode in OFF. 2. Open the driver’s door and turn the com-bination headlights a
nd dimmer switch to
the “OFF” position. 3. Press the LOCK button (1) for 4 to 10 sec-onds and press the UNLOCK button (2) during this time. 4. Release in sequence the LOCK andUNLOCK buttons within 10 seconds of pressing the LOCK button in step 3.
N00579500020
After unlocking the doors and the liftgate, the power liftgate
can be operated
by pressing the
power liftgate button (3). Refer to “Power liftgate” on page 5-38.
N00544701142
If you are near your vehicle and feel threat-ened, you can activate th
e alarm to call atten-
tion as follows: 1. Press the PANIC button (4) for more than 1 second. 2. The headlights will blink on and off andthe horn will sound intermittently for approximately 3 minutes. 3. To turn off the alarm, press any button onthe remote control transmitter.
NOTE
On a vehicle equipped with the Smartphone Link Display Audio, the functions can beadjusted on the screen. For details, refer tothe separate owner’s manual.
Buzzer deactivation/reactivation
NOTE
On a vehicle equipped with the Smartphone Link Display Audio, the functions can be adjusted on the screen. For details, refer to aseparate owner’s manual.
Setting of door and liftgate unlock function
Number of chimes
Condition
One chime [Factory setting]
When the UNLOCK button, driver’s or front passenger’s door lock/unlock switch, or liftgate OPEN switch is pressed one time, all doors and the liftgate unlock.
Tw o chimes
When the UNLOCK button or the driver’s door lock/unlock switch is pres
sed one time,
only the driver's door unlocks.When the UNLOCK button or the driver’s door lock/unlock switch is pressed two times in succession, all doors and the liftgate unlock.
NOTE
On a vehicle equipped with the Smartphone Link Display Audio, the functions can beadjusted on the screen. For details, refer tothe separate owner’s manual.
Operating the power liftgate
Using the panic alarm
NOTE
The indicator light (5)
comes on each time a
button is pressed.
BK0264300US.book 31 ページ 2018年2月28日 水曜日 午後5時16分
Page 315 of 451
HomeLink® Wireless Control System (if so equipped)
Features and controls 5-233
5
N00554301040
HomeLink
® Wireless Control System is a
registered trademark of Gentex Corporation. HomeLink
® provides a convenient way to
replace up to 3 hand-held radio-frequency (RF) transmitters used
to activate devices
such as gate operators, garage door openers, entry door locks, securi
ty systems, even home
lighting. Addi
tional HomeLink
® information
can be found at www.homelink.com, www.youtube.com/HomeL
inkGentex, or by
calling the toll-free HomeLink
®-Hotline at 1-
800-355-3515.
N00584600029
Some garage door openers manufactured after 1995 have “rollin
g code protection”.
To program a garage door openerequipped with “rolli
ng code protection”;
you will need to access the garage door opener motor to press the motor’s “Learn”or “Smart” buttons. For convenience, use a ladder and another person to assist you. It is recommended that a new battery be placed in the hand-held transmitter of the device being programmed to HomeLink
®
for quicker training and accurate trans- mission of the radio-frequency signal.
HomeLink
® Wireless Con-
trol System
(if so equipped)
WA R N I N G Do not use HomeLink
® with any garage
door opener that lacks safety stop and reverse features as re
quired by U.S. Fed-
eral Regulations.
A garage door opener
which cannot detect an object in the path of a closing garage d
oor and then auto-
matically stop and reverse, does not meetcurrent U.S. Federal Regulations. Using a garage door opener wi
thout these features
increases the risk of serious injury ordeath.
During programming, your garage door or gate may open or cl
ose. Make sure that
people and ob
jects are clear of the garage
door or gate that you are programming.NOTE
Once HomeLink
® is programmed, retain the
original transmitter for future programming procedures (for exam
ple, new vehicle pur-
chases). Upon sale of the vehicle, the pro- grammed HomeLink
® buttons should be
erased for security purposes. Refer to “Cleaning the programmed information” on page 5-237. You can program a maximum of 3 devices. To change or replace any of the 3 devicesafter it has been in
itially programmed, you
must first erase the current settings. See “Cleaning the programmed information”on page 5-237 or “Reprogramming a single HomeLink
® button” on page 5-237.
WA R N I N G
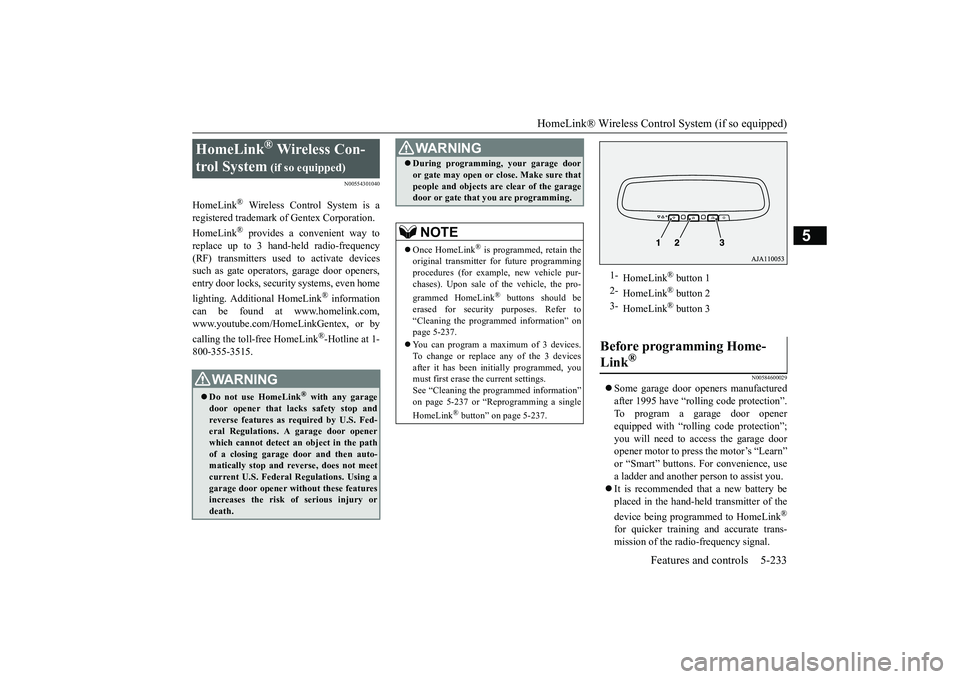
1-
HomeLink
® button 1
2-
HomeLink
® button 2
3-
HomeLink
® button 3
Before programming Home- Link
®
BK0264300US.book 233 ページ 2018年2月28日 水曜日 午後5時16分