relay MITSUBISHI OUTLANDER 2020 Owner's Manual (in English)
[x] Cancel search | Manufacturer: MITSUBISHI, Model Year: 2020, Model line: OUTLANDER, Model: MITSUBISHI OUTLANDER 2020Pages: 443, PDF Size: 60.03 MB
Page 403 of 443

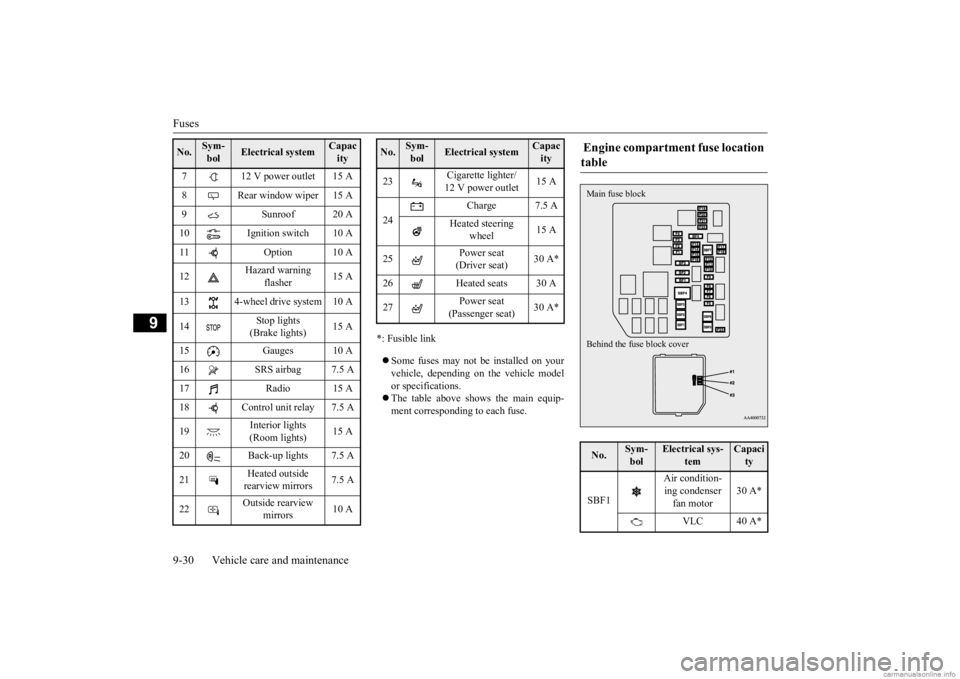
Fuses 9-30 Vehicle care and maintenance
9
*: Fusible link Some fuses may not be installed on your vehicle, depending on
the vehicle model
or specifications. The table above show
s the main equip-
ment corresponding to each fuse.
7 12 V power outlet 15 A 8 Rear window wiper 15 A 9 Sunroof 20 A 10 Ignition switch 10 A11 Option 10 A 12
Hazard warning
flasher
15 A
13 4-wheel drive system 10 A 14
Stop lights (Brake lights)
15 A
15 Gauges 10 A 16 SRS airbag 7.5 A 17 Radio 15 A18 Control unit relay 7.5 A 19
Interior lights (Room lights)
15 A
20 Back-up lights 7.5 A 21
Heated outside rearview mirrors
7.5 A
22
Outside rearview
mirrors
10 A
No.
Sym- bol
Electrical system
Capacity
23
Cigarette lighter/ 12 V power outlet
15 A
24
Charge 7.5 A
Heated steering
wheel
15 A
25
Power seat (Driver seat)
30 A*
26 Heated seats 30 A 27
Power seat (Passenger seat)
30 A*
No.
Sym- bol
Electrical system
Capacity
Engine compartment fuse location table No.
Sym- bol
Electrical sys-
tem
Capacity
SBF1
Air condition- ing condenser fan motor
30 A*
VLC 40 A*
Behind the fuse block cover Main fuse block
BK0278200US.book 30 ページ 2019年4月10日 水曜日 午前10時59分
Page 409 of 443

Replacement of light bulbs 9-36 Vehicle care and maintenance
9
N00901801216
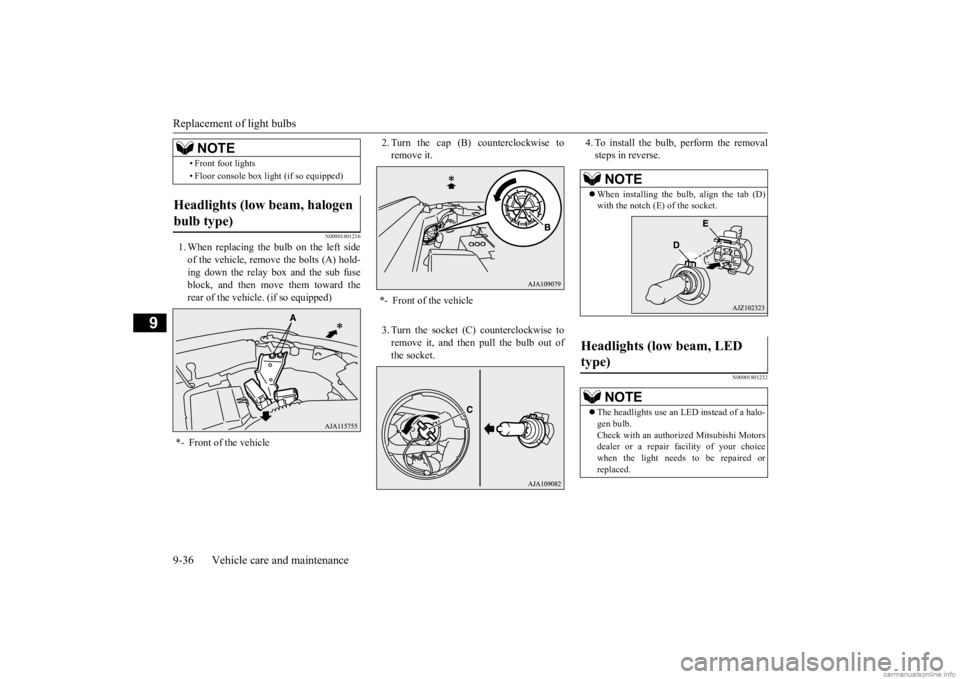
1. When replacing the bulb on the left side of the vehicle, remove the bolts (A) hold- ing down the relay box and the sub fuseblock, and then move them toward the rear of the vehicle. (if so equipped)
2. Turn the cap (B) counterclockwise to remove it. 3. Turn the socket (C) counterclockwise to remove it, and then pull the bulb out of the socket.
4. To install the bulb, perform the removal steps in reverse.
N00901801232
• Front foot lights • Floor console box light (if so equipped)
Headlights (low beam, halogen bulb type) *- Front of the vehicle
NOTE
*- Front of the vehicle
NOTE
When installing the bulb, align the tab (D) with the notch (E) of the socket.
Headlights (low beam, LED type)
NOTE
The headlights use an LED instead of a halo- gen bulb.Check with an authorized Mitsubishi Motors dealer or a repair fa
cility of your choice
when the light needs to be repaired orreplaced.
BK0278200US.book 36 ページ 2019年4月10日 水曜日 午前10時59分
Page 410 of 443

Replacement of light bulbs
Vehicle care and maintenance 9-37
9
N00901901158
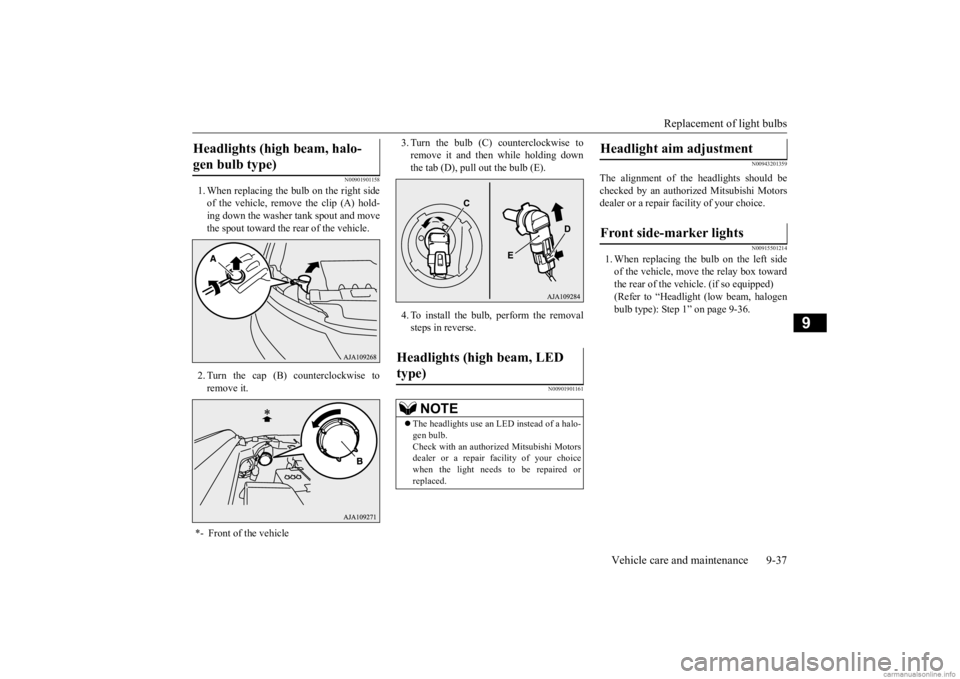
1. When replacing the bulb on the right side of the vehicle, rem
ove the clip (A) hold-
ing down the washer tank spout and move the spout toward the rear of the vehicle. 2. Turn the cap (B) counterclockwise to remove it.
3. Turn the bulb (C) counterclockwise to remove it and then while holding downthe tab (D), pull out the bulb (E). 4. To install the bulb, perform the removal steps in reverse.
N00901901161
N00943201359
The alignment of the headlights should be checked by an authorized Mitsubishi Motors dealer or a repair fa
cility of your choice.
N00915501214
1. When replacing the bulb on the left side of the vehicle, move the relay box toward the rear of the vehicle. (if so equipped) (Refer to “Headlight
(low beam, halogen
bulb type): Step 1” on page 9-36.
Headlights (high beam, halo- gen bulb type) *- Front of the vehicle
Headlights (high beam, LED type)
NOTE
The headlights use an LED instead of a halo- gen bulb.Check with an authorized Mitsubishi Motors dealer or a repair fa
cility of your choice
when the light needs to be repaired orreplaced.
Headlight aim adjustment Front side-marker lights
BK0278200US.book 37 ページ 2019年4月10日 水曜日 午前10時59分