brake MITSUBISHI OUTLANDER PHEV 2014 Owner's Manual (in English)
[x] Cancel search | Manufacturer: MITSUBISHI, Model Year: 2014, Model line: OUTLANDER PHEV, Model: MITSUBISHI OUTLANDER PHEV 2014Pages: 442, PDF Size: 19.04 MB
Page 6 of 442
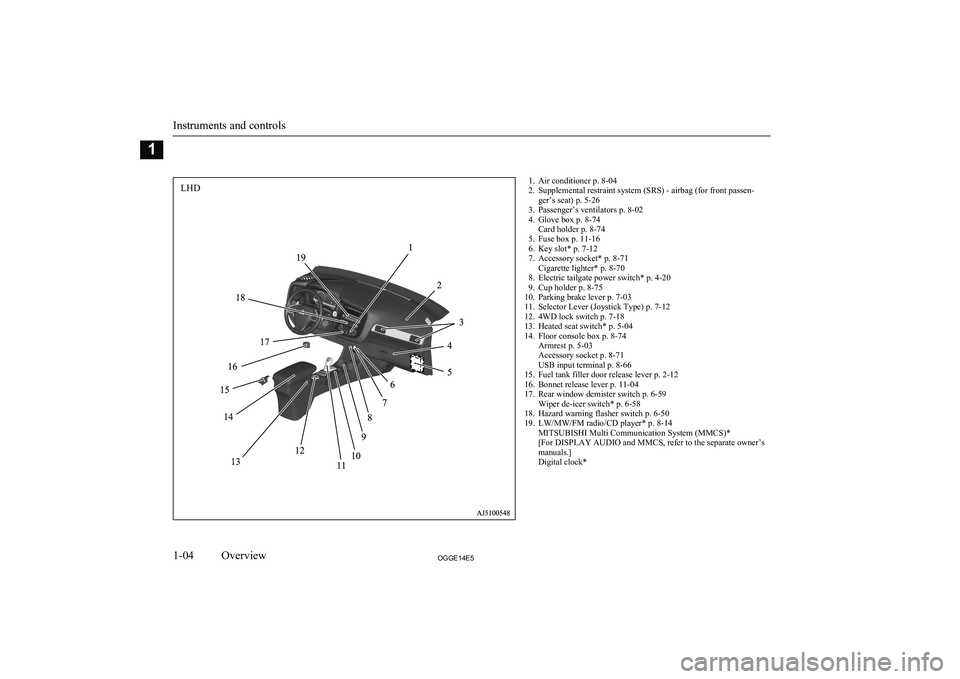
1. Air conditioner p. 8-04
2. Supplemental restraint system (SRS) - airbag (for front passen- ger’s seat) p. 5-26
3. Passenger’s ventilators p. 8-02
4. Glove box p. 8-74 Card holder p. 8-74
5. Fuse box p. 11-16
6. Key slot* p. 7-12
7. Accessory socket* p. 8-71 Cigarette lighter* p. 8-70
8. Electric tailgate power switch* p. 4-20
9. Cup holder p. 8-75
10. Parking brake lever p. 7-03
11. Selector Lever (Joystick Type) p. 7-12
12. 4WD lock switch p. 7-18
13. Heated seat switch* p. 5-04
14. Floor console box p. 8-74 Armrest p. 5-03
Accessory socket p. 8-71
USB input terminal p. 8-66
15. Fuel tank filler door release lever p. 2-12
16. Bonnet release lever p. 11-04
17. Rear window demister switch p. 6-59 Wiper de-icer switch* p. 6-58
18. Hazard warning flasher switch p. 6-50
19. LW/MW/FM radio/CD player* p. 8-14 MITSUBISHI Multi Communication System (MMCS)*
[For DISPLAY AUDIO and MMCS, refer to the separate owner’s
manuals.]
Digital clock*
Instruments and controls
1-04OGGE14E5Overview1LHD
Page 7 of 442
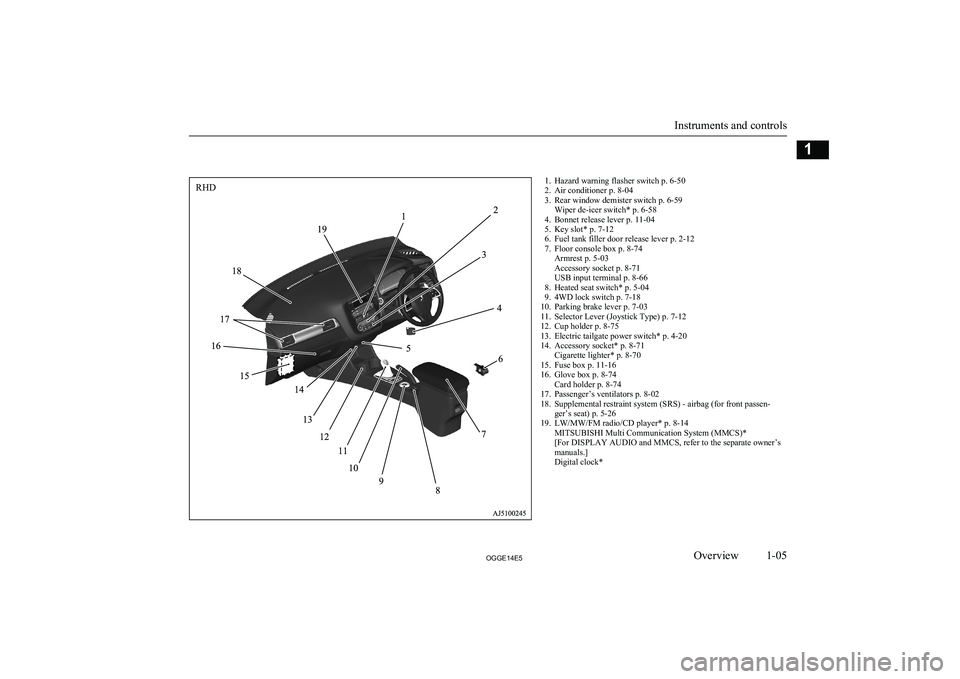
1. Hazard warning flasher switch p. 6-50
2. Air conditioner p. 8-04
3. Rear window demister switch p. 6-59 Wiper de-icer switch* p. 6-58
4. Bonnet release lever p. 11-04
5. Key slot* p. 7-12
6. Fuel tank filler door release lever p. 2-12
7. Floor console box p. 8-74 Armrest p. 5-03
Accessory socket p. 8-71
USB input terminal p. 8-66
8. Heated seat switch* p. 5-04
9. 4WD lock switch p. 7-18
10. Parking brake lever p. 7-03
11. Selector Lever (Joystick Type) p. 7-12
12. Cup holder p. 8-75
13. Electric tailgate power switch* p. 4-20
14. Accessory socket* p. 8-71 Cigarette lighter* p. 8-70
15. Fuse box p. 11-16
16. Glove box p. 8-74 Card holder p. 8-74
17. Passenger’s ventilators p. 8-02
18. Supplemental restraint system (SRS) - airbag (for front passen- ger’s seat) p. 5-26
19. LW/MW/FM radio/CD player* p. 8-14 MITSUBISHI Multi Communication System (MMCS)*
[For DISPLAY AUDIO and MMCS, refer to the separate owner’s
manuals.]
Digital clock*
Instruments and controls
1-05OGGE14E5Overview1RHD
Page 16 of 442
Plug-in Hybrid EV SystemE00203500025Main features
E00203600039
It is operated as an electric vehicle in the EVdrive mode using the electrical power stored
in the drive battery, *1
according to the re-
maining amount of the drive battery. It is also
automatic control *2
for driving in series hy-
brid mode or parallel hybrid mode using en-
gine power from EV drive mode according to the driving condition or if the charging level
of the drive battery is decreased.
l With the high performance motor, noise
and vibration during driving are greatlylimited and powerful acceleration can al-
so be obtained.
l With the regenerative brake, the drive
battery is automatically charged when
the accelerator is released.
*1 If there is a remaining amount in the drive
battery, it is actively driven in the EV
drive mode. The cruising range varies de-
pending on the remaining charge in the drive battery, vehicle speed, and air condi- tioner operating conditions.
*2 You can adjust the timing to switch to the
EV drive mode by using the battery save
switch. Refer to “Battery save switch” on
page 7-21.l The vehicle can be charged from EV
charge power outlets (rated AC 220-240 V).
l Quick charging using CHAdeMO quick
charger (if so equipped) is available.
CHAdeMO is a quick charging standard
for electric vehicles that is promoted by
Japan for adoption as an international
standard.
EV drive mode
l The vehicle is driven by the motors us-
ing only electrical power stored in the drive battery. However, EV drive mode is cancelled depending on the drive bat-
tery level, vehicle speed, and air condi-
tioner operating conditions. Pay atten- tion to the following points: • Check the EV cruising range in the in-
formation screen. Refer to “EV cruis-
ing range display/Total cruising range display” on page 6-14.
• Drive your vehicle at moderate speeds
avoiding quick acceleration/decelera- tion. Repeated quick acceleration/deceleration causes the drive battery
level to decrease quickly, which ex- tremely reduces the EV cruising
range.
Series hybrid mode
l The vehicle is driven by the motors us-
ing only the electricity generated by the
engine. This mode is used when the drive battery level is low, at quick accel-
eration, or when power is required like climbing uphill.
Parallel hybrid mode
l The vehicle is driven by the power of the
engine, assisted by motors. This mode is used during high-speed driving with bet-ter engine efficiency.
The roles of the motors and en-
gine in each drive mode
MotorEngine
Driving
condi- tions
EV Drive ModeONOFF
Driving
on streets and com- muting
Series
Hybrid Mode
ONGenerates
electricity
Powerful accelera- tion up-
hill such
as moun- tain road
Plug-in Hybrid EV System
2-02OGGE14E5General information2
Page 17 of 442
MotorEngine
Drivingcondi- tions
ParallelHybrid Mode
ON
Drivers front
wheels
and gen- erates
electricity
High- speed
driving
Regenerative braking
Motion energy is converted into electric ener-
gy using the motor as a power generator.
Then a braking force generates and converted electric energy will be charged to the drive
battery.
l If you lift your foot off the accelerator
pedal during driving, a braking force that
is equivalent to engine braking of a com- bustion engine vehicle will be generated.
Also, if you shift the select position into “B” (BRAKE) from “D” (DRIVE), ef-
fectiveness of the regenerative braking is getting stronger. Shift the selector lever into “B” (BRAKE) position according to
the driving condition.
l Regenerative brake force increases with
the foot brake force when the brake ped-
al is depressed.
l If a problem occurs in the Plug-in hybrid
EV system, or if the ABS and/or the ASC have been activated, the regenera-
tive braking will be restricted. The foot brake will still operate.Operation of gasoline engine
E00203700030
l Even when the vehicle is driving in EV
drive mode, it may be automatically
changed to series hybrid mode or paral-
lel hybrid mode in the following cases: • The plug-in hybrid EV system is too
hot or too cold.
• Quick acceleration is applied.
• The air conditioner is operating.
• The accelerator pedal is depressed
hard on an uphill road or expressway.
• In cold weather
• The vehicle has not been refueled for
a long time.
• The drive battery level is low.
In addition to the above, there are more
cases where EV drive mode is automati-
cally changed to series or parallel hybrid mode.
l Even while the vehicle is stopped, the
engine may automatically be started in the following cases: • The drive battery level is low.
• The plug-in hybrid EV system is too
hot or too cold.
• The air conditioner is used.
• The vehicle has not been used for a
long time.
• The engine has not been operated for a long time.Refueling (gasoline)
E00203800028
l If the warning display appears, refuel as
soon as possible.
If the vehicle runs out of fuel, the engine will not start even in a situation need to be generated electricity, the following
conditions will occur. • The driving performance falls (since
only the electrical power stored in the drive battery can be used for the driv-
ing).
• The heating performance cannot be
available (except vehicles with elec-
tric heater).
• The effectiveness of the heater is in-
sufficient (vehicles with electric heat-er).
• The catalytic converter may be dam-
aged due to excessive high tempera- ture.
Refer to “Filling the fuel tank” on page 2-12.
Refer to “Fuel remaining display screen” on page 6-10.
Plug-in Hybrid EV System
2-03OGGE14E5General information2
Page 19 of 442
EV cruising range
E00204000027
l Even if the charge level is the same, the
EV cruising range may vary depending
on driving conditions. Since driving at high speed or climbing on a hill requireshigher consumption of the drive batterythan usual, the EV cruising range is
shortened.
l Since the air conditioning (cooling or
heating) consumes power of the drive battery, its operation results in a shorterEV cruising range. Maintain an appro-
priate temperature.
l Put the selector lever to “B” (BRAKE)
position according to the road condition. To charge the drive battery with appro-priate use of the regenerative brake, it can be increased the EV cruising range.
Acoustic Vehicle Alerting Sys-
tem (AVAS)
E00204100031
The Acoustic Vehicle Alerting System
(AVAS) is a device that uses sound to alert pedestrians of the presence of the vehicle.The system operates when the vehicle speed
is about 35 km/h (22 mph) or less and the en-
gine is not running.
Refer to “Acoustic Vehicle Alerting System
(AVAS)” on page 7-23.
WARNINGl Even if the Acoustic Vehicle Alerting Sys-
tem (AVAS) sounds, pay special attention
to pedestrians.
Pedestrians may not notice the oncoming vehicle, which may cause an accident re-
sulting in serious personal injury or death.Operating sound under charg-
ing or remote climate control
E000204600023
Even if the operation mode of the power
switch is OFF, you may hear the operating
sound such as cooling fan for cooling the
drive battery during charging, the air condi- tioning compressor and for remote climate control (if so equipped).
But this is not a malfunction.
Refer to “Remote Climate Control” on page
3-23.
In case of a collision
E00204200032
A crash or impact significant enough to re-
quire an emergency response for convention- al vehicles would also require the same re-sponse for Outlander PHEV.
Also follow the instructions described below to avoid severe burns and electrical shock
that may result in serious injury or death.
WARNINGl If your vehicle is drivable, pull your vehi-
cle off the road to a safe, nearby location and remain on the scene.
Also, if possible, do the following opera- tions and stay out of the way of any on-
coming traffic while awaiting the arrival of emergency responders.
• Apply chocks to the wheels.
• Put the select position in “P” (PARK)
position.
• Apply the parking brake.
• Open the windows, doors and tailgate.
• Put the operation mode in OFF.
• Turn on the hazard warning flashers.
• Move the key away from the vehicle to
prevent unintended start-up of the sys- tem by inadvertent contact with a switch or impact from the crash.
l Never touch high-voltage wiring, connec-
tors, and other high-voltage parts, such as the inverter unit and drive battery. Anelectric shock may occur if exposed elec-
tric wires are visible when viewed from inside or outside of your vehicle. For their locations, see “High-voltage components”
on page 3-12.
l If the vehicle receives a strong impact to
the floor while driving, stop the vehicle in
a safe place and check the floor.
Plug-in Hybrid EV System
2-05OGGE14E5General information2
Page 24 of 442
Approx. ambi-
ent temperaturePhenomenaCorrective action
Approx. -15 °C or lower
Startup and driving
lThe motor output is restricted and the vehicle performance
may be decreased. Then, the limited driving mode warning
display* 1
may be displayed.l Keep driving if you can drive at
a similar speed as the surround-
ing vehicles.
If you cannot drive at a similar
speed as surrounding vehicles,
stop the vehicle in a safe place and charge the drive battery.l Regenerative braking performance may be decreased.l When braking, depress the
brake pedal harder.Charging and batteryl Charging time becomes longer.
l Complete charging may not be possible.l When you have finished driv-
ing, charge the drive battery be-
fore its temperature falls.
Approx. -30 °C or lowerStartup and driving
lThe Plug-in Hybrid EV system may not start.
Then, blinking of the ready indicator* 2
may continue and
“BATTERY TOO COLD” may be displayed on the multi
information display.* 3l
In the daytime, wait for the
temperature to rise, restart the
plug-in hybrid EV system.
l On vehicles equipped with both
MITSUBISHI Remote control
and electric heater, if low tem-
perature is predicted, even if the drive battery is fully charged, connect EV charging cable be-
forehand.
The drive battery is automati-
cally warmed up* 4
.l The motor output may be restricted and the regenerative
braking performance may be decreased or lost when
“BATTERY TOO COLD” is displayed.* 3l
Immediately stop the vehicle in
a safe place.
Also, when braking, depress the brake pedal harder.
Cautions and actions to deal with intense cold
2-10OGGE14E5General information2
Page 42 of 442
NOTElWhen connecting or disconnecting the nor-
mal charge connector, insert/pull out the
connector straight.
Also, do not incline or twist the connector. Doing so could cause a bad connection or malfunction.
l Make sure to lock the doors to prevent theft,
etc. during charging.Charging port courtesy lamp
E08304101051
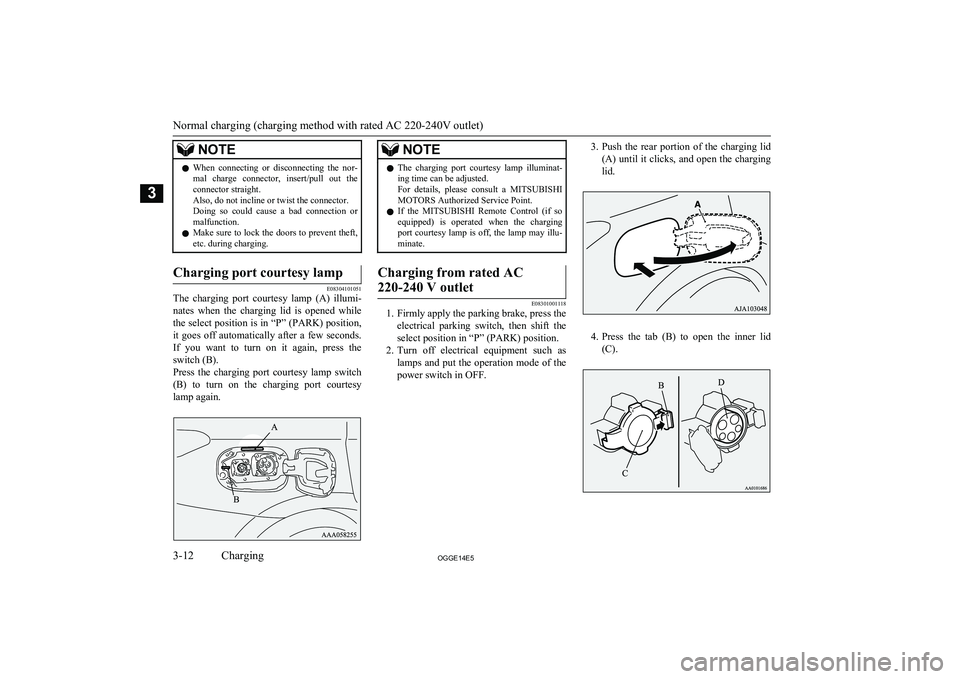
The charging port courtesy lamp (A) illumi-
nates when the charging lid is opened while
the select position is in “P” (PARK) position, it goes off automatically after a few seconds. If you want to turn on it again, press theswitch (B).
Press the charging port courtesy lamp switch (B) to turn on the charging port courtesy
lamp again.
NOTEl The charging port courtesy lamp illuminat-
ing time can be adjusted.
For details, please consult a MITSUBISHI
MOTORS Authorized Service Point.
l If the
MITSUBISHI Remote Control (if so
equipped) is operated when the charging
port courtesy lamp is off, the lamp may illu-
minate.Charging from rated AC
220-240 V outlet
E08301001118
1. Firmly apply the parking brake, press the electrical parking switch, then shift theselect position in “P” (PARK) position.
2. Turn off electrical equipment such as
lamps and put the operation mode of the power switch in OFF.
3. Push the rear portion of the charging lid
(A) until it clicks, and open the charging lid.
4. Press the tab (B) to open the inner lid
(C).
Normal charging (charging method with rated AC 220-240V outlet)
3-12OGGE14E5Charging3
Page 45 of 442
NOTElIf you want to turn the operation mode to
“OFF” after “ACC” or “ON” position in or-
der to use the electrical device such as audio
during charging, make sure that the select
position is in “P”, press the power switch to turn “OFF” without depressing the brakepedal.
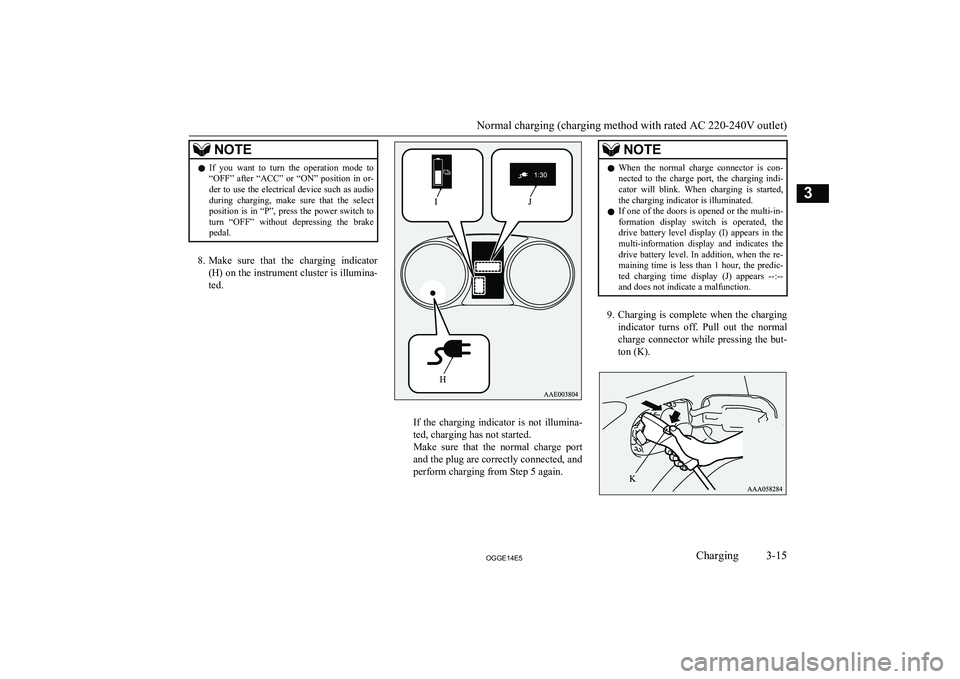
8. Make sure that the charging indicator
(H) on the instrument cluster is illumina-
ted.
If the charging indicator is not illumina-
ted, charging has not started.
Make sure that the normal charge port
and the plug are correctly connected, and
perform charging from Step 5 again.
NOTEl When the normal charge connector is con-
nected to the charge port, the charging indi-
cator will blink. When charging is started, the charging indicator is illuminated.
l If one of the doors is opened or the multi-in-
formation display switch is operated, the drive battery level display (I) appears in the
multi-information display and indicates the drive battery level. In addition, when the re-
maining time is less than 1 hour, the predic- ted charging time display (J) appears --:--
and does not indicate a malfunction.
9. Charging is complete when the charging
indicator turns off. Pull out the normal
charge connector while pressing the but-
ton (K).
Normal charging (charging method with rated AC 220-240V outlet)
3-15OGGE14E5Charging3
Page 47 of 442
WARNINGlWhen the quick charge connector is con-
nected to the quick charge port, prevent foreign matter such as water or dust fromentering in the port.
Connection with foreign matter such as
water or dust may cause fire or an electric shock. Do not perform charging if there
might be strong exposure to water at the
connection.
l During charging, the cooling fans inside
the bonnet room may automatically be operated even if the operation mode of the
power switch is in OFF.
Keep your hands away from the cooling
fan during charging.NOTEl If the charge connector is not easily connec-
ted to the charge port due to foreign materialentering, never force the connection. Doing so could damage the charging equipment or
the vehicle. Contact a MITSUBISHI
MOTORS Authorized Service Point.
l The quick charger might be installed in the
public parking space, some chargers are not
suitable for this vehicle. Check the manual
of each quick charger when charging.
l The charge connector and the EV charging
cable stick out of the vehicle body while
charging, so be careful that your body does not get stuck with them or they do not touchthe next vehicle.NOTEl The vehicle equipped with a quick charge
port is compatible with most CHAdeMO(Japanese industry standard) connectors on charging stations.
l Make sure to lock the doors to prevent theft,
etc. during charging.
1. Firmly apply the parking brake, press the
electrical parking switch, then shift the
select position in “P” (PARK) position.
2. Turn off electrical equipment such as
lamps and put the operation mode of thepower switch in OFF.
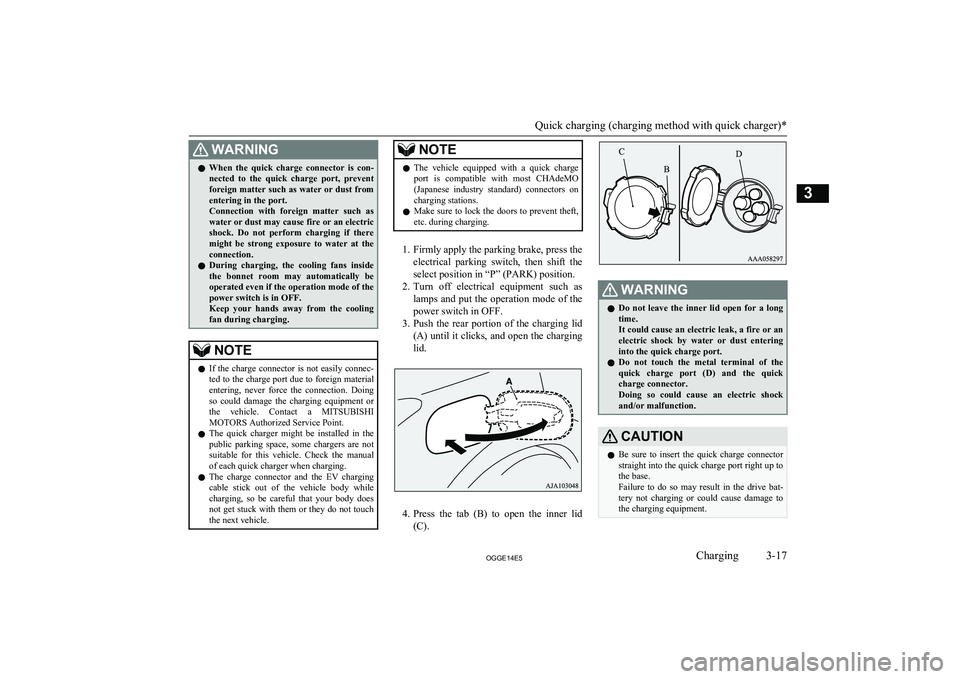
3. Push the rear portion of the charging lid
(A) until it clicks, and open the charging lid.
4. Press the tab (B) to open the inner lid
(C).
WARNINGl Do not leave the inner lid open for a long
time.
It could cause an electric leak, a fire or an electric shock by water or dust entering
into the quick charge port.
l Do not touch the metal terminal of the
quick charge port (D) and the quick
charge connector.
Doing so could cause an electric shock and/or malfunction.CAUTIONl Be sure to insert the quick charge connector
straight into the quick charge port right up to
the base.
Failure to do so may result in the drive bat- tery not charging or could cause damage to the charging equipment.
Quick charging (charging method with quick charger)*
3-17OGGE14E5Charging3
Page 132 of 442
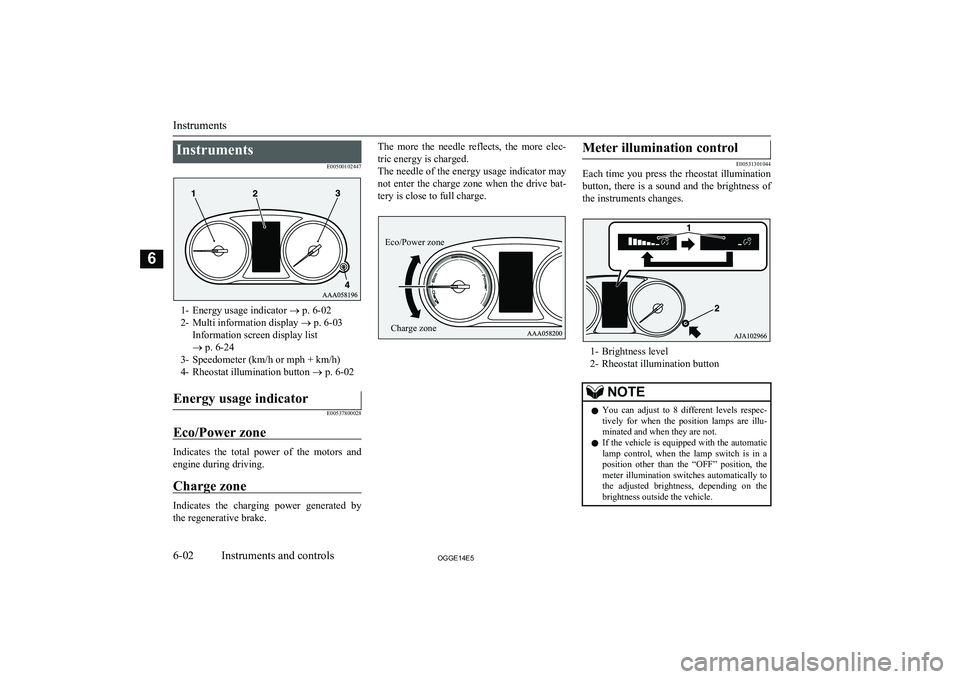
InstrumentsE00500102447
1- Energy usage indicator ® p. 6-02
2- Multi information display ® p. 6-03
Information screen display list
® p. 6-24
3- Speedometer (km/h or mph + km/h)
4- Rheostat illumination button ® p. 6-02
Energy usage indicator
E00537800028
Eco/Power zone
Indicates the total power of the motors and
engine during driving.
Charge zone
Indicates the charging power generated by the regenerative brake.
The more the needle reflects, the more elec-
tric energy is charged.
The needle of the energy usage indicator may not enter the charge zone when the drive bat-tery is close to full charge.Meter illumination control
E00531301044
Each time you press the rheostat illumination
button, there is a sound and the brightness of the instruments changes.
1- Brightness level
2- Rheostat illumination button
NOTEl You can adjust to 8 different levels respec-
tively for when the position lamps are illu- minated and when they are not.
l If the vehicle is equipped with the automatic
lamp control, when the lamp switch is in a position other than the “OFF” position, the
meter illumination switches automatically to
the adjusted brightness, depending on the brightness outside the vehicle.
Instruments
6-02OGGE14E5Instruments and controls6 Eco/Power zoneCharge zone