battery MITSUBISHI OUTLANDER PHEV 2016 (in English) Owner's Guide
[x] Cancel search | Manufacturer: MITSUBISHI, Model Year: 2016, Model line: OUTLANDER PHEV, Model: MITSUBISHI OUTLANDER PHEV 2016Pages: 490, PDF Size: 22.02 MB
Page 40 of 490
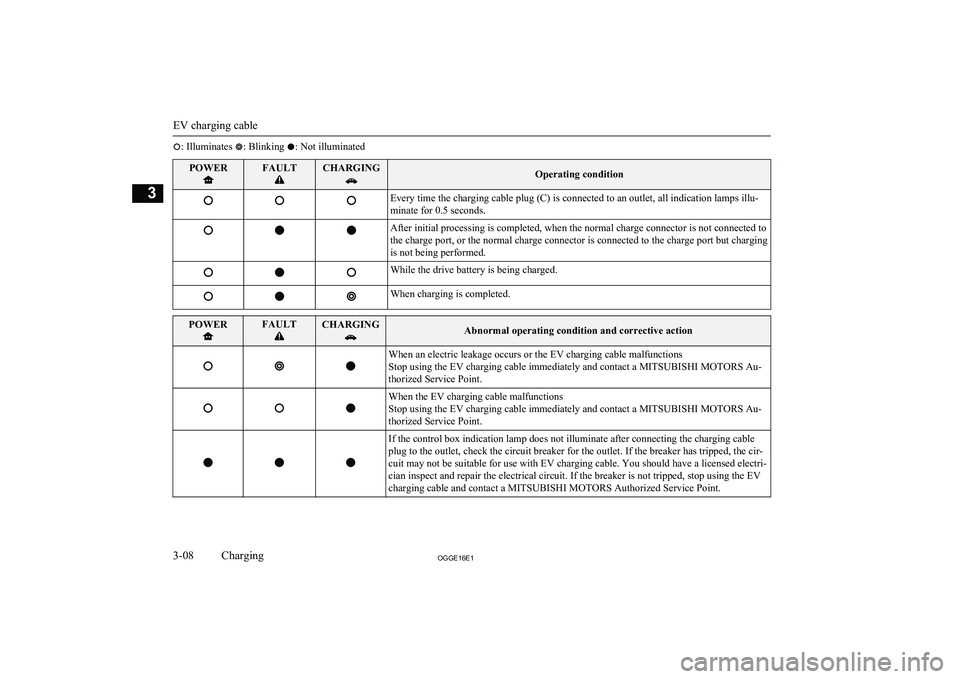
: Illuminates : Blinking : Not illuminatedPOWERFAULTCHARGINGOperating conditionEvery time the charging cable plug (C) is connected to an outlet, all indication lamps illu-
minate for 0.5 seconds.After initial processing is completed, when the normal charge connector is not connected to
the charge port, or the normal charge connector is connected to the charge port but charging
is not being performed.While the drive battery is being charged.When charging is completed.POWERFAULTCHARGINGAbnormal operating condition and corrective actionWhen an electric leakage occurs or the EV charging cable malfunctions
Stop using the EV charging cable immediately and contact a MITSUBISHI MOTORS Au-
thorized Service Point.When the EV charging cable malfunctions
Stop using the EV charging cable immediately and contact a MITSUBISHI MOTORS Au-
thorized Service Point.If the control box indication lamp does not illuminate after connecting the charging cable
plug to the outlet, check the circuit breaker for the outlet. If the breaker has tripped, the cir-
cuit may not be suitable for use with EV charging cable. You should have a licensed electri-
cian inspect and repair the electrical circuit. If the breaker is not tripped, stop using the EV
charging cable and contact a MITSUBISHI MOTORS Authorized Service Point.
EV charging cable
3-08OGGE16E1Charging3
Page 43 of 490
WARNING•Do not open the rear hatch, for exam-
ple to remove or place an item in the
cargo area.
Charging may affect the operation of elec- tric medical devices and result in serious
personal injury or death.
l Do not charge when the EV charging ca-
ble is coiled up.
Doing so the cable may be heated and this
might result in fire.
l Before charging, make sure that there is
no foreign matter such as dust at the nor- mal charge port and the normal charge
connector.
At this time, do not touch the normal charge port.
l When the normal charge connector is
connected to the charge port, prevent for- eign matter such as water or dust from
entering in the connection.
Connection with foreign matter such as
water or dust may cause fire or an electric shock. Do not perform charging if there
might be strong exposure to water at the
connection.
l Never pull the cable to remove the plug.
And never submerge the EV charging connector, control box or plug in water.
l Please observe the following in order to
prevent accidents during charging such as
electrocution.
• Only use the EV charging cable that is
supplied with the vehicle.WARNING• Do not charge another vehicle by the
EV charging cable. The cable may overheat and result in a fire.
• When charging outdoors, make sure to
use an outlet that is protected from wa-
ter entering.
• Do not perform charging with the car
cover.
• Do not connect or disconnect the plug
and connector with wet hands.
l While it is normal for the connector and
charging cable to become warm during charging, discontinue use immediately if
the connector or charging cable becomes hot to the touch.
l While it is normal for the control box to
become warm during charging, discontin- ue use immediately if the control box be- comes hot to the touch.
l If abnormal smells are detected or the ve-
hicle produces smoke, quickly stop charg-
ing.
l Do not perform charging in a poorly ven-
tilated area or in an enclosed area. Keep
sparks, cigarettes, and flames away from
the auxiliary battery.
Flammable gas generated from the auxili- ary battery during charging may be trap- ped, resulting in explosion.
If charging is inevitably required, venti-
late the area well.WARNINGl Grasp the normal charge connector when
connecting or disconnecting the EVcharging cable.
Grasping the cable may damage the cable
and could cause an electric shock, short circuit, and/or fire.CAUTIONl During charging, the cooling fans inside the
engine room may automatically be operated even if the operation mode of the powerswitch in OFF.
Keep your hands away from the cooling fan during charging.
l Do not perform charging from other power
source like a generator. Doing so could cause a malfunction.NOTEl If the charge connector is not easily connec-
ted to the charge port due to foreign materialentering, never force the connection. Doing so could damage the charging equipment or
the vehicle. Please contact a MITSUBISHI
MOTORS Authorized Service Point.
l The on board charger is only for rated AC
220-240V outlets.
Normal charging (charging method with rated AC 220-240V outlet)
3-11OGGE16E1Charging3
Page 47 of 490
NOTElWhen the normal charge connector is con-
nected to the charge port, the charging indi-
cator will blink. When charging is started, the charging indicator is illuminated and thecharging port courtesy lamp blinks 3 timesand then goes off automatically.
l If you want to confirm the drive battery level
or the predicted charging time during charg- ing, one of the doors is opened or the multi
information display switch is operated, the drive battery level display (I) appears and
the predicted charging time display (J) ap- pears in the multi information display.
In addition, when the remaining time is less than 1 hour, the predicted charging time dis-
play (J) appears --:-- and does not indicate a
malfunction.
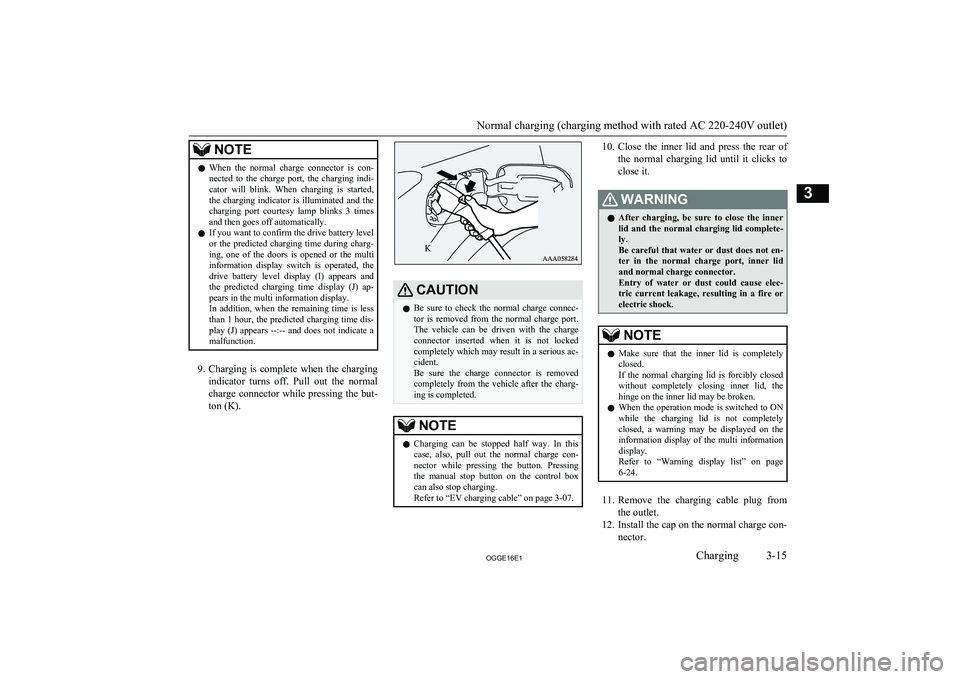
9. Charging is complete when the charging
indicator turns off. Pull out the normal
charge connector while pressing the but-
ton (K).
CAUTIONl Be sure to check the normal charge connec-
tor is removed from the normal charge port.The vehicle can be driven with the charge
connector inserted when it is not locked completely which may result in a serious ac-
cident.
Be sure the charge connector is removed
completely from the vehicle after the charg- ing is completed.NOTEl Charging can be stopped half way. In this
case, also, pull out the normal charge con-nector while pressing the button. Pressingthe manual stop button on the control box
can also stop charging.
Refer to “EV charging cable” on page 3-07.10. Close the inner lid and press the rear of
the normal charging lid until it clicks to close it.WARNINGl After charging, be sure to close the inner
lid and the normal charging lid complete-
ly.
Be careful that water or dust does not en- ter in the normal charge port, inner lid
and normal charge connector.
Entry of water or dust could cause elec- tric current leakage, resulting in a fire or
electric shock.NOTEl Make sure that the inner lid is completely
closed.
If the normal charging lid is forcibly closed
without completely closing inner lid, the hinge on the inner lid may be broken.
l When the operation mode is switched to ON
while the charging lid is not completely closed, a warning may be displayed on the
information display of the multi information
display.
Refer to “Warning display list” on page 6-24.
11. Remove the charging cable plug from
the outlet.
12. Install the cap on the normal charge con-
nector.
Normal charging (charging method with rated AC 220-240V outlet)
3-15OGGE16E1Charging3
Page 50 of 490
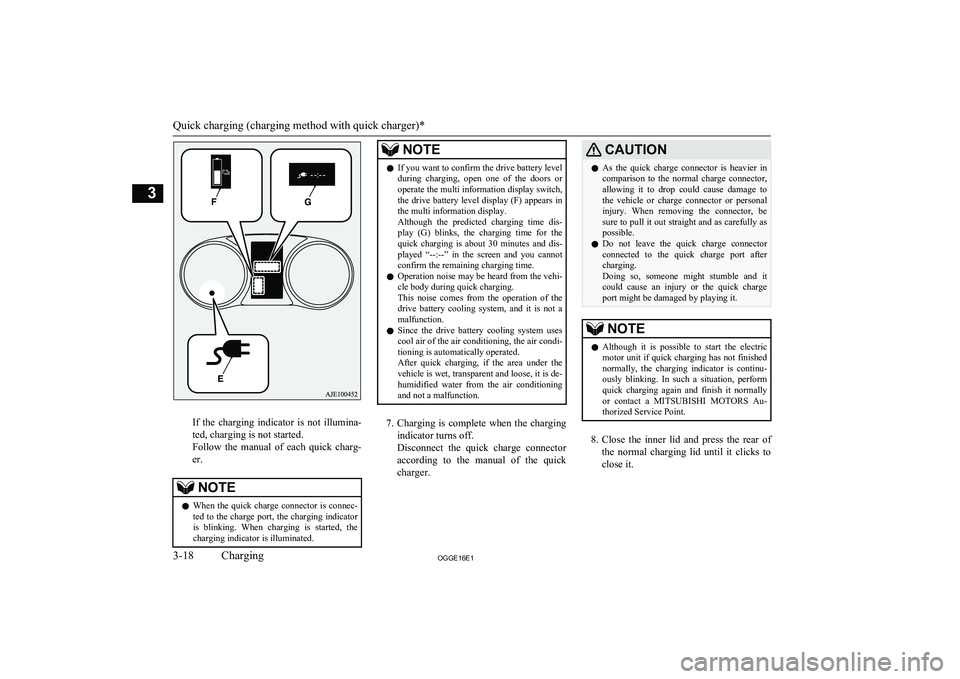
If the charging indicator is not illumina-
ted, charging is not started.
Follow the manual of each quick charg-
er.
NOTEl When the quick charge connector is connec-
ted to the charge port, the charging indicator
is blinking. When charging is started, the charging indicator is illuminated.NOTEl If you want to confirm the drive battery level
during charging, open one of the doors or operate the multi information display switch, the drive battery level display (F) appears in
the multi information display.
Although the predicted charging time dis- play (G) blinks, the charging time for thequick charging is about 30 minutes and dis-
played “--:--” in the screen and you cannot confirm the remaining charging time.
l Operation noise may be heard from the vehi-
cle body during quick charging.
This noise comes from the operation of the drive battery cooling system, and it is not a malfunction.
l Since the drive battery cooling system uses
cool air of the air conditioning, the air condi-tioning is automatically operated.
After quick charging, if the area under the vehicle is wet, transparent and loose, it is de- humidified water from the air conditioning
and not a malfunction.
7. Charging is complete when the charging
indicator turns off.
Disconnect the quick charge connector according to the manual of the quick
charger.
CAUTIONl As the quick charge connector is heavier in
comparison to the normal charge connector, allowing it to drop could cause damage to
the vehicle or charge connector or personal injury. When removing the connector, besure to pull it out straight and as carefully as
possible.
l Do not leave the quick charge connector
connected to the quick charge port after charging.
Doing so, someone might stumble and it
could cause an injury or the quick charge port might be damaged by playing it.NOTEl Although it is possible to start the electric
motor unit if quick charging has not finishednormally, the charging indicator is continu-
ously blinking. In such a situation, perform quick charging again and finish it normally
or contact a MITSUBISHI MOTORS Au-
thorized Service Point.
8. Close the inner lid and press the rear of
the normal charging lid until it clicks to close it.
Quick charging (charging method with quick charger)*
3-18OGGE16E1Charging3
Page 52 of 490
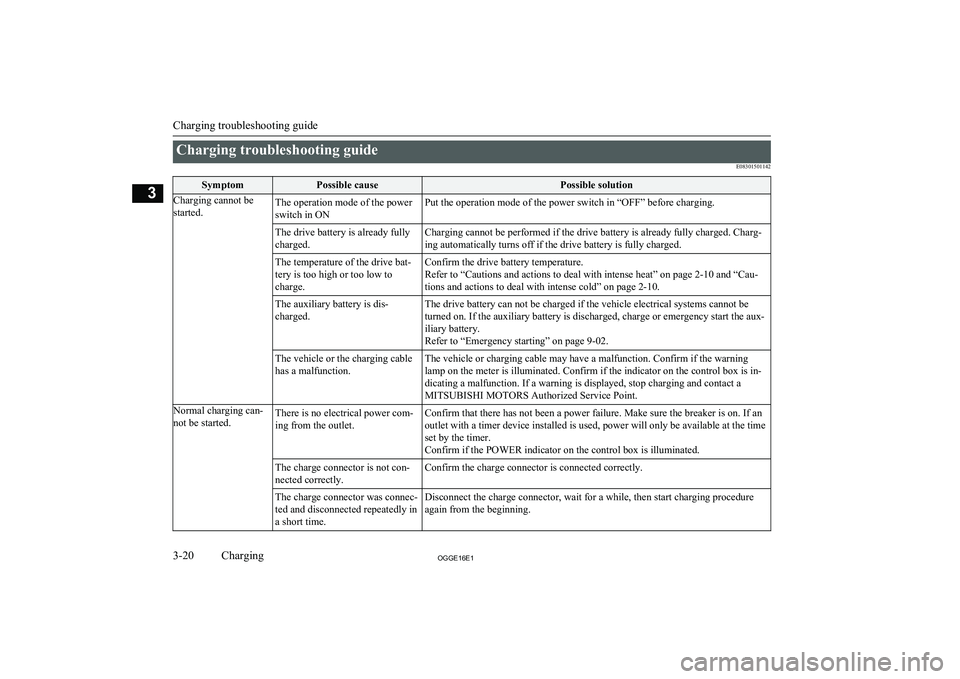
Charging troubleshooting guideE08301501142SymptomPossible causePossible solutionCharging cannot be
started.The operation mode of the power
switch in ONPut the operation mode of the power switch in “OFF” before charging.The drive battery is already fully
charged.Charging cannot be performed if the drive battery is already fully charged. Charg-
ing automatically turns off if the drive battery is fully charged.The temperature of the drive bat-
tery is too high or too low to
charge.Confirm the drive battery temperature.
Refer to “Cautions and actions to deal with intense heat” on page 2-10 and “Cau-
tions and actions to deal with intense cold” on page 2-10.The auxiliary battery is dis-
charged.The drive battery can not be charged if the vehicle electrical systems cannot be
turned on. If the auxiliary battery is discharged, charge or emergency start the aux- iliary battery.
Refer to “Emergency starting” on page 9-02.The vehicle or the charging cable
has a malfunction.The vehicle or charging cable may have a malfunction. Confirm if the warning
lamp on the meter is illuminated. Confirm if the indicator on the control box is in-
dicating a malfunction. If a warning is displayed, stop charging and contact a
MITSUBISHI MOTORS Authorized Service Point.Normal charging can-
not be started.There is no electrical power com-
ing from the outlet.Confirm that there has not been a power failure. Make sure the breaker is on. If an
outlet with a timer device installed is used, power will only be available at the time
set by the timer.
Confirm if the POWER indicator on the control box is illuminated.The charge connector is not con-
nected correctly.Confirm the charge connector is connected correctly.The charge connector was connec-
ted and disconnected repeatedly in
a short time.Disconnect the charge connector, wait for a while, then start charging procedure again from the beginning.
Charging troubleshooting guide
3-20OGGE16E1Charging3
Page 53 of 490
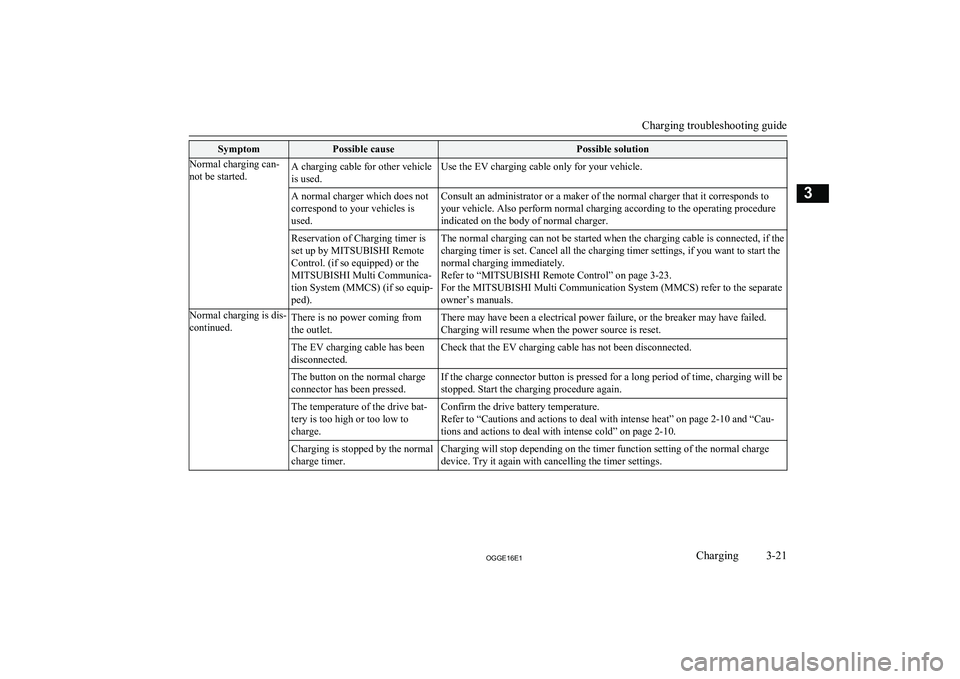
SymptomPossible causePossible solutionNormal charging can-
not be started.A charging cable for other vehicle
is used.Use the EV charging cable only for your vehicle.A normal charger which does not
correspond to your vehicles is
used.Consult an administrator or a maker of the normal charger that it corresponds to
your vehicle. Also perform normal charging according to the operating procedure
indicated on the body of normal charger.Reservation of Charging timer is
set up by MITSUBISHI Remote
Control. (if so equipped) or the
MITSUBISHI Multi Communica-
tion System (MMCS) (if so equip-
ped).The normal charging can not be started when the charging cable is connected, if the
charging timer is set. Cancel all the charging timer settings, if you want to start the
normal charging immediately.
Refer to “MITSUBISHI Remote Control” on page 3-23.
For the MITSUBISHI Multi Communication System (MMCS) refer to the separate
owner’s manuals.Normal charging is dis-
continued.There is no power coming from
the outlet.There may have been a electrical power failure, or the breaker may have failed.
Charging will resume when the power source is reset.The EV charging cable has been
disconnected.Check that the EV charging cable has not been disconnected.The button on the normal charge
connector has been pressed.If the charge connector button is pressed for a long period of time, charging will be
stopped. Start the charging procedure again.The temperature of the drive bat-
tery is too high or too low to
charge.Confirm the drive battery temperature.
Refer to “Cautions and actions to deal with intense heat” on page 2-10 and “Cau-
tions and actions to deal with intense cold” on page 2-10.Charging is stopped by the normal
charge timer.Charging will stop depending on the timer function setting of the normal charge
device. Try it again with cancelling the timer settings.
Charging troubleshooting guide
3-21OGGE16E1Charging3
Page 54 of 490
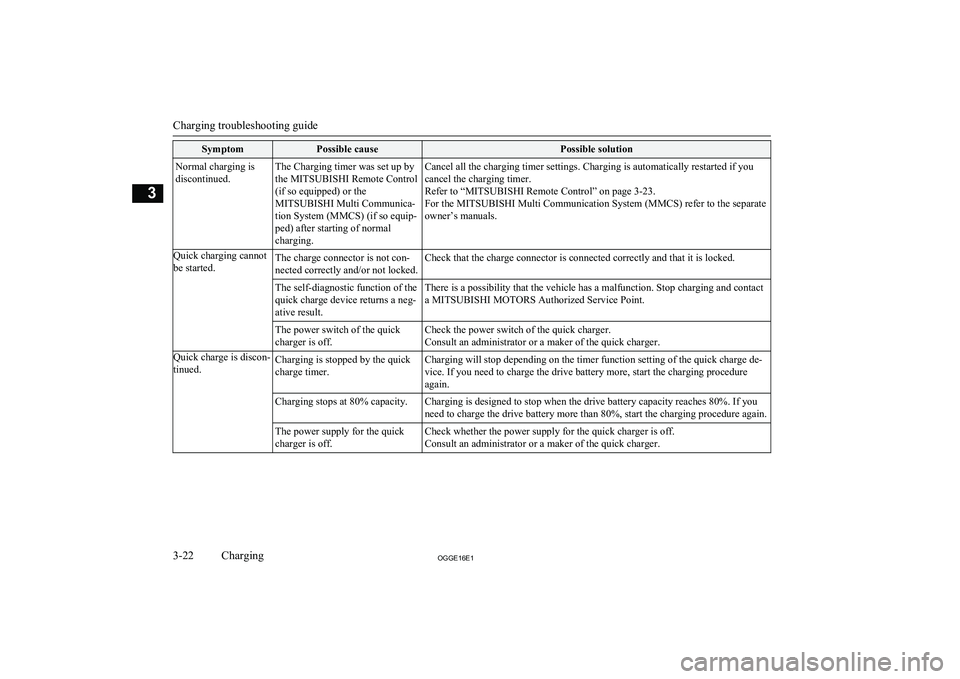
SymptomPossible causePossible solutionNormal charging is
discontinued.The Charging timer was set up by
the MITSUBISHI Remote Control
(if so equipped) or the
MITSUBISHI Multi Communica-
tion System (MMCS) (if so equip-
ped) after starting of normal
charging.Cancel all the charging timer settings. Charging is automatically restarted if you
cancel the charging timer.
Refer to “MITSUBISHI Remote Control” on page 3-23.
For the MITSUBISHI Multi Communication System (MMCS) refer to the separate owner’s manuals.Quick charging cannot
be started.The charge connector is not con-
nected correctly and/or not locked.Check that the charge connector is connected correctly and that it is locked.The self-diagnostic function of the
quick charge device returns a neg-
ative result.There is a possibility that the vehicle has a malfunction. Stop charging and contact
a MITSUBISHI MOTORS Authorized Service Point.The power switch of the quick
charger is off.Check the power switch of the quick charger.
Consult an administrator or a maker of the quick charger.Quick charge is discon-
tinued.Charging is stopped by the quick
charge timer.Charging will stop depending on the timer function setting of the quick charge de-
vice. If you need to charge the drive battery more, start the charging procedure again.Charging stops at 80% capacity.Charging is designed to stop when the drive battery capacity reaches 80%. If you
need to charge the drive battery more than 80%, start the charging procedure again.The power supply for the quick
charger is off.Check whether the power supply for the quick charger is off. Consult an administrator or a maker of the quick charger.
Charging troubleshooting guide
3-22OGGE16E1Charging3
Page 56 of 490
lCharging timer
If you specify the charge start and/or stop time with the normal charge cable
connected, charging is started and/or
stopped at that time.
l Remote Climate Control
By setting the remote climate control to
operate at a predetermined time, cabin comfort can be improved or visibilitycan be ensured (defrosting/demisting)
before getting in the vehicle.
l Customize (function setting change)
The function setting of the keyless oper-
ation system, security alarm, outside rear-view mirror, operation mode of the
power switch, air conditioning, lamps
and windscreen wipers can be changed by MITSUBISHI Remote Control.NOTEl The electric heater is required to activate the
reservation functions of heater, defroster and
demister.
l In a vehicle equipped with the MITSUBISHI
Multi-Communication System (MMCS), it
is possible to change the setting by means of screen operations.
Refer to the separate owner’s manual for de-
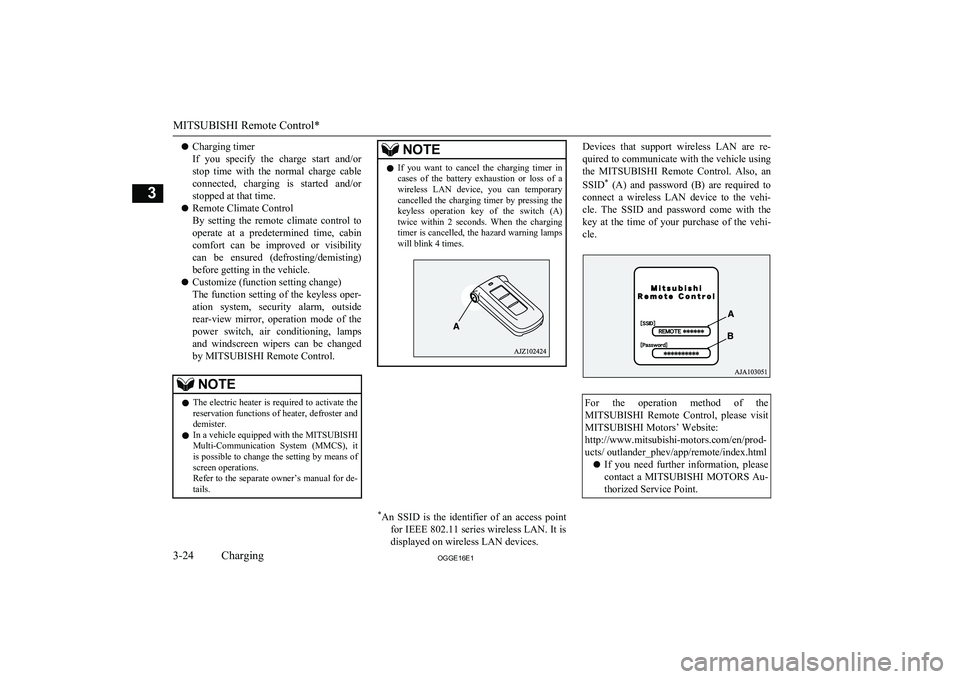
tails.NOTEl If you want to cancel the charging timer in
cases of the battery exhaustion or loss of a
wireless LAN device, you can temporary cancelled the charging timer by pressing the
keyless operation key of the switch (A) twice within 2 seconds. When the charging
timer is cancelled, the hazard warning lamps
will blink 4 times.* An SSID is the identifier of an access point
for IEEE 802.11 series wireless LAN. It is
displayed on wireless LAN devices.Devices that support wireless LAN are re-
quired to communicate with the vehicle using the MITSUBISHI Remote Control. Also, an
SSID *
(A) and password (B) are required to
connect a wireless LAN device to the vehi-
cle. The SSID and password come with the
key at the time of your purchase of the vehi- cle.For the operation method of the MITSUBISHI Remote Control, please visit
MITSUBISHI Motors’ Website:
http://www.mitsubishi-motors.com/en/prod-
ucts/ outlander_phev/app/remote/index.html
l If you need further information, please
contact a MITSUBISHI MOTORS Au-
thorized Service Point.
MITSUBISHI Remote Control*
3-24OGGE16E1Charging3
Page 57 of 490
WARNINGlDo not use the
MITSUBISHI Remote
Control if children, persons in need of care, pets, etc. are in the vehicle. Even if the remote climate control is used, thecabin may become hot or cold due to somereasons such as automatic stop of the sys-
tem. The cabin temperature may quickly
rise in sunshine, which poses a risk of heat
stroke and dehydration. In cold weather, on the other hand, the cabin temperature
may quickly drop. Either of which could lead to death in the worst case.
l The cooling fan in the engine compart-
ment may operate automatically when
charging or when operating air condition- er. Do not bring your hand close to the
cooling fan during charging.CAUTIONl Do not use a car cover except for the
MITSUBISHI MOTORS GENUINE car
cover, when using the timer charging or the remote climate control.NOTEl Keep the following points in mind when us-
ing a wireless LAN device:NOTE• Communication speed and range vary de-
pending on the wireless LAN devices and the surrounding conditions (radio environ-
ment, obstacles, parking area environ- ment, etc.).
• Due to the characteristics of radio waves,
communication speed tends to decrease as the communication distance increases.
Use your wireless LAN device at a short
distance from the vehicle for better re-
sponse.
• When a microwave oven or ISM (indus-
trial, scientific and medical) equipment is being used, the communication speed and
range of wireless LAN devices may de- crease. Use your wireless LAN device
away from these appliances and equip-
ment.
• If a wireless LAN device and Bluetooth
(registered trademark of Bluetooth SIG, Inc.) are used simultaneously, the com-
munication speed and range of each de- vice may decrease. Use your wireless
LAN device away from Bluetooth devi- ces.
l Wireless LAN devices may not communi-
cate with the vehicle, or may not operate
normally or stably in the following environ- ment or situations. Check that the device cancommunicate with your vehicle before use.
• There is an obstruction such as a concrete
or metal wall between the vehicle and
wireless LAN device.NOTE• The vehicle is surrounded by tall vehicles
in a parking lot.
• There are facilities nearby that emit strong
radio waves, such as a TV tower, trans-
former substation, broadcasting station or
airport.
• There is a communication device such as
a mobile phone or radio, or an electric de- vice such as a personal computer near the
wireless LAN device.
• The wireless LAN device is in contact
with or covered by a metal object.
• The battery of the wireless LAN device
has run down.
l The
MITSUBISHI Remote Control cannot
be used under the following conditions:
• The wireless LAN device is turned off.
• The
MITSUBISHI Remote Control appli-
cation software is not installed.
• The
MITSUBISHI Remote Control appli-
cation software is not running.
• The wireless LAN device is not registered
on the vehicle or it is not connected to the
vehicle.
• The wireless LAN device is out of the
communication range.
• The wireless LAN device is connected to
other wireless LAN device.
• The wireless LAN device has failed, or its
battery has run out.
MITSUBISHI Remote Control*
3-25OGGE16E1Charging3
Page 58 of 490
NOTElSome charging facilities have a timer func-
tion that turns the power on or off at a spe-
cific time of the day. When charging at a fa- cility with a timer function, make sure that the charging timer is set within the time peri-
od when the power in the charging facility is
on.
l The auxiliary battery is automatically and
periodically charged using electrical power
stored in the drive battery.
l While the remote climate control is operat-
ing or the charging, the cooling fan or air conditioner compressor may start operating and its sound may be heard. This is normal.
l The remote climate control operates in its
own mode based on the mode selected on
the wireless LAN device, regardless of the switch setting of the vehicle’s air condition-
er.
l Air conditioning performance may deterio-
rate or the remaining charge in the drive bat-tery may decrease under the following con-
ditions:
• In extremely hot weather.
• In hot sunshine.
• In extremely cold weather.
l If the remote climate control is started dur-
ing charging, the time until full charge may extend or the charging rate may decrease.
l When the remaining quantity of the drive
battery is decreased, the remote climate con-
trol does not operate or it may stop on the way.NOTEl When the auxiliary battery is removed, the
timer control of the MITSUBISHI Remote
Control is reset and each function of the MITSUBISHI Remote Control can not be
used. Also the drive battery can not be warmed up.
Communicate the wireless LAN device and
your vehicle again.
MITSUBISHI Remote Control*
3-26OGGE16E1Charging3