battery MITSUBISHI OUTLANDER PHEV 2016 (in English) Service Manual
[x] Cancel search | Manufacturer: MITSUBISHI, Model Year: 2016, Model line: OUTLANDER PHEV, Model: MITSUBISHI OUTLANDER PHEV 2016Pages: 490, PDF Size: 22.02 MB
Page 91 of 490
lOpening any one of the doors or the tail-
gate, when the system is in the system
preparation mode.
l Holding the keyless operation key and
pressing the driver’s or front passenger’s
door lock/unlock switch, or the tailgate open switch to unlock the doors and the
tailgate.NOTEl If the bonnet is opened during the system
preparation mode, the system preparationmode is suspended.
The system returns to the system preparation mode when the bonnet is closed.
l If the battery terminals are disconnected
while the system is in the system preparation mode, the memory will be erased.
l It is possible to register up to 4 remote con-
trol switches for keyless operation system.
As long as they are registered, any of the re- mote control switches, other than the oneused to activate the system, can be used to
cancel the system.
If you want to register additional remote control switches, please contact aMITSUBISHI MOTORS Authorized Serv-
ice Point.NOTEl The activation distance for keyless entry sys-
tem is approximately 4 m.
If it is not possible to lock or unlock the ve- hicle by pressing the switch at the correct
distance or the security alarm system cannot be set or cancelled using the switch, the bat-
tery may need to be replaced.
Replace the battery at a MITSUBISHI
MOTORS Authorized Service Point.
l If the UNLOCK switch on the remote con-
trol switch, or the driver’s or front passen- ger’s door lock/unlock switch is pressed and no door or the tailgate is opened within 30 seconds, the doors and the tailgate will auto-
matically relock. In this case as well, the
system preparation mode will go into effect.
l The time between pressing the UNLOCK
switch on the remote control switch, or thedriver’s or front passenger’s door lock/
unlock switch and automatic locking can be adjusted. Consult a MITSUBISHI MOTORS
Authorized Service Point.
On vehicles equipped with MITSUBISHI
Multi-Communication System (MMCS), screen operations can be used to make theadjustment. Refer to the separate owner’s
manual for details.Alarm activation
E00301900941
When the system is in the system armed
mode, the alarm will be activated as follows
if the vehicle is unlocked or if any of the doors, tailgate or bonnet is opened using a
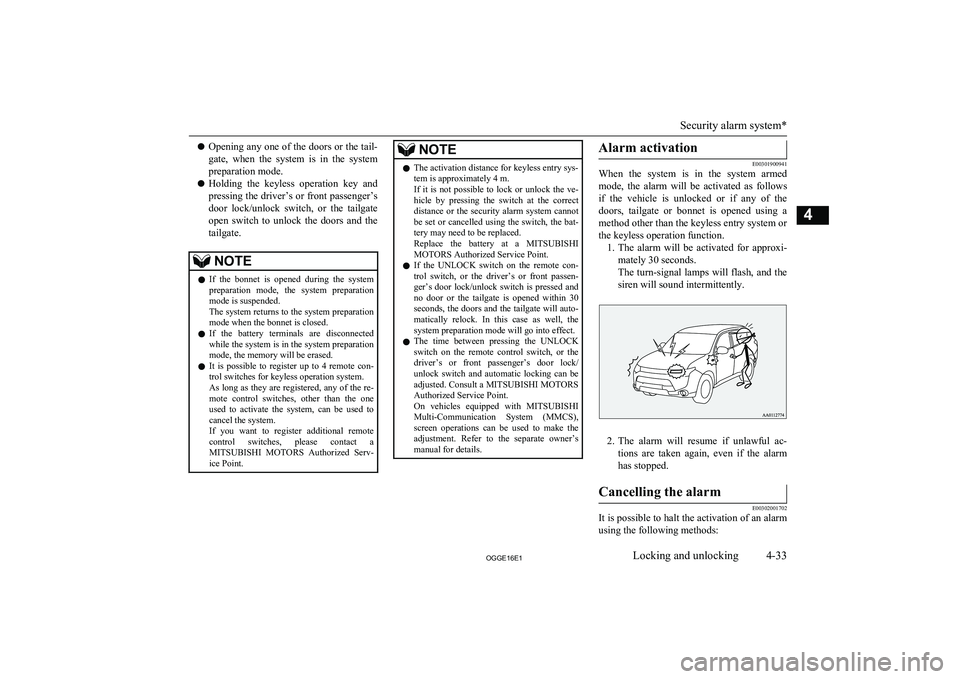
method other than the keyless entry system or the keyless operation function. 1. The alarm will be activated for approxi-
mately 30 seconds.
The turn-signal lamps will flash, and the siren will sound intermittently.
2. The alarm will resume if unlawful ac-
tions are taken again, even if the alarm has stopped.
Cancelling the alarm
E00302001702
It is possible to halt the activation of an alarm
using the following methods:
Security alarm system*
4-33OGGE16E1Locking and unlocking4
Page 92 of 490
lPressing the LOCK or UNLOCK switch
on the remote control switch.
(After pressing the LOCK switch, the
vehicle will lock if all the doors and the
tailgate are closed, after which the sys- tem preparation mode will once again go
into effect.)
l Putting the operation mode in ON.
l Holding the keyless operation key and
locking or unlocking the doors and the tailgate using the keyless operation func-tion.NOTEl When the operation mode is put in ON, the
buzzer sounds 4 times. This operation indi-
cates that the alarm was activated while the
vehicle was parked.
Please check the inside of the vehicle to con- firm that nothing was stolen.
l Even if the battery is disconnected, the alarm
activation memory will not be erased.Electric window control
E00302201632
The electric windows can only be operatedwith the operation mode in ON.
Electric window control switch
E00302301822
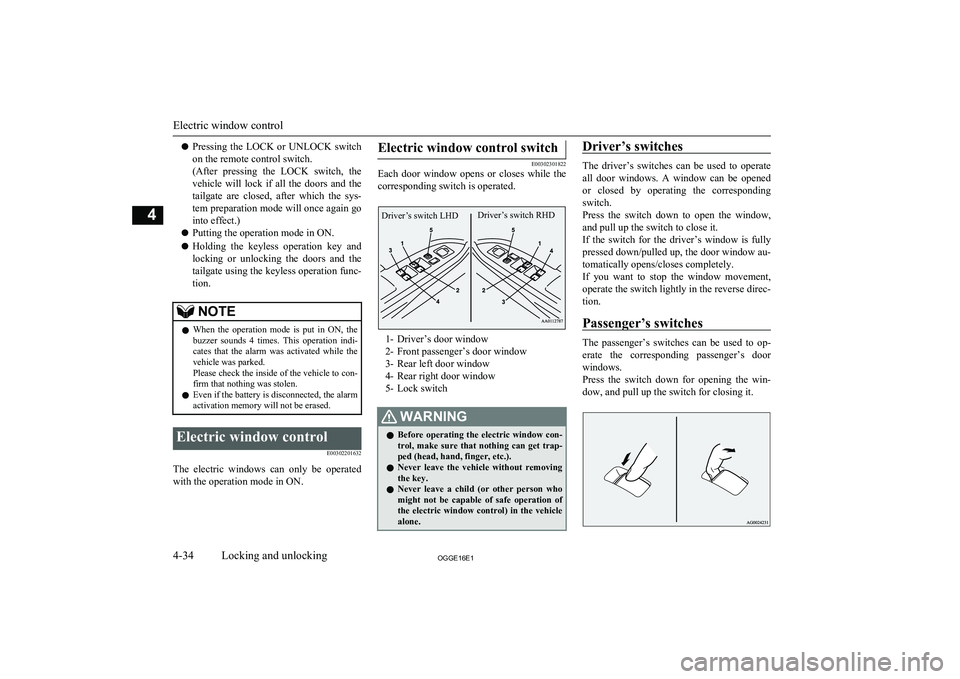
Each door window opens or closes while the
corresponding switch is operated.
1- Driver’s door window
2- Front passenger’s door window
3- Rear left door window
4- Rear right door window
5- Lock switch
WARNINGl Before operating the electric window con-
trol, make sure that nothing can get trap-
ped (head, hand, finger, etc.).
l Never leave the vehicle without removing
the key.
l Never leave a child (or other person who
might not be capable of safe operation of the electric window control) in the vehicle alone.Driver’s switches
The driver’s switches can be used to operate
all door windows. A window can be opened or closed by operating the correspondingswitch.
Press the switch down to open the window, and pull up the switch to close it.
If the switch for the driver’s window is fully
pressed down/pulled up, the door window au- tomatically opens/closes completely.
If you want to stop the window movement,
operate the switch lightly in the reverse direc-
tion.
Passenger’s switches
The passenger’s switches can be used to op-
erate the corresponding passenger’s door
windows.
Press the switch down for opening the win- dow, and pull up the switch for closing it.
Electric window control
4-34OGGE16E1Locking and unlocking4 Driver’s switch RHDDriver’s switch LHD
Page 93 of 490
NOTElRepeated operation with the engine stopped
will run down the battery. Operate the win-
dow switches only while the engine is run- ning.
l The rear door windows only open halfway.Lock switch
E00303101263
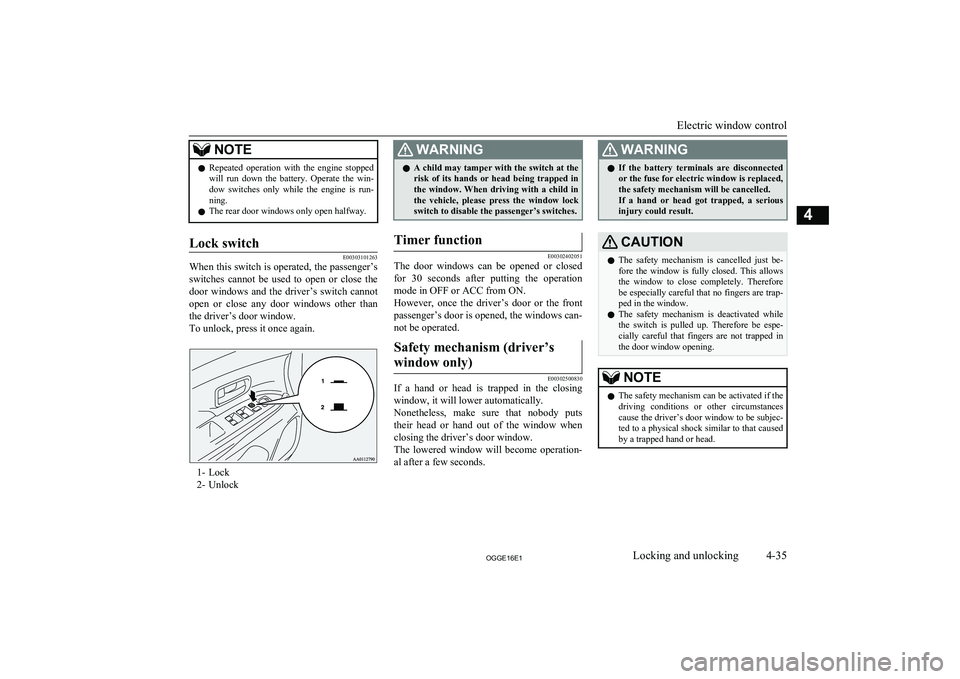
When this switch is operated, the passenger’s
switches cannot be used to open or close the door windows and the driver’s switch cannot
open or close any door windows other than
the driver’s door window.
To unlock, press it once again.
1- Lock
2- Unlock
WARNINGl A child may tamper with the switch at the
risk of its hands or head being trapped in
the window. When driving with a child in the vehicle, please press the window lockswitch to disable the passenger’s switches.Timer function
E00302402051
The door windows can be opened or closed
for 30 seconds after putting the operation mode in OFF or ACC from ON.
However, once the driver’s door or the front
passenger’s door is opened, the windows can-
not be operated.
Safety mechanism (driver’s
window only)
E00302500830
If a hand or head is trapped in the closing window, it will lower automatically.
Nonetheless, make sure that nobody puts
their head or hand out of the window when
closing the driver’s door window.
The lowered window will become operation-
al after a few seconds.
WARNINGl If the battery terminals are disconnected
or the fuse for electric window is replaced,
the safety mechanism will be cancelled. If a hand or head got trapped, a serious injury could result.CAUTIONl The safety mechanism is cancelled just be-
fore the window is fully closed. This allows the window to close completely. Therefore be especially careful that no fingers are trap-
ped in the window.
l The safety mechanism is deactivated while
the switch is pulled up. Therefore be espe-
cially careful that fingers are not trapped in the door window opening.NOTEl The safety mechanism can be activated if the
driving conditions or other circumstancescause the driver’s door window to be subjec- ted to a physical shock similar to that caused
by a trapped hand or head.
Electric window control
4-35OGGE16E1Locking and unlocking4
Page 94 of 490
NOTElIf the battery terminals are disconnected or
the fuse for electric window is replaced, the
safety mechanism will be cancelled and the door window will not automatically open/ close completely.
If the window is open, repeatedly raise the
driver’s door window switch until the win-
dow has been fully closed. Following this, release the switch, raise the switch once again and hold it in this condition for at least
1 second, then release it. You should now be able to operate the driver’s door window in
the normal fashion.Sunroof*
E00302702357
The sunroof can only be operated with theoperation mode in the “ON”.
To open
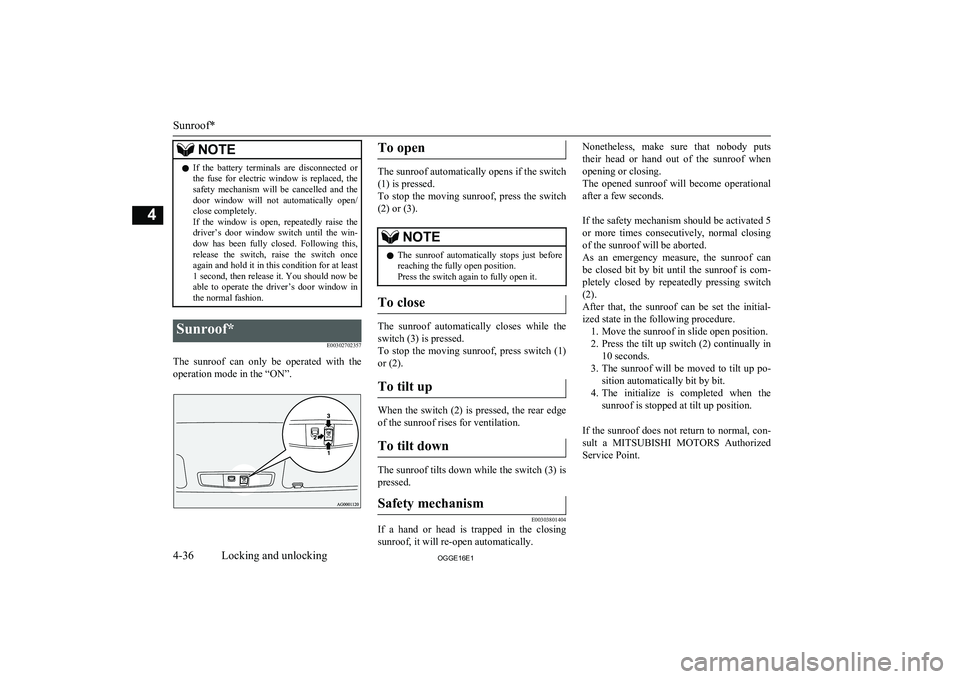
The sunroof automatically opens if the switch
(1) is pressed.
To stop the moving sunroof, press the switch
(2) or (3).
NOTEl The sunroof automatically stops just before
reaching the fully open position.
Press the switch again to fully open it.
To close
The sunroof automatically closes while the
switch (3) is pressed.
To stop the moving sunroof, press switch (1)
or (2).
To tilt up
When the switch (2) is pressed, the rear edge of the sunroof rises for ventilation.
To tilt down
The sunroof tilts down while the switch (3) is
pressed.
Safety mechanism
E00303801404
If a hand or head is trapped in the closing
sunroof, it will re-open automatically.
Nonetheless, make sure that nobody puts
their head or hand out of the sunroof when
opening or closing.
The opened sunroof will become operational after a few seconds.
If the safety mechanism should be activated 5
or more times consecutively, normal closing of the sunroof will be aborted.
As an emergency measure, the sunroof can be closed bit by bit until the sunroof is com-
pletely closed by repeatedly pressing switch
(2).
After that, the sunroof can be set the initial- ized state in the following procedure. 1. Move the sunroof in slide open position.
2. Press the tilt up switch (2) continually in
10 seconds.
3. The sunroof will be moved to tilt up po-
sition automatically bit by bit.
4. The initialize is completed when the
sunroof is stopped at tilt up position.
If the sunroof does not return to normal, con- sult a MITSUBISHI MOTORS Authorized
Service Point.
Sunroof*
4-36OGGE16E1Locking and unlocking4
Page 139 of 490
NOTElThe brightness level of the instruments is
stored when the operation mode of the pow-
er switch is put in OFF.
l If you press and hold the button for about 2
seconds or more when the position lamps are
illuminated, the brightness level changes to
the maximum level. Pressing and holding the button for about 2 seconds or more again returns the brightness level to the previous
level.
On vehicles equipped with MITSUBISHI
Multi-Communication System (MMCS), the map screen colour of MITSUBISHI Multi-
Communication System (MMCS) may not be switched to nighttime setting when the
meter illumination brightness level is at the maximum.Multi information display
E00519902526
Always stop the vehicle in a safe place beforeoperating.
The following information is included on the
multi information display: warnings, odome-
ter, tripmeter, average fuel consumption, EV cruising range, total cruising range, EVHV
driving rate, energy flow, etc.
[When the operation mode of the power switch is OFF]
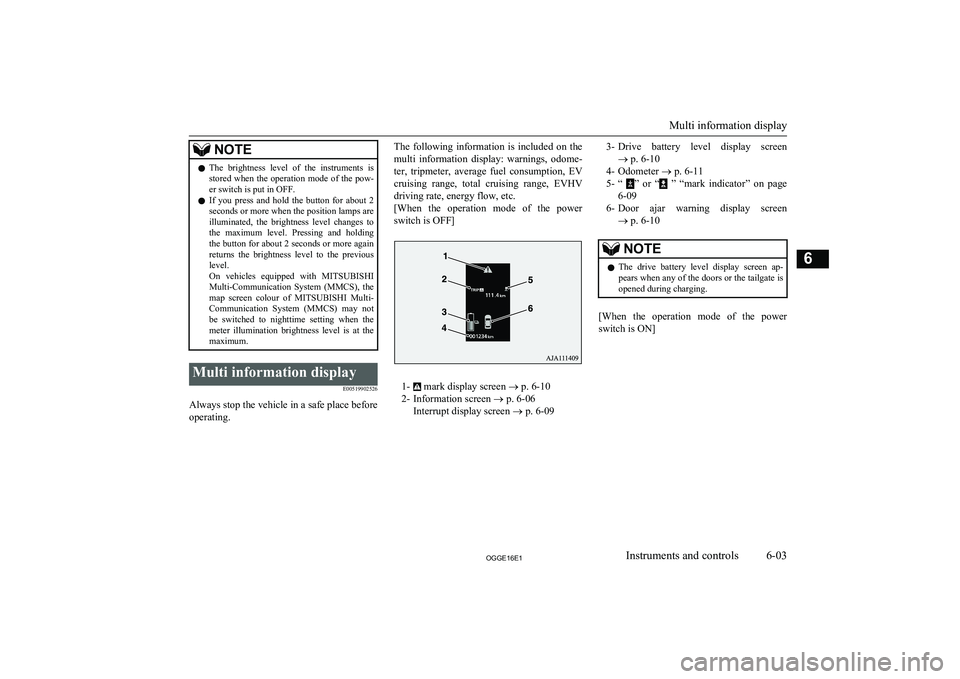
1- mark display screen ® p. 6-10
2- Information screen ® p. 6-06
Interrupt display screen ® p. 6-09
3- Drive battery level display screen
® p. 6-10
4- Odometer ® p. 6-11
5- “
” or “ ” “mark indicator” on page
6-09
6- Door ajar warning display screen
® p. 6-10
NOTEl The drive battery level display screen ap-
pears when any of the doors or the tailgate is
opened during charging.
[When the operation mode of the power
switch is ON]
Multi information display
6-03OGGE16E1Instruments and controls6
Page 140 of 490
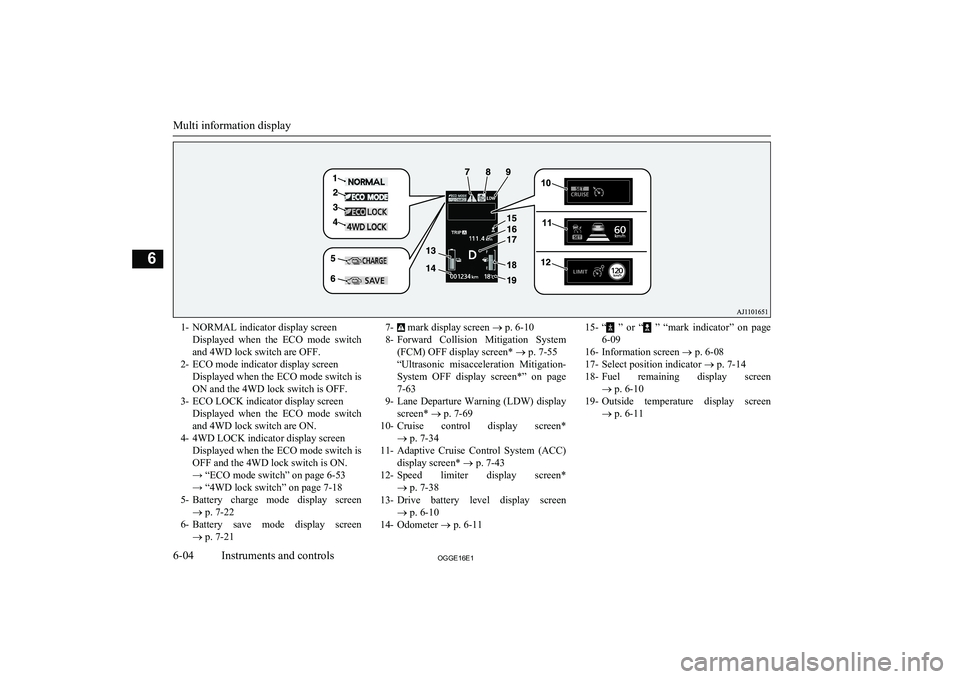
1- NORMAL indicator display screenDisplayed when the ECO mode switchand 4WD lock switch are OFF.
2- ECO mode indicator display screen Displayed when the ECO mode switch isON and the 4WD lock switch is OFF.
3- ECO LOCK indicator display screen Displayed when the ECO mode switchand 4WD lock switch are ON.
4- 4WD LOCK indicator display screen Displayed when the ECO mode switch isOFF and the 4WD lock switch is ON.→ “ECO mode switch” on page 6-53
→ “4WD lock switch” on page 7-18
5- Battery charge mode display screen
® p. 7-22
6- Battery save mode display screen
® p. 7-217- mark display screen ® p. 6-10
8- Forward Collision Mitigation System
(FCM) OFF display screen* ® p. 7-55
“Ultrasonic misacceleration Mitigation-
System OFF display screen*” on page 7-63
9- Lane Departure Warning (LDW) display
screen* ® p. 7-69
10- Cruise control display screen*
® p. 7-34
11- Adaptive Cruise Control System (ACC)
display screen* ® p. 7-43
12- Speed limiter display screen*
® p. 7-38
13- Drive battery level display screen
® p. 6-10
14- Odometer ® p. 6-1115- “ ” or “ ” “mark indicator” on page
6-09
16- Information screen ® p. 6-08
17- Select position indicator ® p. 7-14
18- Fuel remaining display screen
® p. 6-10
19- Outside temperature display screen
® p. 6-11
Multi information display
6-04OGGE16E1Instruments and controls6
Page 146 of 490
mark display screen
E00533901028
This is displayed when you press the multi
information display switch and return from the warning display screen to the previous
screen.
This mark is also displayed if there is another
warning other than the one displayed. When the cause of the warning display is eliminated, the
mark goes out automatical-
ly.
NOTEl When the mark is displayed, the warning
display screen can be redisplayed on the in- formation screen.
Refer to “Information screen (when the op-
eration mode is OFF)” on page 6-06.
Refer to “Information screen (when the op-
eration mode is ON)” on page 6-08.Door ajar warning display
screen
E00522601692
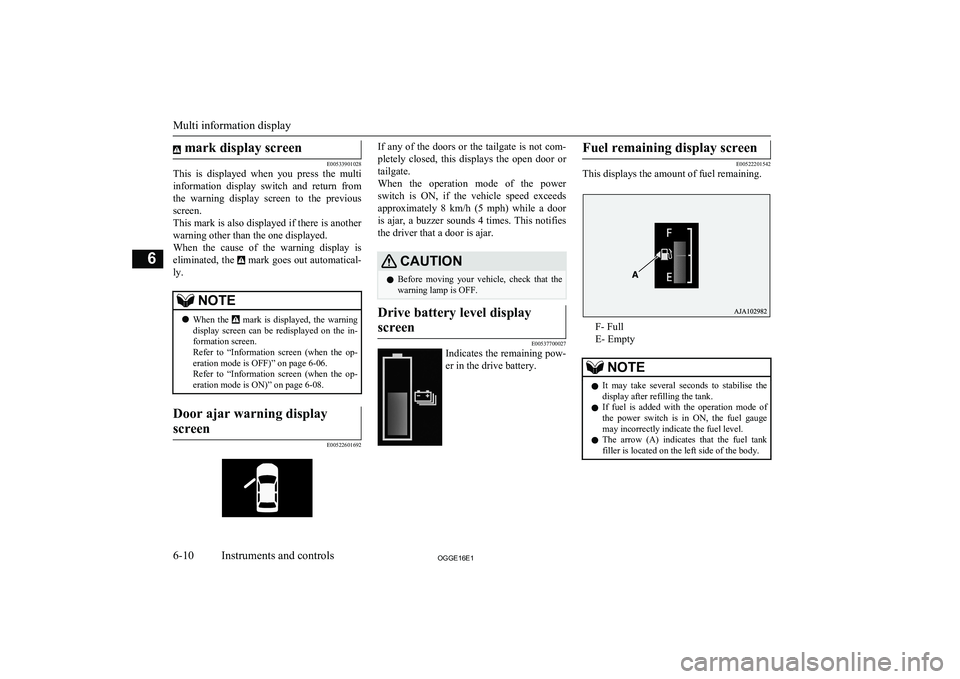
If any of the doors or the tailgate is not com-
pletely closed, this displays the open door or
tailgate.
When the operation mode of the power switch is ON, if the vehicle speed exceeds
approximately 8 km/h (5 mph) while a door is ajar, a buzzer sounds 4 times. This notifies
the driver that a door is ajar.CAUTIONl Before moving your vehicle, check that the
warning lamp is OFF.Drive battery level display
screen
E00537700027
Indicates the remaining pow- er in the drive battery.
Fuel remaining display screen
E00522201542
This displays the amount of fuel remaining.
F- Full
E- Empty
NOTEl It may take several seconds to stabilise the
display after refilling the tank.
l If fuel is added with the operation mode of
the power switch is in ON, the fuel gauge may incorrectly indicate the fuel level.
l The arrow (A) indicates that the fuel tank
filler is located on the left side of the body.
Multi information display
6-10OGGE16E1Instruments and controls6
Page 147 of 490
Fuel remaining warning display
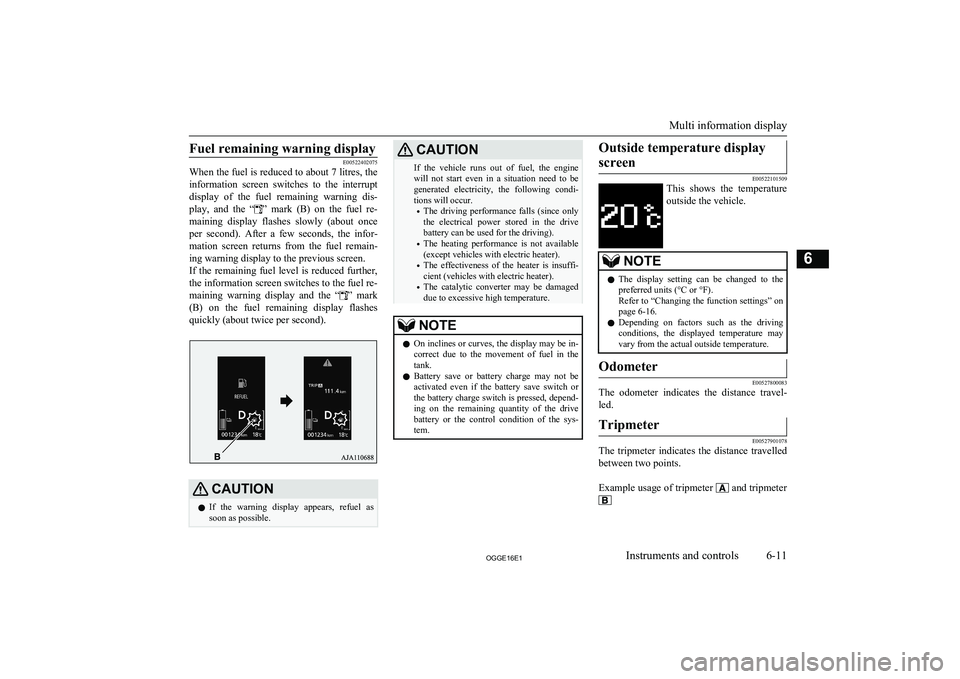
E00522402075
When the fuel is reduced to about 7 litres, the
information screen switches to the interruptdisplay of the fuel remaining warning dis-
play, and the “
” mark (B) on the fuel re-
maining display flashes slowly (about once
per second). After a few seconds, the infor- mation screen returns from the fuel remain-
ing warning display to the previous screen.
If the remaining fuel level is reduced further, the information screen switches to the fuel re-
maining warning display and the “
” mark
(B) on the fuel remaining display flashes
quickly (about twice per second).
CAUTIONl If the warning display appears, refuel as
soon as possible.CAUTIONIf the vehicle runs out of fuel, the enginewill not start even in a situation need to be generated electricity, the following condi-
tions will occur.
• The driving performance falls (since only
the electrical power stored in the drive
battery can be used for the driving).
• The heating performance is not available
(except vehicles with electric heater).
• The effectiveness of the heater is insuffi-
cient (vehicles with electric heater).
• The catalytic converter may be damaged
due to excessive high temperature.NOTEl On inclines or curves, the display may be in-
correct due to the movement of fuel in the
tank.
l Battery save or battery charge may not be
activated even if the battery save switch or
the battery charge switch is pressed, depend-
ing on the remaining quantity of the drive
battery or the control condition of the sys- tem.Outside temperature display
screen
E00522101509
This shows the temperature
outside the vehicle.
NOTEl The display setting can be changed to the
preferred units (°C or °F).
Refer to “Changing the function settings” on page 6-16.
l Depending on factors such as the driving
conditions, the displayed temperature may vary from the actual outside temperature.Odometer
E00527800083
The odometer indicates the distance travel-
led.
Tripmeter
E00527901078
The tripmeter indicates the distance travelled between two points.
Example usage of tripmeter
and tripmeter
Multi information display
6-11OGGE16E1Instruments and controls6
Page 148 of 490
It is possible to measure two currently
travelled distances, from home using
tripmeter
and from a particular point
on the way using tripmeter
.
To reset the tripmeter
To return the display to 0, hold down the
multi-information display switch for about 2
seconds or more. Only the currently dis-
played value will be reset.
Example
If tripmeter
is displayed, only tripmeter
will be reset.
NOTEl When disconnecting the auxiliary battery
terminal, the memory of tripmeter and
are cleared, and the display returns to
“0”.
Service reminder
E00522502021
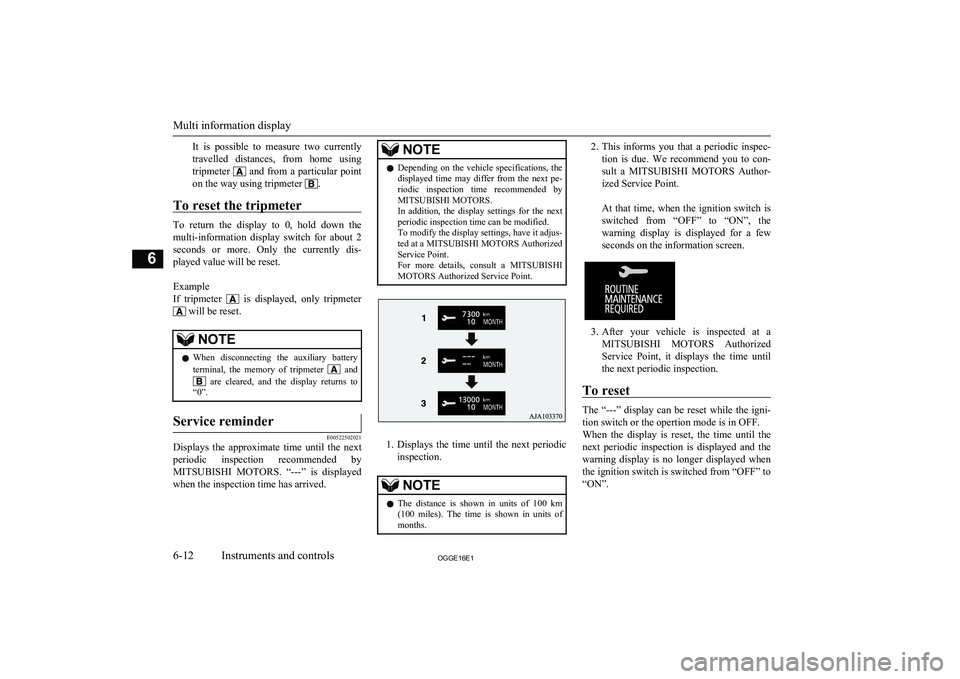
Displays the approximate time until the next
periodic inspection recommended by MITSUBISHI MOTORS . “---” is displayed
when the inspection time has arrived.
NOTEl Depending on the vehicle specifications, the
displayed time may differ from the next pe-
riodic inspection time recommended by
MITSUBISHI MOTORS.
In addition, the display settings for the next periodic inspection time can be modified.
To modify the display settings, have it adjus-
ted at a MITSUBISHI MOTORS Authorized Service Point.
For more details, consult a MITSUBISHI
MOTORS Authorized Service Point.
1. Displays the time until the next periodic
inspection.
NOTEl The distance is shown in units of 100 km
(100 miles). The time is shown in units of months.2. This informs you that a periodic inspec-
tion is due. We recommend you to con-
sult a MITSUBISHI MOTORS Author-
ized Service Point.
At that time, when the ignition switch is switched from “OFF” to “ON”, the
warning display is displayed for a few seconds on the information screen.
3. After your vehicle is inspected at a
MITSUBISHI MOTORS Authorized
Service Point, it displays the time until
the next periodic inspection.
To reset
The “---” display can be reset while the igni-
tion switch or the opertion mode is in OFF.
When the display is reset, the time until the
next periodic inspection is displayed and the warning display is no longer displayed when
the ignition switch is switched from “OFF” to
“ON”.
Multi information display
6-12OGGE16E1Instruments and controls6
Page 150 of 490
EV cruising range display/Total cruising range display
E00537600026
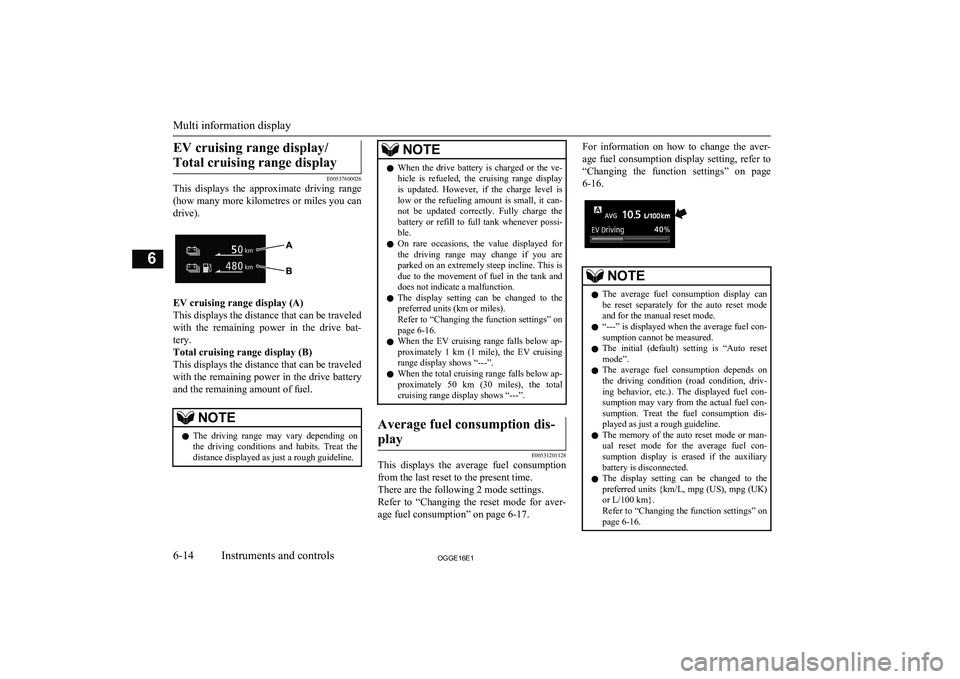
This displays the approximate driving range
(how many more kilometres or miles you can
drive).
EV cruising range display (A)
This displays the distance that can be traveled
with the remaining power in the drive bat- tery.
Total cruising range display (B)
This displays the distance that can be traveled
with the remaining power in the drive battery and the remaining amount of fuel.
NOTEl The driving range may vary depending on
the driving conditions and habits. Treat the
distance displayed as just a rough guideline.NOTEl When the drive battery is charged or the ve-
hicle is refueled, the cruising range display is updated. However, if the charge level is
low or the refueling amount is small, it can-
not be updated correctly. Fully charge the
battery or refill to full tank whenever possi- ble.
l On rare occasions, the value displayed for
the driving range may change if you are
parked on an extremely steep incline. This is due to the movement of fuel in the tank and
does not indicate a malfunction.
l The display setting can be changed to the
preferred units (km or miles).
Refer to “Changing the function settings” on page 6-16.
l When the EV cruising range falls below ap-
proximately 1 km (1 mile), the EV cruising range display shows “---”.
l When the total cruising range falls below ap-
proximately 50 km (30 miles), the total cruising range display shows “---”.Average fuel consumption dis-
play
E00531201128
This displays the average fuel consumption from the last reset to the present time.
There are the following 2 mode settings.
Refer to “Changing the reset mode for aver-
age fuel consumption” on page 6-17.
For information on how to change the aver-
age fuel consumption display setting, refer to “Changing the function settings” on page 6-16.NOTEl The average fuel consumption display can
be reset separately for the auto reset mode and for the manual reset mode.
l “---” is displayed when the average fuel con-
sumption cannot be measured.
l The initial (default) setting is “Auto reset
mode”.
l The average fuel consumption depends on
the driving condition (road condition, driv- ing behavior, etc.). The displayed fuel con- sumption may vary from the actual fuel con-
sumption. Treat the fuel consumption dis- played as just a rough guideline.
l The memory of the auto reset mode or man-
ual reset mode for the average fuel con-sumption display is erased if the auxiliarybattery is disconnected.
l The display setting can be changed to the
preferred units {km/L, mpg (US), mpg (UK)
or L/100 km}.
Refer to “Changing the function settings” on page 6-16.
Multi information display
6-14OGGE16E1Instruments and controls6