service indicator MITSUBISHI OUTLANDER PHEV 2017 Owner's Manual (in English)
[x] Cancel search | Manufacturer: MITSUBISHI, Model Year: 2017, Model line: OUTLANDER PHEV, Model: MITSUBISHI OUTLANDER PHEV 2017Pages: 548, PDF Size: 25.5 MB
Page 30 of 548
lIt is the battery to operate the motor and
the air conditioning.
In addition to the drive battery, OUT-
LANDER PHEV has the auxiliary bat-
tery to operate lamps, wipers, etc.
l Compact, light-weight lithium ion bat-
tery with high energy density is used for the drive battery.
l The drive battery has the following char-
acteristics.
Please read this carefully paying atten-
tion to the following:
Characteristics
l The same as ordinary lithium-ion batter-
ies, the battery capacity of the drive bat-
tery gradually reduces with time. As the
drive battery capacity decreases, the ini- tial EV cruising range and the vehicle
performance will similarly decrease.
Depending on the usage conditions, such as frequent quick acceleration/decelera- tion, extremely hot weather, storing the
vehicle in high ambient temperatures, etc., the rate of battery capacity drop will
increase.
l The performance may be changed due to
the ambient temperature.
At low ambient temperature, in particu- lar, the EV cruising range is short and
the charging time is long, compared to operation at normal temperature. Also,charging may be stopped before com-
plete charging.
l When the ambient temperature lowers,
the engine will start frequently, even if there remains much power in the drive
battery.
l Because the engine starts frequently, the
fuel consumption will increase.
l The battery is gradually discharged with-
out use and the battery charge is low-
ered.
l It is not necessary to consume the bat-
tery completely before charging.Precautions for operation
l If your vehicle is not used for a long
time, check the drive battery level dis-
play every 3 months.
If the drive battery level display shows
0, charge the battery until some indica- tion appears. Alternatively, start the
Plug-in Hybrid EV System and turn on the ready indicator.
The engine will then automatically start to charge the drive battery.
Wait until the engine automatically
stops, then put the operation mode of the
power switch in OFF.
l MITSUBISHI
Motors collects drive bat-
teries. If you scrap your vehicle, please
consult a MITSUBISHI MOTORS Au-
thorized Service Point.
EV cruising range
E00205100025
lEven if the charge level is the same, the
EV cruising range may vary depending on driving conditions. Since driving at
high speed or climbing on a hill requires higher consumption of the drive batterythan usual, the EV cruising range is shortened.
EV cruising range
2-05OGGE17E1General information2
Page 33 of 548
NOTE•Certain front, side or rear collisions.
• Certain Plug-in Hybrid EV system mal-
functions.
l When the emergency shut-off system is acti-
vated, the ready indicator is turned off. Refer
to “Indication and warning lamps” on page 6-23.
l If the emergency shut-off system activates,
contact a MITSUBISHI MOTORS Author-
ized Service Point.Inspection and maintenance
E00205400031
When performing inspection and mainte-nance, be careful in the following points.
WARNINGl Before performing inspection or mainte-
nance, be sure to disconnect the charge connector from the vehicle and confirmthat put the operation mode of the power
switch in “OFF”.WARNINGl Never touch, disassemble, remove or re-
place highvoltage parts, exposed electrical
components, cables or connectors. Failure
to follow this instruction can result in se- vere burns or electric shock causing seri-ous injury or death. High-voltage cables are colored orange. The vehicle high volt-
age system has no user serviceable parts. Take your vehicle to a MITSUBISHI
MOTORS Authorized Service Point for
any necessary maintenance.
l Never touch the service plug under the
rear seat. Improper handling of this could
cause an electric shock which result in a
serious injury or death. The service plug
is used to shut off the high voltage from the drive battery when repairing the vehi-
cle at a MITSUBISHI MOTORS Author-
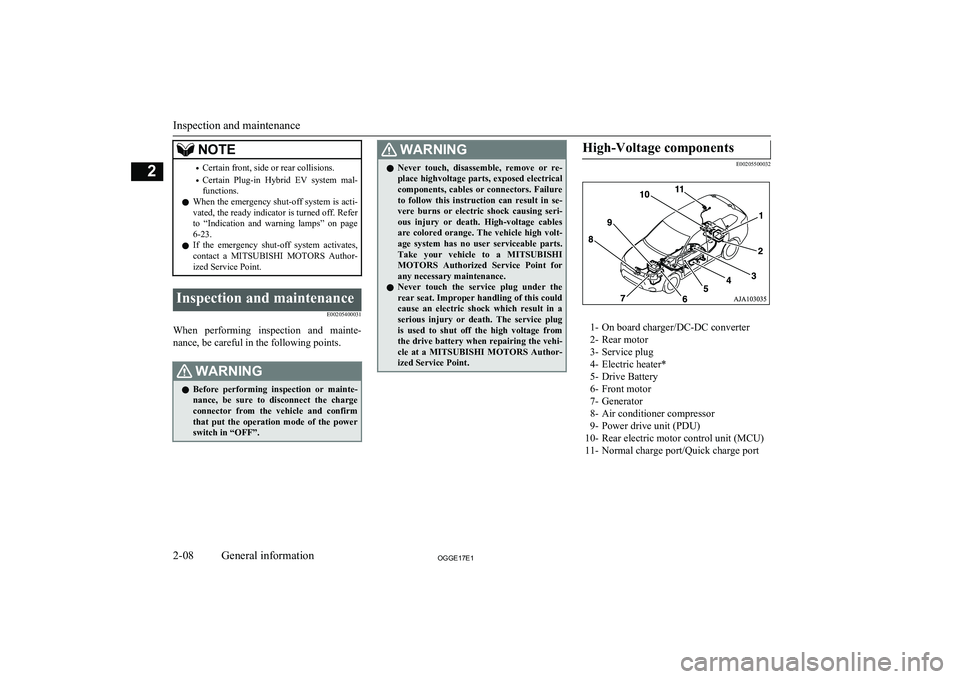
ized Service Point.High-Voltage components
E00205500032
1- On board charger/DC-DC converter
2- Rear motor
3- Service plug
4- Electric heater*
5- Drive Battery
6- Front motor
7- Generator
8- Air conditioner compressor
9- Power drive unit (PDU)
10- Rear electric motor control unit (MCU) 11- Normal charge port/Quick charge port
Inspection and maintenance
2-08OGGE17E1General information2
Page 38 of 548
Approx. ambi-
ent temperaturePhenomenaCorrective actionl The motor output may be restricted and the regenerative
braking performance may be decreased or lost when
“BATTERY TOO COLD” is displayed.* 3l
Immediately stop the vehicle in
a safe place.
Also, when braking, depress the
brake pedal harder.Charging and batteryl Charging may become impossible or charging may stop
during charging, before the battery is fully charged.l In the daytime, wait for the
temperature to rise, restart the plug-in hybrid EV system.CAUTIONl “BATTERY TOO COLD” is displayed* 3
, contact a MITSUBISHI MOTORS Authorized Service Point.
l When blinking of the ready indicator* 2
continues and “BATTERY TOO COLD” is displayed* 3
on the multi information display with vehicle conditions, the
drive battery cannot be warmed up.
Cautions and actions to deal with intense cold
2-13OGGE17E1General information2
Page 52 of 548
WARNINGlIf the POWER or CHARGING indicator does not illuminates or the FAULT indicator blinks or illuminates during normal charging, please contact
a MITSUBISHI MOTORS Authorized Service Point.
l Do not charge when the EV charging cable is coiled up.
The cable may be heated and resulting in fire.
l Do not alter or disassemble the EV charging cable. Doing so could cause fire, an electric shock or injury.
l Be sure to install the cap to the normal charge connector and store the EV charging cable in a place where the cable is not exposed to water or dust.
Entry of foreign matter such as water or dust in the metal terminal of the normal charge connector or charging cable plug may cause a fire or malfunction.
l Never force the connection if the EV charging cable or connector shows damage or is not easily connected due to foreign material entering the
connector or the outlet. And never use an outlet that is worn, damaged, or will not hold the plug firmly. Doing so could cause fire, an electric shock,
or short circuit.
l Pay attention to the following for handling the EV charging cable.
Damage to the cable could cause fire, an electric shock, or short circuit.
• Do not drop the cable or do not give strong impact to it.
• Do not pull or bend with undue force.
• Do not twist.
• Do not drag.
• Do not put an object on top.
• Do not put the cable close to a heating unit including heater.CAUTIONl Do not connect the normal charge cable to an outlet that has a lower rating than the current value described on the control box.NOTElAll indicators are illuminated momentarily for confirming operation when the charging cable plug is inserted into an outlet. After that the POWER indicator
and the CHARGING indicator is continuously illuminated.
l The CHARGING indicator will start to blink when the charging is completed. The POWER indicator is continuously illuminated while the charging cable
plug is inserted into an outlet.
EV charging cable
3-09OGGE17E1Charging3
Page 61 of 548
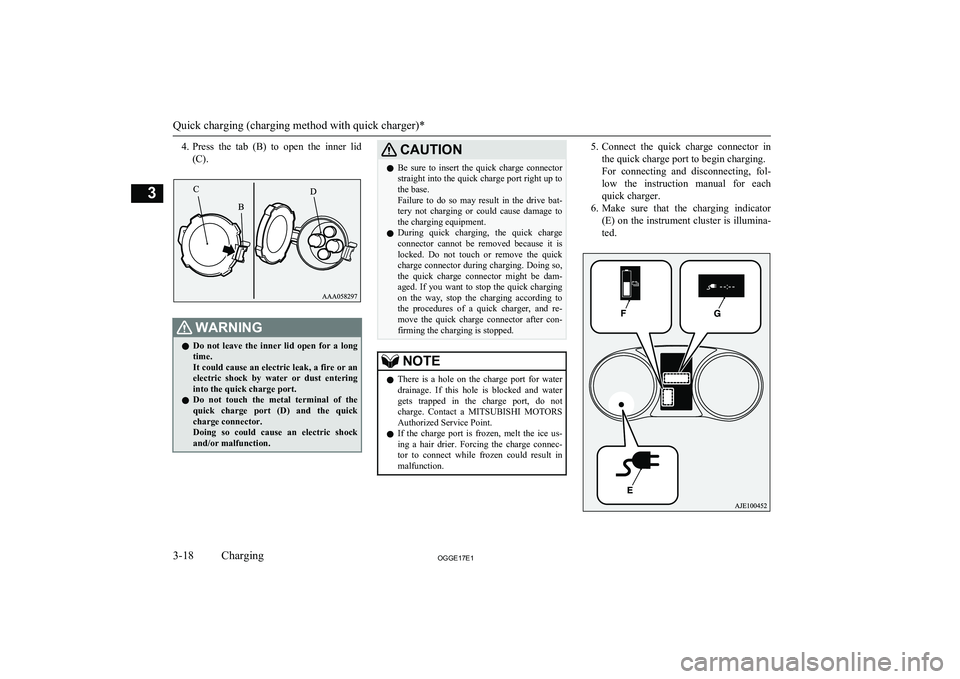
4.Press the tab (B) to open the inner lid
(C).WARNINGl Do not leave the inner lid open for a long
time.
It could cause an electric leak, a fire or an electric shock by water or dust entering
into the quick charge port.
l Do not touch the metal terminal of the
quick charge port (D) and the quick
charge connector.
Doing so could cause an electric shock and/or malfunction.CAUTIONl Be sure to insert the quick charge connector
straight into the quick charge port right up to
the base.
Failure to do so may result in the drive bat- tery not charging or could cause damage to the charging equipment.
l During quick charging, the quick charge
connector cannot be removed because it is locked. Do not touch or remove the quick
charge connector during charging. Doing so, the quick charge connector might be dam-
aged. If you want to stop the quick charging
on the way, stop the charging according to
the procedures of a quick charger, and re- move the quick charge connector after con-
firming the charging is stopped.NOTEl There is a hole on the charge port for water
drainage. If this hole is blocked and watergets trapped in the charge port, do not
charge. Contact a MITSUBISHI MOTORS
Authorized Service Point.
l If the charge port is frozen, melt the ice us-
ing a hair drier. Forcing the charge connec-
tor to connect while frozen could result in malfunction.5. Connect the quick charge connector in
the quick charge port to begin charging.
For connecting and disconnecting, fol- low the instruction manual for each
quick charger.
6. Make sure that the charging indicator
(E) on the instrument cluster is illumina-
ted.
Quick charging (charging method with quick charger)*
3-18OGGE17E1Charging3
Page 62 of 548
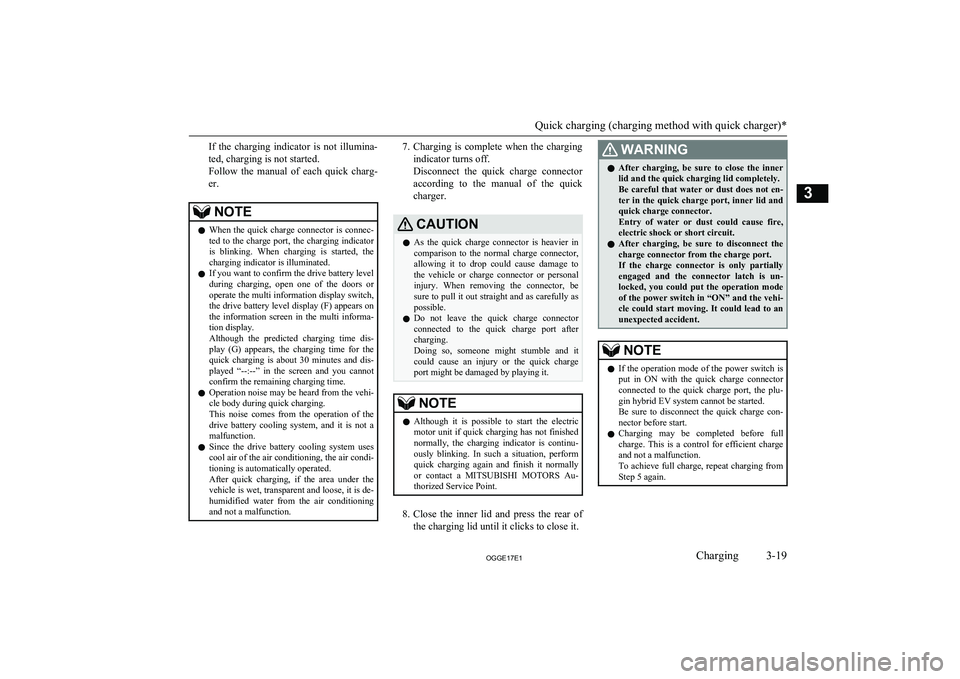
If the charging indicator is not illumina-
ted, charging is not started.
Follow the manual of each quick charg-
er.NOTEl When the quick charge connector is connec-
ted to the charge port, the charging indicator
is blinking. When charging is started, the charging indicator is illuminated.
l If you want to confirm the drive battery level
during charging, open one of the doors or operate the multi information display switch,
the drive battery level display (F) appears on the information screen in the multi informa-tion display.
Although the predicted charging time dis- play (G) appears, the charging time for the
quick charging is about 30 minutes and dis- played “--:--” in the screen and you cannot
confirm the remaining charging time.
l Operation noise may be heard from the vehi-
cle body during quick charging.
This noise comes from the operation of the drive battery cooling system, and it is not a malfunction.
l Since the drive battery cooling system uses
cool air of the air conditioning, the air condi-tioning is automatically operated.
After quick charging, if the area under the vehicle is wet, transparent and loose, it is de-
humidified water from the air conditioning and not a malfunction.7. Charging is complete when the charging
indicator turns off.
Disconnect the quick charge connector according to the manual of the quick
charger.CAUTIONl As the quick charge connector is heavier in
comparison to the normal charge connector,
allowing it to drop could cause damage to the vehicle or charge connector or personal injury. When removing the connector, be
sure to pull it out straight and as carefully as possible.
l Do not leave the quick charge connector
connected to the quick charge port after
charging.
Doing so, someone might stumble and it could cause an injury or the quick chargeport might be damaged by playing it.NOTEl Although it is possible to start the electric
motor unit if quick charging has not finishednormally, the charging indicator is continu-
ously blinking. In such a situation, perform quick charging again and finish it normally
or contact a MITSUBISHI MOTORS Au-
thorized Service Point.
8. Close the inner lid and press the rear of
the charging lid until it clicks to close it.
WARNINGl After charging, be sure to close the inner
lid and the quick charging lid completely.
Be careful that water or dust does not en-
ter in the quick charge port, inner lid and
quick charge connector.
Entry of water or dust could cause fire, electric shock or short circuit.
l After charging, be sure to disconnect the
charge connector from the charge port.If the charge connector is only partially
engaged and the connector latch is un-
locked, you could put the operation mode of the power switch in “ON” and the vehi-
cle could start moving. It could lead to an unexpected accident.NOTEl If the operation mode of the power switch is
put in ON with the quick charge connector
connected to the quick charge port, the plu-
gin hybrid EV system cannot be started.
Be sure to disconnect the quick charge con- nector before start.
l Charging may be completed before full
charge. This is a control for efficient charge
and not a malfunction.
To achieve full charge, repeat charging from
Step 5 again.
Quick charging (charging method with quick charger)*
3-19OGGE17E1Charging3
Page 64 of 548
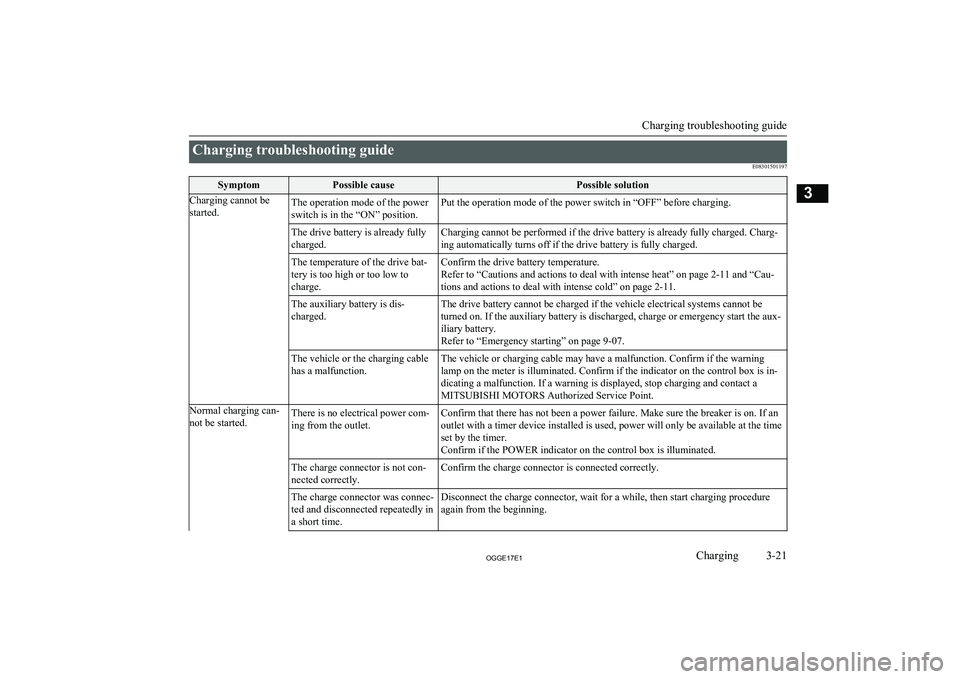
Charging troubleshooting guideE08301501197SymptomPossible causePossible solutionCharging cannot be
started.The operation mode of the power
switch is in the “ON” position.Put the operation mode of the power switch in “OFF” before charging.The drive battery is already fully
charged.Charging cannot be performed if the drive battery is already fully charged. Charg- ing automatically turns off if the drive battery is fully charged.The temperature of the drive bat-
tery is too high or too low to
charge.Confirm the drive battery temperature.
Refer to “Cautions and actions to deal with intense heat” on page 2-11 and “Cau-
tions and actions to deal with intense cold” on page 2-11.The auxiliary battery is dis-
charged.The drive battery cannot be charged if the vehicle electrical systems cannot be
turned on. If the auxiliary battery is discharged, charge or emergency start the aux- iliary battery.
Refer to “Emergency starting” on page 9-07.The vehicle or the charging cable
has a malfunction.The vehicle or charging cable may have a malfunction. Confirm if the warning
lamp on the meter is illuminated. Confirm if the indicator on the control box is in-
dicating a malfunction. If a warning is displayed, stop charging and contact a
MITSUBISHI MOTORS Authorized Service Point.Normal charging can-
not be started.There is no electrical power com-
ing from the outlet.Confirm that there has not been a power failure. Make sure the breaker is on. If an
outlet with a timer device installed is used, power will only be available at the time
set by the timer.
Confirm if the POWER indicator on the control box is illuminated.The charge connector is not con-
nected correctly.Confirm the charge connector is connected correctly.The charge connector was connec-
ted and disconnected repeatedly in
a short time.Disconnect the charge connector, wait for a while, then start charging procedure again from the beginning.
Charging troubleshooting guide
3-21OGGE17E1Charging3
Page 67 of 548
SymptomPossible causePossible solutionThe charging indicator
is continuously blink-
ing even if the quick
charge connector is
not connected into the
quick charge port
when you start the
plug-in hybrid EV sys-
tem after quick charg-
ing.Quick charging has not finished
normally.Perform quick charging again and finish it normally or contact a MITSUBISHI
MOTORS Authorized Service Point.Plug-in Hybrid EV
System does not start
after quick charging.The vehicle has a malfunction.There is a possibility that the vehicle has a malfunction. After turning the operation mode of the power switch to “ON” and putting the select position to “N”, ask the
support of the fellow passenger or people nearby to move the vehicle by pushing it
into safety.
After moving, contact a MITSUBISHI MOTORS Authorized Service Point.
MITSUBISHI Remote
Control* E08304200127
The MITSUBISHI Remote Control allows to
operate the vehicle within the communication
range of the wireless LAN device (which conforms to IEEE 802.11b and supports iOS or Android). The following operations areavailable.NOTEl The communication distance differs depend-
ing on the wireless LAN device, due to this
the communication may go down.
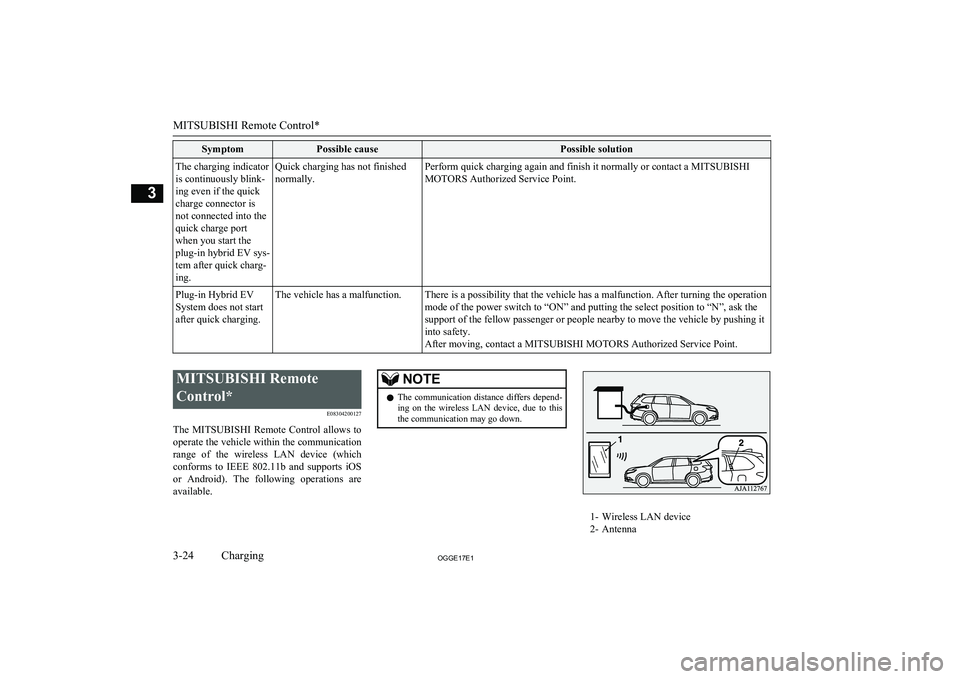
1- Wireless LAN device
2- Antenna
MITSUBISHI Remote Control*
3-24OGGE17E1Charging3
Page 140 of 548
WARNING•Do not turn OFF the front passenger’s
airbag ON-OFF switch except when a child restraint system is fitted to the
front passenger seat.
• If the OFF indicator does not come on
when the front passenger’s airbag ON- OFF switch is turned OFF, do not fit a
child restraint system to the front pas- senger seat. We recommend you to
have the system inspected by a
MITSUBISHI MOTORS Authorized
Service Point.
• If the OFF indicator remains on when
the front passenger’s airbag ON-OFF switch is turned ON, do not allow any- one to sit on the front passenger seat.
We recommend you to have the system inspected by a MITSUBISHI
MOTORS Authorized Service Point.
To turn an airbag off, follow these steps:
1. Remove the emergency key from the
keyless operation key.
Refer to “Emergency key” on page 4-14.
2. Insert the emergency key into the front
passenger’s airbag ON-OFF switch, and turn it to the “OFF” position.
3. Remove the emergency key from the
front passenger’s airbag ON-OFF switch.
4. Put the operation mode of the power
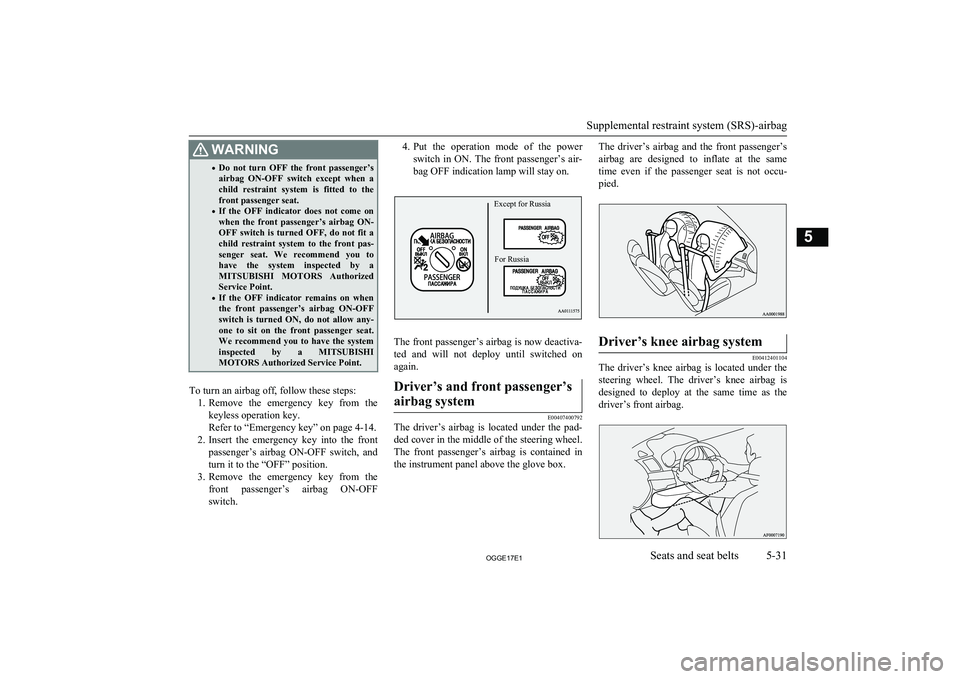
switch in ON. The front passenger’s air- bag OFF indication lamp will stay on.
The front passenger’s airbag is now deactiva-ted and will not deploy until switched on
again.
Driver’s and front passenger’s
airbag system
E00407400792
The driver’s airbag is located under the pad- ded cover in the middle of the steering wheel. The front passenger’s airbag is contained in
the instrument panel above the glove box.
The driver’s airbag and the front passenger’s
airbag are designed to inflate at the same
time even if the passenger seat is not occu- pied.Driver’s knee airbag system
E00412401104
The driver’s knee airbag is located under the steering wheel. The driver’s knee airbag is
designed to deploy at the same time as the driver’s front airbag.
Supplemental restraint system (SRS)-airbag
5-31OGGE17E1Seats and seat belts5 Except for RussiaFor Russia
Page 198 of 548
CAUTIONlWhen the warning lamp remains on or does
not come on, there is a possibility that the
parking brake cannot be operated or re-
leased. Immediately contact the nearest MITSUBISHI MOTORS Authorized Serv-
ice Point. When the warning lamp comes on during driving, immediately stop the vehiclein a safe place, and contact your
MITSUBISHI MOTORS Authorized Serv-
ice Point. If you inevitably have to park, park the vehicle on level and stable ground,
press the electrical parking switch and place
chocks or blocks.Check engine warning lamp
E00502602938
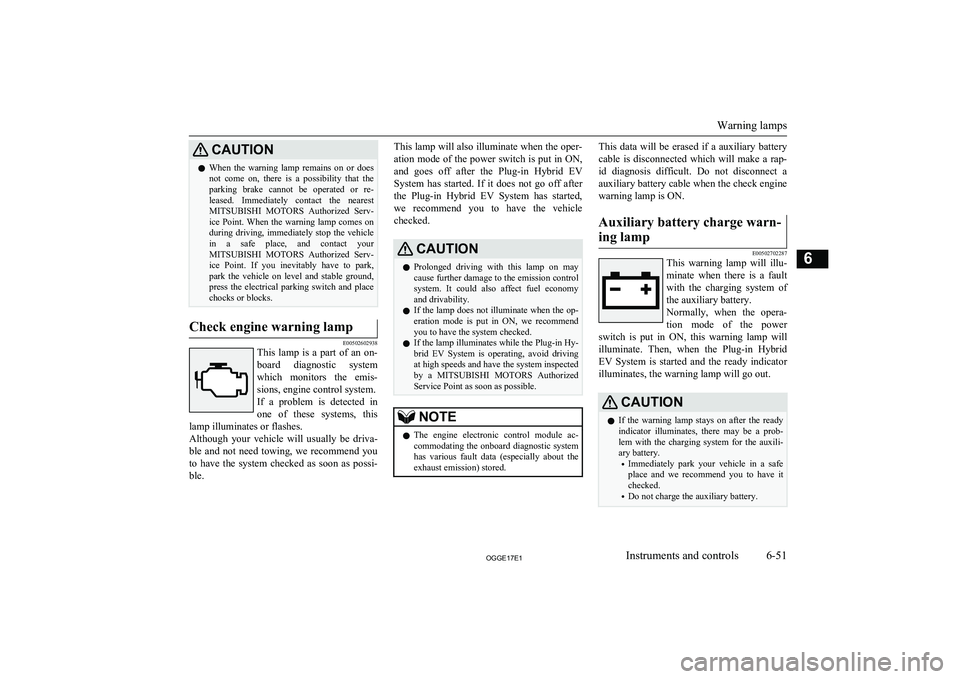
This lamp is a part of an on-
board diagnostic system
which monitors the emis-
sions, engine control system. If a problem is detected in one of these systems, this
lamp illuminates or flashes.
Although your vehicle will usually be driva-
ble and not need towing, we recommend you
to have the system checked as soon as possi- ble.
This lamp will also illuminate when the oper-
ation mode of the power switch is put in ON,
and goes off after the Plug-in Hybrid EV System has started. If it does not go off after
the Plug-in Hybrid EV System has started, we recommend you to have the vehicle
checked.CAUTIONl Prolonged driving with this lamp on may
cause further damage to the emission control system. It could also affect fuel economyand drivability.
l If the lamp does not illuminate when the op-
eration mode is put in ON, we recommend
you to have the system checked.
l If the lamp illuminates while the Plug-in Hy-
brid EV System is operating, avoid driving
at high speeds and have the system inspected by a MITSUBISHI MOTORS Authorized
Service Point as soon as possible.NOTEl The engine electronic control module ac-
commodating the onboard diagnostic system has various fault data (especially about the
exhaust emission) stored.This data will be erased if a auxiliary battery
cable is disconnected which will make a rap- id diagnosis difficult. Do not disconnect a
auxiliary battery cable when the check engine
warning lamp is ON.Auxiliary battery charge warn-
ing lamp
E00502702287
This warning lamp will illu- minate when there is a fault with the charging system of
the auxiliary battery.
Normally, when the opera-
tion mode of the power
switch is put in ON, this warning lamp will illuminate. Then, when the Plug-in Hybrid
EV System is started and the ready indicator
illuminates, the warning lamp will go out.
CAUTIONl If the warning lamp stays on after the ready
indicator illuminates, there may be a prob- lem with the charging system for the auxili-
ary battery.
• Immediately park your vehicle in a safe
place and we recommend you to have it
checked.
• Do not charge the auxiliary battery.
Warning lamps
6-51OGGE17E1Instruments and controls6