sensor MITSUBISHI OUTLANDER PHEV 2018 (in English) Repair Manual
[x] Cancel search | Manufacturer: MITSUBISHI, Model Year: 2018, Model line: OUTLANDER PHEV, Model: MITSUBISHI OUTLANDER PHEV 2018Pages: 538, PDF Size: 25.01 MB
Page 313 of 538
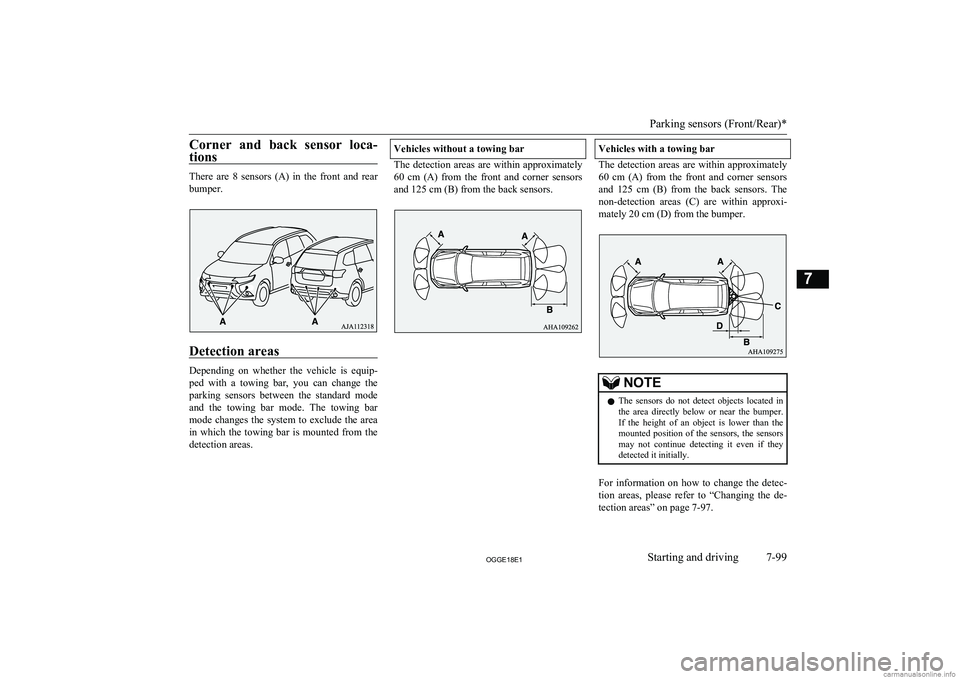
Corner and back sensor loca-tions
There are 8 sensors (A) in the front and rearbumper.
Detection areas
Depending on whether the vehicle is equip-
ped with a towing bar, you can change the parking sensors between the standard modeand the towing bar mode. The towing bar
mode changes the system to exclude the area in which the towing bar is mounted from the
detection areas.
Vehicles without a towing bar
The detection areas are within approximately
60 cm (A) from the front and corner sensors
and 125 cm (B) from the back sensors.
Vehicles with a towing bar
The detection areas are within approximately 60 cm (A) from the front and corner sensors
and 125 cm (B) from the back sensors. The
non-detection areas (C) are within approxi- mately 20 cm (D) from the bumper.
NOTEl The sensors do not detect objects located in
the area directly below or near the bumper. If the height of an object is lower than the
mounted position of the sensors, the sensors
may not continue detecting it even if they detected it initially.
For information on how to change the detec-
tion areas, please refer to “Changing the de- tection areas” on page 7-97.
Parking sensors (Front/Rear)*
7-99OGGE18E1Starting and driving7
Page 314 of 538
CAUTIONlThe parking sensors may not operate proper-
ly under the following conditions:
• The sensors or surroundings have been
wiped by hand.
• The stickers or accessories have been at-
tached to the sensors or surroundings.
• The sensors or surroundings are covered
with ice, snow, or mud.
• When the temperature difference is too
large.
• The sensors are frozen.
• The system receives ultrasonic noise from
other sources (the horns of other vehicles, motorcycle engines, brakes, radios, pour-
ing rain, splashing water, snow traction device (tyre chains), etc.).
• The sensors are extremely hot or cold
(while the vehicle is parked for a long pe- riod of time under a blazing sun or in coldweather).
• The vehicle tilts significantly.
• The vehicle is driven on a rough road
(with a bumpy, gravel, hilly, or grassysurface).
• The vehicle is too close to an obstacle.
• Immediately after Plug-in Hybrid EV
System starting.
l The parking sensors may not properly detect
the following objects:
• Objects that are thin, such as wire nets or
ropes.
• Objects that absorb sound waves, such as
snow.
• Objects that are shaped with a sharp an-
gle.CAUTION• Objects with a smooth surface, such as
glass.
• Objects that are low, such as kerbstones.
l If the bumper has been exposed to an im-
pact, the sensors may fail and prevent the
system from functioning properly. Have the vehicle inspected at a MITSUBISHI
MOTORS Authorized Service Point.NOTEl When the sensor is received ultrasonic noise
from outside, the sensor of the correspond- ing portion will blink at a constant frequen- cy. When they are not received the noise and
return to normal operation.To operate
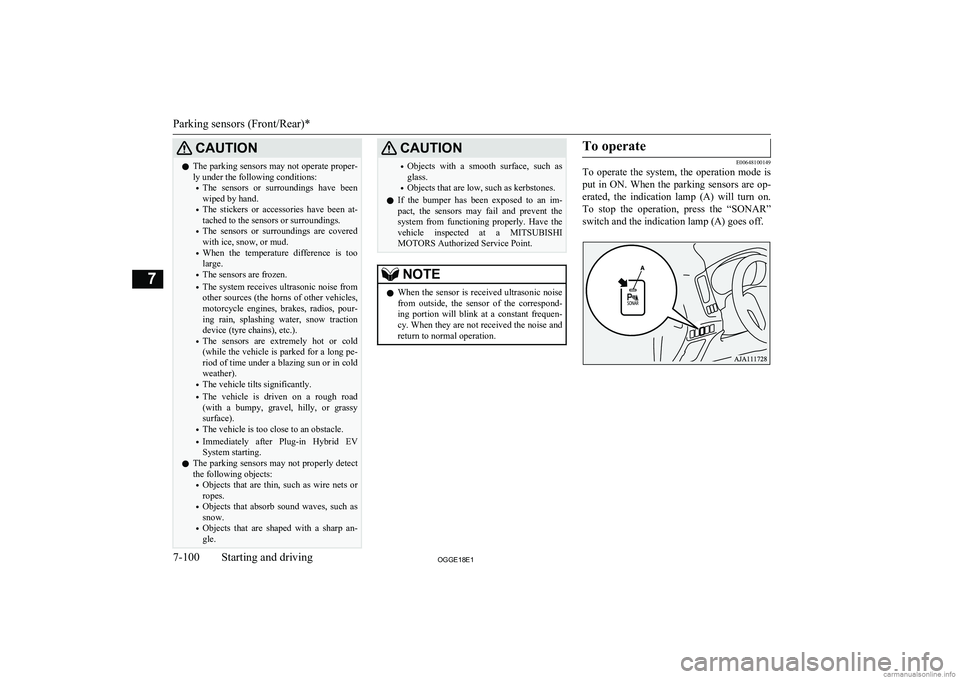
E00648100149
To operate the system, the operation mode is
put in ON. When the parking sensors are op-
erated, the indication lamp (A) will turn on. To stop the operation, press the “SONAR”
switch and the indication lamp (A) goes off.
Parking sensors (Front/Rear)*
7-100OGGE18E1Starting and driving7
Page 315 of 538
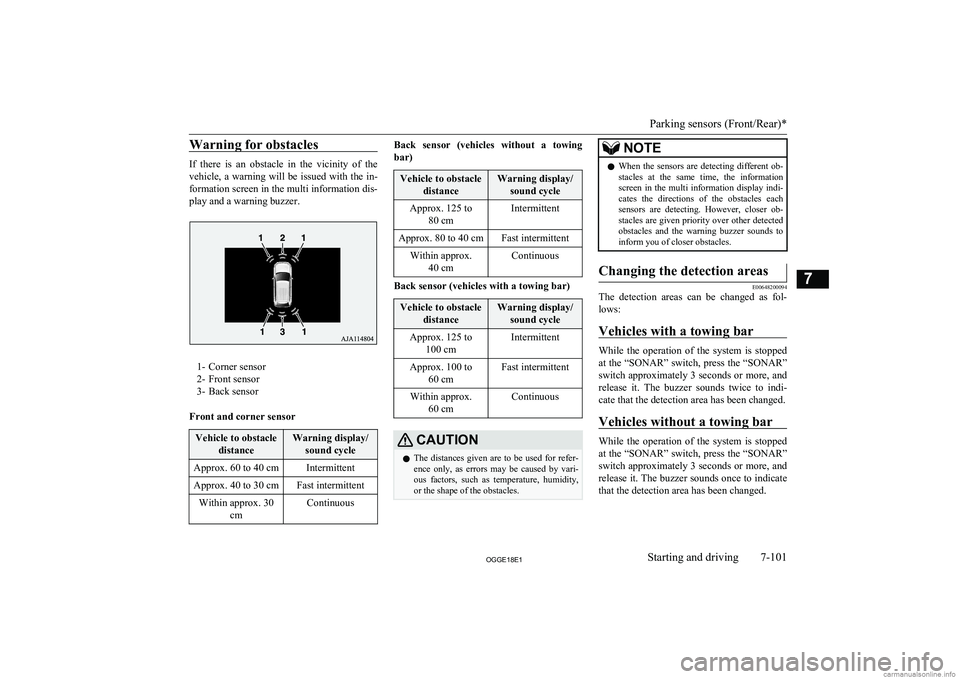
Warning for obstacles
If there is an obstacle in the vicinity of the
vehicle, a warning will be issued with the in-
formation screen in the multi information dis- play and a warning buzzer.
1- Corner sensor
2- Front sensor
3- Back sensor
Front and corner sensor
Vehicle to obstacle distanceWarning display/sound cycleApprox. 60 to 40 cmIntermittentApprox. 40 to 30 cmFast intermittentWithin approx. 30 cmContinuousBack sensor (vehicles without a towing
bar)Vehicle to obstacle distanceWarning display/sound cycleApprox. 125 to 80 cmIntermittentApprox. 80 to 40 cmFast intermittentWithin approx.40 cmContinuous
Back sensor (vehicles with a towing bar)
Vehicle to obstacle distanceWarning display/sound cycleApprox. 125 to 100 cmIntermittentApprox. 100 to 60 cmFast intermittentWithin approx.60 cmContinuousCAUTIONlThe distances given are to be used for refer-
ence only, as errors may be caused by vari- ous factors, such as temperature, humidity,
or the shape of the obstacles.NOTEl When the sensors are detecting different ob-
stacles at the same time, the information screen in the multi information display indi-
cates the directions of the obstacles each sensors are detecting. However, closer ob-
stacles are given priority over other detected obstacles and the warning buzzer sounds to
inform you of closer obstacles.Changing the detection areas
E00648200094
The detection areas can be changed as fol-
lows:
Vehicles with a towing bar
While the operation of the system is stopped
at the “SONAR” switch, press the “SONAR”
switch approximately 3 seconds or more, and release it. The buzzer sounds twice to indi-
cate that the detection area has been changed.
Vehicles without a towing bar
While the operation of the system is stopped
at the “SONAR” switch, press the “SONAR”
switch approximately 3 seconds or more, and
release it. The buzzer sounds once to indicate that the detection area has been changed.
Parking sensors (Front/Rear)*
7-101OGGE18E1Starting and driving7
Page 316 of 538
NOTElThe mode of the detection area can be
switched only when the select position is in
the “R” (REVERSE) position.
l The detection area will not change if you
keep the “SONAR” switch pressed for 10 seconds or more.
l After pressing the “SONAR” switch, the
parking sensors operation differs according
to the detection area setting.
• Setting when towing bar is not equipped
When the selector lever is moved to the “R” (REVERSE) position, the parking
sensors will operate even if the parking sensors operation was stopped by pressing
the “SONAR” switch.
• Setting when towing bar is equipped
When the parking sensors operation was stopped by pressing the “SONAR”
switch, the parking sensors will not oper- ate until the Plug-in Hybrid EV System has been stopped even if the select posi-
tion is put to the “R” (REVERSE) posi-
tion.
To resume the parking sensors operation, press the “SONAR” switch or stop and re-
start the Plug-in Hybrid EV System, and then put the select position to the “R”
(REVERSE) position.Warning display
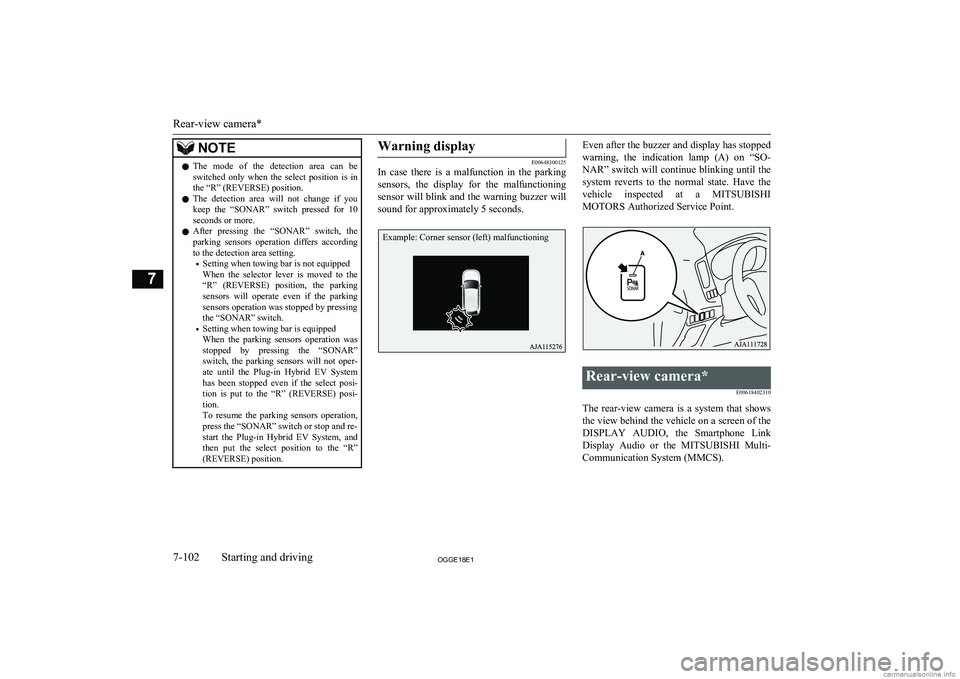
E00648300125
In case there is a malfunction in the parking
sensors, the display for the malfunctioning
sensor will blink and the warning buzzer will sound for approximately 5 seconds.
Even after the buzzer and display has stopped
warning, the indication lamp (A) on “SO- NAR” switch will continue blinking until the
system reverts to the normal state. Have the vehicle inspected at a MITSUBISHI
MOTORS Authorized Service Point.Rear-view camera*
E00618402310
The rear-view camera is a system that showsthe view behind the vehicle on a screen of the
DISPLAY AUDIO, the Smartphone Link Display Audio or the MITSUBISHI Multi-
Communication System (MMCS).
Rear-view camera*
7-102OGGE18E1Starting and driving7 Example: Corner sensor (left) malfunctioning
Page 338 of 538
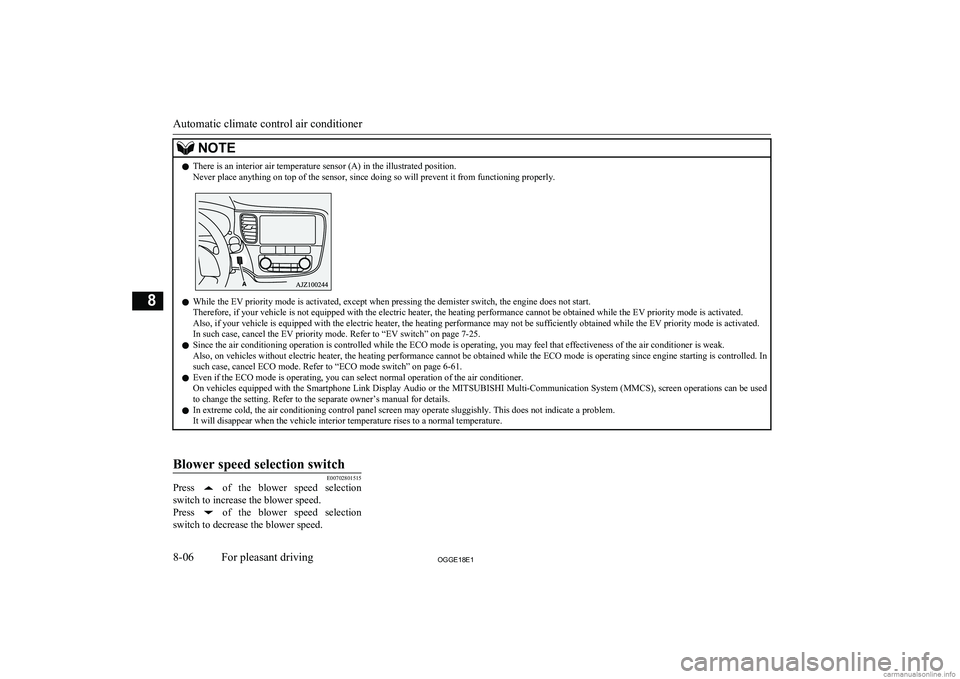
NOTElThere is an interior air temperature sensor (A) in the illustrated position.
Never place anything on top of the sensor, since doing so will prevent it from functioning properly.
l While the EV priority mode is activated, except when pressing the demister switch, the engine does not start.
Therefore, if your vehicle is not equipped with the electric heater, the heating performance cannot be obtained while the EV priority mode is activated.
Also, if your vehicle is equipped with the electric heater, the heating performance may not be sufficiently obtained while the EV priority mode is activated. In such case, cancel the EV priority mode. Refer to “EV switch” on page 7-25.
l Since the air conditioning operation is controlled while the ECO mode is operating, you may feel that effectiveness of the air conditioner is weak.
Also, on vehicles without electric heater, the heating performance cannot be obtained while the ECO mode is operating since engine starting is controlled. In such case, cancel ECO mode. Refer to “ECO mode switch” on page 6-61.
l Even if the ECO mode is operating, you can select normal operation of the air conditioner.
On vehicles equipped with the Smartphone Link Display Audio or the MITSUBISHI Multi-Communication System (MMCS), screen operations can be used
to change the setting. Refer to the separate owner’s manual for details.
l In extreme cold, the air conditioning control panel screen may operate sluggishly. This does not indicate a problem.
It will disappear when the vehicle interior temperature rises to a normal temperature.
Blower speed selection switch
E00702801515
Press of the blower speed selection
switch to increase the blower speed.
Press
of the blower speed selection
switch to decrease the blower speed.
Automatic climate control air conditioner
8-06OGGE18E1For pleasant driving8
Page 426 of 538
5- Valve remover
6- Valve insert (spare)
7- Speed restriction stickerHow to use the tyre repair kit
E00804601130
WARNINGl Using the tyre repair kit may damage the
wheel and/or the tyre inflation pressure
sensor for the tyre.
The vehicle must promptly be inspected and repaired by a MITSUBISHI
MOTORS Authorized Service Point after
using the tyre repair kit.CAUTIONl The tyre sealant can cause health damage if
swallowed. If you accidentally swallow it,
drink as much water as possible and imme-
diately consult a doctor.
l If the tyre sealant gets in your eyes or on
your skin, rinse with lots of water. If you still sense an abnormality, consult a doctor.
l Consult a doctor immediately if any allergic
reactions occur.
l Do not allow children to touch the tyre seal-
ant.
l Do not breathe in the vapours of tyre sealant.
l Be sure to use a
MITSUBISHI MOTORS
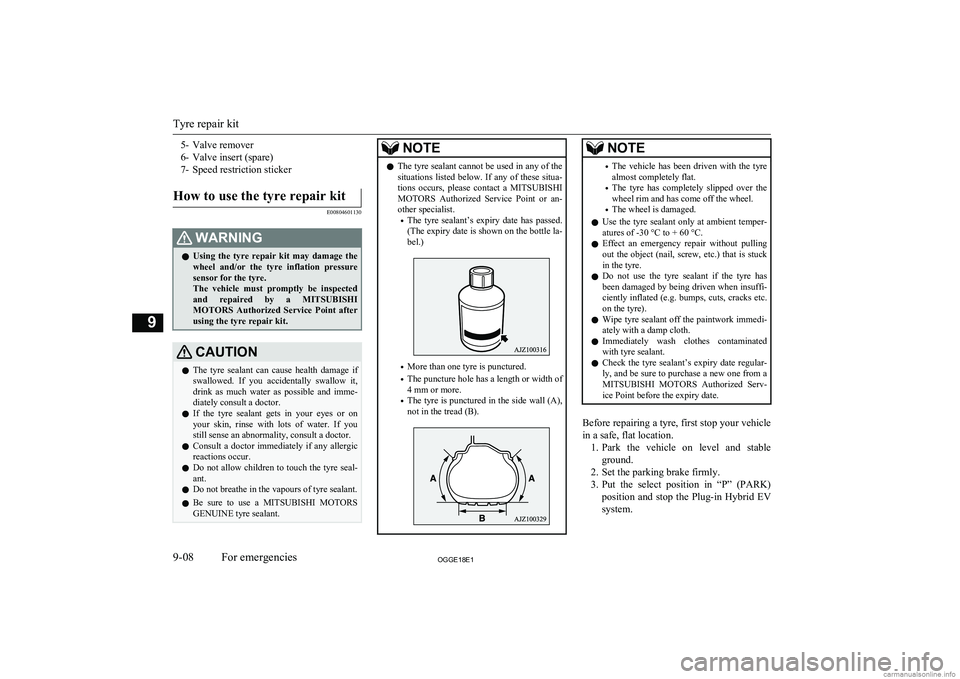
GENUINE tyre sealant.NOTEl The tyre sealant cannot be used in any of the
situations listed below. If any of these situa-
tions occurs, please contact a MITSUBISHI
MOTORS Authorized Service Point or an-
other specialist.
• The tyre sealant’s expiry date has passed.
(The expiry date is shown on the bottle la- bel.)
• More than one tyre is punctured.
• The puncture hole has a length or width of
4 mm or more.
• The tyre is punctured in the side wall (A),
not in the tread (B).
NOTE• The vehicle has been driven with the tyre
almost completely flat.
• The tyre has completely slipped over the
wheel rim and has come off the wheel.
• The wheel is damaged.
l Use the tyre sealant only at ambient temper-
atures of -30 °C to + 60 °C.
l Effect an emergency repair without pulling
out the object (nail, screw, etc.) that is stuck
in the tyre.
l Do not use the tyre sealant if the tyre has
been damaged by being driven when insuffi- ciently inflated (e.g. bumps, cuts, cracks etc.
on the tyre).
l Wipe tyre sealant off the paintwork immedi-
ately with a damp cloth.
l Immediately wash clothes contaminated
with tyre sealant.
l Check the tyre sealant’s expiry date regular-
ly, and be sure to purchase a new one from a
MITSUBISHI MOTORS Authorized Serv-
ice Point before the expiry date.
Before repairing a tyre, first stop your vehicle
in a safe, flat location. 1. Park the vehicle on level and stable
ground.
2. Set the parking brake firmly.
3. Put the select position in “P” (PARK)
position and stop the Plug-in Hybrid EV
system.
Tyre repair kit
9-08OGGE18E1For emergencies9
Page 444 of 538
CAUTIONlAs your vehicle is equipped with the rain
sensor, place the wiper switch lever in the“OFF” position to deactivate the rain sensor
before washing the vehicle. Otherwise, the wipers will operate in the presence of waterspray on the windscreen and may get dam-
aged as a result.
l Refrain from excessively using a car wash as
its brushes may scratch the paint surface,
causing it to lose its gloss. Scratches will be
especially visible on darker coloured vehi-
cles.
l Never spray or splash water on the electrical
components in the engine compartment. Do- ing so could have an adverse effect on the
Plug-in Hybrid EV system startability.
Exercise caution also when washing the un-
derbody; be careful not to spray water into the engine compartment.
l Some types of hot water washing equipment
apply high pressure and heat to the vehicle. They may cause heat distortion and damage
to the vehicle resin parts and may result in flooding of the vehicle interior.
Therefore:
• Maintain a distance of approx. 70 cm or
more between the vehicle body and the washing nozzle.
• When washing around the door glass,
hold the nozzle at a distance of more than
70 cm and at right angles to the glass sur- face.CAUTIONl After washing the vehicle, drive the vehicle
slowly while lightly depressing the brake
pedal several times in order to dry out the
brakes.
Leaving the brakes wet could result in re- duced braking performance. Also, there is a possibility that they could freeze up or be-
come inoperative due to rust, rendering the vehicle unable to move.
l When using an automatic car wash, pay at-
tention to the following items, referring to the operation manual or consulting a car
wash operator. If the following procedure is not followed, it could result in damage to
your vehicle.
• The outside mirrors are retracted.
• The wiper arms are secured in place with
tape.
• As your vehicle is equipped with roof
rails, consult a car wash operator before using a car wash.
• As your vehicle is equipped with the rain
sensor, place the wiper switch lever in the“OFF” position to deactivate the rain sen-
sor.
• Make sure that the charging lid and the
fuel lid are completely closed.
• If your vehicle is equipped with the Ultra-
sonic misacceleration Mitigation System
(UMS), turn the system off by using “FCM and UMS ON/OFF switch” on page 7-68.During cold weather
Salt and other chemicals spread on the roads
in some areas in winter can have a harmful effect on the vehicle body. You should there-
fore wash the vehicle as often as possible in accordance with our care-instructions. It is
recommended to have a preservative applied
and the underfloor protection checked before and after the cold weather season.
After washing your vehicle, wipe off all wa- terdrops from the rubber parts around the
doors to prevent the doors from freezing.
NOTEl To prevent freezing of the weatherstripping
on the doors, bonnet, etc., they should be treated with silicone spray.Waxing
E00901000919
Waxing the vehicle will help prevent the ad-
herence of dust and road chemicals to the paintwork. Apply a wax solution after wash- ing the vehicle, or at least once every three
months to assist displacing of water.
Do not wax your vehicle in direct sunlight.
You should wax after the surfaces have
cooled.
For information on how to use wax refer to the instruction manual of the wax.
Cleaning the exterior of your vehicle
10-04OGGE18E1Vehicle care10
Page 457 of 538
Wheel condition
E01001801970
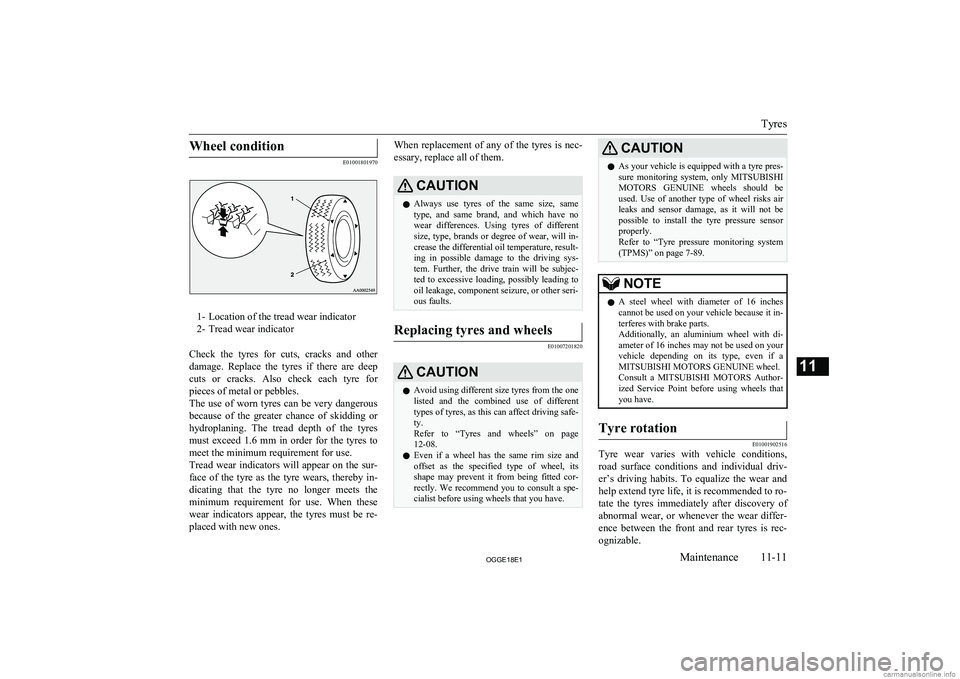
1- Location of the tread wear indicator
2- Tread wear indicator
Check the tyres for cuts, cracks and other damage. Replace the tyres if there are deep
cuts or cracks. Also check each tyre for pieces of metal or pebbles.
The use of worn tyres can be very dangerous
because of the greater chance of skidding or
hydroplaning. The tread depth of the tyres
must exceed 1.6 mm in order for the tyres to meet the minimum requirement for use.
Tread wear indicators will appear on the sur-
face of the tyre as the tyre wears, thereby in-
dicating that the tyre no longer meets the
minimum requirement for use. When these wear indicators appear, the tyres must be re-
placed with new ones.
When replacement of any of the tyres is nec-
essary, replace all of them.CAUTIONl Always use tyres of the same size, same
type, and same brand, and which have no wear differences. Using tyres of differentsize, type, brands or degree of wear, will in-
crease the differential oil temperature, result-
ing in possible damage to the driving sys-
tem. Further, the drive train will be subjec- ted to excessive loading, possibly leading tooil leakage, component seizure, or other seri-
ous faults.Replacing tyres and wheels
E01007201820
CAUTIONl Avoid using different size tyres from the one
listed and the combined use of different
types of tyres, as this can affect driving safe- ty.
Refer to “Tyres and wheels” on page
12-08.
l Even if a wheel has the same rim size and
offset as the specified type of wheel, its
shape may prevent it from being fitted cor- rectly. We recommend you to consult a spe-
cialist before using wheels that you have.CAUTIONl As your vehicle is equipped with a tyre pres-
sure monitoring system, only MITSUBISHI
MOTORS GENUINE wheels should be
used. Use of another type of wheel risks air leaks and sensor damage, as it will not be
possible to install the tyre pressure sensor properly.
Refer to “Tyre pressure monitoring system
(TPMS)” on page 7-89.NOTEl A steel wheel with diameter of 16 inches
cannot be used on your vehicle because it in- terferes with brake parts.
Additionally, an aluminium wheel with di- ameter of 16 inches may not be used on your
vehicle depending on its type, even if a MITSUBISHI MOTORS GENUINE wheel.
Consult a MITSUBISHI MOTORS Author-
ized Service Point before using wheels that you have.Tyre rotation
E01001902516
Tyre wear varies with vehicle conditions,
road surface conditions and individual driv- er’s driving habits. To equalize the wear andhelp extend tyre life, it is recommended to ro-
tate the tyres immediately after discovery of
abnormal wear, or whenever the wear differ- ence between the front and rear tyres is rec-
ognizable.
Tyres
11-11OGGE18E1Maintenance11
Page 458 of 538
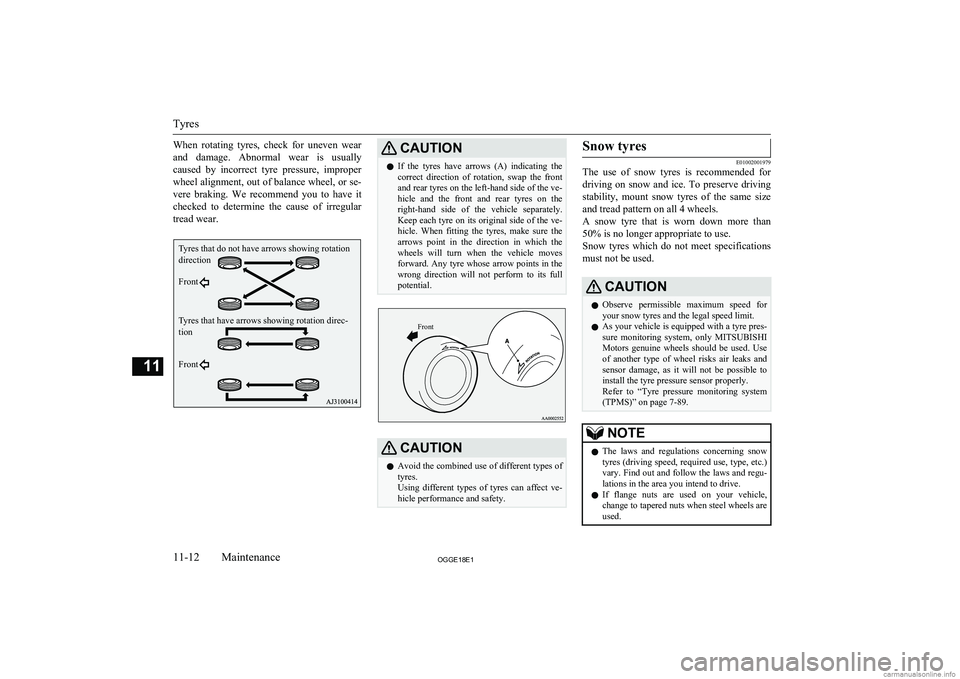
When rotating tyres, check for uneven wear
and damage. Abnormal wear is usually caused by incorrect tyre pressure, improper wheel alignment, out of balance wheel, or se-
vere braking. We recommend you to have it checked to determine the cause of irregular
tread wear.CAUTIONl If the tyres have arrows (A) indicating the
correct direction of rotation, swap the front
and rear tyres on the left-hand side of the ve- hicle and the front and rear tyres on the right-hand side of the vehicle separately.
Keep each tyre on its original side of the ve- hicle. When fitting the tyres, make sure the
arrows point in the direction in which the wheels will turn when the vehicle moves
forward. Any tyre whose arrow points in the wrong direction will not perform to its fullpotential.Front
CAUTIONl Avoid the combined use of different types of
tyres.
Using different types of tyres can affect ve-
hicle performance and safety.Snow tyres
E01002001979
The use of snow tyres is recommended for
driving on snow and ice. To preserve driving stability, mount snow tyres of the same size and tread pattern on all 4 wheels.
A snow tyre that is worn down more than
50% is no longer appropriate to use.
Snow tyres which do not meet specifications must not be used.
CAUTIONl Observe permissible maximum speed for
your snow tyres and the legal speed limit.
l As your vehicle is equipped with a tyre pres-
sure monitoring system, only MITSUBISHI
Motors genuine wheels should be used. Use
of another type of wheel risks air leaks and
sensor damage, as it will not be possible to install the tyre pressure sensor properly.
Refer to “Tyre pressure monitoring system
(TPMS)” on page 7-89.NOTEl The laws and regulations concerning snow
tyres (driving speed, required use, type, etc.)
vary. Find out and follow the laws and regu- lations in the area you intend to drive.
l If flange nuts are used on your vehicle,
change to tapered nuts when steel wheels are used.
Tyres
11-12OGGE18E1Maintenance11Tyres that do not have arrows showing rotation direction Front
Tyres that have arrows showing rotation direc- tion Front
Page 493 of 538
Heated windscreen switch................................. 6-68
Heating.............................................................. 8-13
High-mounted stop lamp................................. 11-24
Hill start assist................................................... 7-34
Hinges and latches lubrication........................ 11-15
Horn switch....................................................... 6-70
How to connect a USB memory........................8-69
I
If the vehicle breaks down................................ 9-02
In case of a collision.......................................... 2-06
Indication lamps................................................ 6-47
Information screen display................................ 6-51
Inside rear-view mirror......................................7-07
Inside tailgate release........................................ 4-27
Inspection and maintenance.............................. 2-08
Inspection and maintenance following rough road operation........................................ 7-24
Installation of accessories..................................2-15
Instruments........................................................ 6-02
Interior lamps.................................................... 8-78
J
Jack.................................................................... 9-06Storage.......................................................... 9-06
Jump starting (Emergency starting).................. 9-02
K
Keyless entry system......................................... 4-03
Keyless operation system.................................. 4-06
Keys...................................................................4-02
L
Labeling...........................................................12-02
Lamp monitor buzzer........................................ 6-54
Lane Departure Warning (LDW)...................... 7-85
Leakage (Fuel, engine coolant, oil and exhaust gas)............................................. 11-15
LED headlamp warning lamp........................... 6-53
Licence plate lamps Bulb capacity.............................................. 11-24
Replacement................................................ 11-30
Link System.......................................................8-49
Locking and unlocking the doors and tailgate.. 1-15
Low voltage electrical system......................... 12-08
Lubricants........................................................ 12-10
Luggage floor box............................................. 8-81
Luggage hooks.................................................. 8-85
Luggage room lamp.......................................... 8-79 Bulb capacity.............................................. 11-25
M
Making a flat seat.............................................. 5-08
Making a luggage area...................................... 5-06
Map lamps......................................................... 8-79 Bulb capacity.............................................. 11-25
Meter illumination control................................ 6-02
Mirror Inside rear-view mirror................................. 7-07
Outside rear-view mirror...............................7-09
MITSUBISHI Remote Control......................... 3-24
Modification/alterations to the electri- cal or fuel systems............................................2-16
Multi Around Monitor.....................................7-106
Multi information display..................................6-02
N
Normal charging (charging methodwith rated AC 220-240V outlet)...................... 3-10
O
OilEngine oil.......................................... 11-05,12-10
Operating sound under charging or remote climate control..................................... 2-06
Operation under adverse driving conditions..... 9-20
Outside rear-view mirrors................................. 7-09
Overheating....................................................... 9-04
P
Parking sensors..................................................7-98
Parking.............................................................. 7-06 Parking brake................................................ 7-03
Plug-in Hybrid EV System................................2-02
Coolant........................................................ 11-06
Plug-in Hybrid EV System warning lamp.........6-50
Position lamps Bulb capacity.............................................. 11-24
Power switch..................................................... 7-12
Precautions to observe when using wipers and washers.......................................... 6-67
Pregnant women restraint.................................. 5-14
Alphabetical index
13- 3
OGGE18E1Alphabetical index