key MITSUBISHI OUTLANDER PHEV 2018 Owner's Manual (in English)
[x] Cancel search | Manufacturer: MITSUBISHI, Model Year: 2018, Model line: OUTLANDER PHEV, Model: MITSUBISHI OUTLANDER PHEV 2018Pages: 538, PDF Size: 25.01 MB
Page 6 of 538
![MITSUBISHI OUTLANDER PHEV 2018 Owners Manual (in English) 1. Multi Around Monitor* p. 7-106Audio* p. 8-13
[For DISPLAY AUDIO, Smartphone Link Display Audio and
MITSUBISHI Multi Communication System (MMCS), refer to
the separate owner’s manual.]
2. Hazard w MITSUBISHI OUTLANDER PHEV 2018 Owners Manual (in English) 1. Multi Around Monitor* p. 7-106Audio* p. 8-13
[For DISPLAY AUDIO, Smartphone Link Display Audio and
MITSUBISHI Multi Communication System (MMCS), refer to
the separate owner’s manual.]
2. Hazard w](/img/19/34890/w960_34890-5.png)
1. Multi Around Monitor* p. 7-106Audio* p. 8-13
[For DISPLAY AUDIO, Smartphone Link Display Audio and
MITSUBISHI Multi Communication System (MMCS), refer to
the separate owner’s manual.]
2. Hazard warning flasher switch p. 6-60
3. ECO mode switch p. 6-61
4. Front passenger’s airbag indicator p. 5-29
5. Passenger’s ventilators p. 8-02
6. Accessory socket* p. 8-74 Cigarette lighter* p. 8-73
7. Electric tailgate power switch* p. 4-20
8. Key slot p. 7-15
9. 220-240 V AC power supply switch* p. 8-75
10. Blind Spot Warning (BSW) switch* p. 7-79
11. Heated steering wheel switch* p. 6-69
12. Heated windscreen switch* p. 6-68
13. Cup holder p. 8-82
14. Selector lever (Joystick type) p. 7-16
15. 220-240 V AC power supply* p. 8-75
16. Floor console box p. 8-81 Arm rest
Accessory socket p. 8-74
USB input terminal p. 8-69
17. Fuel tank filler door release lever p. 2-14
18. Bonnet release lever p. 11-04
19. Rear window demister switch p. 6-67 Wiper de-icer switch* p. 6-67
20. Air conditioner p. 8-04
21. Seat belt reminder p. 5-11
Instruments and controls
1-04OGGE18E1Overview1LHD
Page 7 of 538
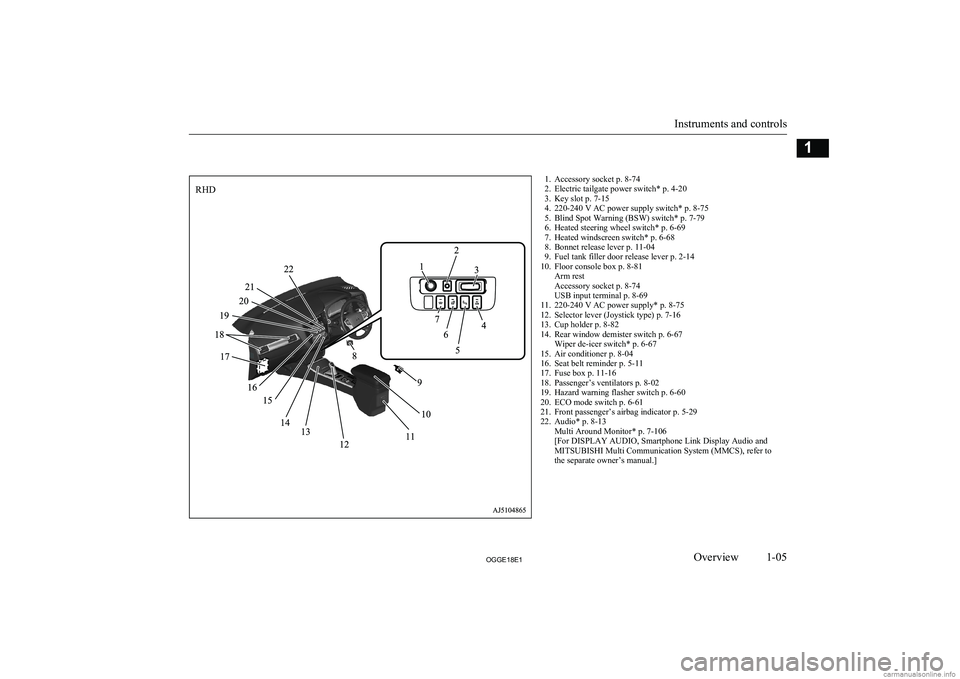
1. Accessory socket p. 8-74
2. Electric tailgate power switch* p. 4-20
3. Key slot p. 7-15
4. 220-240 V AC power supply switch* p. 8-75
5. Blind Spot Warning (BSW) switch* p. 7-79
6. Heated steering wheel switch* p. 6-69
7. Heated windscreen switch* p. 6-68
8. Bonnet release lever p. 11-04
9. Fuel tank filler door release lever p. 2-14
10. Floor console box p. 8-81 Arm rest
Accessory socket p. 8-74
USB input terminal p. 8-69
11. 220-240 V AC power supply* p. 8-75
12. Selector lever (Joystick type) p. 7-16
13. Cup holder p. 8-82
14. Rear window demister switch p. 6-67 Wiper de-icer switch* p. 6-67
15. Air conditioner p. 8-04
16. Seat belt reminder p. 5-11
17. Fuse box p. 11-16
18. Passenger’s ventilators p. 8-02
19. Hazard warning flasher switch p. 6-60
20. ECO mode switch p. 6-61
21. Front passenger’s airbag indicator p. 5-29
22. Audio* p. 8-13 Multi Around Monitor* p. 7-106
[For DISPLAY AUDIO, Smartphone Link Display Audio and
MITSUBISHI Multi Communication System (MMCS), refer to
the separate owner’s manual.]
Instruments and controls
1-05OGGE18E1Overview1RHD
Page 16 of 538
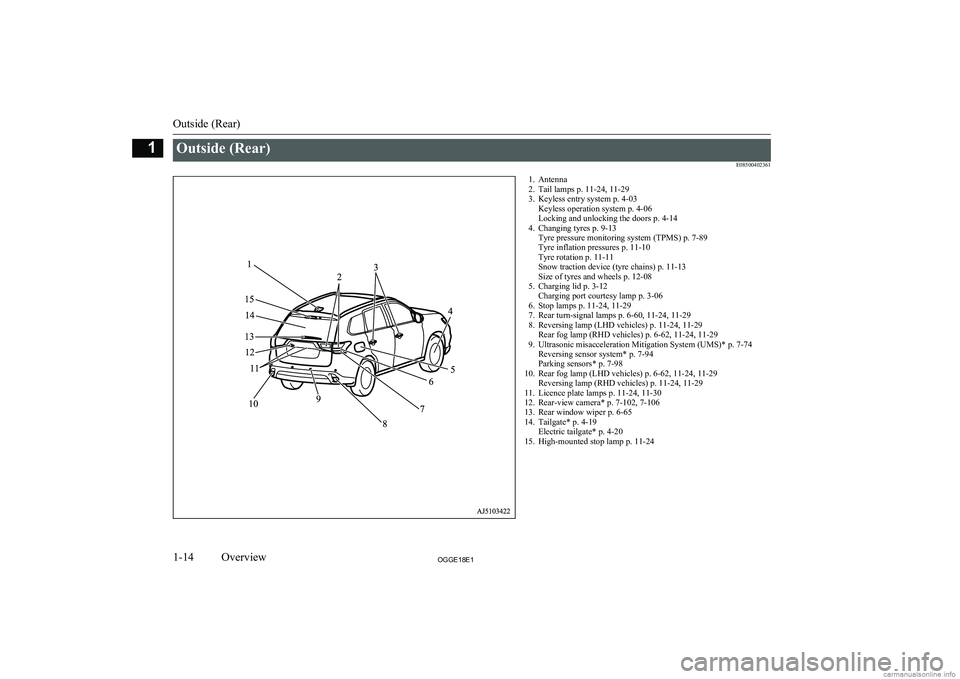
Outside (Rear)E085004023611. Antenna2. Tail lamps p. 11-24, 11-29
3. Keyless entry system p. 4-03 Keyless operation system p. 4-06
Locking and unlocking the doors p. 4-14
4. Changing tyres p. 9-13 Tyre pressure monitoring system (TPMS) p. 7-89
Tyre inflation pressures p. 11-10
Tyre rotation p. 11-11
Snow traction device (tyre chains) p. 11-13
Size of tyres and wheels p. 12-08
5. Charging lid p. 3-12 Charging port courtesy lamp p. 3-06
6. Stop lamps p. 11-24, 11-29
7. Rear turn-signal lamps p. 6-60, 11-24, 11-29
8. Reversing lamp (LHD vehicles) p. 11-24, 11-29 Rear fog lamp (RHD vehicles) p. 6-62, 11-24, 11-29
9. Ultrasonic misacceleration Mitigation System (UMS)* p. 7-74 Reversing sensor system* p. 7-94
Parking sensors* p. 7-98
10. Rear fog lamp (LHD vehicles) p. 6-62, 11-24, 11-29 Reversing lamp (RHD vehicles) p. 11-24, 11-29
11. Licence plate lamps p. 11-24, 11-30
12. Rear-view camera* p. 7-102, 7-106
13. Rear window wiper p. 6-65
14. Tailgate* p. 4-19 Electric tailgate* p. 4-20
15. High-mounted stop lamp p. 11-24
Outside (Rear)
1-14OGGE18E1Overview1
Page 17 of 538
Quick guideE08500500010Locking and unlocking the
doors and tailgate
E08500601483
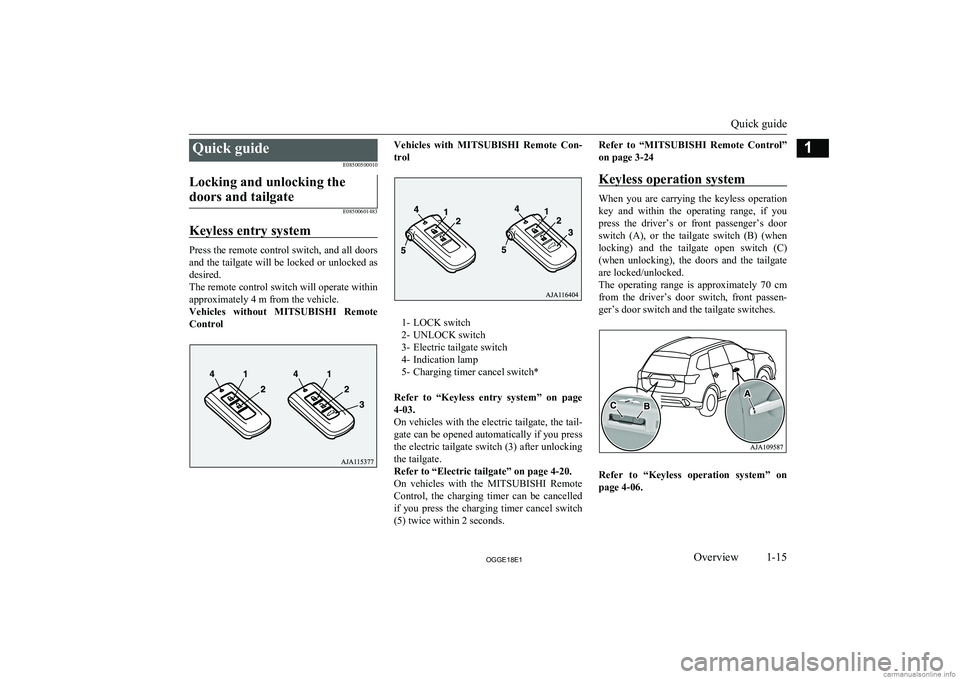
Keyless entry system
Press the remote control switch, and all doors and the tailgate will be locked or unlocked as
desired.
The remote control switch will operate within
approximately 4 m from the vehicle.
Vehicles without MITSUBISHI Remote
Control
Vehicles with MITSUBISHI Remote Con-
trol
1- LOCK switch
2- UNLOCK switch
3- Electric tailgate switch
4- Indication lamp
5- Charging timer cancel switch*
Refer to “Keyless entry system” on page 4-03.
On vehicles with the electric tailgate, the tail-
gate can be opened automatically if you press
the electric tailgate switch (3) after unlocking the tailgate.
Refer to “Electric tailgate” on page 4-20.
On vehicles with the MITSUBISHI Remote
Control, the charging timer can be cancelled if you press the charging timer cancel switch (5) twice within 2 seconds.
Refer to “MITSUBISHI Remote Control”
on page 3-24
Keyless operation system
When you are carrying the keyless operation
key and within the operating range, if you
press the driver’s or front passenger’s door switch (A), or the tailgate switch (B) (when locking) and the tailgate open switch (C)(when unlocking), the doors and the tailgate
are locked/unlocked.
The operating range is approximately 70 cm
from the driver’s door switch, front passen- ger’s door switch and the tailgate switches.
Refer to “Keyless operation system” onpage 4-06.
Quick guide
1-15OGGE18E1Overview1
Page 19 of 538
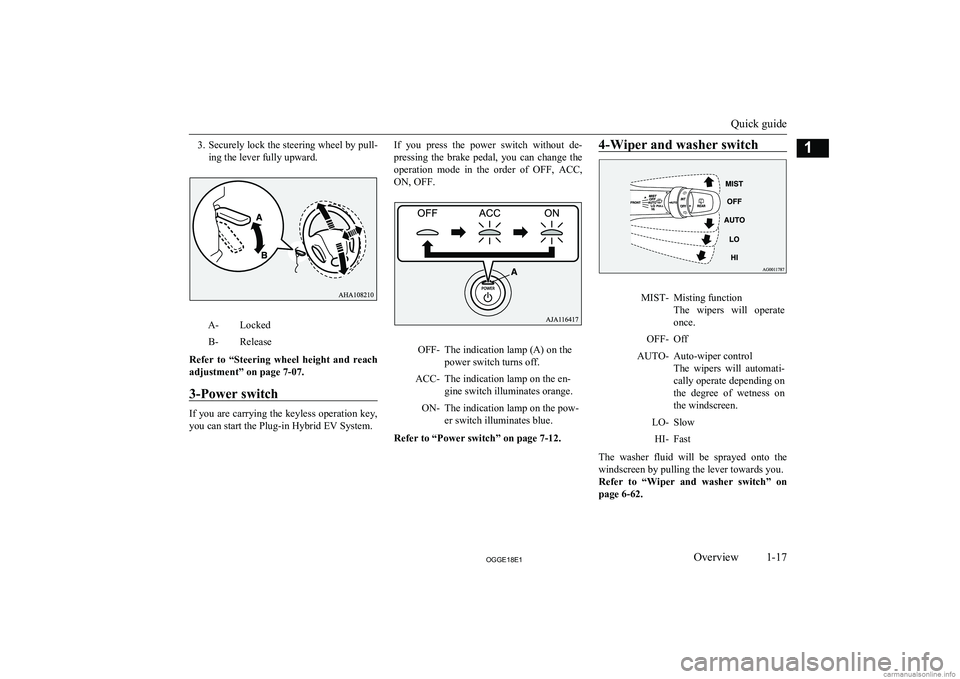
3.Securely lock the steering wheel by pull-
ing the lever fully upward.A-LockedB-Release
Refer to “Steering wheel height and reach adjustment” on page 7-07.
3-Power switch
If you are carrying the keyless operation key,
you can start the Plug-in Hybrid EV System.
If you press the power switch without de-
pressing the brake pedal, you can change the
operation mode in the order of OFF, ACC,
ON, OFF.OFF-The indication lamp (A) on the
power switch turns off.ACC-The indication lamp on the en-
gine switch illuminates orange.ON-The indication lamp on the pow-
er switch illuminates blue.
Refer to “Power switch” on page 7-12.
4-Wiper and washer switchMIST-Misting function
The wipers will operate
once.OFF-OffAUTO-Auto-wiper control
The wipers will automati- cally operate depending on
the degree of wetness on the windscreen.LO-SlowHI-Fast
The washer fluid will be sprayed onto the
windscreen by pulling the lever towards you.
Refer to “Wiper and washer switch” on page 6-62.
Quick guide
1-17OGGE18E1Overview1
Page 30 of 538
lSince the air conditioning (cooling or
heating) consumes power of the drive battery, its operation results in a shorterEV cruising range. Maintain an appro-
priate temperature.
l Put the selector lever to “B” (BRAKE)
position according to the road condition. To charge the drive battery with appro-priate use of the regenerative brake, it
can be increased the EV cruising range.Acoustic Vehicle Alerting
System (AVAS) E00205200042
The Acoustic Vehicle Alerting System(AVAS) is a device that uses sound to alert
pedestrians of the presence of the vehicle. The system operates when the vehicle speed
is about 35 km/h (22 mph) or less and the en-
gine is not running.
Refer to “Acoustic Vehicle Alerting System
(AVAS)” on page 7-29.
WARNINGl Even if the Acoustic Vehicle Alerting Sys-
tem (AVAS) sounds, pay special attention
to pedestrians.
Pedestrians may not notice the oncoming vehicle, which may cause an accident re-
sulting in serious personal injury or death.Operating sound under
charging or Remote ClimateControl E00205700050
Even if the operation mode of the powerswitch is OFF, you may hear an operating
sound such as the cooling fan for cooling the drive battery during charging, the air condi-
tioning compressor and for remote climate control (if so equipped).
This is not a malfunction.
Refer to “MITSUBISHI Remote control: Re-
mote Climate Control” on page 3-24.
In case of a collision
E00205300085
A crash or impact significant enough to re-
quire an emergency response for convention- al vehicles would also require the same re-sponse for Outlander PHEV.
Also follow the instructions described below
to avoid severe burns and electrical shock
that may result in serious injury or death.WARNINGl If your vehicle is drivable, pull your vehi-
cle off the road to a safe, nearby location
and remain on the scene.
Also, if possible, do the following opera- tions and stay out of the way of any on- coming traffic while awaiting the arrival
of emergency responders.
• Apply chocks to the wheels.
• Put the select position in “P” (PARK)
position.
• Apply the parking brake.
• Open the windows, doors and tailgate.
• Put the operation mode in OFF.
• Turn on the hazard warning flashers.
• Move the key away from the vehicle to
prevent unintended start-up of the sys- tem by inadvertent contact with a switch or impact from the crash.
l Never touch high-voltage wiring, connec-
tors, and other high-voltage parts, such as
the inverter unit and drive battery. An electric shock may occur if exposed elec-
tric wires are visible when viewed from inside or outside of your vehicle. For their locations, see “High-voltage components”
on page 2-08.
l If the vehicle receives a strong impact to
the floor while driving, stop the vehicle in
a safe place and check the floor.
Acoustic Vehicle Alerting System (AVAS)
2-06OGGE18E1General information2
Page 33 of 538
For persons with electro-medical apparatus such as implantable cardiac pacemaker or im-plantable cardioverter-defibrillator E00205600075WARNINGlBefore normal charging
• Before you perform charging work, ask the manufacturer of your electro-medical apparatus about the effect from charging work. Charging may
affect the operation of your electro-medical apparatus.
Refer to “Normal charging (charging method with rated AC 220-240V outlet)” on page 3-10.
Refer to “Quick charging (charging method with quick charger)” on page 3-17.
l When the normal charging
• Observe the following precautions for normal charging.
• During charging, do not close the implantation portion of electro-medical apparatus such as implantable cardiac pacemaker or implantable
cardioverter defibrillator to the charge connector, EV charging cable, control box and normal charging station.
• Do not stay inside the vehicle.
• Do not get in the vehicle (including the luggage compartment) to take out something or for other purposes.
Refer to “Normal charging (charging method with rated AC 220-240V outlet)” on page 3-10.
l Do not perform quick charging and keep away from a quick charger
• Please observe the following precautions.
There is a possibility that electromagnetic waves affect the operation of the electro-medical apparatus.
• Please do not use a quick charger.
• Keep away as much as possible from the place where the quick charger is stored.
If you approach it carelessly, leave quickly without standing still.
• Please ask someone to perform the quick charging if necessary.
Refer to “Quick charging (charging method with quick charger)” on page 3-17.
l Do not bring your body close to the foot area of the rear seat and do not stay in the luggage compartment while the vehicle is running. Also, do not
allow persons using an electro-medical apparatus to stay in the luggage compartment while the vehicle is running. The operation of electro-medical
apparatus may be affected.
l When using the keyless operation system, please observe following precautions.
• People with implantable cardiac pacemakers or implantable cardiovascular-defibrillators should not go near the exterior transmitters (A) or the
interior transmitters. The radio waves used by the keyless operation system could adversely affect implantable cardiac pacemakers or implanta- ble cardiovascular-defibrillators.
• When using electro-medical devices other than implantable cardiac pacemakers or implantable cardiovascular-defibrillators, contact the electro-
medical device manufacturer ahead of time to determine the affects of radio waves on the devices. Electromedical device operations could be
adverse effect by radio waves. Refer to “Keyless operation system” on page 4-06.
For persons with electro-medical apparatus such as implantable cardiac pacemaker or implantable cardioverter-defibrillator
2-09OGGE18E1General information2
Page 54 of 538
NOTElWhen connecting or disconnecting the nor-
mal charge connector, insert/pull out the
connector straight.
Also, do not incline or twist the connector. Doing so could cause a bad connection or malfunction.
l Make sure to lock the doors to prevent theft,
etc. during charging.
l Do not push the rear portion of the charging
lid when the charging lid is locked.There is a possibility that the charging lid
opens unexpectedly when the doors are un- locked while using the central door locks,keyless entry system or keyless operation
function.Charging from rated AC
220-240 V outlet
E08301001352
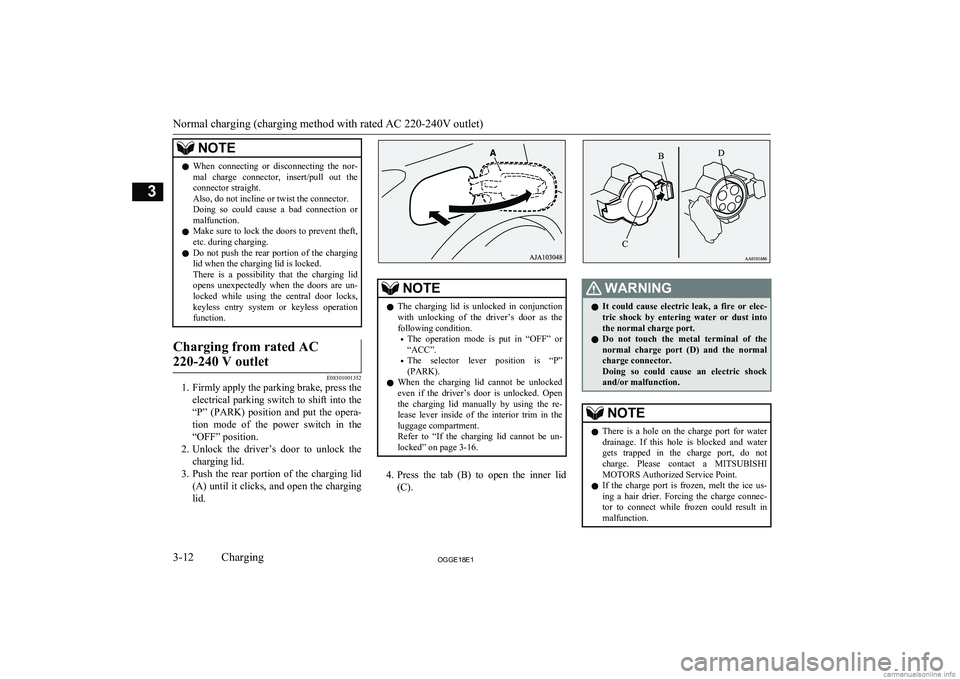
1. Firmly apply the parking brake, press the electrical parking switch to shift into the
“P” (PARK) position and put the opera- tion mode of the power switch in the
“OFF” position.
2. Unlock the driver’s door to unlock the
charging lid.
3. Push the rear portion of the charging lid
(A) until it clicks, and open the charging lid.
NOTEl The charging lid is unlocked in conjunction
with unlocking of the driver’s door as thefollowing condition.
• The operation mode is put in “OFF” or
“ACC”.
• The selector lever position is “P”
(PARK).
l When the charging lid cannot be unlocked
even if the driver’s door is unlocked. Open
the charging lid manually by using the re- lease lever inside of the interior trim in theluggage compartment.
Refer to “If the charging lid cannot be un- locked” on page 3-16.
4. Press the tab (B) to open the inner lid
(C).
WARNINGl It could cause electric leak, a fire or elec-
tric shock by entering water or dust intothe normal charge port.
l Do not touch the metal terminal of the
normal charge port (D) and the normal
charge connector.
Doing so could cause an electric shock and/or malfunction.NOTEl There is a hole on the charge port for water
drainage. If this hole is blocked and watergets trapped in the charge port, do not
charge. Please contact a MITSUBISHI
MOTORS Authorized Service Point.
l If the charge port is frozen, melt the ice us-
ing a hair drier. Forcing the charge connec- tor to connect while frozen could result in malfunction.
Normal charging (charging method with rated AC 220-240V outlet)
3-12OGGE18E1Charging3
Page 58 of 538
WARNINGlAfter charging, be sure to close the inner
lid and charging lid completely.
Be careful that water or dust does not en-
ter in the normal charge port, inner lid and normal charge connector.
Entry of water or dust could cause an
electric leak, resulting in a fire or electric shock.NOTEl Make sure that the inner lid is completely
closed.
If the charging lid is forcibly closed without completely closing inner lid, the hinge on
the inner lid may be broken.
l While the charging lid is open, if the doors
and tailgate are locked with the central door
lock, the keyless entry system or the keyless operation system, the charging lid will lock
when the charging lid is closed.
l When the operation mode is switched to ON
while the charging lid is not completely
closed, a warning may be displayed on the information screen in the multi information
display.
Refer to “Warning display list” on page 6-23.
l If the charging lid is closed while the driv-
er’s door is locked, the charging lid will be locked.
11. Remove the charging cable plug from
the outlet.
12. Install the cap on the normal charge con-
nector.WARNINGl After charging, be sure to disconnect the
charge connector from the charge port.
If the charge connector is only partially
engaged and the connector latch is un-
locked, you could put the operation mode
of the power switch in ON and the vehicle could start moving. It could lead to an un- expected accident.NOTEl Make sure that the charging lid is complete-
ly closed before using an automatic car
wash. There is a possibility that the charging lid will be damaged if the lid is open.If the charging lid cannot be
unlocked
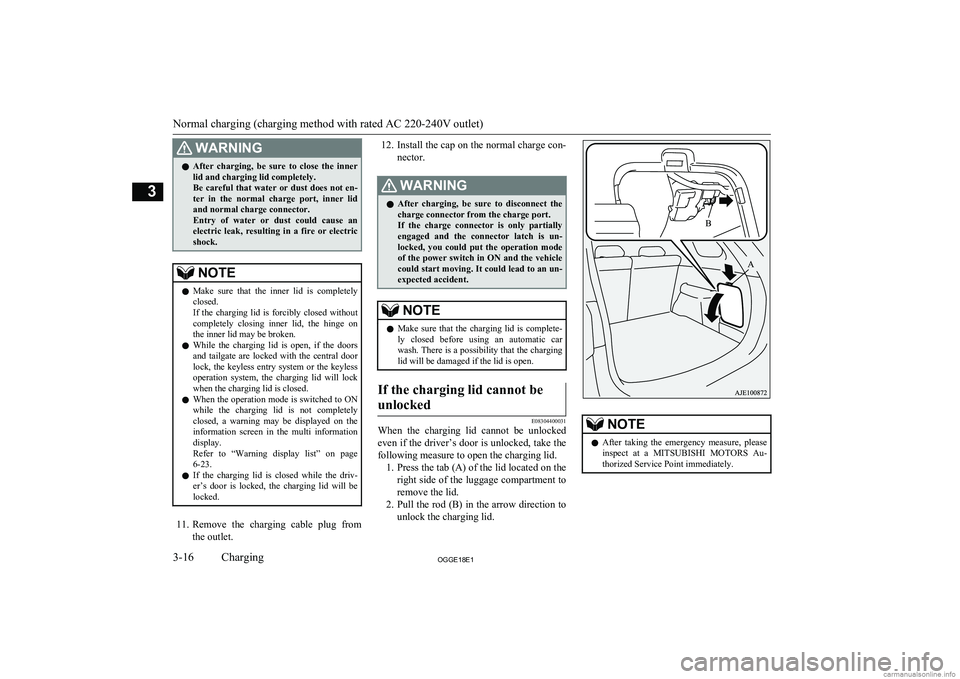
E08304400031
When the charging lid cannot be unlocked even if the driver’s door is unlocked, take the
following measure to open the charging lid. 1. Press the tab (A) of the lid located on the
right side of the luggage compartment to remove the lid.
2. Pull the rod (B) in the arrow direction to
unlock the charging lid.
NOTEl After taking the emergency measure, please
inspect at a MITSUBISHI MOTORS Au-
thorized Service Point immediately.
Normal charging (charging method with rated AC 220-240V outlet)
3-16OGGE18E1Charging3
Page 62 of 538
WARNINGlAfter charging, be sure to close the inner
lid and the quick charging lid completely.
Be careful that water or dust does not en-
ter in the quick charge port, inner lid and
quick charge connector.
Entry of water or dust could cause fire, electric shock or short circuit.
l After charging, be sure to disconnect the
charge connector from the charge port.If the charge connector is only partially
engaged and the connector latch is un-
locked, you could put the operation mode of the power switch in ON and the vehicle
could start moving. It could lead to an un- expected accident.NOTEl If the operation mode of the power switch is
put in ON with the quick charge connector
connected to the quick charge port, the plu-
gin hybrid EV system cannot be started.
Be sure to disconnect the quick charge con- nector before start.
l Charging may be completed before full
charge. This is a control for efficient charge
and not a malfunction.
To achieve full charge, repeat charging from
Step 5 again.NOTEl Make sure that the inner lid is completely
closed.
If the charging lid is forcibly closed without completely closing inner lid, the hinge on
the inner lid may be broken.
l While the charging lid is open, if the doors
and tailgate are locked with the central door
lock, the keyless entry system or the keyless operation system, the charging lid will lock
when the charging lid is closed.
l When the operation mode is switched to ON
while the charging lid is not completely
closed, a warning may be displayed on the information display of the multi information
display.
Refer to “Warning display list” on page
6-23.
Quick charging (charging method with quick charger)
3-20OGGE18E1Charging3