ABS MITSUBISHI PAJERO IV 2011 Owners Manual
[x] Cancel search | Manufacturer: MITSUBISHI, Model Year: 2011, Model line: PAJERO IV, Model: MITSUBISHI PAJERO IV 2011Pages: 377, PDF Size: 29.43 MB
Page 60 of 377
Seat belt pretensioner system and
force limiter system E00405700081
The driver’s seat
and front passenger’s seat each
have a seat belt equipped with a pretensioner system.
Pretensioner system E00405800747
The pretensioner system will retract their respec-
tive seat belts
instantaneously, thus maximizing the
seat belt’s effectiveness, if there is a frontal impact
severe enough to injure the driver and/or front pas-
senger and the ignition switch is in the “ON” or
“START” position. WARNING
l To obtain
the
best results from your pre-
tensioner seat belt, make sure you have ad-
justed your seat correctly and wear your
seat belt properly. CAUTION
l
Installation of
audio
equipment or re-
pairs in the vicinity of the pretensioner
seat belts or floor console must be per-
formed in line with MITSUBISHI
MOTORS guidelines. It is important to
do so because the work could affect the
pretensioner systems. CAUTION
l
If you need
to scrap the vehicle, please con-
sult a MITSUBISHI MOTORS Author-
ized Service Point.
It is important to do so because unexpec-
ted activation of the pretensioner seat
belts could cause injuries.
NOTE l The
pretensioner seat
belts will be activated
if the vehicle suffers a severe frontal impact,
even if the seat belts are not worn.
l The pretensioner seat belts are designed to
work only once. After the pretensioner seat
belts have been activated, we recommend
you have them replaced by a MITSUBISHI
MOTORS Authorized Service Point.
SRS warning lamp E00405900083
This warning lamp is shared by the SRS airbags
and the pretensioner
seat belts. Refer to “SRS warn-
ing lamp” on page 2-43.
Force limiter system E00406000153
In the event of a collision, each force limiter sys-
tem will effectively
absorb the load applied to the
seat belt to minimize the impact to the passenger. Child restraint
E00406401604
When transporting children
in your vehicle, some
type of child restraint system should always be
used according to the size of the child. This is re-
quired by law in most countries.
The regulations concerning driving with children in
the front seat may differ from country to country.
You are advised to comply with the relevant regula-
tions. WARNING
l When possible,
put
children in the rear
seat. Accident statistics indicate that chil-
dren of all sizes and ages are safer when
properly restrained in the rear seat rath-
er than in the front seat.
l Holding a child in your arms is no substi-
tute for a restraint system. Failure to use
a proper restraint system can result in se-
vere or fatal injury to the child.
l Each child restraint device or fixing is to
be used only by one child.
l When attaching a child restraint to the
rear seat, place the front seatbacks in the
upright position.
Otherwise, the child could be seriously in-
jured in the event of hard braking or a col-
lision. Seat and seat belts
2-23 2
OBKE12E1
Page 75 of 377
Deployment of front airbags
E00407501279
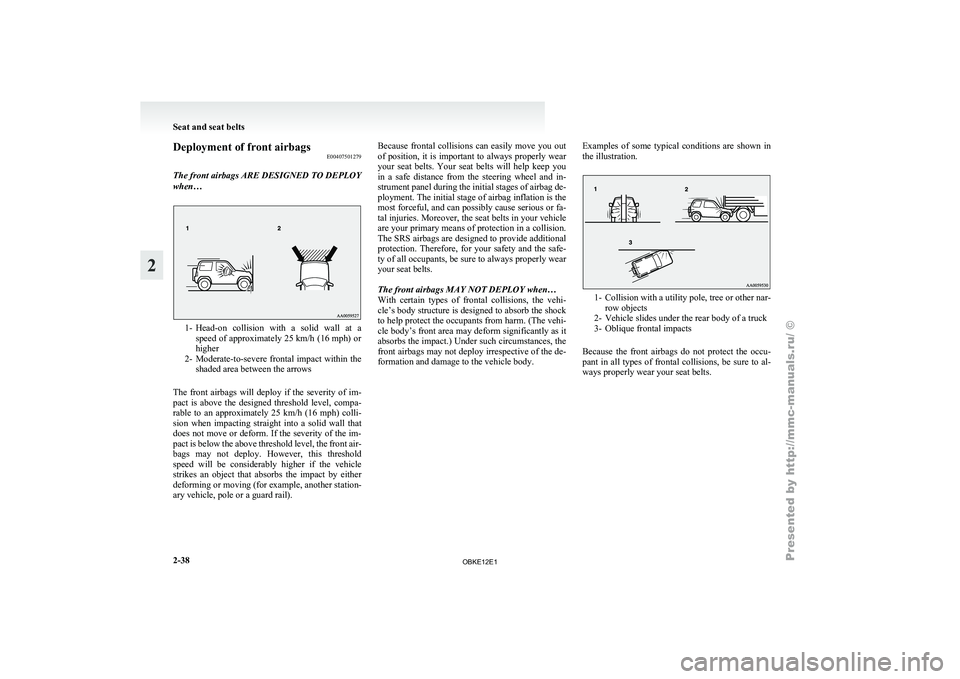
The front airbags ARE DESIGNED TO DEPLOY
when… 1- Head-on collision with
a solid wall at a
speed of approximately 25 km/h (16 mph) or
higher
2- Moderate-to-severe frontal impact within the shaded area between the arrows
The front airbags will deploy if the severity of im-
pact is above the designed threshold level, compa-
rable to an approximately 25 km/h (16 mph) colli-
sion when impacting straight into a solid wall that
does not move or deform. If the severity of the im-
pact is below the above threshold level, the front air-
bags may not deploy. However, this threshold
speed will be considerably higher if the vehicle
strikes an object that absorbs the impact by either
deforming or moving (for example, another station-
ary vehicle, pole or a guard rail). Because frontal collisions can easily move you out
of position, it
is important to always properly wear
your seat belts. Your seat belts will help keep you
in a safe distance from the steering wheel and in-
strument panel during the initial stages of airbag de-
ployment. The initial stage of airbag inflation is the
most forceful, and can possibly cause serious or fa-
tal injuries. Moreover, the seat belts in your vehicle
are your primary means of protection in a collision.
The SRS airbags are designed to provide additional
protection. Therefore, for your safety and the safe-
ty of all occupants, be sure to always properly wear
your seat belts.
The front airbags MAY NOT DEPLOY when…
With certain types of frontal collisions, the vehi-
cle’s body structure is designed to absorb the shock
to help protect the occupants from harm. (The vehi-
cle body’s front area may deform significantly as it
absorbs the impact.) Under such circumstances, the
front airbags may not deploy irrespective of the de-
formation and damage to the vehicle body. Examples of some typical conditions are shown in
the illustration. 1- Collision with
a
utility pole, tree or other nar-
row objects
2- Vehicle slides under the rear body of a truck
3- Oblique frontal impacts
Because the front airbags do not protect the occu-
pant in all types of frontal collisions, be sure to al-
ways properly wear your seat belts. Seat and seat belts
2-38
2
OBKE12E1
Page 78 of 377
The side airbags and curtain airbags MAY NOT
DEPLOY when…
With certain types
of side collisions, the vehicle’s
body structure is designed to absorb the shock to
help protect the occupants from harm. (The vehicle
body’s side area may deform significantly as it ab-
sorbs the impact.) Under such circumstances, the
side airbags and curtain airbags may not deploy ir-
respective of the deformation and damage to the ve-
hicle body. Also, depending on the location of the
impact, the side airbags and curtain airbags may
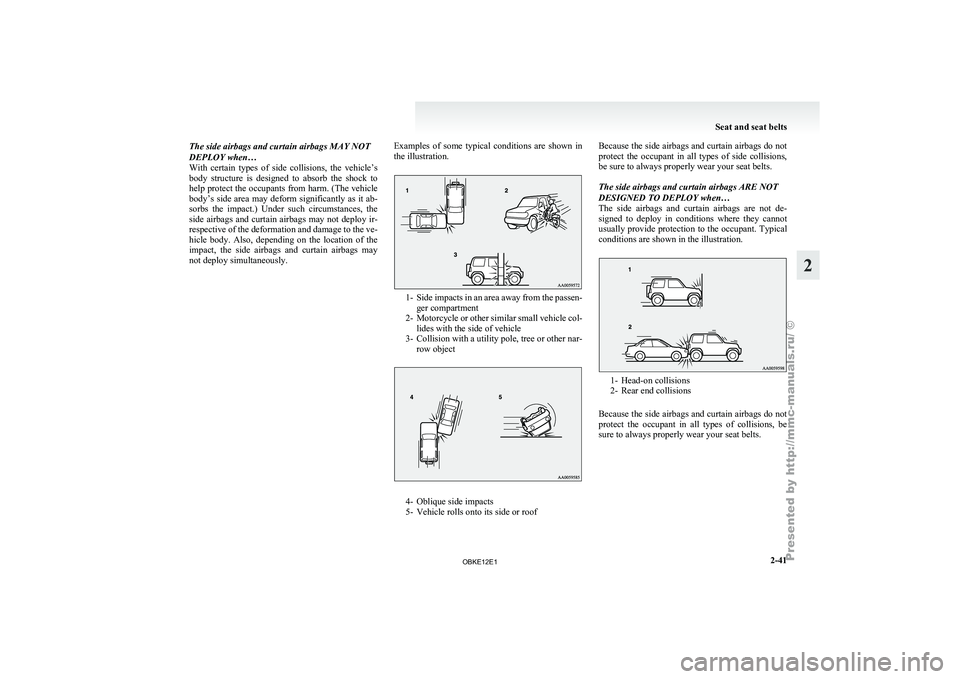
not deploy simultaneously. Examples of some typical conditions are shown in
the illustration. 1- Side impacts in an area away from the passen-
ger compartment
2- Motorcycle
or other similar small vehicle col-
lides with the side of vehicle
3- Collision with a utility pole, tree or other nar- row object 4- Oblique side impacts
5- Vehicle rolls onto its side or roofBecause
the
side airbags and curtain airbags do not
protect the occupant
in all types of side collisions,
be sure to always properly wear your seat belts.
The side airbags and curtain airbags ARE NOT
DESIGNED TO DEPLOY when…
The side airbags and curtain airbags are not de-
signed to deploy in conditions where they cannot
usually provide protection to the occupant. Typical
conditions are shown in the illustration. 1- Head-on collisions
2- Rear end collisions
Because the
side airbags and curtain airbags do not
protect the occupant in all types of collisions, be
sure to always properly wear your seat belts. Seat and seat belts
2-41 2
OBKE12E1
Page 88 of 377
Indication and warning lamps
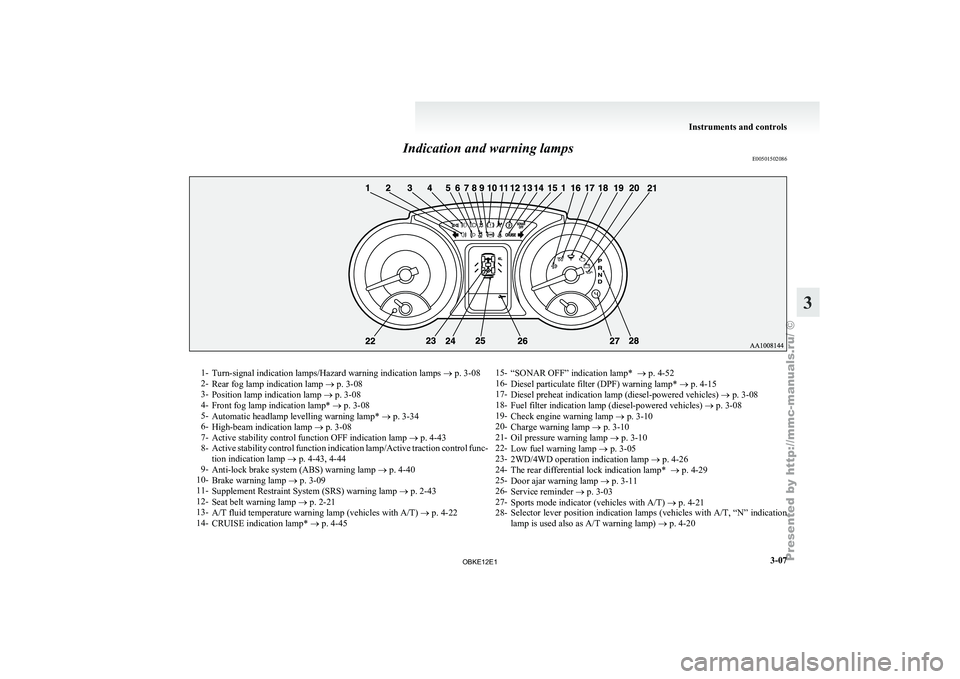
E005015020861-
Turn-signal indication lamps/Hazard warning indication lamps ® p. 3-08
2- Rear fog lamp indication lamp
® p. 3-08
3- Position lamp indication lamp ® p. 3-08
4- Front fog lamp indication lamp* ® p. 3-08
5- Automatic headlamp levelling warning lamp* ® p. 3-34
6- High-beam indication lamp ® p. 3-08
7- Active stability control function OFF indication lamp ® p. 4-43
8- Active stability control function indication lamp/Active traction control func-
tion indication lamp ® p. 4-43, 4-44
9- Anti-lock brake system (ABS) warning lamp ® p. 4-40
10- Brake warning lamp ® p. 3-09
11- Supplement Restraint System (SRS) warning lamp ® p. 2-43
12- Seat belt warning lamp ® p. 2-21
13- A/T fluid temperature warning lamp (vehicles with A/T) ® p. 4-22
14- CRUISE indication lamp* ® p. 4-45 15-
“SONAR OFF” indication lamp* ® p. 4-52
16- Diesel particulate filter (DPF) warning lamp* ®
p. 4-15
17- Diesel preheat indication lamp (diesel-powered vehicles) ® p. 3-08
18- Fuel filter indication lamp (diesel-powered vehicles) ® p. 3-08
19- Check engine warning lamp ® p. 3-10
20- Charge warning lamp ® p. 3-10
21- Oil pressure warning lamp ® p. 3-10
22- Low fuel warning lamp ® p. 3-05
23- 2WD/4WD operation indication lamp ® p. 4-26
24- The rear differential lock indication lamp* ® p. 4-29
25- Door ajar warning lamp ® p. 3-11
26- Service reminder ® p. 3-03
27- Sports mode indicator (vehicles with A/T) ® p. 4-21
28- Selector lever position indication lamps (vehicles with A/T, “N” indication
lamp is used also as A/T warning lamp) ® p. 4-20 Instruments and controls
3-07 3
OBKE12E1
Page 90 of 377
Warning lamps
E00502400017Brake warning lamp (brake
warning buzzer)
E00502501712
This lamp illuminates
when the ignition
switch is turned to the “ON” position,
and goes off after a few seconds.
Always make sure that the lamp goes off
before driving.
With the ignition switch in the “ON” po-
sition, the brake warning lamp illumi-
nates under the following conditions:
l When the parking brake lever has
been engaged.
l When the brake fluid level in the
reservoir falls to a low level.
l When the brake force distribution
function or the brake system is not
operating correctly.
Brake warning buzzer
When there is a danger of brake perform-
ance becoming compromised,
a buzzer
will sound to alert the driver. If this buz-
zer should continue to sound, park your
vehicle in a safe place and we recom-
mend you to have it checked. NOTE
l Depressing
the brake
pedal repeat-
edly may turn on the brake warn-
ing lamp, ABS warning lamp and
brake warning buzzer. It is normal
if the lamp goes out and the buz-
zer stops sounding after a few sec-
onds. CAUTION
l
In the
situations
listed below,
brake performance may be com-
promised or the vehicle may be-
come unstable if brakes are ap-
plied suddenly; consequently,
avoid driving at high speeds or
applying the brakes suddenly.
Furthermore, the vehicle
should be brought to a stop in a
safe location and to have it
checked. • The brake warning lampdoes not illuminate when
the parking brake is applied
or does not turn off when
the parking brake is re-
leased.
• The ABS warning lamp and brake warning lamp illumi-
nate at the same time.
For details, refer to “ABS
warning lamp” on page
4-40.
• The brake warning buzzer does not turn off.
l The vehicle should be brought
to a halt in the following man- CAUTION
ner when brake performance
has deteriorated.
• Depress the brake
pedal
harder than usual.
Even if the brake pedal
moves down to the very end
of its possible stroke, keep it
pressed down hard.
• Should the brakes fail, use engine braking to reduce
your speed and pull the park-
ing brake lever.
Depress the brake pedal to
operate the stop lamp to
alert the vehicles behind you.
NOTE l In
certain cases
immediately after
the engine has been started or
when the brake pedal is depressed
repeatedly, a noise generated by
operation of brake devices may be
heard coming from the engine com-
partment. At this time, you may
feel a shock from the brake pedal
if you depress it. This type of
noise or shock is normal and there
is no need for concern. In fact,
they indicate that the correspond-
ing devices are operating normally.
l The brake system uses brake fluid
pressurized by the pump.
Please refer to “Braking” on page
4-37. Instruments and controls
3-09 3
OBKE12E1
Page 126 of 377
Economical driving.......................................................................4-02
Driving, alcohol and drugs
........................................................... 4-02
Safe driving techniques ................................................................ 4-03
Running-in recommendations....................................................... 4-04
Parking brake
................................................................................ 4-06
Parking.......................................................................................... 4-07
Steering wheel height adjustment .................................................4-08
Inside rear-view mirror ................................................................. 4-08
Outside rear-view mirrors ............................................................. 4-10
Ignition switch .............................................................................. 4-12
Steering wheel lock ...................................................................... 4-13
Starting.......................................................................................... 4-14
Diesel particulate filter (DPF)* .................................................... 4-15
Manual transmission ..................................................................... 4-16
Automatic transmission INVECS-II Sports Mode 5A/T (Intelligent & Innovative Vehicle Electronic Control
System II)................................................................................. 4-19
Super select 4WD II (SS4 II)........................................................ 4-24
Rear differential lock* .................................................................. 4-29
4-wheel drive operation ................................................................ 4-32
Inspection and maintenance following rough road oper- ation.......................................................................................... 4-35
Cautions on handling of 4-wheel drive vehicles ..........................4-35
Braking......................................................................................... 4-37
Brake assist system....................................................................... 4-38
Anti-lock brake system (ABS) ..................................................... 4-39
Power steering system.................................................................. 4-41
Active stability & traction control (ASTC) ..................................4-41
Cruise control* ............................................................................. 4-45
Reversing sensor system*............................................................. 4-49 Rear-view camera*
....................................................................... 4-52
Cargo loads................................................................................... 4-56
Trailer towing ............................................................................... 4-57Starting and driving
4
OBKE12E1
Page 155 of 377
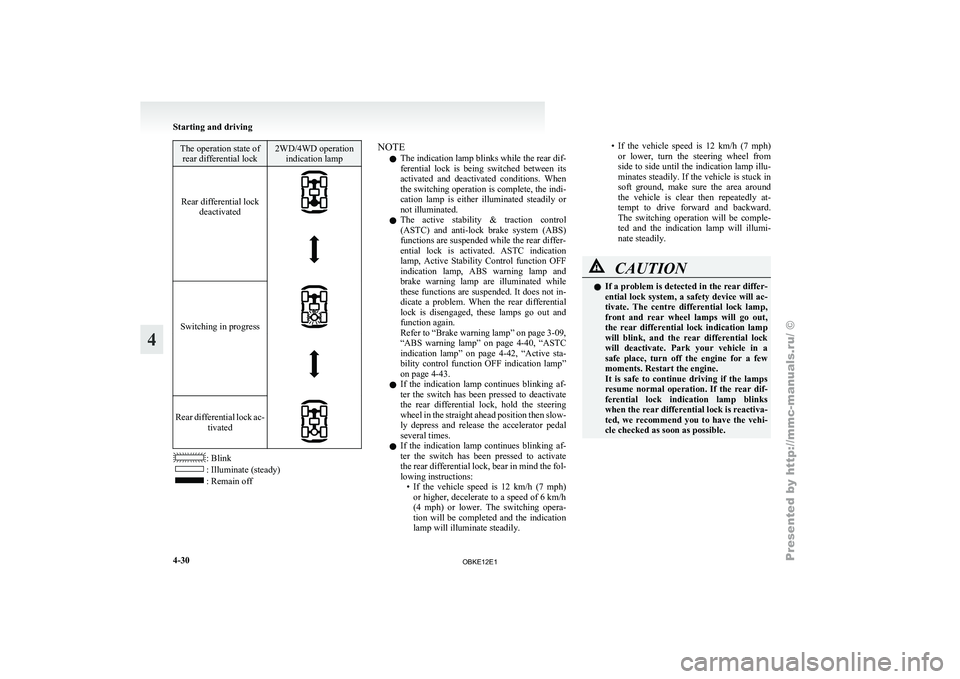
The operation state of
rear differential lock 2WD/4WD operation
indication lamp
Rear differential lock deactivated
Switching in progress
Rear differential lock ac-
tivated : Blink
: Illuminate (steady)
: Remain off NOTE
l The indication lamp blinks while the rear dif-
ferential
lock is
being switched between its
activated and deactivated conditions. When
the switching operation is complete, the indi-
cation lamp is either illuminated steadily or
not illuminated.
l The active stability & traction control
(ASTC) and anti-lock brake system (ABS)
functions are suspended while the rear differ-
ential lock is activated. ASTC indication
lamp, Active Stability Control function OFF
indication lamp, ABS warning lamp and
brake warning lamp are illuminated while
these functions are suspended. It does not in-
dicate a problem. When the rear differential
lock is disengaged, these lamps go out and
function again.
Refer to “Brake warning lamp” on page 3-09,
“ABS warning lamp” on page 4-40, “ASTC
indication lamp” on page 4-42, “Active sta-
bility control function OFF indication lamp”
on page 4-43.
l If the indication lamp continues blinking af-
ter the switch has been pressed to deactivate
the rear differential lock, hold the steering
wheel in the straight ahead position then slow-
ly depress and release the accelerator pedal
several times.
l If the indication lamp continues blinking af-
ter the switch has been pressed to activate
the rear differential lock, bear in mind the fol-
lowing instructions:
• If the vehicle speed is 12 km/h (7 mph)or higher, decelerate to a speed of 6 km/h
(4 mph) or lower. The switching opera-
tion will be completed and the indication
lamp will illuminate steadily. • If the vehicle speed is 12 km/h (7 mph)
or lower,
turn the steering wheel from
side to side until the indication lamp illu-
minates steadily. If the vehicle is stuck in
soft ground, make sure the area around
the vehicle is clear then repeatedly at-
tempt to drive forward and backward.
The switching operation will be comple-
ted and the indication lamp will illumi-
nate steadily. CAUTION
l
If a
problem
is detected in the rear differ-
ential lock system, a safety device will ac-
tivate. The centre differential lock lamp,
front and rear wheel lamps will go out,
the rear differential lock indication lamp
will blink, and the rear differential lock
will deactivate. Park your vehicle in a
safe place, turn off the engine for a few
moments. Restart the engine.
It is safe to continue driving if the lamps
resume normal operation. If the rear dif-
ferential lock indication lamp blinks
when the rear differential lock is reactiva-
ted, we recommend you to have the vehi-
cle checked as soon as possible. Starting and driving
4-30
4
OBKE12E1
Page 158 of 377
CAUTION
l
Selecting the “4HLc” or “4LLc” position
to drive on dry paved road will increase
the fuel consumption with possible noise
generation and early tyre wear.
It may also increase the differential oil
temperature, resulting in possible dam-
age to the driving system.
Further, the drive train will be subjected
to excessive loading, possibly leading to
oil leakage, component seizure, or other
serious faults.
Driving on snowy or icy roads
Set the transfer
shift lever to the “4H” or “4HLc”
position in accordance with the road conditions,
and then gradually depress the accelerator pedal for
a smooth start.
NOTE
l The use of snow tyres and/or tyre chains is
recommended.
l In order to ensure that the anti-lock brake sys-
tem (ABS) will operate correctly in situa-
tions where tyre chains have been fitted,
drive in the “4H”, “4HLc” or “4LLc” position.
l Maintain a safe distance between vehicles,
avoid sudden braking, and use engine brak-
ing (downshifting). CAUTION
l
Avoid sudden braking,
sudden accelera-
tion, and sharp turning; such operations
could cause skidding and spinouts. Driving on sandy or muddy roads
Set the
transfer
shift lever to the “4HLc” or “4LLc”
position and then gradually depress the accelerator
pedal for a smooth start. Keep the pressure on the
accelerator pedal as constant as possible, and drive
at low speed. CAUTION
l
Do not
force
the vehicle or drive reckless-
ly on sandy surfaces. In comparison with
normal road surfaces, the engine and oth-
er drive-system components are put un-
der excessive strain when driving on such
a surface, and this could lead to accidents.
l If any of following conditions occur while
the vehicle is being driven, immediately
park your vehicle in a safe place and fol-
low these procedures:
• The needle in the temperature gaugeapproaches the overheating zone.
Refer to “Engine overheating” on
page 6-04.
• A/T fluid temperature warning lamp illuminates.
Refer to “When the A/T fluid temper-
ature warning lamp comes on” on
page 4-22. WARNING
l When attempting to rock your vehicle out
of a stuck
position, be sure that the area
around the vehicle is clear of people and
physical objects. The rocking motion may
cause the vehicle to suddenly launch for-
ward or backward, causing injury or dam-
age to nearby people or objects.
NOTE l Avoid
sudden braking,
acceleration, and turn-
ing; such operations could result in the vehi-
cle becoming stuck.
l If the vehicle becomes stuck in sandy or mud-
dy roads, it can often be moved with a rock-
ing motion. Move the selector lever rhythmi-
cally between the “D” (DRIVE) and “R” (RE-
VERSE) position (with M/T, between 1 st
and
Reverse), while applying slight pressure to
the accelerator pedal.
l It is recommended to start the vehicle with
parking brake partially, but not completely,
applied by slightly pulling the parking brake
lever.
After the vehicle has become free, do not for-
get to release the parking brake.
l If it is necessary to drive in extremely muddy
conditions, the use of tyre chains is recom-
mended. Because the extent of muddy condi-
tions is difficult to judge and the vehicle
could become bogged down very deeply, op-
eration should be at a low speed. If possible,
get out of the vehicle and check the condi-
tions ahead before proceeding. Starting and driving
4-33 4
OBKE12E1
Page 159 of 377
l
Driving over
roads in coastal areas or roads
on which anti-skid preparations have been
spread can cause rust on the vehicle; wash
the vehicle thoroughly as soon as possible af-
ter such use.
Climbing sharp grades
Set the transfer shift lever to the “4LLc” position to
maximize the engine torque. WARNING
l Go
straight
up.
Do not try to traverse
across a steep slope.
l If you begin to lose traction, ease off the
accelerator pedal and gently turn the
steering wheel alternatively left and right
to regain adequate traction again.
NOTE l Choose
as smooth
a slope as possible with
few stones or other obstacles.
l Before attempting to drive up the slope, walk
it up to confirm that the vehicle can handle
the grade.
Descending sharp grades
Set the transfer shift lever to the “4LLc” position,
use the engine brake (downshifting) and descend
slowly. WARNING
l Avoid
snaking
down
a sharp grade. De-
scend the grade as straight as possible. NOTE
l When descending a sharp grade, if the brakes
are
applied suddenly
because of an obstacle
encountered, control of the vehicle could be
lost. Before descending the slope, walk it
down and confirm the path.
l Before descending a grade, it is necessary to
choose the appropriate gear. Avoid changing
gears or depressing the clutch while descend-
ing the grade.
l MITSUBISHI MOTORS is not responsible
to the operator for any damage or injury
caused or liability incurred by improper and
negligent operation of a vehicle. All techni-
ques of vehicle operation described herein de-
pend on the skill and experience of the opera-
tor and other participating parties and any de-
viation from the recommended operation in-
structions above is at their own risk.
Turning sharp corners
When turning a sharp corner in the “4HLc” or
“4LLc” position at low speed, a slight difference in
steering may be experienced similar to as if the
brakes were applied. This is called tight corner brak-
ing and results from each of the 4 tyres being at a
different distance from the corner.
The phenomenon is peculiar to 4-wheel drive vehi-
cles. If this occurs, either straighten the steering
wheel, or change to rear-wheel drive.
Crossing a stream
4-wheel drive vehicles are not necessarily water-
proof. If the electrical circuits become wet, further
operation of the vehicle will be impossible; there-
fore, avoid crossing streams unless absolutely nec-
essary. If crossing a stream is unavoidable, use the
following procedure: 1. Check depths of a stream and geographical
features before
attempting to cross a stream
and ford the stream where the water is as shal-
low as practicable.
2. Cross at a place where the water is less than 70 cm deep.
3. Set the transfer shift lever to the “4LLc” po- sition.
4. Drive slowly at a speed of approximately 5 km/h (3 mph) to avoid splashing too much
water. CAUTION
l
Do not
attempt
to cross a stream at a
place where the water is more than 70 cm
deep.
l Cross a stream temporarily for emergen-
cies and avoid doing so for a long period
of time.
l After crossing a stream, apply the brakes
to be sure they are functioning properly.
If the brakes are wet and not functioning
properly, dry them out by driving slowly
while lightly depressing the brake pedal.
Inspect each part of the vehicle carefully.
NOTE l Because
the inside
of the vehicle is flooded
with water when crossing at a place where
the water is more than 50 cm deep, we recom-
mend you to have your vehicle inspected.
l Frequent crossing of streams can adversely af-
fect the life span of the vehicle; we recom-
mend you to take the necessary measures to
prepare, inspect, and repair the vehicle. Starting and driving
4-34
4
OBKE12E1
Page 162 of 377
Braking
E00607001524
All the parts
of the brake system are critical to safe-
ty. We recommend you to have the vehicle
checked at regular intervals according to the serv-
ice booklet. CAUTION
l
Avoid driving
habits
that cause heavy
braking and never “ride” the brakes by
resting your foot on the brake pedal
while driving.
It causes brake overheating and fade.
Brake system
The service brake
is divided into two brake circuits
so that when one brake circuit fails, the other is
available to stop the vehicle. In this situation, even
if the brake pedal moves down to the very end of
its possible stroke, keep depressing the brake pedal
down harder than usual; stop driving as soon as pos-
sible and have the brake system repaired.
For details, refer to “Brake warning lamp” on page
3-09.
Power brakes
The power brakes use brake fluid pressurized by
the pump to power-assist the brake. If the brake sys-
tem fails during driving, the brake warning lamp
comes on and a buzzer sounds continuously. In this
case, the brake may not work properly.
If this buzzer should continue to sound, park your
vehicle in a safe place and have the system checked.
Refer to “Brake warning lamp” on page 3-09. CAUTION
l
Bring the vehicle
to halt in a safe location
by applying the brakes gently. Applying
the brakes rapidly or driving at high
speed may make the vehicle unstable.
NOTE l Depressing
the brake
pedal repeatedly may
turn on the brake warning lamp, ABS warn-
ing lamp and brake warning buzzer. (The
ASTC indication lamp and Active Stability
Control function OFF indication lamp also
turn on.) It is normal if the lamp goes out
and the buzzer stops sounding after a few sec-
onds.
l In certain cases immediately after the engine
has been started or when the brake pedal is
depressed repeatedly, a noise generated by op-
eration of brake devices may be heard com-
ing from the engine compartment, or the
brake pedal vibration may be felt. This type
of noise or vibration is normal and there is
no need for concern. In fact, it indicates that
the corresponding devices are operating nor-
mal. WARNING
l Do not
turn
off the engine while your ve-
hicle is in motion. If you turn off the en-
gine while driving, the power assistance
for the braking system will stop working
and your brakes will not work effectively. WARNING
l If the power
assist is lost or if either
brake hydraulic system stops working
properly, have your vehicle checked im-
mediately.
Warning lamp l The
brake warning
lamp illuminates to indi-
cate a fault in the braking system. Read
“Brake warning lamp” on page 3-09.
l On vehicles with the rear differential lock,
the active stability & traction control
(ASTC) and anti-lock brake system (ABS)
functions are suspended while the rear differ-
ential lock is activated. ASTC indication
lamp, Active Stability Control function OFF
indication lamp, ABS warning lamp and
brake warning lamp are illuminated while
these functions are suspended. It does not in-
dicate a problem. When the rear differential
lock is disengaged, these lamps go out and
function again.
Refer to “Brake warning lamp” on page 3-09,
“ABS warning lamp” on page 4-40, “ASTC
indication lamp” on page 4-42, “Active sta-
bility control function OFF indication lamp”
on page 4-43.
When brakes are wet
Check the brake system while driving at a low
speed immediately after starting, especially when
the brakes are wet, to confirm they work normally.
A film of water can be formed on the brake discs
and prevent normal braking after driving in heavy
rain or through large puddles, or after the vehicle is
washed. If this occurs, dry the brakes out by driv-
ing slowly while lightly depressing the brake pedal. Starting and driving
4-37 4
OBKE12E1