heater MITSUBISHI SHOGUN 2003 Owner's Manual (in English)
[x] Cancel search | Manufacturer: MITSUBISHI, Model Year: 2003, Model line: SHOGUN, Model: MITSUBISHI SHOGUN 2003Pages: 392, PDF Size: 14.34 MB
Page 3 of 392
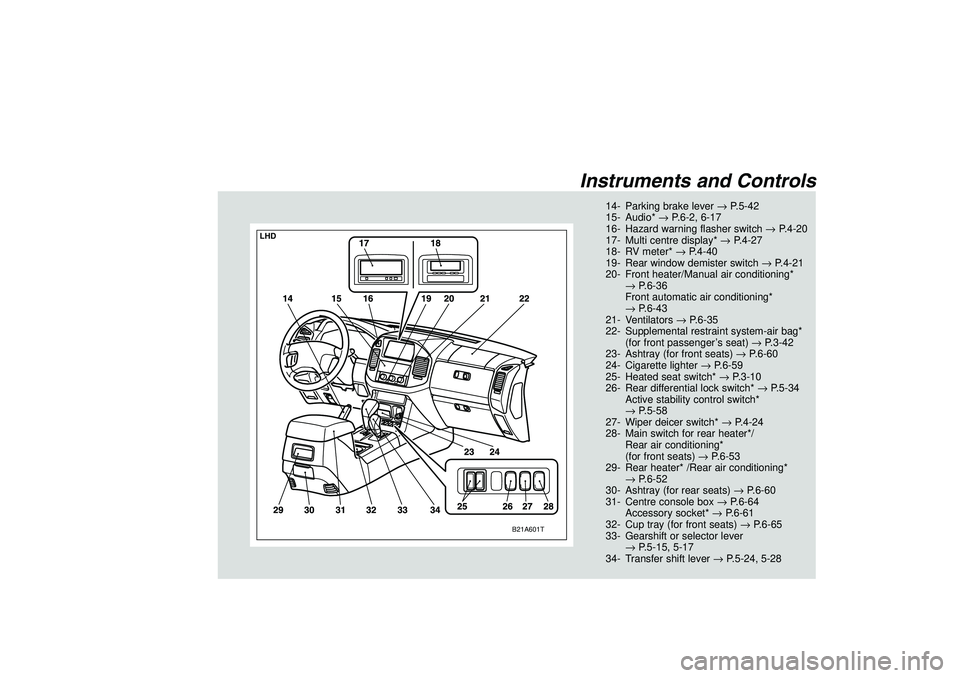
Instruments and Controls
B21A601T
LHD
14- Parking brake lever→P.5-42
15- Audio*→P.6-2, 6-17
16- Hazard warning flasher switch→P.4-20
17- Multi centre display*→P.4-27
18- RV meter*→P.4-40
19- Rear window demister switch→P.4-21
20- Front heater/Manual air conditioning*
→P.6-36
Front automatic air conditioning*
→P.6-43
21- Ventilators→P.6-35
22- Supplemental restraint system-air bag*
(for front passenger’s seat)→P.3-42
23- Ashtray (for front seats)→P.6-60
24- Cigarette lighter→P.6-59
25- Heated seat switch*→P.3-10
26- Rear differential lock switch*→P.5-34
Active stability control switch*
→P.5-58
27- Wiper deicer switch*→P.4-24
28- Main switch for rear heater*/
Rear air conditioning*
(for front seats)→P.6-53
29- Rear heater* /Rear air conditioning*
→P.6-52
30- Ashtray (for rear seats)→P.6-60
31- Centre console box→P.6-64
Accessory socket*→P.6-61
32- Cup tray (for front seats)→P.6-65
33- Gearshift or selector lever
→P.5-15, 5-17
34- Transfer shift lever→P.5-24, 5-28
Div:
Out put date:
Page 5 of 392
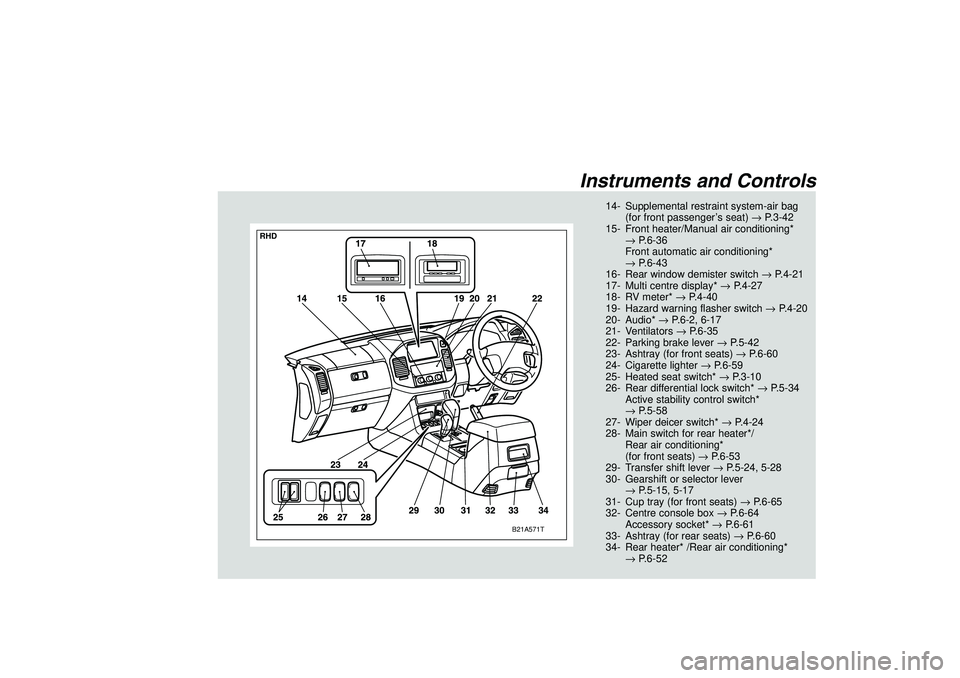
Instruments and Controls
B21A571T
RHD
14- Supplemental restraint system-air bag
(for front passenger’s seat)→P.3-42
15- Front heater/Manual air conditioning*
→P.6-36
Front automatic air conditioning*
→P.6-43
16- Rear window demister switch→P.4-21
17- Multi centre display*→P.4-27
18- RV meter*→P.4-40
19- Hazard warning flasher switch→P.4-20
20- Audio*→P.6-2, 6-17
21- Ventilators→P.6-35
22- Parking brake lever→P.5-42
23- Ashtray (for front seats)→P.6-60
24- Cigarette lighter→P.6-59
25- Heated seat switch*→P.3-10
26- Rear differential lock switch*→P.5-34
Active stability control switch*
→P.5-58
27- Wiper deicer switch*→P.4-24
28- Main switch for rear heater*/
Rear air conditioning*
(for front seats)→P.6-53
29- Transfer shift lever→P.5-24, 5-28
30- Gearshift or selector lever
→P.5-15, 5-17
31- Cup tray (for front seats)→P.6-65
32- Centre console box→P.6-64
Accessory socket*→P.6-61
33- Ashtray (for rear seats)→P.6-60
34- Rear heater* /Rear air conditioning*
→P.6-52
Div:
Out put date:
Page 42 of 392
CAUTION
(1) Use a foot to operate the pedal
(2).
(2) The reclining mechanism of the
seatback is spring loaded, caus-
ing it to return to the vertical
position when the lock lever is
operated. When using the lever,
sit close to the seatback or hold
it with your hand.
WARNING
The front seatbacks also serve the
purpose of protecting passengers in
the rear seat from being thrown for-
wards in case of an accident. Thus,
in order to prevent serious injury, the
vehicle should not be driven with a
seatback tilted forward.
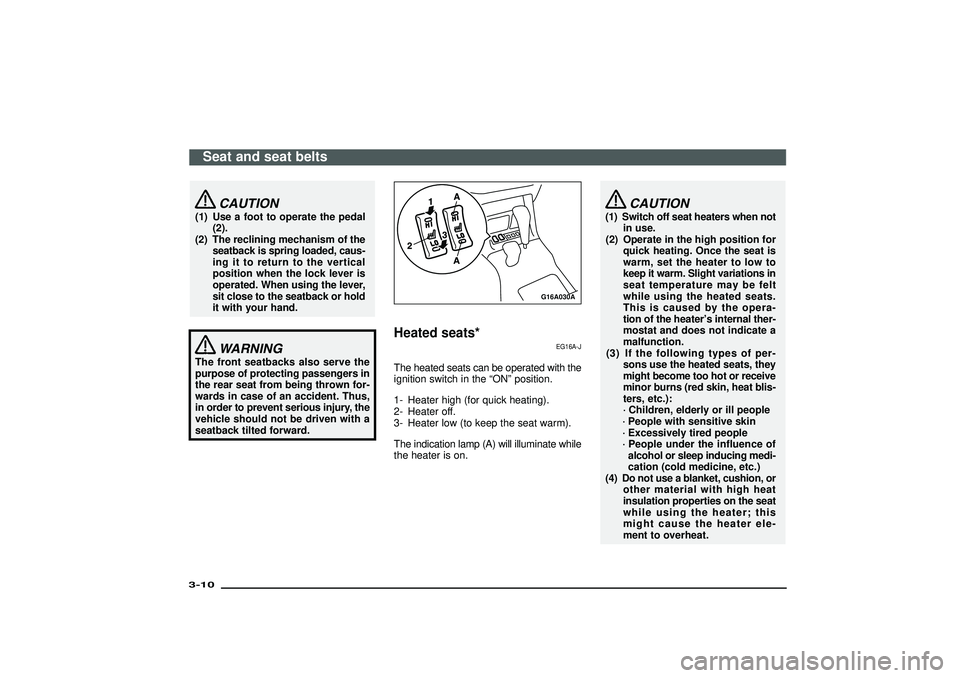
G16A030A
Heated seats*
EG16A-J
The heated seats can be operated with the
ignition switch in the“ON”position.
1- Heater high (for quick heating).
2- Heater off.
3- Heater low (to keep the seat warm).
The indication lamp (A) will illuminate while
the heater is on.
CAUTION
(1) Switch off seat heaters when not
in use.
(2) Operate in the high position for
quick heating. Once the seat is
warm, set the heater to low to
keep it warm. Slight variations in
seat temperature may be felt
while using the heated seats.
This is caused by the opera-
tion of the heater’s internal ther-
mostat and does not indicate a
malfunction.
(3) If the following types of per-
sons use the heated seats, they
might become too hot or receive
minor burns (red skin, heat blis-
ters, etc.):
·Children, elderly or ill people
·People with sensitive skin
·Excessively tired people
·People under the influence of
alcohol or sleep inducing medi-
cation (cold medicine, etc.)
(4) Do not use a blanket, cushion, or
other material with high heat
insulation properties on the seat
while using the heater; this
might cause the heater ele-
ment to overheat.
Seat and seat belts
3-10Div:
Out put date:
Page 43 of 392
CAUTION
(5) Turn the heater off immediately
if it appears to be malfunction-
ing during use.
NOTE
(1) Do not place heavy objects on the seat
or stick pins, needles, or other pointed
objects into it.
(2) When cleaning the seat, do not use
benzene, gasoline, alcohol, or other
organic solvents; this might damage the
surface of the seat, but also the heater
element.
(3) If water or any other liquid is spilled on
the seat, allow it to dry thoroughly
before attempting to use the heater.
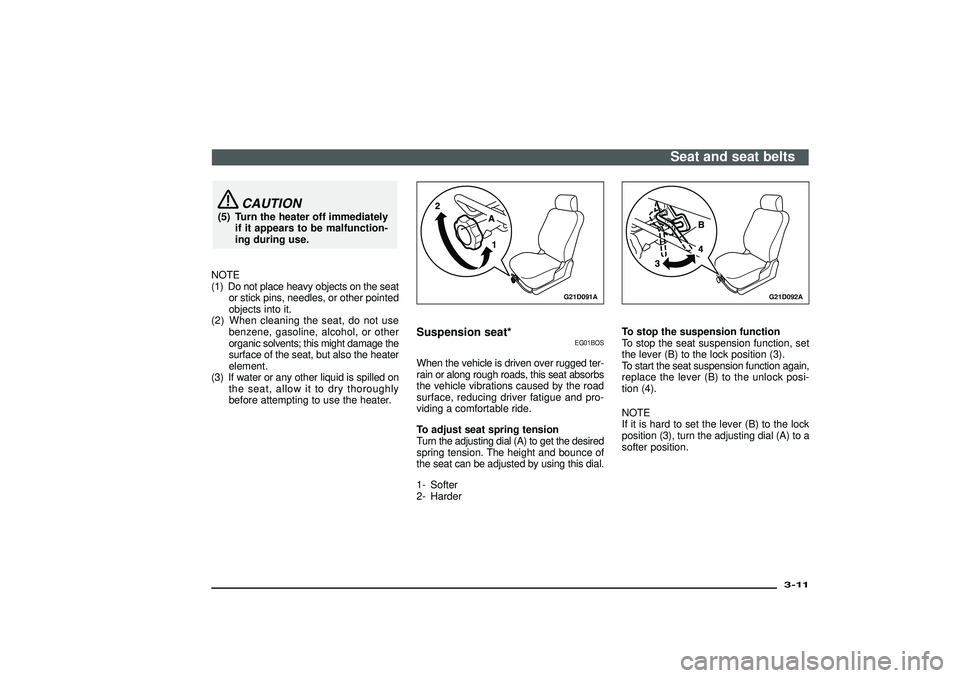
G21D091A
Suspension seat*
EG01BOS
When the vehicle is driven over rugged ter-
rain or along rough roads, this seat absorbs
the vehicle vibrations caused by the road
surface, reducing driver fatigue and pro-
viding a comfortable ride.
To adjust seat spring tension
Turn the adjusting dial (A) to get the desired
spring tension. The height and bounce of
the seat can be adjusted by using this dial.
1- Softer
2- Harder
G21D092A
To stop the suspension function
To stop the seat suspension function, set
the lever (B) to the lock position (3).
To start the seat suspension function again,
replace the lever (B) to the unlock posi-
tion (4).
NOTE
If it is hard to set the lever (B) to the lock
position (3), turn the adjusting dial (A) to a
softer position.
Seat and seat belts
3-11
Div:
Out put date:
Page 113 of 392
I08B119A
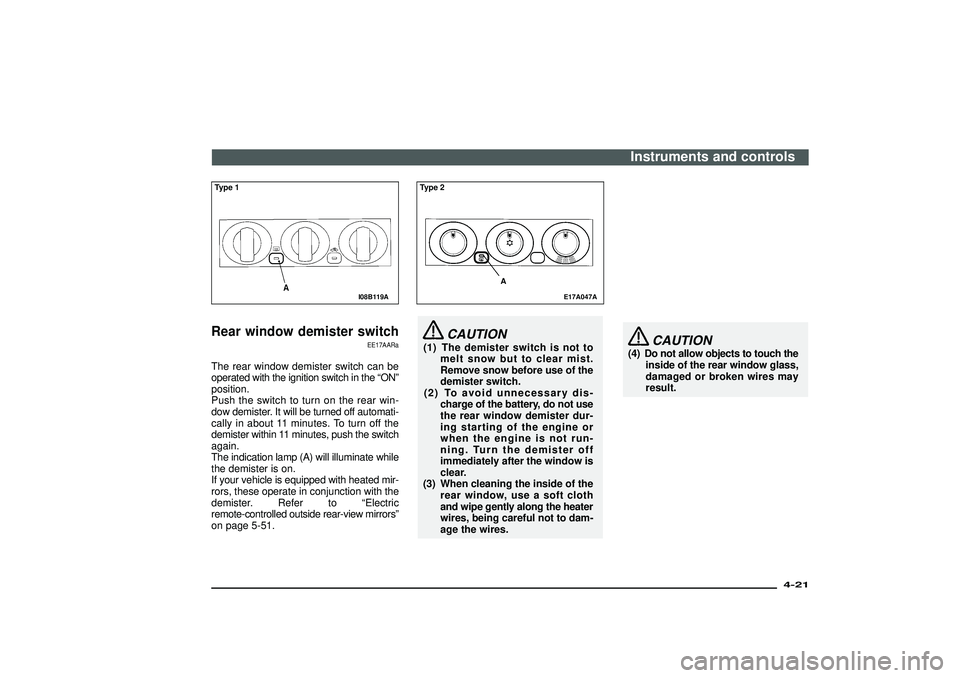
Type 1Rear window demister switch
EE17AARa
The rear window demister switch can be
operated with the ignition switch in the“ON”
position.
Push the switch to turn on the rear win-
dow demister. It will be turned off automati-
cally in about 11 minutes. To turn off the
demister within 11 minutes, push the switch
again.
The indication lamp (A) will illuminate while
the demister is on.
If your vehicle is equipped with heated mir-
rors, these operate in conjunction with the
demister. Refer to“Electric
remote-controlled outside rear-view mirrors”
on page 5-51.
E17A047A
Type 2
A
CAUTION
(1) The demister switch is not to
melt snow but to clear mist.
Remove snow before use of the
demister switch.
(2) To avoid unnecessary dis-
charge of the battery, do not use
the rear window demister dur-
ing starting of the engine or
when the engine is not run-
ning. Turn the demister off
immediately after the window is
clear.
(3) When cleaning the inside of the
rear window, use a soft cloth
and wipe gently along the heater
wires, being careful not to dam-
age the wires.
CAUTION
(4) Do not allow objects to touch the
inside of the rear window glass,
damaged or broken wires may
result.Instruments and controls
4-21
Div:
Out put date:
Page 210 of 392
I08B099A
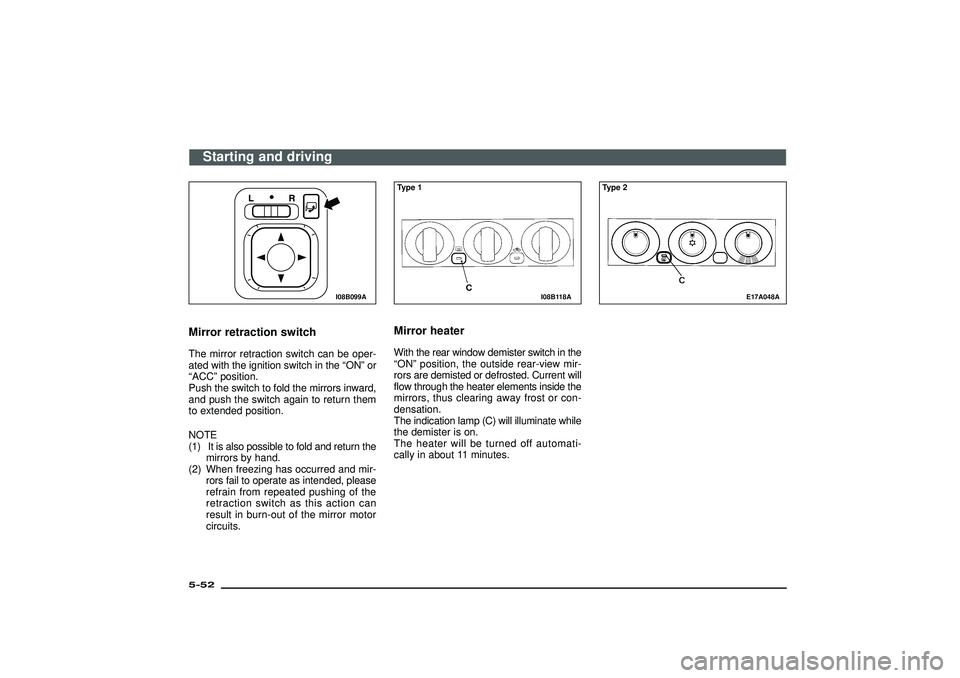
Mirror retraction switchThe mirror retraction switch can be oper-
ated with the ignition switch in the“ON”or
“ACC”position.
Push the switch to fold the mirrors inward,
and push the switch again to return them
to extended position.
NOTE
(1) It is also possible to fold and return the
mirrors by hand.
(2) When freezing has occurred and mir-
rors fail to operate as intended, please
refrain from repeated pushing of the
retraction switch as this action can
result in burn-out of the mirror motor
circuits.
I08B118A
Type 1Mirror heaterWith the rear window demister switch in the
“ON”position, the outside rear-view mir-
rors are demisted or defrosted. Current will
flow through the heater elements inside the
mirrors, thus clearing away frost or con-
densation.
The indication lamp (C) will illuminate while
the demister is on.
The heater will be turned off automati-
cally in about 11 minutes.
E17A048A
Type 2
Starting and driving
5-52Div:
Out put date:
Page 221 of 392
For pleasant driving
UKW/MW/LW electronic tuning radio
with tape player ............................................................ 6- 2
UKW/MW/LW electronic tuning radio
with CD player .............................................................. 6-17
CD (Compact-Disc) player ................................................ 6-30
How to set CD autochanger ............................................. 6-31
Audio system anti-theft feature ....................................... 6-32
Antenna .............................................................................. 6-35
Ventilators .......................................................................... 6-35
Front heater / Manual air conditioning ........................... 6-36
Front automatic air conditioning ..................................... 6-43
Rear heater/Rear air conditioning ................................... 6-52
Air purifier .......................................................................... 6-55
Sun visors ......................................................................... 6-56
Vanity mirror ...................................................................... 6-58
Cigarette lighter................................................................. 6-59
Ashtray ............................................................................... 6-60
Accessory socket.............................................................. 6-61
Accessory boxes............................................................... 6-62
Glove box .......................................................................... 6-63
Luggage floor box ............................................................. 6-66
Side box ............................................................................ 6-67
Installation position for warning triangle ....................... 6-67
Luggage hooks.................................................................. 6-68
Tonneau cover rail ............................................................ 6-68
Rear shelf ........................................................................... 6-69
Div:
Out put date:
Page 253 of 392
Handling of cassette tapes
EH02B-Ad
CAUTION
To maintain the cassette tape player
in good condition, observe the fol-
lowing precautions.
(1) Do not use cassette tapes longer
than C-90, otherwise sound
quality and tape durability will be
greatly diminished.
(2) Keep the cassette tape in its
case to protect from tape loose-
ness and dust when it is not
used.
(3) Keep the cassette tape away
from direct sunlight, heat and
magnetic fields such as the
radio speakers.
(4) Before inserting the cassette,
make sure that the label is
adhered securely to the cas-
sette.
CAUTION
(5) A loose tape should be cor-
rected before use.
(6) Do not oil any part of the player
and do not insert any object
other than tape cassettes into
the slot, or the tape player may
be damaged. Also, avoid insert-
ing your fingers into the slot.
There is a danger of being burnt
by the hot internal parts.
H12F004A
Handling of compact discs
EH12E-Dc
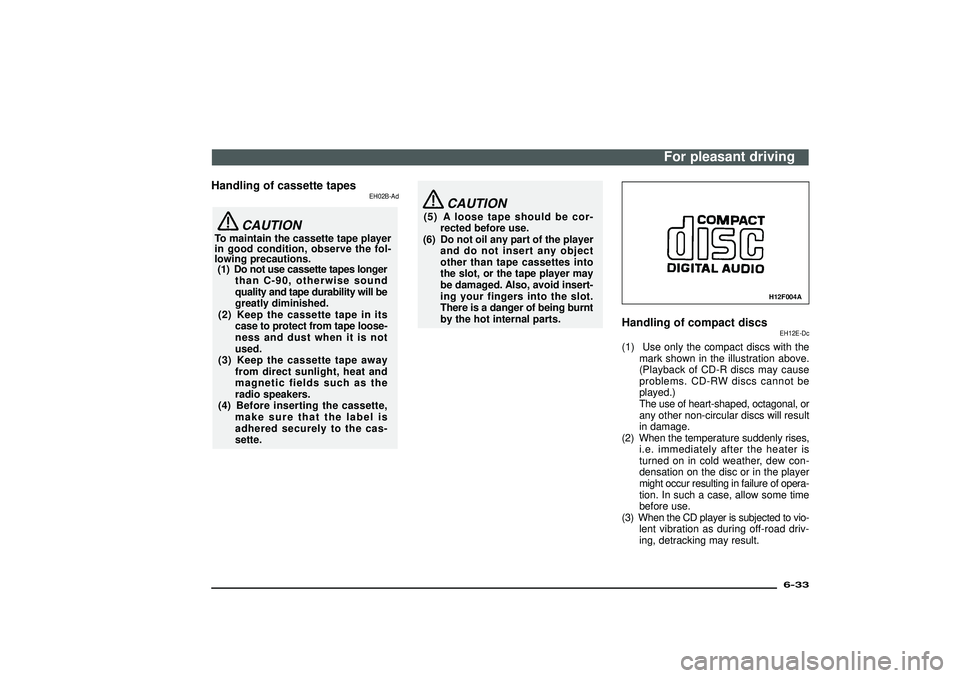
(1) Use only the compact discs with the
mark shown in the illustration above.
(Playback of CD-R discs may cause
problems. CD-RW discs cannot be
played.)
The use of heart-shaped, octagonal, or
any other non-circular discs will result
in damage.
(2) When the temperature suddenly rises,
i.e. immediately after the heater is
turned on in cold weather, dew con-
densation on the disc or in the player
might occur resulting in failure of opera-
tion. In such a case, allow some time
before use.
(3) When the CD player is subjected to vio-
lent vibration as during off-road driv-
ing, detracking may result.
For pleasant driving
6-33
Div:
Out put date:
Page 256 of 392
H16A297A
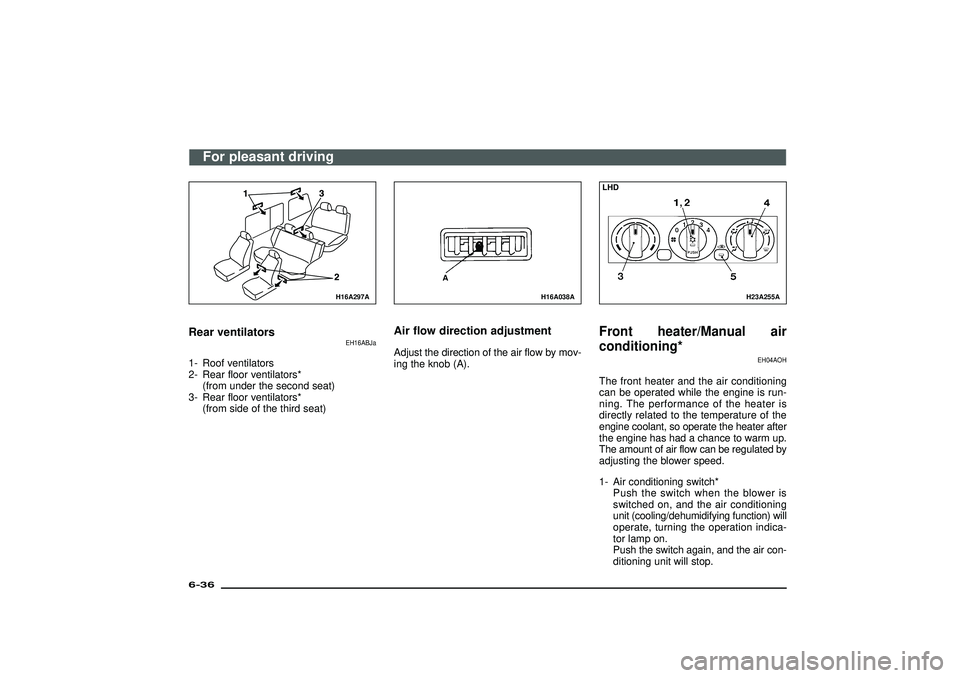
Rear ventilators
EH16ABJa
1- Roof ventilators
2- Rear floor ventilators*
(from under the second seat)
3- Rear floor ventilators*
(from side of the third seat)
H16A038A
A
Air flow direction adjustmentAdjust the direction of the air flow by mov-
ing the knob (A).
H23A255A
LHDFront heater/Manual air
conditioning*
EH04AOH
The front heater and the air conditioning
can be operated while the engine is run-
ning. The performance of the heater is
directly related to the temperature of the
engine coolant, so operate the heater after
the engine has had a chance to warm up.
The amount of air flow can be regulated by
adjusting the blower speed.
1- Air conditioning switch*
Push the switch when the blower is
switched on, and the air conditioning
unit (cooling/dehumidifying function) will
operate, turning the operation indica-
tor lamp on.
Push the switch again, and the air con-
ditioning unit will stop.
For pleasant driving
6-36Div:
Out put date:
Page 257 of 392
H23A254A
RHDNOTE
On an air conditioned vehicle, the cool air
from the ventilators may appear as a mist.
This is due to moist air being suddenly
cooled by the air conditioning. This will clear
after a few moments.
CAUTION
(1) When using the air condition-
ing, the idling speed may slightly
increase as the air condition-
ing compressor is switched
on/off automatically. Especially
for vehicles with an automatic
transmission, while the vehicle
is stationary, fully depress the
brake pedal to prevent the
vehicle from creeping.
CAUTION
(2) On 3500 models, if a problem is
detected in the air conditioning
compressor, the air condition-
ing operation indicator lamp
blinks. Stop the vehicle in a safe
place, turn off the engine, then
restart the engine. If the air con-
ditioning operation indicator
lamp does not blink, there is no
problem. If it does blink, have it
checked at an authorized MIT-
SUBISHI dealer.
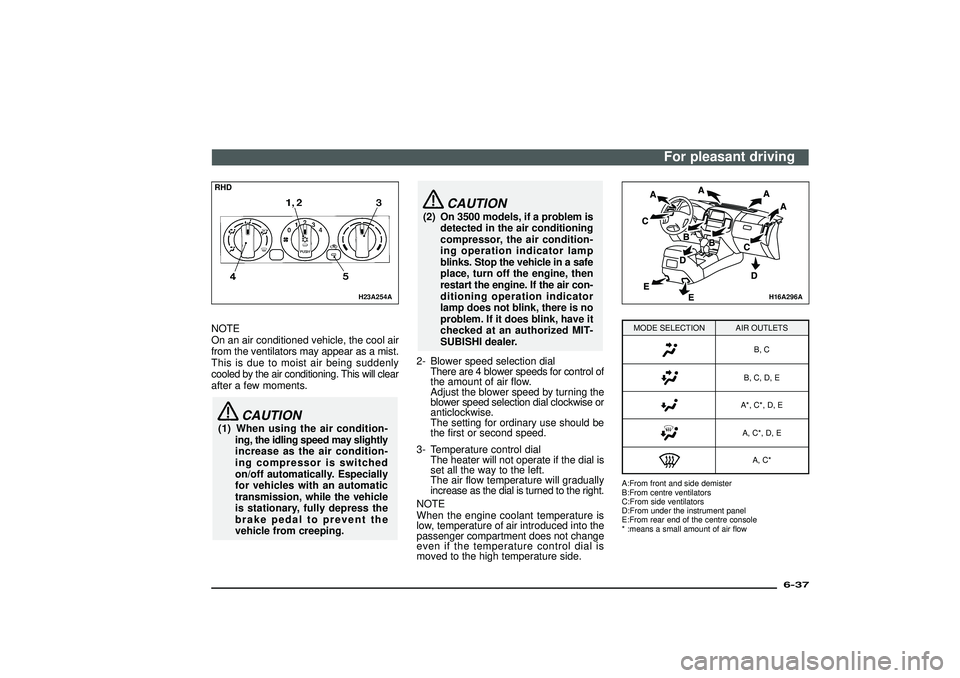
2- Blower speed selection dial
There are 4 blower speeds for control of
the amount of air flow.
Adjust the blower speed by turning the
blower speed selection dial clockwise or
anticlockwise.
The setting for ordinary use should be
the first or second speed.
3- Temperature control dial
The heater will not operate if the dial is
set all the way to the left.
The air flow temperature will gradually
increase as the dial is turned to the right.
NOTE
When the engine coolant temperature is
low, temperature of air introduced into the
passenger compartment does not change
even if the temperature control dial is
moved to the high temperature side.
H16A296A
MODE SELECTION AIR OUTLETS
B, CB, C, D, EA*, C*, D, EA, C*, D, EA, C*
A:From front and side demister
B:From centre ventilators
C:From side ventilators
D:From under the instrument panel
E:From rear end of the centre console
* :means a small amount of air flow
For pleasant driving
6-37
Div:
Out put date: