turn signal bulb MITSUBISHI SHOGUN 2008 Owner's Manual (in English)
[x] Cancel search | Manufacturer: MITSUBISHI, Model Year: 2008, Model line: SHOGUN, Model: MITSUBISHI SHOGUN 2008Pages: 538, PDF Size: 25.09 MB
Page 136 of 538
3-12 Instruments and controls
3
Indicator lamps
E00501600012
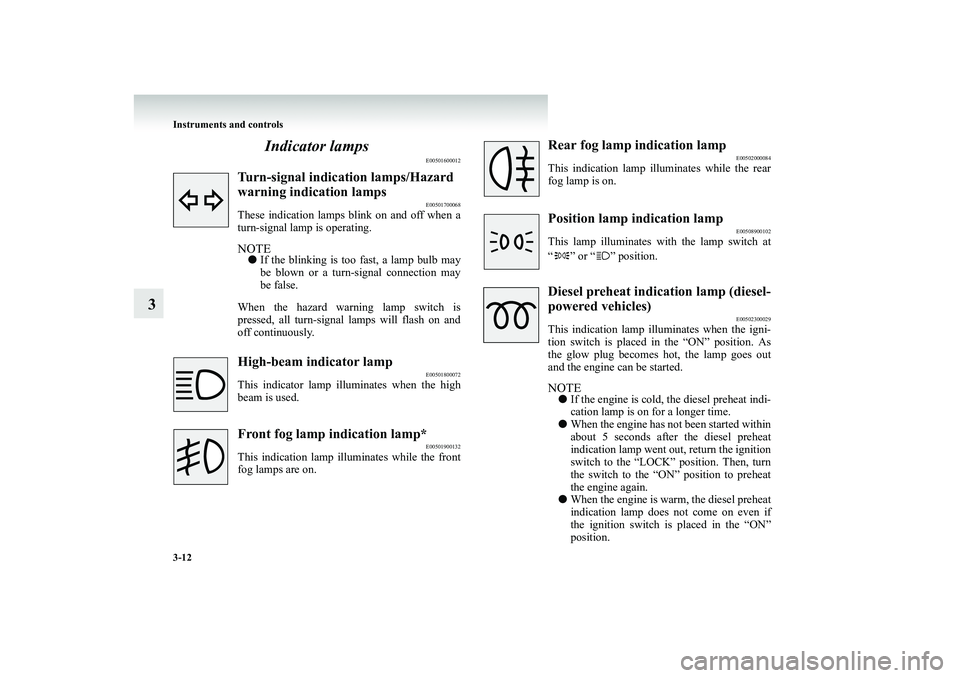
Turn-signal indication lamps/Hazard warning indication lamps
E00501700068
These indication lamps blink on and off when a turn-signal lamp is operating.NOTE●
If the blinking is too fast, a lamp bulb may be blown or a turn-signal connection may be false.
When the hazard warning lamp switch is pressed, all turn-signal lamps will flash on andoff continuously.High-beam indicator lamp
E00501800072
This indicator lamp illuminates when the highbeam is used.Front fog lamp indication lamp*
E00501900132
This indication lamp illuminates while the frontfog lamps are on.
Rear fog lamp indication lamp
E00502000084
This indication lamp illuminates while the rearfog lamp is on.Position lamp indication lamp
E00508900102
This lamp illuminates with the lamp switch at “ ” or “ ” position.Diesel preheat indica
tion lamp (diesel-
powered vehicles)
E00502300029
This indication lamp illuminates when the igni- tion switch is placed in the “ON” position. Asthe glow plug becomes hot, the lamp goes out and the engine can be started.NOTE●
If the engine is cold,
the diesel preheat indi-
cation lamp is on for a longer time.
●
When the engine has not been started within about 5 seconds after the diesel preheatindication lamp went out, return the ignition switch to the “LOCK” position. Then, turn the switch to the “ON” position to preheat the engine again.
●
When the engine is warm, the diesel preheat indication lamp does not come on even if the ignition switch is placed in the “ON” position.
BK-BK2008E1ENUK.en-uk-Section6.fm Page
12 Wednesday, January 9, 2008 4:32 PM
Page 189 of 538
Instruments and controls
3-65
3
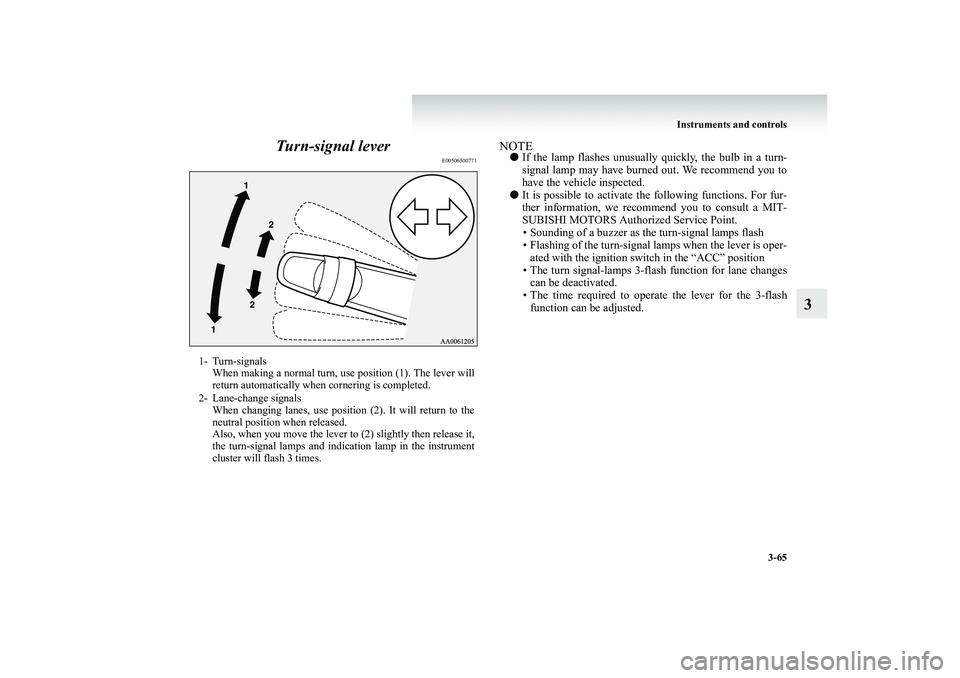
Turn-signal lever
E00506500771
NOTE●
If the lamp flashes unusually quickly, the bulb in a turn- signal lamp may have burned out. We recommend you to have the vehicle inspected.
●
It is possible to activate the following functions. For fur- ther information, we recommend you to consult a MIT- SUBISHI MOTORS Author
ized Service Point.
• Sounding of a buzzer as the turn-signal lamps flash• Flashing of the turn-signal lamps when the lever is oper- ated with the ignition switch in the “ACC” position • The turn signal-lamps 3-flash function for lane changescan be deactivated. • The time required to operate the lever for the 3-flash function can be adjusted.
1- Turn-signals
When making a normal turn, use position (1). The lever willreturn automatically when cornering is completed.
2- Lane-change signals
When changing lanes, use position (2). It will return to theneutral position when released.Also, when you move the lever to (2) slightly then release it,the turn-signal lamps and indication lamp in the instrumentcluster will flash 3 times.
BK-BK2008E1ENUK.en-uk-Section6.fm Page
65 Wednesday, January 9, 2008 4:32 PM
Page 486 of 538
8-36 Maintenance
8
Replacement of lamp bulbs
E01003100521
Before replacing a bulb, ensure the lamp is off. Do not touch the glass part of the new bulb with your bare fingers; the skin oil left on the glass will evapor
ate when the bulb gets hot and
the vapor will condense on th
e reflector and dim the surface.
NOTE●
Do not attempt to repair or
replace the lamp bulbs other
than described in this owner’s manual. For repair or replacement, contact a MITS
UBISHI MOTORS Author-
ized Service Point.
●
If you are unsure of how to carry out the work as required, we recommend you to consult a specialist.
●
Be careful not to scratch the vehicle body when removing a lamp or lens.
●
When it rains or when the
vehicle has been washed, the
inside of the lens sometimes becomes foggy. This is the same phenomenon as when window glass mists up on a humid day, and does not indicate a functional problem.When the lamp is switched on, the heat will remove the fog. However, if water gathers inside the lamp, we recom- mend you to have it checked.
Bulb capacity
E01003200014
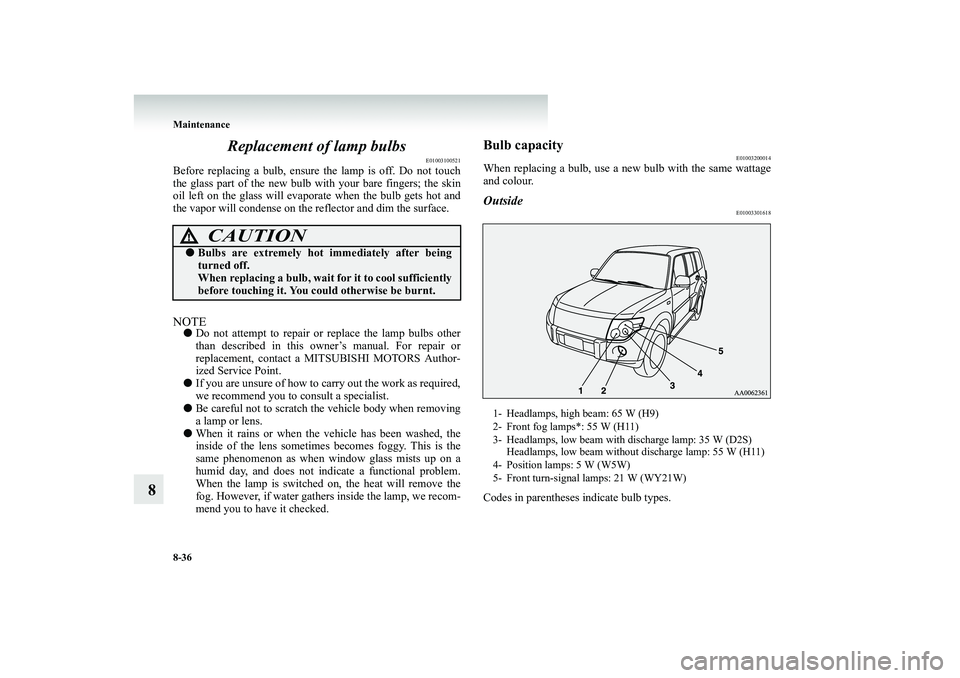
When replacing a bulb, use a new bulb with the same wattageand colour.Outside
E01003301618
Codes in parentheses indicate bulb types.
CAUTION
!●
Bulbs are extremely hot immediately after being turned off. When replacing a bulb, wait for it to cool sufficiently before touching it. You could otherwise be burnt.
1- Headlamps, high beam: 65 W (H9) 2- Front fog lamps*: 55 W (H11) 3- Headlamps, low beam with discharge lamp: 35 W (D2S)
Headlamps, low beam without discharge lamp: 55 W (H11)
4- Position lamps: 5 W (W5W) 5- Front turn-signal lamps: 21 W (WY21W)
BK-BK2008E1ENUK.en-uk-Section11.fm Page
36 Wednesday, January 9, 2008 4:50 PM
Page 487 of 538
Maintenance
8-37
8
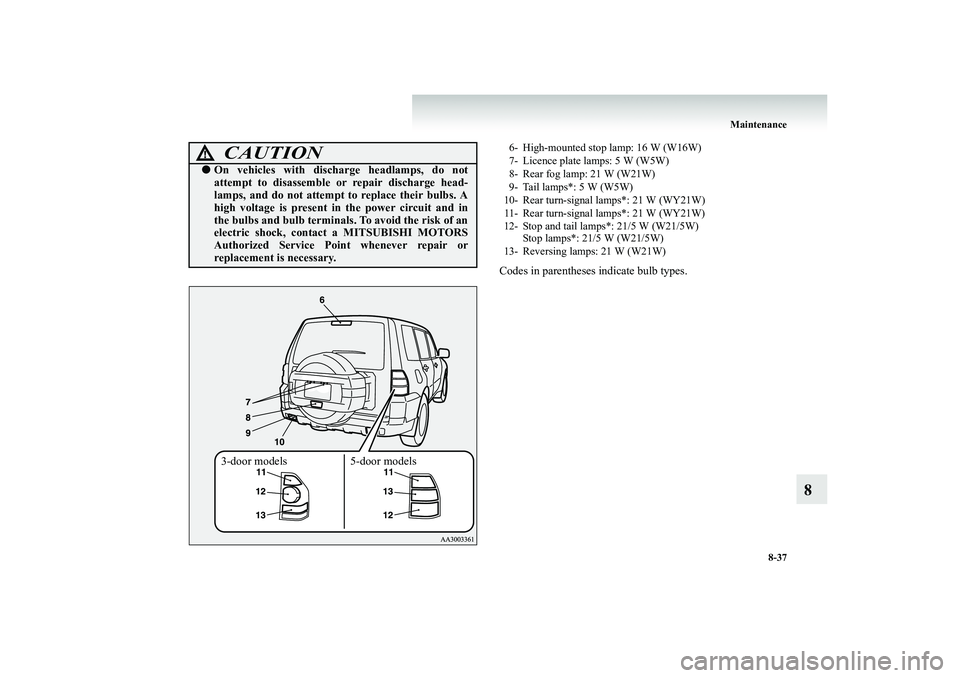
Codes in parentheses indicate bulb types.
CAUTION
!●
On vehicles with discha
rge headlamps, do not
attempt to disassemble or repair discharge head-lamps, and do not attempt to replace their bulbs. A high voltage is present in
the power circuit and in
the bulbs and bulb
terminals. To avoid the risk of an
electric shock, contact a MITSUBISHI MOTORS Authorized Service Point whenever repair or replacement is necessary.3-door models 5-door models
6- High-mounted stop lamp: 16 W (W16W) 7- Licence plate lamps: 5 W (W5W)8- Rear fog lamp: 21 W (W21W) 9- Tail lamps*: 5 W (W5W) 10- Rear turn-signal lamps*: 21 W (WY21W)11- Rear turn-signal lamps*: 21 W (WY21W) 12- Stop and tail lamps*: 21/5 W (W21/5W)
Stop lamps*: 21/5 W (W21/5W)
13- Reversing lamps: 21 W (W21W)
BK-BK2008E1ENUK.en-uk-Section11.fm Page
37 Wednesday, January 9, 2008 4:50 PM
Page 491 of 538
Maintenance
8-41
8
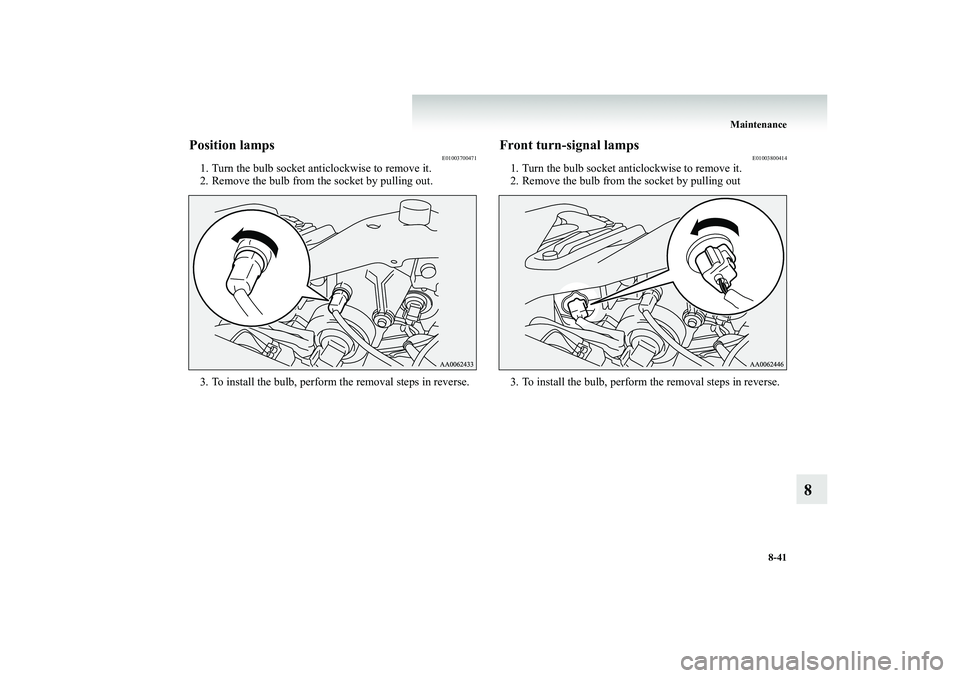
Position lamps
E01003700471
1. Turn the bulb socket an
ticlockwise to remove it.
2. Remove the bulb from the socket by pulling out. 3. To install the bulb, perform the removal steps in reverse.
Front turn-signal lamps
E01003800414
1. Turn the bulb socket anticlockwise to remove it. 2. Remove the bulb from the socket by pulling out 3. To install the bulb, perform the removal steps in reverse.
BK-BK2008E1ENUK.en-uk-Section11.fm Page
41 Wednesday, January 9, 2008 4:50 PM
Page 495 of 538
Maintenance
8-45
8
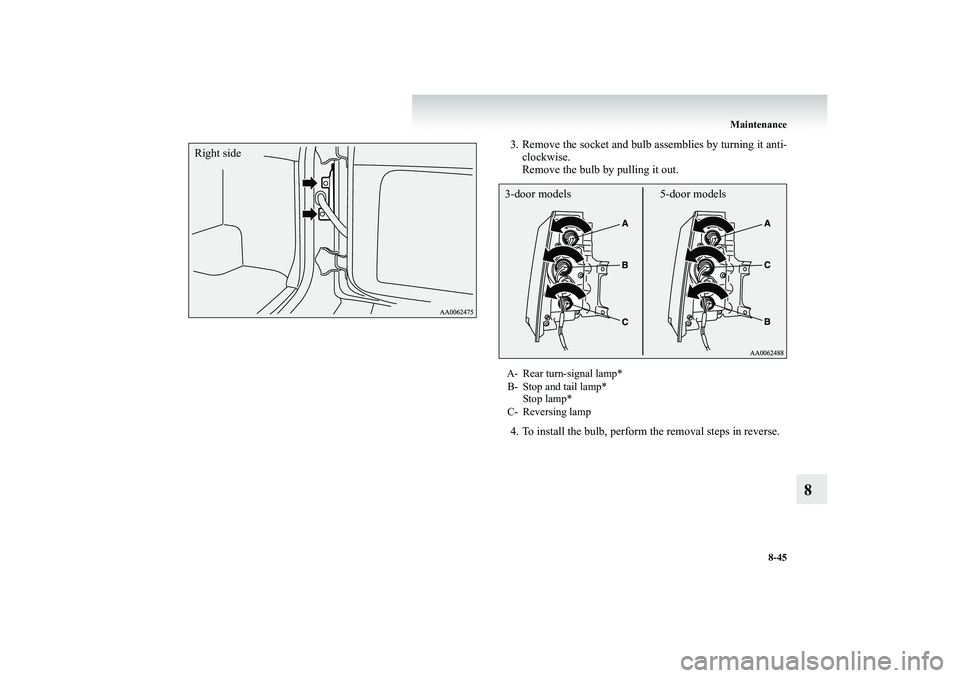
3. Remove the socket and bulb assemblies by turning it anti-
clockwise. Remove the bulb by pulling it out.
4. To install the bulb, perform the removal steps in reverse.
Right side
A- Rear turn-signal lamp* B- Stop and tail lamp*
Stop lamp*
C- Reversing lamp 3-door models 5-door models
BK-BK2008E1ENUK.en-uk-Section11.fm Page
45 Wednesday, January 9, 2008 4:50 PM
Page 496 of 538
8-46 Maintenance
8
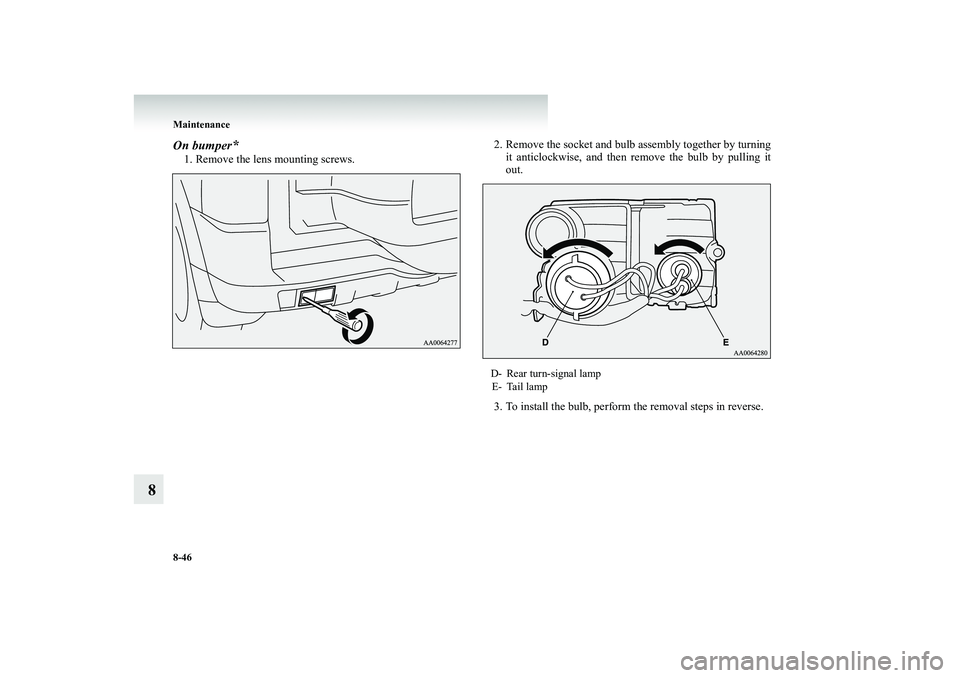
On bumper
*
1. Remove the lens mounting screws.
2. Remove the socket and bulb assembly together by turning
it anticlockwise, and then remove the bulb by pulling it out.
3. To install the bulb, perform the removal steps in reverse.D- Rear turn-signal lamp E- Tail lamp
BK-BK2008E1ENUK.en-uk-Section11.fm Page
46 Wednesday, January 9, 2008 4:50 PM
Page 527 of 538

Alphabetical index
3
Exterior and interior lamp operation 8-27
F
Fluid Automatic transmission fluid 9-16Brake fluid 8-13, 9-16Clutch fluid 8-14, 9-16Engine coolant 8-10, 9-16Manual transmission fluid 9-16Power steering fluid 8-16, 9-16Washer fluid 8-11, 9-16Fog lamp switch 3-66Foot lamps and ceiling lamp 5-89For cold and snowy weather 8-28Front automatic air conditioning 5-4Front fog lampsBulb capacity 8-36Indication lamp 3-12Replacement 8-42Switch 3-66Front seats 2-6Front turn-signal lampsBulb capacity 8-36Replacement 8-41FuelFilling the fuel tank 3Fuel filter indication lamp 3-13Fuel gauge 3-7Fuel selection 2
Low fuel warning lamp 3-8 Modification/alterations to th
e electrical or fuel systems 7
Tank capacity 3Fuel consumption 9-14Fuses 8-29Fusible links 8-29
G
Gauges 3-2, 3-10General maintenance 8-27General vehicle data 9-4Genuine parts 7Glove box 5-93Glove box lampBulb capacity 8-38Replacement 8-55
H
Handling of compact discs 5-74Hazard warning flasher switch 3-66Hazard warning indication lamps 3-12Head restraints 2-16Headlamp levelling 3-62Headlamp washer switch 3-76HeadlampsBulb capacity 8-36Headlamp flasher 3-61Replacement 8-38Switch 3-58
BK-BK2008E1ENUK.en-ukIX.fm Page 3 Thursday, January 10, 2008 7:53 AM
Page 529 of 538
Alphabetical index
5
Mirror Inside rear-view mirror 4-9Outside rear-view mirrors 4-11MIVEC engine 4-20Modification/alterations to th
e electrical or fuel systems 7N
Notes regarding diesel fuel 9-15
O
Odometer 3-3 OilDifferential oil 9-16Engine oil 8-6, 9-16Transfer oil 9-16Oil pressure warning lamp 3-16Operation under adverse driving conditions 6-35Outside rear-view mirrors 4-11Overheating 6-6
P
Parking 4-7Parking brake 4-6Position lampsBulb capacity 8-36Indication lamp 3-13Replacement 8-41Power brakes 4-56Power steering
Fluid 8-16, 9-16 System 4-63Precautions to observe when us
ing wipers and washers 3-76
Pregnant women restraint 2-43Puncture (Tyre changing) 6-16
R
RadioLW/MW/FM electronic tuning radio with CDautochanger 5-43LW/MW/FM electronic tuning
radio with CD player 5-20
Rear air conditioning 5-15Rear combination lampsBulb capacity 8-36Replacement 8-44Rear differential lock 4-42Rear fog lampBulb capacity 8-36Indication lamp 3-12Replacement 8-47Switch 3-67Rear heater 5-15Rear personal lamp 5-87Bulb capacity 8-38Replacement 8-51Rear shelf (3-door models) 5-101Rear side/quarter window 1-20Rear turn-signal lampsBulb capacity 8-36
BK-BK2008E1ENUK.en-ukIX.fm Page 5 Thursday, January 10, 2008 7:53 AM
Page 531 of 538
Alphabetical index
7
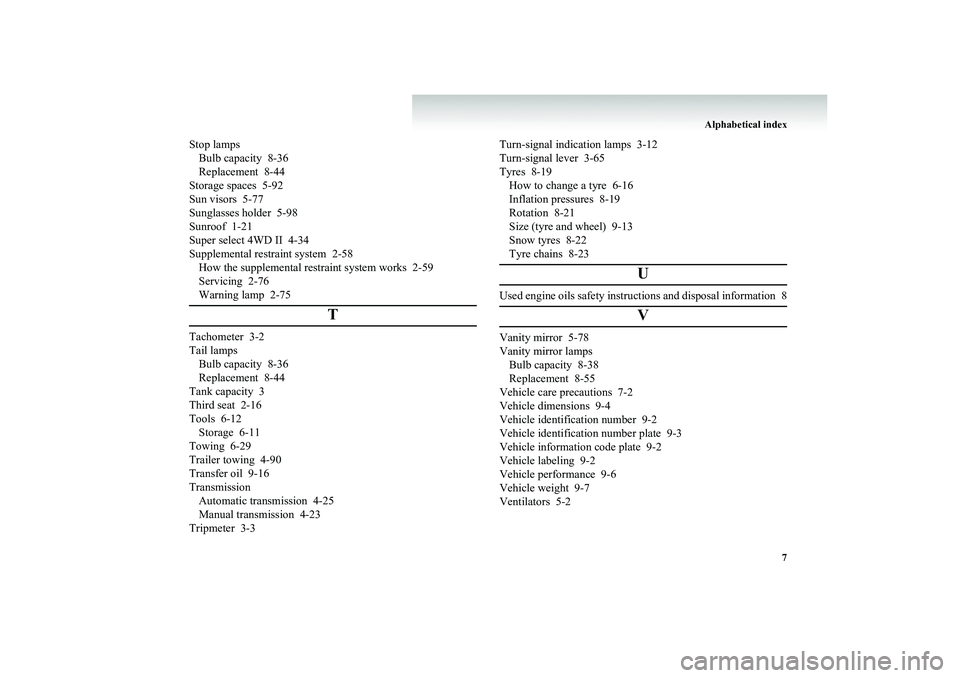
Stop lamps Bulb capacity 8-36Replacement 8-44Storage spaces 5-92Sun visors 5-77Sunglasses holder 5-98Sunroof 1-21Super select 4WD II 4-34Supplemental restraint system 2-58How the supplemental restraint system works 2-59Servicing 2-76Warning lamp 2-75
T
Tachometer 3-2Tail lampsBulb capacity 8-36Replacement 8-44Tank capacity 3Third seat 2-16Tools 6-12Storage 6-11Towing 6-29Trailer towing 4-90Transfer oil 9-16TransmissionAutomatic transmission 4-25Manual transmission 4-23Tripmeter 3-3
Turn-signal indication lamps 3-12 Turn-signal lever 3-65Tyres 8-19How to change a tyre 6-16Inflation pressures 8-19Rotation 8-21Size (tyre and wheel) 9-13Snow tyres 8-22Tyre chains 8-23
U
Used engine oils safety instructions and disposal information 8
V
Vanity mirror 5-78Vanity mirror lampsBulb capacity 8-38Replacement 8-55Vehicle care precautions 7-2Vehicle dimensions 9-4Vehicle identification number 9-2Vehicle identification number plate 9-3Vehicle information code plate 9-2Vehicle labeling 9-2Vehicle performance 9-6Vehicle weight 9-7Ventilators 5-2
BK-BK2008E1ENUK.en-ukIX.fm Page 7 Thursday, January 10, 2008 7:53 AM