change wheel MITSUBISHI SHOGUN 2017 (in English) User Guide
[x] Cancel search | Manufacturer: MITSUBISHI, Model Year: 2017, Model line: SHOGUN, Model: MITSUBISHI SHOGUN 2017Pages: 394, PDF Size: 19 MB
Page 305 of 394
WARNINGlDo not bump the raised vehicle or leave it
sitting on the jack for a long time. Bothare very dangerous.
l Do not use a jack except the one that
came with your vehicle.
l The jack should not be used for any pur-
pose other than to change a tyre.
l No one should be in your vehicle when us-
ing the jack.
l Do not start or run the engine while your
vehicle is on the jack.
l Do not turn the raised wheel. The tyres
still on the ground could turn and make your vehicle fall off the jack.
7. Remove the wheel nuts with the wheel
nut wrench, then take the wheel off.
CAUTIONl Handle the wheel carefully when changing
the tyre, to avoid scratching the wheel sur- face.
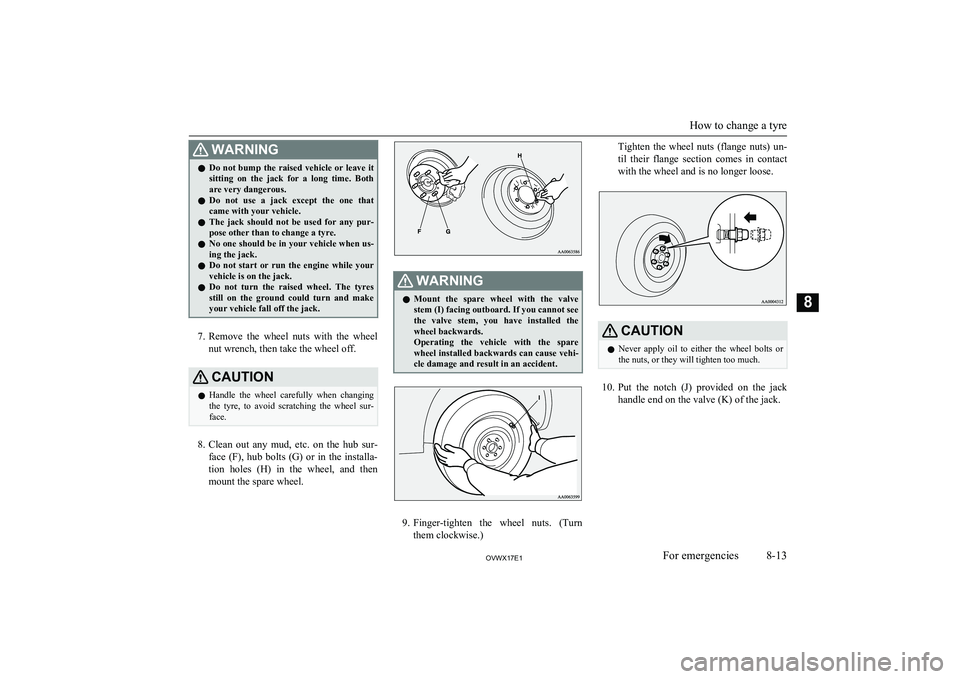
8. Clean out any mud, etc. on the hub sur-
face (F), hub bolts (G) or in the installa- tion holes (H) in the wheel, and then
mount the spare wheel.
WARNINGl Mount the spare wheel with the valve
stem (I) facing outboard. If you cannot see
the valve stem, you have installed the wheel backwards.
Operating the vehicle with the spare
wheel installed backwards can cause vehi-
cle damage and result in an accident.
9. Finger-tighten the wheel nuts. (Turn
them clockwise.)
Tighten the wheel nuts (flange nuts) un-
til their flange section comes in contact
with the wheel and is no longer loose.CAUTIONl Never apply oil to either the wheel bolts or
the nuts, or they will tighten too much.
10. Put the notch (J) provided on the jack
handle end on the valve (K) of the jack.
How to change a tyre
8-13OVWX17E1For emergencies8
Page 306 of 394

Using the jack handle, turn the releasevalve anticlockwise slowly to lower thevehicle until the tyre touches the ground.WARNINGl Be sure to open the release valve slowly. If
it is opened quickly, the vehicle will drop
abruptly and the jack may come out of
position, causing a serious accident.
11. Tighten the nuts crisscross in 2 or 3
steps until each nut has been tightened
securely.
Tightening torque
105 to 125 N•m
(Achieved by applying a force of 390
to 460 N at the end of the wheel nut wrench supplied with the vehicle.)CAUTIONl Never use your foot or a pipe extension for
extra force in the wheel nut wrench. If you
do so, you will tighten the nut too much.
12. Lower the jack all the way and remove
it.
CAUTIONl If the release valve is loosened too much (2
or more turns) in the anticlockwise direction, the jack’s oil will leak and the jack cannotbe used.CAUTIONl Close the release valve slowly when lower-
ing the vehicle, or the valve may be dam-
aged.NOTEl Occasionally when the vehicle is jacked up,
the grooved portion of the designated pointwill not come off. When this happens, rock
the vehicle to lower the ram.
l If the jack is difficult to remove by hand, in-
sert the jack handle (L) into the bracket (M).Then using the handle, remove the jack.
13. Press the piston down all the way, and
turn the release valve clockwise as far as possible.
How to change a tyre
8-14OVWX17E1For emergencies8
Page 307 of 394
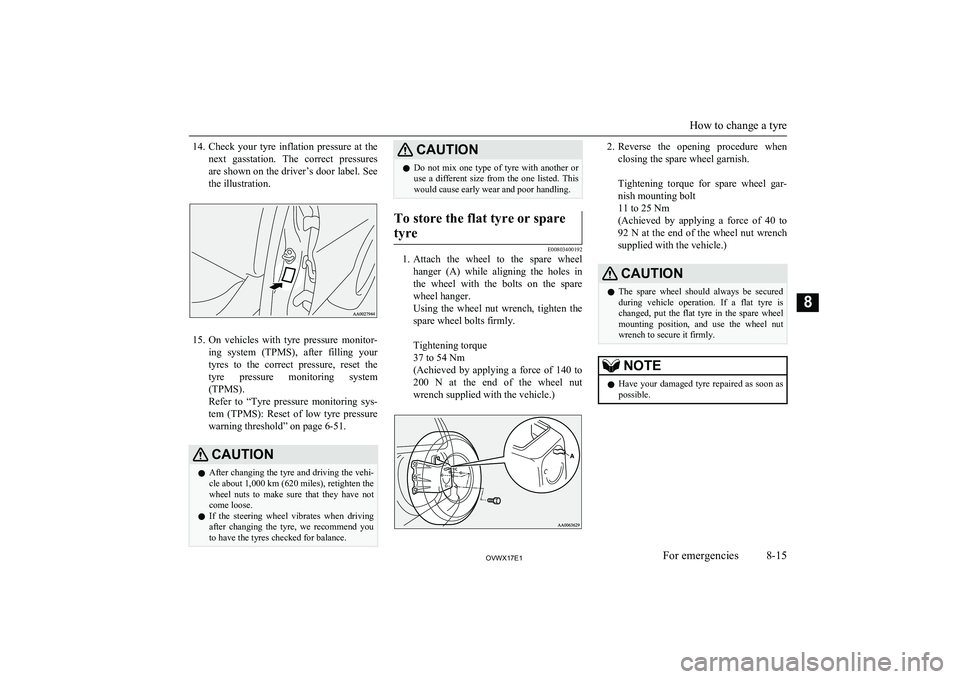
14.Check your tyre inflation pressure at the
next gasstation. The correct pressures
are shown on the driver’s door label. See the illustration.
15. On vehicles with tyre pressure monitor-
ing system (TPMS), after filling your tyres to the correct pressure, reset the tyre pressure monitoring system(TPMS).
Refer to “Tyre pressure monitoring sys-
tem (TPMS): Reset of low tyre pressure
warning threshold” on page 6-51.
CAUTIONl After changing the tyre and driving the vehi-
cle about 1,000 km (620 miles), retighten the
wheel nuts to make sure that they have not come loose.
l If the steering wheel vibrates when driving
after changing the tyre, we recommend you to have the tyres checked for balance.CAUTIONl Do not mix one type of tyre with another or
use a different size from the one listed. This
would cause early wear and poor handling.To store the flat tyre or spare
tyre
E00803400192
1. Attach the wheel to the spare wheel
hanger (A) while aligning the holes in
the wheel with the bolts on the spare
wheel hanger.
Using the wheel nut wrench, tighten the spare wheel bolts firmly.
Tightening torque
37 to 54 Nm
(Achieved by applying a force of 140 to
200 N at the end of the wheel nut wrench supplied with the vehicle.)
2. Reverse the opening procedure when
closing the spare wheel garnish.
Tightening torque for spare wheel gar- nish mounting bolt
11 to 25 Nm
(Achieved by applying a force of 40 to
92 N at the end of the wheel nut wrench supplied with the vehicle.)CAUTIONl The spare wheel should always be secured
during vehicle operation. If a flat tyre is changed, put the flat tyre in the spare wheel
mounting position, and use the wheel nut
wrench to secure it firmly.NOTEl Have your damaged tyre repaired as soon as
possible.
How to change a tyre
8-15OVWX17E1For emergencies8
Page 332 of 394
*- If the spare tyre wheel differs from thestandard tyre wheel, do not perform tyre rota-
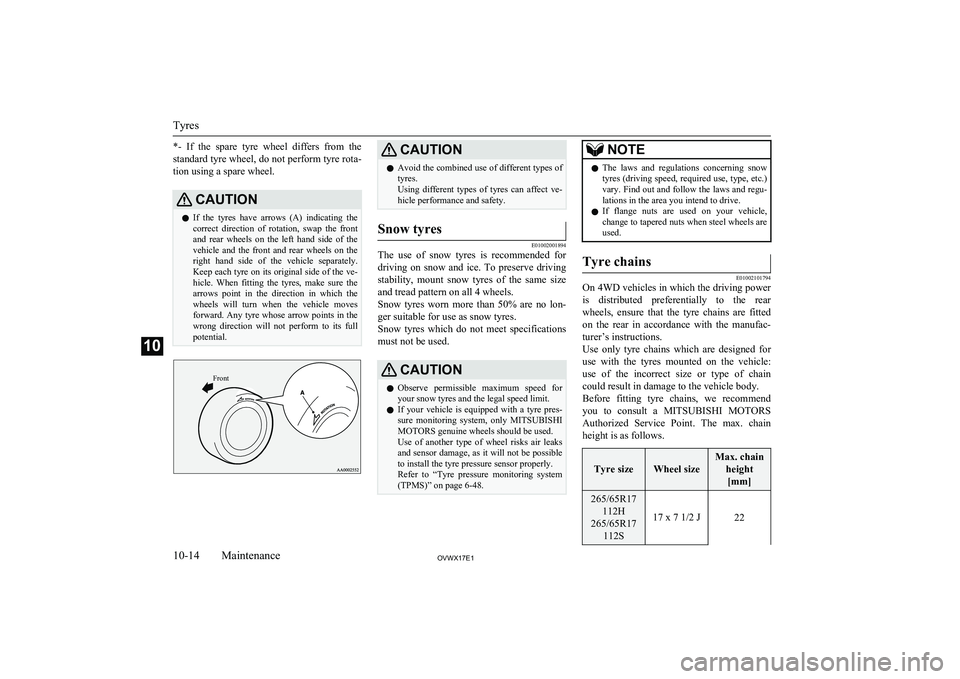
tion using a spare wheel.CAUTIONl If the tyres have arrows (A) indicating the
correct direction of rotation, swap the front and rear wheels on the left hand side of the
vehicle and the front and rear wheels on the
right hand side of the vehicle separately. Keep each tyre on its original side of the ve-hicle. When fitting the tyres, make sure the
arrows point in the direction in which the wheels will turn when the vehicle moves
forward. Any tyre whose arrow points in the
wrong direction will not perform to its full potential.Front
CAUTIONl Avoid the combined use of different types of
tyres.
Using different types of tyres can affect ve-
hicle performance and safety.Snow tyres
E01002001894
The use of snow tyres is recommended for
driving on snow and ice. To preserve driving stability, mount snow tyres of the same size and tread pattern on all 4 wheels.
Snow tyres worn more than 50% are no lon-
ger suitable for use as snow tyres.
Snow tyres which do not meet specifications must not be used.
CAUTIONl Observe permissible maximum speed for
your snow tyres and the legal speed limit.
l If your vehicle is equipped with a tyre pres-
sure monitoring system, only MITSUBISHI
MOTORS genuine wheels should be used.
Use of another type of wheel risks air leaks and sensor damage, as it will not be possible
to install the tyre pressure sensor properly.
Refer to “Tyre pressure monitoring system
(TPMS)” on page 6-48.NOTEl The laws and regulations concerning snow
tyres (driving speed, required use, type, etc.)
vary. Find out and follow the laws and regu- lations in the area you intend to drive.
l If flange nuts are used on your vehicle,
change to tapered nuts when steel wheels are used.Tyre chains
E01002101794
On 4WD vehicles in which the driving power
is distributed preferentially to the rear wheels, ensure that the tyre chains are fitted
on the rear in accordance with the manufac- turer’s instructions.
Use only tyre chains which are designed for use with the tyres mounted on the vehicle: use of the incorrect size or type of chain
could result in damage to the vehicle body.
Before fitting tyre chains, we recommend you to consult a MITSUBISHI MOTORS
Authorized Service Point. The max. chain
height is as follows.
Tyre sizeWheel size
Max. chain
height[mm]265/65R17 112H
265/65R17 112S
17 x 7 1/2 J22Tyres
10-14OVWX17E1Maintenance10
Page 371 of 394
Transfer oil...................................................... 11-14
Transmission Automatic transmission................................ 6-15
Tripmeter........................................................... 5-02
Turn-signal indication lamps.............................5-09
Turn-signal lever............................................... 5-42
Tyre pressure monitoring system...................... 6-48
Tyres................................................................ 10-11 How to change a tyre.................................... 8-09
Inflation pressures....................................... 10-11
Rotation....................................................... 10-13
Size (tyre and wheel).................................. 11-11
Snow tyres................................................... 10-14
Spare wheel information............................... 8-10
Tyre chains.................................................. 10-14
U
USB port............................................................7-71
Used engine oils safety instructions and disposal information..................................2-06
V
Vanity mirror..................................................... 7-74
Vanity mirror lamps
Bulb capacity.............................................. 10-25
Replacement................................................ 10-32
Vehicle care precautions................................... 9-02
Vehicle dimensions......................................... 11-04
Vehicle identification number......................... 11-02
Vehicle identification number plate................ 11-02
Vehicle information code plate....................... 11-02
Vehicle labeling...............................................11-02
Vehicle performance....................................... 11-06
Vehicle weight.................................................11-06
Ventilators......................................................... 7-02
W
Warning lamps.................................................. 5-10
Washer Fluid.................................................. 10-07,11-14
Switch........................................... 5-41,5-44,5-48
Washing.............................................................9-03
Water temperature gauge.................................. 5-06
Waxing.............................................................. 9-04
Weatherstripping............................................. 10-17
Weight............................................................. 11-06
Wheel condition.............................................. 10-12
Wheel Specification............................................... 11-11
Wiper de-icer switch......................................... 5-49
Wiper Rear window................................................. 5-48Switch........................................................... 5-44 Wiper blades............................................... 10-15
Alphabetical index
12- 5
OVWX17E1Alphabetical index