oil change MITSUBISHI SPYDER 1990 Service Repair Manual
[x] Cancel search | Manufacturer: MITSUBISHI, Model Year: 1990, Model line: SPYDER, Model: MITSUBISHI SPYDER 1990Pages: 2103, PDF Size: 68.98 MB
Page 44 of 2103
GENERALMaintenanceService
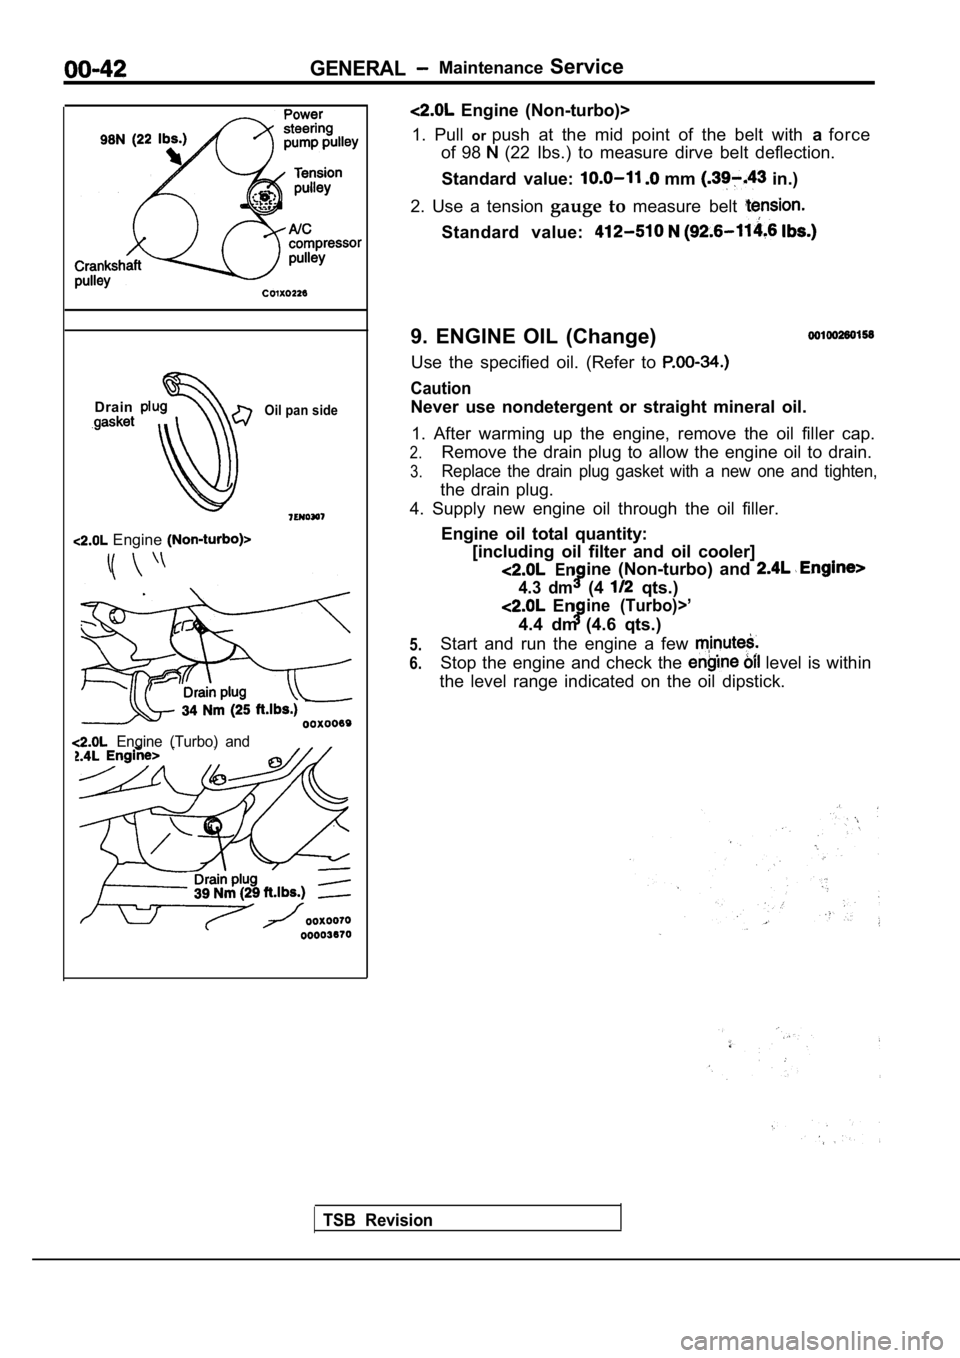
Drain
Oil pan side
Engine
Engine (Turbo) and
TSB Revision
Engine (Non-turbo)>
1. Pull orpush at the mid point of the belt with aforce
of 98
(22 Ibs.) to measure dirve belt deflection.
Standard value:
mm in.)
2. Use a tension gauge to measure belt
Standard value:
9. ENGINE OIL (Change)
Use the specified oil. (Refer to
Caution
Never use nondetergent or straight mineral oil.
1. After warming up the engine, remove the oil fill er cap.
2.Remove the drain plug to allow the engine oil to drain.
3.Replace the drain plug gasket with a new one and ti ghten,
the drain plug.
4. Supply new engine oil through the oil filler.
Engine oil total quantity:[including oil filter and oil cooler]
Enine (Non-turbo) and
4.3 dm(4 qts.)
Enine (Turbo)>’
4.4 dm (4.6 qts.)
Start and run the engine a few
Stop the engine and check the level is within
the level range indicated on the oil dipstick.
5.
6.
Page 46 of 2103
GENERAL
Oil level
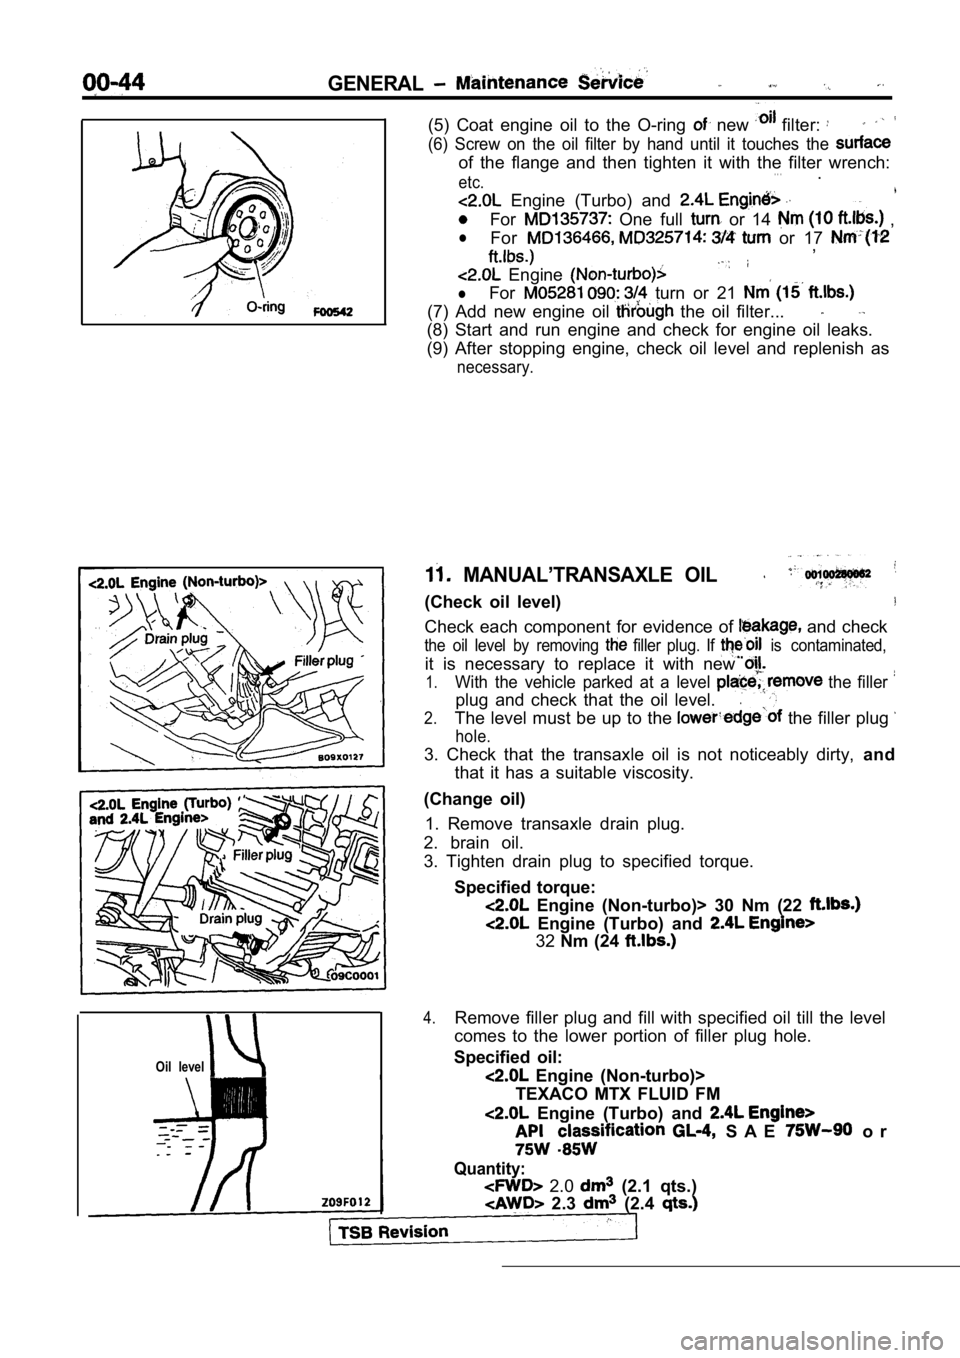
(5) Coat engine oil to the O-ring new filter:
(6) Screw on the oil filter by hand until it touches the
of the flange and then tighten it with the filter w rench:. . .etc..
Engine (Turbo) and
For One full or 14 ,
lFor or 17 ,
Engine
lFor turn or 21
(7) Add new engine oil the oil filter...
(8) Start and run engine and check for engine oil l eaks.
(9) After stopping engine, check oil level and repl enish as
necessary.
MANUAL’TRANSAXLE OIL
(Check oil level)
Check each component for evidence of and check
the oil level by removing filler plug. If is contaminated,
it is necessary to replace it with new
1.With the vehicle parked at a level the filler
plug and check that the oil level..
2.The level must be up to the the filler plug
hole.
3. Check that the transaxle oil is not noticeably d irty, and
that it has a suitable viscosity.
(Change oil) 1. Remove transaxle drain plug.
2. brain oil.
3. Tighten drain plug to specified torque.
Specified torque:
Engine (Non-turbo)> 30 Nm (22
Engine (Turbo) and
32Nm (24
4.Remove filler plug and fill with specified oil till the level
comes to the lower portion of filler plug hole.
Specified oil:
Engine (Non-turbo)>
TEXACO MTX FLUID FM
Engine (Turbo) and
S A E o r
Quantity:
2.0 (2.1 qts.)
2.3 (2.4
Page 48 of 2103
GENERAL Maintenance
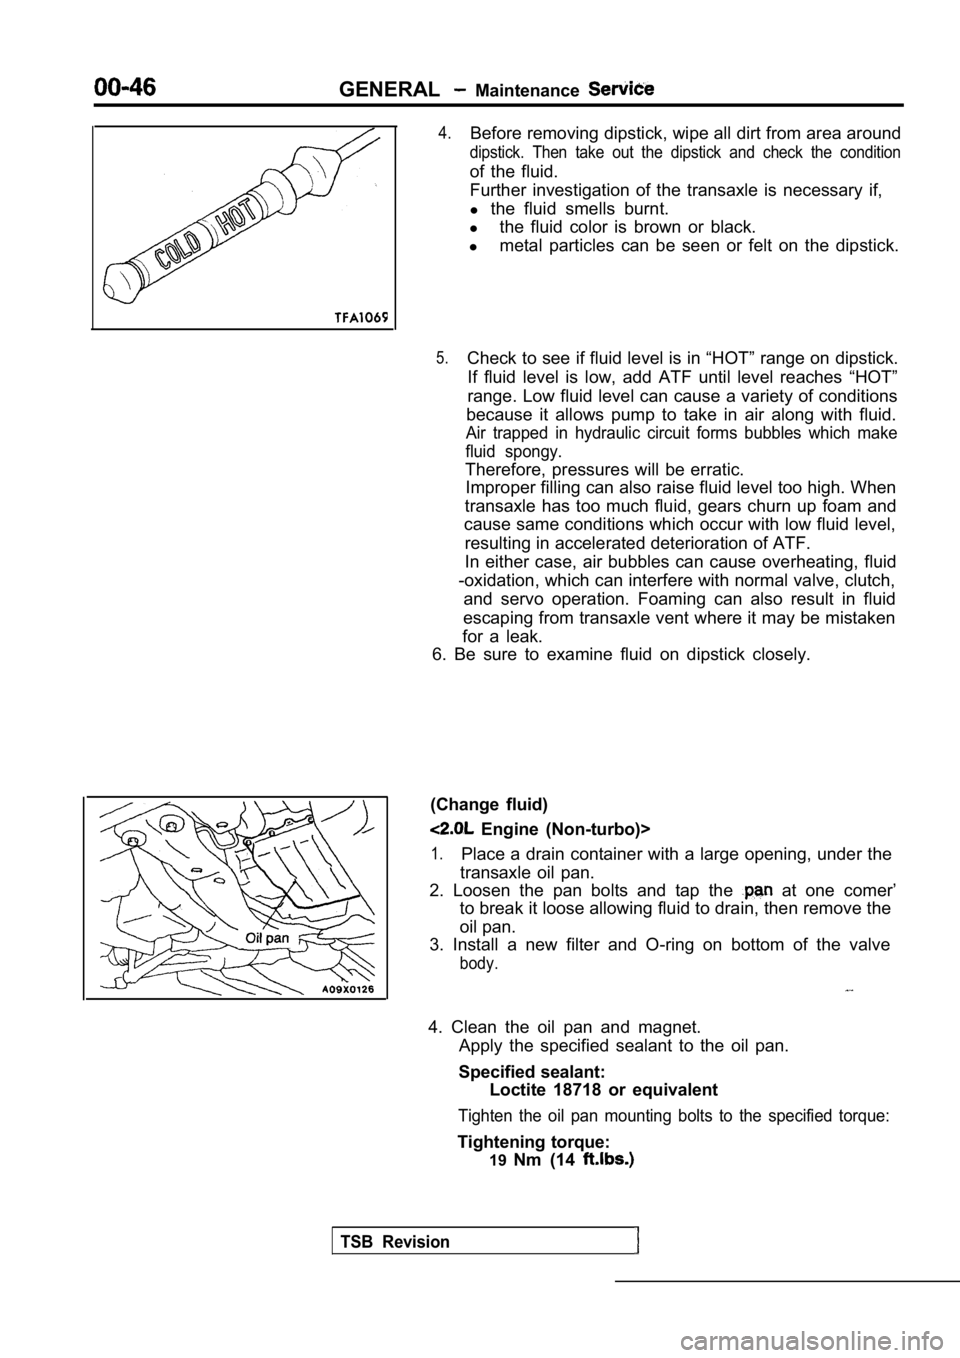
4.Before removing dipstick, wipe all dirt from area around
dipstick. Then take out the dipstick and check the condition
of the fluid.
Further investigation of the transaxle is necessary if,
l the fluid smells burnt.
l the fluid color is brown or black.
l metal particles can be seen or felt on the dipstick .
5.Check to see if fluid level is in “HOT” range on dipstick.
If fluid level is low, add ATF until level reaches “HOT”
range. Low fluid level can cause a variety of condi tions
because it allows pump to take in air along with fl uid.
Air trapped in hydraulic circuit forms bubbles which make
fluid spongy.
Therefore, pressures will be erratic. Improper filling can also raise fluid level too hig h. When
transaxle has too much fluid, gears churn up foam a nd
cause same conditions which occur with low fluid le vel,
resulting in accelerated deterioration of ATF.
In either case, air bubbles can cause overheating, fluid
-oxidation, which can interfere with normal valve, clutch,
and servo operation. Foaming can also result in flu id
escaping from transaxle vent where it may be mistak en
for a leak.
6. Be sure to examine fluid on dipstick closely.
(Change fluid)
Engine (Non-turbo)>
1.Place a drain container with a large opening, under the
transaxle oil pan.
2. Loosen the pan bolts and tap the
at one comer’
to break it loose allowing fluid to drain, then rem ove the
oil pan.
3. Install a new filter and O-ring on bottom of the valve
body.
4. Clean the oil pan and magnet.
Apply the specified sealant to the oil pan.
Specified sealant: Loctite 18718 or equivalent
Tighten the oil pan mounting bolts to the specified torque:
Tightening torque:
19Nm (14
TSB Revision
Page 50 of 2103
GENERAL Maintenance Service
,
Revision
Drain Plug
13. TRANSFER OIL
(Check oil level)
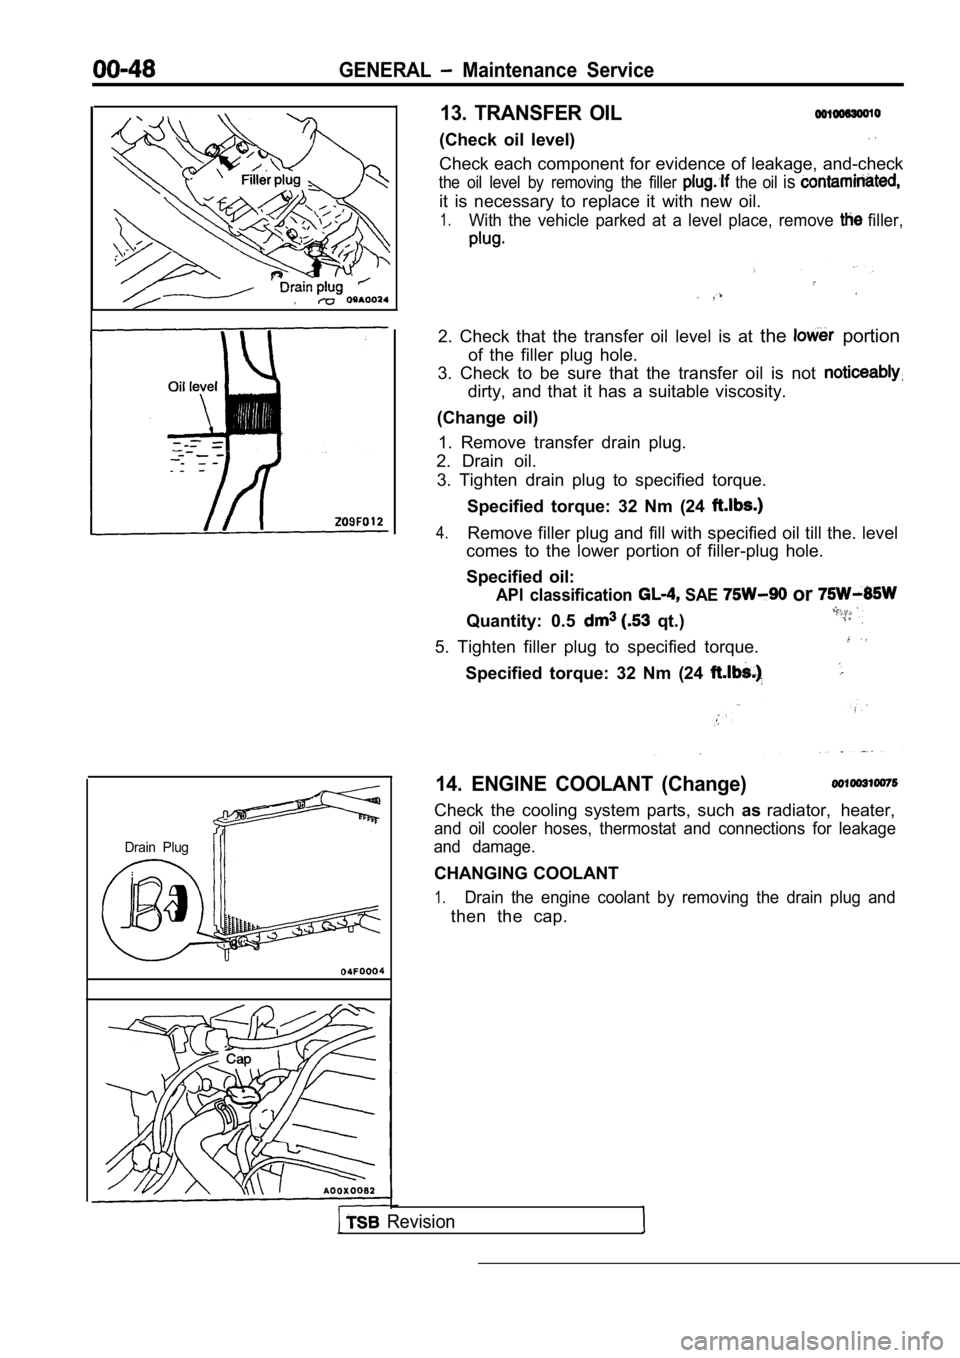
Check each component for evidence of leakage, and-check
the oil level by removing the filler the oil is
it is necessary to replace it with new oil.
1.With the vehicle parked at a level place, remove filler,
2. Check that the transfer oil level is at the portion
of the filler plug hole.
3. Check to be sure that the transfer oil is not
dirty, and that it has a suitable viscosity.
(Change oil) 1. Remove transfer drain plug.
2. Drain oil.
3. Tighten drain plug to specified torque.
Specified torque: 32 Nm (24
4.Remove filler plug and fill with specified oil till the. level
comes to the lower portion of filler-plug hole.
Specified oil:
API classification SAE or
Quantity: 0.5 qt.)
5. Tighten filler plug to specified torque.
Specified torque: 32 Nm (24
14. ENGINE COOLANT (Change)
Check the cooling system parts, such asradiator, heater,
and oil cooler hoses, thermostat and connections fo r leakage
and damage.
CHANGING COOLANT
1.Drain the engine coolant by removing the drain plug and
then the cap.
Page 66 of 2103
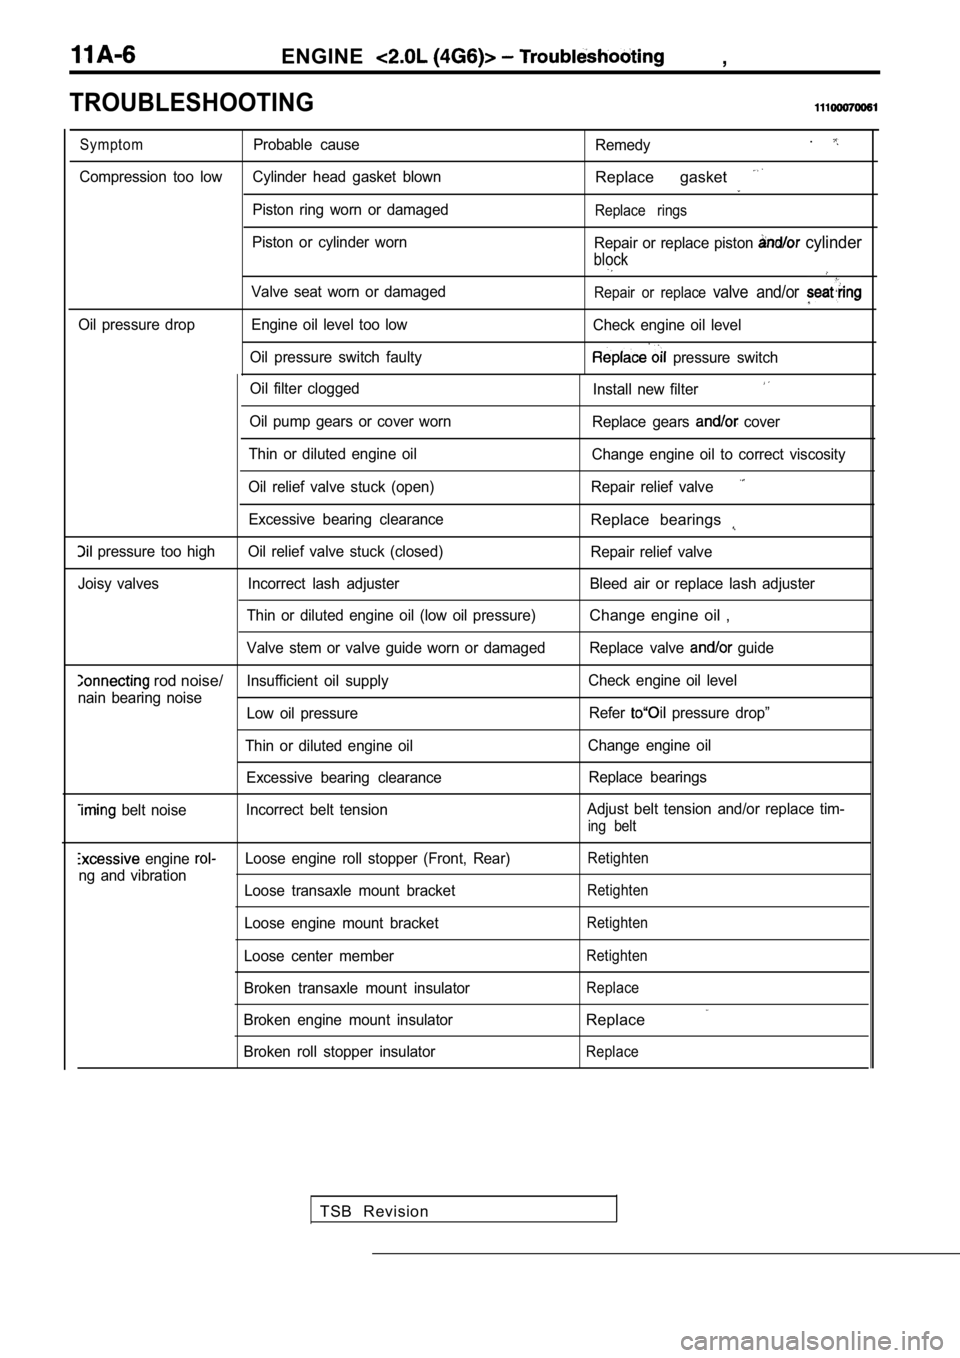
ENGINE,
TROUBLESHOOTING
Oil filter cloggedInstall new filter
Oil pump gears or cover wornReplace gears cover
Thin or diluted engine oil Change engine oil to correct viscosity
Oil relief valve stuck (open) Repair relief valve
Excessive bearing clearanceReplace bearings
pressure too high Oil relief valve stuck (closed) Repair relief valve
Joisy valves Incorrect lash adjuster Bleed air or rep lace lash adjuster
Thin or diluted engine oil (low oil pressure)
Change engine oil ,
Valve stem or valve guide worn or damaged Replace va lve guide
rod noise/Insufficient oil supplyCheck engine oil level
nain bearing noise Low oil pressure Refer
pressure drop”
Thin or diluted engine oil Change engine oil
Excessive bearing clearance Replace bearings
belt noiseIncorrect belt tension Adjust belt tension and/or replace tim-ing belt
engine Loose engine roll stopper (Front, Rear)Retighten
ng and vibration
Loose transaxle mount bracketRetighten
Loose engine mount bracketRetighten
Loose center memberRetighten
Broken transaxle mount insulatorReplace
Broken engine mount insulatorReplace
Broken roll stopper insulatorReplace
Symptom
Probable cause
Remedy.
Compression too low Cylinder head gasket blownReplace gasket
Piston ring worn or damagedReplace rings
Piston or cylinder worn
Repair or replace piston cylinder
block
Valve seat worn or damagedRepair or replace valve and/or
Oil pressure drop Engine oil level too low Check engine oil level
Oil pressure switch faulty
pressure switch
TSB Revision
Page 177 of 2103
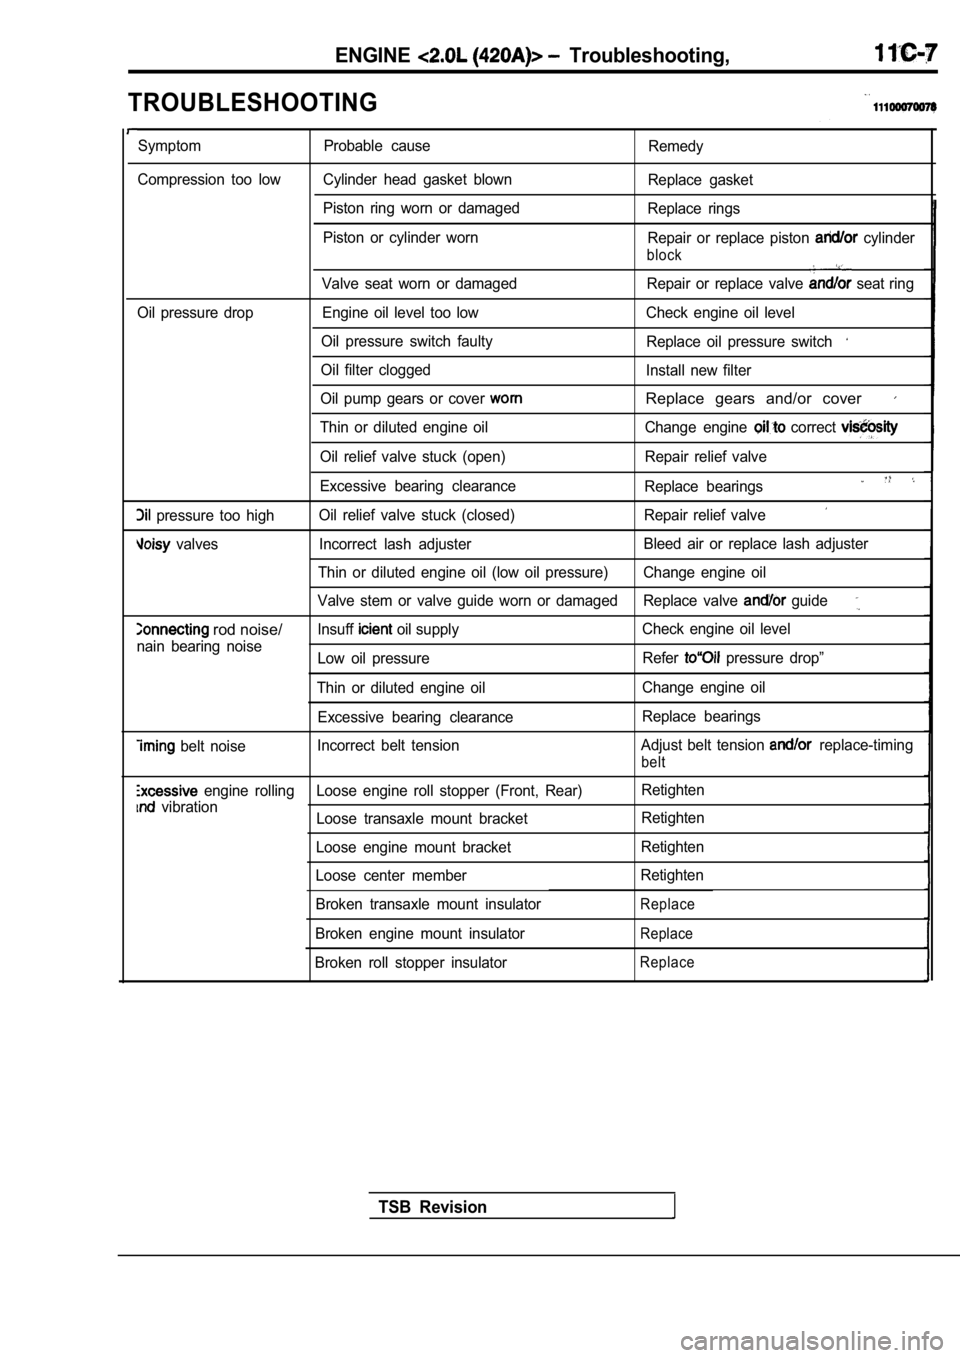
ENGINE Troubleshooting,
TROUBLESHOOTING
Symptom Probable causeRemedy
Compression too low Cylinder head gasket blown Replace gasket
Piston ring worn or damaged Replace rings
Piston or cylinder worn Repair or replace piston
cylinder
block
Valve seat worn or damaged Repair or replace valve seat ring
Oil pressure drop Engine oil level too low Check engi ne oil level
Oil pressure switch faulty Replace oil pressure switch
Oil filter clogged
Install new filter
Oil pump gears or cover
Replace gears and/or cover
Thin or diluted engine oil Change engine correct
Oil relief valve stuck (open) Repair relief valve
Excessive bearing clearance Replace bearings
pressure too highOil relief valve stuck (closed) Repair relief valve
valves Incorrect lash adjuster Bleed air or replace lash adjuster
Thin or diluted engine oil (low oil pressure) Change engine oil
Valve stem or valve guide worn or damaged Replace va lve
guide
rod noise/lnsuff oil supplyCheck engine oil level
nain bearing noise Low oil pressure Refer
pressure drop”
Thin or diluted engine oil Change engine oil
Excessive bearing clearance Replace bearings
belt noiseIncorrect belt tension
Adjust belt tension replace-timing
belt
engine rolling Loose engine roll stopper (Front, Re
ar)Retighten
vibration
Loose transaxle mount bracket Retighten
Loose engine mount bracket Retighten
Loose center member Retighten
Broken transaxle mount insulator
Replace
Broken engine mount insulatorReplace
Broken roll stopper insulatorReplace
TSB Revision
Page 192 of 2103
ENGINECamshaft and
554
.
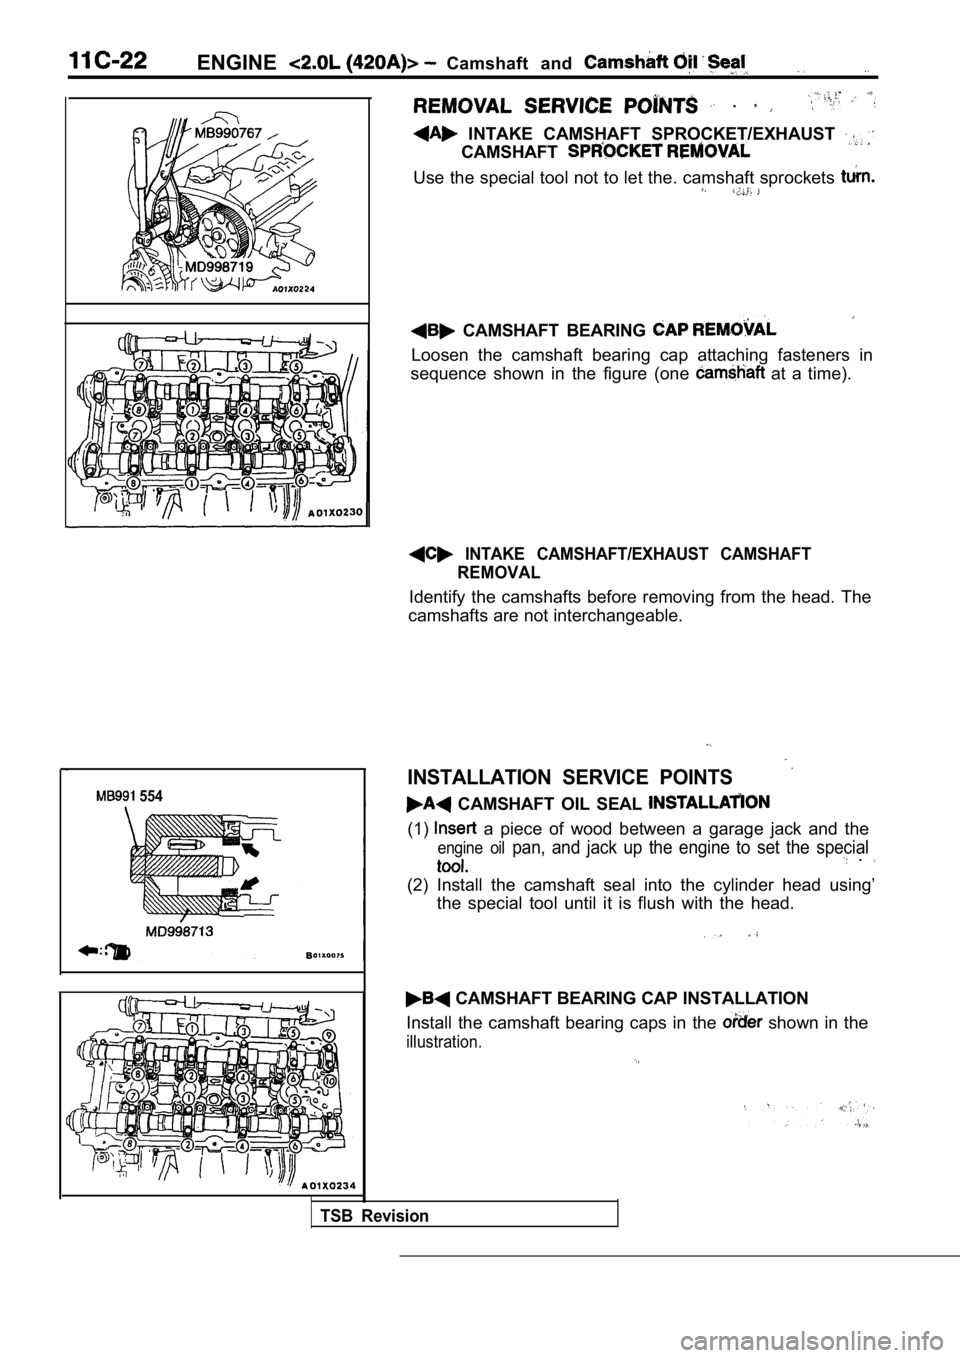
INTAKE CAMSHAFT SPROCKET/EXHAUST
CAMSHAFT
Use the special tool not to let the. camshaft sprockets
CAMSHAFT BEARING
Loosen the camshaft bearing cap attaching fasteners in
sequence shown in the figure (one
at a time).
INTAKE CAMSHAFT/EXHAUST CAMSHAFT REMOVAL
Identify the camshafts before removing from the hea d. The
camshafts are not interchangeable.
INSTALLATION SERVICE POINTS
CAMSHAFT OIL SEAL
(1) a piece of wood between a garage jack and the
engine oil pan, and jack up the engine to set the special .
(2) Install the camshaft seal into the cylinder hea d using’
the special tool until it is flush with the head.
CAMSHAFT BEARING CAP INSTALLATION
Install the camshaft bearing caps in the
shown in the
illustration.
TSB Revision
Page 255 of 2103
piston,
ENGINE
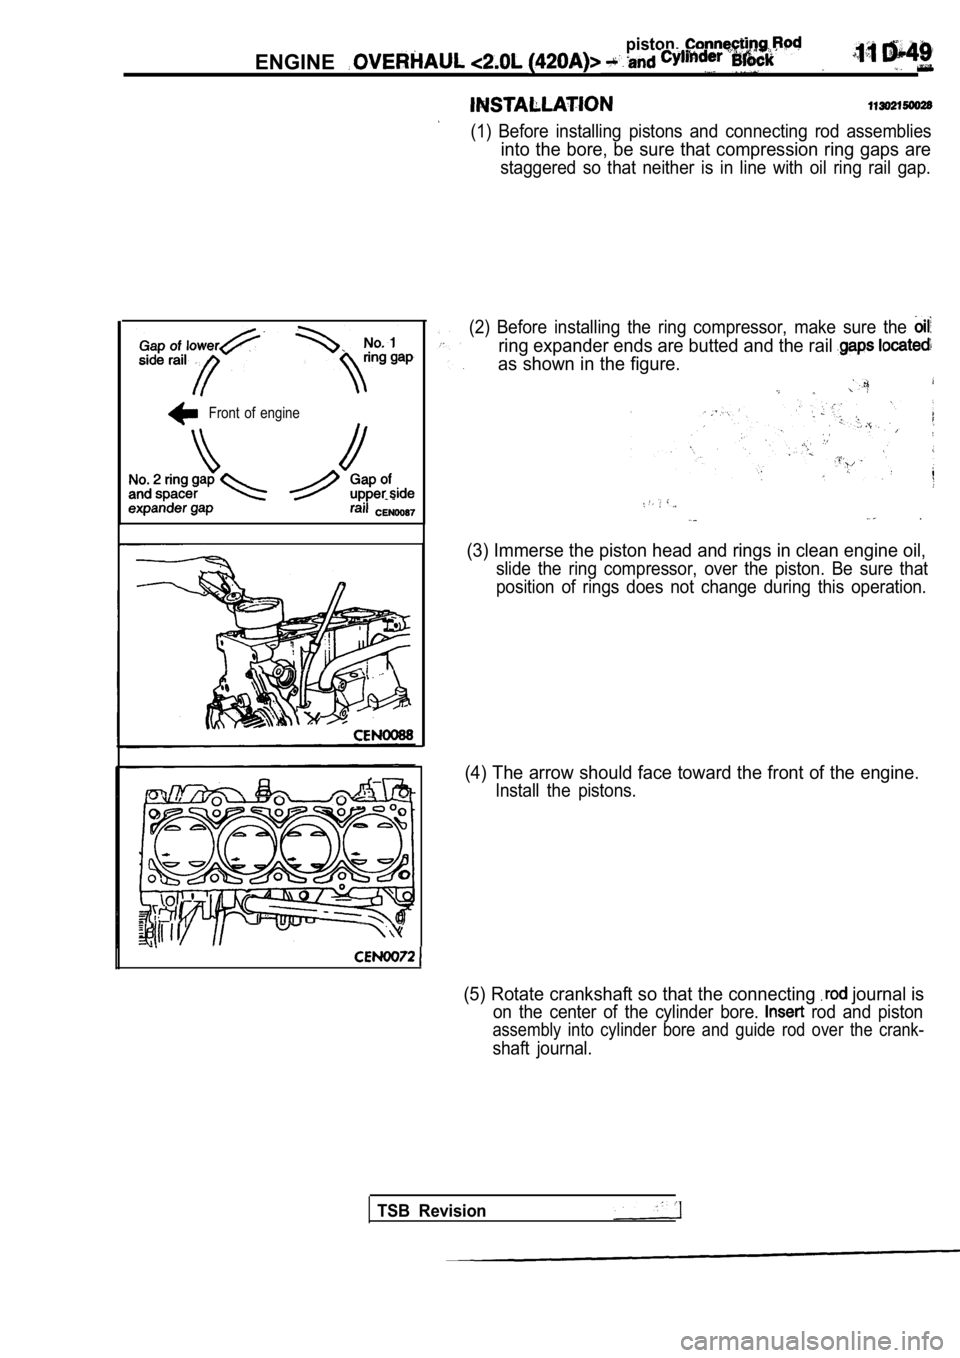
(1) Before installing pistons and connecting rod assemblies
into the bore, be sure that compression ring gaps a re
staggered so that neither is in line with oil ring rail gap.
Front of engine
(2) Before installing the ring compressor, make sur e the
ring expander ends are butted and the rail
as shown in the figure.
.
(3) Immerse the piston head and rings in clean engine oil,
slide the ring compressor, over the piston. Be sure that
position of rings does not change during this opera tion.
(4) The arrow should face toward the front of the engine.
Install the pistons.
(5) Rotate crankshaft so that the connecting journal is
on the center of the cylinder bore. rod and piston
assembly into cylinder bore and guide rod over the crank-
shaft journal.
TSB Revision
Page 262 of 2103
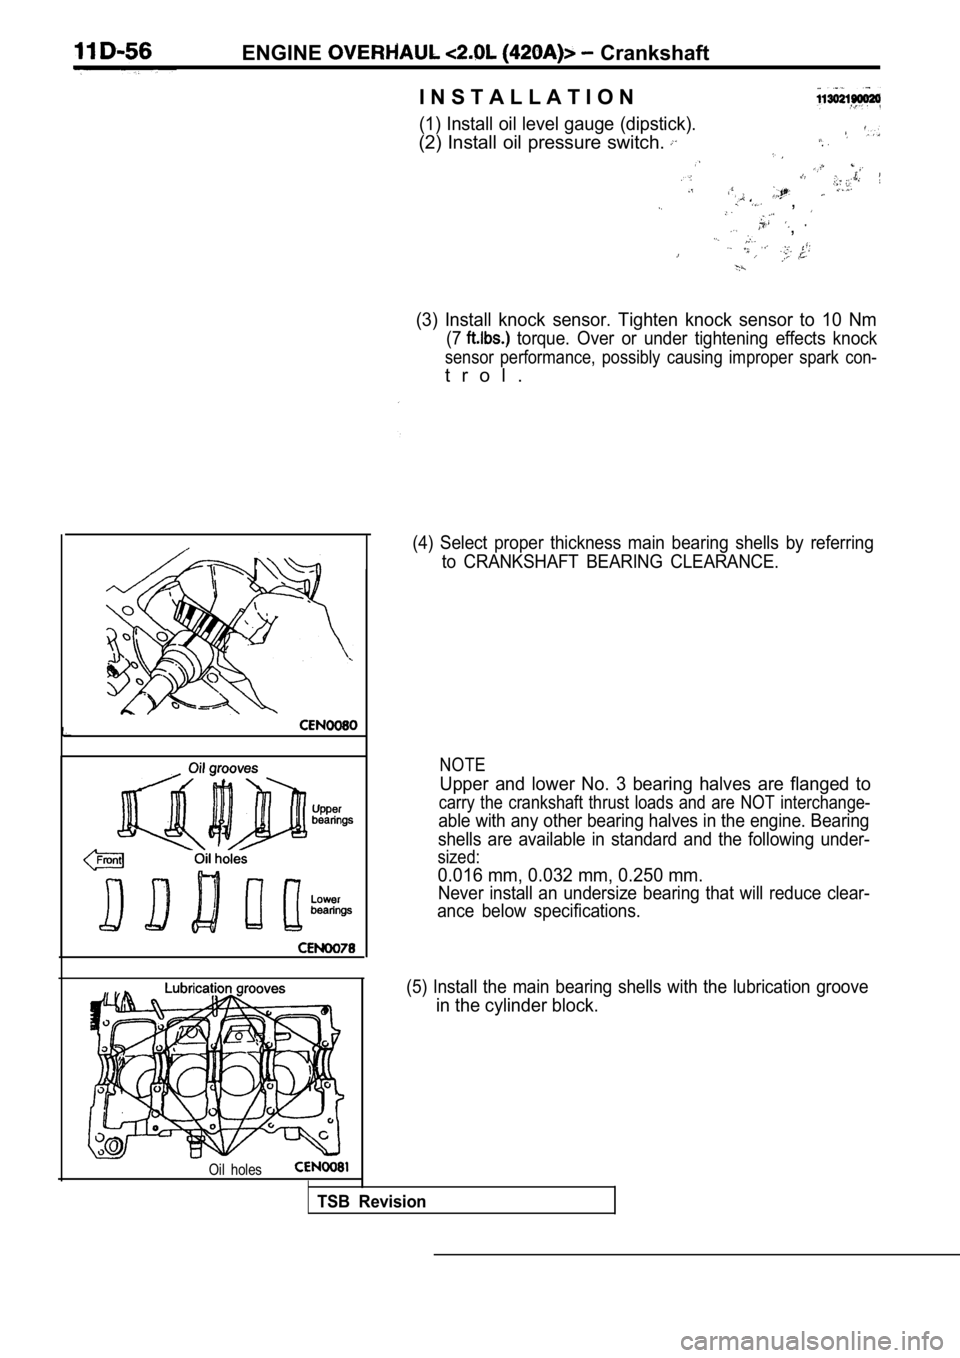
ENGINE Crankshaft
Oil holes
I N S T A L L A T I O N
(1) Install oil level gauge (dipstick).
(2) Install oil pressure switch.
,
,
(3) Install knock sensor. Tighten knock sensor to 10 Nm
(7 torque. Over or under tightening effects knock
sensor performance, possibly causing improper spark con-
t r o l .
(4) Select proper thickness main bearing shells by referring
to CRANKSHAFT BEARING CLEARANCE.
NOTE
Upper and lower No. 3 bearing halves are flanged to
carry the crankshaft thrust loads and are NOT inter change-
able with any other bearing halves in the engine. Bearing
shells are available in standard and the following under-
sized:
0.016 mm, 0.032 mm, 0.250 mm.
Never install an undersize bearing that will reduce clear-
ance below specifications.
(5) Install the main bearing shells with the lubric ation groove
in the cylinder block.
TSB Revision
Page 274 of 2103
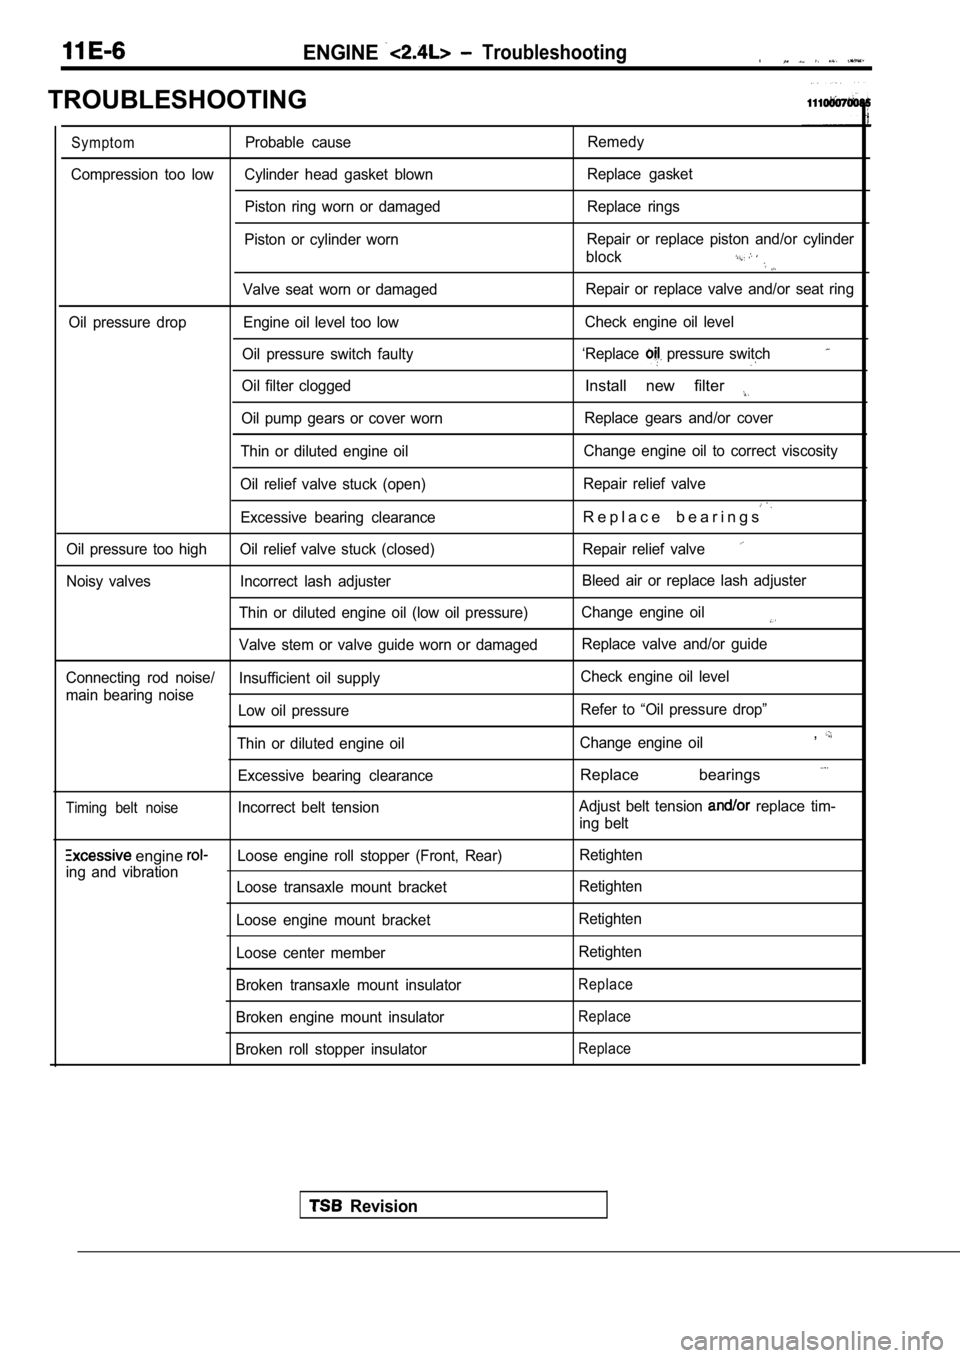
ENGINE Troubleshooting.
TROUBLESHOOTING
SymptomProbable causeRemedy
Compression too low Cylinder head gasket blown Replace gasket
Piston ring worn or damaged Replace rings
Piston or cylinder worn Repair or replace piston and/or cylinder
block
Valve seat worn or damaged Repair or replace valve and/or seat ring
Oil pressure drop Engine oil level too low Check engine oil level
Oil pressure switch faulty ‘Replace
pressure switch
Oil filter cloggedInstall new filter
Oil pump gears or cover worn Replace gears and/or cover
Thin or diluted engine oil Change engine oil to correct viscosity
Oil relief valve stuck (open) Repair relief valve
Excessive bearing clearanceR e p l a c e b e a r i n g s
Oil pressure too high Oil relief valve stuck (closed
) Repair relief valve
Noisy valves Incorrect lash adjuster Bleed air or replace lash adjuster
Thin or diluted engine oil (low oil pressure) Change engine oil
Valve stem or valve guide worn or damaged Replace valve and/or guide
Connecting rod noise/ Insufficient oil supply Check engine oil level
main bearing noise Low oil pressure Refer to “Oil pressure drop”
Thin or diluted engine oil Change engine oil
,
Excessive bearing clearanceReplace bearings
Timing belt noiseIncorrect belt tensionAdjust belt tension replace tim-
ing belt
engine Loose engine roll stopper (Front, Rear) Retighten
ing and vibration Loose transaxle mount bracket Retighten
Loose engine mount bracket Retighten
Loose center member Retighten
Broken transaxle mount insulator
Replace
Broken engine mount insulatorReplace
Broken roll stopper insulatorReplace
Revision