USB MITSUBISHI TRITON 2011 User Guide
[x] Cancel search | Manufacturer: MITSUBISHI, Model Year: 2011, Model line: TRITON, Model: MITSUBISHI TRITON 2011Pages: 369, PDF Size: 26.15 MB
Page 224 of 369
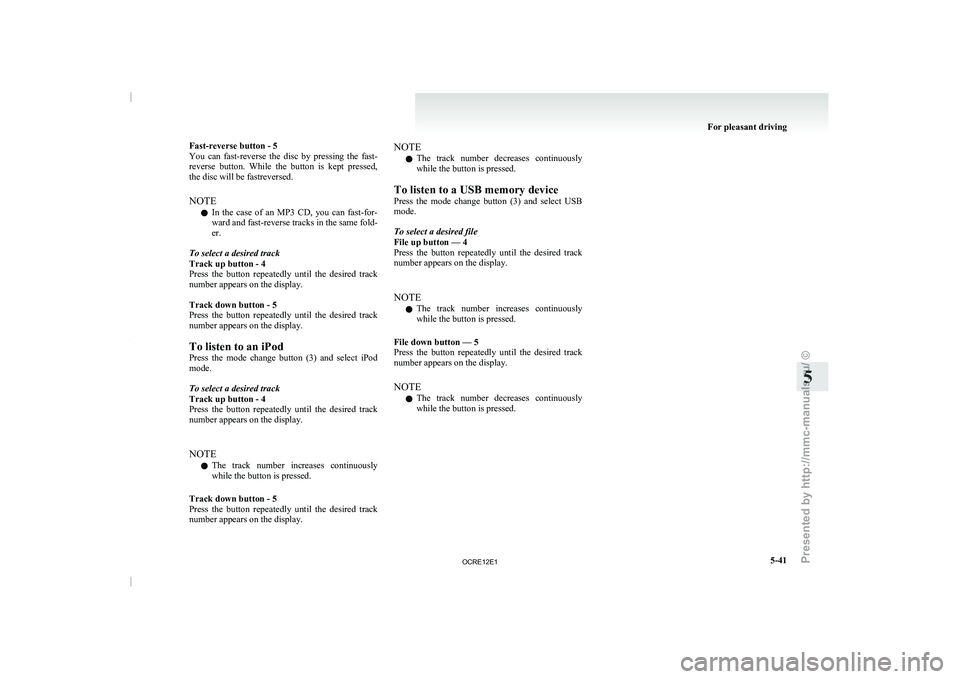
Fast-reverse button - 5
You can fast-reverse the disc
by pressing the fast-
reverse button. While the button is kept pressed,
the disc will be fastreversed.
NOTE
l In the case of an MP3 CD, you can fast-for-
ward and fast-reverse tracks in the same fold-
er.
To select a desired track
Track up button - 4
Press the button repeatedly until the desired track
number appears on the display.
Track down button - 5
Press the button repeatedly until the desired track
number appears on the display.
To listen to an iPod
Press the mode change button (3) and select iPod
mode.
To select a desired track
Track up button - 4
Press the button repeatedly until the desired track
number appears on the display.
NOTE l The track number increases continuously
while the button is pressed.
Track down button - 5
Press the button repeatedly until the desired track
number appears on the display. NOTE
l The
track number decreases continuously
while the button is pressed.
To listen to a USB memory device
Press
the mode change button (3) and select USB
mode.
To select a desired file
File up button — 4
Press the button repeatedly until the desired track
number appears on the display.
NOTE
l The track number increases continuously
while the button is pressed.
File down button — 5
Press the button repeatedly until the desired track
number appears on the display.
NOTE l The track number decreases continuously
while the button is pressed. For pleasant driving
5-41 5
OCRE12E1
Presented by http://mmc-manuals.ru/ \251
Page 228 of 369
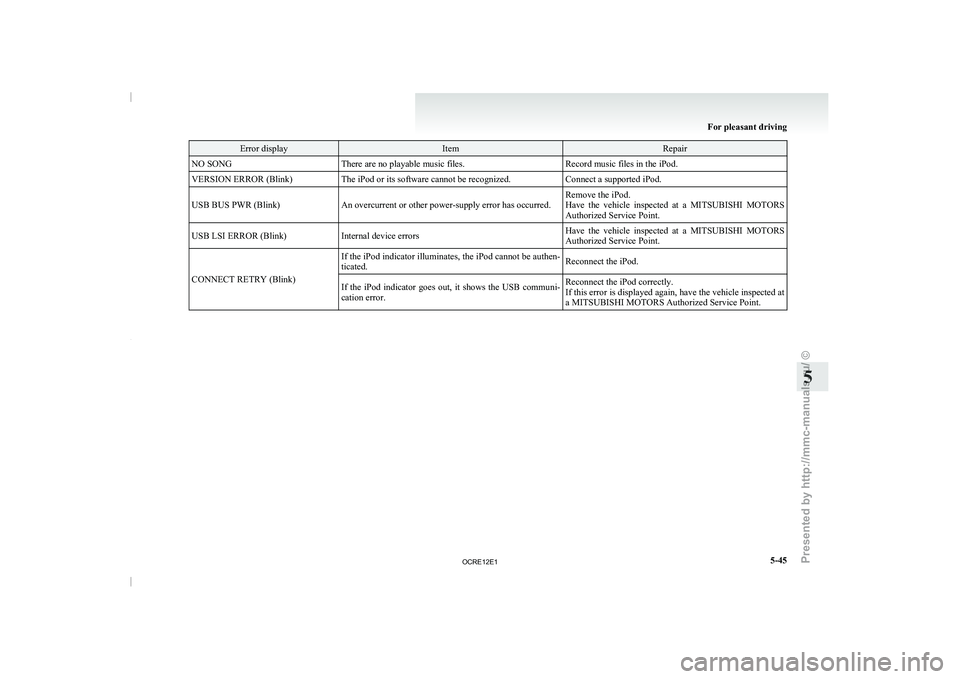
Error display Item Repair
NO SONG There are no playable music files. Record music files in the iPod.
VERSION ERROR (Blink) The iPod or its software cannot be recognized. Connect a supported iPod.
USB BUS PWR (Blink) An overcurrent or other power-supply error has occurred. Remove the iPod.
Have the vehicle inspected at
a MITSUBISHI MOTORS
Authorized Service Point.
USB LSI ERROR (Blink) Internal device errors Have the vehicle inspected at a MITSUBISHI MOTORS
Authorized Service Point.
CONNECT RETRY (Blink) If the iPod indicator illuminates, the iPod cannot be authen-
ticated.
Reconnect the iPod.
If the iPod indicator goes out, it shows the USB communi-
cation error. Reconnect the iPod correctly.
If this error is displayed
again, have the vehicle inspected at
a MITSUBISHI MOTORS Authorized Service Point. For pleasant driving
5-45 5
OCRE12E1
Presented by http://mmc-manuals.ru/ \251
Page 229 of 369
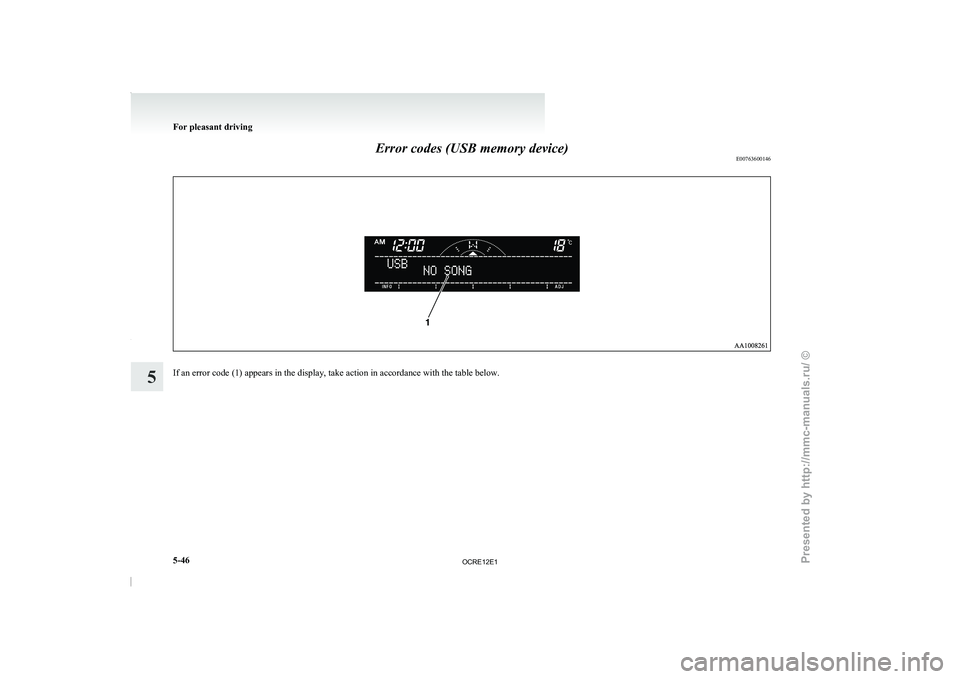
Error codes (USB memory device)
E00763600146If an error code (1) appears in the display, take action in accordance with the table below.For pleasant driving
5-46
5
OCRE12E1
Presented by http://mmc-manuals.ru/ \251
Page 230 of 369
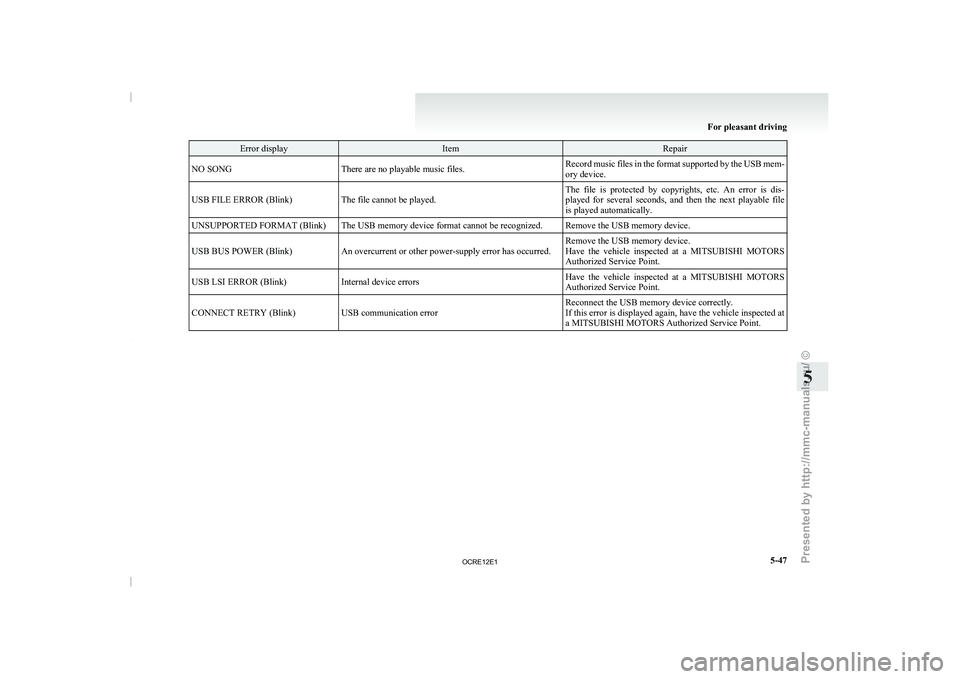
Error display Item Repair
NO SONG There are no playable music files. Record music files in the format supported by the USB mem-
ory device.
USB FILE ERROR (Blink) The file cannot be played. The file is protected by copyrights, etc. An error is dis-
played for several seconds, and
then the next playable file
is played automatically.
UNSUPPORTED FORMAT (Blink) The USB memory device format cannot be recognized. Remove the USB memory device.
USB BUS POWER (Blink) An overcurrent or other power-supply error has occurred. Remove the USB memory device.
Have the vehicle inspected at
a MITSUBISHI MOTORS
Authorized Service Point.
USB LSI ERROR (Blink) Internal device errors Have the vehicle inspected at a MITSUBISHI MOTORS
Authorized Service Point.
CONNECT RETRY (Blink) USB communication error Reconnect the USB memory device correctly.
If this error is displayed
again, have the vehicle inspected at
a MITSUBISHI MOTORS Authorized Service Point. For pleasant driving
5-47 5
OCRE12E1
Presented by http://mmc-manuals.ru/ \251
Page 234 of 369
NOTE
l Be
sure to remove the
roof antenna in the fol-
lowing cases: • When using an automatic car wash.
• When placing a car cover over the vehicle.
l Before driving into a structure that has a low
ceiling, fold down the antenna to prevent it
from hitting the ceiling. Link System*
E00764500012
The Link System takes
overall
control of the devi-
ces connected via the USB input terminal or the
Bluetooth ®
2.0 interface allowing the connected de-
vices to be operated by using the switches in the ve-
hicle or voice commands.
See the following section for details on how to op-
erate.
Refer to “Bluetooth ®
2.0 interface” on page 5-51.
Refer to “USB input terminal” on page 5-67.
Refer to “To play tracks from USB device” on
page 5-27.
Refer to “To play tracks from a Bluetooth ®
device”
on page 5-36.
Refer to “To use the external audio input function”
on page 5-39.
Bluetooth ®
is a registered trademark of BLUE-
TOOTH SIG, INC.
Link System End User Licence Agree-
ment E00764600013
You have acquired a device that includes software
licensed by MITSUBISHI MOTORS
CORPORA-
TION from JOHNSON CONTROLS Inc (the auto-
motive experience business unit), and their subse-
quent 3 rd
party suppliers. For a complete list of
these 3 rd
party products and their end user licence
agreements, please go to the following website.
http://www.jciblueconnect.com/faq/fulldisclo-
sure.pdf Bluetooth
®
2.0 interface*
E00726000556
The Bluetooth ®
2.0 interface allows for
making/re-
ceiving hands-free calls in the vehicle using a Blue-
tooth ®
compatible cellular phone based on the wire-
less communication technology commonly known
as Bluetooth ®
. It also allows the user to play mu-
sic, saved in a Bluetooth ®
music player, from the
vehicle’s speakers.
The system is equipped with a voice recognition
function, which allows you to make hands-free
calls by simple switch operations and voice com-
mand operations using a defined voice tree.
The Bluetooth ®
2.0 interface can be used when the
ignition switch is in the “ON” or “ACC” position.
Before you can use the Bluetooth ®
2.0 interface,
you must pair the Bluetooth ®
device and Blue-
tooth ®
2.0 interface. Refer to “Connecting the Blue-
tooth® 2.0 interface and Bluetooth® device” on
page 5-55.
Bluetooth ®
is a registered trademark of BLUE-
TOOTH SIG, INC. For pleasant driving
5-51 5
OCRE12E1
Presented by http://mmc-manuals.ru/ \251
Page 250 of 369
USB input terminal*
E00761900015
You can connect your USB
memory device or
iPod* to play music files stored in the USB memo-
ry device or iPod.
The following explains how to connect and remove
a USB memory device or iPod.
Refer to the following sections for details on how
to play music files:
Refer to “To play tracks from USB device” on
page 5-27.
*: “iPod” is a registered trademark of Apple Inc. in
the United States and other countries.
How to connect a USB memory device E00762000202
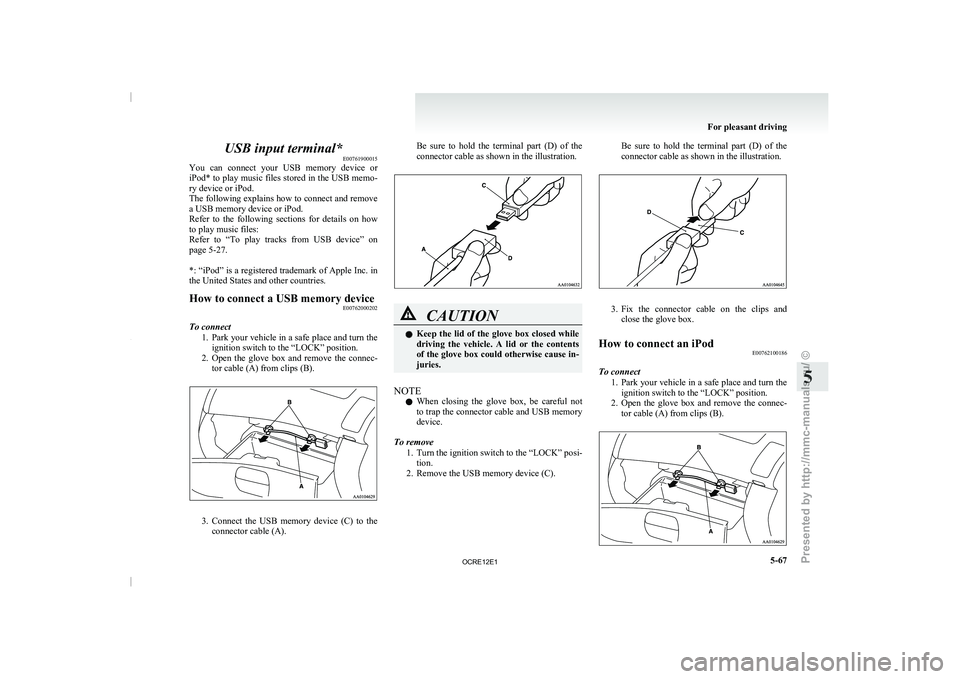
To connect 1. Park your vehicle in a
safe place and turn the
ignition switch to the “LOCK” position.
2. Open the glove box and remove the connec- tor cable (A) from clips (B). 3. Connect the USB memory device (C) to the
connector cable (A). Be sure to
hold
the terminal part (D) of the
connector cable as shown in the illustration. CAUTION
l
Keep the lid of
the
glove box closed while
driving the vehicle. A lid or the contents
of the glove box could otherwise cause in-
juries.
NOTE l When
closing the glove box,
be careful not
to trap the connector cable and USB memory
device.
To remove 1. Turn the ignition switch to the “LOCK” posi-tion.
2. Remove the USB memory device (C). Be sure to hold the terminal part (D) of the
connector cable as shown in the illustration.
3. Fix the connector cable on the clips and
close the glove box.
How to connect an iPod E00762100186
To connect 1. Park your vehicle in
a
safe place and turn the
ignition switch to the “LOCK” position.
2. Open the glove box and remove the connec- tor cable (A) from clips (B). For pleasant driving
5-67 5
OCRE12E1
Presented by http://mmc-manuals.ru/ \251
Page 251 of 369
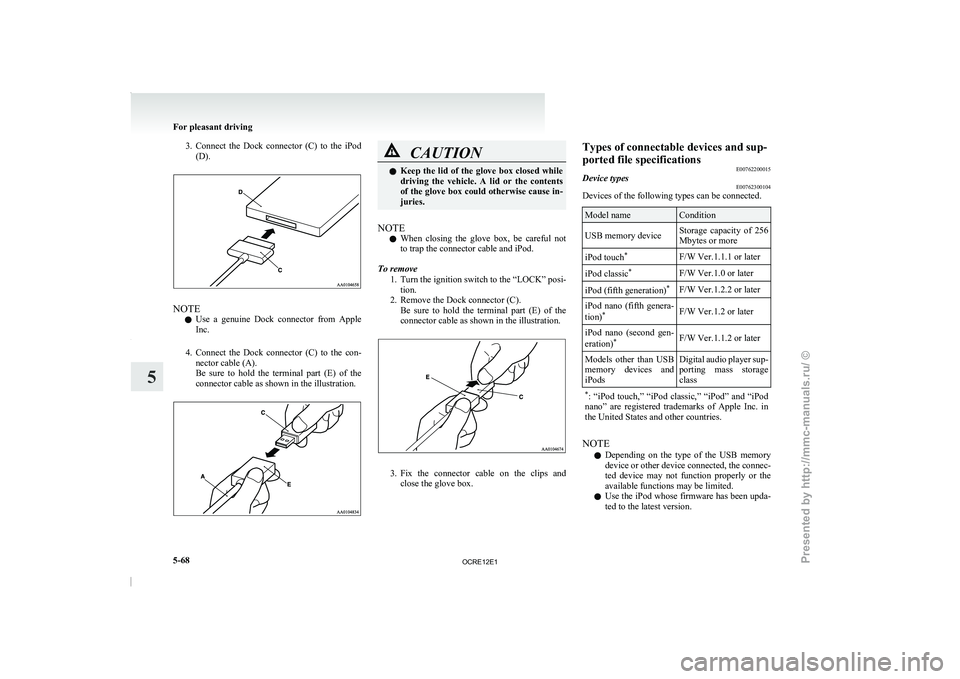
3. Connect the Dock connector (C) to the iPod
(D). NOTE
l Use
a genuine Dock connector
from Apple
Inc.
4. Connect the Dock connector (C) to the con- nector cable (A).
Be sure to hold the terminal part (E) of the
connector cable as shown in the illustration. CAUTION
l
Keep the lid of the
glove box closed while
driving the vehicle. A lid or the contents
of the glove box could otherwise cause in-
juries.
NOTE l When
closing the glove box,
be careful not
to trap the connector cable and iPod.
To remove 1. Turn the ignition switch to the “LOCK” posi-tion.
2. Remove the Dock connector (C). Be sure to hold the terminal part (E) of the
connector cable as shown in the illustration. 3. Fix the connector cable on the clips and
close the glove box. Types of connectable devices and sup-
ported file specifications
E00762200015
Device types E00762300104
Devices of the following types can be connected. Model name Condition
USB memory device Storage capacity of 256
Mbytes or more
iPod touch *
F/W Ver.1.1.1 or later
iPod classic *
F/W Ver.1.0 or later
iPod (fifth generation) *
F/W Ver.1.2.2 or later
iPod nano (fifth genera-
tion) *
F/W Ver.1.2 or later
iPod nano (second gen-
eration) *
F/W Ver.1.1.2 or later
Models other than USB
memory devices and
iPods Digital audio
player
sup-
porting mass storage
class
* : “iPod touch,” “iPod classic,”
“iPod” and “iPod
nano” are registered trademarks of Apple Inc. in
the United States and other countries. NOTE
l Depending
on the
type of
the USB memory
device or other device connected, the connec-
ted device may not function properly or the
available functions may be limited.
l Use the iPod whose firmware has been upda-
ted to the latest version. For pleasant driving
5-68
5
OCRE12E1
Presented by http://mmc-manuals.ru/ \251
Page 252 of 369
l
You can charge your iPod by connecting it to
the USB input terminal
when
the ignition
switch is in the “ACC” or “ON” position.
l Do not keep your USB memory device or
iPod in your vehicle.
l It is recommended that you back up files in
case of data damage.
l Do not connect to the USB input terminal
any device (hard disk, card reader, memory
reader, etc.) other than the connectable devi-
ces specified in the previous section. The de-
vice and/or data may be damaged. If any of
these devices was connected by mistake, re-
move it after turning the ignition switch to
the “LOCK” position.
File specifications E00762400017
You can play music files of the following specifica-
tions that are saved in
a USB memory device or oth-
er device supporting mass storage class. Item Condition
File format MP3, WMA, AAC,
WAV
Maximum number of
levels (including the
root) Level 8
Number of folders 700
Number of files 65,535 Sun visors
E00711200693 1- To eliminate front glare
2- To eliminate side glare
Ticket holder*
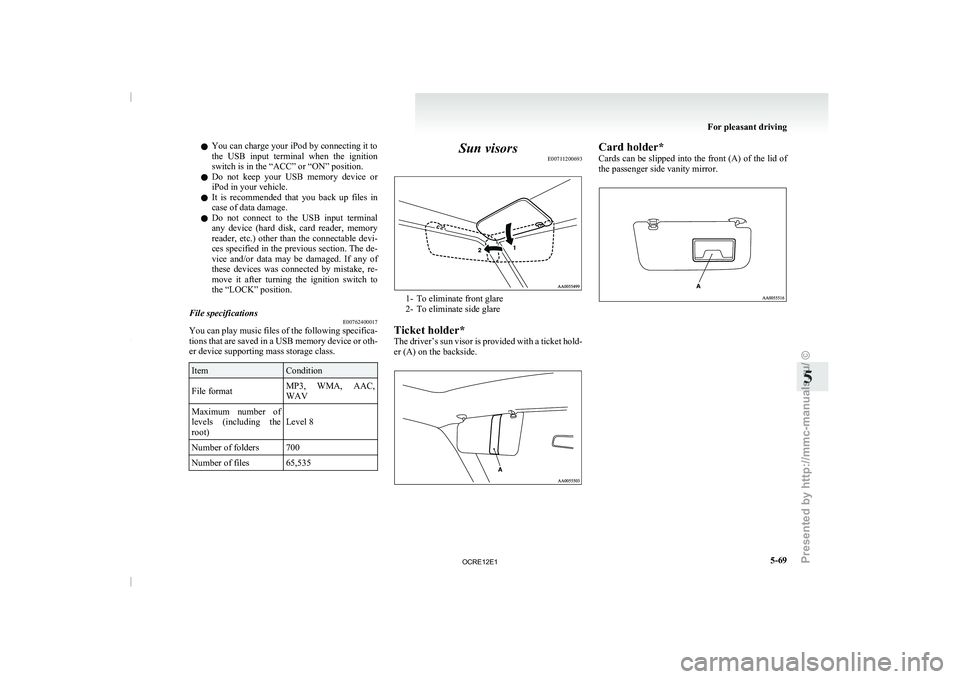
The driver’s sun visor
is provided with a ticket hold-
er (A) on the backside. Card holder*
Cards can be slipped
into
the front (A) of the lid of
the passenger side vanity mirror. For pleasant driving
5-69 5
OCRE12E1
Presented by http://mmc-manuals.ru/ \251
Page 259 of 369
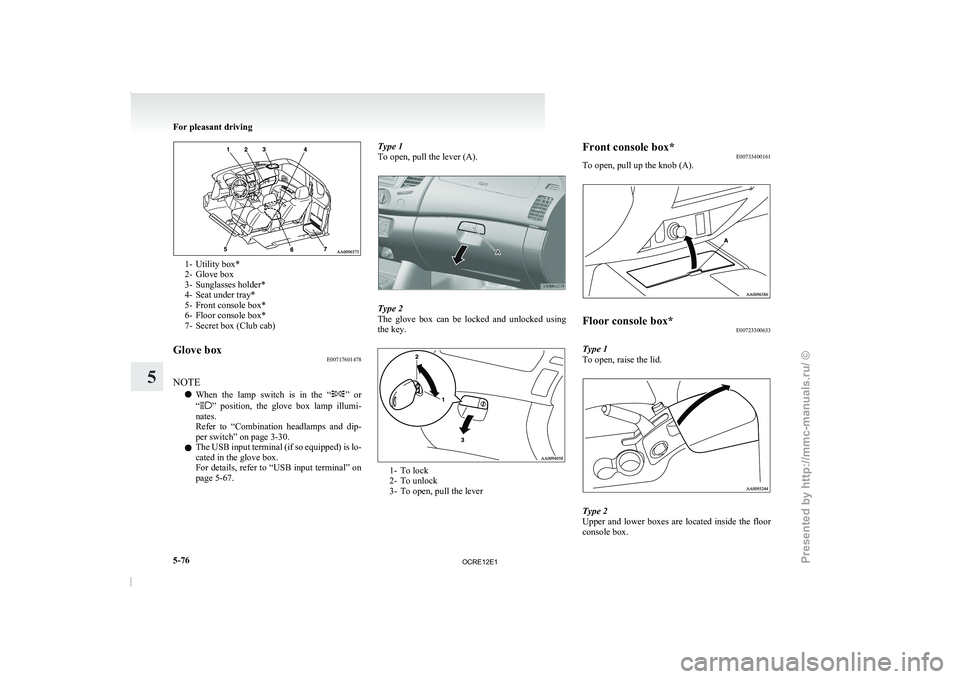
1- Utility box*
2- Glove box
3- Sunglasses holder*
4- Seat under tray*
5-
Front console box*
6-
Floor console box*
7- Secret box (Club cab)
Glove box E00717601478
NOTE l When
the lamp switch is
in the “ ” or
“ ” position, the glove box lamp illumi-
nates.
Refer to “Combination headlamps
and dip-
per switch” on page 3-30.
l The USB input terminal (if so equipped) is lo-
cated in the glove box.
For details, refer to “USB input terminal” on
page 5-67. Type 1
To open, pull the lever (A).
Type 2
The glove box can
be
locked and unlocked using
the key. 1- To lock
2- To unlock
3- To open, pull the leverFront console box*
E00733400161
To open, pull up the knob (A). Floor console box*
E00723300633
Type 1
To open, raise the lid. Type 2
Upper and lower boxes
are
located inside the floor
console box. For pleasant driving
5-76
5
OCRE12E1
Presented by http://mmc-manuals.ru/ \251
Page 359 of 369
Seat under tray 5-78
Seat
Adjustment 2-03
Armrest (Double cab) 2-07
Front seat 2-03
Head restraints 2-08
Heated seats 2-06
Rear seat 2-07
Secret box 5-77
Service precaution 8-02 Side airbag system 2-35
Side turn-signal lamps Bulb capacity 8-24
Replacement 8-28
Snow tyres 8-14
Spare wheel 6-16
Spark plug 9-17
Specifications 9-02
Speedometer 3-03
Starting 4-13
Steering Power steering fluid 8-09,9-22
Power steering system 4-47
Steering wheel height adjustment 4-09Steering wheel lock
4-12
Steering wheel remote control switch 5-40
Stop lamps Bulb capacity 8-23
Replacement 8-30
Storage spaces 5-75
Sun visors 5-69
Sunglasses holder 5-77
Sunroof 1-13 Safety mechanism 1-14
Sunshade 1-14
Switch 1-13
Super select 4WD 4-30
Supplemental restraint system 2-27 How the Supplemental Restraint System
works 2-29
Servicing 2-39
Warning lamp 2-38
T Tachometer 3-03
Tail lamps
Bulb capacity 8-24
Replacement 8-30
Tank capacity 02
Ticket holder 5-69
Tools 6-09 Storage 6-07
Towing 6-20
Trailer towing 4-54
Transfer oil 9-22
Transmission Automatic transmission 4A/T
4-17
Automatic transmission Sports Mode 5A/
T 4-21
Fluid 8-07,9-22
Manual transmission 4-15
Specifications 9-16
Tripmeter 3-03
Turn-signal indication lamps 3-07
Turn-signals lever 3-33
Tyres 8-11 How to change a tyre 6-17
Inflation pressures 8-12
Rotation 8-13
Size (tyre and wheel) 9-18
Snow tyres 8-14
Tyre chains 8-14
Wheel condition 8-13 U USB input terminal 5-67
How to connect an iPod 5-67
USB input terminal device How to connect a USB memory device 5-67
Used engine oils safety
instructions and disposal in-
formation 05
Utility box 5-77
V Vanity mirror 5-70
Vehicle care precautions 7-02
Vehicle dimensions 9-03
Vehicle identification number 9-02
Vehicle identification number plate 9-02
Vehicle information code plate
9-02
Vehicle labeling
9-02
Vehicle performance 9-09
Vehicle weight 9-10
Ventilators 5-02
W Warning lamps 3-08
Washer
Fluid 8-08,9-22
Switch 3-36,3-39
Washing 7-03
Water temperature gauge 3-05
Waxing 7-04
Weatherstripping 8-19
Weight 9-10
Wheel condition 8-13
Wheel Specification 9-18
Wiper Alphabetical index
4
OCRE12E1
Presented by http://mmc-manuals.ru/ \251