manual transmission MITSUBISHI TRITON 2011 Owners Manual
[x] Cancel search | Manufacturer: MITSUBISHI, Model Year: 2011, Model line: TRITON, Model: MITSUBISHI TRITON 2011Pages: 369, PDF Size: 26.15 MB
Page 91 of 369
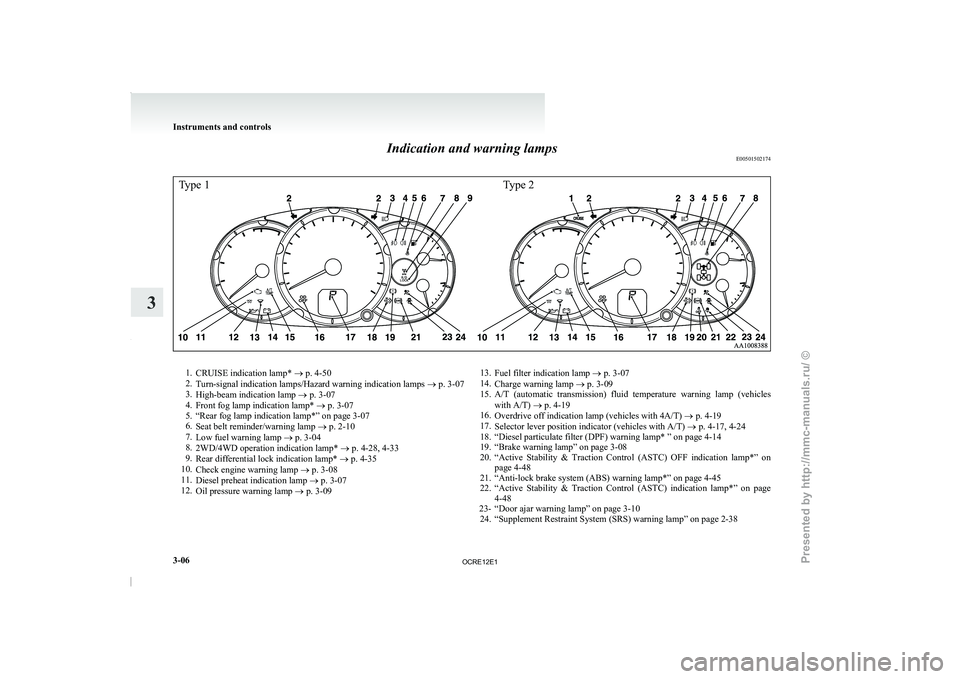
Indication and warning lamps
E00501502174Type 1Type 21.
CRUISE indication lamp* ® p. 4-50
2. Turn-signal indication lamps/Hazard warning indication lamps ®
p. 3-07
3. High-beam indication lamp ® p. 3-07
4. Front fog lamp indication lamp* ® p. 3-07
5. “Rear fog lamp indication lamp*” on page 3-07
6. Seat belt reminder/warning lamp ® p. 2-10
7. Low fuel warning lamp ® p. 3-04
8. 2WD/4WD operation indication lamp* ® p. 4-28, 4-33
9. Rear differential lock indication lamp* ® p. 4-35
10. Check engine warning lamp ® p. 3-08
11. Diesel preheat indication lamp ® p. 3-07
12. Oil pressure warning lamp ® p. 3-09 13.
Fuel filter indication lamp ® p. 3-07
14. Charge warning lamp ® p. 3-09
15.
A/T (automatic transmission) fluid temperature warning lamp (vehicleswith A/T) ® p. 4-19
16. Overdrive off indication lamp (vehicles with 4A/T) ® p. 4-19
17. Selector lever position indicator (vehicles with A/T) ® p. 4-17, 4-24
18. “Diesel particulate filter (DPF) warning lamp* ” on page 4-14
19. “Brake warning lamp” on page 3-08
20. “Active Stability & Traction Control (ASTC) OFF indication lamp*” on page 4-48
21. “Anti-lock brake system (ABS) warning lamp*” on page 4-45
22. “Active Stability & Traction Control (ASTC) indication lamp*” on page 4-48
23- “Door ajar warning lamp” on page 3-10 24. “Supplement Restraint System (SRS) warning lamp” on page 2-38 Instruments and controls
3-06
3
OCRE12E1
Presented by http://mmc-manuals.ru/ \251
Page 93 of 369
Warning lamps
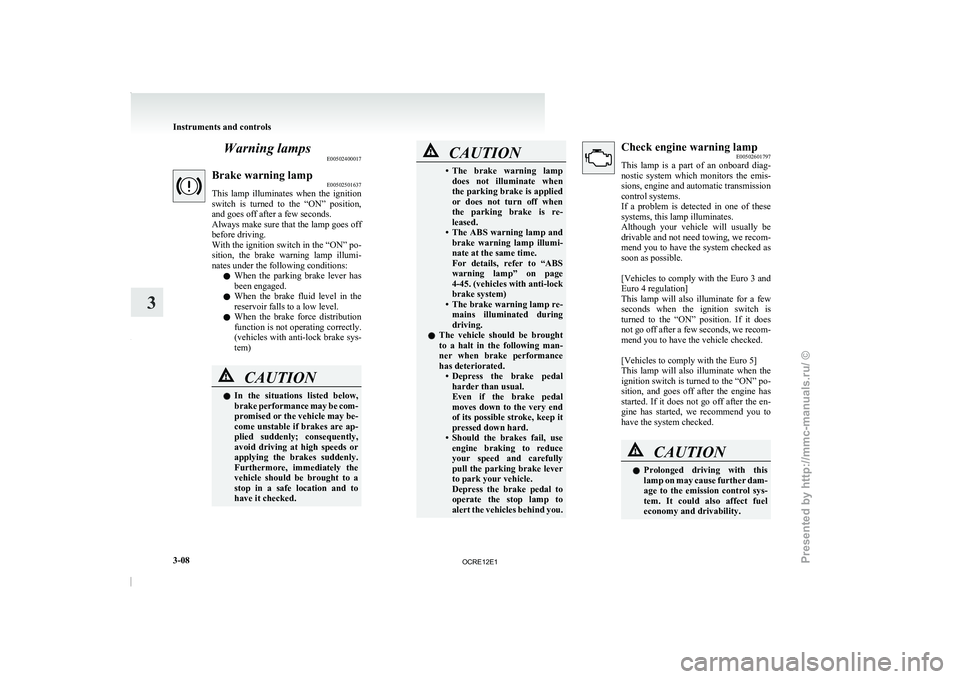
E00502400017Brake warning lamp
E00502501637
This lamp illuminates when the
ignition
switch is turned to the “ON” position,
and goes off after a few seconds.
Always make sure that the lamp goes off
before driving.
With the ignition switch in the “ON” po-
sition, the brake warning lamp illumi-
nates under the following conditions:
l When the parking brake lever has
been engaged.
l When the brake fluid level in the
reservoir falls to a low level.
l When the brake force distribution
function is not operating correctly.
(vehicles with anti-lock brake sys-
tem) CAUTION
l
In the situations listed
below,
brake
performance may be com-
promised or the vehicle may be-
come unstable if brakes are ap-
plied suddenly; consequently,
avoid driving at high speeds or
applying the brakes suddenly.
Furthermore, immediately the
vehicle should be brought to a
stop in a safe location and to
have it checked. CAUTION
• The brake warning lamp
does not illuminate when
the
parking brake is applied
or does not turn off when
the parking brake is re-
leased.
• The ABS warning lamp and brake warning lamp illumi-
nate at the same time.
For details, refer to “ABS
warning lamp” on page
4-45. (vehicles with anti-lock
brake system)
• The brake warning lamp re- mains illuminated during
driving.
l The vehicle should be brought
to a halt in the following man-
ner when brake performance
has deteriorated.
• Depress the brake pedalharder than usual.
Even if the brake pedal
moves down to the very end
of its possible stroke, keep it
pressed down hard.
• Should the brakes fail, use engine braking to reduce
your speed and carefully
pull the parking brake lever
to park your vehicle.
Depress the brake pedal to
operate the stop lamp to
alert the vehicles behind you. Check engine warning lamp
E00502601797
This lamp is a part
of an onboard diag-
nostic system which monitors the emis-
sions, engine and automatic transmission
control systems.
If a problem is detected in one of these
systems, this lamp illuminates.
Although your vehicle will usually be
drivable and not need towing, we recom-
mend you to have the system checked as
soon as possible.
[Vehicles to comply with the Euro 3 and
Euro 4 regulation]
This lamp will also illuminate for a few
seconds when the ignition switch is
turned to the “ON” position. If it does
not go off after a few seconds, we recom-
mend you to have the vehicle checked.
[Vehicles to comply with the Euro 5]
This lamp will also illuminate when the
ignition switch is turned to the “ON” po-
sition, and goes off after the engine has
started. If it does not go off after the en-
gine has started, we recommend you to
have the system checked. CAUTION
l
Prolonged driving with this
lamp
on
may cause further dam-
age to the emission control sys-
tem. It could also affect fuel
economy and drivability. Instruments and controls
3-08
3
OCRE12E1
Presented by http://mmc-manuals.ru/ \251
Page 126 of 369
Economical driving.......................................................................4-02
Driving, alcohol and drugs
........................................................... 4-02
Safe driving techniques ................................................................ 4-03
Running-in recommendations.......................................................4-04 Parking brake................................................................................ 4-07
Parking .......................................................................................... 4-08
Steering wheel height adjustment .................................................4-09
Inside rear-view mirror ................................................................. 4-09
Outside rear-view mirrors ............................................................. 4-10
Ignition switch .............................................................................. 4-11
Steering wheel lock ...................................................................... 4-12
Starting.......................................................................................... 4-13
Diesel particulate filter (DPF)* .................................................... 4-14
Manual transmission ..................................................................... 4-15
Automatic transmission
4A/T....................................................... 4-17
Automatic transmission Sports Mode 5A/T .................................4-21
Easy select 4WD* ......................................................................... 4-26
Super select 4WD* ....................................................................... 4-30
Rear differential lock* .................................................................. 4-35
4-wheel drive operation ................................................................ 4-39
Inspection and maintenance following rough road oper- ation.......................................................................................... 4-41
Cautions on handling of 4-wheel drive vehicles ..........................4-41
Limited-slip differential* .............................................................. 4-43
Braking......................................................................................... 4-43
Brake assist system*..................................................................... 4-44
Anti-lock brake system (ABS)* ................................................... 4-44
Power steering system.................................................................. 4-47
Active Stability & Traction Control (ASTC)* .............................4-47
Cruise control* ............................................................................. 4-50 Cargo loads...................................................................................
4-54
Trailer towing (Except for vehicles for Morocco)........................4-54 Starting and driving
4
OCRE12E1
Presented by http://mmc-manuals.ru/ \251
Page 129 of 369
Running-in recommendations
E00600402395
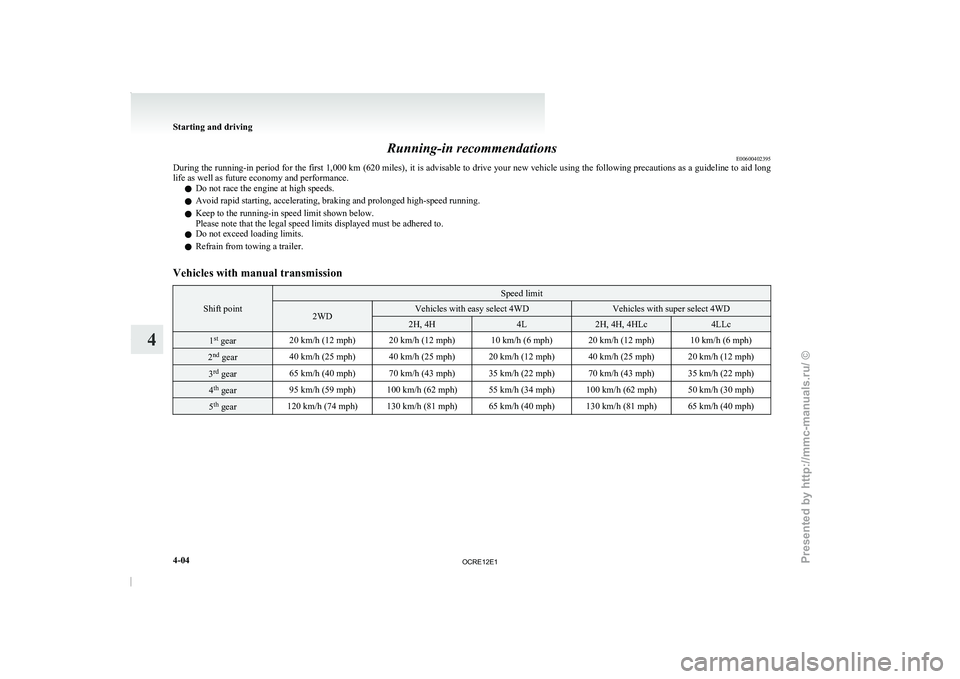
During the running-in period for
the first 1,000 km (620 miles), it is advisable to drive your new vehicle using the following precautions as a guideline to aid long
life as well as future economy and performance.
l Do not race the engine at high speeds.
l Avoid rapid starting, accelerating, braking and prolonged high-speed running.
l Keep to the running-in speed limit shown below.
Please note that the legal speed limits displayed must be adhered to.
l Do not exceed loading limits.
l Refrain from towing a trailer.
Vehicles with manual transmission Shift point Speed limit
2WD Vehicles with easy select 4WD Vehicles with super select 4WD
2H, 4H 4L 2H, 4H, 4HLc 4LLc
1
st
gear 20 km/h (12 mph) 20 km/h (12 mph) 10 km/h (6 mph) 20 km/h (12 mph) 10 km/h (6 mph)2
nd
gear 40 km/h (25 mph) 40 km/h (25 mph) 20 km/h (12 mph) 40 km/h (25 mph) 20 km/h (12 mph)3
rd
gear 65 km/h (40 mph) 70 km/h (43 mph) 35 km/h (22 mph) 70 km/h (43 mph) 35 km/h (22 mph)4
th
gear 95 km/h (59 mph) 100 km/h (62 mph) 55 km/h (34 mph) 100 km/h (62 mph) 50 km/h (30 mph)5
th
gear 120 km/h (74 mph) 130 km/h (81 mph) 65 km/h (40 mph) 130 km/h (81 mph) 65 km/h (40 mph)Starting and driving
4-04
4
OCRE12E1
Presented by http://mmc-manuals.ru/ \251
Page 130 of 369
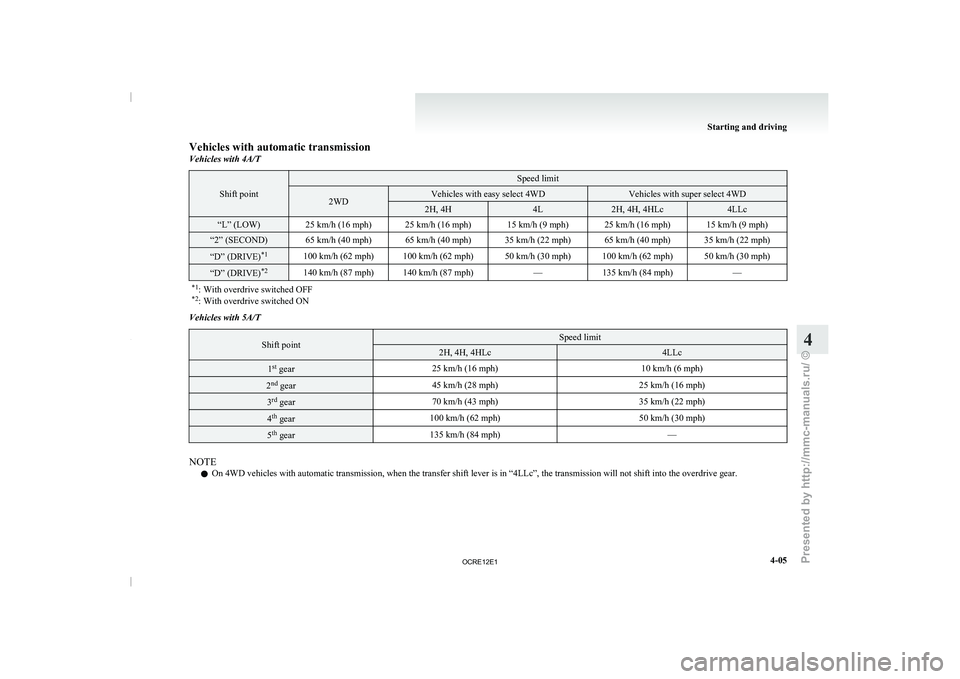
Vehicles with automatic transmission
Vehicles with 4A/T
Shift point Speed limit
2WD Vehicles with easy select 4WD Vehicles with super select 4WD
2H, 4H 4L 2H, 4H, 4HLc 4LLc
“L” (LOW) 25 km/h (16 mph) 25 km/h (16 mph) 15 km/h (9 mph) 25 km/h (16 mph) 15 km/h (9 mph)
“2” (SECOND) 65 km/h (40 mph) 65 km/h (40 mph) 35 km/h (22 mph) 65 km/h (40 mph) 35 km/h (22 mph)
“D” (DRIVE)
*1
100 km/h (62 mph) 100 km/h (62 mph) 50 km/h (30 mph) 100 km/h (62 mph) 50 km/h (30 mph) “D” (DRIVE)
*2
140 km/h (87 mph) 140 km/h (87 mph) —135 km/h (84 mph) —
*1 : With overdrive switched OFF
*2 : With overdrive switched ON Vehicles with 5A/T
Shift point Speed limit
2H, 4H, 4HLc 4LLc
1
st
gear 25 km/h (16 mph)
10 km/h (6 mph)2
nd
gear 45 km/h (28 mph)
25 km/h (16 mph)3
rd
gear 70 km/h (43 mph)
35 km/h (22 mph)4
th
gear 100 km/h (62 mph)
50 km/h (30 mph)5
th
gear 135 km/h (84 mph)
—NOTE
l On 4WD vehicles with automatic transmission, when the transfer shift lever is in “4LLc”, the transmission will not shift into the overdrive gear. Starting and driving
4-05 4
OCRE12E1
Presented by http://mmc-manuals.ru/ \251
Page 132 of 369
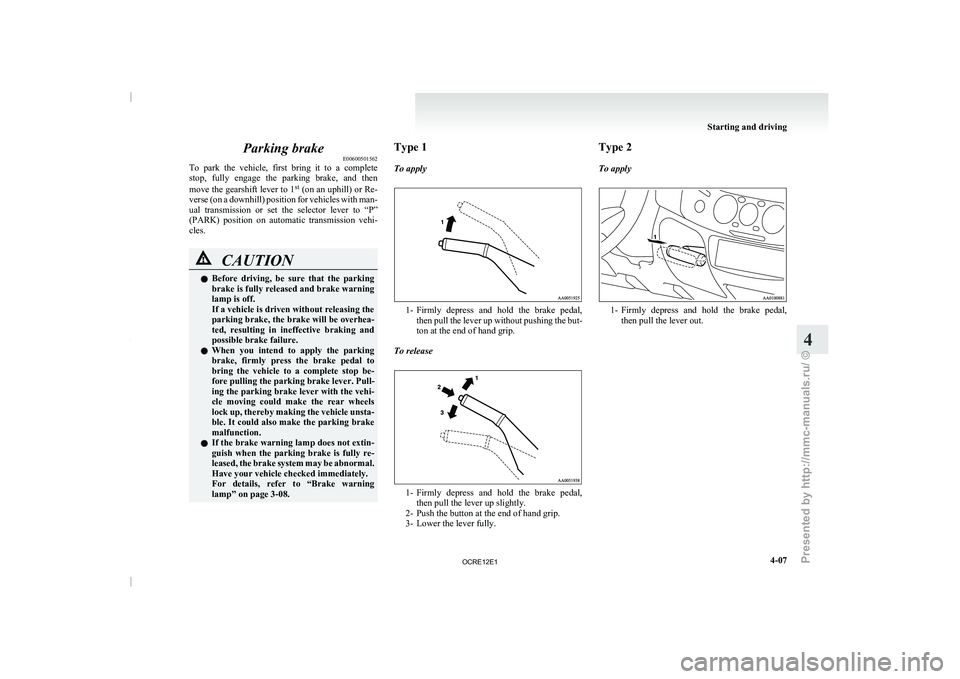
Parking brake
E00600501562
To park the vehicle, first
bring it to a complete
stop, fully engage the parking brake, and then
move the gearshift lever to 1 st
(on an uphill) or Re-
verse (on a downhill) position for vehicles with man-
ual transmission or set the selector lever to “P”
(PARK) position on automatic transmission vehi-
cles. CAUTION
l
Before driving, be sure
that
the parking
brake is fully released and brake warning
lamp is off.
If a vehicle is driven without releasing the
parking brake, the brake will be overhea-
ted, resulting in ineffective braking and
possible brake failure.
l When you intend to apply the parking
brake, firmly press the brake pedal to
bring the vehicle to a complete stop be-
fore pulling the parking brake lever. Pull-
ing the parking brake lever with the vehi-
cle moving could make the rear wheels
lock up, thereby making the vehicle unsta-
ble. It could also make the parking brake
malfunction.
l If the brake warning lamp does not extin-
guish when the parking brake is fully re-
leased, the brake system may be abnormal.
Have your vehicle checked immediately.
For details, refer to “Brake warning
lamp” on page 3-08. Type 1
To apply
1- Firmly depress and hold the brake pedal,
then pull the lever
up without pushing the but-
ton at the end of hand grip.
To release 1- Firmly depress and hold the brake pedal,
then pull the lever up slightly.
2- Push the button at the end of hand grip.
3- Lower the lever fully. Type 2
To apply
1- Firmly depress and hold the brake pedal,
then pull the lever out. Starting and driving
4-07 4
OCRE12E1
Presented by http://mmc-manuals.ru/ \251
Page 138 of 369
Starting
E00601600404
Tips for starting l Do not operate the
starter
motor continuous-
ly for anything longer than 10 seconds; do-
ing so could run down the battery. If the en-
gine does not start, turn the ignition switch
back to “LOCK” position, wait a few sec-
onds, and then try again.
Trying repeatedly with the starter motor still
turning will damage the starter mechanism.
l If the engine cannot be started because the
battery is weak or dead, refer to the “Emer-
gency starting” section for instructions on
starting the engine.
l The engine is well warmed up if the coolant
temperature gauge needle starts to move (the
engine speed decreases). Extended warming-
up operation will result in excessive fuel con-
sumption. WARNING
l Never
run
the engine
in
a closed or poor-
ly ventilated area any longer than is nee-
ded to move your vehicle in or out of the
area. Carbon monoxide gases are odour-
less and can be fatal. CAUTION
l
Never attempt to start the
engine by push-
ing or pulling the vehicle. Especially the
automatic transmission, since the struc-
ture is different from a manual transmis-
sion, it is not possible to start the engine
by using this technique. Never attempt
this or it could damage the automatic
transmission.
l Do not run the engine at high rpm or
drive the vehicle at high speed until the en-
gine has had a chance to warm up.
l Release the ignition key as soon as the en-
gine starts to avoid damaging the starter
motor.
l Do not stop the engine immediately after
high-speed or uphill driving. First allow
the engine to idle to give the turbocharg-
er a chance to cool down.
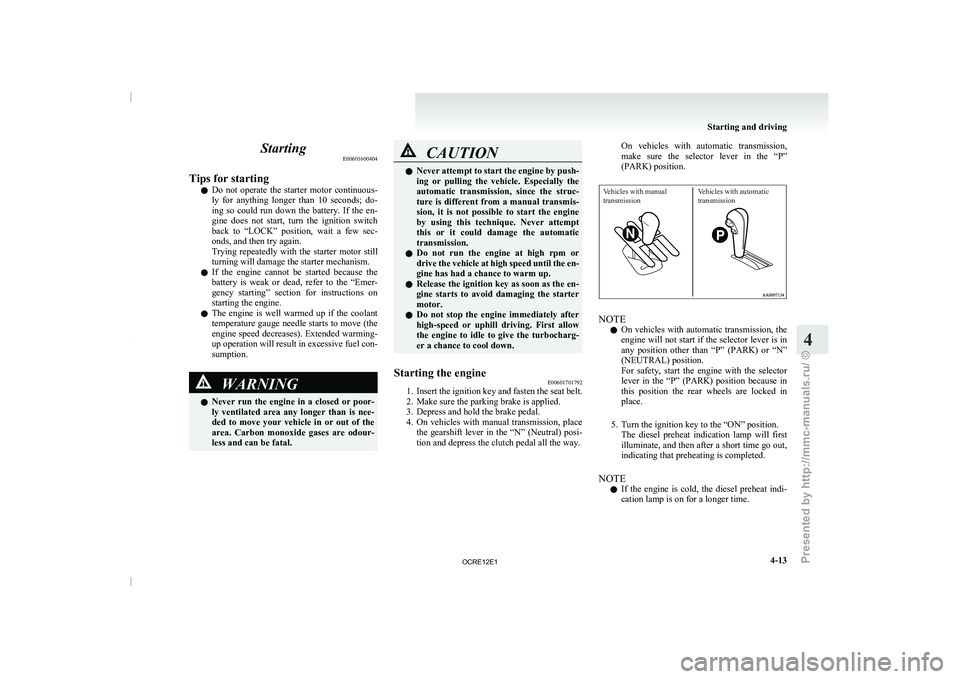
Starting the engine E00601701792
1. Insert the ignition key and fasten the seat belt.
2. Make sure the parking brake is applied.
3. Depress and hold the brake pedal.
4. On
vehicles with manual transmission, place
the gearshift lever in the “N” (Neutral) posi-
tion and depress the clutch pedal all the way. On vehicles with automatic transmission,
make
sure
the selector
lever
in the “P”
(PARK) position.
Vehicles with manual
transmission Vehicles with automatic
transmission NOTE
l On
vehicles with automatic transmission,
the
engine will not start if the selector lever is in
any position other than “P” (PARK) or “N”
(NEUTRAL) position.
For safety, start the engine with the selector
lever in the “P” (PARK) position because in
this position the rear wheels are locked in
place.
5. Turn the ignition key to the “ON” position. The diesel preheat indication lamp will first
illuminate, and then after a short time go out,
indicating that preheating is completed.
NOTE l If the engine is cold, the diesel preheat indi-
cation lamp is on for a longer time. Starting and driving
4-13 4
OCRE12E1
Presented by http://mmc-manuals.ru/ \251
Page 140 of 369
CAUTION
l
You do not have to continuously drive ex-
actly as indicated above. Always strive to
drive safely in accordance with road con-
ditions.
If the DPF warning lamp flashes dur-
ing vehicle operation
Flashing of the DPF warning
lamp indicates an ab-
normality in the DPF system. Have the system in-
spected at a MITSUBISHI MOTORS Authorized
Service Point. CAUTION
l
Continuing to drive with
the
DPF warn-
ing lamp flashing could result in engine
trouble and DPF damage. Manual transmission
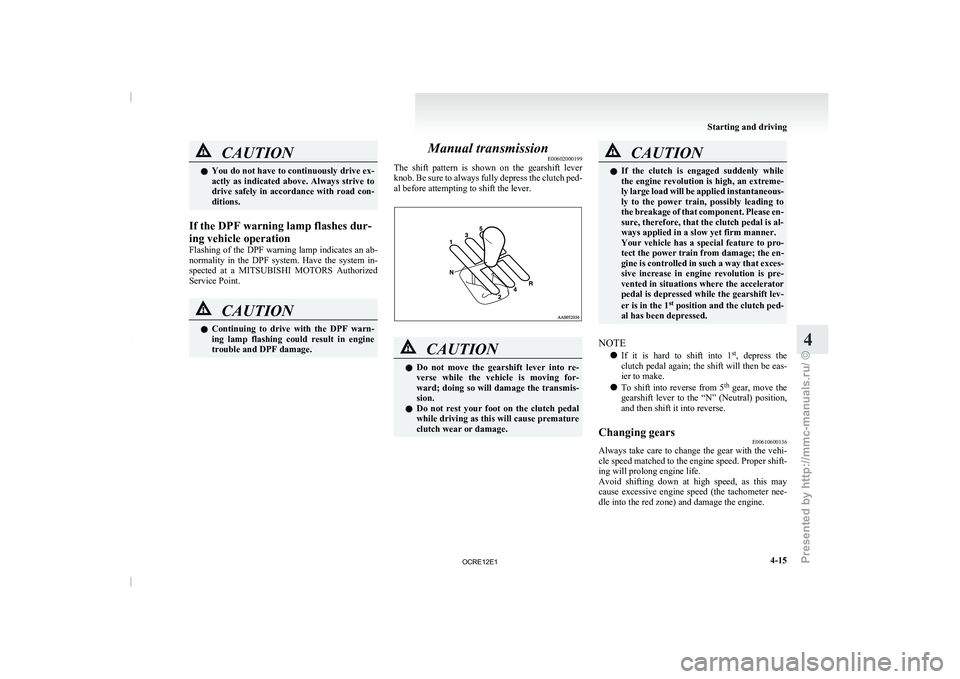
E00602000199
The shift pattern is shown
on the gearshift lever
knob. Be sure to always fully depress the clutch ped-
al before attempting to shift the lever. CAUTION
l
Do not move the
gearshift
lever into re-
verse while the vehicle is moving for-
ward; doing so will damage the transmis-
sion.
l Do not rest your foot on the clutch pedal
while driving as this will cause premature
clutch wear or damage. CAUTION
l
If the clutch is engaged
suddenly while
the engine revolution is high, an extreme-
ly large load will be applied instantaneous-
ly to the power train, possibly leading to
the breakage of that component. Please en-
sure, therefore, that the clutch pedal is al-
ways applied in a slow yet firm manner.
Your vehicle has a special feature to pro-
tect the power train from damage; the en-
gine is controlled in such a way that exces-
sive increase in engine revolution is pre-
vented in situations where the accelerator
pedal is depressed while the gearshift lev-
er is in the 1 st
position and the clutch ped-
al has been depressed.
NOTE l If it is hard
to
shift into 1st
, depress the
clutch pedal again; the shift will then be eas-
ier to make.
l To shift into reverse from 5 th
gear, move the
gearshift lever to the “N” (Neutral) position,
and then shift it into reverse.
Changing gears E00610600136
Always take care to change the gear with the vehi-
cle speed matched to the
engine speed. Proper shift-
ing will prolong engine life.
Avoid shifting down at high speed, as this may
cause excessive engine speed (the tachometer nee-
dle into the red zone) and damage the engine. Starting and driving
4-15 4
OCRE12E1
Presented by http://mmc-manuals.ru/ \251
Page 142 of 369
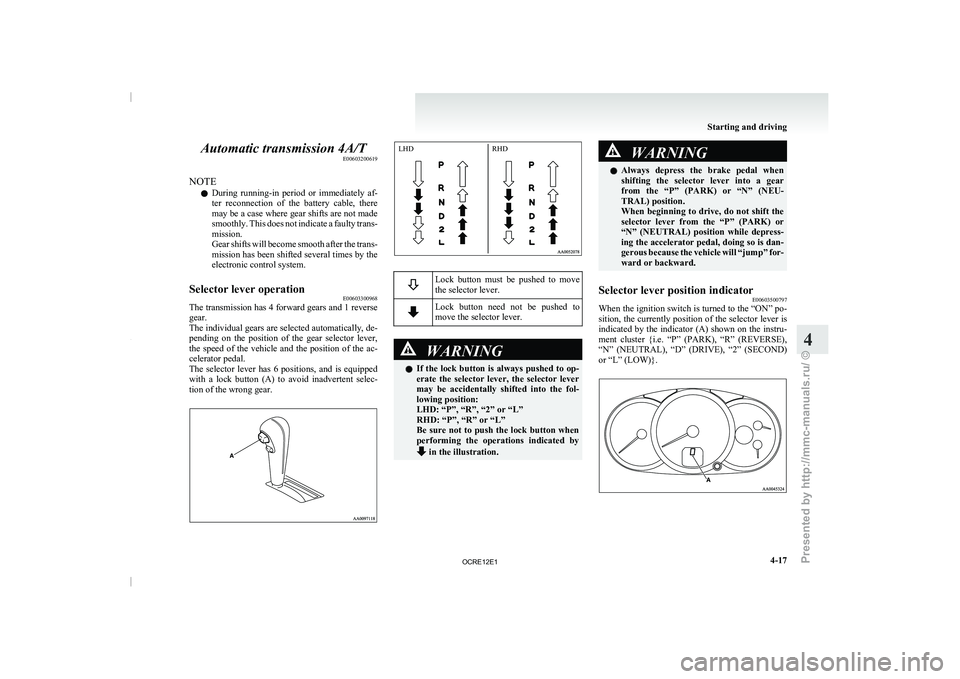
Automatic transmission 4A/T
E00603200619
NOTE l During
running-in period or immediately
af-
ter reconnection of the battery cable, there
may be a case where gear shifts are not made
smoothly. This does not indicate a faulty trans-
mission.
Gear shifts will become smooth after the trans-
mission has been shifted several times by the
electronic control system.
Selector lever operation E00603300968
The transmission has 4 forward gears and 1 reverse
gear.
The individual gears are selected
automatically, de-
pending on the position of the gear selector lever,
the speed of the vehicle and the position of the ac-
celerator pedal.
The selector lever has 6 positions, and is equipped
with a lock button (A) to avoid inadvertent selec-
tion of the wrong gear. Lock button must be pushed to move
the selector lever.
Lock button need not be pushed to
move the selector lever.
WARNING
l If the lock button is
always pushed to op-
erate the selector lever, the selector lever
may be accidentally shifted into the fol-
lowing position:
LHD: “P”, “R”, “2” or “L”
RHD: “P”, “R” or “L”
Be sure not to push the lock button when
performing the operations indicated by in the illustration. WARNING
l Always depress the brake pedal
when
shifting the selector lever into a gear
from the “P” (PARK) or “N” (NEU-
TRAL) position.
When beginning to drive, do not shift the
selector lever from the “P” (PARK) or
“N” (NEUTRAL) position while depress-
ing the accelerator pedal, doing so is dan-
gerous because the vehicle will “jump” for-
ward or backward.
Selector lever position indicator E00603500797
When the ignition switch is turned to the “ON” po-
sition, the currently
position of
the selector lever is
indicated by the indicator (A) shown on the instru-
ment cluster {i.e. “P” (PARK), “R” (REVERSE),
“N” (NEUTRAL), “D” (DRIVE), “2” (SECOND)
or “L” (LOW)}. Starting and driving
4-17 4 LHD
RHD
OCRE12E1
Presented by http://mmc-manuals.ru/ \251
Page 143 of 369
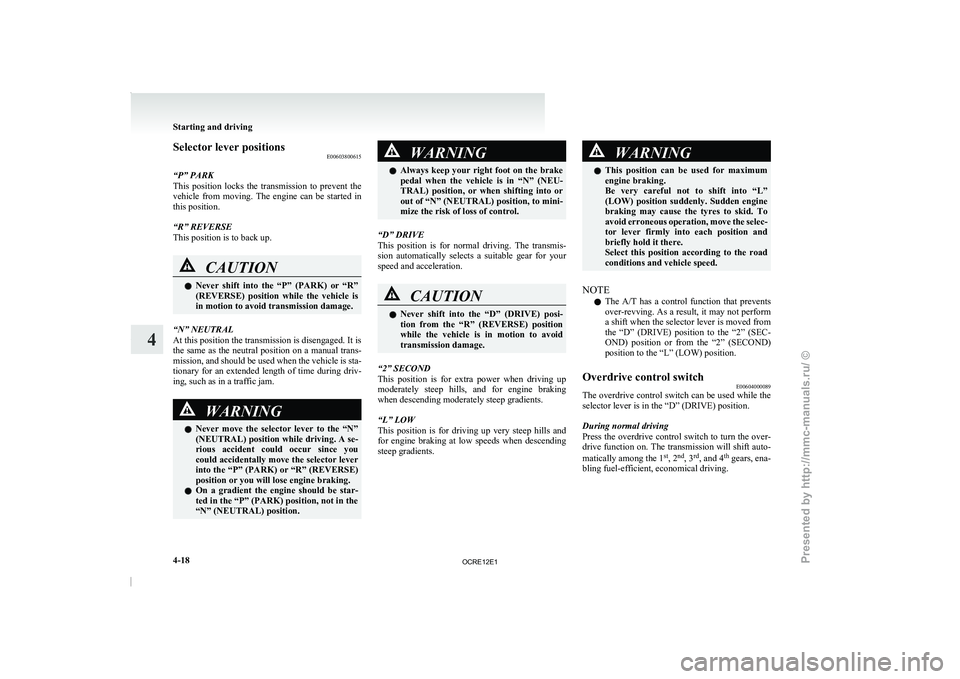
Selector lever positions
E00603800615
“P” PARK
This position locks the transmission
to prevent the
vehicle from moving. The engine can be started in
this position.
“R” REVERSE
This position is to back up. CAUTION
l
Never
shift into
the “P”
(PARK) or “R”
(REVERSE) position while the vehicle is
in motion to avoid transmission damage.
“N” NEUTRAL
At this position the transmission is disengaged. It is
the same as the neutral
position on a manual trans-
mission, and should be used when the vehicle is sta-
tionary for an extended length of time during driv-
ing, such as in a traffic jam. WARNING
l Never move the selector
lever
to the “N”
(NEUTRAL) position while driving. A se-
rious accident could occur since you
could accidentally move the selector lever
into the “P” (PARK) or “R” (REVERSE)
position or you will lose engine braking.
l On a gradient the engine should be star-
ted in the “P” (PARK) position, not in the
“N” (NEUTRAL) position. WARNING
l Always keep your right foot
on the brake
pedal when the vehicle is in “N” (NEU-
TRAL) position, or when shifting into or
out of “N” (NEUTRAL) position, to mini-
mize the risk of loss of control.
“D” DRIVE
This position is for normal
driving. The transmis-
sion automatically selects a suitable gear for your
speed and acceleration. CAUTION
l
Never shift into the
“D”
(DRIVE) posi-
tion from the “R” (REVERSE) position
while the vehicle is in motion to avoid
transmission damage.
“2” SECOND
This position is for extra
power when driving up
moderately steep hills, and for engine braking
when descending moderately steep gradients.
“L” LOW
This position is for driving up very steep hills and
for engine braking at low speeds when descending
steep gradients. WARNING
l This position can be used
for maximum
engine braking.
Be very careful not to shift into “L”
(LOW) position suddenly. Sudden engine
braking may cause the tyres to skid. To
avoid erroneous operation, move the selec-
tor lever firmly into each position and
briefly hold it there.
Select this position according to the road
conditions and vehicle speed.
NOTE l The A/T
has a control function
that prevents
over-revving. As a result, it may not perform
a shift when the selector lever is moved from
the “D” (DRIVE) position to the “2” (SEC-
OND) position or from the “2” (SECOND)
position to the “L” (LOW) position.
Overdrive control switch E00604000089
The overdrive control switch can be used while the
selector lever is in the “D” (DRIVE) position.
During normal driving
Press the overdrive control switch
to turn the over-
drive function on. The transmission will shift auto-
matically among the 1 st
, 2 nd
, 3 rd
, and 4 th
gears, ena-
bling fuel-efficient, economical driving. Starting and driving
4-18
4
OCRE12E1
Presented by http://mmc-manuals.ru/ \251