stop start NISSAN 350Z 2003 Z33 Owner's Manual
[x] Cancel search | Manufacturer: NISSAN, Model Year: 2003, Model line: 350Z, Model: NISSAN 350Z 2003 Z33Pages: 227, PDF Size: 2.39 MB
Page 142 of 227
ice and snow from the windows and wiper
blades.
Ia sturdy, flat board to be placed under the
jack to give it firm support.
Ia shovel to dig the vehicle out of snow-drifts.
Iextra window washer fluid to refill the reser-
voir tank.
DRIVING ON SNOW OR ICE
WARNING
IWet ice (32ÉF, 0ÉC and freezing rain),
very cold snow or ice can be slick and
very hard to drive on. The vehicle will
have a lot less traction or grip under
these conditions. Try to avoid driving
on wet ice until the road is salted or
sanded.
IWhatever the condition, drive with
caution. Accelerate and slow down
with care. If accelerating or down-
shifting too fast, the drive wheels will
lose even more traction.
IAllow more stopping distance underthese conditions. Braking should be
started sooner than on dry pavement.
IAllow greater following distances on
slippery roads.
IWatch for slippery spots (glare ice).
These may appear on an otherwise
clear road in shaded areas. If a patch
of ice is seen ahead, brake before
reaching it. Try not to brake while
actually on the ice, and avoid any
sudden steering maneuvers.
IDo not use cruise control on slippery
roads.
ISnow can trap dangerous exhaust
gases under your vehicle. Keep snow
clear of the exhaust pipe and from
around your vehicle.
ENGINE BLOCK HEATER (if so
equipped)An engine block heater to assist extreme cold
temperature starting is available through your
NISSAN dealer.
WARNING
Do not use your heater with an un-
grounded electrical system or two-
pronged (cheater) adapters. You can be
injured by an electrical shock if you use
an ungrounded connection.
Starting and driving
5-25
Z
02.9.13/Z33-D/V5.0
X
Page 145 of 227
LOW TIRE PRESSURE WARNING
SYSTEM (if so equipped)The low tire pressure warning system which
displays pressure of all tires (except the spare
tire) on the trip computer by sending a signal
from a sensor that is installed in each wheel. If
the vehicle is being driven with a flat tire or very
low tire pressure (lower than 28 psi), the low tire
pressure warning system will activate and warn
you of it by the low tire pressure warning light (in
the meter panel) or the PSI indicator (on the trip
computer). This system will activate only when
the vehicle is driven at speeds above 20 MPH
(32 km/h). For more details, refer to ªTrip com-
puterº and ªWarning/indicator lights and audible
remindersº in the ª2. Instruments and controlsº
section and ªLow tire pressure warning systemº
in the ª5. Starting and drivingº section.
WARNING
IIf the low tire pressure warning light
comes on and/or the PSI indicator
flashes while driving, avoid sudden
steering maneuvers or abrupt brak-
ing, reduce vehicle speed, pull off the
road to a safe location and stop thevehicle as soon as possible. Serious
vehicle damage could occur and may
lead to an accident and could result
in serious personal injury. Check the
pressure for all four tires and adjust
the pressure to the COLD tire pres-
sure shown on the tire placard. If you
have a flat tire, replace it with a spare
tire as soon as possible.
IWhen a spare tire is mounted or a
wheel is replaced, tire pressure will
not be indicated and the low tire
pressure warning system will not
function. Contact your NISSAN
dealer as soon as possible for tire
replacement and/or system reset-
ting.
IDo not inject any tire liquid or aerosol
tire sealant into the tires, as this may
cause a malfunction of the tire pres-
sure sensors.
CHANGING A FLAT TIREIf you have a flat tire, follow the instructions
below.Stopping the vehicle1. Safely move the vehicle off the road away
from traffic.
2. Turn on the hazard warning flashers.
3. Park on a level surface and apply the parking
brake. Shift the manual transmission into R
(Reverse) position (automatic transmission in
P (Park) position).
4. Turn off the engine.
5. Raise the hood to warn other traffic, and to
signal professional road assistance person-
nel that you need assistance.
6. Have all passengers get out of the vehicle
and stand in a safe place, away from traffic
and clear of the vehicle.
WARNING
IMake sure that the parking brake is
securely applied and the manual
transmission is shifted into R (Re-
FLAT TIRE6-2
In case of emergency
Z
02.9.13/Z33-D/V5.0
X
Page 149 of 227
For models equipped with the low tire
pressure warning system:
After adjusting tire pressure to the COLD tire
pressure, the display of the tire pressure infor-
mation may show higher pressure than the
COLD tire pressure after the vehicle has been
driven more than 1 mile (1.6 km). This is because
the tire pressurizes as the tire temperature rises.
This does not indicate a system malfunction.
WARNING
Retighten the wheel nuts when the ve-
hicle has been driven for 600 miles
(1,000 km) (also in cases of a flat tire,
etc.).Stowing the tire and toolsSecurely store the spare tire and jacking equip-
ment in the vehicle.
WARNING
IAlways make sure that the spare tire
and jacking equipment are properly
secured after use. Such items canbecome dangerous projectiles in an
accident or sudden stop.
IThe T-type spare tire and small size
spare tire are designed for emer-
gency use. See ªWheels and tiresº in
the ª8. Maintenance and do-it-
yourselfº section.To start your engine with a booster battery, the
instructions and precautions below must be
followed.
WARNING
IIf done incorrectly, jump starting can
lead to a battery explosion, resulting
in severe injury or death. It could also
damage your vehicle.
IExplosive hydrogen gas is always
present in the vicinity of the battery.
Keep all sparks and flames away
from the battery.
IDo not allow battery fluid to come
into contact with eyes, skin, cloth or
painted surfaces. Battery fluid is a
corrosive sulphuric acid solution
which can cause severe burns. If the
fluid should come into contact with
anything, immediately flush the con-
tacted area with water.
IKeep battery out of the reach of chil-
dren.
IThe booster battery must be rated atJUMP STARTING
6-6
In case of emergency
Z
02.9.13/Z33-D/V5.0
X
Page 152 of 227
WARNING
IDo not continue to drive if your ve-
hicle overheats. Doing so could
cause a vehicle fire.
ITo avoid the danger of being scalded,
never remove the radiator cap while
the engine is still hot. When the ra-
diator cap is removed, pressurized
hot water will spurt out, possibly
causing serious injury.
IDo not open the hood if steam is
coming out.
If your vehicle is overheating (indicated by an
extremely high temperature gauge reading), or if
you feel a lack of engine power, detect abnormal
noise, etc., take the following steps:
1. Move the vehicle safely off the road, apply the
parking brake and move the shift lever to the
N (Neutral) position (automatic transmission
to the P (Park) position).
Do not stop the engine.
2. Turn off the air conditioner switch. Open all
the windows, move the heater or air condi-tioner temperature control to maximum hot
and fan control to high speed.
3. If engine overheating is caused by climbing a
long hill on a hot day, run the engine at a fast
idle (approximately 1,500 rpm) until the tem-
perature gauge indication returns to normal.
4. Get out of the vehicle. Look and listen for
steam or coolant escaping from the radiator
before opening the hood. Wait until no steam
or coolant can be seen before proceeding.
5. Open the engine hood.
WARNING
If steam or water is coming from the
engine, stand clear to prevent getting
burned.
6. Visually check if the cooling fan is running.
The radiator hoses and radiator should not
leak water.
If coolant is leaking or the cooling fan does
not run, stop the engine.
WARNING
IBe careful not to allow your hands,
hair, jewelry or clothing to come into
contact with, or to get caught in the
cooling fan, or drive belt.
IThe engine cooling fan can start at
any time when the coolant tempera-
ture is high.
7. After the engine cools down, check the cool-
ant level in the reservoir tank with the engine
running. Add coolant to the reservoir tank if
necessary. Have your vehicle repaired at the
nearest NISSAN dealer.
IF YOUR VEHICLE OVERHEATS
In case of emergency
6-9
Z
02.9.13/Z33-D/V5.0
X
Page 170 of 227
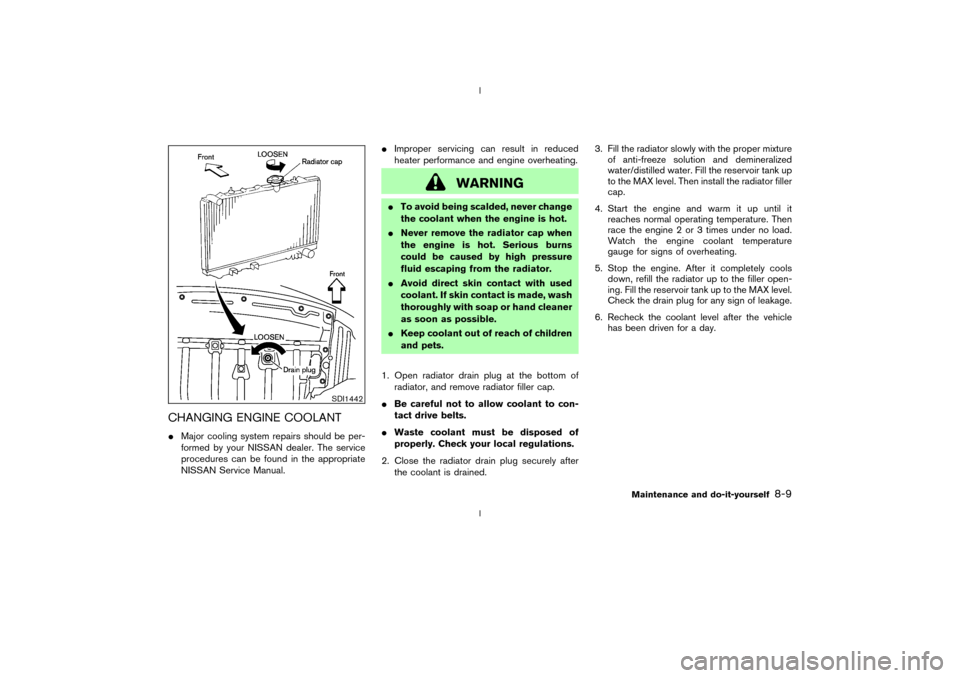
CHANGING ENGINE COOLANTIMajor cooling system repairs should be per-
formed by your NISSAN dealer. The service
procedures can be found in the appropriate
NISSAN Service Manual.IImproper servicing can result in reduced
heater performance and engine overheating.
WARNING
ITo avoid being scalded, never change
the coolant when the engine is hot.
INever remove the radiator cap when
the engine is hot. Serious burns
could be caused by high pressure
fluid escaping from the radiator.
IAvoid direct skin contact with used
coolant. If skin contact is made, wash
thoroughly with soap or hand cleaner
as soon as possible.
IKeep coolant out of reach of children
and pets.
1. Open radiator drain plug at the bottom of
radiator, and remove radiator filler cap.
IBe careful not to allow coolant to con-
tact drive belts.
IWaste coolant must be disposed of
properly. Check your local regulations.
2. Close the radiator drain plug securely after
the coolant is drained.3. Fill the radiator slowly with the proper mixture
of anti-freeze solution and demineralized
water/distilled water. Fill the reservoir tank up
to the MAX level. Then install the radiator filler
cap.
4. Start the engine and warm it up until it
reaches normal operating temperature. Then
race the engine 2 or 3 times under no load.
Watch the engine coolant temperature
gauge for signs of overheating.
5. Stop the engine. After it completely cools
down, refill the radiator up to the filler open-
ing. Fill the reservoir tank up to the MAX level.
Check the drain plug for any sign of leakage.
6. Recheck the coolant level after the vehicle
has been driven for a day.
SDI1442
Maintenance and do-it-yourself
8-9
Z
02.9.13/Z33-D/V5.0
X
Page 179 of 227
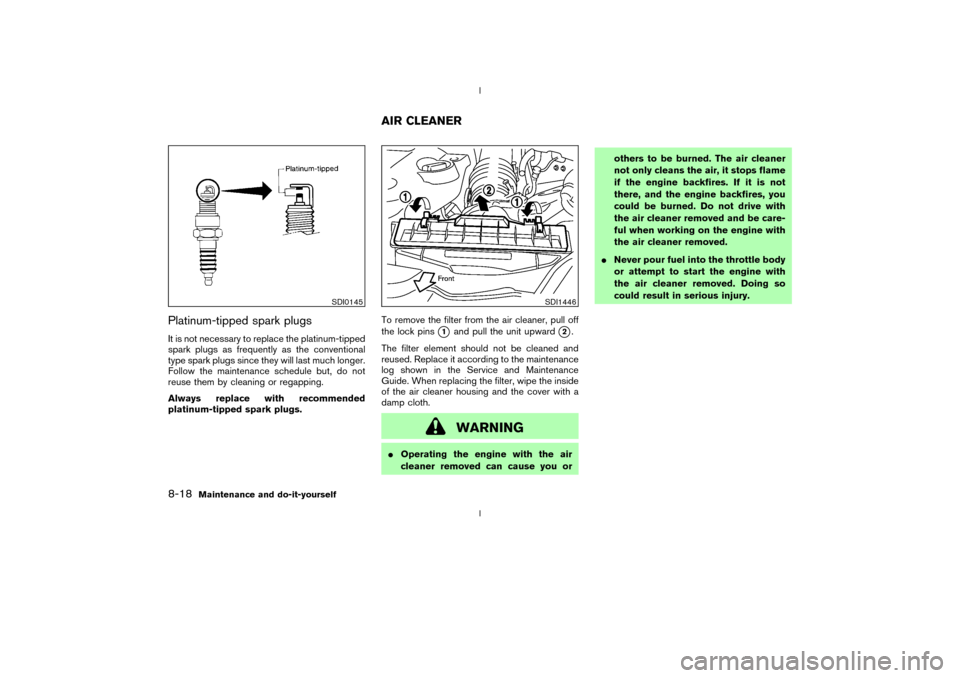
Platinum-tipped spark plugsIt is not necessary to replace the platinum-tipped
spark plugs as frequently as the conventional
type spark plugs since they will last much longer.
Follow the maintenance schedule but, do not
reuse them by cleaning or regapping.
Always replace with recommended
platinum-tipped spark plugs.To remove the filter from the air cleaner, pull off
the lock pins
q1
and pull the unit upward
q2.
The filter element should not be cleaned and
reused. Replace it according to the maintenance
log shown in the Service and Maintenance
Guide. When replacing the filter, wipe the inside
of the air cleaner housing and the cover with a
damp cloth.
WARNING
IOperating the engine with the air
cleaner removed can cause you orothers to be burned. The air cleaner
not only cleans the air, it stops flame
if the engine backfires. If it is not
there, and the engine backfires, you
could be burned. Do not drive with
the air cleaner removed and be care-
ful when working on the engine with
the air cleaner removed.
INever pour fuel into the throttle body
or attempt to start the engine with
the air cleaner removed. Doing so
could result in serious injury.
SDI0145
SDI1446
AIR CLEANER
8-18
Maintenance and do-it-yourself
Z
02.9.13/Z33-D/V5.0
X
Page 183 of 227
BRAKE BOOSTERCheck the brake booster function as follows:
1. With the engine off, press and release the
brake pedal several times. When brake pedal
movement (distance of travel) remains the
same from one pedal application to the next,
continue on to the next step.
2. While depressing the brake pedal, start the
engine. The pedal height should drop a little.
3. With the brake pedal depressed, stop the
engine. Keeping the pedal depressed for
about 30 seconds, the pedal height should
not change.
4. Run the engine for one minute without de-
pressing the brake pedal, then turn it off.
Depress the brake pedal several times. The
pedal travel distance will decrease gradually
with each depression as the vacuum is re-
leased from the booster.
If the brakes do not operate properly, see your
NISSAN dealer.
CAUTION
Never use a fuse of higher amperage
rating than that specified on the fuse
box cover. This could damage the elec-
trical system or cause a fire.
ENGINE COMPARTMENTIf any electrical equipment does not operate,
check for an open fuse.
1. Be sure the ignition key and headlight switch
are OFF.
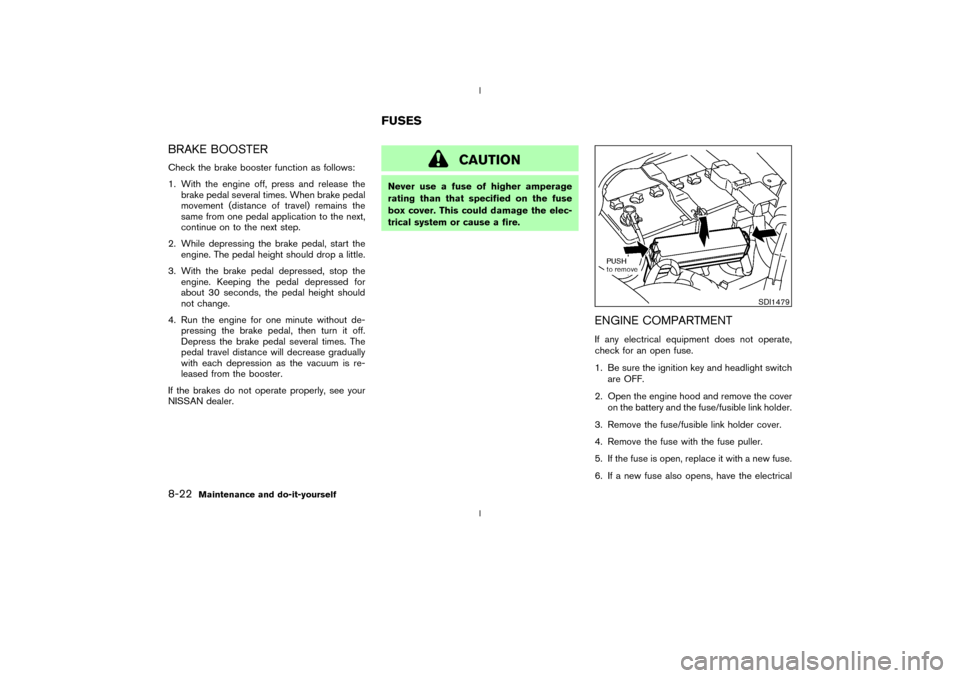
2. Open the engine hood and remove the cover
on the battery and the fuse/fusible link holder.
3. Remove the fuse/fusible link holder cover.
4. Remove the fuse with the fuse puller.
5. If the fuse is open, replace it with a new fuse.
6. If a new fuse also opens, have the electrical
SDI1479
FUSES
8-22
Maintenance and do-it-yourself
Z
02.9.13/Z33-D/V5.0
X
Page 213 of 227

load, worn suspension or other possible
causes of either condition.
IAlways secure items in the trailer to prevent
load shifts while driving.
IBe certain your rear view mirrors conform to
all federal, state or local regulations. If not,
install any mirrors required for towing before
driving the vehicle.
Trailer towing tipsIn order to gain skill and an understanding of the
vehicle's behavior, you should practice turning,
stopping and backing up in an area which is free
from traffic. Steering stability, and braking per-
formance will be somewhat different than under
normal driving conditions.
IAlways secure items in the trailer to prevent
load shift while driving.
IAvoid abrupt starts, acceleration or stops.
IAvoid sharp turns or lane changes.
IAlways drive your vehicle at a moderate
speed.
IAlways block the wheels on both vehicle and
trailer when parking. Parking on a slope is not
recommended; however, if you must do so,
and if your vehicle is equipped with automatic
transmission, first apply the parking brakeand block the wheels, and then move the
transmission selector lever into the P (Park)
position. If you move the selector lever to the
P (Park) position before blocking the wheels
and applying the parking brake, the transmis-
sion may get damaged.
IWhen going down a hill, shift into a lower
gear and use the engine braking effect.
When ascending on a long grade, downshift
the transmission to a lower gear and reduce
speed to reduce chances of engine overload-
ing and/or overheating.
IIf the engine coolant rises to an extremely
high temperature when the air conditioning
system is on, turn off the air conditioner.
Coolant heat can be additionally vented by
opening the windows, switching the fan con-
trol to high and setting the temperature con-
trol to the HOT position.
ITrailer towing consumes more fuel than nor-
mal circumstances.
IAvoid towing a trailer for the first 500 miles
(800 km).
IHave your vehicle serviced more often than at
intervals specified in the recommended main-
tenance schedule.
IWhen making a turn, your trailer wheels will
be closer to the inside of the turn than yourvehicle wheels. To compensate for this, make
a larger than normal turning radius during the
turn.
ICrosswinds and rough roads will adversely
affect vehicle/trailer handling, possibly caus-
ing vehicle sway. When being passed by
larger vehicles, be prepared for possible
changes in crosswinds that could affect ve-
hicle handling. If swaying does occur, firmly
grip the steering wheel, steer straight ahead,
and immediately (but gradually) reduce ve-
hicle speed. This combination will help stabi-
lize the vehicle. Never increase speed.
IBe careful when passing other vehicles.
Passing while towing a trailer requires con-
siderably more distance than normal passing.
Remember the length of the trailer must also
pass the other vehicle before you can safely
change lanes.
ITo maintain engine braking efficiency and
electrical charging performance, do not use
6th gear (manual transmission) or 5th posi-
tion (automatic transmission).
IAvoid holding the brake pedal down too long
or too frequently. This could cause the brakes
to overheat, resulting in reduced braking ef-
ficiency.
When towing a trailer, change transmis-9-18
Technical and consumer information
Z
02.9.13/Z33-D/V5.0
X
Page 216 of 227
Due to legal requirements in some states/
areas, your vehicle may be required to be in what
is called the ªready conditionº for an
Inspection/Maintenance (I/M) test of the emis-
sion control system.
The vehicle is set to the ªready conditionº when
it is driven through certain driving patterns.
Usually, the ªready conditionº can be obtained
by ordinary usage of the vehicle.
If a powertrain system component is repaired or
the battery is disconnected, the vehicle may be
reset to a not ªready conditionº. Before taking
the I/M test, drive the vehicle through the follow-
ing pattern to set the vehicle to the ready
condition. If you cannot or do not want to
perform the driving pattern, a NISSAN dealer
can conduct it for you.
WARNING
Always drive the vehicle in a safe and
prudent manner according to traffic
conditions, and obey all traffic laws.
1. Start the engine. Allow the engine to idle until
the engine coolant temperature gauge needle
points between the C and H (normal operat-
ing temperature).2. Accelerate the vehicle to 55 MPH (88 km/h),
then quickly release the accelerator pedal
completely and keep it released for at least 6
seconds.
3. Quickly depress the accelerator pedal for a
moment, then drive the vehicle at a speed of
53 to 60 MPH (86 to 96 km/h) for at least 5
minutes.
4. Stop the vehicle. Leave the engine running.
5. Accelerate the vehicle to 35 MPH (55 km/h)
and maintain the speed for 20 seconds.
6. Repeat steps 4 and 5 at least 3 times.
7. Accelerate the vehicle to 55 MPH (88 km/h)
and maintain the speed for at least 3 minutes.
8. Stop the vehicle. Place the automatic trans-
mission gear selector lever in the P (Park) or
N (Neutral) position or the manual transmis-
sion shift lever in the N position.
9. Turn the engine off.
10.Repeat steps 1 through 8 at least one more
time.
If step 1 through 7 is interrupted, repeat the
preceding step. Any safe driving mode is ac-
ceptable between steps. Do not stop the engine
until step 7 is completed.READINESS FOR INSPECTION/
MAINTENANCE (I/M) TEST (US
only)
Technical and consumer information
9-21
Z
02.9.13/Z33-D/V5.0
X
Page 222 of 227

Tachometer ............................................................. 2-5
Trip computer ......................................................... 2-8
General maintenance .................................................. 8-2
H
Hatch, Rear hatch........................................................ 3-9
Hazard warning flasher switch............................... 2-24
Head restraints ............................................................. 1-5
Headlights
Bulb replacement ............................................... 8-26
Headlight switch ................................................. 2-22
Xenon headlights ................................................ 2-21
Heated seats .............................................................. 2-25
Heater
Engine coolant heater ....................................... 5-25
Heater and air conditioner (automatic)............ 4-3
HomeLink
Universal Transceiver ......................... 2-36
Hood, release ............................................................... 3-8
Horn .............................................................................. 2-24
How to stop alarm, Vehicle security .................... 2-17
I
Ignition switch ............................................................... 5-5
Automatic transmission models................ 5-5, 5-9
Key positions .......................................................... 5-7
Manual transmission models .................. 5-6, 5-12
Immobilizer system .................................................... 2-18
Indicator lights............................................................ 2-14
Inside
Automatic anti-glare mirror............................... 3-13
Mirror...................................................................... 3-13Inspection/maintenance (I/M) test ........................ 9-21
Instrument panel........................................................... 2-2
Instrument pocket...................................................... 2-29
Interior light ................................................................. 2-35
Interior light replacement......................................... 8-27
J
Jump starting................................................................. 6-6
K
Keyless entry (See remote keyless entry
system) ........................................................................... 3-4
Keys................................................................................. 3-2
L
Label, Air conditioner specification label ............ 9-12
Label, Emission control information label............ 9-11
Label, F.M.V.S.S. certification label ...................... 9-11
Labels
Air bag warning labels ...................................... 1-16
Engine serial number ......................................... 9-11
Vehicle identification number (VIN)................ 9-10
License plate, Installing front license plate......... 9-13
Light
Air bag warning light ......................................... 1-16
Bulb replacement ............................................... 8-25
Headlight switch ................................................. 2-22
Headlights, Bulb replacement ......................... 8-26
Interior light .......................................................... 2-35
Luggage compartment light ............................. 2-36Replacement ........................................................ 8-25
Vanity mirror light ................................................ 2-36
Warning/indicator lights and audible
reminders .................................................. 2-11, 2-14
Xenon headlights ................................................ 2-21
Lights, Exterior and interior light replacement ... 8-27
Loading information (See vehicle loading
information) ................................................................. 9-14
Lock
Door locks ............................................................... 3-2
Power door lock .................................................... 3-2
Rear hatch lock...................................................... 3-9
Low tire pressure warning light ............................. 2-13
Low tire pressure warning system .......................... 5-3
Luggage compartment light.................................... 2-36
M
Maintenance
Battery ................................................................... 8-15
General maintenance ........................................... 8-2
Inside the vehicle................................................... 8-3
Maintenance precautions .................................... 8-5
Outside the vehicle............................................... 8-2
Seat belt maintenance ...................................... 1-24
Under the hood and the vehicle........................ 8-4
Manual front seat adjustment ................................... 1-3
Meters and gauges ..................................................... 2-3
Mirror
Automatic anti-glare inside mirror .................. 3-13
Inside mirror ......................................................... 3-13
Outside mirror control ....................................... 3-14
Outside mirrors ................................................... 3-14
Z
02.9.13/Z33-D/V5.0
X
10-3