warning light NISSAN 350Z 2003 Z33 Owner's Manual
[x] Cancel search | Manufacturer: NISSAN, Model Year: 2003, Model line: 350Z, Model: NISSAN 350Z 2003 Z33Pages: 227, PDF Size: 2.39 MB
Page 69 of 227
CAUTION
IDo not use for anything other than
glasses.
IDo not leave glasses in the sun-
glasses holder while parking in direct
sunlight. The heat may damage the
glasses.
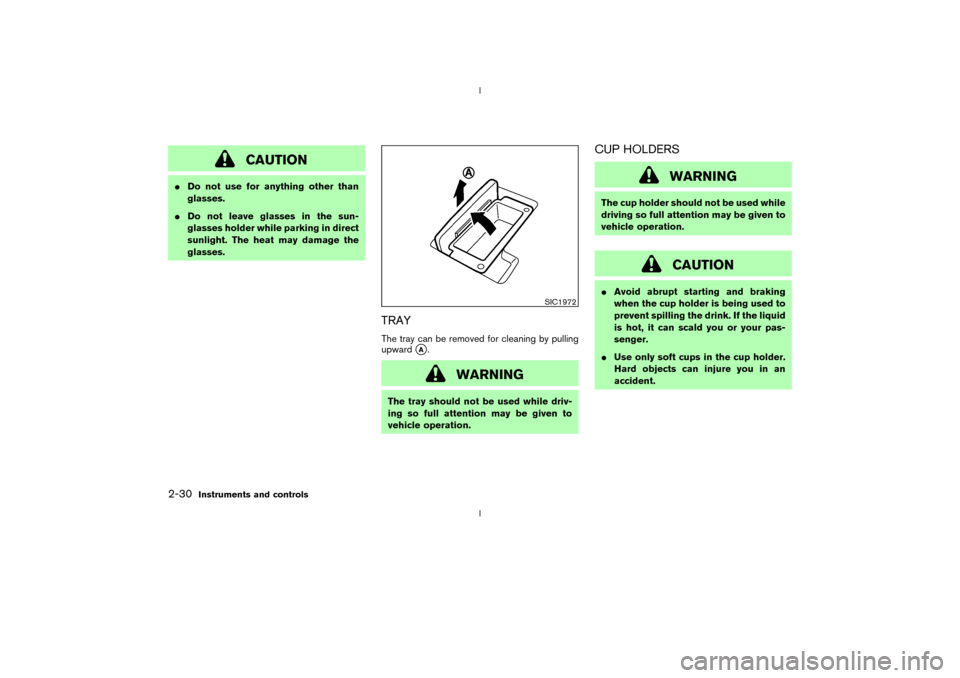
TRAYThe tray can be removed for cleaning by pulling
upward
qA.
WARNING
The tray should not be used while driv-
ing so full attention may be given to
vehicle operation.
CUP HOLDERS
WARNING
The cup holder should not be used while
driving so full attention may be given to
vehicle operation.
CAUTION
IAvoid abrupt starting and braking
when the cup holder is being used to
prevent spilling the drink. If the liquid
is hot, it can scald you or your pas-
senger.
IUse only soft cups in the cup holder.
Hard objects can injure you in an
accident.
SIC1972
2-30
Instruments and controls
Z
02.9.13/Z33-D/V5.0
X
Page 70 of 227
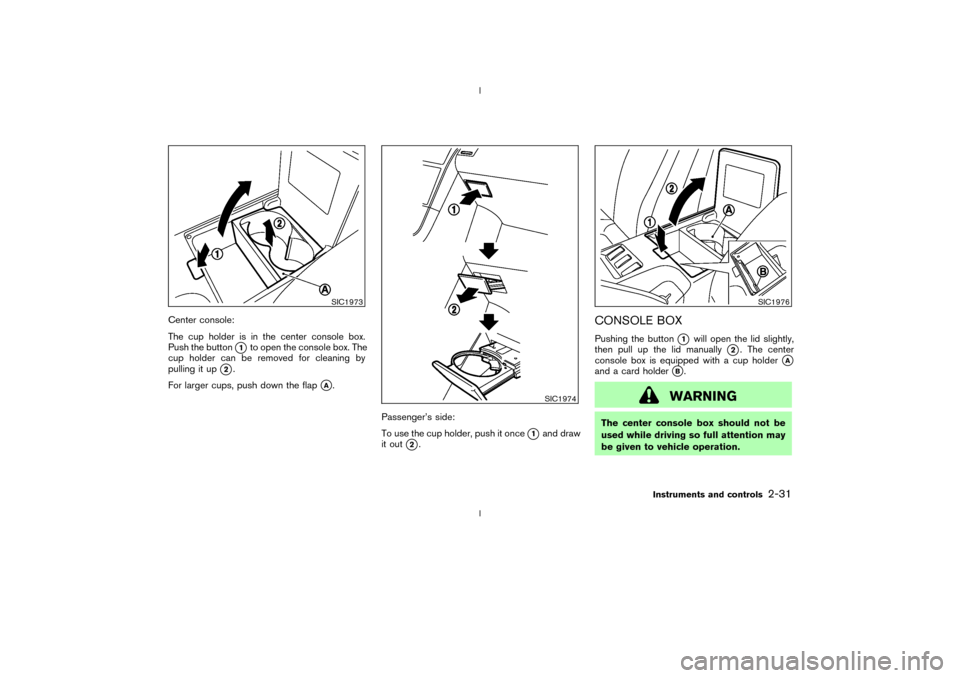
Center console:
The cup holder is in the center console box.
Push the button
q1to open the console box. The
cup holder can be removed for cleaning by
pulling it up
q2.
For larger cups, push down the flap
qA.
Passenger's side:
To use the cup holder, push it once
q1and draw
it out
q2.
CONSOLE BOXPushing the button
q1
will open the lid slightly,
then pull up the lid manually
q2. The center
console box is equipped with a cup holder
qA
and a card holder
qB.
WARNING
The center console box should not be
used while driving so full attention may
be given to vehicle operation.
SIC1973
SIC1974
SIC1976
Instruments and controls
2-31
Z
02.9.13/Z33-D/V5.0
X
Page 71 of 227
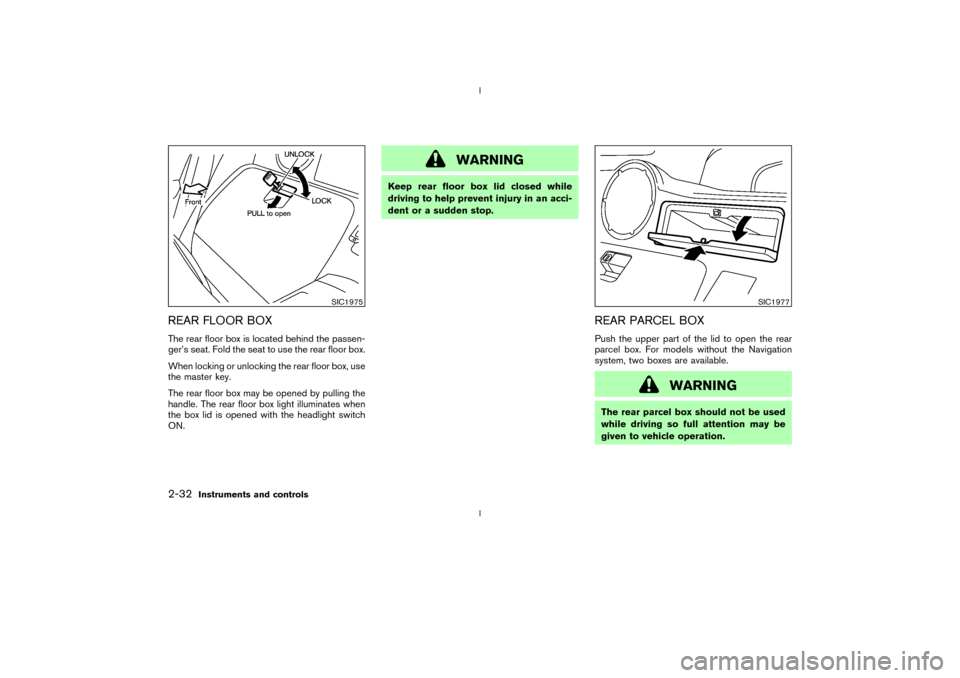
REAR FLOOR BOXThe rear floor box is located behind the passen-
ger's seat. Fold the seat to use the rear floor box.
When locking or unlocking the rear floor box, use
the master key.
The rear floor box may be opened by pulling the
handle. The rear floor box light illuminates when
the box lid is opened with the headlight switch
ON.
WARNING
Keep rear floor box lid closed while
driving to help prevent injury in an acci-
dent or a sudden stop.
REAR PARCEL BOXPush the upper part of the lid to open the rear
parcel box. For models without the Navigation
system, two boxes are available.
WARNING
The rear parcel box should not be used
while driving so full attention may be
given to vehicle operation.
SIC1975
SIC1977
2-32
Instruments and controls
Z
02.9.13/Z33-D/V5.0
X
Page 73 of 227

Automatic operationTo fully open or close the window, completely
press or lift the switch and release it; it need not
be held. The window will automatically open or
close all the way. To stop the window, just press
or lift the switch on the opposite side.Auto reverse functionIf the control unit detects something caught in a
window as it moves up, the window will be
immediately lowered.
The auto reverse function can be activated when
a window is closed by automatic operation when
the ignition key is in the ON position or for about45 seconds after the ignition key is turned to the
OFF position.
Depending on the environment or driving
conditions, the auto reverse function may
be activated if an impact or load similar to
something being caught in the window
occurs.
WARNING
There are some small distances imme-
diately before the closed position which
cannot be detected. Make sure that all
passengers have their hands, etc., in-
side the vehicle before closing the win-
dow.AUTOMATIC ADJUSTING
FUNCTION
CAUTION
When the battery cable is removed from
the battery terminal, do not close either
of front doors. The automatic window
adjusting function will not work, and theside roof panel may be damaged.
The power window has an automatic adjusting
function. When the door is being opened, the
window is automatically lowered slightly to avoid
contact between the window and the side roof
panel. When the door is closed, the window is
automatically raised slightly.
SIC1979
2-34
Instruments and controls
Z
02.9.13/Z33-D/V5.0
X
Page 76 of 227
WARNING
IDo not use the HomeLink
Universal
Transceiver with any garage door
opener that lacks safety stop and
reverse features as required by fed-
eral safety standards. (These stan-
dards became effective for opener
models manufactured after April 1,
1982). A garage door opener which
cannot detect an object in the path of
a closing garage door and then auto-
matically stop and reverse, does not
meet current federal safety stan-
dards. Using a garage door opener
without these features increases the
risk of serious injury or death.
IDuring programming, your garage
door or gate may open or close.
Make sure that people and objects
are clear of the garage door or gate
that you are programming.
IYour vehicle's engine should be
turned off while programming the
HomeLink
Universal Transceiver.
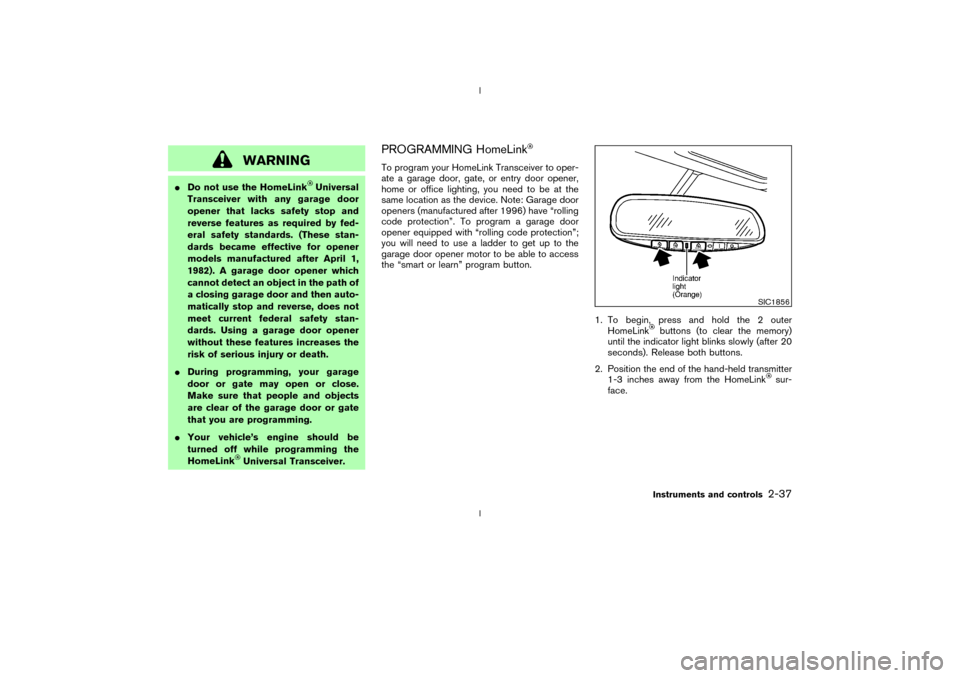
PROGRAMMING HomeLinkTo program your HomeLink Transceiver to oper-
ate a garage door, gate, or entry door opener,
home or office lighting, you need to be at the
same location as the device. Note: Garage door
openers (manufactured after 1996) have ªrolling
code protectionº. To program a garage door
opener equipped with ªrolling code protectionº;
you will need to use a ladder to get up to the
garage door opener motor to be able to access
the ªsmart or learnº program button.
1. To begin, press and hold the 2 outer
HomeLink
buttons (to clear the memory)
until the indicator light blinks slowly (after 20
seconds). Release both buttons.
2. Position the end of the hand-held transmitter
1-3 inches away from the HomeLink
sur-
face.
SIC1856
Instruments and controls
2-37
Z
02.9.13/Z33-D/V5.0
X
Page 88 of 227
LOCK button again for 3 more seconds.Releasing the rear hatch1. Push the REAR HATCH button on the keyfob
for longer than 0.5 seconds with the key
removed from the ignition key cylinder.
2. The rear hatch opens.Using the panic alarmIf you are near your vehicle and feel threatened,
you may activate the alarm to call attention as
follows:
1. Push the PANIC button on the keyfob for
longer than 0.5 secondswith the key
removed from the ignition key cylinder.
2. The theft warning alarm and headlights will
stay on for 30 seconds.
3. The panic alarm stops when:
IIt has run for 30 seconds, or
IThe LOCK or the UNLOCK button is
pressed, or
IThe PANIC or the REAR HATCH button is
pushed on the keyfob for longer than 0.5
seconds.
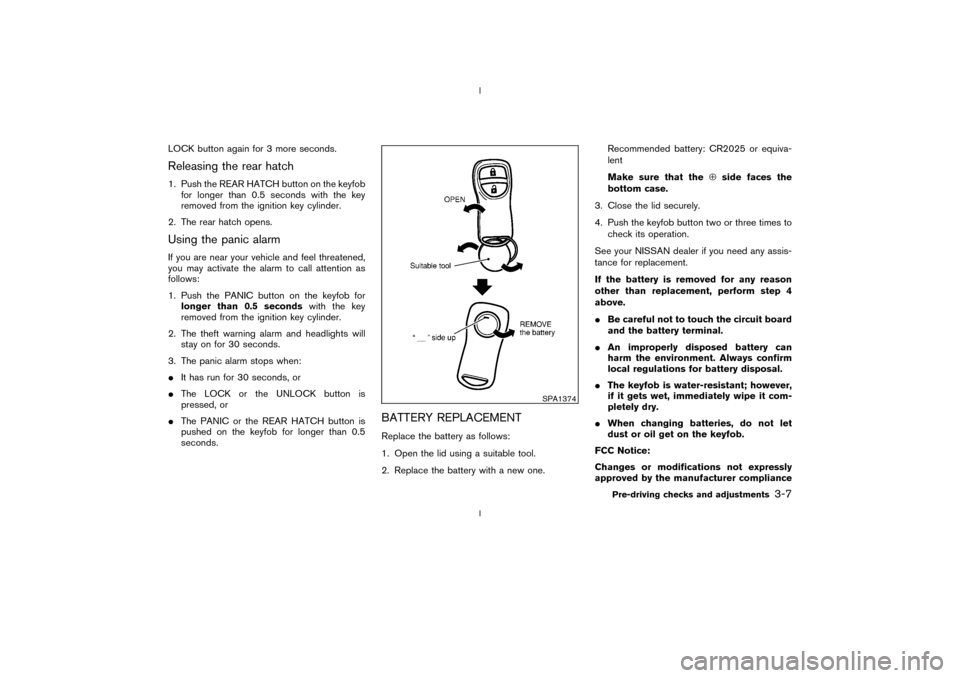
BATTERY REPLACEMENTReplace the battery as follows:
1. Open the lid using a suitable tool.
2. Replace the battery with a new one.Recommended battery: CR2025 or equiva-
lent
Make sure that theÅside faces the
bottom case.
3. Close the lid securely.
4. Push the keyfob button two or three times to
check its operation.
See your NISSAN dealer if you need any assis-
tance for replacement.
If the battery is removed for any reason
other than replacement, perform step 4
above.
IBe careful not to touch the circuit board
and the battery terminal.
IAn improperly disposed battery can
harm the environment. Always confirm
local regulations for battery disposal.
IThe keyfob is water-resistant; however,
if it gets wet, immediately wipe it com-
pletely dry.
IWhen changing batteries, do not let
dust or oil get on the keyfob.
FCC Notice:
Changes or modifications not expressly
approved by the manufacturer compliance
SPA1374
Pre-driving checks and adjustments
3-7
Z
02.9.13/Z33-D/V5.0
X
Page 89 of 227
could void the user's authority to operate
the equipment. This device complies with
Part 15 of the FCC Rules and RSS-210 of
Industry Canada. Operation is subject to
the following two conditions: (1) This de-
vice may not cause harmful interference,
and (2) this device must accept any inter-
ference received, including interference
that may cause undesired operation of the
device.
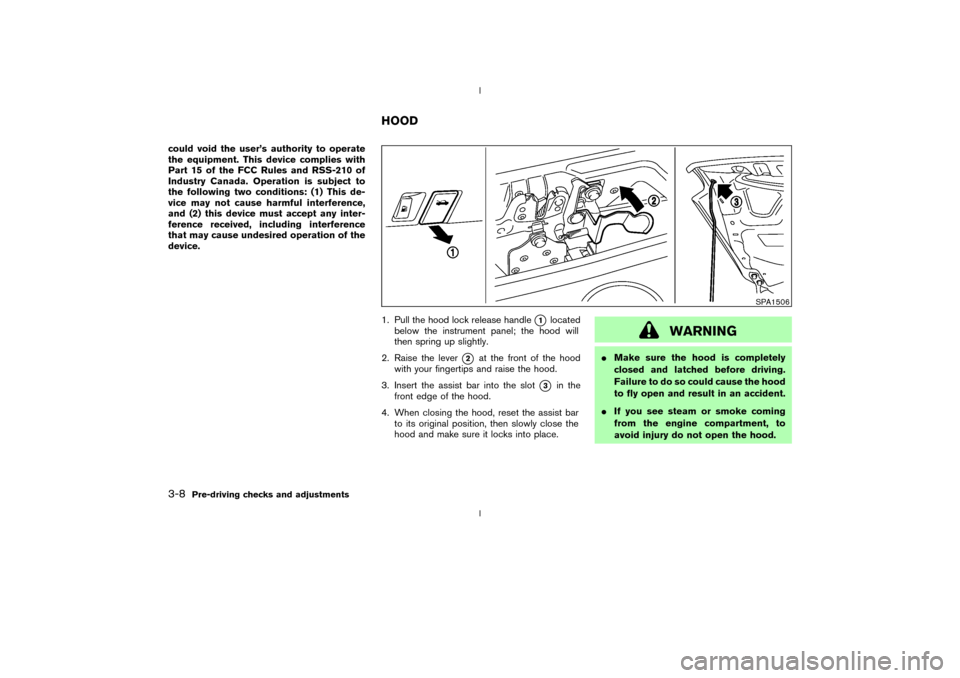
1. Pull the hood lock release handle
q1
located
below the instrument panel; the hood will
then spring up slightly.
2. Raise the lever
q2
at the front of the hood
with your fingertips and raise the hood.
3. Insert the assist bar into the slot
q3
in the
front edge of the hood.
4. When closing the hood, reset the assist bar
to its original position, then slowly close the
hood and make sure it locks into place.
WARNING
IMake sure the hood is completely
closed and latched before driving.
Failure to do so could cause the hood
to fly open and result in an accident.
IIf you see steam or smoke coming
from the engine compartment, to
avoid injury do not open the hood.
SPA1506
HOOD
3-8
Pre-driving checks and adjustments
Z
02.9.13/Z33-D/V5.0
X
Page 90 of 227
WARNING
Do not drive with the rear hatch open.
This could allow dangerous exhaust
gases to be drawn into the vehicle. See
ªPrecautions when starting and drivingº
in the ª5. Starting and drivingº section
for exhaust gas.
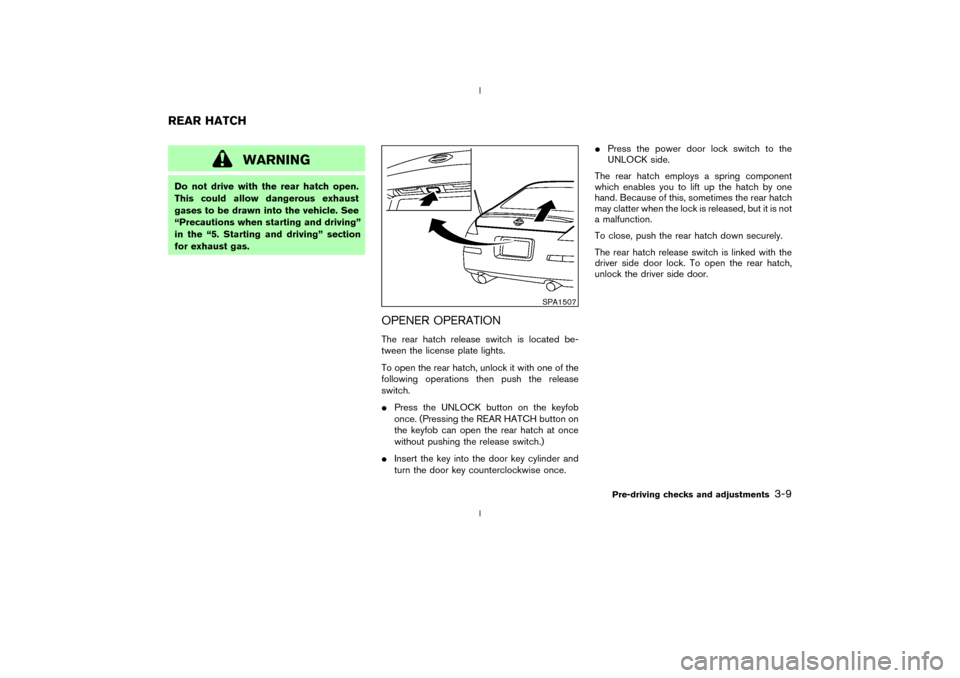
OPENER OPERATIONThe rear hatch release switch is located be-
tween the license plate lights.
To open the rear hatch, unlock it with one of the
following operations then push the release
switch.
IPress the UNLOCK button on the keyfob
once. (Pressing the REAR HATCH button on
the keyfob can open the rear hatch at once
without pushing the release switch.)
IInsert the key into the door key cylinder and
turn the door key counterclockwise once.IPress the power door lock switch to the
UNLOCK side.
The rear hatch employs a spring component
which enables you to lift up the hatch by one
hand. Because of this, sometimes the rear hatch
may clatter when the lock is released, but it is not
a malfunction.
To close, push the rear hatch down securely.
The rear hatch release switch is linked with the
driver side door lock. To open the rear hatch,
unlock the driver side door.
SPA1507
REAR HATCH
Pre-driving checks and adjustments
3-9
Z
02.9.13/Z33-D/V5.0
X
Page 94 of 227
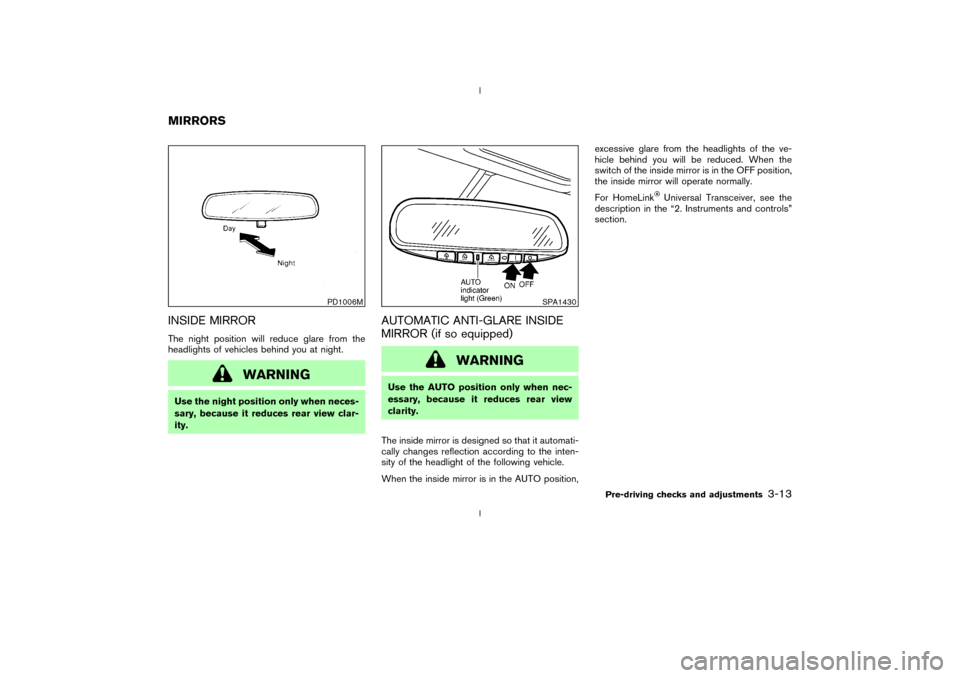
INSIDE MIRRORThe night position will reduce glare from the
headlights of vehicles behind you at night.
WARNING
Use the night position only when neces-
sary, because it reduces rear view clar-
ity.
AUTOMATIC ANTI-GLARE INSIDE
MIRROR (if so equipped)
WARNING
Use the AUTO position only when nec-
essary, because it reduces rear view
clarity.
The inside mirror is designed so that it automati-
cally changes reflection according to the inten-
sity of the headlight of the following vehicle.
When the inside mirror is in the AUTO position,excessive glare from the headlights of the ve-
hicle behind you will be reduced. When the
switch of the inside mirror is in the OFF position,
the inside mirror will operate normally.
For HomeLink
Universal Transceiver, see the
description in the ª2. Instruments and controlsº
section.
PD1006M
SPA1430
MIRRORS
Pre-driving checks and adjustments
3-13
Z
02.9.13/Z33-D/V5.0
X
Page 120 of 227
d. You have had an accident involv-
ing damage to the exhaust system,
underbody, or rear of the vehicle.
THREE WAY CATALYSTThe three way catalyst is an emission control
device installed in the exhaust system. Exhaust
gases in the converter are burned at high tem-
peratures to help reduce pollutants.
WARNING
IThe exhaust gas and the exhaust sys-
tem are very hot. Keep people, ani-
mals or flammable materials away
from the exhaust system compo-
nents.
IDo not stop or park the vehicle over
flammable materials such as dry
grass, waste paper or rags. They may
ignite and cause a fire.
CAUTION
IDo not use leaded gasoline. Deposits
from leaded gasoline seriously re-
duce the three way catalyst's ability
to help reduce exhaust pollutants.
IKeep your engine tuned up. Malfunc-
tions in the ignition, fuel injection, or
electrical systems can cause overrich
fuel flow into the three way catalyst,
causing it to overheat. Do not keep
driving if the engine misfires, or if
noticeable loss of performance or
other unusual operating conditions
are detected. Have the vehicle in-
spected promptly by a NISSAN
dealer.
IAvoid driving with an extremely low
fuel level. Running out of fuel could
cause the engine to misfire, damag-
ing the three way catalyst.
IDo not race the engine while warm-
ing it up.
IDo not push or tow your vehicle to
start the engine.
LOW TIRE PRESSURE WARNING
SYSTEM (if so equipped)The low tire pressure warning system displays
pressure of all tires (except the spare tire) on the
trip computer by sending a signal from a sensor
that is installed in each wheel.
The low tire pressure warning system will acti-
vate only when the vehicle is driven at speeds
above 20 MPH (32 km/h). Also, this system may
not detect a sudden drop in tire pressure (for
example, a flat tire by catching something while
driving).
Frequently check the tire pressure indicator on
the trip computer and adjust pressure of each
tire properly. See ªTrip computerº in the ª2.
Instruments and controlsº section for the tire
pressure indicator.Flat tire warningIf the vehicle is being driven with a flat tire or
extremely low tire pressure (lower than 28 psi),
the low tire pressure warning light comes on,
and the chime sounds for about 10 seconds. On
the trip computer, the PSI indicator starts flash-
ing and the current display switches to the tire
pressure indicator.
For additional information regarding the above
warning, see ªTrip computerº and
Starting and driving
5-3
Z
02.9.13/Z33-D/V5.0
X