sat NISSAN 370Z 2018 Owner´s Manual
[x] Cancel search | Manufacturer: NISSAN, Model Year: 2018, Model line: 370Z, Model: NISSAN 370Z 2018Pages: 453, PDF Size: 2.19 MB
Page 221 of 453
Turn the VOL control knob to adjust the
volume.
Adjusting tone quality and speaker
balance:
To adjust Bass, Treble, Balance and Fade,
push the Audio control knob. When the
display shows the setting you want to
change (Bass, Treble, Balance and Fade),
rotate the Audio control knob to set the
desired setting. For the other setting
methods, see “How to use SETTING but-
ton” (P.4-11).
This vehicle has some sound effect func-
tions as follows:
.Speed Sensitive Vol.
For more details, see “How to use SETTING
button” (P.4-11).
Switching the display:
Pushing the DISC·AUX button will switch
the displays as follows:
iPod®/USB ?CD/DVD ?Bluetooth®
Audio ?AUX ?iPod®/USBFM-AM-SAT radio operation
radio (FM/AM) band select:
Pushing the radio band select button will
change the band as follows:
AM ?FM1 ?FM2 ?AM
radio (SAT) band select:
Pushing the radio band select button will
change the band as follows:
XM1 ?XM2 ?XM3 ?XM1
When the radio band select button is
pushed while the ignition switch is in the
ACC or ON position, the radio will come
on at the channel last played.
The last channel played will also come on
when the ON·OFF button is pushed to ON.
The satellite radio is not available in
Alaska, Hawaii and Guam.
If another audio source is playing when
the radio band select button is turned to
ON, the audio source will automatically be
turned off and the last radio channel
played will come on.
When the stereo broadcast signal is weak,
the radio will automatically change from
stereo to monaural reception. TUNE (Tuning):
. For AM and FM radio
Turn the radio TUNE knob for manual
tuning.
. For SiriusXM Satellite Radio
Turn the radio TUNE knob to seek
channels from all of the categories
when any category is not selected.
SEEK tuning/CATEGORY
(CAT):
. For AM and FM radio
Push the SEEK button
orto
tune from low to high or high to low
frequencies and to stop at the next
broadcasting station.
. For SiriusXM Satellite Radio
Push the SEEK button
orto
tune to the first channel of the next or
previous category.
During satellite radio reception, the fol-
lowing notices will be displayed under
certain conditions.
. NO SIGNAL (No signal is received while
the SAT tuner is connected.)
. OFF AIR (Broadcasting signed off)
. CHECK ANTENNA (Antenna connec-
tion error)
. LOADING (When the initial setting is
performed)
Center display, heater, air conditioner, audio, phone and voice recognition systems4-53
Page 222 of 453
4-54Center display, heater, air conditioner, audio, phone and voice recognition systems
.UPDATING (When the satellite radio
subscription is not active)
SCAN tuning:
Push the SCAN tuning button to tune
from low to high frequencies and stop at
each broadcasting station/channel for 5
seconds. Pushing the button again during
this 5 seconds period will stop SCAN
tuning and the radio will remain tuned
to that station/channel.
If the SCAN tuning button is not pushed
within 5 seconds, SCAN tuning moves to
the next station/channel.
toStation memory operations:
12 stations/channels can be set for the
FM band (6 each for FM1 and FM2), 18 for
SiriusXM Satellite Radio (6 each for XM1,
XM2 and XM3) and 6 stations can be set
for the AM band.
1. Choose the radio band using the radio band select button.
2. Tune to the desired station/channel using the SEEK/TRACK, SCAN button
or the radio TUNE knob.
3. Push and hold the desired station preset button
tountil the radio
mutes.
4. The station indicator will then come on and the sound will resume. Mem- orizing is now complete.
5. Other buttons can be set in the same manner.
If the battery cable is disconnected, or if
the fuse opens, the radio memory will be
erased. In that case, reset the desired
stations/channels.
List (AM and FM radio):
When the “List” key on the display is
selected while the FM or AM radio is being
played, the preset station list will be
displayed.
If 1 of the 6 preset stations listed is
touched and held, the current station will
be stored as the new preset.
Menu (SiriusXM Satellite Radio):
When the “Menu” key on the display is
selected while the SiriusXM Satellite Radio
is being played, the menu list will be
displayed.
The following items are available.
. Preset List
Displays the preset channel list. If 1 of
the 6 preset stations listed is touched
and held, the current station will be
stored as the new preset.
. Customize Channel List
Selects specific channels to skip while
using the TUNE, SEEK/CATEGORY or Menu-Categories feature.
. Favorite Artists & Songs
Stores the current artist or song that
is being played. Touch the “Alert” key
to be reminded when the stored artist
or song is playing on a station while
listening to SiriusXM Satellite Radio.
. Categories
Selecting a category will go to the first
channel in that category as defined by
SiriusXM Satellite Radio.
. Direct Tune
Inputs the channel number by using a
keypad.
Compact Disc (CD) player operation
Push the ignition switch to the ACC or ON
position and insert the Compact Disc (CD)
into the slot with the label side facing up.
The CD will be guided automatically into
the slot and start playing.
After loading the CD, the number of
tracks on the CD and the play time will
appear on the display.
If the radio is already operating, it will
automatically turn off and the CD will
play.
If the system has been turned off while
the CD was playing, pushing the ON·OFF
button will start the CD.
Do not use 3.1 in (8 cm) discs.
Page 223 of 453
PLAY:
When the DISC·AUX (CD play) button is
pushed with the system off and the CD
loaded, the system will turn on and the
CD will start to play.
When the DISC·AUX button is pushed with
the CD loaded and the radio playing, the
radio will automatically be turned off and
the CD will start to play.
Menu:
When the “Menu” key on the display is
selected while the CD is being played, the
menu screen will be displayed. The fol-
lowing menu options are available.
. Folder List (for CD with compressed
audio files)
Displays the folder list.
. Track List
Displays the track list.
. Play Mode
Select a play mode from the following
items.
— Normal
— 1 Folder Repeat (for CD with com-
pressed audio files)
— 1 Track Repeat
— 1 Disc Random
— 1 Folder Random (for CD with com- pressed audio files)Next/Previous Track and
Fast Forward/Rewind:
When the
orbutton is pushed for
more than 1.5 seconds while the CD is
being played, the CD will play while fast
forwarding or rewinding. When the but-
ton is released, the CD will return to
normal play speed.
When the
orbutton is pushed for
less than 1.5 seconds while the CD is being
played, the next track or the beginning of
the current track on the CD will be played.
When the rewind button is pushed for less
than 1.5 seconds within 3 seconds after
the current track starts playing, the pre-
vious track will be played. Push the button
several times to skip through the tracks.
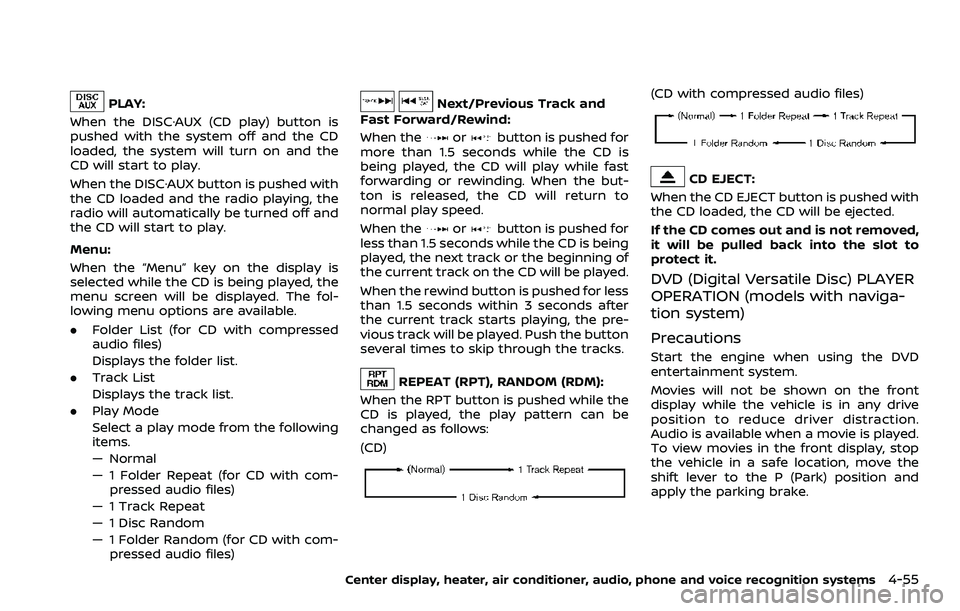
REPEAT (RPT), RANDOM (RDM):
When the RPT button is pushed while the
CD is played, the play pattern can be
changed as follows:
(CD)
(CD with compressed audio files)
CD EJECT:
When the CD EJECT button is pushed with
the CD loaded, the CD will be ejected.
If the CD comes out and is not removed,
it will be pulled back into the slot to
protect it.
DVD (Digital Versatile Disc) PLAYER
OPERATION (models with naviga-
tion system)
Precautions
Start the engine when using the DVD
entertainment system.
Movies will not be shown on the front
display while the vehicle is in any drive
position to reduce driver distraction.
Audio is available when a movie is played.
To view movies in the front display, stop
the vehicle in a safe location, move the
shift lever to the P (Park) position and
apply the parking brake.
Center display, heater, air conditioner, audio, phone and voice recognition systems4-55
Page 241 of 453
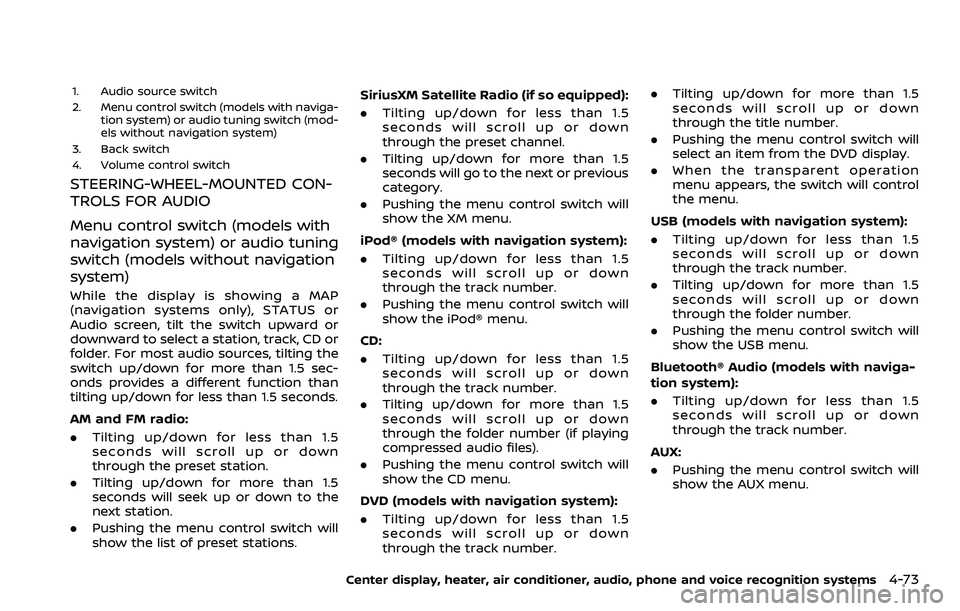
1. Audio source switch
2. Menu control switch (models with naviga-tion system) or audio tuning switch (mod-
els without navigation system)
3. Back switch
4. Volume control switch
STEERING-WHEEL-MOUNTED CON-
TROLS FOR AUDIO
Menu control switch (models with
navigation system) or audio tuning
switch (models without navigation
system)
While the display is showing a MAP
(navigation systems only), STATUS or
Audio screen, tilt the switch upward or
downward to select a station, track, CD or
folder. For most audio sources, tilting the
switch up/down for more than 1.5 sec-
onds provides a different function than
tilting up/down for less than 1.5 seconds.
AM and FM radio:
. Tilting up/down for less than 1.5
seconds will scroll up or down
through the preset station.
. Tilting up/down for more than 1.5
seconds will seek up or down to the
next station.
. Pushing the menu control switch will
show the list of preset stations. SiriusXM Satellite Radio (if so equipped):
. Tilting up/down for less than 1.5
seconds will scroll up or down
through the preset channel.
. Tilting up/down for more than 1.5
seconds will go to the next or previous
category.
. Pushing the menu control switch will
show the XM menu.
iPod® (models with navigation system):
. Tilting up/down for less than 1.5
seconds will scroll up or down
through the track number.
. Pushing the menu control switch will
show the iPod® menu.
CD:
. Tilting up/down for less than 1.5
seconds will scroll up or down
through the track number.
. Tilting up/down for more than 1.5
seconds will scroll up or down
through the folder number (if playing
compressed audio files).
. Pushing the menu control switch will
show the CD menu.
DVD (models with navigation system):
. Tilting up/down for less than 1.5
seconds will scroll up or down
through the track number. .
Tilting up/down for more than 1.5
seconds will scroll up or down
through the title number.
. Pushing the menu control switch will
select an item from the DVD display.
. When the transparent operation
menu appears, the switch will control
the menu.
USB (models with navigation system):
. Tilting up/down for less than 1.5
seconds will scroll up or down
through the track number.
. Tilting up/down for more than 1.5
seconds will scroll up or down
through the folder number.
. Pushing the menu control switch will
show the USB menu.
Bluetooth® Audio (models with naviga-
tion system):
. Tilting up/down for less than 1.5
seconds will scroll up or down
through the track number.
AUX:
. Pushing the menu control switch will
show the AUX menu.
Center display, heater, air conditioner, audio, phone and voice recognition systems4-73
Page 243 of 453

conditions.
— The vehicle enters an auto-matic car wash.
— The vehicle enters a garage with a low ceiling.
— The vehicle is covered with a car cover.
. Always properly tighten the an-
tenna rod during installation.
Otherwise, the antenna rod may
break during vehicle operation. When installing a car phone or a CB radio
in your vehicle, be sure to observe the
following cautions, otherwise the new
equipment may adversely affect the elec-
tronic control modules and electronic
control system harness.
WARNING
.
A cellular phone should not be
used for any purpose while driv-
ing so full attention may be given
to vehicle operation. Some juris-
dictions prohibit the use of cellu-
lar phones while driving.
. If you must make a call while your
vehicle is in motion, the hands-
free cellular phone operational
mode (if so equipped) is highly
recommended. Exercise extreme
caution at all times so full atten-
tion may be given to vehicle
operation.
. If a conversation in a moving
vehicle requires you to take
notes, pull off the road to a safe
location and stop your vehicle
before doing so.
CAUTION
.Keep the antenna as far away as
possible from the electronic con-
trol modules.
. Keep the antenna wire more than
8 in (20 cm) away from the
electronic control system har-
ness. Do not route the antenna
wire next to any harness.
. Adjust the antenna standing-
wave ratio as recommended by
the manufacturer.
. Connect the ground wire from the
CB radio chassis to the body.
. For details, it is recommended
you visit a NISSAN dealer.
Center display, heater, air conditioner, audio, phone and voice recognition systems4-75
CAR PHONE OR CB RADIO
Page 270 of 453
4-102Center display, heater, air conditioner, audio, phone and voice recognition systems
SAA2533
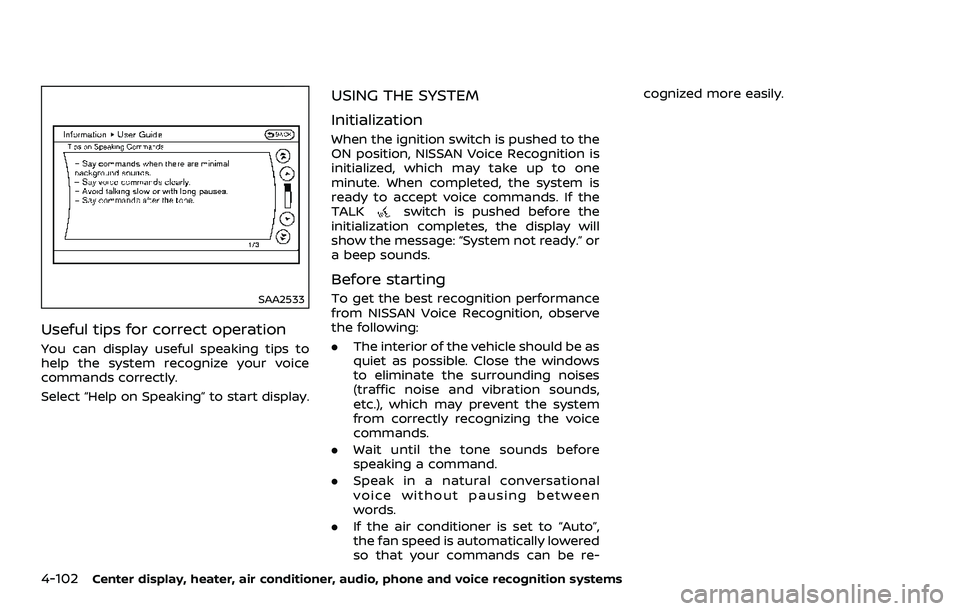
Useful tips for correct operation
You can display useful speaking tips to
help the system recognize your voice
commands correctly.
Select “Help on Speaking” to start display.
USING THE SYSTEM
Initialization
When the ignition switch is pushed to the
ON position, NISSAN Voice Recognition is
initialized, which may take up to one
minute. When completed, the system is
ready to accept voice commands. If the
TALK
switch is pushed before the
initialization completes, the display will
show the message: “System not ready.” or
a beep sounds.
Before starting
To get the best recognition performance
from NISSAN Voice Recognition, observe
the following:
. The interior of the vehicle should be as
quiet as possible. Close the windows
to eliminate the surrounding noises
(traffic noise and vibration sounds,
etc.), which may prevent the system
from correctly recognizing the voice
commands.
. Wait until the tone sounds before
speaking a command.
. Speak in a natural conversational
voice without pausing between
words.
. If the air conditioner is set to “Auto”,
the fan speed is automatically lowered
so that your commands can be re- cognized more easily.
Page 274 of 453
4-106Center display, heater, air conditioner, audio, phone and voice recognition systems
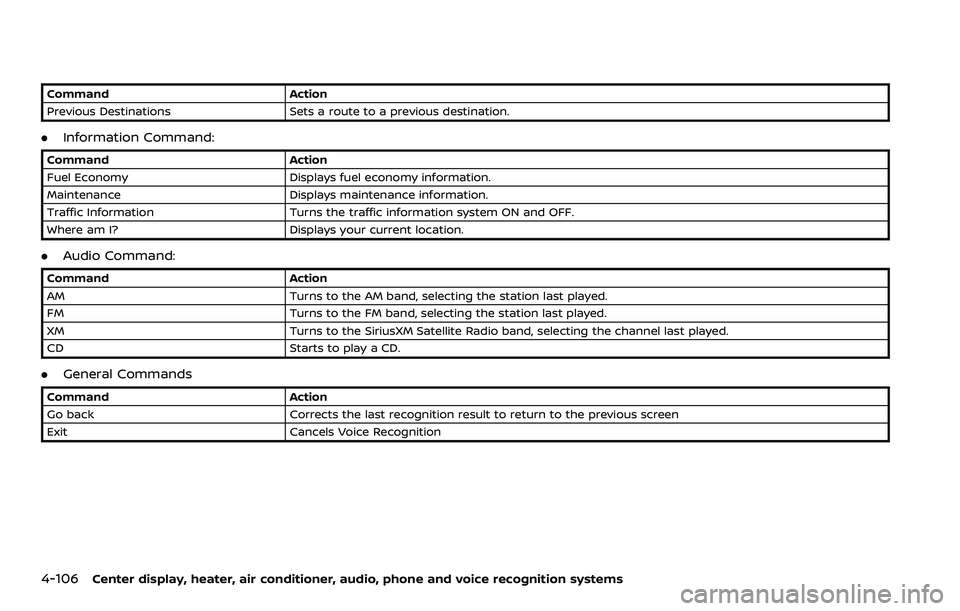
CommandAction
Previous Destinations Sets a route to a previous destination.
.Information Command:
Command Action
Fuel Economy Displays fuel economy information.
Maintenance Displays maintenance information.
Traffic Information Turns the traffic information system ON and OFF.
Where am I? Displays your current location.
.Audio Command:
Command Action
AM Turns to the AM band, selecting the station last played.
FM Turns to the FM band, selecting the station last played.
XM Turns to the SiriusXM Satellite Radio band, selecting the channel last played.
CD Starts to play a CD.
.General Commands
Command Action
Go back Corrects the last recognition result to return to the previous screen
Exit Cancels Voice Recognition
Page 284 of 453
4-116Center display, heater, air conditioner, audio, phone and voice recognition systems
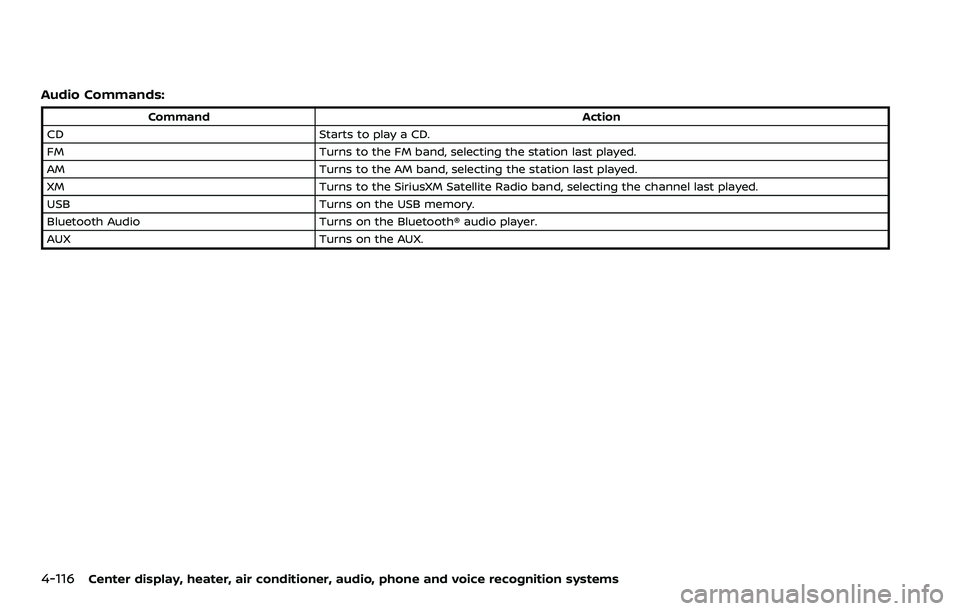
Audio Commands:
CommandAction
CD Starts to play a CD.
FM Turns to the FM band, selecting the station last played.
AM Turns to the AM band, selecting the station last played.
XM Turns to the SiriusXM Satellite Radio band, selecting the channel last played.
USB Turns on the USB memory.
Bluetooth Audio Turns on the Bluetooth® audio player.
AUX Turns on the AUX.
Page 321 of 453
faces even with ABS. Stopping
distances may also be longer on
rough, gravel or snow covered
roads, or if you are using tire
chains. Always maintain a safe
distance from the vehicle in front
of you. Ultimately, the driver is
responsible for safety.
. Tire type and condition may also
affect braking effectiveness.
— When replacing tires, install
the specified size of tires on
all four wheels.
— When installing a spare tire, make sure that it is the proper
size and type as specified on
the Tire and Loading Informa-
tion label. See “Tire and Load-
ing Information label” (P.10-
14) of this manual.
— For detailed information, see “Wheels and tires” (P.8-26) of
this manual.
The Anti-lock Braking System (ABS) con-
trols the brakes so the wheels do not lock
during hard braking or when braking on
slippery surfaces. The system detects the
rotation speed at each wheel and varies
the brake fluid pressure to prevent each
wheel from locking and sliding. By pre- venting each wheel from locking, the
system helps the driver maintain steering
control and helps to minimize swerving
and spinning on slippery surfaces.
Using the system
Depress the brake pedal and hold it down.
Depress the brake pedal with firm steady
pressure, but do not pump the brakes.
The ABS will operate to prevent the
wheels from locking up. Steer the vehicle
to avoid obstacles.
WARNING
Do not pump the brake pedal. Doing
so may result in increased stopping
distances.
Self-test feature
The ABS includes electronic sensors, elec-
tric pumps, hydraulic solenoids and a
computer. The computer has a built-in
diagnostic feature that tests the system
each time you start the engine and move
the vehicle at a low speed in forward or
reverse. When the self-test occurs, you
may hear a “clunk” noise and/or feel a
pulsation in the brake pedal. This is
normal and does not indicate a malfunc-
tion. If the computer senses a malfunc-
tion, it switches the ABS off and
illuminates the ABS warning light on the
instrument panel. The brake system then
operates normally, but without anti-lock
assistance.
If the ABS warning light illuminates during
the self-test or while driving, have the
vehicle checked. It is recommended you
visit a NISSAN dealer for this service.
Normal operation
The ABS operates at speeds above 3 to 6
MPH (5 to 10 km/h).
When the ABS senses that one or more
wheels are close to locking up, the
actuator rapidly applies and releases
hydraulic pressure. This action is similar
to pumping the brakes very quickly. You
may feel a pulsation in the brake pedal
and hear a noise from under the hood or
feel a vibration from the actuator when it
is operating. This is normal and indicates
that the ABS is operating properly. How-
ever, the pulsation may indicate that road
conditions are hazardous and extra care
is required while driving.
Starting and driving5-29
Page 322 of 453
5-30Starting and driving
The Vehicle Dynamic Control (VDC) sys-
tem uses various sensors to monitor
driver inputs and vehicle motion. Under
certain driving conditions, the VDC sys-
tem helps to perform the following func-
tions.
.Controls brake pressure to reduce
wheel slip on one slipping drive wheel
so power is transferred to a non
slipping drive wheel on the same axle.
. Controls brake pressure and engine
output to reduce drive wheel slip
based on vehicle speed (traction con-
trol function).
. Controls brake pressure at individual
wheels and engine output to help the
driver maintain control of the vehicle
in the following conditions:
— understeer (vehicle tends to not
follow the steered path despite
increased steering input)
— oversteer (vehicle tends to spin due to certain road or driving condi-
tions).
The VDC system can help the driver to
maintain control of the vehicle, but it
cannot prevent loss of vehicle control in
all driving situations.
When the VDC system operates, the VDC
warning light
in the instrument panel
flashes so note the following: .
The road may be slippery or the
system may determine some action
is required to help keep the vehicle on
the steered path.
. You may feel a pulsation in the brake
pedal and hear a noise or vibration
from under the hood. This is normal
and indicates that the VDC system is
working properly.
. Adjust your speed and driving to the
road conditions.
See “Vehicle Dynamic Control (VDC) warn-
ing light” (P.2-15).
If a malfunction occurs in the system, the
VDC warning light
illuminates in the
instrument panel. The VDC system auto-
matically turns off.
The VDC OFF switch is used to turn off the
VDC system. The VDC off indicator light
illuminates to indicate the VDC sys-
tem is off. When the VDC switch is used to
turn off the system, the VDC system still
operates to prevent one drive wheel from
slipping by transferring power to a non
slipping drive wheel. The VDC warning
light
flashes if this occurs. All other
VDC functions are off, and the VDC
warning light
will not flash. The VDC
system is automatically reset to on when
the ignition switch is placed in the off
position then back to the on position.
See “Vehicle Dynamic Control (VDC) warn- ing light” (P.2-15) and “Vehicle Dynamic
Control (VDC) off indicator light” (P.2-18).
The computer has a built-in diagnostic
feature that tests the system each time
you start the engine and move the vehicle
forward or in reverse at a slow speed.
When the self-test occurs, you may hear a
“clunk” noise and/or feel a pulsation in the
brake pedal. This is normal and is not an
indication of a malfunction.
WARNING
.
The VDC system is designed to
help the driver maintain stability
but does not prevent accidents
due to abrupt steering operation
at high speeds or by careless or
dangerous driving techniques.
Reduce vehicle speed and be
especially careful when driving
and cornering on slippery sur-
faces and always drive carefully.
. Do not modify the vehicle’s sus-
pension. If suspension parts such
as shock absorbers, struts,
springs, stabilizer bars, bushings
and wheels are not NISSAN re-
commended for your vehicle or
are extremely deteriorated, the
VDC system may not operate
VEHICLE DYNAMIC CONTROL (VDC) SYSTEM