sat NISSAN 370Z 2018 Owner´s Manual
[x] Cancel search | Manufacturer: NISSAN, Model Year: 2018, Model line: 370Z, Model: NISSAN 370Z 2018Pages: 453, PDF Size: 2.19 MB
Page 6 of 453
CALIFORNIA PERCHLORATE ADVI-
SORY
Some vehicle parts, such as lithium
batteries, may contain perchlorate ma-
terial. The following advisory is pro-
vided: “Perchlorate Material - special
handling may apply, See www.dtsc.ca.
gov/hazardouswaste/perchlorate.”
Bluetooth® is a trademark
owned by Bluetooth SIG, Inc.
and licensed to Visteon Cor-
poration and Clarion Co., Ltd.
SiriusXM® services require a
subscription after trial period
and are sold separately or as
a package. The satellite ser-
vice is available only in the 48
contiguous USA and DC. Sir-
iusXM® satellite service is
also available in Canada: see
www.siriusxm.ca.
© 2017 NISSAN MOTOR CO., LTD.
All rights reserved. No part of this Owner’s
Manual may be reproduced or stored in a
retrieval system, or transmitted in any
form, or by any means, electronic, me-
chanical, photocopying, recording or
otherwise, without the prior written per-
mission of Nissan Motor Co., Ltd.
Page 8 of 453
NISSAN CUSTOMER CARE PROGRAM
NISSAN CARES ...
Both NISSAN and your NISSAN dealer are dedicated to serving all your automotive needs. Your satisfaction with your vehicle and your
NISSAN dealer are our primary concerns. Your NISSAN dealer is always available to assist you with all your automobile sales and
service needs.
However, if there is something that your
NISSAN dealer cannot assist you with or
you would like to provide NISSAN directly
with comments or questions, please con-
tact the NISSAN Consumer Affairs Depart-
ment using our toll-free number:For U.S. customers1-800-NISSAN-1
(1-800-647-7261)
For Canadian customers 1-800-387-0122 The Consumer Affairs Department will
ask for the following information:
.
Your name, address, and telephone
number
. Vehicle identification number (at-
tached to the top of the instrument
panel on the driver’s side)
. Date of purchase
. Current odometer reading
. Your NISSAN dealer’s name
. Your comments or questions
OR You can write to NISSAN with the infor-
mation on the left at:
For U.S. customersNissan North America, Inc.
Consumer Affairs Department
P.O. Box 685003
Franklin, TN 37068-5003
or via e-mail at:
nnaconsumeraffairs@nissan-usa.
com
For Canadian customers Nissan Canada Inc.
5290 Orbitor Drive
Mississauga, Ontario L4W 4Z5
or via e-mail at:
information.centre@nissancana-
da.com
If you prefer, visit us at:
www.nissanusa.com(for U.S. customers)
or
www.nissan.ca(for Canadian customers)
We appreciate your interest in NISSAN
and thank you for buying a quality NISSAN
vehicle.
Page 15 of 453
SSI0811
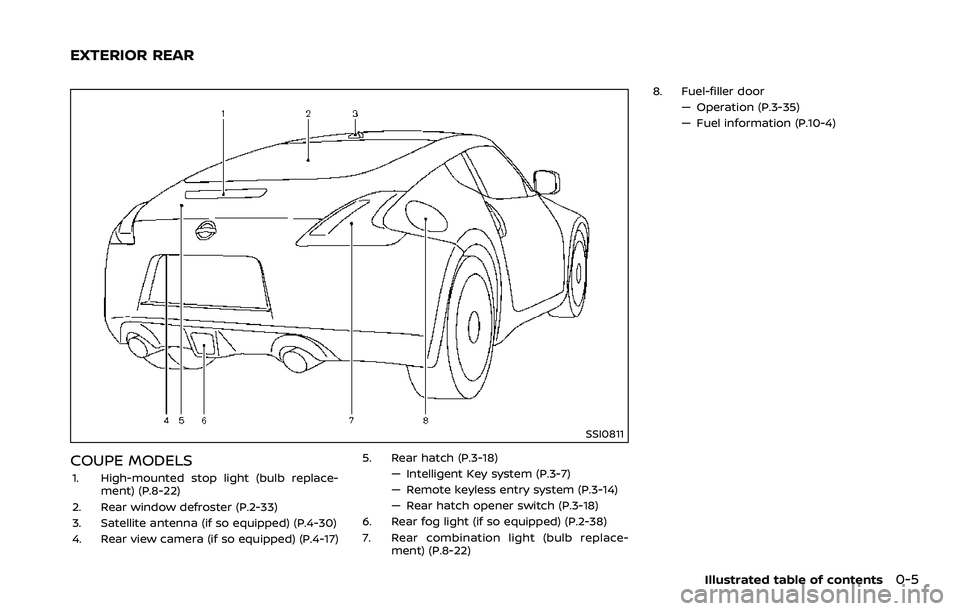
COUPE MODELS
1. High-mounted stop light (bulb replace-ment) (P.8-22)
2. Rear window defroster (P.2-33)
3. Satellite antenna (if so equipped) (P.4-30)
4. Rear view camera (if so equipped) (P.4-17) 5. Rear hatch (P.3-18)
— Intelligent Key system (P.3-7)
— Remote keyless entry system (P.3-14)
— Rear hatch opener switch (P.3-18)
6. Rear fog light (if so equipped) (P.2-38)
7. Rear combination light (bulb replace- ment) (P.8-22) 8. Fuel-filler door
— Operation (P.3-35)
— Fuel information (P.10-4)
Illustrated table of contents0-5
EXTERIOR REAR
Page 60 of 453
1-36Safety — Seats, seat belts and supplemental restraint system
JVR0087X
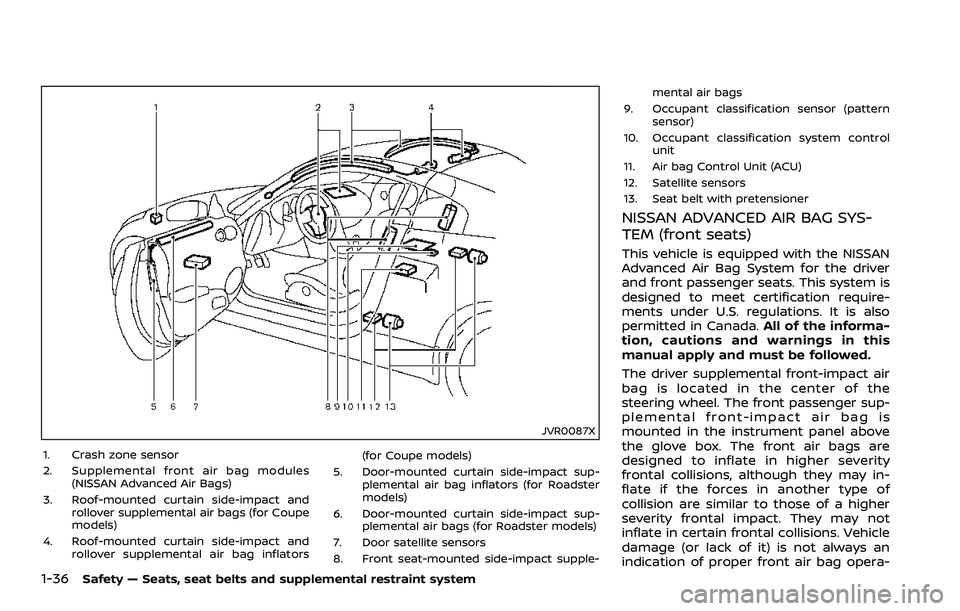
1. Crash zone sensor
2. Supplemental front air bag modules(NISSAN Advanced Air Bags)
3. Roof-mounted curtain side-impact and rollover supplemental air bags (for Coupe
models)
4. Roof-mounted curtain side-impact and rollover supplemental air bag inflators (for Coupe models)
5. Door-mounted curtain side-impact sup- plemental air bag inflators (for Roadster
models)
6. Door-mounted curtain side-impact sup- plemental air bags (for Roadster models)
7. Door satellite sensors
8. Front seat-mounted side-impact supple- mental air bags
9. Occupant classification sensor (pattern sensor)
10. Occupant classification system control unit
11. Air bag Control Unit (ACU)
12. Satellite sensors
13. Seat belt with pretensioner
NISSAN ADVANCED AIR BAG SYS-
TEM (front seats)
This vehicle is equipped with the NISSAN
Advanced Air Bag System for the driver
and front passenger seats. This system is
designed to meet certification require-
ments under U.S. regulations. It is also
permitted in Canada. All of the informa-
tion, cautions and warnings in this
manual apply and must be followed.
The driver supplemental front-impact air
bag is located in the center of the
steering wheel. The front passenger sup-
plemental front-impact air bag is
mounted in the instrument panel above
the glove box. The front air bags are
designed to inflate in higher severity
frontal collisions, although they may in-
flate if the forces in another type of
collision are similar to those of a higher
severity frontal impact. They may not
inflate in certain frontal collisions. Vehicle
damage (or lack of it) is not always an
indication of proper front air bag opera-
Page 169 of 453

4 Center display, heater, air conditioner,audio, phone and voice recognition sys-
tems
Safety note ........................................................................\
................. 4-3
Center multi-function control panel (models with
navigation system) ....................................................................... 4-4
How to use multi-function controller ..................... 4-4
How to use touch screen ................................................. 4-5
Menu options ........................................................................\
..... 4-7
How to select menus on the screen ....................... 4-7
Vehicle information and settings (models with
navigation system) ....................................................................... 4-8 How to use STATUS button ........................................... 4-8
How to use brightness control and display
ON/OFF button ........................................................................\
. 4-8
How to use INFO button ................................................... 4-8
How to use SETTING button ......................................... 4-11
RearView Monitor (models with
navigation system) ..................................................................... 4-17 RearView Monitor system operation .................... 4-18
How to read displayed lines ......................................... 4-18
How to park with predictive course lines ......... 4-19
Adjusting the screen ......................................................... 4-22
Predictive course line settings .................................. 4-22
RearView Monitor system limitations .................. 4-22
System maintenance ........................................................ 4-23 Ventilators ........................................................................\
............... 4-24
Center ventilators ............................................................. 4-24
Side ventilators ................................................................... 4-24
Heater and air conditioner ................................................. 4-25
Automatic air conditioner (Type A) (if
so equipped) ........................................................................\
.. 4-26
Automatic air conditioner (Type B) (if
so equipped) ........................................................................\
.. 4-28
Operating tips ...................................................................... 4-30
In-cabin microfilter ........................................................... 4-30
Servicing air conditioner .............................................. 4-30
Audio system ........................................................................\
........ 4-30 Audio operation precautions ................................... 4-30
FM-AM radio with Compact Disc
(CD) player ........................................................................\
....... 4-43
FM-AM-SAT radio with Compact Disc
(CD) player ........................................................................\
....... 4-52
DVD (Digital Versatile Disc) player operation
(models with navigation system) ......................... 4-55
USB (Universal Serial Bus) connection port
(models with navigation system) ......................... 4-59
Bluetooth® streaming audio (models with
navigation system) ........................................................... 4-63
Page 191 of 453
.Use the displayed lines as a re-
ference. The lines are highly af-
fected by the number of
occupants, fuel level, vehicle po-
sition, road conditions and road
grade.
. Make sure that the trunk lid or
rear hatch is securely closed
when backing up.
. Do not put anything on the rear-
view camera. The rearview cam-
era is installed above the license
plate.
. When washing the vehicle with
high-pressure water, be sure not
to spray it around the camera.
Otherwise, water may enter the
camera unit causing water con-
densation on the lens, a malfunc-
tion, fire or an electric shock.
. Do not strike the camera. It is a
precision instrument. Otherwise,
it may malfunction or cause da-
mage resulting in a fire or an
electric shock.
The following are operating limitations
and do not represent a system malfunc-
tion:
. When the temperature is extremely
high or low, the screen may not clearly display objects.
. When strong light is directly coming
on the camera, objects may not be
displayed clearly.
. Vertical lines may be seen in objects
on the screen. This is due to strong
reflected light from the bumper.
. The screen may flicker under fluores-
cent light.
. The colors of objects on the RearView
Monitor may differ somewhat from
the actual color of objects.
. Objects on the monitor may not be
clear in a dark environment.
. If dirt, rain or snow accumulates on
the camera, the RearView Monitor
may not display objects clearly. Clean
the camera.
. Do not use wax on the camera win-
dow. Wipe off any wax with a clean
cloth dampened with mild detergent
diluted with water.
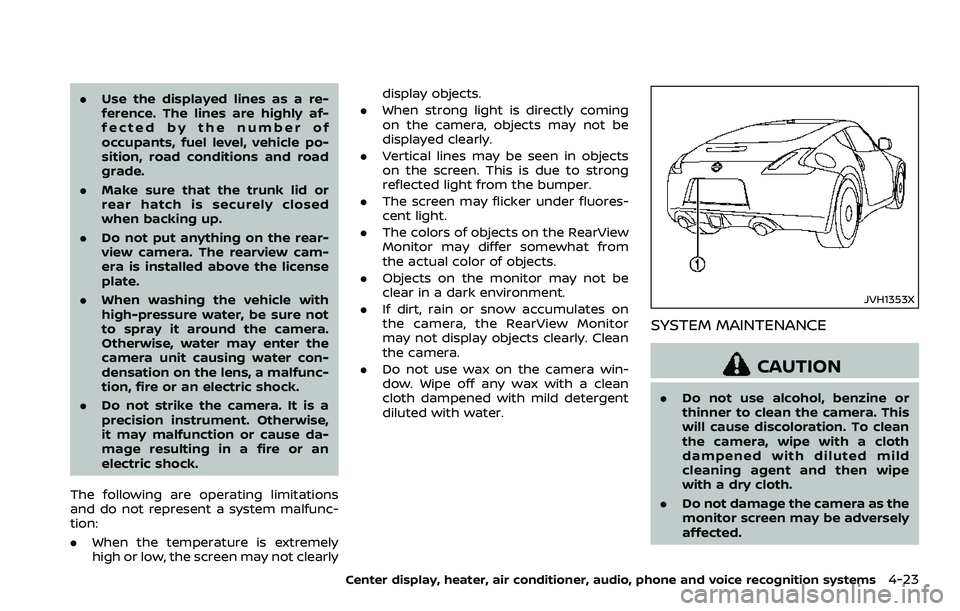
JVH1353X
SYSTEM MAINTENANCE
CAUTION
.Do not use alcohol, benzine or
thinner to clean the camera. This
will cause discoloration. To clean
the camera, wipe with a cloth
dampened with diluted mild
cleaning agent and then wipe
with a dry cloth.
. Do not damage the camera as the
monitor screen may be adversely
affected.
Center display, heater, air conditioner, audio, phone and voice recognition systems4-23
Page 200 of 453
4-32Center display, heater, air conditioner, audio, phone and voice recognition systems
cal power lines, electric signs and even
traffic lights.
Satellite radio reception (if so
equipped):
When the satellite radio is used for the
first time or the battery has been re-
placed, the satellite radio may not work
properly. This is not a malfunction. Wait
more than 10 minutes with the satellite
radio ON and the vehicle outside of any
metal or large building for the satellite
radio to receive all of the necessary data.
The satellite radio mode requires an
active SiriusXM Satellite Radio subscrip-
tion. The satellite radio is not available in
Alaska, Hawaii and Guam.
The satellite radio performance may be
affected if cargo carried on the roof
blocks the satellite radio signal.
If possible, do not put cargo near the
satellite antenna.
A build up of ice on the satellite radio
antenna can affect satellite radio perfor-
mance. Remove the ice to restore satellite
radio reception.
SAA0480
Compact Disc (CD) player
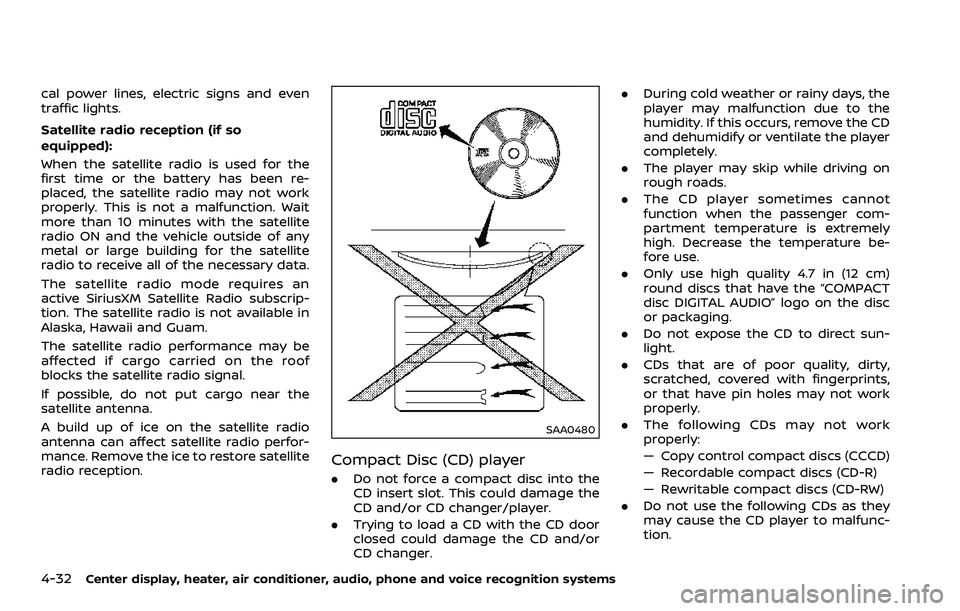
.Do not force a compact disc into the
CD insert slot. This could damage the
CD and/or CD changer/player.
. Trying to load a CD with the CD door
closed could damage the CD and/or
CD changer. .
During cold weather or rainy days, the
player may malfunction due to the
humidity. If this occurs, remove the CD
and dehumidify or ventilate the player
completely.
. The player may skip while driving on
rough roads.
. The CD player sometimes cannot
function when the passenger com-
partment temperature is extremely
high. Decrease the temperature be-
fore use.
. Only use high quality 4.7 in (12 cm)
round discs that have the “COMPACT
disc DIGITAL AUDIO” logo on the disc
or packaging.
. Do not expose the CD to direct sun-
light.
. CDs that are of poor quality, dirty,
scratched, covered with fingerprints,
or that have pin holes may not work
properly.
. The following CDs may not work
properly:
— Copy control compact discs (CCCD)
— Recordable compact discs (CD-R)
— Rewritable compact discs (CD-RW)
. Do not use the following CDs as they
may cause the CD player to malfunc-
tion.
Page 201 of 453
— 3.1 in (8 cm) discs
— CDs that are not round
— CDs with a paper label
— CDs that are warped, scratched, orhave abnormal edges
. This audio system can only play pre-
recorded CDs. It has no capabilities to
record or burn CDs.
. If the CD cannot be played, one of the
following messages will be displayed.
CHECK DISC:
— Confirm that the CD is inserted
correctly (the label side is facing
up, etc.).
— Confirm that the CD is not bent or warped and it is free of scratches.
PUSH EJECT:
This is an error due to the tempera-
ture inside the player is too high.
Remove the CD by pushing the EJECT
button, and after a short time reinsert
the CD. The CD can be played when
the temperature of the player returns
to normal.
UNPLAYABLE:
The file is unplayable in this audio
system (only MP3 or WMA CD).
LHA0484
DVD (Digital Versatile Disc) player
(models with navigation system)
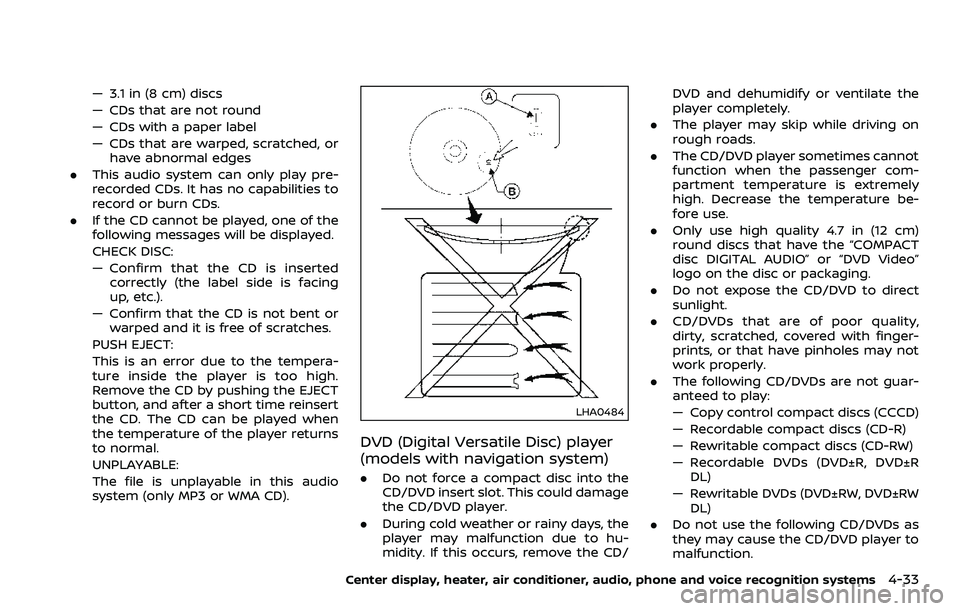
. Do not force a compact disc into the
CD/DVD insert slot. This could damage
the CD/DVD player.
. During cold weather or rainy days, the
player may malfunction due to hu-
midity. If this occurs, remove the CD/ DVD and dehumidify or ventilate the
player completely.
. The player may skip while driving on
rough roads.
. The CD/DVD player sometimes cannot
function when the passenger com-
partment temperature is extremely
high. Decrease the temperature be-
fore use.
. Only use high quality 4.7 in (12 cm)
round discs that have the “COMPACT
disc DIGITAL AUDIO” or “DVD Video”
logo on the disc or packaging.
. Do not expose the CD/DVD to direct
sunlight.
. CD/DVDs that are of poor quality,
dirty, scratched, covered with finger-
prints, or that have pinholes may not
work properly.
. The following CD/DVDs are not guar-
anteed to play:
— Copy control compact discs (CCCD)
— Recordable compact discs (CD-R)
— Rewritable compact discs (CD-RW)
— Recordable DVDs (DVD±R, DVD±R
DL)
— Rewritable DVDs (DVD±RW, DVD±RW DL)
. Do not use the following CD/DVDs as
they may cause the CD/DVD player to
malfunction.
Center display, heater, air conditioner, audio, phone and voice recognition systems4-33
Page 208 of 453
4-40Center display, heater, air conditioner, audio, phone and voice recognition systems
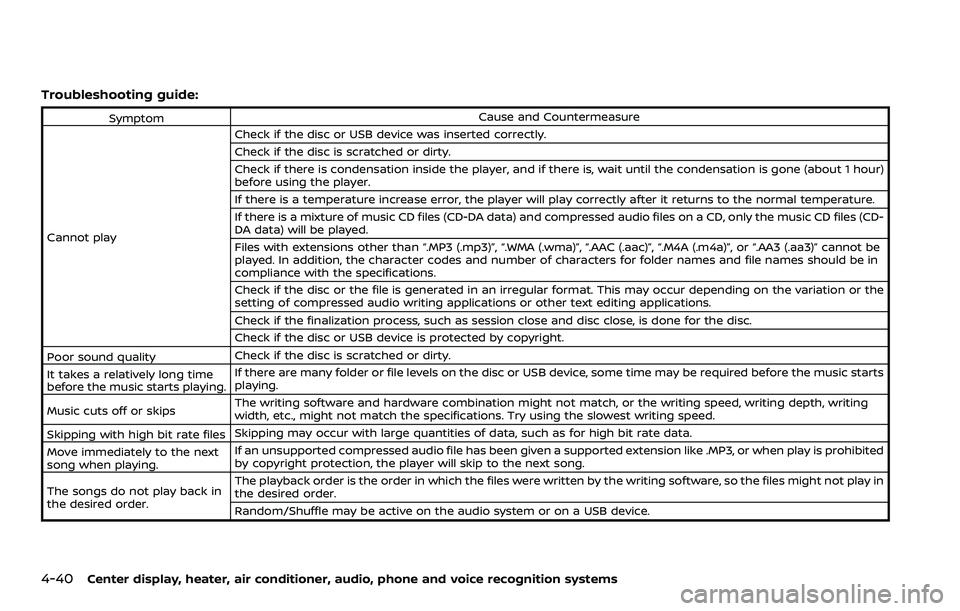
Troubleshooting guide:
SymptomCause and Countermeasure
Cannot play Check if the disc or USB device was inserted correctly.
Check if the disc is scratched or dirty.
Check if there is condensation inside the player, and if there is, wait until the condensation is gone (about 1 hour)
before using the player.
If there is a temperature increase error, the player will play correctly after it returns to the normal temperature.
If there is a mixture of music CD files (CD-DA data) and compressed audio files on a CD, only the music CD files (CD-
DA data) will be played.
Files with extensions other than “.MP3 (.mp3)”, “.WMA (.wma)”, “.AAC (.aac)”, “.M4A (.m4a)”, or “.AA3 (.aa3)” cannot be
played. In addition, the character codes and number of characters for folder names and file names should be in
compliance with the specifications.
Check if the disc or the file is generated in an irregular format. This may occur depending on the variation or the
setting of compressed audio writing applications or other text editing applications.
Check if the finalization process, such as session close and disc close, is done for the disc.
Check if the disc or USB device is protected by copyright.
Poor sound quality Check if the disc is scratched or dirty.
It takes a relatively long time
before the music starts playing. If there are many folder or file levels on the disc or USB device, some time may be required before the music starts
playing.
Music cuts off or skips The writing software and hardware combination might not match, or the writing speed, writing depth, writing
width, etc., might not match the specifications. Try using the slowest writing speed.
Skipping with high bit rate files Skipping may occur with large quantities of data, such as for high bit rate data.
Move immediately to the next
song when playing. If an unsupported compressed audio file has been given a supported extension like .MP3, or when play is prohibited
by copyright protection, the player will skip to the next song.
The songs do not play back in
the desired order. The playback order is the order in which the files were written by the writing software, so the files might not play in
the desired order.
Random/Shuffle may be active on the audio system or on a USB device.
Page 220 of 453
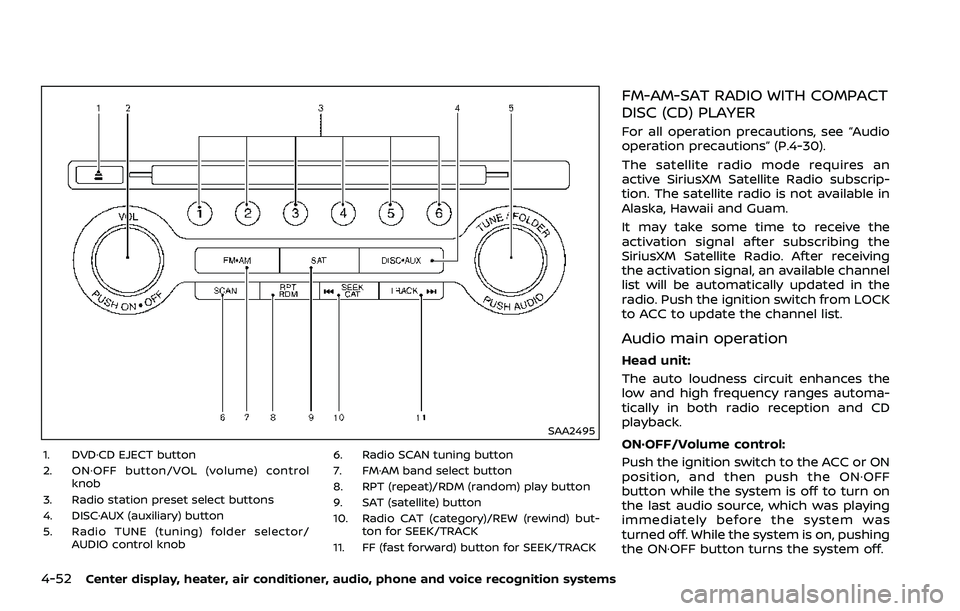
4-52Center display, heater, air conditioner, audio, phone and voice recognition systems
SAA2495
1. DVD·CD EJECT button
2. ON·OFF button/VOL (volume) controlknob
3. Radio station preset select buttons
4. DISC·AUX (auxiliary) button
5. Radio TUNE (tuning) folder selector/ AUDIO control knob 6. Radio SCAN tuning button
7. FM·AM band select button
8. RPT (repeat)/RDM (random) play button
9. SAT (satellite) button
10. Radio CAT (category)/REW (rewind) but-
ton for SEEK/TRACK
11. FF (fast forward) button for SEEK/TRACK
FM-AM-SAT RADIO WITH COMPACT
DISC (CD) PLAYER
For all operation precautions, see “Audio
operation precautions” (P.4-30).
The satellite radio mode requires an
active SiriusXM Satellite Radio subscrip-
tion. The satellite radio is not available in
Alaska, Hawaii and Guam.
It may take some time to receive the
activation signal after subscribing the
SiriusXM Satellite Radio. After receiving
the activation signal, an available channel
list will be automatically updated in the
radio. Push the ignition switch from LOCK
to ACC to update the channel list.
Audio main operation
Head unit:
The auto loudness circuit enhances the
low and high frequency ranges automa-
tically in both radio reception and CD
playback.
ON·OFF/Volume control:
Push the ignition switch to the ACC or ON
position, and then push the ON·OFF
button while the system is off to turn on
the last audio source, which was playing
immediately before the system was
turned off. While the system is on, pushing
the ON·OFF button turns the system off.