parking brake NISSAN 370Z 2020 Owner´s Manual
[x] Cancel search | Manufacturer: NISSAN, Model Year: 2020, Model line: 370Z, Model: NISSAN 370Z 2020Pages: 455, PDF Size: 2.22 MB
Page 309 of 455
.Make sure the area around the vehicle
is clear.
. Check fluid levels such as engine oil,
coolant, brake fluid and window
washer fluid as frequently as possible,
or at least whenever you refuel.
. Check that all windows and lights are
clean.
. Visually inspect tires for their appear-
ance and condition. Also check tires
for proper inflation.
. Lock all doors.
. Position seat and adjust head re-
straints.
. Adjust inside and outside mirrors.
. Fasten seat belts and ask all passen-
gers to do likewise.
. Check the operation of warning lights
when the ignition switch is pushed to
the ON position. (See “Warning lights,
indicator lights and audible remin-
ders” (P.2-10).) 1. Apply the parking brake.
2.
Automatic Transmission (AT) model:
Move the shift lever to the P (Park) or N
(Neutral) position. (P is recommended.)
The starter is designed not to operate
unless the shift lever is in either of the
above positions.
Manual Transmission (MT) model:
Move the shift lever to the N (Neutral)
position. Depress the clutch pedal fully
to the floor.
The starter is designed not to operate
unless the clutch pedal is fully de-
pressed.
The Intelligent Key must be carried
when operating the ignition switch.
3. Push the ignition switch to the ON position. Firmly depress the brake
pedal (AT model) or the clutch pedal
(MT model) and push the ignition
switch to start the engine.
To start the engine immediately, push
and release the ignition switch while
depressing the brake pedal or the
clutch pedal with the ignition switch
in any position.
.If the engine is very hard to start inextremely cold weather or when
restarting, depress the accelerator
pedal a little (approximately 1/3 to the floor) and while holding, crank
the engine. Release the accelerator
pedal when the engine starts.
.If the engine is very hard to start
because it is flooded, depress the
accelerator pedal all the way to the
floor and hold it. Push the ignition
switch to the ON position to start
cranking the engine. After 5 or 6
seconds, stop cranking by pushing
the ignition switch to OFF. After
cranking the engine, release the
accelerator pedal. Crank the engine
with your foot off the accelerator
pedal by depressing the brake
pedal and pushing the push-button
ignition switch to start the engine.
If the engine starts, but fails to run,
repeat the above procedure.
CAUTION
Do not operate the starter for more
than 15 seconds at a time. If the
engine does not start, push the
ignition switch to OFF and wait 10
seconds before cranking again,
otherwise the starter could be da-
maged.
Starting and driving5-11
BEFORE STARTING THE ENGINE STARTING THE ENGINE
Page 311 of 455
1. Keep the foot brake pedal depressedand push the shift lever button to shift
into a driving gear.
2. Release the parking brake and foot brake, then gradually start the vehicle
in motion.
WARNING
.Do not depress the accelerator
pedal while shifting from P (Park)
or N (Neutral) to R (Reverse) D
(Drive), or manual shift mode. Al-
ways depress the brake pedal
until shifting is completed. Failure
to do so could cause you to lose
control and have an accident.
. Cold engine idle speed is high, so
use caution when shifting into a
forward or reverse gear before
the engine has warmed up.
. Never shift to either the P (Park)
or R (Reverse) position while the
vehicle is moving forward and P
(Park) or D (Drive) position while
the vehicle is reversing. This could
cause an accident or damage the
transmission.
. Do not downshift abruptly on
slippery roads. This may cause a loss of control.
CAUTION
.
Except in an emergency, do not
shift to the N (Neutral) position
while driving. Coasting with the
transmission in the N (Neutral)
position may cause serious da-
mage to the transmission.
. To avoid possible damage to your
vehicle; when stopping the vehi-
cle on an uphill grade, do not hold
the vehicle by depressing the
accelerator pedal. The foot brake
should be used for this purpose.
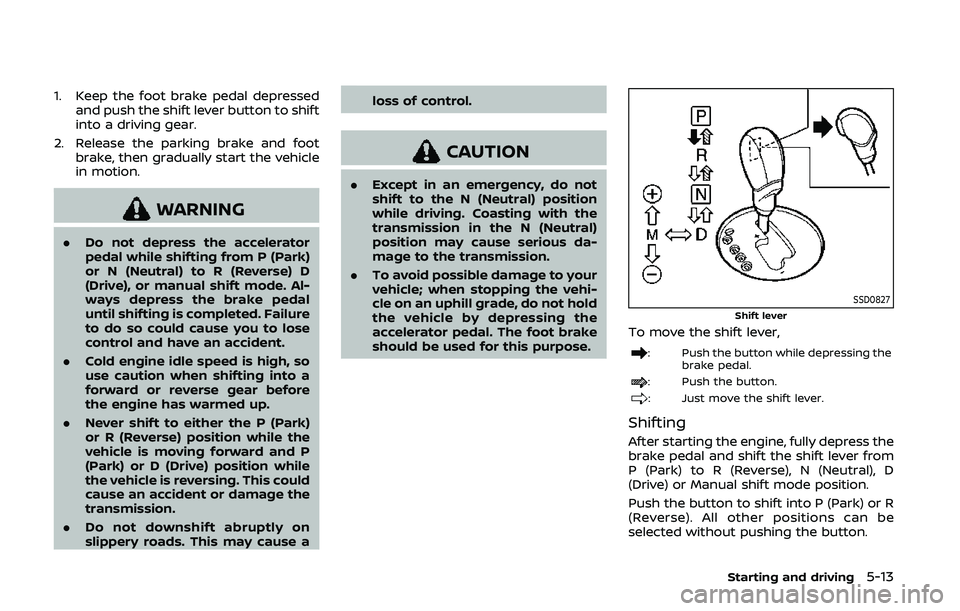
SSD0827Shift lever
To move the shift lever,
: Push the button while depressing the
brake pedal.
: Push the button.
: Just move the shift lever.
Shifting
After starting the engine, fully depress the
brake pedal and shift the shift lever from
P (Park) to R (Reverse), N (Neutral), D
(Drive) or Manual shift mode position.
Push the button to shift into P (Park) or R
(Reverse). All other positions can be
selected without pushing the button.
Starting and driving5-13
Page 312 of 455
5-14Starting and driving
WARNING
Apply the parking brake if the shift
lever is in any position while the
engine is not running. Failure to do
so could cause the vehicle to move
unexpectedly or roll away and result
in serious personal injury or property
damage.
CAUTION
Make sure the vehicle is completely
stopped and the transmission is in
the P (Park) position.
P (Park) position:
Use this position when the vehicle is
parked or when starting the engine. Make
sure the vehicle is completely stopped.
The brake pedal must be depressed and
the shift lever button pushed in to move
the shift lever from the N (Neutral)
position or any drive position to the P
(Park) position. Apply the parking brake.
When parking on a hill, apply the parking
brake first, then move the shift lever to
the P (Park) position.
CAUTION
Use this position only when the
vehicle is completely stopped.
R (Reverse):
Use this position to back up. Always be
sure the vehicle is completely stopped
before selecting the R (Reverse) position.
The brake pedal must be depressed and
the shift lever button pushed in to move
the shift lever from the P (Park) posi-
tion, the N (Neutral) position or any
drive position to the R (Reverse) posi-
tion.
N (Neutral):
Neither forward nor reverse gear is en-
gaged. The engine can be started in this
position. You may shift to the N (Neutral)
position and restart a stalled engine while
the vehicle is moving.
D (Drive):
Use this position for all normal forward
driving.
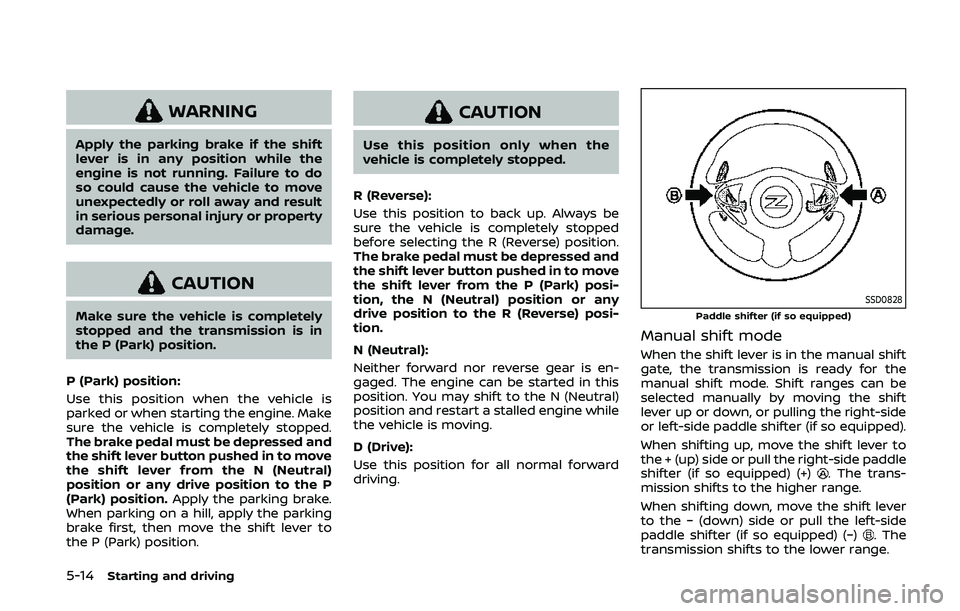
SSD0828Paddle shifter (if so equipped)
Manual shift mode
When the shift lever is in the manual shift
gate, the transmission is ready for the
manual shift mode. Shift ranges can be
selected manually by moving the shift
lever up or down, or pulling the right-side
or left-side paddle shifter (if so equipped).
When shifting up, move the shift lever to
the + (up) side or pull the right-side paddle
shifter (if so equipped) (+)
. The trans-
mission shifts to the higher range.
When shifting down, move the shift lever
to the − (down) side or pull the left-side
paddle shifter (if so equipped) (−)
. The
transmission shifts to the lower range.
Page 315 of 455
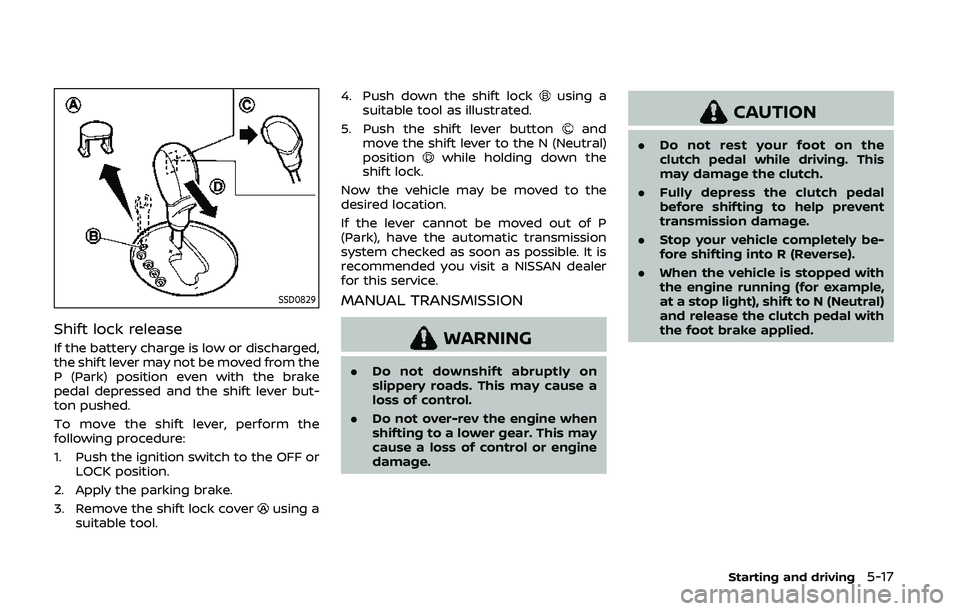
SSD0829
Shift lock release
If the battery charge is low or discharged,
the shift lever may not be moved from the
P (Park) position even with the brake
pedal depressed and the shift lever but-
ton pushed.
To move the shift lever, perform the
following procedure:
1. Push the ignition switch to the OFF orLOCK position.
2. Apply the parking brake.
3. Remove the shift lock cover
using a
suitable tool. 4. Push down the shift lock
using a
suitable tool as illustrated.
5. Push the shift lever button
and
move the shift lever to the N (Neutral)
position
while holding down the
shift lock.
Now the vehicle may be moved to the
desired location.
If the lever cannot be moved out of P
(Park), have the automatic transmission
system checked as soon as possible. It is
recommended you visit a NISSAN dealer
for this service.
MANUAL TRANSMISSION
WARNING
. Do not downshift abruptly on
slippery roads. This may cause a
loss of control.
. Do not over-rev the engine when
shifting to a lower gear. This may
cause a loss of control or engine
damage.
CAUTION
.Do not rest your foot on the
clutch pedal while driving. This
may damage the clutch.
. Fully depress the clutch pedal
before shifting to help prevent
transmission damage.
. Stop your vehicle completely be-
fore shifting into R (Reverse).
. When the vehicle is stopped with
the engine running (for example,
at a stop light), shift to N (Neutral)
and release the clutch pedal with
the foot brake applied.
Starting and driving5-17
Page 319 of 455
![NISSAN 370Z 2020 Owner´s Manual For quick acceleration in low altitude
areas or in high altitude areas [over
4,000 ft (1,219 m)]:
Gear changeMPH (km/h)
1st to 2nd 15 (24)
2nd to 3rd 25 (40)
3rd to 4th 40 (64)
4th to 5th 45 (72)
5th NISSAN 370Z 2020 Owner´s Manual For quick acceleration in low altitude
areas or in high altitude areas [over
4,000 ft (1,219 m)]:
Gear changeMPH (km/h)
1st to 2nd 15 (24)
2nd to 3rd 25 (40)
3rd to 4th 40 (64)
4th to 5th 45 (72)
5th](/img/5/40288/w960_40288-318.png)
For quick acceleration in low altitude
areas or in high altitude areas [over
4,000 ft (1,219 m)]:
Gear changeMPH (km/h)
1st to 2nd 15 (24)
2nd to 3rd 25 (40)
3rd to 4th 40 (64)
4th to 5th 45 (72)
5th to 6th 50 (80)
Suggested maximum speed in
each gear
Downshift to a lower gear if the engine is
not running smoothly, or if you need to
accelerate.
Do not exceed the maximum suggested
speed (shown below) in any gear. For level
road driving, use the highest gear sug-
gested for that speed. Always observe
posted speed limits, and drive according
to the road conditions, which will ensure
safe operation. Do not over-rev the en-
gine when shifting to a lower gear as it
may cause engine damage or loss of
vehicle control.
GearMPH (km/h)
1st 38 (62)
2nd 63 (102)
3rd 91 (146)
4th —
5th —
6th —
WARNING
.
Be sure the parking brake is fully
released before driving. Failure to
do so can cause brake failure and
lead to an accident.
. Do not release the parking brake
from outside the vehicle.
. Do not use the shift lever in place
of the parking brake. When park-
ing, be sure the parking brake is
fully engaged.
. To help avoid risk of injury or
death through unintended opera-
tion of the vehicle and/or its
systems, do not leave children,
people who require the assis-
tance of others or pets unat-
tended in your vehicle.
Additionally, the temperature in-
side a closed vehicle on a warm
day can quickly become high
enough to cause a significant risk
of injury or death to people and
pets.
Starting and driving5-21
PARKING BRAKE
Page 320 of 455
5-22Starting and driving
SPA2110
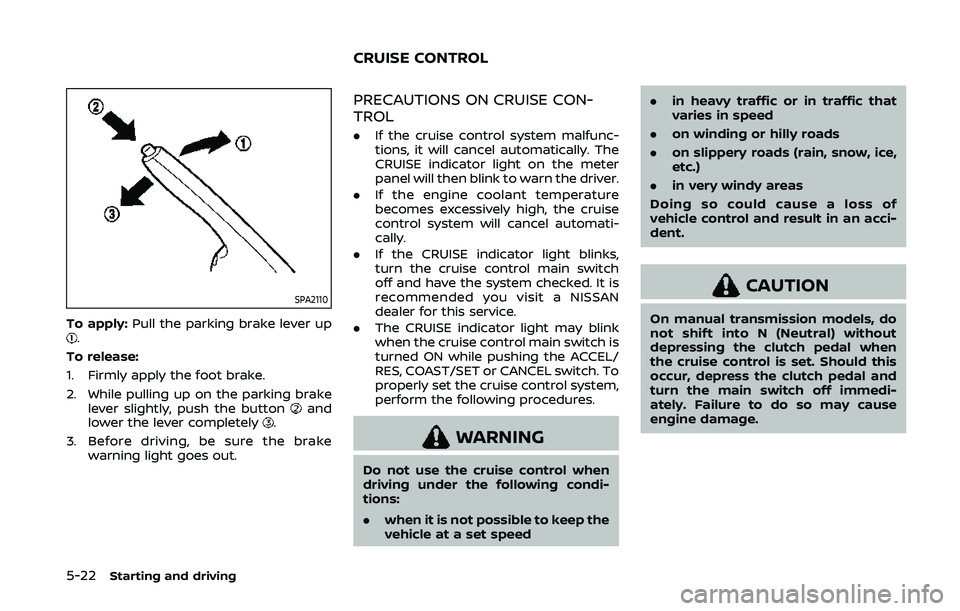
To apply:Pull the parking brake lever up.
To release:
1. Firmly apply the foot brake.
2. While pulling up on the parking brake lever slightly, push the button
and
lower the lever completely.
3. Before driving, be sure the brake warning light goes out.
PRECAUTIONS ON CRUISE CON-
TROL
.If the cruise control system malfunc-
tions, it will cancel automatically. The
CRUISE indicator light on the meter
panel will then blink to warn the driver.
. If the engine coolant temperature
becomes excessively high, the cruise
control system will cancel automati-
cally.
. If the CRUISE indicator light blinks,
turn the cruise control main switch
off and have the system checked. It is
recommended you visit a NISSAN
dealer for this service.
. The CRUISE indicator light may blink
when the cruise control main switch is
turned ON while pushing the ACCEL/
RES, COAST/SET or CANCEL switch. To
properly set the cruise control system,
perform the following procedures.
WARNING
Do not use the cruise control when
driving under the following condi-
tions:
.when it is not possible to keep the
vehicle at a set speed .
in heavy traffic or in traffic that
varies in speed
. on winding or hilly roads
. on slippery roads (rain, snow, ice,
etc.)
. in very windy areas
Doing so could cause a loss of
vehicle control and result in an acci-
dent.
CAUTION
On manual transmission models, do
not shift into N (Neutral) without
depressing the clutch pedal when
the cruise control is set. Should this
occur, depress the clutch pedal and
turn the main switch off immedi-
ately. Failure to do so may cause
engine damage.
CRUISE CONTROL
Page 324 of 455
5-26Starting and driving
SD1006MA
WARNING
.Do not stop or park the vehicle
over flammable materials such as
dry grass, waste paper or rags.
They may ignite and cause a fire.
. Never leave the engine running
while the vehicle is unattended.
. Do not leave children unattended
inside the vehicle. They could
unknowingly activate switches
or controls. Unattended children
could become involved in serious
accidents. .
To help avoid risk of injury or
death through unintended opera-
tion of the vehicle and/or its
systems, do not leave children,
people who require the assis-
tance of others or pets unat-
tended in your vehicle.
Additionally, the temperature in-
side a closed vehicle on a warm
day can quickly become high
enough to cause a significant risk
of injury or death to people and
pets.
. Safe parking procedures require
that both the parking brake be
applied and the transmission placed into P (Park) for Automatic
Transmission (AT) model or in an
appropriate gear for Manual
Transmission (MT) model. Failure
to do so could cause the vehicle
to move unexpectedly or roll
away and result in an accident.
. Make sure the automatic trans-
mission shift lever has been
pushed as far forward as it can
go and cannot be moved without
depressing the foot brake pedal.
1. Firmly apply the parking brake.
2. Automatic transmission models:
Move the shift lever to the P (Park)
position.
Manual transmission models:
Place the shift lever in the R (Reverse)
gear. When parking on an uphill grade,
place the shift lever in the 1st gear.
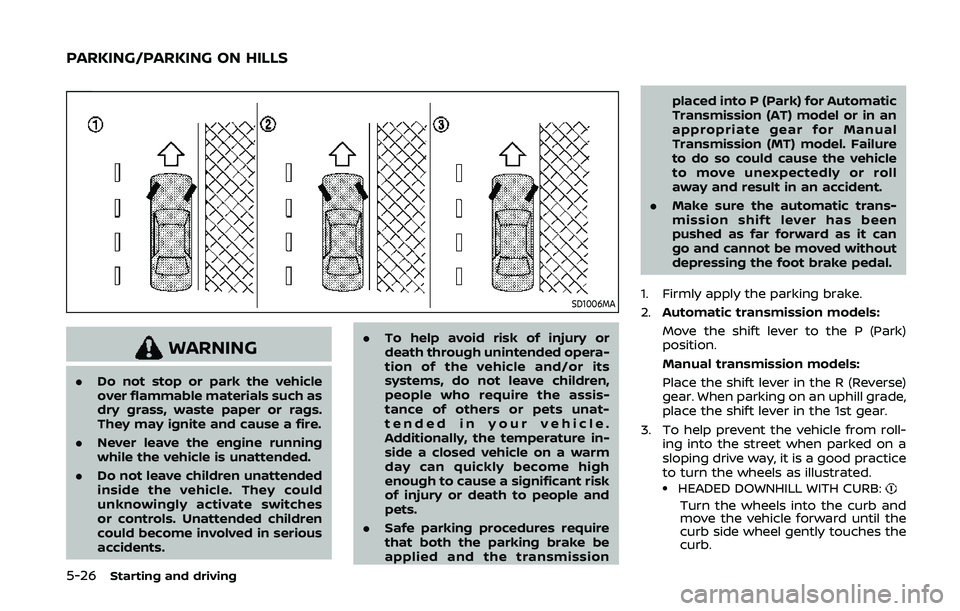
3. To help prevent the vehicle from roll- ing into the street when parked on a
sloping drive way, it is a good practice
to turn the wheels as illustrated.
.HEADED DOWNHILL WITH CURB:
Turn the wheels into the curb and
move the vehicle forward until the
curb side wheel gently touches the
curb.
PARKING/PARKING ON HILLS
Page 326 of 455
5-28Starting and driving
PARKING BRAKE BREAK-IN
Break in the parking brake shoes when-
ever the stopping effect of the parking
brake is weakened or whenever the
parking brake shoes and/or drums/ro-
tors are replaced, in order to assure the
best braking performance.
This procedure is described in the vehicle
service manual. It is recommended you
visit a NISSAN dealer for this service.
Using the brakes
Avoid resting your foot on the brake
pedal while driving. This will cause over-
heating of the brakes, wearing out the
brake and pads faster and reduce gas
mileage.
To help save the brakes and to prevent
the brakes from overheating, reduce
speed and downshift to a lower gear
before going down a slope or long grade.
Overheated brakes may reduce braking
performance and could result in loss of
vehicle control.
WARNING
.While driving on a slippery sur-
face, be careful when braking,
accelerating or downshifting.
Abrupt braking or accelerating could cause the wheels to skid
and result in an accident.
. If the engine is not running or is
turned off while driving, the
power assist for the brakes will
not work. Braking will be harder.
BRAKE ASSIST
When the force applied to the brake pedal
exceeds a certain level, the Brake Assist is
activated generating greater braking
force than a conventional brake booster
even with light pedal force.
WARNING
The Brake Assist is only an aid to
assist braking operation and is not a
collision warning or avoidance de-
vice. It is the driver’s responsibility to
stay alert, drive safely and be in
control of the vehicle at all times.
ANTI-LOCK BRAKING SYSTEM (ABS)
WARNING
.The Anti-lock Braking System
(ABS) is a sophisticated device,
but it cannot prevent accidents
resulting from careless or dan-
gerous driving techniques. It can
help maintain vehicle control dur-
ing braking on slippery surfaces.
Remember that stopping dis-
tances on slippery surfaces will
be longer than on normal sur-
BRAKE ASSIST
Page 338 of 455
6-4In case of emergency
possible. It is recommended you
visit a NISSAN dealer for these
services.
. Replacing tires with those not
originally specified by NISSAN
could affect the proper operation
of the TPMS.
. NISSAN recommends using only
Genuine NISSAN Emergency Tire
Sealant provided with your vehi-
cle. Other tire sealants may da-
mage the valve stem seal which
can cause the tire to lose air
pressure. It is recommended you
visit a NISSAN dealer as soon as
possible after using tire repair
sealant (for models equipped
with the emergency tire puncture
repair kit).
CHANGING A FLAT TIRE (for models
with spare tire)
If you have a flat tire, follow the instruc-
tions below.
Stopping the vehicle
1. Safely move the vehicle off the road
and away from traffic.
2. Turn on the hazard warning flashers.
3. Park on a level surface and apply the parking brake. Move the shift lever to
the P (Park) position (Automatic trans-
mission models). Move the shift lever
to the R (Reverse) gear (Manual trans-
mission models).
4. Turn off the engine.
5. Raise the hood to warn other traffic, and to signal professional road assis-
tance personnel that you need assis-
tance.
6. Have all passengers get out of the vehicle and stand in a safe place, away
from traffic and clear of the vehicle.
WARNING
.Make sure the parking brake is
securely applied and the manual
transmission is shifted into R
(Reverse), or the automatic trans-
mission into P (Park).
. Never change tires when the ve-
hicle is on a slope, ice or slippery
areas. This is hazardous. .
Never change tires if oncoming
traffic is close to your vehicle.
Wait for professional road assis-
tance.
Page 344 of 455
6-10In case of emergency
— when the sealant has passedits expiration date (shown on
the label attached to the bot-
tle)
— when the cut or the puncture is approximately 0.25 in (6
mm) or longer
— when the tire sidewall is da- maged
— when the vehicle has been driven with extremely low tire
pressure
— when the tire has come off the inside or the outside of the
wheel.
— when the tire wheel is da- maged
— when two or more tires are flat
Stopping the vehicle
1. Safely move the vehicle off the road and away from traffic.
2. Turn on the hazard warning flashers.
3. Park on a level surface and apply the parking brake.
4. Automatic Transmission models:
Move the shift lever to the P (Park) position.
Manual Transmission models:
Move the shift lever to the R (Reverse)
position.
5. Turn off the engine.
6. Raise the hood to warn other traffic and to signal professional road assis-
tance personnel that you need assis-
tance.
7. Have all passengers get out of the vehicle and stand in a safe place, away
from traffic and clear of the vehicle.
WARNING
Make sure the parking brake is se-
curely applied and the manual trans-
mission is shifted into R (Reverse) or
the automatic transmission into P
(Park).
. Never repair tires when the vehi-
cle is on a slope, ice or slippery
areas. This is hazardous.
. Never repair tires if oncoming
traffic is close to your vehicle.
Wait for professional road assis-
tance.
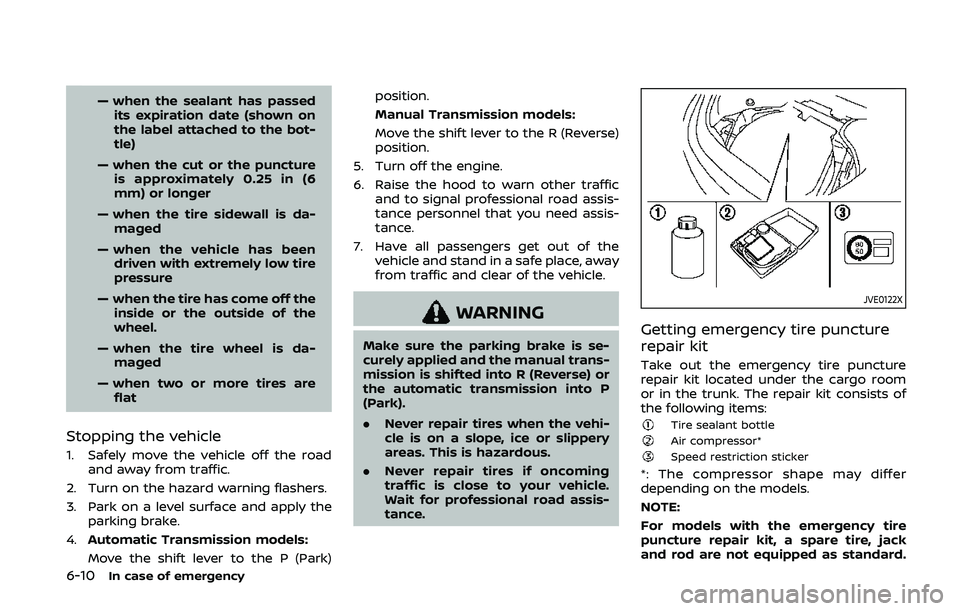
JVE0122X
Getting emergency tire puncture
repair kit
Take out the emergency tire puncture
repair kit located under the cargo room
or in the trunk. The repair kit consists of
the following items:
Tire sealant bottleAir compressor*Speed restriction sticker
*: The compressor shape may differ
depending on the models.
NOTE:
For models with the emergency tire
puncture repair kit, a spare tire, jack
and rod are not equipped as standard.