door lock NISSAN 370Z 2020 Owner´s Manual
[x] Cancel search | Manufacturer: NISSAN, Model Year: 2020, Model line: 370Z, Model: NISSAN 370Z 2020Pages: 455, PDF Size: 2.22 MB
Page 12 of 455
0-4Illustrated table of contents
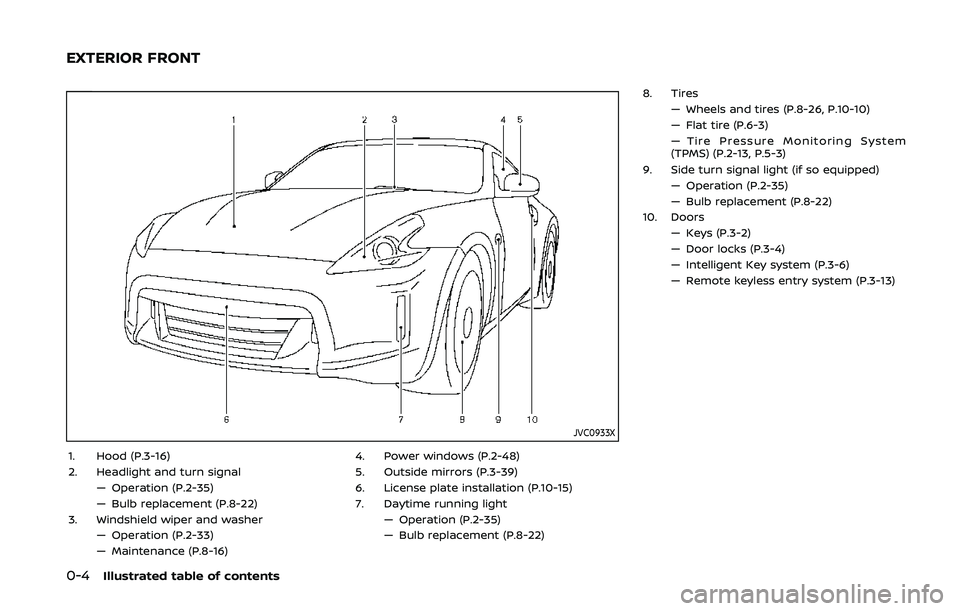
JVC0933X
1. Hood (P.3-16)
2. Headlight and turn signal— Operation (P.2-35)
— Bulb replacement (P.8-22)
3. Windshield wiper and washer — Operation (P.2-33)
— Maintenance (P.8-16) 4. Power windows (P.2-48)
5. Outside mirrors (P.3-39)
6. License plate installation (P.10-15)
7. Daytime running light
— Operation (P.2-35)
— Bulb replacement (P.8-22) 8. Tires
— Wheels and tires (P.8-26, P.10-10)
— Flat tire (P.6-3)
— Tire Pressure Monitoring System
(TPMS) (P.2-13, P.5-3)
9. Side turn signal light (if so equipped) — Operation (P.2-35)
— Bulb replacement (P.8-22)
10. Doors — Keys (P.3-2)
— Door locks (P.3-4)
— Intelligent Key system (P.3-6)
— Remote keyless entry system (P.3-13)
EXTERIOR FRONT
Page 35 of 455
.An object placed between the seat
cushion and center console or be-
tween the seat cushion and the door.
. An object hanging on the seat or
placed in the seatback pocket (If so
equipped).
. A child restraint or other object press-
ing against the rear of the seatback.
PREGNANT WOMEN
NISSAN recommends that pregnant wo-
men use seat belts. The seat belt should
be worn snug, and always position the lap
belt as low as possible around the hips,
not the waist, and place the shoulder belt
over your shoulder and across your chest.
Never run the lap/shoulder belt over your
abdominal area. Contact your doctor for
specific recommendations.
INJURED PERSONS
NISSAN recommends that injured persons
use seat belts, depending on the injury.
Check with your doctor for specific re-
commendations.
THREE-POINT TYPE SEAT BELT
WARNING
.Every person who drives or rides
in this vehicle should use a seat
belt at all times.
. Do not ride in a moving vehicle
when the seatback is reclined.
This can be dangerous. The
shoulder belt will not be against
your body. In an accident, you
could be thrown into it and re-
ceive neck or other serious inju-
ries. You could also slide under
the lap belt and receive serious
internal injuries.
. For the most effective protection
when the vehicle is in motion, the
seat should be upright. Always sit
well back and upright in the seat
with both feet on the floor and
adjust the seat belt properly.
. Do not allow children to play with
the seat belts. Most seating posi-
tions are equipped with Auto-
matic Locking Retractor (ALR)
mode seat belts. If the seat belt
becomes wrapped around a
child’s neck with the ALR mode
activated, the child can be ser- iously injured or killed if the seat
belt retracts and becomes tight.
This can occur even if the vehicle
is parked. Unbuckle the seat belt
to release the child. If the seat
belt can not be unbuckled or is
already unbuckled, release the
child by cutting the seat belt with
a suitable tool (such as a knife or
scissors) to release the seat belt.
Safety — Seats, seat belts and supplemental restraint system1-13
Page 76 of 455
2-8Instruments and controls
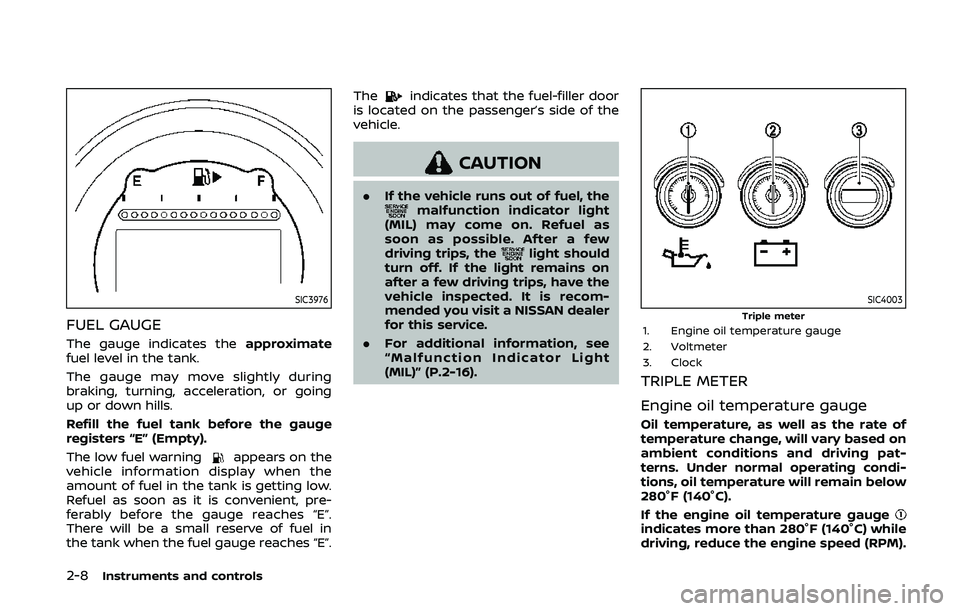
SIC3976
FUEL GAUGE
The gauge indicates theapproximate
fuel level in the tank.
The gauge may move slightly during
braking, turning, acceleration, or going
up or down hills.
Refill the fuel tank before the gauge
registers “E” (Empty).
The low fuel warning
appears on the
vehicle information display when the
amount of fuel in the tank is getting low.
Refuel as soon as it is convenient, pre-
ferably before the gauge reaches “E”.
There will be a small reserve of fuel in
the tank when the fuel gauge reaches “E”. The
indicates that the fuel-filler door
is located on the passenger’s side of the
vehicle.
CAUTION
. If the vehicle runs out of fuel, themalfunction indicator light
(MIL) may come on. Refuel as
soon as possible. After a few
driving trips, the
light should
turn off. If the light remains on
after a few driving trips, have the
vehicle inspected. It is recom-
mended you visit a NISSAN dealer
for this service.
. For additional information, see
“Malfunction Indicator Light
(MIL)” (P.2-16).
SIC4003Triple meter1. Engine oil temperature gauge
2. Voltmeter
3. Clock
TRIPLE METER
Engine oil temperature gauge
Oil temperature, as well as the rate of
temperature change, will vary based on
ambient conditions and driving pat-
terns. Under normal operating condi-
tions, oil temperature will remain below
280°F (140°C).
If the engine oil temperature gauge
indicates more than 280°F (140°C) while
driving, reduce the engine speed (RPM).
Page 79 of 455
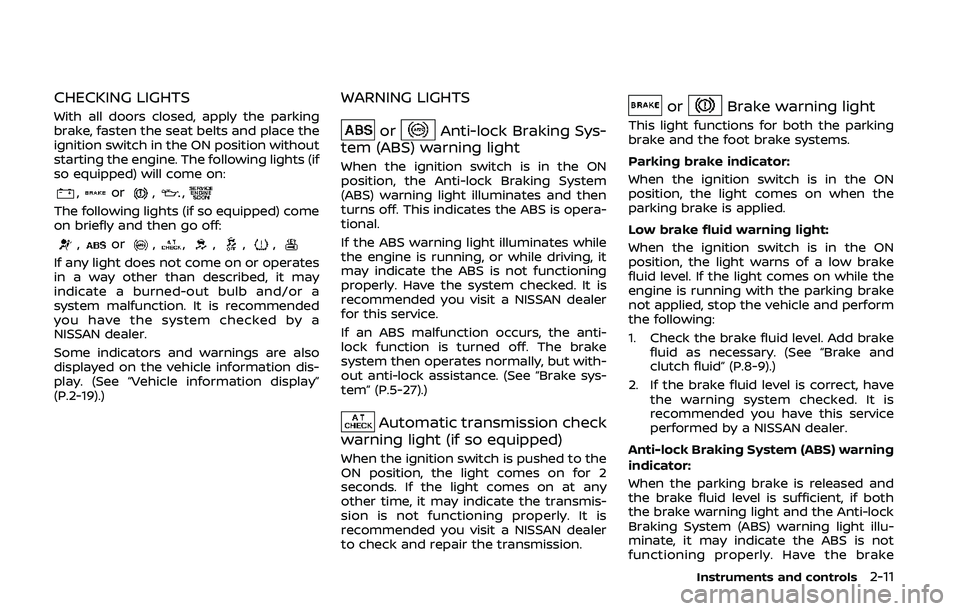
CHECKING LIGHTS
With all doors closed, apply the parking
brake, fasten the seat belts and place the
ignition switch in the ON position without
starting the engine. The following lights (if
so equipped) will come on:
,or,,
The following lights (if so equipped) come
on briefly and then go off:
,or,,,,,
If any light does not come on or operates
in a way other than described, it may
indicate a burned-out bulb and/or a
system malfunction. It is recommended
you have the system checked by a
NISSAN dealer.
Some indicators and warnings are also
displayed on the vehicle information dis-
play. (See “Vehicle information display”
(P.2-19).)
WARNING LIGHTS
orAnti-lock Braking Sys-
tem (ABS) warning light
When the ignition switch is in the ON
position, the Anti-lock Braking System
(ABS) warning light illuminates and then
turns off. This indicates the ABS is opera-
tional.
If the ABS warning light illuminates while
the engine is running, or while driving, it
may indicate the ABS is not functioning
properly. Have the system checked. It is
recommended you visit a NISSAN dealer
for this service.
If an ABS malfunction occurs, the anti-
lock function is turned off. The brake
system then operates normally, but with-
out anti-lock assistance. (See “Brake sys-
tem” (P.5-27).)
Automatic transmission check
warning light (if so equipped)
When the ignition switch is pushed to the
ON position, the light comes on for 2
seconds. If the light comes on at any
other time, it may indicate the transmis-
sion is not functioning properly. It is
recommended you visit a NISSAN dealer
to check and repair the transmission.
orBrake warning light
This light functions for both the parking
brake and the foot brake systems.
Parking brake indicator:
When the ignition switch is in the ON
position, the light comes on when the
parking brake is applied.
Low brake fluid warning light:
When the ignition switch is in the ON
position, the light warns of a low brake
fluid level. If the light comes on while the
engine is running with the parking brake
not applied, stop the vehicle and perform
the following:
1. Check the brake fluid level. Add brake
fluid as necessary. (See “Brake and
clutch fluid” (P.8-9).)
2. If the brake fluid level is correct, have the warning system checked. It is
recommended you have this service
performed by a NISSAN dealer.
Anti-lock Braking System (ABS) warning
indicator:
When the parking brake is released and
the brake fluid level is sufficient, if both
the brake warning light and the Anti-lock
Braking System (ABS) warning light illu-
minate, it may indicate the ABS is not
functioning properly. Have the brake
Instruments and controls2-11
Page 86 of 455
2-18Instruments and controls
For more details about the electric soft
top operation, see “Soft top (Roadster
models)” (P.3-22).
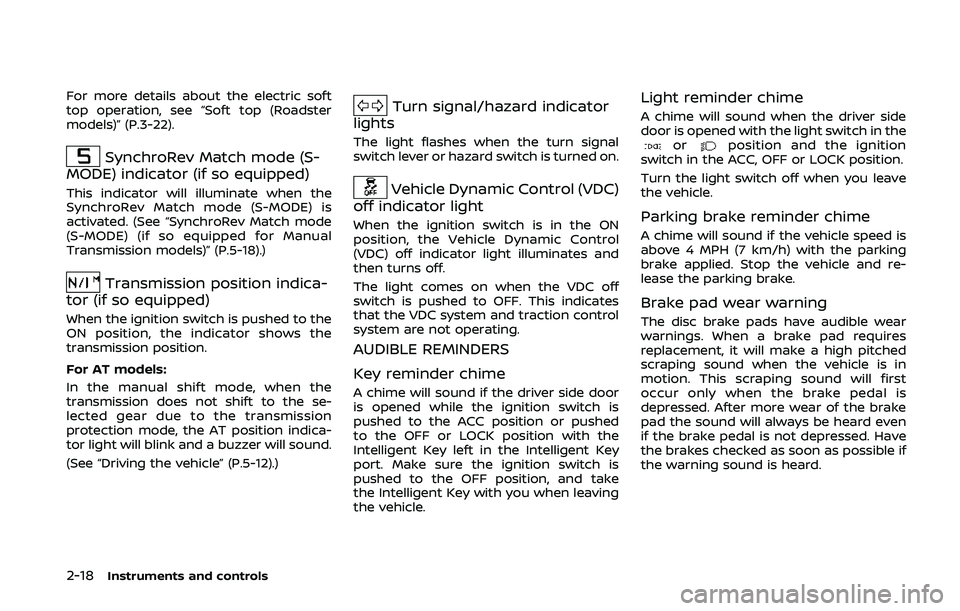
SynchroRev Match mode (S-
MODE) indicator (if so equipped)
This indicator will illuminate when the
SynchroRev Match mode (S-MODE) is
activated. (See “SynchroRev Match mode
(S-MODE) (if so equipped for Manual
Transmission models)” (P.5-18).)
Transmission position indica-
tor (if so equipped)
When the ignition switch is pushed to the
ON position, the indicator shows the
transmission position.
For AT models:
In the manual shift mode, when the
transmission does not shift to the se-
lected gear due to the transmission
protection mode, the AT position indica-
tor light will blink and a buzzer will sound.
(See “Driving the vehicle” (P.5-12).)
Turn signal/hazard indicator
lights
The light flashes when the turn signal
switch lever or hazard switch is turned on.
Vehicle Dynamic Control (VDC)
off indicator light
When the ignition switch is in the ON
position, the Vehicle Dynamic Control
(VDC) off indicator light illuminates and
then turns off.
The light comes on when the VDC off
switch is pushed to OFF. This indicates
that the VDC system and traction control
system are not operating.
AUDIBLE REMINDERS
Key reminder chime
A chime will sound if the driver side door
is opened while the ignition switch is
pushed to the ACC position or pushed
to the OFF or LOCK position with the
Intelligent Key left in the Intelligent Key
port. Make sure the ignition switch is
pushed to the OFF position, and take
the Intelligent Key with you when leaving
the vehicle.
Light reminder chime
A chime will sound when the driver side
door is opened with the light switch in the
orposition and the ignition
switch in the ACC, OFF or LOCK position.
Turn the light switch off when you leave
the vehicle.
Parking brake reminder chime
A chime will sound if the vehicle speed is
above 4 MPH (7 km/h) with the parking
brake applied. Stop the vehicle and re-
lease the parking brake.
Brake pad wear warning
The disc brake pads have audible wear
warnings. When a brake pad requires
replacement, it will make a high pitched
scraping sound when the vehicle is in
motion. This scraping sound will first
occur only when the brake pedal is
depressed. After more wear of the brake
pad the sound will always be heard even
if the brake pedal is not depressed. Have
the brakes checked as soon as possible if
the warning sound is heard.
Page 88 of 455
2-20Instruments and controls
JVI0351X
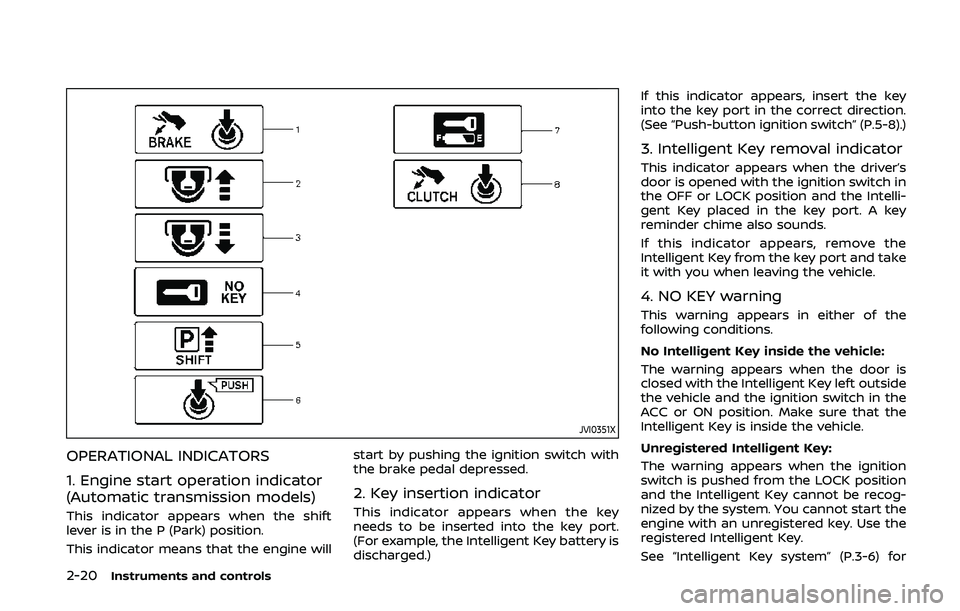
OPERATIONAL INDICATORS
1. Engine start operation indicator
(Automatic transmission models)
This indicator appears when the shift
lever is in the P (Park) position.
This indicator means that the engine willstart by pushing the ignition switch with
the brake pedal depressed.
2. Key insertion indicator
This indicator appears when the key
needs to be inserted into the key port.
(For example, the Intelligent Key battery is
discharged.)If this indicator appears, insert the key
into the key port in the correct direction.
(See “Push-button ignition switch” (P.5-8).)
3. Intelligent Key removal indicator
This indicator appears when the driver’s
door is opened with the ignition switch in
the OFF or LOCK position and the Intelli-
gent Key placed in the key port. A key
reminder chime also sounds.
If this indicator appears, remove the
Intelligent Key from the key port and take
it with you when leaving the vehicle.
4. NO KEY warning
This warning appears in either of the
following conditions.
No Intelligent Key inside the vehicle:
The warning appears when the door is
closed with the Intelligent Key left outside
the vehicle and the ignition switch in the
ACC or ON position. Make sure that the
Intelligent Key is inside the vehicle.
Unregistered Intelligent Key:
The warning appears when the ignition
switch is pushed from the LOCK position
and the Intelligent Key cannot be recog-
nized by the system. You cannot start the
engine with an unregistered key. Use the
registered Intelligent Key.
See “Intelligent Key system” (P.3-6) for
Page 99 of 455
cannot prevent it, nor can it prevent the
theft of interior or exterior vehicle com-
ponents in all situations. Always secure
your vehicle even if parking for a brief
period. Never leave your Intelligent Key(s)
in the vehicle, and always lock it when
unattended. Be aware of your surround-
ings, and park in secure, well-lit areas
whenever possible.
Many devices offering additional protec-
tion, such as component locks, identifica-
tion markers, and tracking systems, are
available at auto supply stores and speci-
alty shops. Your NISSAN dealer may also
offer such equipment. Check with your
insurance company to see if you may be
eligible for discounts for various theft
protection features.
SIC2045
How to arm the vehicle security
system
1. Close all windows.The system can be armed even if the
windows are open.
2. Push the ignition switch to the OFF position.
3. Remove the Intelligent Key from the vehicle.
4. Close all doors, hood and rear hatch/ trunk. Lock all doors and trunk (Road-
ster models). The doors can be locked
with the Intelligent Key, door handle
request switch or power door lock
switch. 5. Confirm that the security indicator
light comes on. The security indicator
light stays on for about 30 seconds.
The vehicle security system is now
pre-armed. After about 30 seconds
the vehicle security system automati-
cally shifts into the armed phase. The
security light begins to flash once
every approximately 3 seconds. If,
during this 30-second pre-arm time
period, the door is unlocked, or the
ignition switch is pushed to ACC or
ON, the system will not arm.
Even when the driver and/or passen-
gers are in the vehicle, the system will
activate with all doors, hood and rear
hatch locked with the ignition switch in
the LOCK position. When pushing the
ignition switch to the ACC or ON posi-
tion, the system will be released.
Vehicle security system activation
The vehicle security system will give the
following alarm:
. The headlights blink and the horn
sounds intermittently.
. The alarm automatically turns off
after approximately 1 minute. How-
ever, the alarm reactivates if the
vehicle is tampered with again.
The alarm is activated by:
Instruments and controls2-31
Page 100 of 455
2-32Instruments and controls
.Unlocking the door or opening the
rear hatch without using the UNLOCK
button on the Intelligent Key or the
door handle request switch. (Even if
the door is opened by releasing the
door inside lock knob or using the
mechanical key, the alarm will acti-
vate.)
. Opening the hood.
How to stop an activated alarm
The alarm will stop by unlocking a door
by pushing the UNLOCK button on the
Intelligent Key or the door handle request
switch. The alarm will not stop if the
ignition switch is pushed to the ACC or
ON position.
If the Intelligent Key battery is dis-
charged:
If the Intelligent Key battery is discharged,
the alarm will not stop by pushing the
UNLOCK button on the Intelligent Key or
the door handle request switch. In such a
case, insert the Intelligent Key into the
Intelligent Key port to stop the alarm. See
“Intelligent Key battery discharge” (P.5-10)
for details about the Intelligent Key port.
If the system does not operate as
described above, it is recommended
you have it checked by a NISSAN dealer.
NISSAN VEHICLE IMMOBILIZER SYS-
TEM
The NISSAN Vehicle Immobilizer System
will not allow the engine to start without
the use of the registered Intelligent Key.
Never leave these keys in the vehicle.
For USA:
This device complies with Part 15 of the
FCC Rules. Operation is subject to the
following two conditions:
(1) This device may not cause harmful
interference, and (2) this device must
accept any interference received, in-
cluding interference that may cause
undesired operation.
Note: Changes or modifications not
expressly approved by the party re-
sponsible for compliance could void
the user’s authority to operate the
equipment.
For Canada:
This device complies with Industry Ca-
nada licence-exempt RSS standard(s).
Operation is subject to the following
two conditions:
(1) this device may not cause interfer-
ence, and (2) this device must accept
any interference, including interference
that may cause undesired operation of
the device.
SIC2045
Security indicator light
The security indicator light is located on
the meter panel. It indicates the status of
the NISSAN Vehicle Immobilizer System.
The light blinks after the ignition switch is
in the LOCK, ACC or OFF position. This
function indicates the security systems
equipped on the vehicle are operational.
If the NISSAN Vehicle Immobilizer System
is malfunctioning, this light will remain on
while the ignition switch is in the ON
position.
If the light still remains on and/or the
engine will not start, seek service for
NISSAN Vehicle Immobilizer System as
Page 105 of 455
SIC3784A
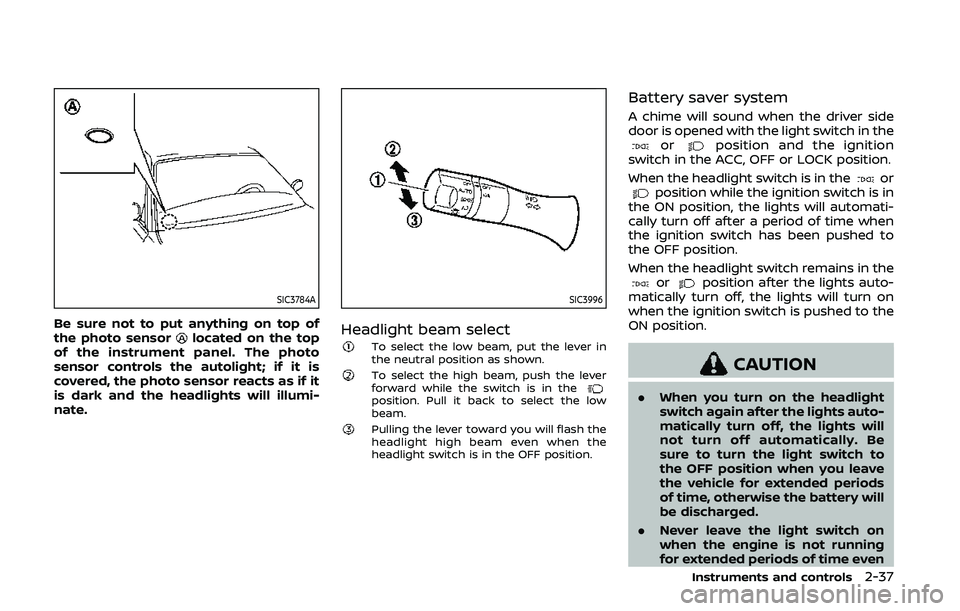
Be sure not to put anything on top of
the photo sensorlocated on the top
of the instrument panel. The photo
sensor controls the autolight; if it is
covered, the photo sensor reacts as if it
is dark and the headlights will illumi-
nate.
SIC3996
Headlight beam selectTo select the low beam, put the lever in
the neutral position as shown.
To select the high beam, push the lever
forward while the switch is in the
position. Pull it back to select the low
beam.
Pulling the lever toward you will flash the
headlight high beam even when the
headlight switch is in the OFF position.
Battery saver system
A chime will sound when the driver side
door is opened with the light switch in the
orposition and the ignition
switch in the ACC, OFF or LOCK position.
When the headlight switch is in the
orposition while the ignition switch is in
the ON position, the lights will automati-
cally turn off after a period of time when
the ignition switch has been pushed to
the OFF position.
When the headlight switch remains in the
orposition after the lights auto-
matically turn off, the lights will turn on
when the ignition switch is pushed to the
ON position.
CAUTION
. When you turn on the headlight
switch again after the lights auto-
matically turn off, the lights will
not turn off automatically. Be
sure to turn the light switch to
the OFF position when you leave
the vehicle for extended periods
of time, otherwise the battery will
be discharged.
. Never leave the light switch on
when the engine is not running
for extended periods of time even
Instruments and controls2-37
Page 116 of 455
2-48Instruments and controls
POWER WINDOWS
WARNING
.Make sure that all passengers
have their hands, etc. inside the
vehicle while it is in motion and
before closing the windows. Use
the window lock switch to pre-
vent unexpected use of the
power windows.
. To help avoid risk of injury or
death through unintended opera-
tion of the vehicle and or its
systems, including entrapment
in windows or inadvertent door
lock activation, do not leave chil-
dren, people who require the
assistance of others or pets un-
attended in your vehicle. Addi-
tionally, the temperature inside a
closed vehicle on a warm day can
quickly become high enough to
cause a significant risk of injury
or death to people and pets.
The power windows operate when the
ignition switch is in the ON position or for
about 45 seconds after the ignition
switch is pushed to the OFF position. If
the driver’s or front passenger’s door is opened during this period of about 45
seconds, power to the windows is can-
celed.
The power window switches will be
deactivated during soft top operation
(Roadster models).
JVI1248X
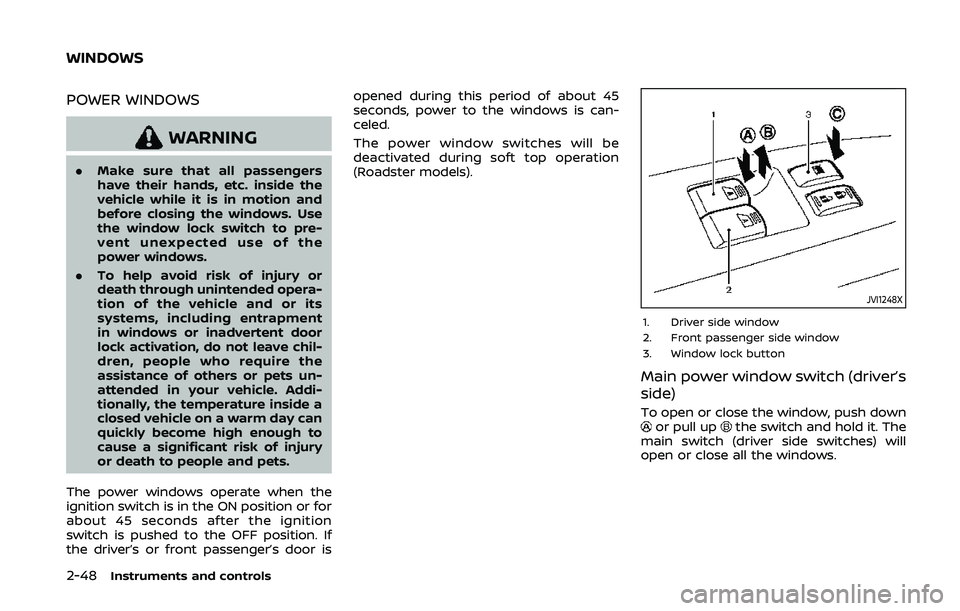
1. Driver side window
2. Front passenger side window
3. Window lock button
Main power window switch (driver’s
side)
To open or close the window, push downor pull upthe switch and hold it. The
main switch (driver side switches) will
open or close all the windows.
WINDOWS