brake NISSAN 370Z COUPE 2011 User Guide
[x] Cancel search | Manufacturer: NISSAN, Model Year: 2011, Model line: 370Z COUPE, Model: NISSAN 370Z COUPE 2011Pages: 419, PDF Size: 3.61 MB
Page 78 of 419
Black plate (74,1)
Model "Z34-D" EDITED: 2010/ 7/ 27
SIC3977
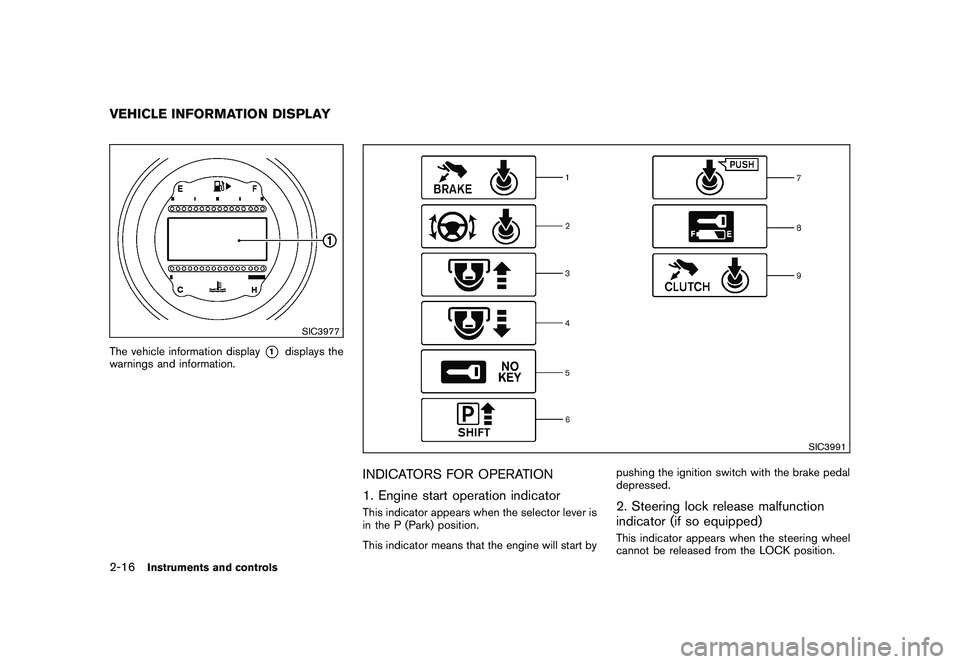
The vehicle information display
*1
displays the
warnings and information.
SIC3991
INDICATORS FOR OPERATION
1. Engine start operation indicatorThis indicator appears when the selector lever is
in the P (Park) position.
This indicator means that the engine will start by pushing the ignition switch with the brake pedal
depressed.
2. Steering lock release malfunction
indicator (if so equipped)This indicator appears when the steering wheel
cannot be released from the LOCK position.
VEHICLE INFORMATION DISPLAY2-16
Instruments and controls
Page 80 of 419
Black plate (76,1)
Model "Z34-D" EDITED: 2010/ 7/ 27
SIC4677
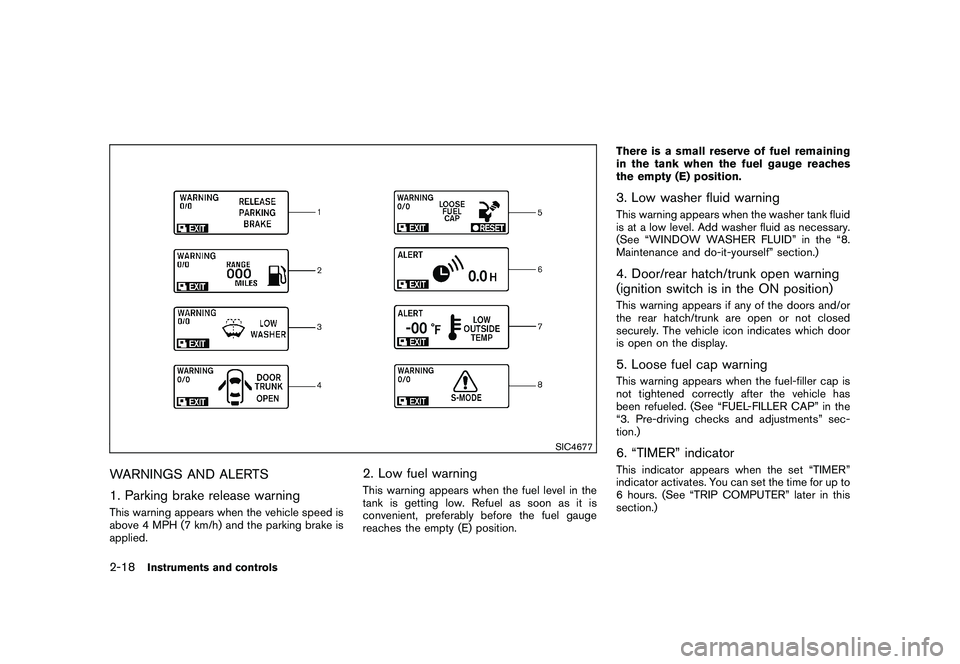
WARNINGS AND ALERTS
1. Parking brake release warningThis warning appears when the vehicle speed is
above 4 MPH (7 km/h) and the parking brake is
applied.
2. Low fuel warningThis warning appears when the fuel level in the
tank is getting low. Refuel as soon as it is
convenient, preferably before the fuel gauge
reaches the empty (E) position.There is a small reserve of fuel remaining
in the tank when the fuel gauge reaches
the empty (E) position.
3. Low washer fluid warningThis warning appears when the washer tank fluid
is at a low level. Add washer fluid as necessary.
(See “WINDOW WASHER FLUID” in the “8.
Maintenance and do-it-yourself” section.)4. Door/rear hatch/trunk open warning
(ignition switch is in the ON position)This warning appears if any of the doors and/or
the rear hatch/trunk are open or not closed
securely. The vehicle icon indicates which door
is open on the display.5. Loose fuel cap warningThis warning appears when the fuel-filler cap is
not tightened correctly after the vehicle has
been refueled. (See “FUEL-FILLER CAP” in the
“3. Pre-driving checks and adjustments” sec-
tion.)6. “TIMER” indicatorThis indicator appears when the set “TIMER”
indicator activates. You can set the time for up to
6 hours. (See “TRIP COMPUTER” later in this
section.)
2-18
Instruments and controls
Page 86 of 419
Black plate (82,1)
Model "Z34-D" EDITED: 2010/ 7/ 27
.LANGUAGE
Select this submenu to choose English or
French for display.
. UNIT
Select this submenu to choose the unit from
US or METRIC.
. EFFECTS
Select this menu to set the dial effects
described below to on or off.
— The indicator needles sweep in the meters when the engine is started.
To return to the top page of the setting mode,
select “BACK”.
SIC3993
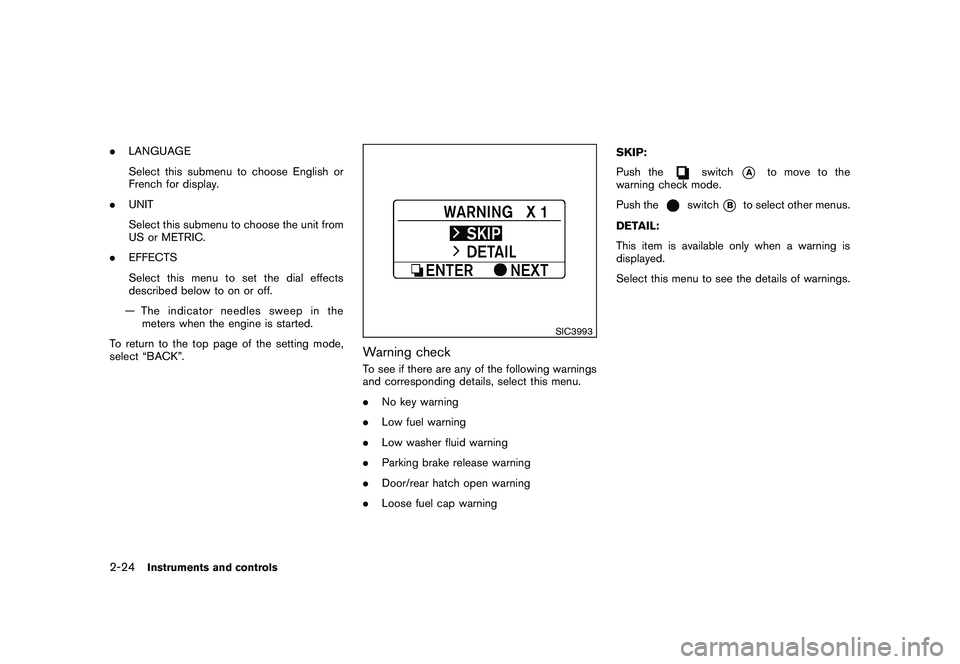
Warning checkTo see if there are any of the following warnings
and corresponding details, select this menu.
. No key warning
. Low fuel warning
. Low washer fluid warning
. Parking brake release warning
. Door/rear hatch open warning
. Loose fuel cap warning SKIP:
Push the
switch
*A
to move to the
warning check mode.
Push the
switch
*B
to select other menus.
DETAIL:
This item is available only when a warning is
displayed.
Select this menu to see the details of warnings.
2-24
Instruments and controls
Page 94 of 419
Black plate (90,1)
Model "Z34-D" EDITED: 2010/ 7/ 27
When the headlight switch is in the
or
position while the ignition switch is in the ON
position, the lights will automatically turn off 5
minutesaftertheignitionswitchhasbeen
pushed to the OFF position.
When the headlight switch remains in theor
position after the lights automatically
turn off, the lights will turn on when the ignition
switch is pushed to the ON position.
CAUTION
. When you turn on the headlight
switch again after the lights auto-
matically turn off, the lights will not
turn off automatically. Be sure to
turn the light switch to the OFF
position when you leave the vehicle
for extended periods of time, other-
wise the battery will be discharged.
. Never leave the light switch on
when the engine is not running for
extended periods of time even if the
headlights turn off automatically.Daytime running light system (Canada
only)The daytime running lights automatically illumi-
nate when the engine is started with the parking
brake released. The daytime running lights operate with the headlight switch in the OFF
position or in the
position. Turn the
headlight switch to the
position for full
illumination when driving at night.
If the parking brake is applied before the engine
is started, the daytime running lights do not
illuminate. The daytime running lights illuminate
once the parking brake is released. The daytime
running lights will remain on until the ignition
switch is pushed to the OFF position.
WARNING
It is necessary at dusk to turn on your
headlights. Failure to do so could cause
an accident injuring yourself and
others.
SIC3981
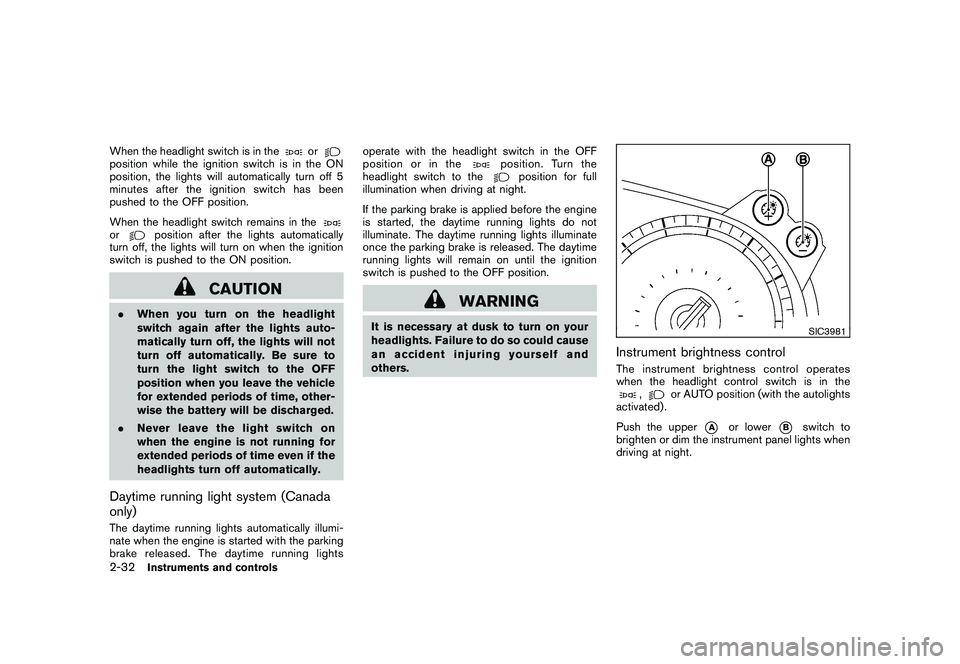
Instrument brightness controlThe instrument brightness control operates
when the headlight control switch is in the
,
or AUTO position (with the autolights
activated) .
Push the upper
*A
or lower
*B
switch to
brighten or dim the instrument panel lights when
driving at night.
2-32
Instruments and controls
Page 136 of 419
Black plate (132,1)
Model "Z34-D" EDITED: 2010/ 7/ 27
.When the selector lever or shift lever is in a
position other than the R (Reverse) position.
CAUTION
Always keep the engine running while
operating the soft top. The top will also
operate when the ignition switch is in
the ON position, but run the engine to
prevent a discharged battery.
Be sure to follow the operating instructions, and
all the warnings and cautions in this section.
Improper operation of the top could cause
a system malfunction, damage, or dete-
rioration of the top material and related
parts.
WARNING
. Park the vehicle in a safe and level
place and apply the parking brake.
. Make sure the area is clear of
obstacles and there is enough clear-
ance over the top (for example, in a
garage or a covered area) . More
than approximately 6.6 ft (2 m) from
the ground is required to open or
close the top safely. Otherwise, the
top may damage any objects above it while moving. The top operating
system could also be damaged.
. Do not operate the top in a strong
wind. It could be blown by the wind,
striking someone or damage the
top.
. Do not allow anyone to stand up or
extend any portion of their body out
of the opening while the vehicle is in
motion or while the top is being
operated.
. In an accident you could be thrown
from the vehicle with an open top.
Always use seat belts and proper
child restraints.
CAUTION
.Do not operate the top when the
temperature is below 32 8F(0 8C) .
This may result in damage to the
top material or operating system.
. Remove water drops, snow, ice or
sand from the top, and dry the
surface of the top completely before
opening it.
. Do not open the top when it is wet
or damp. This may cause interior water damage, stains or mildew on
the top material.
. Be sure to turn off the rear window
defroster switch. Never turn it on
while the top is being operated or
fully opened. The heat may damage
the top material.
3-22
Pre-driving checks and adjustments
Page 156 of 419
Black plate (152,1)
Model "Z34-D" EDITED: 2010/ 7/ 27
WARNING
.Do not disassemble or modify this
system. If you do, it may result in
accidents, fire, or electric shock.
. Do not use this system if you notice
any abnormality, such as a frozen
screen or lack of sound. Continued
use of the system may result in
accident, fire or electric shock.
. In case you notice any foreign
object in the system hardware, spill
liquid on it, or notice smoke or smell
coming from it, stop using the
system immediately and contact
your nearest NISSAN dealer. Ignor-
ing such conditions may lead to
accidents, fire, or electric shock.
. Park the vehicle in a safe location
and apply the parking brake to view
the images on the front center dis-
play screen using devices connected
to the auxiliary input jacks.
Do not attempt to operate the system in
extreme temperature conditions [below
� 48F( �208 C) and above 158 8F(70 8C)].
Operating this system under these condi-
tions may result in system malfunctions.
SAA2273
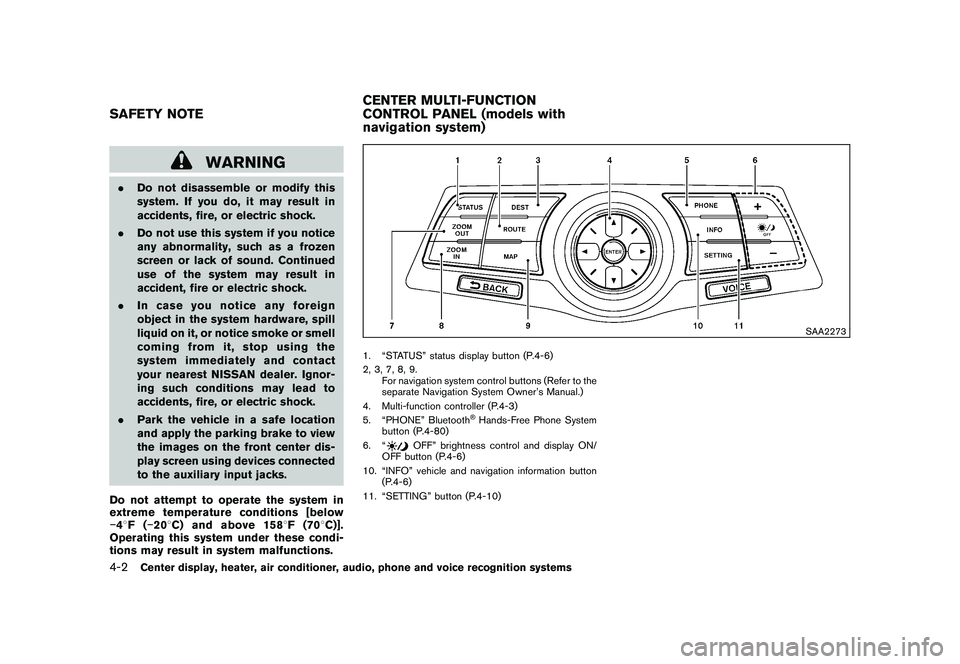
1. “STATUS” status display button (P.4-6)
2, 3, 7, 8, 9.
For navigation system control buttons (Refer to the
separate Navigation System Owner’s Manual.)
4. Multi-function controller (P.4-3)
5. “PHONE” Bluetooth
®Hands-Free Phone System
button (P.4-80)
6. “
OFF” brightness control and display ON/
OFF button (P.4-6)
10. “INFO” vehicle and navigation information button (P.4-6)
11. “SETTING” button (P.4-10)
SAFETY NOTE CENTER MULTI-FUNCTION
CONTROL PANEL (models with
navigation system)4-2
Center display, heater, air conditioner, audio, phone and voice recognition systems
Page 167 of 419
Black plate (163,1)
Model "Z34-D" EDITED: 2010/ 7/ 27
SAA2487
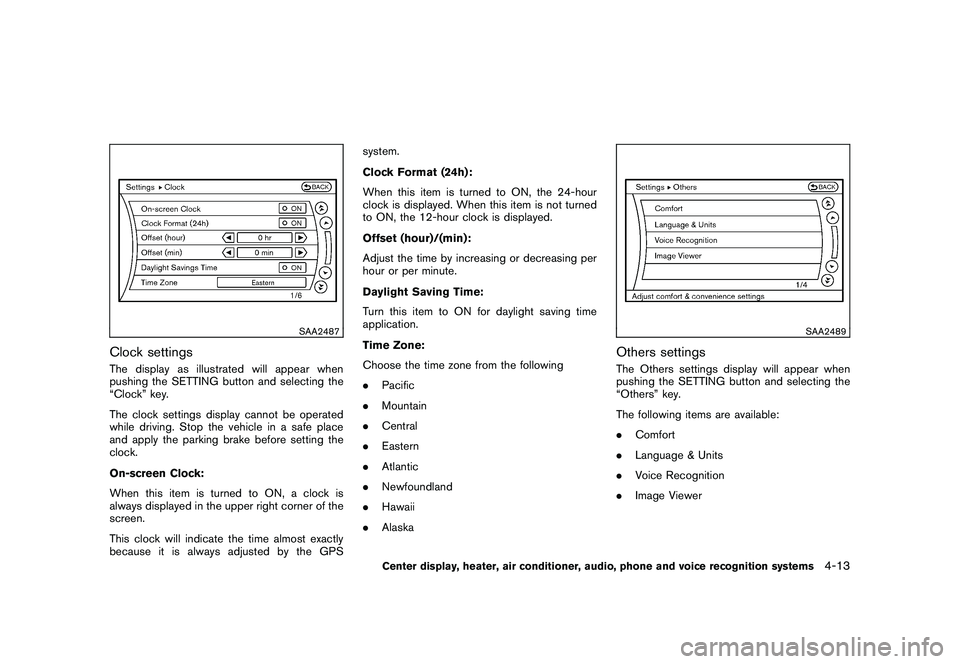
Clock settingsThe display as illustrated will appear when
pushing the SETTING button and selecting the
“Clock” key.
The clock settings display cannot be operated
while driving. Stop the vehicle in a safe place
and apply the parking brake before setting the
clock.
On-screen Clock:
When this item is turned to ON, a clock is
always displayed in the upper right corner of the
screen.
This clock will indicate the time almost exactly
because it is always adjusted by the GPSsystem.
Clock Format (24h):
When this item is turned to ON, the 24-hour
clock is displayed. When this item is not turned
to ON, the 12-hour clock is displayed.
Offset (hour)/(min):
Adjust the time by increasing or decreasing per
hour or per minute.
Daylight Saving Time:
Turn this item to ON for daylight saving time
application.
Time Zone:
Choose the time zone from the following
.
Pacific
. Mountain
. Central
. Eastern
. Atlantic
. Newfoundland
. Hawaii
. Alaska
SAA2489
Others settingsThe Others settings display will appear when
pushing the SETTING button and selecting the
“Others” key.
The following items are available:
.Comfort
. Language & Units
. Voice Recognition
. Image Viewer
Center display, heater, air conditioner, audio, phone and voice recognition systems
4-13
Page 170 of 419
Black plate (166,1)
Model "Z34-D" EDITED: 2010/ 7/ 27
SAA2491
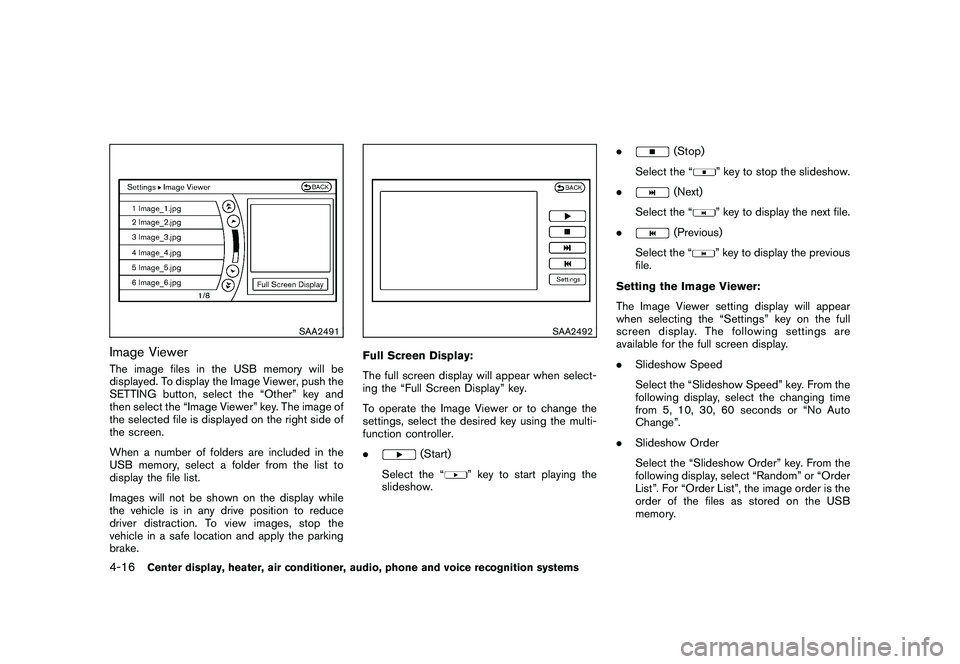
Image ViewerThe image files in the USB memory will be
displayed. To display the Image Viewer, push the
SETTING button, select the “Other” key and
then select the “Image Viewer” key. The image of
the selected file is displayed on the right side of
the screen.
When a number of folders are included in the
USB memory, select a folder from the list to
display the file list.
Images will not be shown on the display while
the vehicle is in any drive position to reduce
driver distraction. To view images, stop the
vehicle in a safe location and apply the parking
brake.
SAA2492
Full Screen Display:
The full screen display will appear when select-
ing the “Full Screen Display” key.
To operate the Image Viewer or to change the
settings, select the desired key using the multi-
function controller.
.
(Start)
Select the “
” key to start playing the
slideshow. .
(Stop)
Select the “
” key to stop the slideshow.
.
(Next)
Select the “
” key to display the next file.
.
(Previous)
Select the “
” key to display the previous
file.
Setting the Image Viewer:
The Image Viewer setting display will appear
when selecting the “Settings” key on the full
screen display. The following settings are
available for the full screen display.
. Slideshow Speed
Select the “Slideshow Speed” key. From the
following display, select the changing time
from 5, 10, 30, 60 seconds or “No Auto
Change”.
. Slideshow Order
Select the “Slideshow Order” key. From the
following display, select “Random” or “Order
List”. For “Order List”, the image order is the
order of the files as stored on the USB
memory.
4-16
Center display, heater, air conditioner, audio, phone and voice recognition systems
Page 174 of 419
Black plate (170,1)
Model "Z34-D" EDITED: 2010/ 7/ 27
5. When the vehicle is parked in the spacecompletely, move the selector lever to the P
(Park) position and apply the parking brake.DIFFERENCE BETWEEN PREDICTED
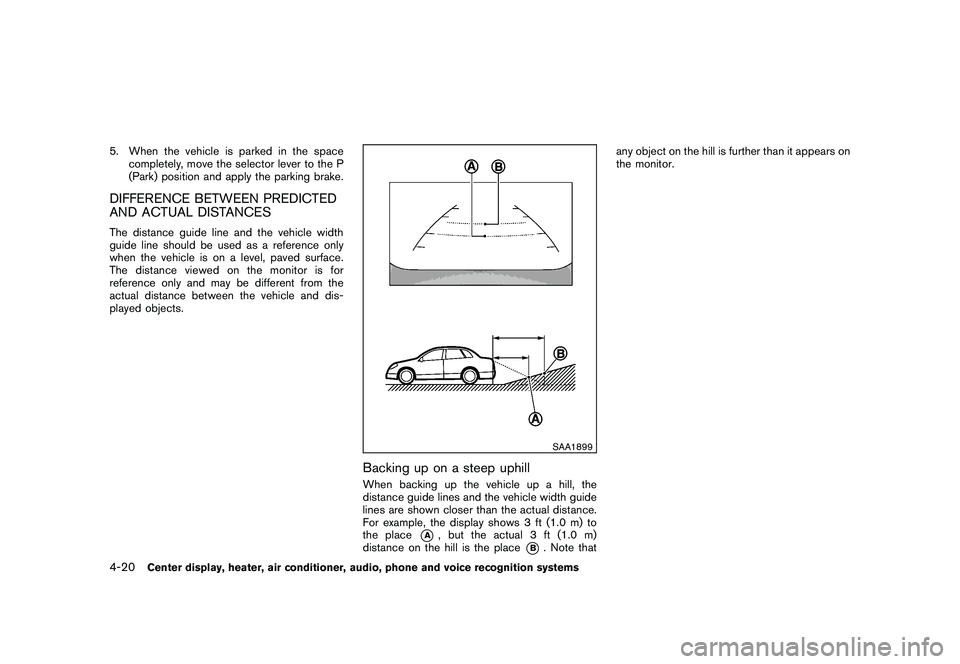
AND ACTUAL DISTANCESThe distance guide line and the vehicle width
guide line should be used as a reference only
when the vehicle is on a level, paved surface.
The distance viewed on the monitor is for
reference only and may be different from the
actual distance between the vehicle and dis-
played objects.
SAA1899
Backing up on a steep uphillWhen backing up the vehicle up a hill, the
distance guide lines and the vehicle width guide
lines are shown closer than the actual distance.
For example, the display shows 3 ft (1.0 m) to
the place
*A
, but the actual 3 ft (1.0 m)
distance on the hill is the place
*B. Note that any object on the hill is further than it appears on
the monitor.
4-20
Center display, heater, air conditioner, audio, phone and voice recognition systems
Page 176 of 419
Black plate (172,1)
Model "Z34-D" EDITED: 2010/ 7/ 27
SAA1924
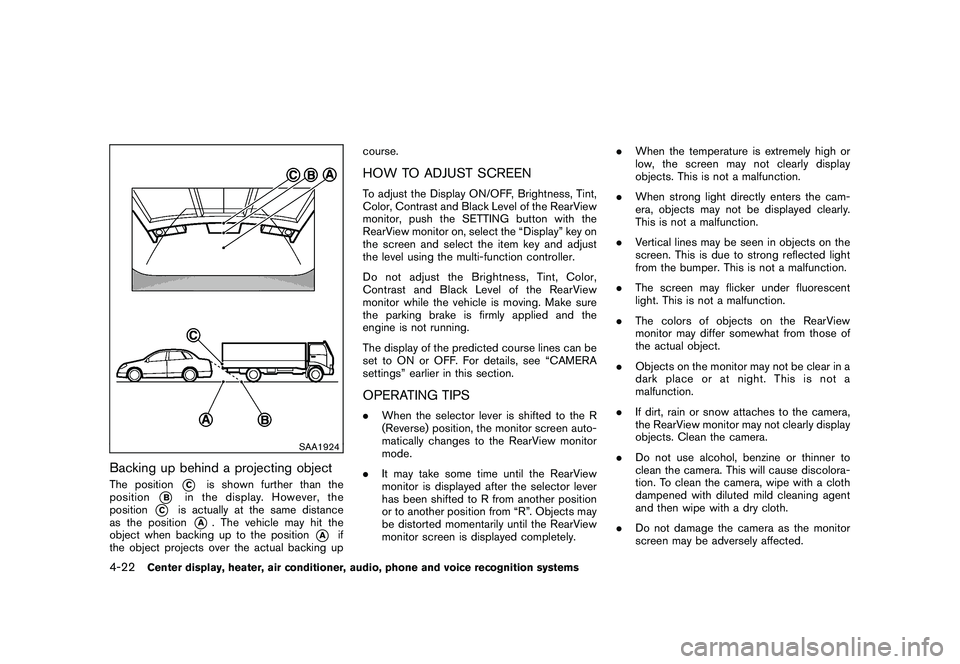
Backing up behind a projecting objectThe position
*C
is shown further than the
position
*B
in the display. However, the
position
*C
is actually at the same distance
as the position
*A
. The vehicle may hit the
object when backing up to the position
*A
if
the object projects over the actual backing up course.
HOW TO ADJUST SCREENTo adjust the Display ON/OFF, Brightness, Tint,
Color, Contrast and Black Level of the RearView
monitor, push the SETTING button with the
RearView monitor on, select the “Display” key on
the screen and select the item key and adjust
the level using the multi-function controller.
Do not adjust the Brightness, Tint, Color,
Contrast and Black Level of the RearView
monitor while the vehicle is moving. Make sure
the parking brake is firmly applied and the
engine is not running.
The display of the predicted course lines can be
set to ON or OFF. For details, see “CAMERA
settings” earlier in this section.OPERATING TIPS.
When the selector lever is shifted to the R
(Reverse) position, the monitor screen auto-
matically changes to the RearView monitor
mode.
. It may take some time until the RearView
monitor is displayed after the selector lever
has been shifted to R from another position
or to another position from “R”. Objects may
be distorted momentarily until the RearView
monitor screen is displayed completely. .
When the temperature is extremely high or
low, the screen may not clearly display
objects. This is not a malfunction.
. When strong light directly enters the cam-
era, objects may not be displayed clearly.
This is not a malfunction.
. Vertical lines may be seen in objects on the
screen. This is due to strong reflected light
from the bumper. This is not a malfunction.
. The screen may flicker under fluorescent
light. This is not a malfunction.
. The colors of objects on the RearView
monitor may differ somewhat from those of
the actual object.
. Objects on the monitor may not be clear in a
dark place or at night. This is not a
malfunction.
. If dirt, rain or snow attaches to the camera,
the RearView monitor may not clearly display
objects. Clean the camera.
. Do not use alcohol, benzine or thinner to
clean the camera. This will cause discolora-
tion. To clean the camera, wipe with a cloth
dampened with diluted mild cleaning agent
and then wipe with a dry cloth.
. Do not damage the camera as the monitor
screen may be adversely affected.
4-22
Center display, heater, air conditioner, audio, phone and voice recognition systems