rear NISSAN 370Z COUPE 2016 Z34 Repair Manual
[x] Cancel search | Manufacturer: NISSAN, Model Year: 2016, Model line: 370Z COUPE, Model: NISSAN 370Z COUPE 2016 Z34Pages: 428, PDF Size: 3.01 MB
Page 176 of 428
SAA2490
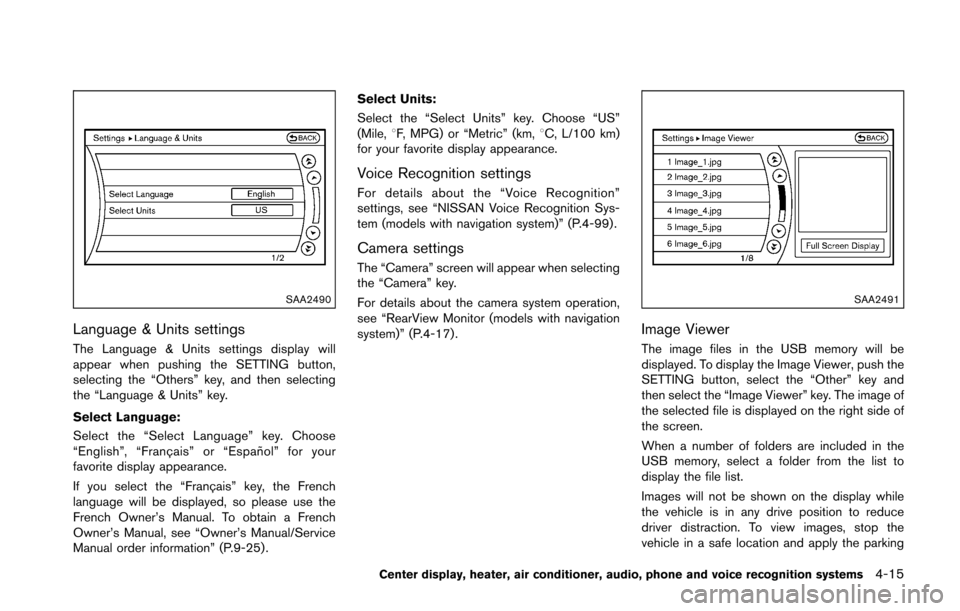
Language & Units settings
The Language & Units settings display will
appear when pushing the SETTING button,
selecting the “Others” key, and then selecting
the “Language & Units” key.
Select Language:
Select the “Select Language” key. Choose
“English”, “Franc¸ ais” or “Espan˜
ol” for your
favorite display appearance.
If you select the “Franc¸ ais” key, the French
language will be displayed, so please use the
French Owner’s Manual. To obtain a French
Owner’s Manual, see “Owner’s Manual/Service
Manual order information” (P.9-25) . Select Units:
Select the “Select Units” key. Choose “US”
(Mile, 8F, MPG) or “Metric” (km, 8C, L/100 km)
for your favorite display appearance.
Voice Recognition settings
For details about the “Voice Recognition”
settings, see “NISSAN Voice Recognition Sys-
tem (models with navigation system)” (P.4-99) .
Camera settings
The “Camera” screen will appear when selecting
the “Camera” key.
For details about the camera system operation,
see “RearView Monitor (models with navigation
system)” (P.4-17) .
SAA2491
Image Viewer
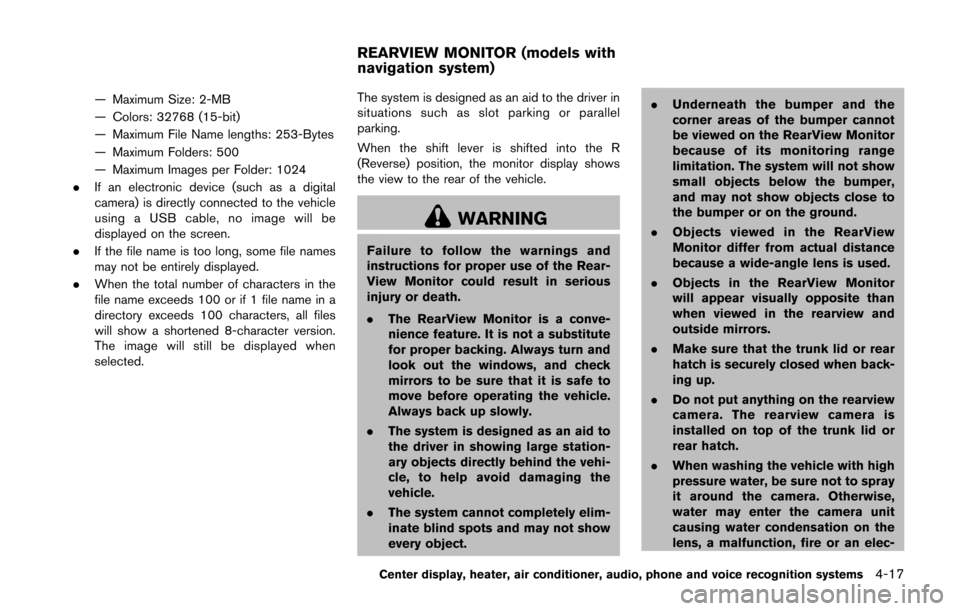
The image files in the USB memory will be
displayed. To display the Image Viewer, push the
SETTING button, select the “Other” key and
then select the “Image Viewer” key. The image of
the selected file is displayed on the right side of
the screen.
When a number of folders are included in the
USB memory, select a folder from the list to
display the file list.
Images will not be shown on the display while
the vehicle is in any drive position to reduce
driver distraction. To view images, stop the
vehicle in a safe location and apply the parking
Center display, heater, air conditioner, audio, phone and voice recognition systems4-15
Page 178 of 428
— Maximum Size: 2-MB
— Colors: 32768 (15-bit)
— Maximum File Name lengths: 253-Bytes
— Maximum Folders: 500
— Maximum Images per Folder: 1024
. If an electronic device (such as a digital
camera) is directly connected to the vehicle
using a USB cable, no image will be
displayed on the screen.
. If the file name is too long, some file names
may not be entirely displayed.
. When the total number of characters in the
file name exceeds 100 or if 1 file name in a
directory exceeds 100 characters, all files
will show a shortened 8-character version.
The image will still be displayed when
selected. The system is designed as an aid to the driver in
situations such as slot parking or parallel
parking.
When the shift lever is shifted into the R
(Reverse) position, the monitor display shows
the view to the rear of the vehicle.
WARNING
Failure to follow the warnings and
instructions for proper use of the Rear-
View Monitor could result in serious
injury or death.
.
The RearView Monitor is a conve-
nience feature. It is not a substitute
for proper backing. Always turn and
look out the windows, and check
mirrors to be sure that it is safe to
move before operating the vehicle.
Always back up slowly.
. The system is designed as an aid to
the driver in showing large station-
ary objects directly behind the vehi-
cle, to help avoid damaging the
vehicle.
. The system cannot completely elim-
inate blind spots and may not show
every object. .
Underneath the bumper and the
corner areas of the bumper cannot
be viewed on the RearView Monitor
because of its monitoring range
limitation. The system will not show
small objects below the bumper,
and may not show objects close to
the bumper or on the ground.
. Objects viewed in the RearView
Monitor differ from actual distance
because a wide-angle lens is used.
. Objects in the RearView Monitor
will appear visually opposite than
when viewed in the rearview and
outside mirrors.
. Make sure that the trunk lid or rear
hatch is securely closed when back-
ing up.
. Do not put anything on the rearview
camera. The rearview camera is
installed on top of the trunk lid or
rear hatch.
. When washing the vehicle with high
pressure water, be sure not to spray
it around the camera. Otherwise,
water may enter the camera unit
causing water condensation on the
lens, a malfunction, fire or an elec-
Center display, heater, air conditioner, audio, phone and voice recognition systems4-17
REARVIEW MONITOR (models with
navigation system)
Page 179 of 428
4-18Center display, heater, air conditioner, audio, phone and voice recognition systems
tric shock.
. Do not strike the camera. It is a
precision instrument. Otherwise, it
may malfunction or cause damage
resulting in a fire or an electric
shock.
CAUTION
Do not scratch the camera lens when
cleaning dirt or snow from the lens.
SAA1896
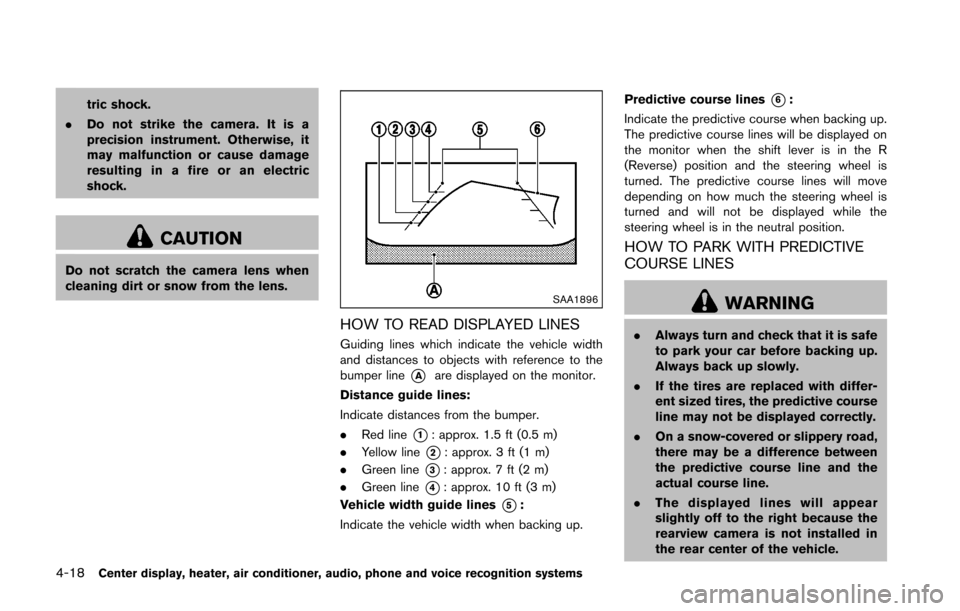
HOW TO READ DISPLAYED LINES
Guiding lines which indicate the vehicle width
and distances to objects with reference to the
bumper line
*Aare displayed on the monitor.
Distance guide lines:
Indicate distances from the bumper.
. Red line
*1: approx. 1.5 ft (0.5 m)
. Yellow line
*2: approx. 3 ft (1 m)
. Green line
*3: approx. 7 ft (2 m)
. Green line
*4: approx. 10 ft (3 m)
Vehicle width guide lines
*5:
Indicate the vehicle width when backing up. Predictive course lines
*6:
Indicate the predictive course when backing up.
The predictive course lines will be displayed on
the monitor when the shift lever is in the R
(Reverse) position and the steering wheel is
turned. The predictive course lines will move
depending on how much the steering wheel is
turned and will not be displayed while the
steering wheel is in the neutral position.
HOW TO PARK WITH PREDICTIVE
COURSE LINES
WARNING
. Always turn and check that it is safe
to park your car before backing up.
Always back up slowly.
. If the tires are replaced with differ-
ent sized tires, the predictive course
line may not be displayed correctly.
. On a snow-covered or slippery road,
there may be a difference between
the predictive course line and the
actual course line.
. The displayed lines will appear
slightly off to the right because the
rearview camera is not installed in
the rear center of the vehicle.
Page 180 of 428
.The distance guide line and the
vehicle width guide line should be
used as a reference only when the
vehicle is on a level paved surface.
The distance viewed on the monitor
is for reference only and may be
different than the actual distance
between the vehicle and displayed
objects.
. When backing up the vehicle up a
hill, objects viewed in the monitor
are further than they appear. When
backing up the vehicle down a hill,
objects viewed in the monitor are
closer than they appear. Use the
inside mirror or glance over your
shoulder to properly judge dis-
tances to other objects.
The vehicle width and predictive course
lines are wider than the actual width and
course.
SAA1897
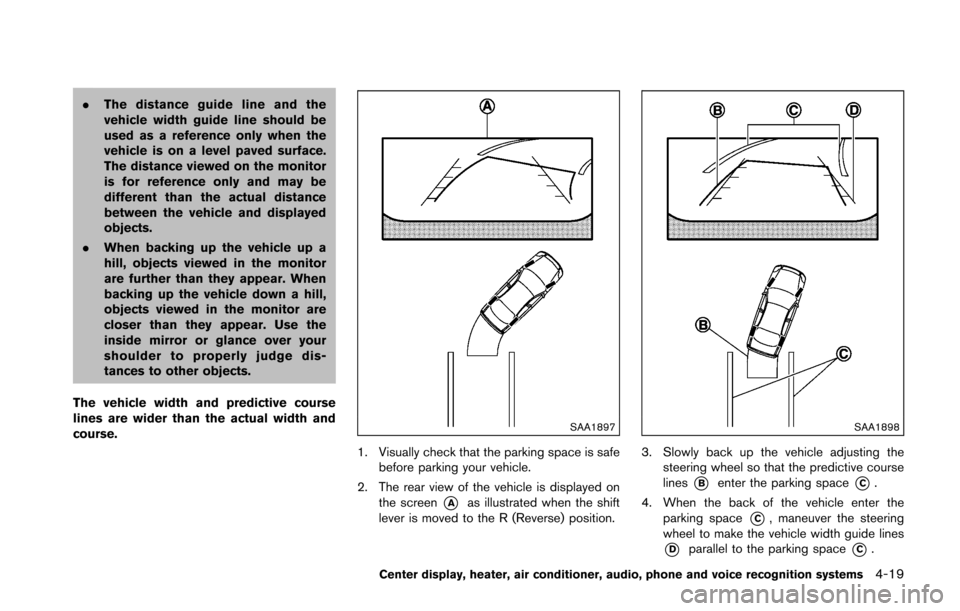
1. Visually check that the parking space is safe before parking your vehicle.
2. The rear view of the vehicle is displayed on the screen
*Aas illustrated when the shift
lever is moved to the R (Reverse) position.
SAA1898
3. Slowly back up the vehicle adjusting the steering wheel so that the predictive course
lines
*Benter the parking space*C.
4. When the back of the vehicle enter the parking space
*C, maneuver the steering
wheel to make the vehicle width guide lines
*Dparallel to the parking space*C.
Center display, heater, air conditioner, audio, phone and voice recognition systems4-19
Page 184 of 428
HOW TO ADJUST SCREEN
To adjust the Display ON/OFF, Brightness, Tint,
Color, Contrast and Black Level of the RearView
Monitor, push the SETTING button with the
RearView Monitor on, select the “Display” key
on the screen and select the item key and adjust
the level using the multi-function controller.
Do not adjust the Brightness, Tint, Color,
Contrast and Black Level of the RearView
Monitor while the vehicle is moving. Make sure
the parking brake is firmly applied.
OPERATING TIPS
.When the shift lever is shifted to the R
(Reverse) position, the monitor screen auto-
matically changes to the RearView Monitor
mode. However, the radio can be heard.
. When the temperature is extremely high or
low, the screen may not clearly display
objects. This is not a malfunction.
. When strong light is directly coming on the
camera, objects may not be displayed
clearly. This is not a malfunction.
. Vertical lines may be seen in objects on the
screen. This is due to strong reflected light
from the bumper. This is not a malfunction.
. The screen may flicker under fluorescent
light. This is not a malfunction. .
The colors of objects on the RearView
Monitor may differ somewhat from the actual
color of objects. This is not a malfunction.
. Objects on the monitor may not be clear in a
dark environment. This is not a malfunction.
. If dirt, rain or snow accumulates on the
camera, the RearView Monitor may not
display object clearly. Clean the camera.
. Do not use alcohol, benzine or thinner to
clean the camera. This will cause discolora-
tion. To clean the camera, wipe with a cloth
dampened with diluted mild cleaning agent
and then wipe with a dry cloth.
. Do not damage the camera as the monitor
screen may be adversely affected.
. Do not use wax on the camera window.
Wipe off any wax with a clean cloth
dampened with mild detergent diluted with
water.SAA2275
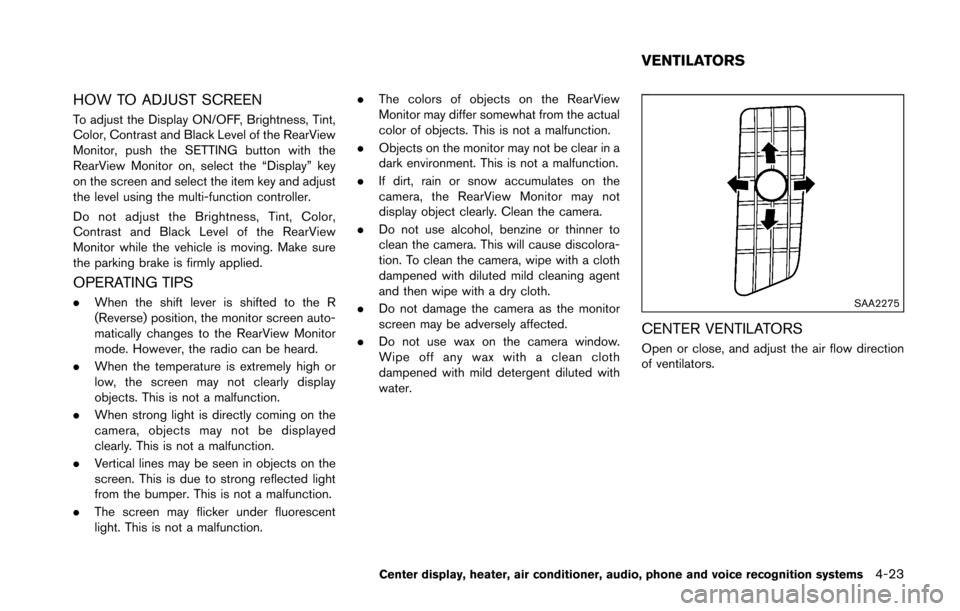
CENTER VENTILATORS
Open or close, and adjust the air flow direction
of ventilators.
Center display, heater, air conditioner, audio, phone and voice recognition systems4-23
VENTILATORS
Page 186 of 428
SAA2493
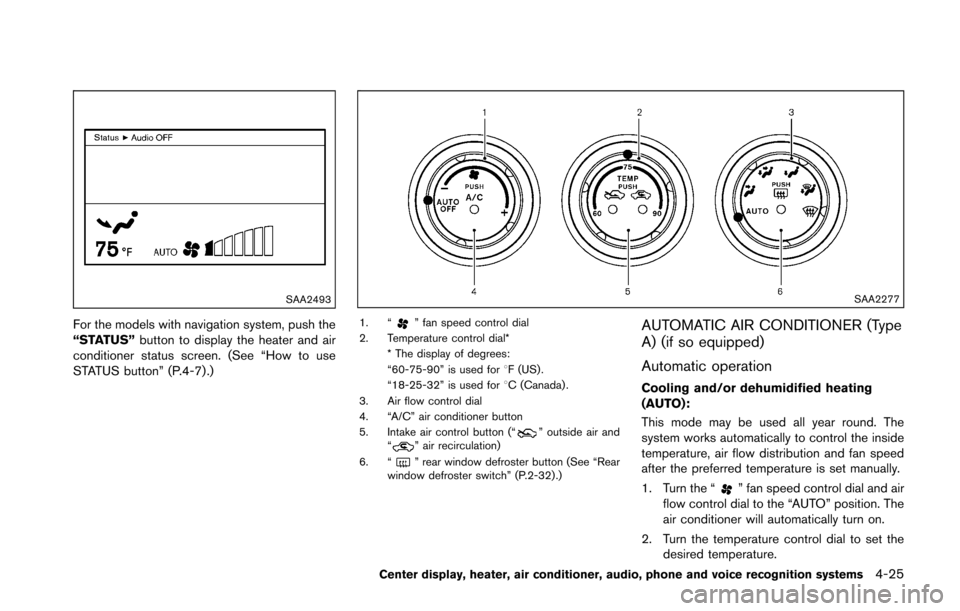
For the models with navigation system, push the
“STATUS”button to display the heater and air
conditioner status screen. (See “How to use
STATUS button” (P.4-7) .)
SAA2277
1. “” fan speed control dial
2. Temperature control dial* * The display of degrees:
“60-75-90” is used for 8F (US) .
“18-25-32” is used for 8C (Canada) .
3. Air flow control dial
4. “A/C” air conditioner button
5. Intake air control button (“
” outside air and
“” air recirculation)
6. “
” rear window defroster button (See “Rear
window defroster switch” (P.2-32) .)
AUTOMATIC AIR CONDITIONER (Type
A) (if so equipped)
Automatic operation
Cooling and/or dehumidified heating
(AUTO):
This mode may be used all year round. The
system works automatically to control the inside
temperature, air flow distribution and fan speed
after the preferred temperature is set manually.
1. Turn the “
” fan speed control dial and air
flow control dial to the “AUTO” position. The
air conditioner will automatically turn on.
2. Turn the temperature control dial to set the desired temperature.
Center display, heater, air conditioner, audio, phone and voice recognition systems4-25
Page 188 of 428
To turn the system off
Turn the “” fan speed control dial to the
“OFF” position.
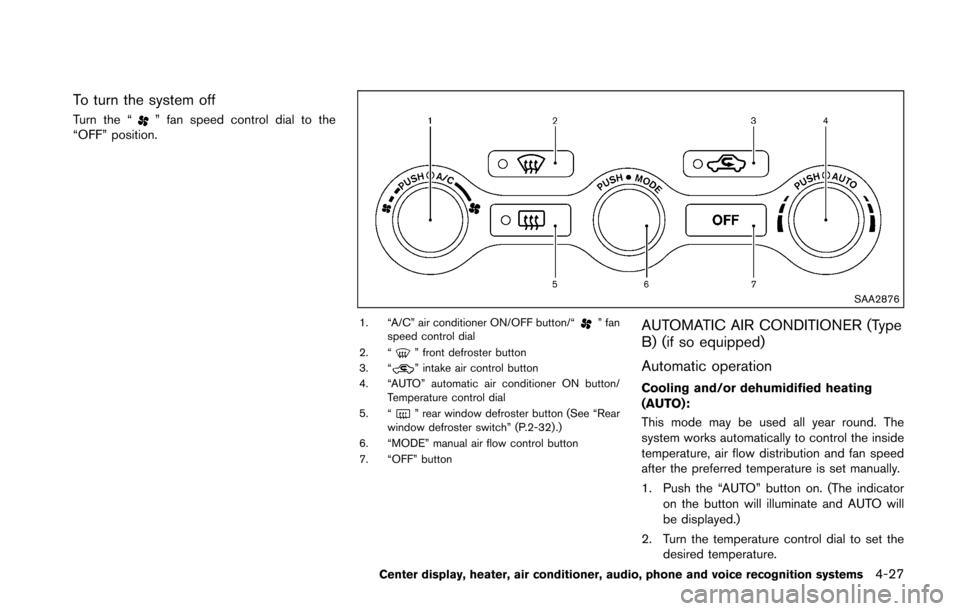
SAA2876
1. “A/C” air conditioner ON/OFF button/“” fan
speed control dial
2. “
” front defroster button
3. “” intake air control button
4. “AUTO” automatic air conditioner ON button/ Temperature control dial
5. “
” rear window defroster button (See “Rear
window defroster switch” (P.2-32) .)
6. “MODE” manual air flow control button
7. “OFF” button
AUTOMATIC AIR CONDITIONER (Type
B) (if so equipped)
Automatic operation
Cooling and/or dehumidified heating
(AUTO):
This mode may be used all year round. The
system works automatically to control the inside
temperature, air flow distribution and fan speed
after the preferred temperature is set manually.
1. Push the “AUTO” button on. (The indicator on the button will illuminate and AUTO will
be displayed.)
2. Turn the temperature control dial to set the desired temperature.
Center display, heater, air conditioner, audio, phone and voice recognition systems4-27
Page 205 of 428
4-44Center display, heater, air conditioner, audio, phone and voice recognition systems
SETUP button:
To configure Audio, Clock, Language or Scroll
direction settings, perform the following proce-
dure:
1. Push the SETUP button.
2. Push the ENTER button.
3. Turn the TUNE/MENU knob clockwise orcounterclockwise, the display will appear in
the following order:
Audio �œClock �œLanguage �œScroll
Direction
After the desired levels have been set, push
either the back button repeatedly, the SETUP
button, or wait for 8 seconds without pushing
any buttons to exit the menu screen.
Audio adjustments:
Push the SETUP button to enter the setup menu
screen then select Audio by using TUNE/MENU
knob.
Each time the ENTER button is pushed, the
mode will change as follows:
Bass ?Treble ?Fade ?Balance ?AUX VOL
? SPD VOL ?Audio (setup menu screen)
Turn the TUNE/MENU knob clockwise or
counterclockwise to adjust the following items
and push the ENTER button to confirm. Bass control:
Use this control to enhance or attenuate bass
response sound.
Treble control:
Use this control to enhance or attenuate the
treble.
Fade control:
Use this control to adjust the balance of the
volume between the front and rear (if so
equipped) speakers.
Balance control:
Use this control to adjust the balance of the
volume between the left and right speakers.
AUX VOL (Auxiliary volume) control:
Use this control to adjust the volume output from
the auxiliary source.
SPD VOL (Speed volume) control:
This mode controls the volume output from the
speakers automatically in relation to vehicle
speed.
Adjusting the setting to 0 (zero) turns off the
speed volume feature.
Clock setting:
Push the SETUP button to enter the setup menu
screen then select Clock.
Turn the TUNE/MENU knob, the mode will change as follows:
Set Time
�œON/OFF �œClock Format �œSet
time
Set Time:
Select Set Time then adjust the clock as follows:
1. The hour display will start flashing. Turn the TUNE/MENU knob to adjust the hour and
push the ENTER button.
2. The minute display will start flashing. Turn the TUNE/MENU knob to adjust the minute
and push the ENTER button to finish the
clock adjustment.
ON/OFF:
Set the clock display between on or off when the
audio unit is turned off. If set in the ON position,
the clock will be displayed when the audio unit is
turned off either by pushing the power button or
when the ignition switch is placed in the “OFF”
position.
Clock Format:
Switch the clock display between 24-hour mode
and 12-hour clock mode.
Language setting:
Push the SETUP button to enter the setup menu
screen then select Language.
Select the appropriate language and push the
ENTER button. Upon completion, the screen will
Page 234 of 428
.Tilting up/down for more than 1.5 seconds
will scroll up or down through the title
number.
. Pushing the menu control switch will select
an item from the DVD display.
. When the transparent operation menu ap-
pears, the switch will control the menu.
USB (models with navigation system):
. Tilting up/down for less than 1.5 seconds
will scroll up or down through the track
number.
. Tilting up/down for more than 1.5 seconds
will scroll up or down through the folder
number
. Pushing the menu control switch will show
the USB Menu.
Bluetooth
�ŠAudio (models with navigation
system):
. Tilting up/down for less than 1.5 seconds
will scroll up or down through the track
number.
AUX:
. Pushing the menu control switch will show
the AUX Menu.
BACK switch (models with navi-
gation system)
Push this switch to go back to the previous
screen or cancel the selection if it is not
completed.
Volume control switches
Push the upper (+) or lower (�í) side switch to
increase or decrease the volume.
Audio source switch
Push the audio source switch to change the
mode to available audio source.
ANTENNA
Window antenna (for Coupe models)
The antenna pattern is printed inside the rear
window.
CAUTION
. Do not place metalized film near the
rear window glass or attach any
metal parts to it. This may cause
poor reception or noise.
. When cleaning the inside of the rear
window, be careful not to scratch or
damage the rear window antenna.
Lightly wipe along the antenna with
a dampened soft cloth.
Center display, heater, air conditioner, audio, phone and voice recognition systems4-73
Page 287 of 428
5-2Starting and driving
WARNING
.Do not leave children or adults who
would normally require the support
of others alone in your vehicle. Pets
should not be left alone either. They
could accidentally injure themselves
or others through inadvertent op-
eration of the vehicle. Also, on hot,
sunny days, temperatures in a
closed vehicle could quickly become
high enough to cause severe or
possibly fatal injuries to people or
animals.
. Properly secure all cargo to help
prevent it from sliding or shifting.
Do not place cargo higher than the
seatbacks. In a sudden stop or
collision, unsecured cargo could
cause personal injury (Coupe mod-
els) .
. Closely supervise children when
they are around cars to prevent
them from playing and becoming
locked in the trunk where they could
be seriously injured. Keep the car
locked with the trunk closed when
not in use, and prevent children’s access to car keys (Roadster mod-
els) .
If the engine oil temperature is high, the
engine protection mode, which helps re-
duce the chance of engine damage, could
activate and automatically decrease en-
gine power. Driving while the engine oil
temperature is high may result in engine
damage.
EXHAUST GAS (carbon monoxide)
WARNING
. Do not breathe exhaust gases; they
contain colorless and odorless car-
bon monoxide. Carbon monoxide is
dangerous. It can cause uncon-
sciousness or death.
. If you suspect that exhaust fumes
are entering the vehicle, drive with
all windows fully open, and have the
vehicle inspected immediately.
. Do not run the engine in closed
spaces such as a garage.
. Do not park the vehicle with the
engine running for any extended
length of time. .
Keep the rear hatch/trunk lid closed
while driving, otherwise exhaust
gases could be drawn into the
passenger compartment. If you
must drive with the rear hatch/trunk
lid open, follow these precautions:
1) Open all the windows.
2) Set the
air recirculation to
off and the fan control to high to
circulate the air.
. The exhaust system and body
should be inspected by a qualified
mechanic whenever:
— The vehicle is raised for service.
— You suspect that exhaust fumes
are entering into the passenger
compartment.
— You notice a change in the sound of the exhaust system.
— You have had an accident invol- ving damage to the exhaust
system, underbody, or rear of
the vehicle.
PRECAUTIONS WHEN STARTING
AND DRIVING