rear NISSAN 370Z COUPE 2016 Z34 Manual PDF
[x] Cancel search | Manufacturer: NISSAN, Model Year: 2016, Model line: 370Z COUPE, Model: NISSAN 370Z COUPE 2016 Z34Pages: 428, PDF Size: 3.01 MB
Page 293 of 428
5-8Starting and driving
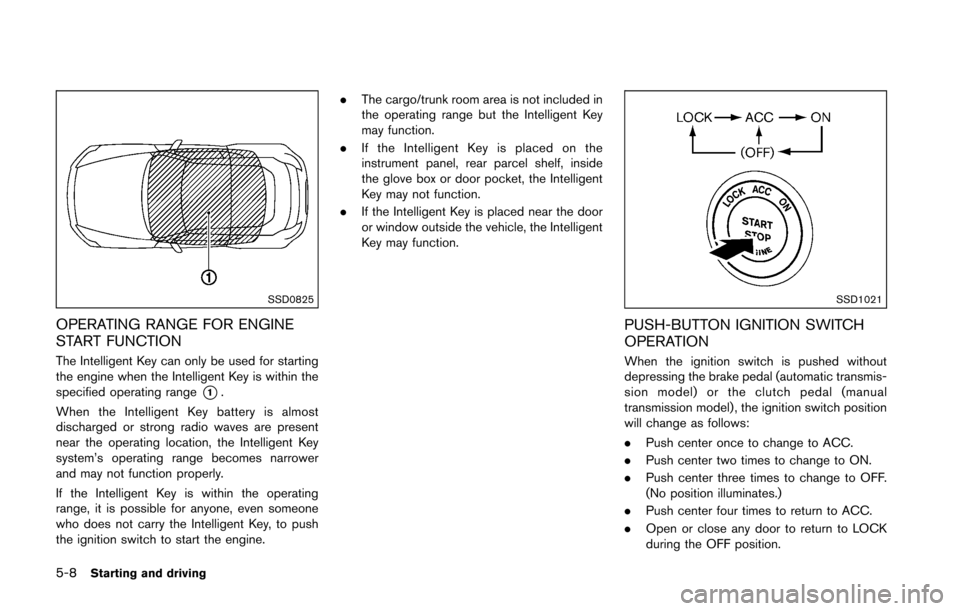
SSD0825
OPERATING RANGE FOR ENGINE
START FUNCTION
The Intelligent Key can only be used for starting
the engine when the Intelligent Key is within the
specified operating range
*1.
When the Intelligent Key battery is almost
discharged or strong radio waves are present
near the operating location, the Intelligent Key
system’s operating range becomes narrower
and may not function properly.
If the Intelligent Key is within the operating
range, it is possible for anyone, even someone
who does not carry the Intelligent Key, to push
the ignition switch to start the engine. .
The cargo/trunk room area is not included in
the operating range but the Intelligent Key
may function.
. If the Intelligent Key is placed on the
instrument panel, rear parcel shelf, inside
the glove box or door pocket, the Intelligent
Key may not function.
. If the Intelligent Key is placed near the door
or window outside the vehicle, the Intelligent
Key may function.
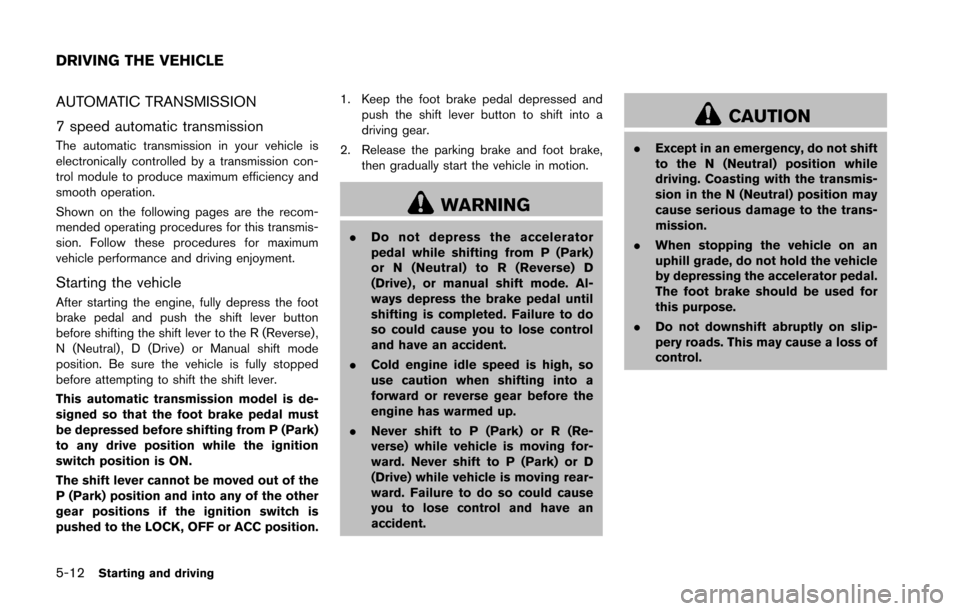
SSD1021
PUSH-BUTTON IGNITION SWITCH
OPERATION
When the ignition switch is pushed without
depressing the brake pedal (automatic transmis-
sion model) or the clutch pedal (manual
transmission model) , the ignition switch position
will change as follows:
.Push center once to change to ACC.
. Push center two times to change to ON.
. Push center three times to change to OFF.
(No position illuminates.)
. Push center four times to return to ACC.
. Open or close any door to return to LOCK
during the OFF position.
Page 297 of 428
5-12Starting and driving
AUTOMATIC TRANSMISSION
7 speed automatic transmission
The automatic transmission in your vehicle is
electronically controlled by a transmission con-
trol module to produce maximum efficiency and
smooth operation.
Shown on the following pages are the recom-
mended operating procedures for this transmis-
sion. Follow these procedures for maximum
vehicle performance and driving enjoyment.
Starting the vehicle
After starting the engine, fully depress the foot
brake pedal and push the shift lever button
before shifting the shift lever to the R (Reverse) ,
N (Neutral) , D (Drive) or Manual shift mode
position. Be sure the vehicle is fully stopped
before attempting to shift the shift lever.
This automatic transmission model is de-
signed so that the foot brake pedal must
be depressed before shifting from P (Park)
to any drive position while the ignition
switch position is ON.
The shift lever cannot be moved out of the
P (Park) position and into any of the other
gear positions if the ignition switch is
pushed to the LOCK, OFF or ACC position.1. Keep the foot brake pedal depressed and
push the shift lever button to shift into a
driving gear.
2. Release the parking brake and foot brake, then gradually start the vehicle in motion.
WARNING
.Do not depress the accelerator
pedal while shifting from P (Park)
or N (Neutral) to R (Reverse) D
(Drive) , or manual shift mode. Al-
ways depress the brake pedal until
shifting is completed. Failure to do
so could cause you to lose control
and have an accident.
. Cold engine idle speed is high, so
use caution when shifting into a
forward or reverse gear before the
engine has warmed up.
. Never shift to P (Park) or R (Re-
verse) while vehicle is moving for-
ward. Never shift to P (Park) or D
(Drive) while vehicle is moving rear-
ward. Failure to do so could cause
you to lose control and have an
accident.
CAUTION
.Except in an emergency, do not shift
to the N (Neutral) position while
driving. Coasting with the transmis-
sion in the N (Neutral) position may
cause serious damage to the trans-
mission.
. When stopping the vehicle on an
uphill grade, do not hold the vehicle
by depressing the accelerator pedal.
The foot brake should be used for
this purpose.
. Do not downshift abruptly on slip-
pery roads. This may cause a loss of
control.
DRIVING THE VEHICLE
Page 316 of 428
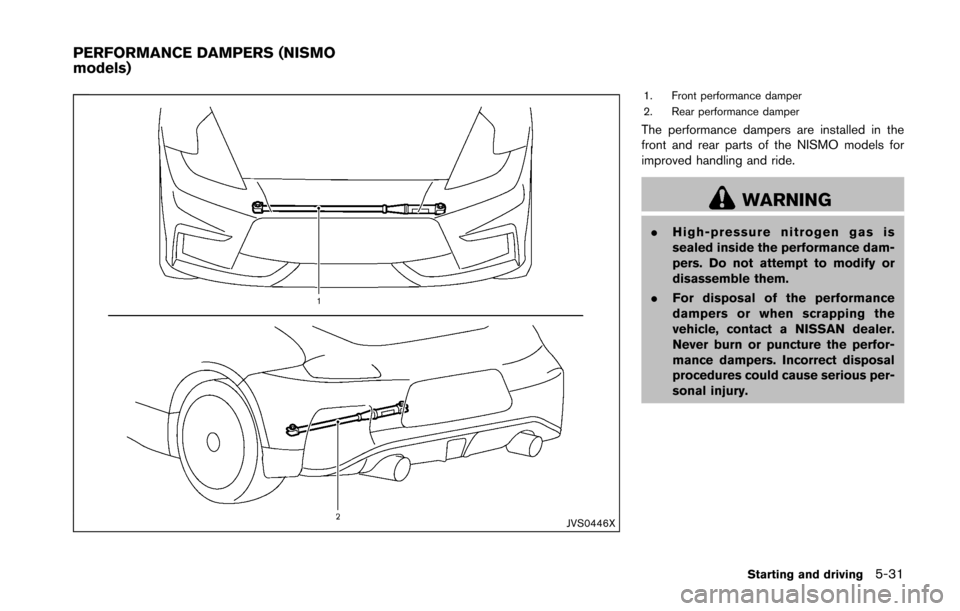
JVS0446X
1. Front performance damper
2. Rear performance damper
The performance dampers are installed in the
front and rear parts of the NISMO models for
improved handling and ride.
WARNING
.High-pressure nitrogen gas is
sealed inside the performance dam-
pers. Do not attempt to modify or
disassemble them.
. For disposal of the performance
dampers or when scrapping the
vehicle, contact a NISSAN dealer.
Never burn or puncture the perfor-
mance dampers. Incorrect disposal
procedures could cause serious per-
sonal injury.
Starting and driving5-31
PERFORMANCE DAMPERS (NISMO
models)
Page 325 of 428
6-6In case of emergency
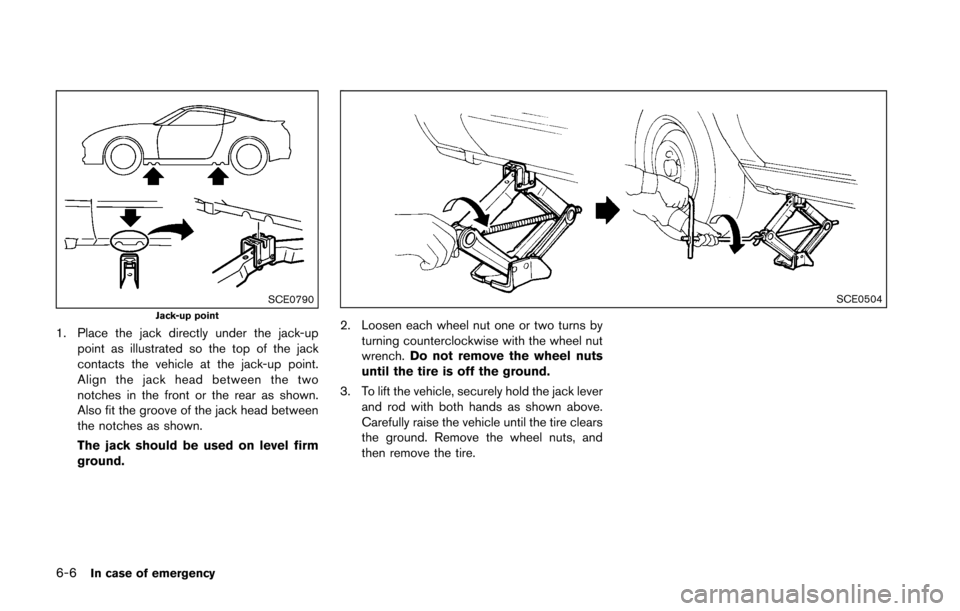
SCE0790Jack-up point
1. Place the jack directly under the jack-uppoint as illustrated so the top of the jack
contacts the vehicle at the jack-up point.
Align the jack head between the two
notches in the front or the rear as shown.
Also fit the groove of the jack head between
the notches as shown.
The jack should be used on level firm
ground.
SCE0504
2. Loosen each wheel nut one or two turns by
turning counterclockwise with the wheel nut
wrench. Do not remove the wheel nuts
until the tire is off the ground.
3. To lift the vehicle, securely hold the jack lever and rod with both hands as shown above.
Carefully raise the vehicle until the tire clears
the ground. Remove the wheel nuts, and
then remove the tire.
Page 326 of 428
SCE0661
Installing the spare tire
The T-type spare tire is designed for
emergency use. (See specific instructions
under the heading “Wheels and tires” (P.8-
30) .)
1. Clean any mud or dirt from the surfacebetween the wheel and hub.
2. Carefully put the spare tire on and tighten the wheel nuts finger tight. Check that all the
wheel nuts contact the wheel surface
horizontally.
Models equipped with different sized
tires in the front and rear:
When replacing a front tire, make sure that the hole in the spare tire wheel is aligned
with the pin on the brake rotor.
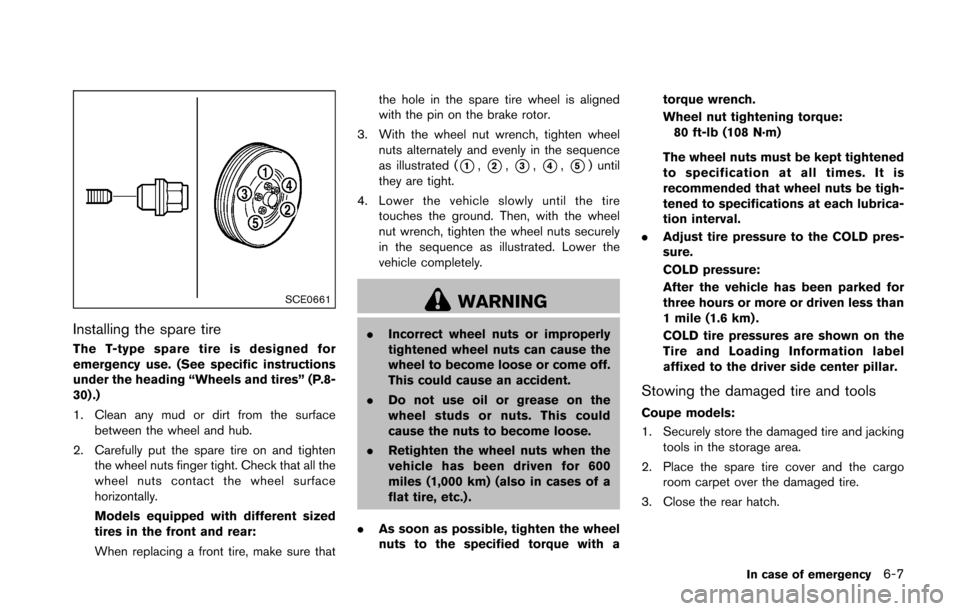
3. With the wheel nut wrench, tighten wheel nuts alternately and evenly in the sequence
as illustrated (
*1,*2,*3,*4,*5) until
they are tight.
4. Lower the vehicle slowly until the tire touches the ground. Then, with the wheel
nut wrench, tighten the wheel nuts securely
in the sequence as illustrated. Lower the
vehicle completely.
WARNING
.Incorrect wheel nuts or improperly
tightened wheel nuts can cause the
wheel to become loose or come off.
This could cause an accident.
. Do not use oil or grease on the
wheel studs or nuts. This could
cause the nuts to become loose.
. Retighten the wheel nuts when the
vehicle has been driven for 600
miles (1,000 km) (also in cases of a
flat tire, etc.) .
. As soon as possible, tighten the wheel
nuts to the specified torque with a torque wrench.
Wheel nut tightening torque:
80 ft-lb (108 N·m)
The wheel nuts must be kept tightened
to specification at all times. It is
recommended that wheel nuts be tigh-
tened to specifications at each lubrica-
tion interval.
. Adjust tire pressure to the COLD pres-
sure.
COLD pressure:
After the vehicle has been parked for
three hours or more or driven less than
1 mile (1.6 km) .
COLD tire pressures are shown on the
Tire and Loading Information label
affixed to the driver side center pillar.
Stowing the damaged tire and tools
Coupe models:
1. Securely store the damaged tire and jacking
tools in the storage area.
2. Place the spare tire cover and the cargo room carpet over the damaged tire.
3. Close the rear hatch.
In case of emergency6-7
Page 338 of 428
SCE0792
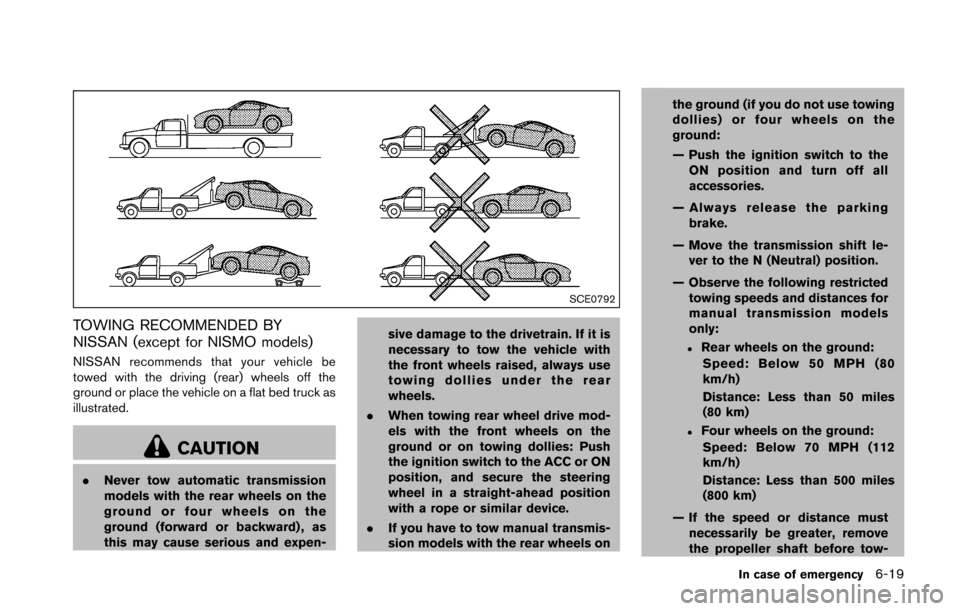
TOWING RECOMMENDED BY
NISSAN (except for NISMO models)
NISSAN recommends that your vehicle be
towed with the driving (rear) wheels off the
ground or place the vehicle on a flat bed truck as
illustrated.
CAUTION
.Never tow automatic transmission
models with the rear wheels on the
ground or four wheels on the
ground (forward or backward) , as
this may cause serious and expen- sive damage to the drivetrain. If it is
necessary to tow the vehicle with
the front wheels raised, always use
towing dollies under the rear
wheels.
. When towing rear wheel drive mod-
els with the front wheels on the
ground or on towing dollies: Push
the ignition switch to the ACC or ON
position, and secure the steering
wheel in a straight-ahead position
with a rope or similar device.
. If you have to tow manual transmis-
sion models with the rear wheels on the ground (if you do not use towing
dollies) or four wheels on the
ground:
— Push the ignition switch to the
ON position and turn off all
accessories.
— Always release the parking brake.
— Move the transmission shift le- ver to the N (Neutral) position.
— Observe the following restricted towing speeds and distances for
manual transmission models
only:
.Rear wheels on the ground:
Speed: Below 50 MPH (80
km/h)
Distance: Less than 50 miles
(80 km)
.Four wheels on the ground:Speed: Below 70 MPH (112
km/h)
Distance: Less than 500 miles
(800 km)
— If the speed or distance must necessarily be greater, remove
the propeller shaft before tow-
In case of emergency6-19
Page 339 of 428
6-20In case of emergency
ing to prevent damage to the
drivetrain.
SCE0836
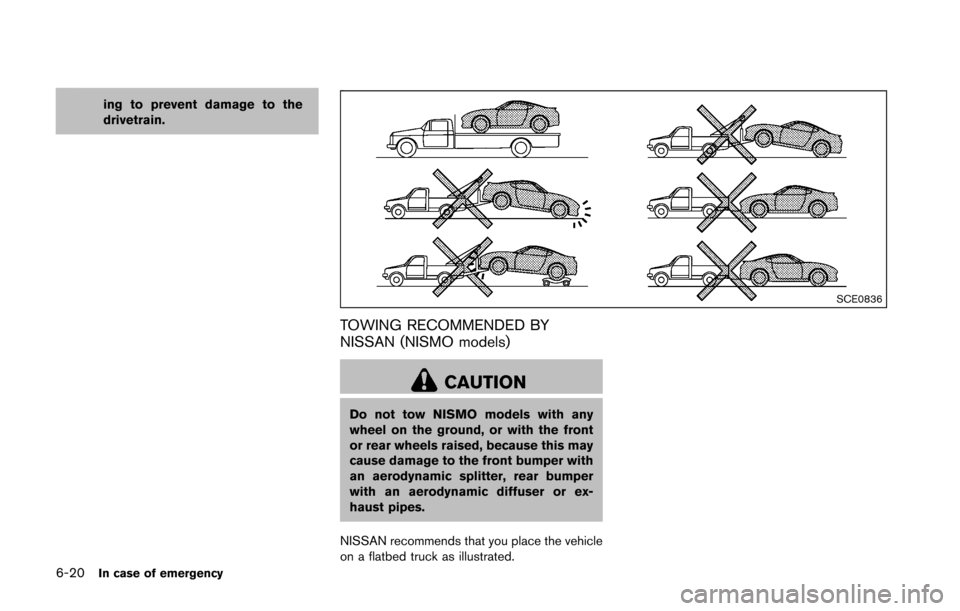
TOWING RECOMMENDED BY
NISSAN (NISMO models)
CAUTION
Do not tow NISMO models with any
wheel on the ground, or with the front
or rear wheels raised, because this may
cause damage to the front bumper with
an aerodynamic splitter, rear bumper
with an aerodynamic diffuser or ex-
haust pipes.
NISSAN recommends that you place the vehicle
on a flatbed truck as illustrated.
Page 344 of 428
JVA0019X
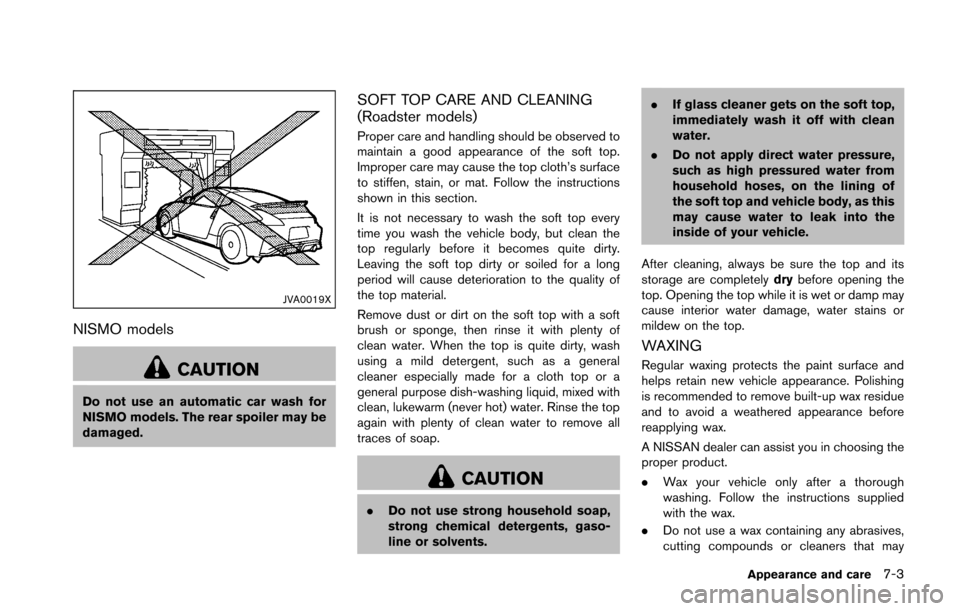
NISMO models
CAUTION
Do not use an automatic car wash for
NISMO models. The rear spoiler may be
damaged.
SOFT TOP CARE AND CLEANING
(Roadster models)
Proper care and handling should be observed to
maintain a good appearance of the soft top.
Improper care may cause the top cloth’s surface
to stiffen, stain, or mat. Follow the instructions
shown in this section.
It is not necessary to wash the soft top every
time you wash the vehicle body, but clean the
top regularly before it becomes quite dirty.
Leaving the soft top dirty or soiled for a long
period will cause deterioration to the quality of
the top material.
Remove dust or dirt on the soft top with a soft
brush or sponge, then rinse it with plenty of
clean water. When the top is quite dirty, wash
using a mild detergent, such as a general
cleaner especially made for a cloth top or a
general purpose dish-washing liquid, mixed with
clean, lukewarm (never hot) water. Rinse the top
again with plenty of clean water to remove all
traces of soap.
CAUTION
.Do not use strong household soap,
strong chemical detergents, gaso-
line or solvents. .
If glass cleaner gets on the soft top,
immediately wash it off with clean
water.
. Do not apply direct water pressure,
such as high pressured water from
household hoses, on the lining of
the soft top and vehicle body, as this
may cause water to leak into the
inside of your vehicle.
After cleaning, always be sure the top and its
storage are completely drybefore opening the
top. Opening the top while it is wet or damp may
cause interior water damage, water stains or
mildew on the top.
WAXING
Regular waxing protects the paint surface and
helps retain new vehicle appearance. Polishing
is recommended to remove built-up wax residue
and to avoid a weathered appearance before
reapplying wax.
A NISSAN dealer can assist you in choosing the
proper product.
. Wax your vehicle only after a thorough
washing. Follow the instructions supplied
with the wax.
. Do not use a wax containing any abrasives,
cutting compounds or cleaners that may
Appearance and care7-3
Page 345 of 428
7-4Appearance and care
damage the vehicle finish.
Machine compound or aggressive polishing on a
base coat/clear coat paint finish may dull the
finish or leave swirl marks.
REMOVING SPOTS
Remove tar and oil spots, industrial dust,
insects, and tree sap as quickly as possible
from the paint surface to avoid lasting damage
or staining. Special cleaning products are
available at a NISSAN dealer or any automotive
accessory stores.
UNDERBODY
In areas where road salt is used in winter, the
underbody must be cleaned regularly. This will
prevent dirt and salt from building up and
causing the acceleration of corrosion on the
underbody and suspension. Before the winter
period and again in the spring, the underseal
must be checked and, if necessary, re-treated.
GLASS
Use glass cleaner to remove smoke and dust
film from the glass surfaces. It is normal for glass
to become coated with a film after the vehicle is
parked in the hot sun. Glass cleaner and a soft
cloth will easily remove this film.
CAUTION
. When cleaning the inside of the
windows, do not use sharp-edged
tools, abrasive cleaners or chlorine-
based disinfectant cleaners. They
could damage the electrical conduc-
tors, radio antenna elements or rear
window defroster elements.
. If glass cleaner gets on the soft top,
immediately wash it off with clean
water (Roadster models) .
WHEELS
Wash the wheels when washing the vehicle to
maintain their appearance.
.Clean the inner side of the wheels when the
wheel is changed or the underside of the
vehicle is washed.
. Inspect wheel rims regularly for dents or
corrosion. Such damage may cause loss of
pressure or poor seal at the tire bead.
. NISSAN recommends that the road wheels
be waxed to protect against road salt in
areas where it is used during winter.
CAUTION
Do not use abrasive cleaners when
washing the wheels.
Aluminum alloy wheels
Wash regularly with a sponge dampened in a
mild soap solution, especially during winter
months in areas where road salt is used. Salt
could discolor the wheels if not removed.
CAUTION
Follow the directions below to avoid
staining or discoloring the wheels:
.Do not use a cleaner that uses
strong acid or alkali contents to
clean the wheels.
. Do not apply wheel cleaners to the
wheels when they are hot. The
wheel temperature should be the
same as ambient temperature.
. Rinse the wheel to completely re-
move the cleaner within 15 minutes
after the cleaner is applied.
Page 353 of 428
8-4Maintenance and do-it-yourself
Lights*:Clean the headlights on a regular basis.
Make sure that the headlights, stop lights, tail
lights, turn signal lights, and other lights are all
operating properly and installed securely. Also
check headlight aim.
Road wheel nuts (lug nuts)*: When checking
the tires, make sure no wheel nuts are missing,
and check for any loose wheel nuts. Tighten if
necessary.
Tire rotation*: Tires cannot be rotated, as the
front tires are a different size from the rear tires
and the direction of wheel rotation is fixed in
each tire.
Tires*: Check the pressure with a gauge often
and always prior to long distance trips. If
necessary, adjust the pressure in all tires,
including the spare, to the pressure specified.
Check carefully for damage, cuts or excessive
wear.
Tire Pressure Monitoring System (TPMS)
transmitter components: Replace the TPMS
transmitter grommet seal, valve core and cap
when the tires are replaced due to wear or age.
Tire, wheel alignment and balance: If the
vehicle should pull to either side while driving on
a straight and level road, or if you detect uneven
or abnormal tire wear, there may be a need for
wheel alignment. If the steering wheel or seat vibrates at normal
highway speeds, wheel balancing may be
needed.
For additional information regarding tires, refer
to “Important Tire Safety Information” (US) or
“Tire Safety Information” (Canada) in the
NISSAN Warranty Information Booklet.
Windshield:
Clean the windshield on a regular
basis. Check the windshield at least every six
months for cracks or other damage. Have a
damaged windshield repaired by a qualified
repair facility.
Windshield wiper blades*: Check for cracks
or wear if they do not wipe properly.
Inside the vehicle
The maintenance items listed here should be
checked on a regular basis, such as when
performing scheduled maintenance, cleaning
the vehicle, etc.
Accelerator pedal: Check the pedal for
smooth operation and make sure the pedal
does not catch or require uneven effort. Keep
the floor mat away from the pedal.
Automatic transmission P (Park) mechan-
ism: On a fairly steep hill, check that your
vehicle is held securely with the shift lever in the
P (Park) position without applying any brakes. Brake pedal:
Check the pedal for smooth
operation. If the brake pedal suddenly goes
down further than normal, the pedal feels
spongy or the vehicle seems to take longer to
stop, see a NISSAN dealer immediately. Keep
the floor mat away from the pedal.
Brakes: Check that the brakes do not pull the
vehicle to one side when applied.
Parking brake: Check the parking brake
operation regularly. The vehicle should be
securely held on a fairly steep hill with only the
parking brake applied. If the parking brake needs
adjusted, see a NISSAN dealer.
Seat belts: Check that all parts of the seat belt
system (for example, buckles, anchors, adjuster
and retractors) operate properly and smoothly,
and are installed securely. Check the belt
webbing for cuts, fraying, wear or damage.
Seats: Check seat position controls such as
seat adjusters, seatback recliner, etc. to ensure
they operate smoothly and that all latches lock
securely in every position. Check that the head
restraints move up and down smoothly and that
the locks (if so equipped) hold securely in all
latched positions.
Steering wheel: Check for changes in the
steering conditions, such as excessive free play,
hard steering or strange noises.