change time NISSAN 370Z ROADSTER 2014 Z34 User Guide
[x] Cancel search | Manufacturer: NISSAN, Model Year: 2014, Model line: 370Z ROADSTER, Model: NISSAN 370Z ROADSTER 2014 Z34Pages: 428, PDF Size: 2.14 MB
Page 208 of 428
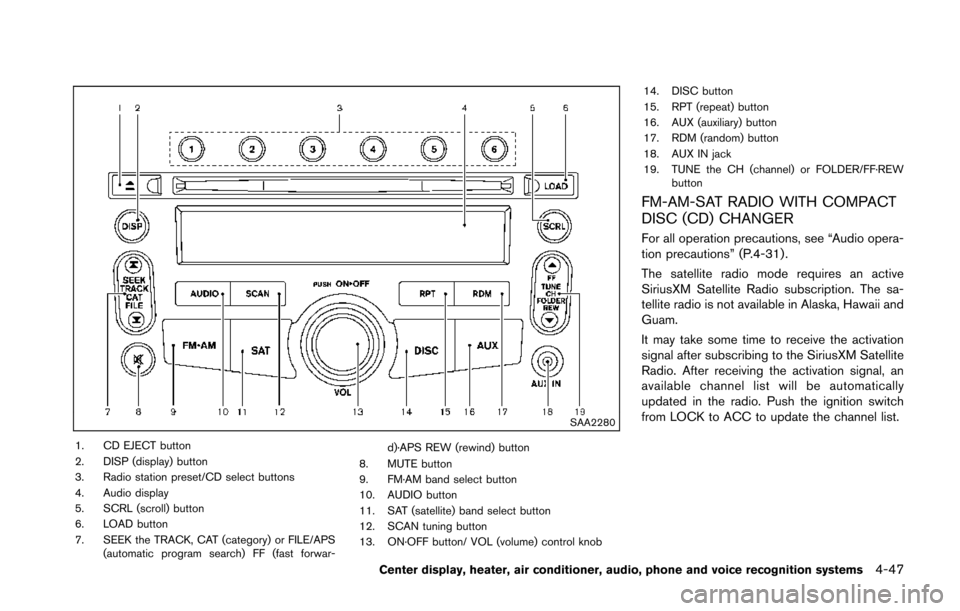
SAA2280
1. CD EJECT button
2. DISP (display) button
3. Radio station preset/CD select buttons
4. Audio display
5. SCRL (scroll) button
6. LOAD button
7. SEEK the TRACK, CAT (category) or FILE/APS(automatic program search) FF (fast forwar- d)·APS REW (rewind) button
8. MUTE button
9. FM·AM band select button
10. AUDIO button
11. SAT (satellite) band select button
12. SCAN tuning button
13. ON·OFF button/ VOL (volume) control knob 14. DISC button
15. RPT (repeat) button
16. AUX (auxiliary) button
17. RDM (random) button
18. AUX IN jack
19. TUNE the CH (channel) or FOLDER/FF·REW
button
FM-AM-SAT RADIO WITH COMPACT
DISC (CD) CHANGER
For all operation precautions, see “Audio opera-
tion precautions” (P.4-31) .
The satellite radio mode requires an active
SiriusXM Satellite Radio subscription. The sa-
tellite radio is not available in Alaska, Hawaii and
Guam.
It may take some time to receive the activation
signal after subscribing to the SiriusXM Satellite
Radio. After receiving the activation signal, an
available channel list will be automatically
updated in the radio. Push the ignition switch
from LOCK to ACC to update the channel list.
Center display, heater, air conditioner, audio, phone and voice recognition systems4-47
Page 210 of 428
During satellite radio reception, the following
notices will be displayed under certain condi-
tions.
.NO SIGNAL (No signal is received while the
SAT tuner is connected.)
. OFF AIR (Broadcasting signed off)
. CHECK ANTENNA (Antenna connection
error)
. LOADING (When the initial setting is
performed)
. UPDATING (When the satellite radio sub-
scription is not active)
SCAN tuning:
Push the SCAN tuning button to tune from low
to high frequencies and stop at each broad-
casting station/channel for 5 seconds. Pushing
the button again during this 5 seconds period
will stop SCAN tuning and the radio will remain
tuned to that station/channel.
If the SCAN tuning button is not pushed within 5
seconds, SCAN tuning moves to the next
station/channel.
*1to*6Station memory operations:
18 stations/channels can be set for the SAT
band (6 each for XM1, XM2 and XM3) , 12 can
be set for the FM band (6 each for FM1 and
FM2), and 6 can be set for the AM band. 1. Choose the radio band using the radio band
select button.
2. Tune to the desired station/channel using the SEEK, SCAN or TUNE button.
3. Push and hold the desired radio station preset button
*1to*6until a beep sound
is heard. (The radio mutes when the select
button is pushed.)
4. The station indicator will then come on and the sound will resume. Memorizing is now
complete.
5. Other buttons can be set in the same manner.
If the battery cable is disconnected, or if the fuse
opens, the radio memory will be erased. In that
case, reset the desired stations.
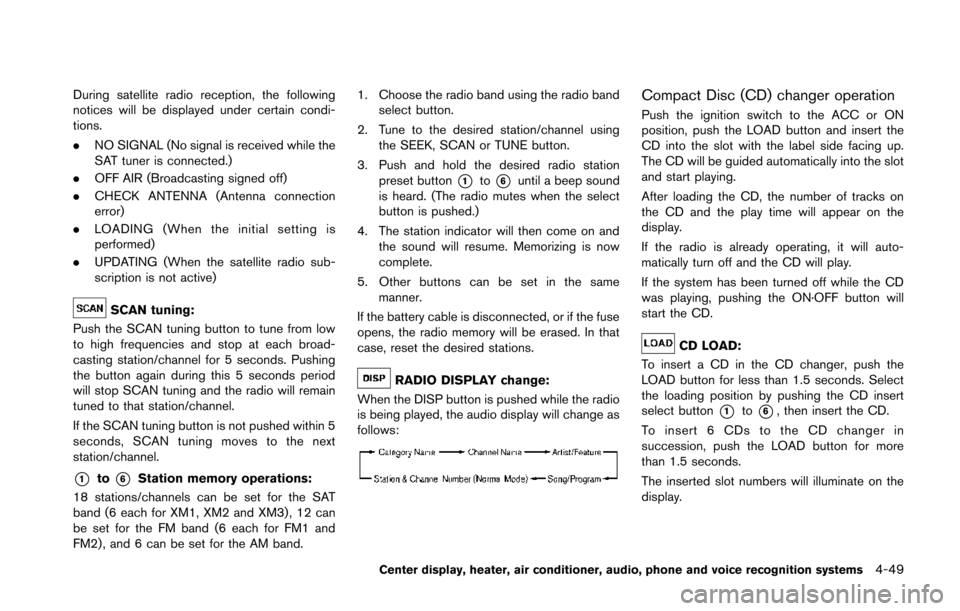
RADIO DISPLAY change:
When the DISP button is pushed while the radio
is being played, the audio display will change as
follows:
Compact Disc (CD) changer operation
Push the ignition switch to the ACC or ON
position, push the LOAD button and insert the
CD into the slot with the label side facing up.
The CD will be guided automatically into the slot
and start playing.
After loading the CD, the number of tracks on
the CD and the play time will appear on the
display.
If the radio is already operating, it will auto-
matically turn off and the CD will play.
If the system has been turned off while the CD
was playing, pushing the ON·OFF button will
start the CD.
CD LOAD:
To insert a CD in the CD changer, push the
LOAD button for less than 1.5 seconds. Select
the loading position by pushing the CD insert
select button
*1to*6, then insert the CD.
To insert 6 CDs to the CD changer in
succession, push the LOAD button for more
than 1.5 seconds.
The inserted slot numbers will illuminate on the
display.
Center display, heater, air conditioner, audio, phone and voice recognition systems4-49
Page 211 of 428
4-50Center display, heater, air conditioner, audio, phone and voice recognition systems
PLAY:
When the DISC (CD play) button is pushed with
the system off and the CD loaded, the system
will turn on and the CD will start to play.
When the DISC button is pushed with the CD
loaded and the radio playing, the radio will
automatically be turned off and the CD will start
to play.
When the DISC button is pushed while a CD is
loaded and a medium is played using the
auxiliary input jacks, you can toggle back and
forth between CD and medium.
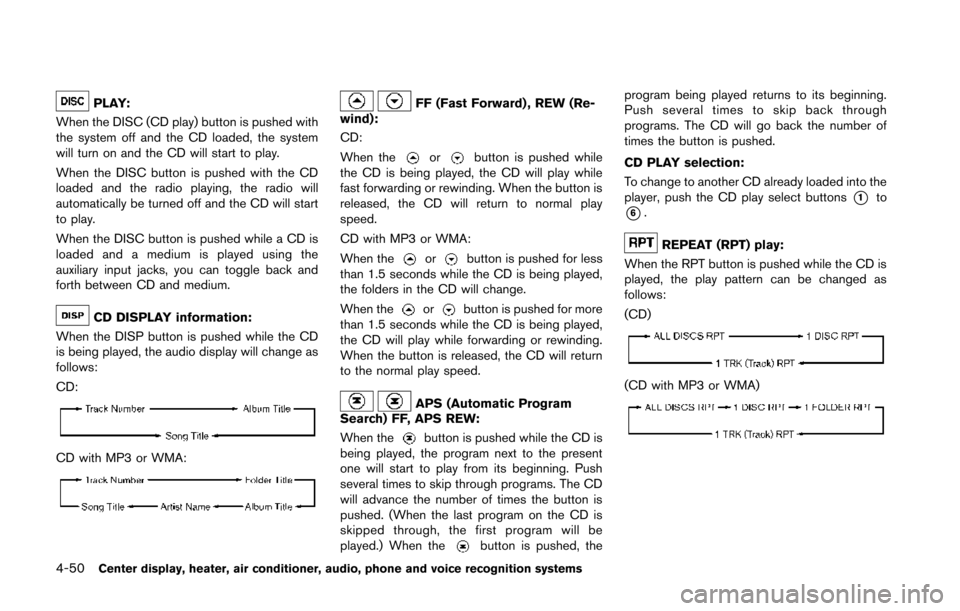
CD DISPLAY information:
When the DISP button is pushed while the CD
is being played, the audio display will change as
follows:
CD:
CD with MP3 or WMA:
FF (Fast Forward) , REW (Re-
wind):
CD:
When the
orbutton is pushed while
the CD is being played, the CD will play while
fast forwarding or rewinding. When the button is
released, the CD will return to normal play
speed.
CD with MP3 or WMA:
When the
orbutton is pushed for less
than 1.5 seconds while the CD is being played,
the folders in the CD will change.
When the
orbutton is pushed for more
than 1.5 seconds while the CD is being played,
the CD will play while forwarding or rewinding.
When the button is released, the CD will return
to the normal play speed.
APS (Automatic Program
Search) FF, APS REW:
When the
button is pushed while the CD is
being played, the program next to the present
one will start to play from its beginning. Push
several times to skip through programs. The CD
will advance the number of times the button is
pushed. (When the last program on the CD is
skipped through, the first program will be
played.) When the
button is pushed, the program being played returns to its beginning.
Push several times to skip back through
programs. The CD will go back the number of
times the button is pushed.
CD PLAY selection:
To change to another CD already loaded into the
player, push the CD play select buttons
*1to
*6.
REPEAT (RPT) play:
When the RPT button is pushed while the CD is
played, the play pattern can be changed as
follows:
(CD)
(CD with MP3 or WMA)
Page 217 of 428
4-56Center display, heater, air conditioner, audio, phone and voice recognition systems
DVD (Digital Versatile Disc) PLAYER
OPERATION (models with navigation
system)
Precautions
Start the engine when using the DVD entertain-
ment system.
Movies will not be shown on the front display
while the vehicle is in any drive position to
reduce driver distraction. Audio is available
when a movie is played. To view movies in the
front display, stop the vehicle in a safe location,
move the shift lever to the P (Park) position and
apply the parking brake.
WARNING
.The driver must not attempt to
operate the DVD system or wear
the headphones while the vehicle is
in motion so that full attention may
be given to vehicle operation.
. Do not attempt to modify the system
to display a movie on the front
screen while the vehicle is being
driven. Doing so may distract the
driver and may cause a collision and
serious personal injury or death.
CAUTION
.Only operate the DVD while the
vehicle engine is running. Operating
the DVD for extended periods of
time with the engine OFF can dis-
charge the vehicle battery.
. Do not allow the system to get wet.
Excessive moisture such as spilled
liquids may cause the system to
malfunction.
. While playing VIDEO-CD media, this
DVD player does not guarantee
complete functionality of all VI-
DEO-CD formats.
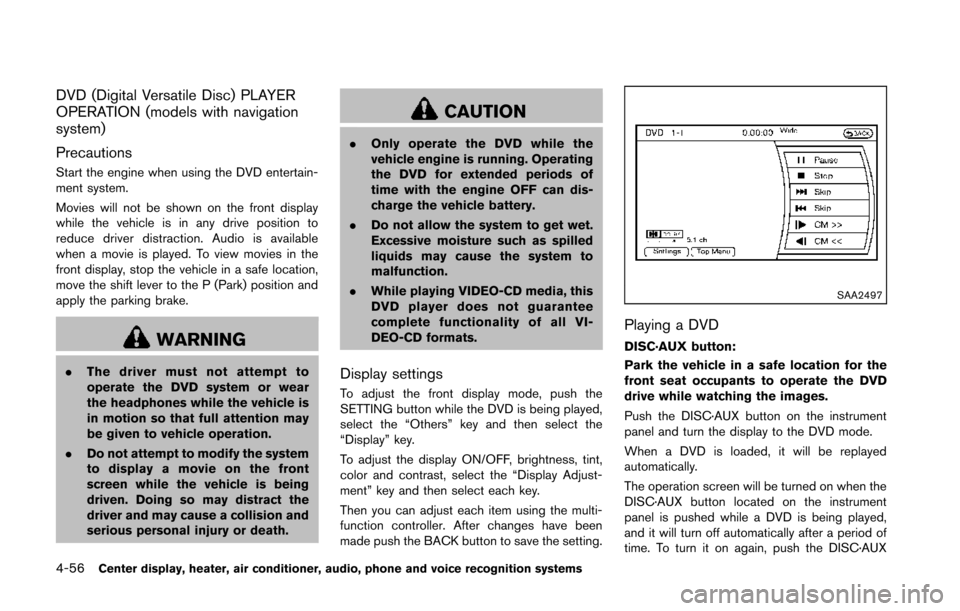
Display settings
To adjust the front display mode, push the
SETTING button while the DVD is being played,
select the “Others” key and then select the
“Display” key.
To adjust the display ON/OFF, brightness, tint,
color and contrast, select the “Display Adjust-
ment” key and then select each key.
Then you can adjust each item using the multi-
function controller. After changes have been
made push the BACK button to save the setting.
SAA2497
Playing a DVD
DISC·AUX button:
Park the vehicle in a safe location for the
front seat occupants to operate the DVD
drive while watching the images.
Push the DISC·AUX button on the instrument
panel and turn the display to the DVD mode.
When a DVD is loaded, it will be replayed
automatically.
The operation screen will be turned on when the
DISC·AUX button located on the instrument
panel is pushed while a DVD is being played,
and it will turn off automatically after a period of
time. To turn it on again, push the DISC·AUX
Page 219 of 428
4-58Center display, heater, air conditioner, audio, phone and voice recognition systems
Key (DVD-VIDEO):
Keys for the DVD menu operation are displayed.
: Move the cursor to select a DVD menu.
Enter: Enter the selected menu.
Move: Change the display location by moving the operation key.
Back: Return to the previous screen.
Hide: Hide the operation key.
Title Menu (DVD-VIDEO):
Some menus specific to each disc will be
shown. For details, see the instructions on the
disc.
Title Search (DVD-VIDEO, DVD-VR):
The scene with the specified title will be
displayed each time the “+” side or “ −” side is
selected.
Group Search (VIDEO CD):
A scene in the specified group will be displayed
each time the “+” side or “−” side is selected.
10 Key Search (DVD-VIDEO, VIDEO-CD,
CD-DA, DVD-VR):
Select the “10 Key Search” key to open the
number entry screen. Input the number to be
searched and select the “OK” key. The specified
Title/Chapter or Group/Track will be played. Select No. (VIDEO-CD):
Select the “Select No.” key to open the number
entry screen. Input the number to be searched
and select the “OK” key. The specified scene
will be played.
Angle (DVD-VIDEO):
If the DVD contains different angles (such as
moving images), the current image angle can be
switched to another one. Select the “Angle” key.
The angle will change each time the “+” side or
“−” side is selected.
Angle Mark (DVD-VIDEO):
When this item is turned on, an angle mark will
be shown on the bottom of the screen if the
scene can be seen from a different angle.
Menu Skip (DVD-VIDEO):
DVD menus are automatically configured and
the contents will be played directly when the
“Menu Skip” key is turned on. Note that some
discs may not be played directly even if this item
is turned on.
CM Skip (DVD-VIDEO):
Select the “CM Skip” key. Choose the setting
time from 15, 30 or 60 seconds by selecting the
“+” side or “−” side. DRC (DVD-VIDEO, DVD-VR):
DRC (Dynamic Range Compression) automati-
cally adjusts the soundtrack volume level to
maintain a more even sound to the speakers.
DVD Language (DVD-VIDEO, VIDEO-CD):
Select the “DVD Language” key to open the
number entry screen. Input the number corre-
sponding to the preferred language and select
the “OK” key. The DVD top menu language will
be changed to the one specified.
Display:
To adjust the image quality of the screen, select
the preferred adjustment items.
Audio:
Select the preferred language for audio.
Subtitle (DVD-VIDEO, DVD-VR):
Select the preferred language for subtitles.
Display Mode (DVD-VIDEO, VIDEO-CD,
DVD-VR):
Select from the “Full”, “Wide”, “Normal” or
“Cinema” modes.
Title List (DVD-VR):
Select the preferred title from the list.
Play Mode:
Select the preferred play mode.
Page 223 of 428
4-62Center display, heater, air conditioner, audio, phone and voice recognition systems
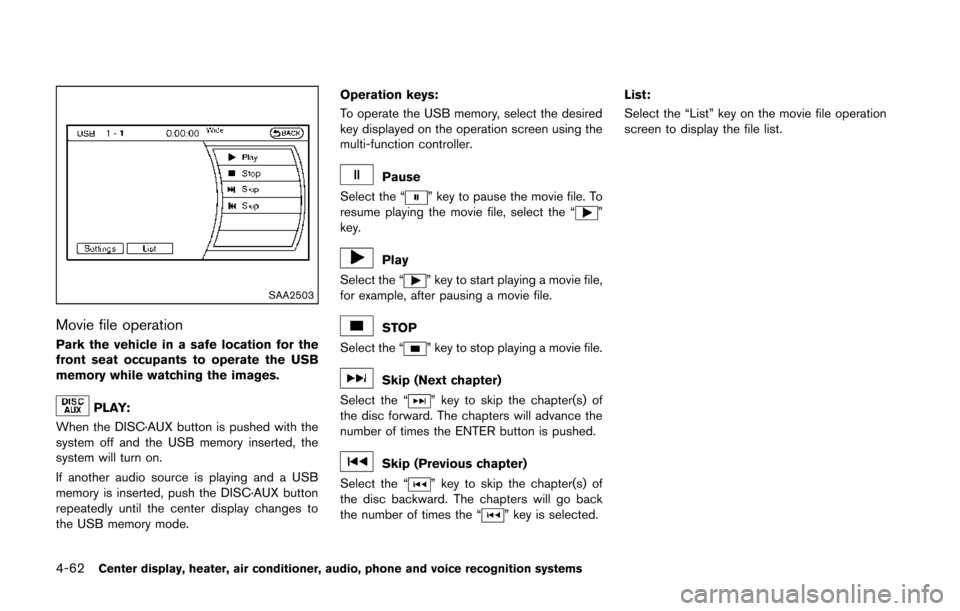
SAA2503
Movie file operation
Park the vehicle in a safe location for the
front seat occupants to operate the USB
memory while watching the images.
PLAY:
When the DISC·AUX button is pushed with the
system off and the USB memory inserted, the
system will turn on.
If another audio source is playing and a USB
memory is inserted, push the DISC·AUX button
repeatedly until the center display changes to
the USB memory mode. Operation keys:
To operate the USB memory, select the desired
key displayed on the operation screen using the
multi-function controller.
Pause
Select the “
” key to pause the movie file. To
resume playing the movie file, select the “”
key.
Play
Select the “
” key to start playing a movie file,
for example, after pausing a movie file.
STOP
Select the “
” key to stop playing a movie file.
Skip (Next chapter)
Select the “
” key to skip the chapter(s) of
the disc forward. The chapters will advance the
number of times the ENTER button is pushed.
Skip (Previous chapter)
Select the “
” key to skip the chapter(s) of
the disc backward. The chapters will go back
the number of times the “
” key is selected. List:
Select the “List” key on the movie file operation
screen to display the file list.
Page 251 of 428
4-90Center display, heater, air conditioner, audio, phone and voice recognition systems
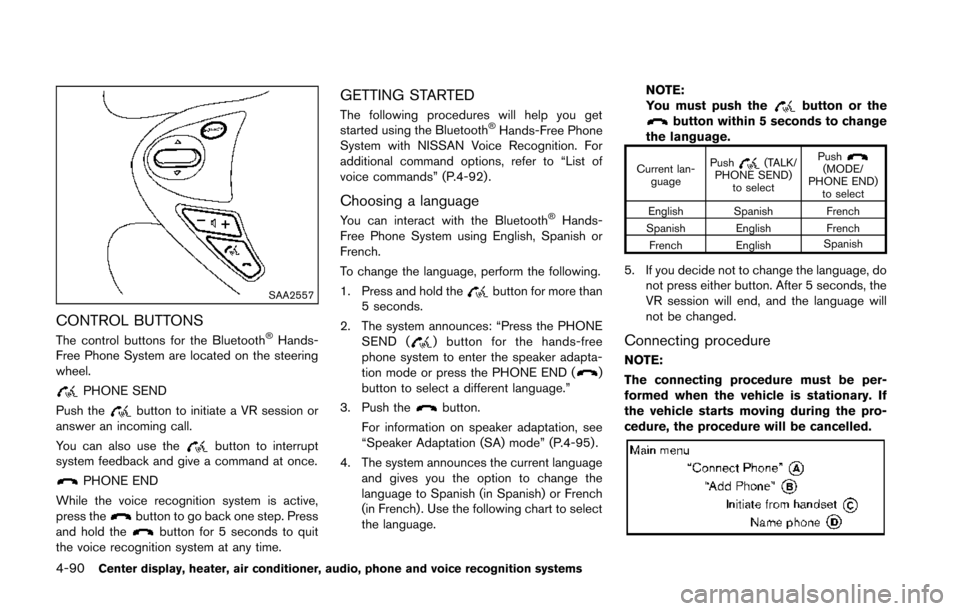
SAA2557
CONTROL BUTTONS
The control buttons for the Bluetooth®Hands-
Free Phone System are located on the steering
wheel.
PHONE SEND
Push the
button to initiate a VR session or
answer an incoming call.
You can also use the
button to interrupt
system feedback and give a command at once.
PHONE END
While the voice recognition system is active,
press the
button to go back one step. Press
and hold thebutton for 5 seconds to quit
the voice recognition system at any time.
GETTING STARTED
The following procedures will help you get
started using the Bluetooth®Hands-Free Phone
System with NISSAN Voice Recognition. For
additional command options, refer to “List of
voice commands” (P.4-92) .
Choosing a language
You can interact with the Bluetooth®Hands-
Free Phone System using English, Spanish or
French.
To change the language, perform the following.
1. Press and hold the
button for more than
5 seconds.
2. The system announces: “Press the PHONE SEND (
) button for the hands-free
phone system to enter the speaker adapta-
tion mode or press the PHONE END (
)
button to select a different language.”
3. Push the
button.
For information on speaker adaptation, see
“Speaker Adaptation (SA) mode” (P.4-95) .
4. The system announces the current language and gives you the option to change the
language to Spanish (in Spanish) or French
(in French). Use the following chart to select
the language. NOTE:
You must push the
button or thebutton within 5 seconds to change
the language.
Current lan- guage Push(TALK/
PHONE SEND) to select Push(MODE/
PHONE END) to select
English Spanish French
Spanish English French French English Spanish
5. If you decide not to change the language, do
not press either button. After 5 seconds, the
VR session will end, and the language will
not be changed.
Connecting procedure
NOTE:
The connecting procedure must be per-
formed when the vehicle is stationary. If
the vehicle starts moving during the pro-
cedure, the procedure will be cancelled.
Page 256 of 428
“Previous Name”*D
Use the Previous Name command to move the
previous name of list.
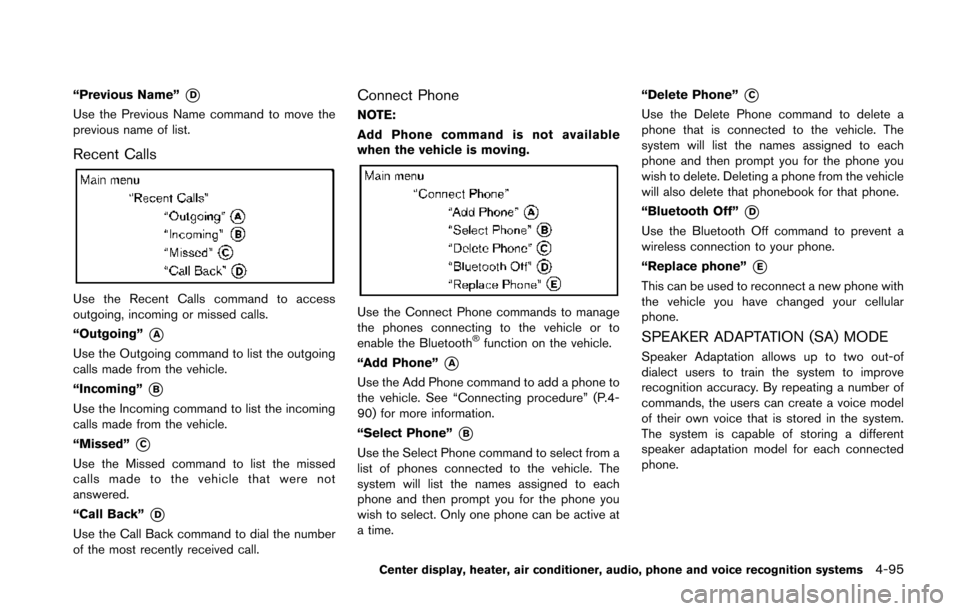
Recent Calls
Use the Recent Calls command to access
outgoing, incoming or missed calls.
“Outgoing”
*A
Use the Outgoing command to list the outgoing
calls made from the vehicle.
“Incoming”
*B
Use the Incoming command to list the incoming
calls made from the vehicle.
“Missed”
*C
Use the Missed command to list the missed
calls made to the vehicle that were not
answered.
“Call Back”
*D
Use the Call Back command to dial the number
of the most recently received call.
Connect Phone
NOTE:
Add Phone command is not available
when the vehicle is moving.
Use the Connect Phone commands to manage
the phones connecting to the vehicle or to
enable the Bluetooth
®function on the vehicle.
“Add Phone”
*A
Use the Add Phone command to add a phone to
the vehicle. See “Connecting procedure” (P.4-
90) for more information.
“Select Phone”
*B
Use the Select Phone command to select from a
list of phones connected to the vehicle. The
system will list the names assigned to each
phone and then prompt you for the phone you
wish to select. Only one phone can be active at
a time. “Delete Phone”
*C
Use the Delete Phone command to delete a
phone that is connected to the vehicle. The
system will list the names assigned to each
phone and then prompt you for the phone you
wish to delete. Deleting a phone from the vehicle
will also delete that phonebook for that phone.
“Bluetooth Off”
*D
Use the Bluetooth Off command to prevent a
wireless connection to your phone.
“Replace phone”
*E
This can be used to reconnect a new phone with
the vehicle you have changed your cellular
phone.
SPEAKER ADAPTATION (SA) MODE
Speaker Adaptation allows up to two out-of
dialect users to train the system to improve
recognition accuracy. By repeating a number of
commands, the users can create a voice model
of their own voice that is stored in the system.
The system is capable of storing a different
speaker adaptation model for each connected
phone.
Center display, heater, air conditioner, audio, phone and voice recognition systems4-95
Page 289 of 428
5-2Starting and driving
WARNING
.Do not leave children or adults who
would normally require the support
of others alone in your vehicle. Pets
should not be left alone either. They
could accidentally injure themselves
or others through inadvertent op-
eration of the vehicle. Also, on hot,
sunny days, temperatures in a
closed vehicle could quickly become
high enough to cause severe or
possibly fatal injuries to people or
animals.
. Properly secure all cargo to help
prevent it from sliding or shifting.
Do not place cargo higher than the
seatbacks. In a sudden stop or
collision, unsecured cargo could
cause personal injury (Coupe mod-
els) .
. Closely supervise children when
they are around cars to prevent
them from playing and becoming
locked in the trunk where they could
be seriously injured. Keep the car
locked with the trunk closed when
not in use, and prevent children’s access to car keys (Roadster mod-
els) .
If the engine oil temperature is high, the
engine protection mode, which helps re-
duce the chance of engine damage, could
activate and automatically decrease en-
gine power. Driving while the engine oil
temperature is high may result in engine
damage.
EXHAUST GAS (carbon monoxide)
WARNING
. Do not breathe exhaust gases; they
contain colorless and odorless car-
bon monoxide. Carbon monoxide is
dangerous. It can cause uncon-
sciousness or death.
. If you suspect that exhaust fumes
are entering the vehicle, drive with
all windows fully open, and have the
vehicle inspected immediately.
. Do not run the engine in closed
spaces such as a garage.
. Do not park the vehicle with the
engine running for any extended
length of time. .
Keep the rear hatch/trunk lid closed
while driving, otherwise exhaust
gases could be drawn into the
passenger compartment. If you
must drive with the rear hatch/trunk
lid open, follow these precautions:
1) Open all the windows.
2) Set the
air recirculation to
off and the fan control to high to
circulate the air.
. The exhaust system and body
should be inspected by a qualified
mechanic whenever:
— The vehicle is raised for service.
— You suspect that exhaust fumes
are entering into the passenger
compartment.
— You notice a change in the sound of the exhaust system.
— You have had an accident invol- ving damage to the exhaust
system, underbody, or rear of
the vehicle.
PRECAUTIONS WHEN STARTING
AND DRIVING
Page 294 of 428
following the procedure below. Please note that
this procedure is only a general guide. The
vehicle must be driven as appropriate based on
the conditions of the vehicle, road and traffic.
WARNING
The following actions can increase the
chance of losing control of the vehicle if
there is a sudden loss of tire air
pressure. Losing control of the vehicle
may cause a collision and result in
personal injury.
.The vehicle generally moves or pulls
in the direction of the flat tire.
. Do not rapidly apply the brakes.
. Do not rapidly release the accelera-
tor pedal.
. Do not rapidly turn the steering
wheel.
1. Remain calm and do not overreact.
2. Maintain a firm grip on the steering wheel with both hands and try to hold a straight
course.
3. When appropriate, slowly release the accel- erator pedal to gradually slow the vehicle. 4. Gradually steer the vehicle to a safe location
off the road and away from traffic if possible.
5. Lightly apply the brake pedal to gradually stop the vehicle.
6. Turn on the hazard warning flashers and either contact a roadside emergency service
to change the tire or see “Changing a flat
tire (for models with spare tire)” (P.6-4) of
this Owner’s Manual.
DRINKING ALCOHOL/DRUGS AND
DRIVING
WARNING
Never drive under the influence of
alcohol or drugs. Alcohol in the blood-
stream reduces coordination, delays
reaction time and impairs judgement.
Driving after drinking alcohol increases
the likelihood of being involved in an
accident injuring yourself and others.
Additionally, if you are injured in an
accident, alcohol can increase the se-
verity of the injury.
NISSAN is committed to safe driving. However,
you must choose not to drive under the influence
of alcohol. Every year thousands of people are injured or killed in alcohol-related accidents.
Although the local laws vary on what is
considered to be legally intoxicated, the fact is
that alcohol affects all people differently and
most people underestimate the effects of
alcohol.
Remember, drinking and driving don’t mix! And
that is true for drugs, too (over-the-counter,
prescription, and illegal drugs) . Don’t drive if
your ability to operate your vehicle is impaired by
alcohol, drugs, or some other physical condition.
Starting and driving5-7