parking brake NISSAN ALMERA N16 2003 Electronic User Guide
[x] Cancel search | Manufacturer: NISSAN, Model Year: 2003, Model line: ALMERA N16, Model: NISSAN ALMERA N16 2003Pages: 3189, PDF Size: 54.76 MB
Page 1474 of 3189
AT-18
OVERALL SYSTEM
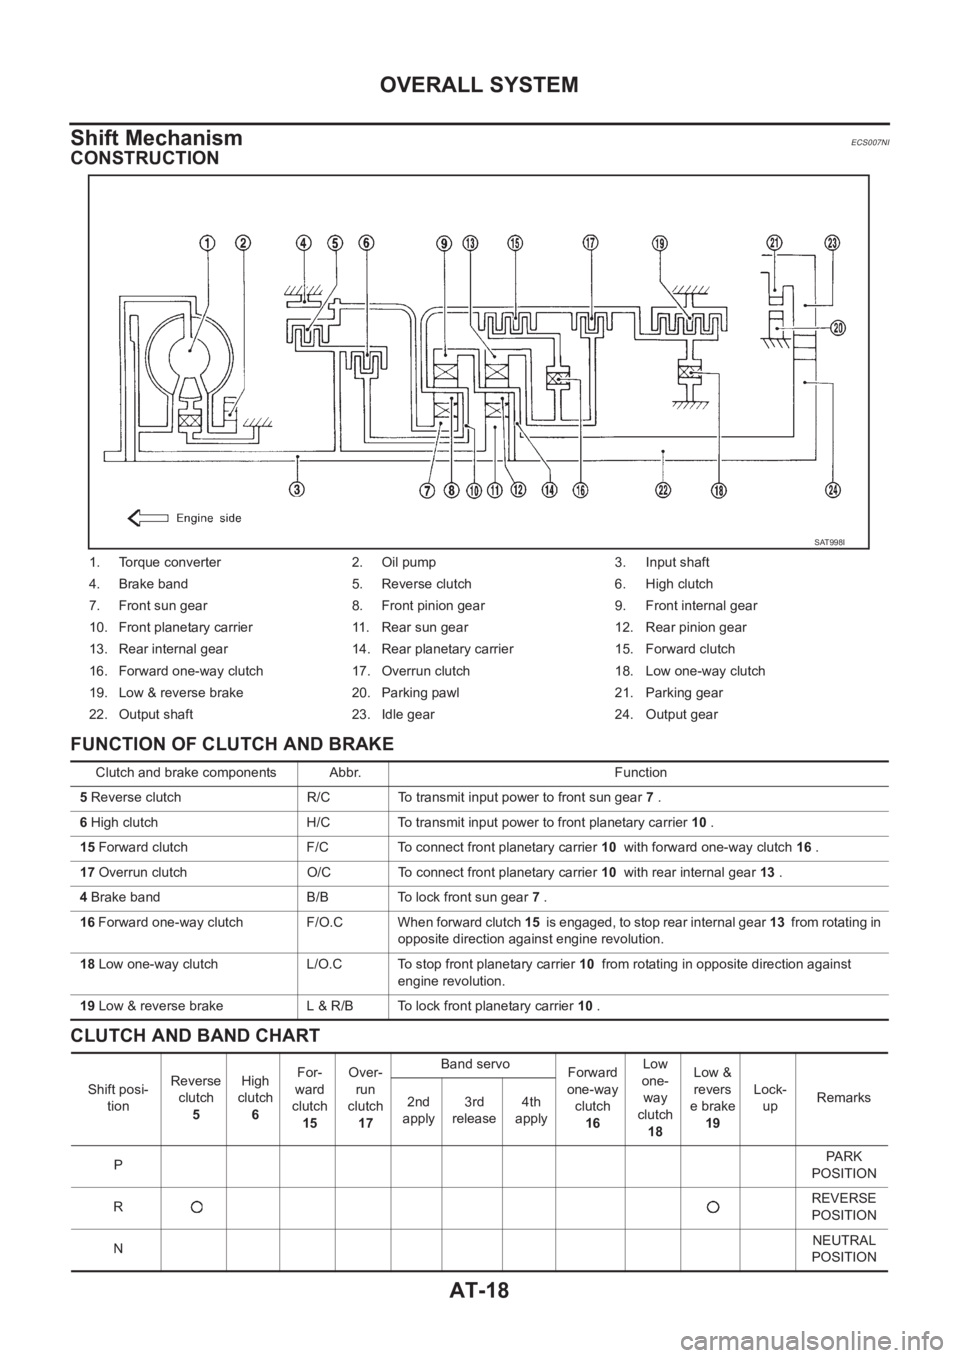
Shift Mechanism
ECS007NI
CONSTRUCTION
FUNCTION OF CLUTCH AND BRAKE
CLUTCH AND BAND CHART
1. Torque converter 2. Oil pump 3. Input shaft
4. Brake band 5. Reverse clutch 6. High clutch
7. Front sun gear 8. Front pinion gear 9. Front internal gear
10. Front planetary carrier 11. Rear sun gear 12. Rear pinion gear
13. Rear internal gear 14. Rear planetary carrier 15. Forward clutch
16. Forward one-way clutch 17. Overrun clutch 18. Low one-way clutch
19. Low & reverse brake 20. Parking pawl 21. Parking gear
22. Output shaft 23. Idle gear 24. Output gear
SAT998I
Clutch and brake components Abbr. Function
5 Reverse clutch R/C To transmit input power to front sun gear 7 .
6 High clutch H/C To transmit input power to front planetary carrier 10 .
15 Forward clutch F/C To connect front planetary carrier 10 with forward one-way clutch 16 .
17 Overrun clutch O/C To connect front planetary carrier 10 with rear internal gear 13 .
4 Brake band B/B To lock front sun gear 7 .
16 Forward one-way clutch F/O.C When forward clutch 15 is engaged, to stop rear internal gear 13 from rotatin g in
opposite direction against engine revolution.
18 Low one-way clutch L/O.C To stop front planetary carrier 10 from rotating in opposite direction against
engine revolution.
19 Low & reverse brake L & R/B To lock front planetary carrier 10 .
Shift posi-
tionReverse
clutch
5High
clutch
6For-
ward
clutch
15Over-
run
clutch
17Band servo
Forward
one-way
clutch
16Low
one-
way
clutch
18Low &
revers
e brake
19Lock-
upRemarks
2nd
apply3rd
release4th
apply
PPA R K
POSITION
RREVERSE
POSITION
NNEUTRAL
POSITION
Page 1520 of 3189
AT-64
[EURO-OBD]
TROUBLE DIAGNOSIS — BASIC INSPECTION
Stall Test
ECS007NX
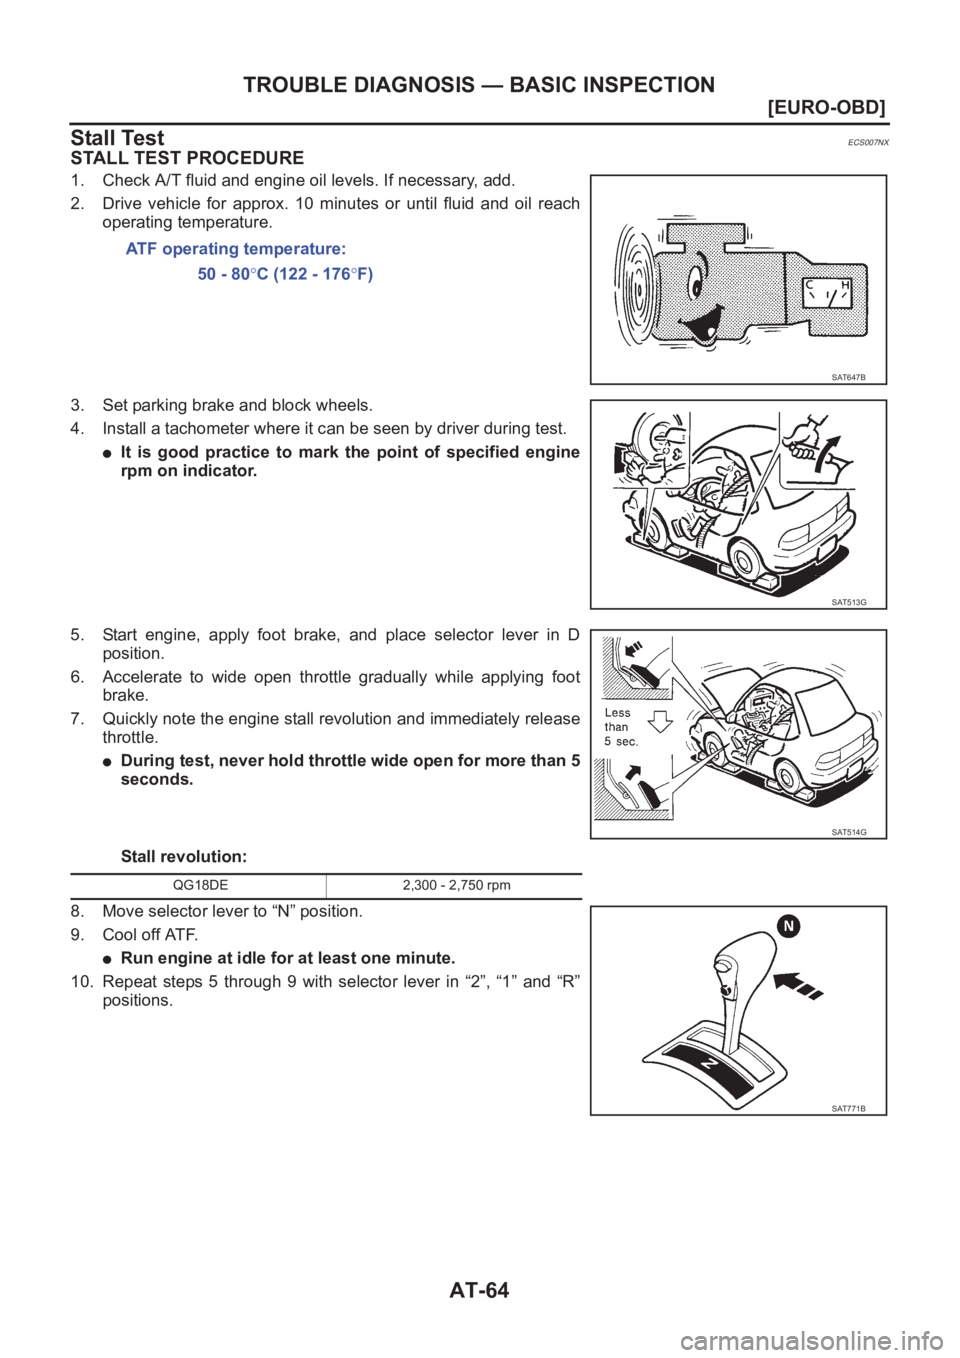
STALL TEST PROCEDURE
1. Check A/T fluid and engine oil levels. If necessary, add.
2. Drive vehicle for approx. 10 minutes or until fluid and oil reach
operating temperature.
3. Set parking brake and block wheels.
4. Install a tachometer where it can be seen by driver during test.
●It is good practice to mark the point of specified engine
rpm on indicator.
5. Start engine, apply foot brake, and place selector lever in D
position.
6. Accelerate to wide open throttle gradually while applying foot
brake.
7. Quickly note the engine stall revolution and immediately release
throttle.
●During test, never hold throttle wide open for more than 5
seconds.
Stall revolution:
8. Move selector lever to “N” position.
9. Cool off ATF.
●Run engine at idle for at least one minute.
10. Repeat steps 5 through 9 with selector lever in “2”, “1” and “R”
positions.ATF operating temperature:
50 - 80°C (122 - 176°F)
SAT647B
SAT513G
SAT514G
QG18DE 2,300 - 2,750 rpm
SAT771B
Page 1523 of 3189
TROUBLE DIAGNOSIS — BASIC INSPECTION
AT-67
[EURO-OBD]
D
E
F
G
H
I
J
K
L
MA
B
AT
Line Pressure TestECS007NY
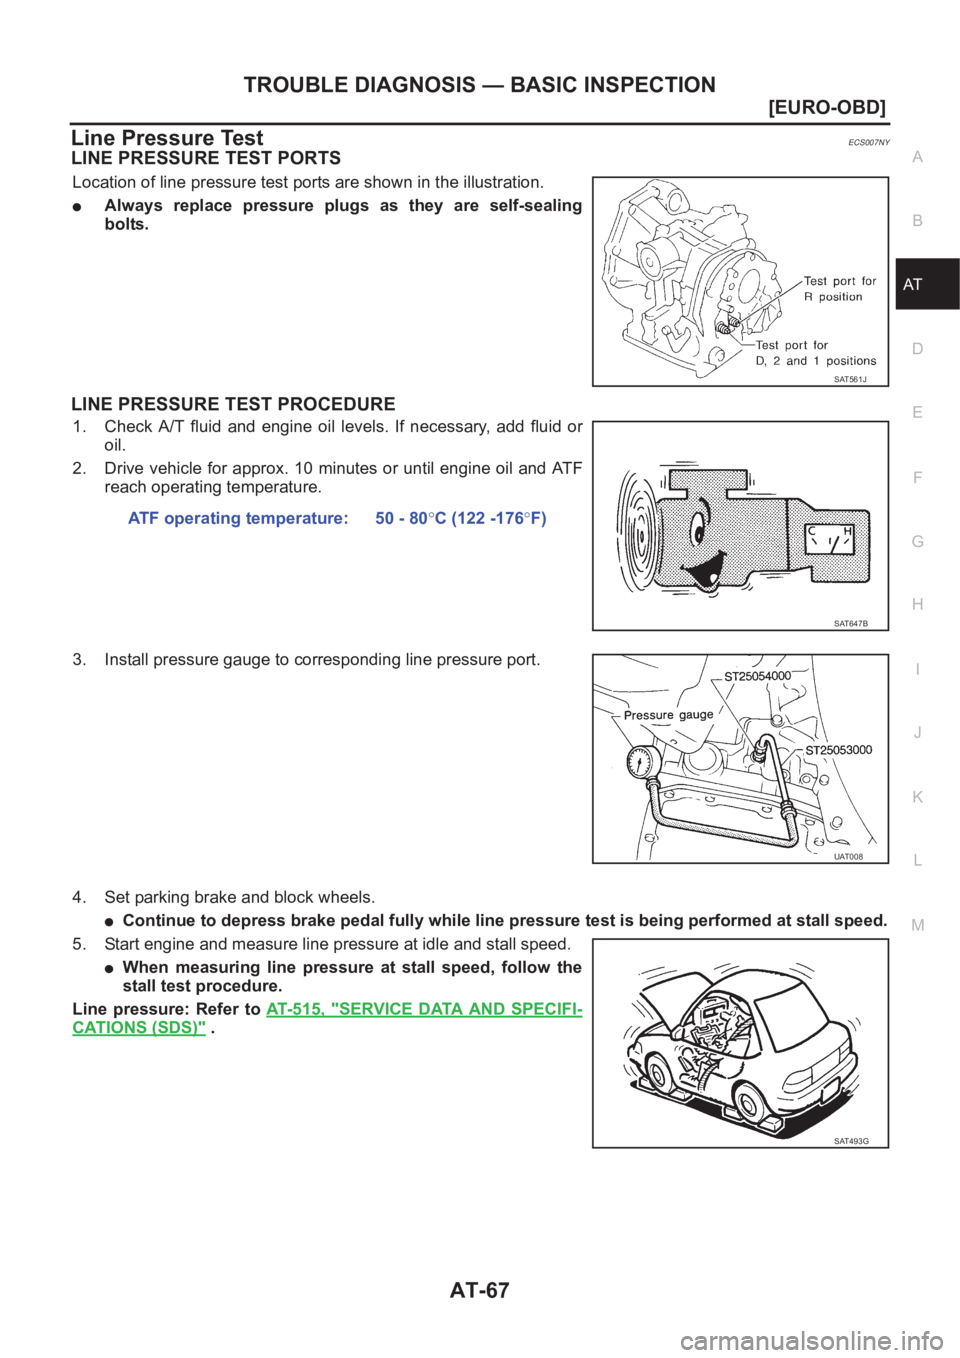
LINE PRESSURE TEST PORTS
Location of line pressure test ports are shown in the illustration.
●Always replace pressure plugs as they are self-sealing
bolts.
LINE PRESSURE TEST PROCEDURE
1. Check A/T fluid and engine oil levels. If necessary, add fluid or
oil.
2. Drive vehicle for approx. 10 minutes or until engine oil and AT F
reach operating temperature.
3. Install pressure gauge to corresponding line pressure port.
4. Set parking brake and block wheels.
●Continue to depress brake pedal fully while line pressure test is being performed at stall speed.
5. Start engine and measure line pressure at idle and stall speed.
●When measuring line pressure at stall speed, follow the
stall test procedure.
Line pressure: Refer to AT- 5 1 5 , "
SERVICE DATA AND SPECIFI-
CATIONS (SDS)" .
SAT561J
ATF operating temperature: 50 - 80°C (122 -176°F)
SAT647B
UAT008
SAT493G
Page 1528 of 3189
AT-72
[EURO-OBD]
TROUBLE DIAGNOSIS — BASIC INSPECTION
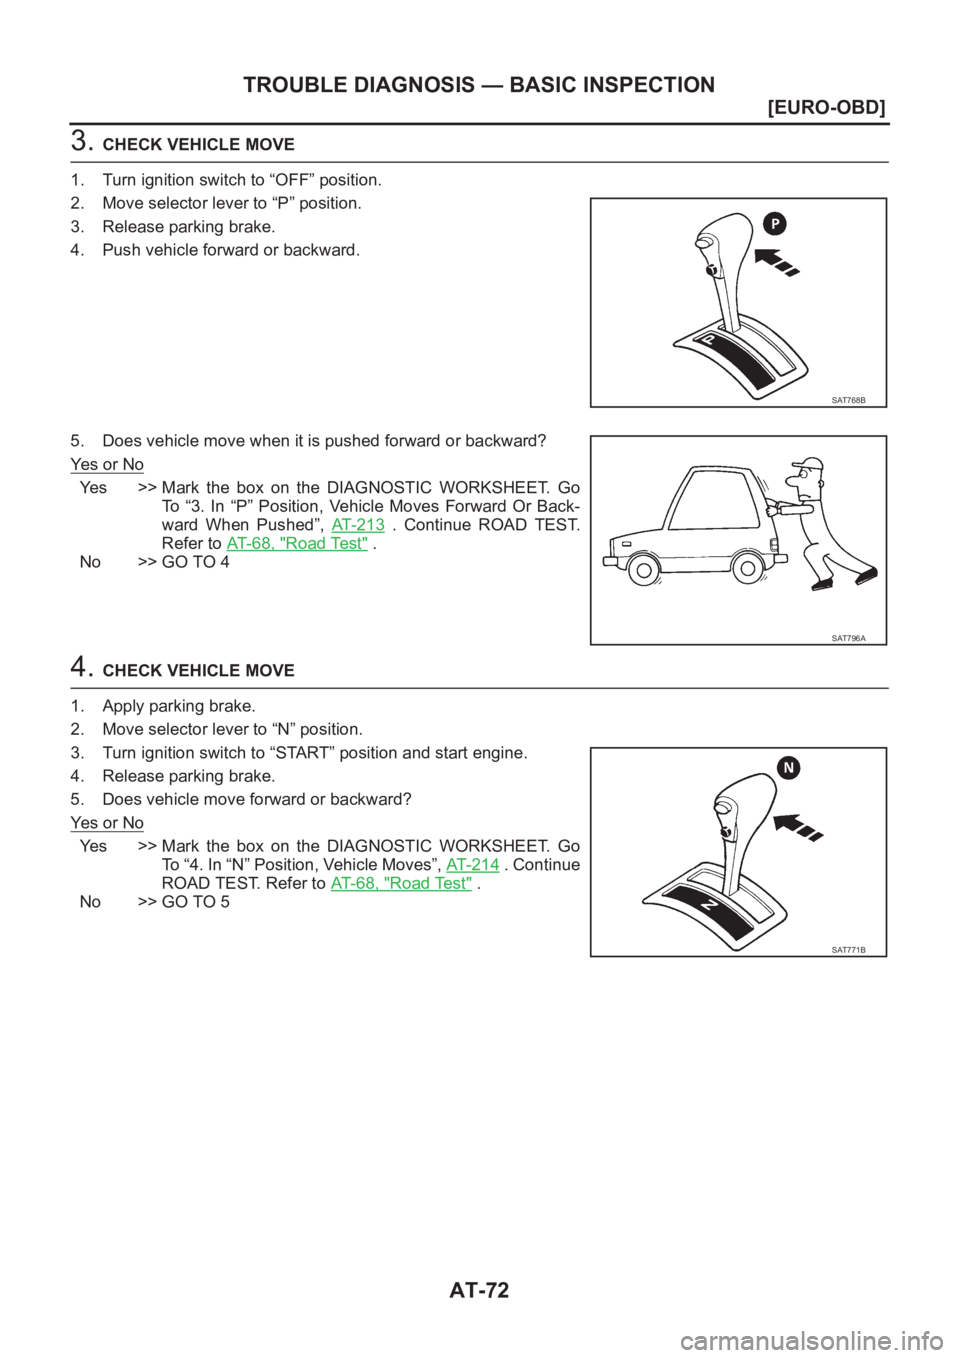
3. CHECK VEHICLE MOVE
1. Turn ignition switch to “OFF” position.
2. Move selector lever to “P” position.
3. Release parking brake.
4. Push vehicle forward or backward.
5. Does vehicle move when it is pushed forward or backward?
Ye s o r N o
Yes >> Mark the box on the DIAGNOSTIC WORKSHEET. Go
To “3. In “P” Position, Vehicle Moves Forward Or Back-
ward When Pushed”, AT- 2 1 3
. Continue ROAD TEST.
Refer to AT-68, "
Road Test" .
No >> GO TO 4
4. CHECK VEHICLE MOVE
1. Apply parking brake.
2. Move selector lever to “N” position.
3. Turn ignition switch to “START” position and start engine.
4. Release parking brake.
5. Does vehicle move forward or backward?
Ye s o r N o
Yes >> Mark the box on the DIAGNOSTIC WORKSHEET. Go
To “4. In “N” Position, Vehicle Moves”, AT- 2 1 4
. Continue
ROAD TEST. Refer to AT-68, "
Road Test" .
No >> GO TO 5
SAT768B
SAT796A
SAT771B
Page 1555 of 3189
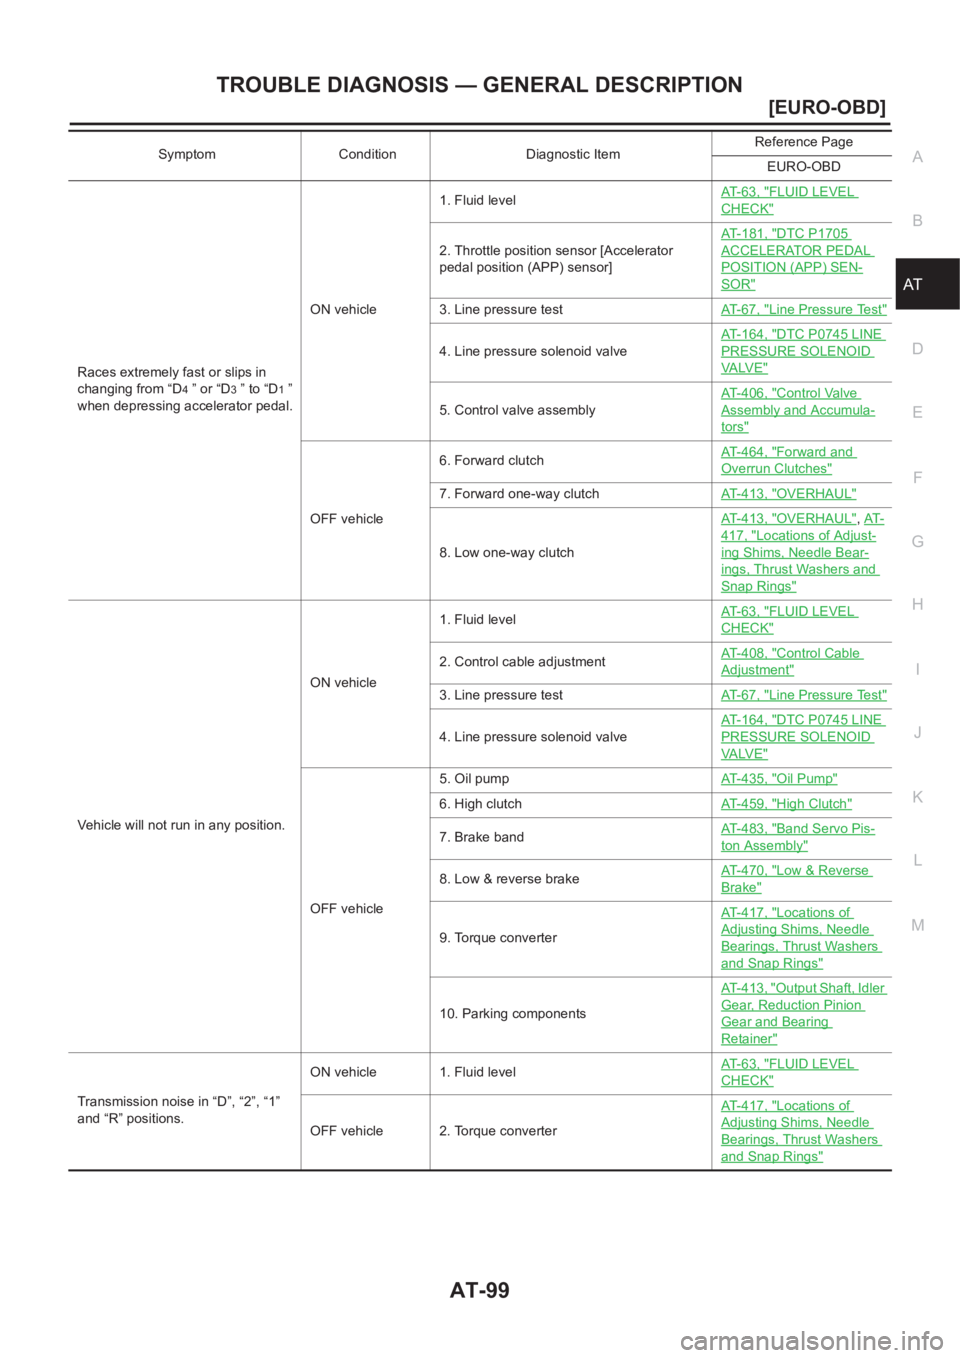
TROUBLE DIAGNOSIS — GENERAL DESCRIPTION
AT-99
[EURO-OBD]
D
E
F
G
H
I
J
K
L
MA
B
AT
Races extremely fast or slips in
changing from “D
4 ” or “D3 ” to “D1 ”
when depressing accelerator pedal.ON vehicle1. Fluid levelAT-63, "
FLUID LEVEL
CHECK"
2. Throttle position sensor [Accelerator
pedal position (APP) sensor]AT-181, "
DTC P1705
ACCELERATOR PEDAL
POSITION (APP) SEN-
SOR"
3. Line pressure testAT-67, "Line Pressure Test"
4. Line pressure solenoid valveAT-164, "
DTC P0745 LINE
PRESSURE SOLENOID
VA LV E"
5. Control valve assemblyAT-406, "
Control Valve
Assembly and Accumula-
tors"
OFF vehicle6. Forward clutchAT-464, "
Forward and
Overrun Clutches"
7. Forward one-way clutchAT-413, "OVERHAUL"
8. Low one-way clutchAT-413, "
OVERHAUL",AT-
417, "Locations of Adjust-
ing Shims, Needle Bear-
ings, Thrust Washers and
Snap Rings"
Vehicle will not run in any position.ON vehicle1. Fluid levelAT-63, "
FLUID LEVEL
CHECK"
2. Control cable adjustmentAT-408, "Control Cable
Adjustment"
3. Line pressure testAT-67, "Line Pressure Test"
4. Line pressure solenoid valveAT-164, "
DTC P0745 LINE
PRESSURE SOLENOID
VA LV E"
OFF vehicle5. Oil pumpAT-435, "
Oil Pump"
6. High clutchAT-459, "High Clutch"
7. Brake bandAT-483, "Band Servo Pis-
ton Assembly"
8. Low & reverse brakeAT-470, "Low & Reverse
Brake"
9. Torque converterAT-417, "
Locations of
Adjusting Shims, Needle
Bearings, Thrust Washers
and Snap Rings"
10. Parking componentsAT-413, "
Output Shaft, Idler
Gear, Reduction Pinion
Gear and Bearing
Retainer"
Transmission noise in “D”, “2”, “1”
and “R” positions.ON vehicle 1. Fluid levelAT-63, "
FLUID LEVEL
CHECK"
OFF vehicle 2. Torque converterAT-417, "
Locations of
Adjusting Shims, Needle
Bearings, Thrust Washers
and Snap Rings"
Symptom Condition Diagnostic ItemReference Page
EURO-OBD
Page 1718 of 3189
AT-262
[EXC.F/EURO-OBD]
TROUBLE DIAGNOSIS — BASIC INSPECTION
Stall Test
ECS007QS
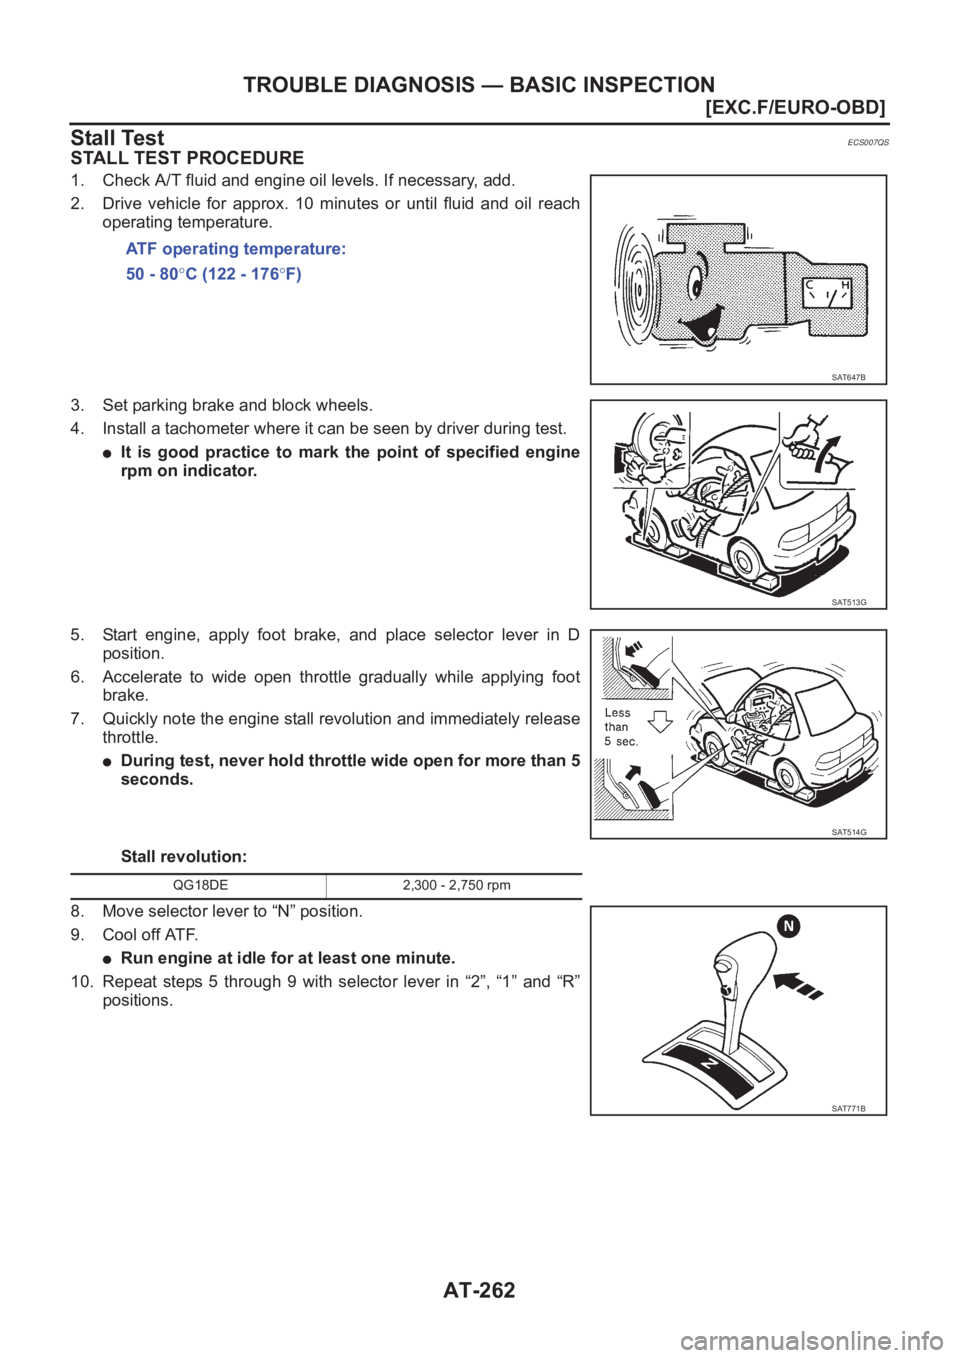
STALL TEST PROCEDURE
1. Check A/T fluid and engine oil levels. If necessary, add.
2. Drive vehicle for approx. 10 minutes or until fluid and oil reach
operating temperature.
3. Set parking brake and block wheels.
4. Install a tachometer where it can be seen by driver during test.
●It is good practice to mark the point of specified engine
rpm on indicator.
5. Start engine, apply foot brake, and place selector lever in D
position.
6. Accelerate to wide open throttle gradually while applying foot
brake.
7. Quickly note the engine stall revolution and immediately release
throttle.
●During test, never hold throttle wide open for more than 5
seconds.
Stall revolution:
8. Move selector lever to “N” position.
9. Cool off ATF.
●Run engine at idle for at least one minute.
10. Repeat steps 5 through 9 with selector lever in “2”, “1” and “R”
positions.ATF operating temperature:
50 - 80°C (122 - 176°F)
SAT647B
SAT513G
SAT514G
QG18DE 2,300 - 2,750 rpm
SAT771B
Page 1721 of 3189
TROUBLE DIAGNOSIS — BASIC INSPECTION
AT-265
[EXC.F/EURO-OBD]
D
E
F
G
H
I
J
K
L
MA
B
AT
Line Pressure TestECS007QT
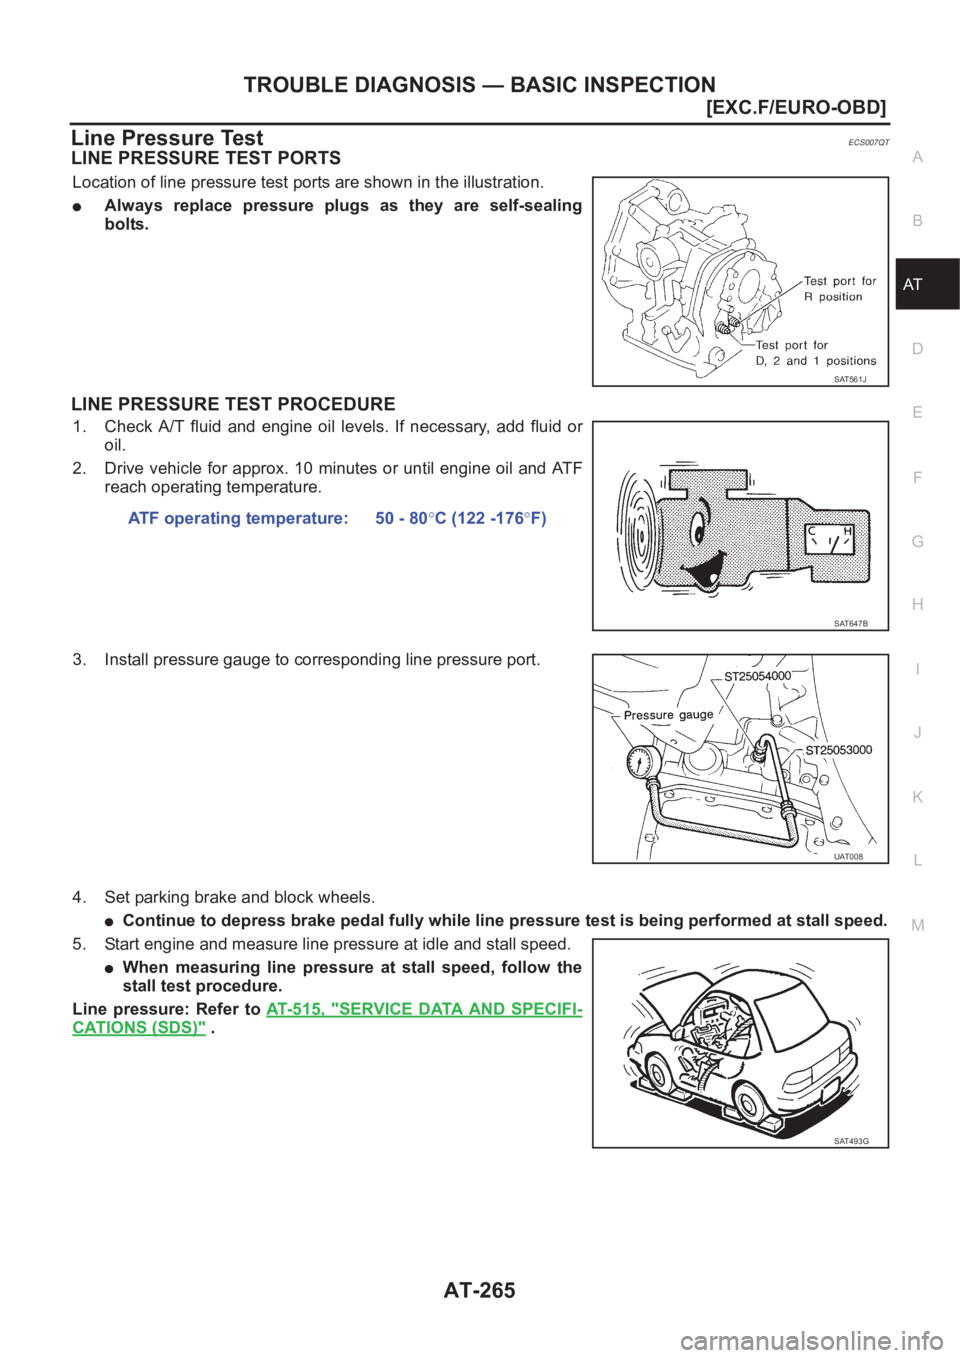
LINE PRESSURE TEST PORTS
Location of line pressure test ports are shown in the illustration.
●Always replace pressure plugs as they are self-sealing
bolts.
LINE PRESSURE TEST PROCEDURE
1. Check A/T fluid and engine oil levels. If necessary, add fluid or
oil.
2. Drive vehicle for approx. 10 minutes or until engine oil and AT F
reach operating temperature.
3. Install pressure gauge to corresponding line pressure port.
4. Set parking brake and block wheels.
●Continue to depress brake pedal fully while line pressure test is being performed at stall speed.
5. Start engine and measure line pressure at idle and stall speed.
●When measuring line pressure at stall speed, follow the
stall test procedure.
Line pressure: Refer to AT- 5 1 5 , "
SERVICE DATA AND SPECIFI-
CATIONS (SDS)" .
SAT561J
ATF operating temperature: 50 - 80°C (122 -176°F)
SAT647B
UAT008
SAT493G
Page 1725 of 3189
TROUBLE DIAGNOSIS — BASIC INSPECTION
AT-269
[EXC.F/EURO-OBD]
D
E
F
G
H
I
J
K
L
MA
B
AT
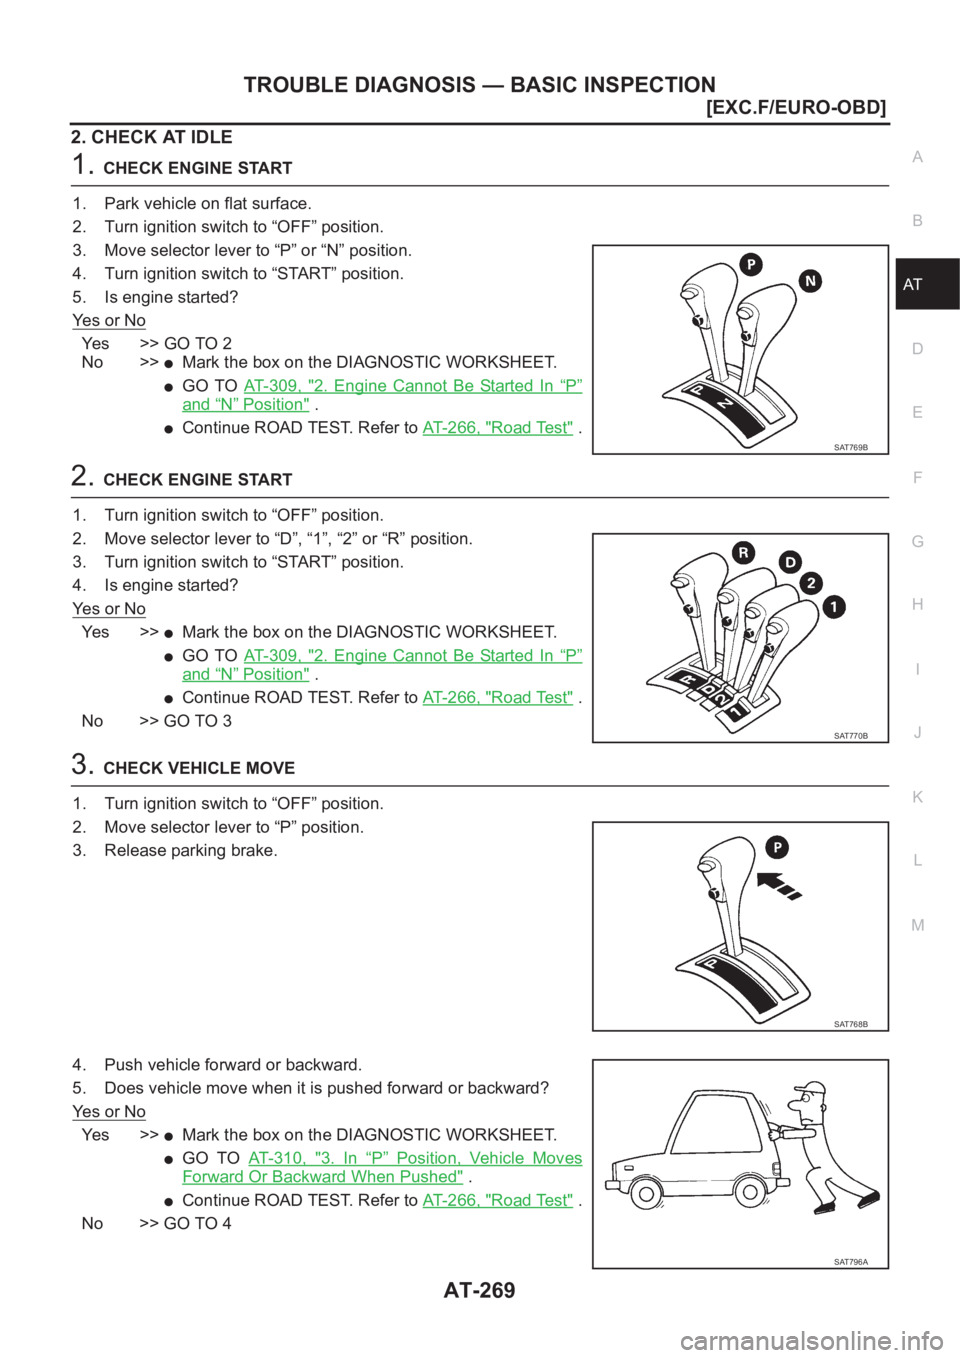
2. CHECK AT IDLE
1.CHECK ENGINE START
1. Park vehicle on flat surface.
2. Turn ignition switch to “OFF” position.
3. Move selector lever to “P” or “N” position.
4. Turn ignition switch to “START” position.
5. Is engine started?
Ye s o r N o
Ye s > > G O T O 2
No >>
●Mark the box on the DIAGNOSTIC WORKSHEET.
●GO TO AT- 3 0 9 , "2. Engine Cannot Be Started In “P”
and “N” Position" .
●Continue ROAD TEST. Refer to AT-266, "Road Test" .
2.CHECK ENGINE START
1. Turn ignition switch to “OFF” position.
2. Move selector lever to “D”, “1”, “2” or “R” position.
3. Turn ignition switch to “START” position.
4. Is engine started?
Ye s o r N o
Ye s > >●Mark the box on the DIAGNOSTIC WORKSHEET.
●GO TO AT- 3 0 9 , "2. Engine Cannot Be Started In “P”
and “N” Position" .
●Continue ROAD TEST. Refer to AT-266, "Road Test" .
No >> GO TO 3
3.CHECK VEHICLE MOVE
1. Turn ignition switch to “OFF” position.
2. Move selector lever to “P” position.
3. Release parking brake.
4. Push vehicle forward or backward.
5. Does vehicle move when it is pushed forward or backward?
Ye s o r N o
Ye s > >●Mark the box on the DIAGNOSTIC WORKSHEET.
●GO TO AT- 3 1 0 , "3. In “P” Position, Vehicle Moves
Forward Or Backward When Pushed" .
●Continue ROAD TEST. Refer to AT-266, "Road Test" .
No >> GO TO 4
SAT769B
SAT770B
SAT768B
SAT796A
Page 1726 of 3189
AT-270
[EXC.F/EURO-OBD]
TROUBLE DIAGNOSIS — BASIC INSPECTION
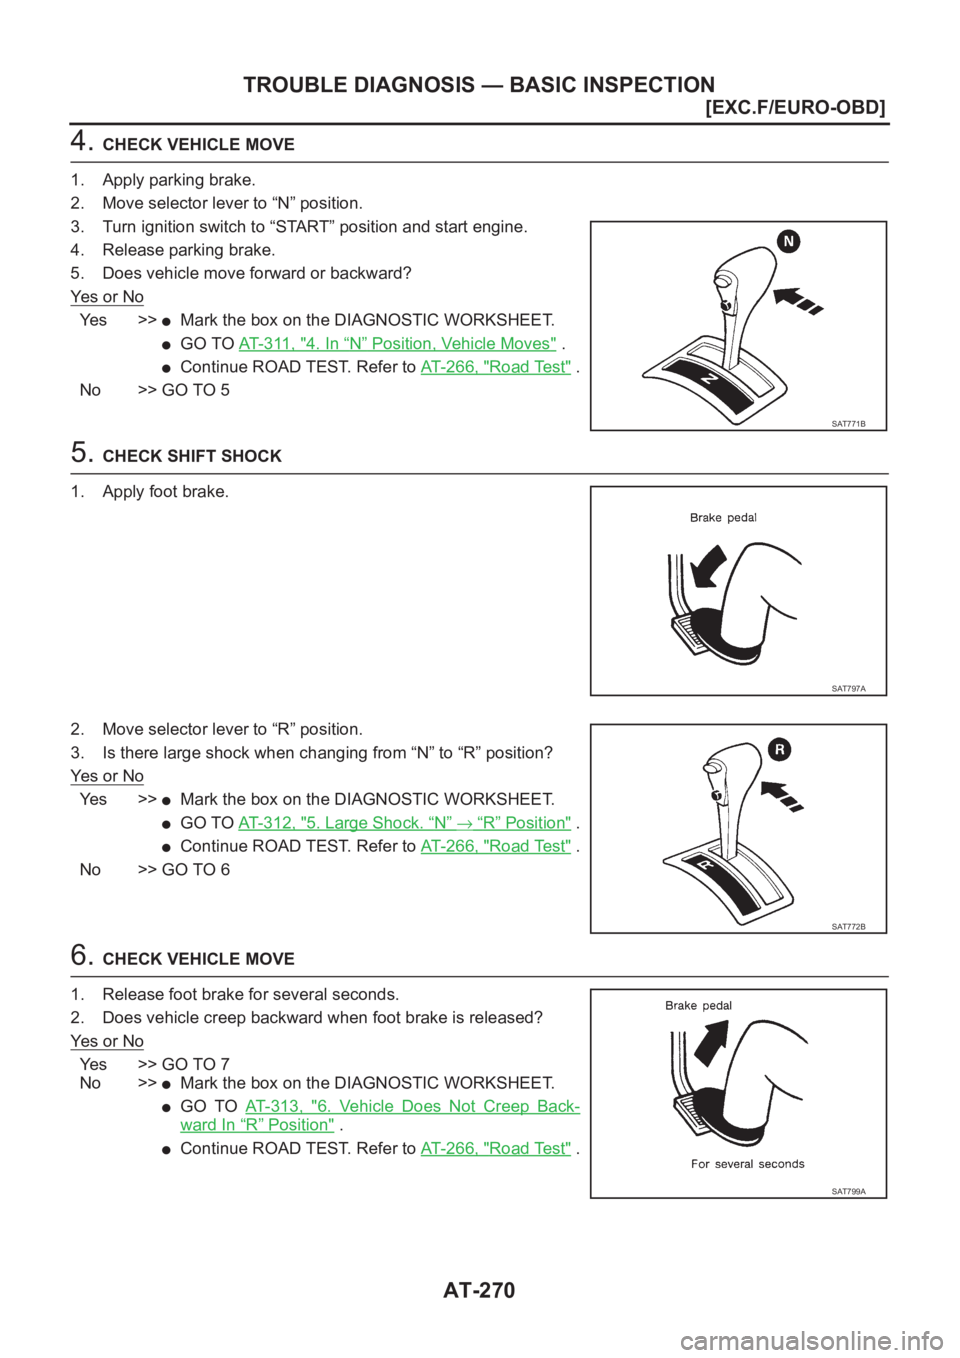
4. CHECK VEHICLE MOVE
1. Apply parking brake.
2. Move selector lever to “N” position.
3. Turn ignition switch to “START” position and start engine.
4. Release parking brake.
5. Does vehicle move forward or backward?
Ye s o r N o
Ye s > >●Mark the box on the DIAGNOSTIC WORKSHEET.
●GO TO AT-311, "4. In “N” Position, Vehicle Moves" .
●Continue ROAD TEST. Refer to AT-266, "Road Test" .
No >> GO TO 5
5. CHECK SHIFT SHOCK
1. Apply foot brake.
2. Move selector lever to “R” position.
3. Is there large shock when changing from “N” to “R” position?
Ye s o r N o
Ye s > >●Mark the box on the DIAGNOSTIC WORKSHEET.
●GO TO AT- 3 1 2 , "5. Large Shock. “N”→“R” Position" .
●Continue ROAD TEST. Refer to AT-266, "Road Test" .
No >> GO TO 6
6. CHECK VEHICLE MOVE
1. Release foot brake for several seconds.
2. Does vehicle creep backward when foot brake is released?
Ye s o r N o
Yes >> GO TO 7
No >>
●Mark the box on the DIAGNOSTIC WORKSHEET.
●GO TO AT- 3 1 3 , "6. Vehicle Does Not Creep Back-
ward In “R” Position" .
●Continue ROAD TEST. Refer to AT-266, "Road Test" .
SAT771B
SAT797A
SAT772B
SAT799A
Page 1751 of 3189
TROUBLE DIAGNOSIS — GENERAL DESCRIPTION
AT-295
[EXC.F/EURO-OBD]
D
E
F
G
H
I
J
K
L
MA
B
AT
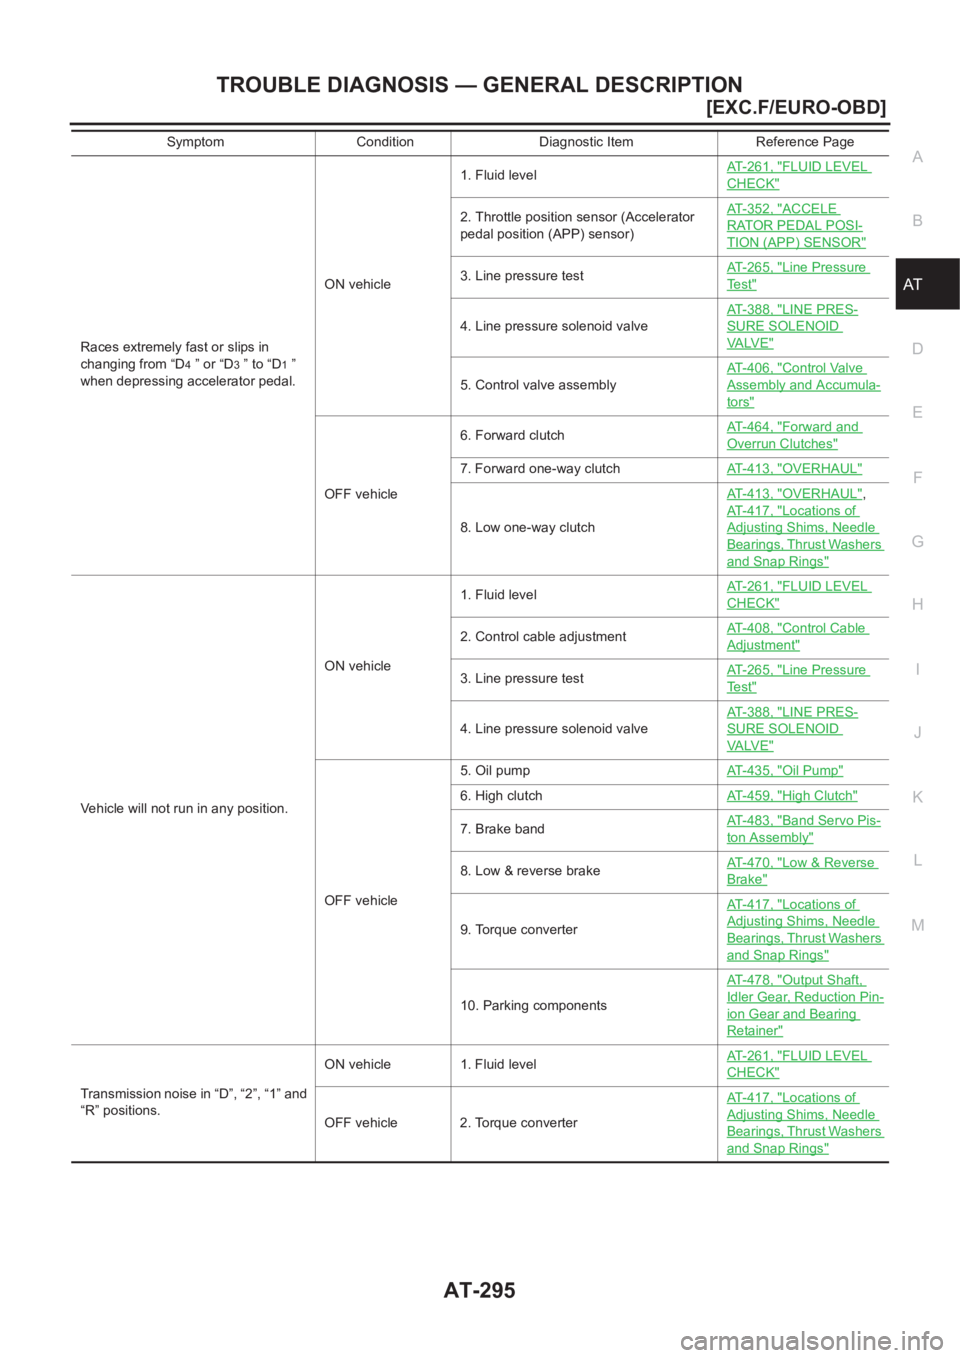
Races extremely fast or slips in
changing from “D
4 ” or “D3 ” to “D1 ”
when depressing accelerator pedal.ON vehicle1. Fluid levelAT- 2 6 1 , "
FLUID LEVEL
CHECK"
2. Throttle position sensor (Accelerator
pedal position (APP) sensor)AT- 3 5 2 , "ACCELE
RATOR PEDAL POSI-
TION (APP) SENSOR"
3. Line pressure testAT- 2 6 5 , "Line Pressure
Te s t"
4. Line pressure solenoid valveAT- 3 8 8 , "
LINE PRES-
SURE SOLENOID
VA LV E"
5. Control valve assemblyAT- 4 0 6 , "
Control Valve
Assembly and Accumula-
tors"
OFF vehicle6. Forward clutchAT- 4 6 4 , "
Forward and
Overrun Clutches"
7. Forward one-way clutchAT- 4 1 3 , "OVERHAUL"
8. Low one-way clutchAT- 4 1 3 , "
OVERHAUL",
AT- 4 1 7 , "
Locations of
Adjusting Shims, Needle
Bearings, Thrust Washers
and Snap Rings"
Vehicle will not run in any position.ON vehicle1. Fluid levelAT- 2 6 1 , "
FLUID LEVEL
CHECK"
2. Control cable adjustmentAT- 4 0 8 , "Control Cable
Adjustment"
3. Line pressure testAT- 2 6 5 , "Line Pressure
Te s t"
4. Line pressure solenoid valveAT- 3 8 8 , "
LINE PRES-
SURE SOLENOID
VA LV E"
OFF vehicle5. Oil pumpAT- 4 3 5 , "
Oil Pump"
6. High clutchAT- 4 5 9 , "High Clutch"
7. Brake bandAT- 4 8 3 , "Band Servo Pis-
ton Assembly"
8. Low & reverse brakeAT- 4 7 0 , "Low & Reverse
Brake"
9. Torque converterAT- 4 1 7 , "
Locations of
Adjusting Shims, Needle
Bearings, Thrust Washers
and Snap Rings"
10. Parking componentsAT- 4 7 8 , "
Output Shaft,
Idler Gear, Reduction Pin-
ion Gear and Bearing
Retainer"
Transmission noise in “D”, “2”, “1” and
“R” positions.ON vehicle 1. Fluid levelAT- 2 6 1 , "
FLUID LEVEL
CHECK"
OFF vehicle 2. Torque converterAT- 4 1 7 , "
Locations of
Adjusting Shims, Needle
Bearings, Thrust Washers
and Snap Rings"
Symptom Condition Diagnostic Item Reference Page