headlights NISSAN ALTIMA 1996 U13 / 1.G Owners Manual
[x] Cancel search | Manufacturer: NISSAN, Model Year: 1996, Model line: ALTIMA, Model: NISSAN ALTIMA 1996 U13 / 1.GPages: 183, PDF Size: 1.38 MB
Page 14 of 183

Theft warning system operation
The warning system will give the following
alarm:
cThe headlights blink and the horn sounds
intermittently. In addition, the starter mo-
tor will not operate.
cThe alarm automatically turns off after 2
to 3 minutes; however, the alarm will
reactivate if the vehicle is tampered with
again. The alarm can be shut off by
unlocking a door or trunk lid with the key.
The alarm is activated by:
cOpening the door or trunk lid without
using the key (even if the door is un-
locked by releasing the door inside lock
switch) or opening the trunk lid by oper-
ating the opener lever.
cOpening the hood.
cPushing in or pulling out of the key
cylinder on the door or trunk lid.
How to stop the alarm
The alarm will stop only by unlocking a door
or the trunk lid with the key. The alarm will
not stop if the ignition switch is turned to
``ACC'' or ``ON''.If the system does not operate as de-
scribed above, have it checked by your
NISSAN dealer.
Push the lever down to operate the wind-
shield wipers. Pull the lever toward you to
operate the washer.
Intermittent operation can be adjusted from
2 to approximately 20 seconds by turning
the knob (Type B only).
AIC0079
WINDSHIELD WIPER AND
WASHER SWITCH
1-9
ZX
Page 16 of 183

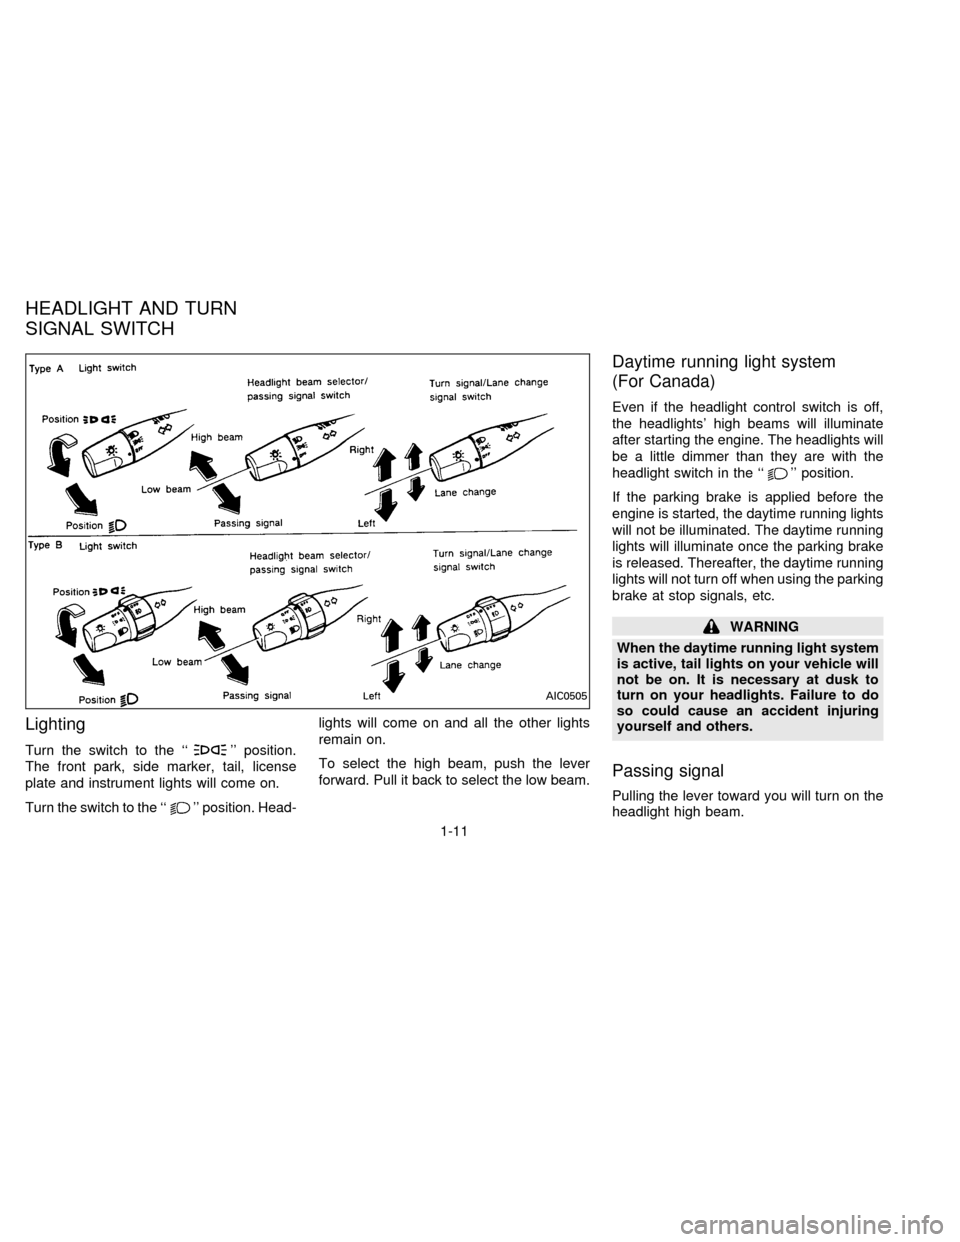
Lighting
Turn the switch to the ``'' position.
The front park, side marker, tail, license
plate and instrument lights will come on.
Turn the switch to the ``
'' position. Head-lights will come on and all the other lights
remain on.
To select the high beam, push the lever
forward. Pull it back to select the low beam.
Daytime running light system
(For Canada)
Even if the headlight control switch is off,
the headlights' high beams will illuminate
after starting the engine. The headlights will
be a little dimmer than they are with the
headlight switch in the ``
'' position.
If the parking brake is applied before the
engine is started, the daytime running lights
will not be illuminated. The daytime running
lights will illuminate once the parking brake
is released. Thereafter, the daytime running
lights will not turn off when using the parking
brake at stop signals, etc.
WARNING
When the daytime running light system
is active, tail lights on your vehicle will
not be on. It is necessary at dusk to
turn on your headlights. Failure to do
so could cause an accident injuring
yourself and others.
Passing signal
Pulling the lever toward you will turn on the
headlight high beam.
AIC0505
HEADLIGHT AND TURN
SIGNAL SWITCH
1-11
ZX
Page 17 of 183

Turn signal
Move the lever up or down to signal the
turning direction. When the turn is com-
pleted, the turn signals cancel automati-
cally.
Lane change signal
To indicate a lane change, move the lever
up or down to the point where lights begin
flashing.
The cornering light provides additional illu-
mination toward the turning direction on
some models. The light on the turning direc-
tion side will come on when the turn signal
lever is moved to the right or left with the
headlights on.The instrument brightness control operates
when the light switch is in the ``
'' or
``'' position.
Turn the control to adjust the brightness of
instrument panel lights.
NOTE: For vehicles with the clock located in
the instrument panel (if so equipped) the
instrument brightness control function has
no effect on the brightness of the clock.
IC1030IC1269
CORNERING LIGHT INSTRUMENT BRIGHTNESS
CONTROL
1-12
ZX
Page 56 of 183

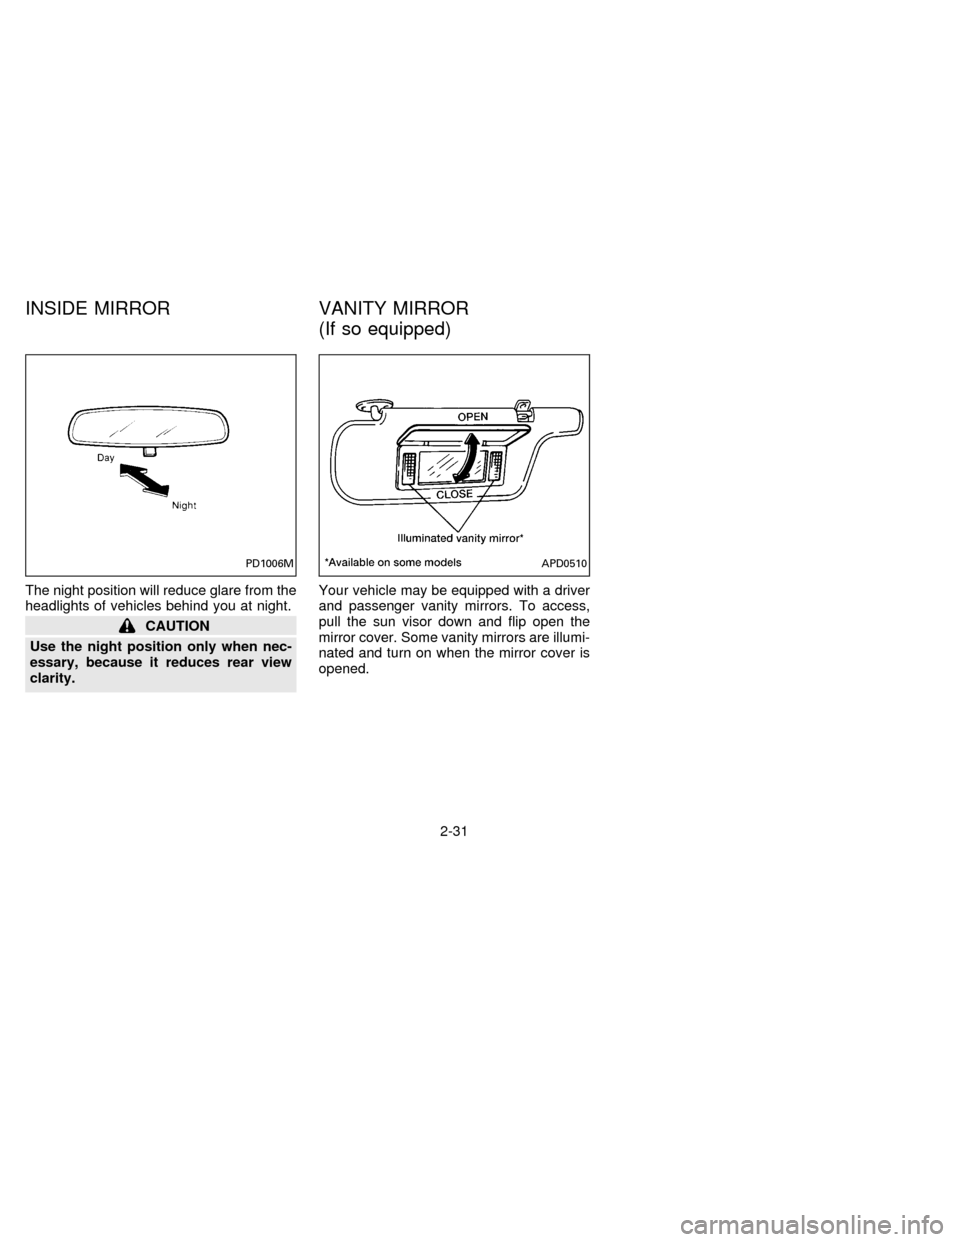
The night position will reduce glare from the
headlights of vehicles behind you at night.
CAUTION
Use the night position only when nec-
essary, because it reduces rear view
clarity.Your vehicle may be equipped with a driver
and passenger vanity mirrors. To access,
pull the sun visor down and flip open the
mirror cover. Some vanity mirrors are illumi-
nated and turn on when the mirror cover is
opened.
PD1006MAPD0510
INSIDE MIRROR VANITY MIRROR
(If so equipped)
2-31
ZX
Page 136 of 183

If the electrical equipment does not operate
and fuses are in good condition, check the
fusible links. If any of these fusible links are
melted, replace only with genuine NISSAN
parts.
HEADLIGHTS
The headlight is a semi-sealed beam type
which uses a replaceable headlight (halo-
gen) bulb.
CAUTION
High pressure halogen gas is sealed
inside the halogen bulb. The bulb may
break if the glass envelope is scratched
or the bulb is dropped.
When handling the bulb, do not touch
the glass envelope.
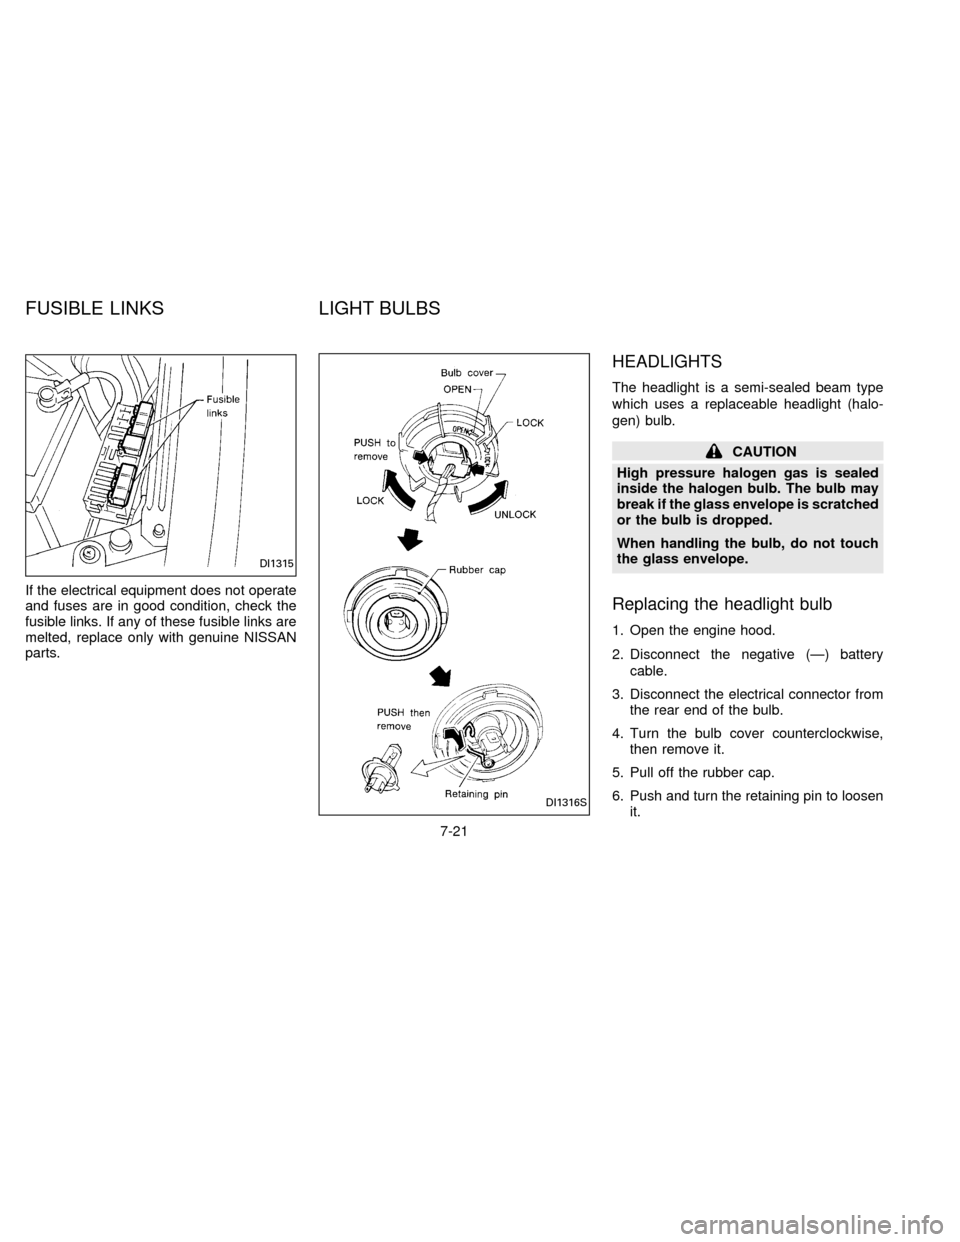
Replacing the headlight bulb
1. Open the engine hood.
2. Disconnect the negative (Ð) battery
cable.
3. Disconnect the electrical connector from
the rear end of the bulb.
4. Turn the bulb cover counterclockwise,
then remove it.
5. Pull off the rubber cap.
6. Push and turn the retaining pin to loosen
it.
DI1316S
DI1315
FUSIBLE LINKS LIGHT BULBS
7-21
ZX
Page 138 of 183

3. Adjust the horizontal indicator by turning
the adjusting screw with a Phillips screw-
driver.
The inner red line with the ``0'' mark
should align with the indicator line. Never
turn screw
sAas indicated in earlier
illustration.
ADJUSTMENT AFTER
HEADLIGHT ASSEMBLY
REPLACEMENT
If the vehicle has had front body repair and
the headlight assembly has been replaced,
the aiming should be checked using the
aiming chart as shown in the illustration.
a. Adjust headlights so that main axis of
light is parallel to center line of body
and is aligned with point P shown in
the illustration.
b. Dotted lines in illustration show cen-
ter of headlight.
``H'': Horizontal center line of head-
lights
``W'': Distance between each head-
light center
``L'': Distance between the headlights
and the wall that the lights are
tested against. 7,620 mm (300.00
in)
``C'': Distance below the horizontal
center line of the light (ªHº)
used in determining the main
axis of light. 106 mm (4.17 in)
H-C=M
M = main axis of light
ADI0505
ADI0096
7-23
ZX
Page 150 of 183

Tire rotation*Ð Tires should be rotated
every 7,500 miles (12,000 km).
Wheel alignment and balanceÐIfthe
vehicle should pull to either side while driv-
ing on a straight and level road, or if you
detect uneven or abnormal tire wear, there
may be a need for wheel alignment.
If the steering wheel or seat vibrates at
normal highway speeds, wheel balancing
may be needed.
Windshield wiper blades*Ð Check for
cracks or wear if they do not wipe properly.
Doors and engine hoodÐ Check that all
doors and the engine hood operate prop-
erly. Also ensure all latches lock securely.
Lubricate hinges, latches, rollers and links if
necessary. Make sure that the secondary
latch keeps the hood from opening when
the primary latch is released.
When driving in areas using road salt or
other corrosive materials, check lubrication
frequently.
Lights*Ð Make sure the headlights, stop
lights, tail lights, turn signal lights, and other
lights are all operating properly and installed
securely. Also check headlight aim.INSIDE THE VEHICLE
The maintenance items listed here should
be checked on a regular basis, such as
when performing periodic maintenance,
cleaning the vehicle, etc.
Warning lights and chimesÐ Make sure
that all warning lights and buzzers/chimes
are operating properly.
Windshield wiper and washer*Ð Check
that the wipers and washer operate properly
and that the wipers do not streak.
Windshield defrosterÐ Check that the air
comes out of the defroster outlets properly
and in sufficient quantity when operating the
heater or air conditioner.
Steering wheelÐ Check for changes in
the steering conditions, such as excessive
freeplay, hard steering or strange noises.
SeatsÐ Check seat position controls such
as seat adjusters, seatback recliner, etc. to
ensure they operate smoothly and that all
latches lock securely in every position.
Check that the head restraints move up and
down smoothly and that the locks (if so
equipped) hold securely in all latched posi-
tions.Seat beltsÐ Check that all parts of the seat
belt system (for example, buckles, anchors,
adjusters and retractors) operate properly
and smoothly, and are installed securely.
Check the belt webbing for cuts, fraying,
wear or damage.
Accelerator pedalÐ Check the pedal for
smooth operation and make sure the pedal
does not catch or require uneven effort.
Keep the floor mats away from the pedal.
Clutch pedal*Ð Make sure the pedal
operates smoothly and check that it has the
proper free travel.
BrakesÐ Check that the brakes do not pull
the vehicle to one side when applied.
Brake pedal*Ð Check the pedal for
smooth operation and make sure it has the
proper distance under it when depressed
fully. Check the brake booster function. Be
certain to keep floor mats away from the
pedal.
Parking brake*Ð Check that the lever has
the proper travel and confirm that your
vehicle is held securely on a fairly steep hill
with only the parking brake applied.
8-3
ZX
Page 180 of 183

H
Hazard warning flasher switch .................. 1-13
Head restraints .......................................... 2-10
Headlight and turn signal switch ............... 1-11
Headlights .................................................. 7-21
Heater and air conditioner
Heater and air conditioner controls
(automatic) .............................................. 3-8
Heater and air conditioner controls
(manual).................................................. 3-2
Hood release ............................................... 2-5
I
Ignition switch .............................................. 4-4
Indicator lights and chimes (See warning/
indicator lights and chimes)
Inside mirror ............................................... 2-31
Instrument brightness control .................... 1-12
Interior light ................................................ 1-18
J
Jump starting ............................................... 5-7
K
Key ............................................................... 2-2L
Labels
Air conditioner specification label ......... 9-11
Warning labels (for SRS) ..................... 2-15
Emission control information label........ 9-10
Engine serial number ............................. 9-9
F.M.V.S.S.certification label ................. 9-10
Vehicle identification number plate ........ 9-9
License plate
Installing front license plate .................. 9-12
Light
Air bag warning light............................. 2-16
Brake light (See stop light)
Bulb check/instrument panel .................. 1-5
Bulb replacement.................................. 7-24
Cornering light ...................................... 1-12
Front fog light switch ........................... 1-13
Headlight and turn signal switch .......... 1-11
Headlights ............................................. 7-21
Interior light ........................................... 1-18
Light bulbs ............................................ 7-21
Spotlight ................................................ 1-19
Trunk light ............................................. 1-19
Warning/indicator lights and chimes ...... 1-5
Lock
Child safety rear door lock ..................... 2-4
Door locks............................................... 2-2
Fuel filler lid lock operation .................... 2-7
Glove box ............................................... 2-5
Power door lock...................................... 2-3Power window lock switch .................... 1-15
Trunk lid lock operation .......................... 2-6
M
Maintenance
General maintenance ............................. 8-2
Inside the vehicle.................................... 8-3
Outside the vehicle ................................. 8-2
Periodic maintenance schedules ............ 8-5
Seat belt maintenance.......................... 2-23
Under the hood and vehicle ................... 8-4
Malfunction indicator light ............................ 1-7
Manual antenna ......................................... 3-22
Manual transmission
Driving with manual transmission ........... 4-8
Manual transmission fluid ....................... 8-9
Map light (See spotlight)
Meters and gauges ...................................... 1-2
Mirror
Inside mirror.......................................... 2-31
Outside mirror remote control .............. 2-30
Outside mirrors ..................................... 2-30
Vanity mirror (If so equipped) ............... 2-31
O
Octane rating (See fuel)
Odometer ..................................................... 1-3
Oil
Capacities and recommended
fuel/lubricants.......................................... 9-2
10-3
ZX