NISSAN ALTIMA 2000 L30 / 2.G Owners Manual
Manufacturer: NISSAN, Model Year: 2000, Model line: ALTIMA, Model: NISSAN ALTIMA 2000 L30 / 2.GPages: 242, PDF Size: 1.94 MB
Page 171 of 242
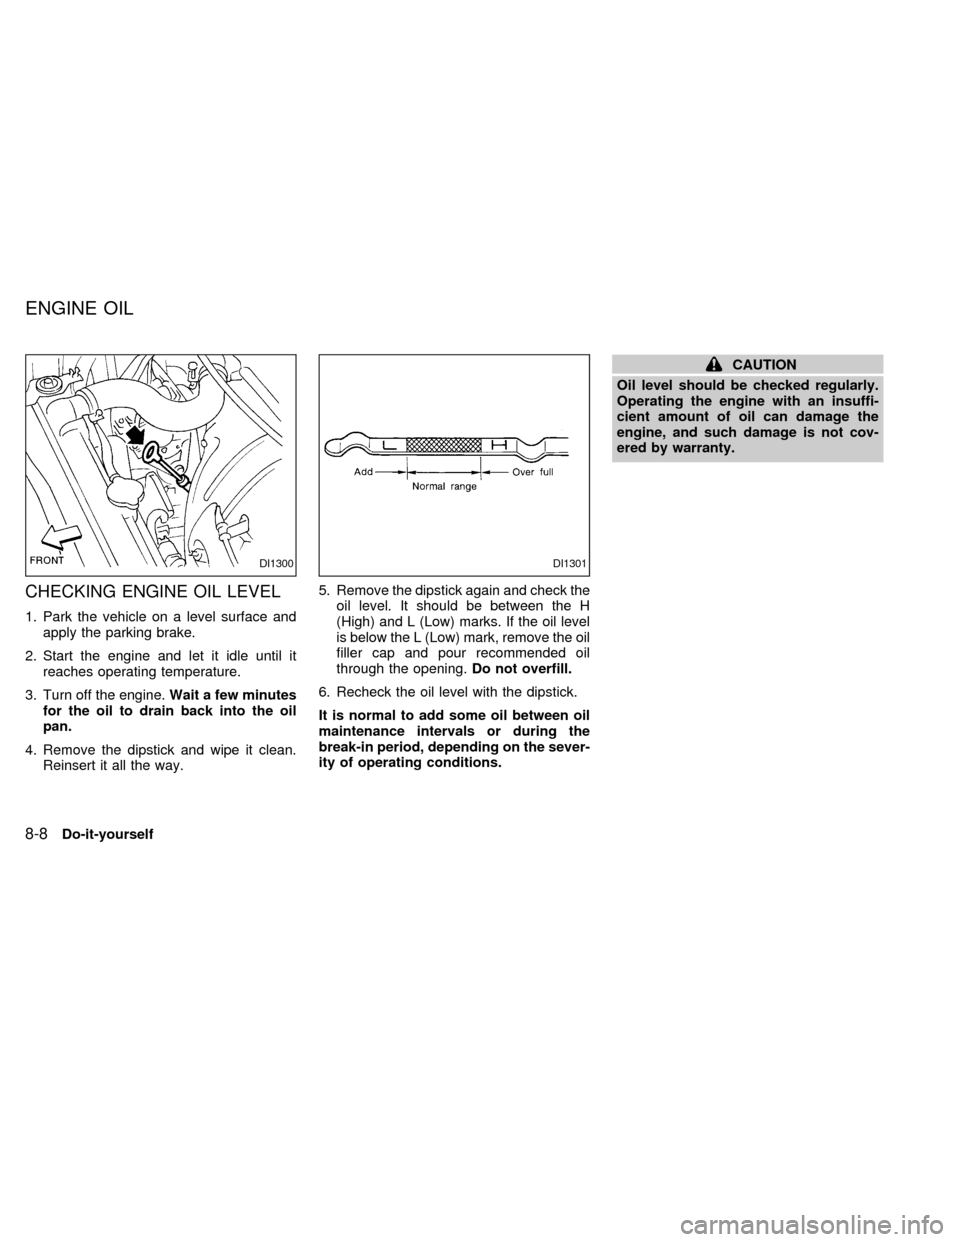
CHECKING ENGINE OIL LEVEL
1. Park the vehicle on a level surface and
apply the parking brake.
2. Start the engine and let it idle until it
reaches operating temperature.
3. Turn off the engine.Wait a few minutes
for the oil to drain back into the oil
pan.
4. Remove the dipstick and wipe it clean.
Reinsert it all the way.5. Remove the dipstick again and check the
oil level. It should be between the H
(High) and L (Low) marks. If the oil level
is below the L (Low) mark, remove the oil
filler cap and pour recommended oil
through the opening.Do not overfill.
6. Recheck the oil level with the dipstick.
It is normal to add some oil between oil
maintenance intervals or during the
break-in period, depending on the sever-
ity of operating conditions.
CAUTION
Oil level should be checked regularly.
Operating the engine with an insuffi-
cient amount of oil can damage the
engine, and such damage is not cov-
ered by warranty.
DI1300DI1301
ENGINE OIL
8-8Do-it-yourself
ZX
Page 172 of 242
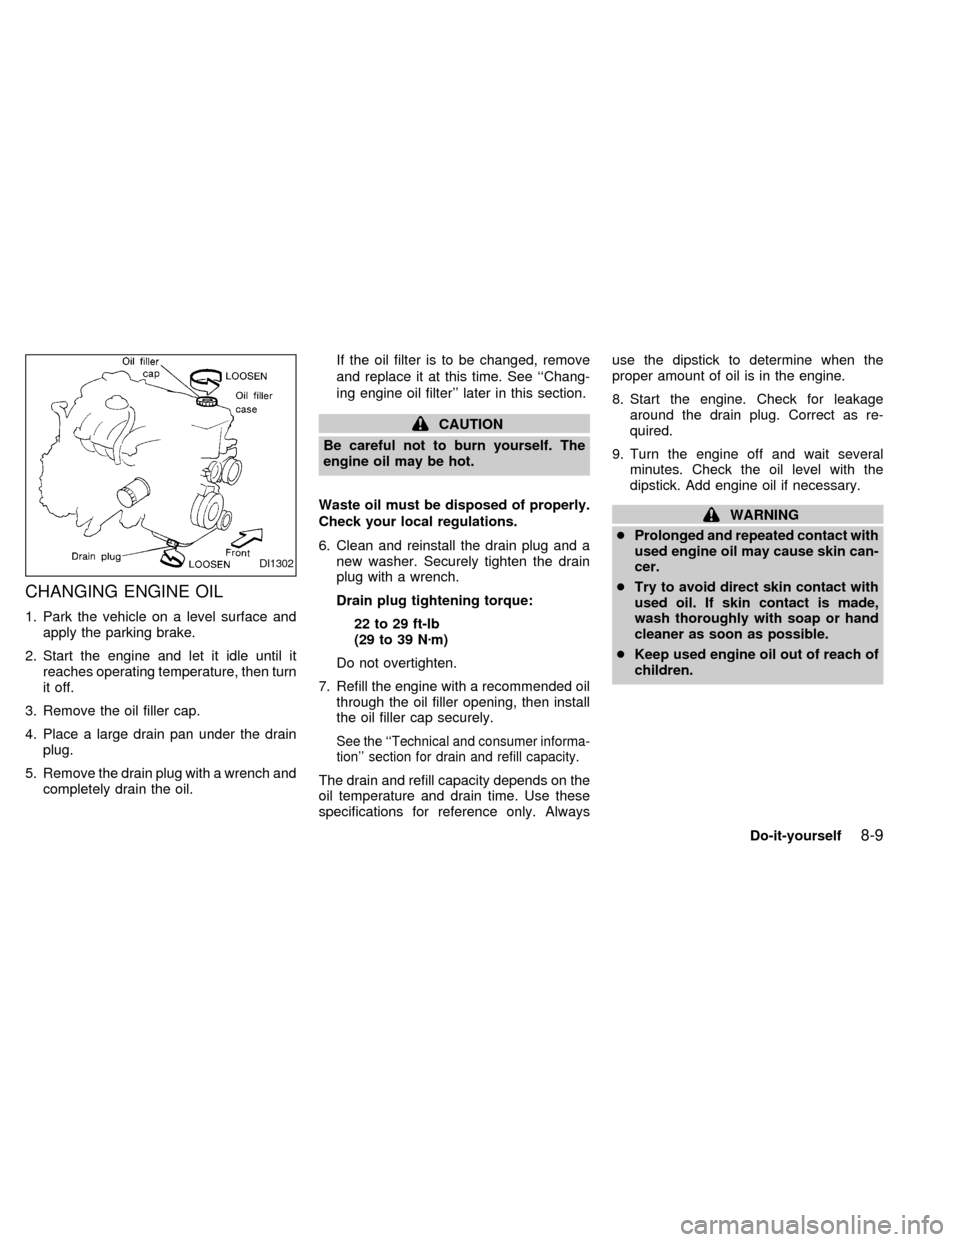
CHANGING ENGINE OIL
1. Park the vehicle on a level surface and
apply the parking brake.
2. Start the engine and let it idle until it
reaches operating temperature, then turn
it off.
3. Remove the oil filler cap.
4. Place a large drain pan under the drain
plug.
5. Remove the drain plug with a wrench and
completely drain the oil.If the oil filter is to be changed, remove
and replace it at this time. See ``Chang-
ing engine oil filter'' later in this section.
CAUTION
Be careful not to burn yourself. The
engine oil may be hot.
Waste oil must be disposed of properly.
Check your local regulations.
6. Clean and reinstall the drain plug and a
new washer. Securely tighten the drain
plug with a wrench.
Drain plug tightening torque:
22 to 29 ft-lb
(29 to 39 Nzm)
Do not overtighten.
7. Refill the engine with a recommended oil
through the oil filler opening, then install
the oil filler cap securely.
See the ``Technical and consumer informa-
tion'' section for drain and refill capacity.
The drain and refill capacity depends on the
oil temperature and drain time. Use these
specifications for reference only. Alwaysuse the dipstick to determine when the
proper amount of oil is in the engine.
8. Start the engine. Check for leakage
around the drain plug. Correct as re-
quired.
9. Turn the engine off and wait several
minutes. Check the oil level with the
dipstick. Add engine oil if necessary.
WARNING
cProlonged and repeated contact with
used engine oil may cause skin can-
cer.
cTry to avoid direct skin contact with
used oil. If skin contact is made,
wash thoroughly with soap or hand
cleaner as soon as possible.
cKeep used engine oil out of reach of
children.
DI1302
Do-it-yourself8-9
ZX
Page 173 of 242
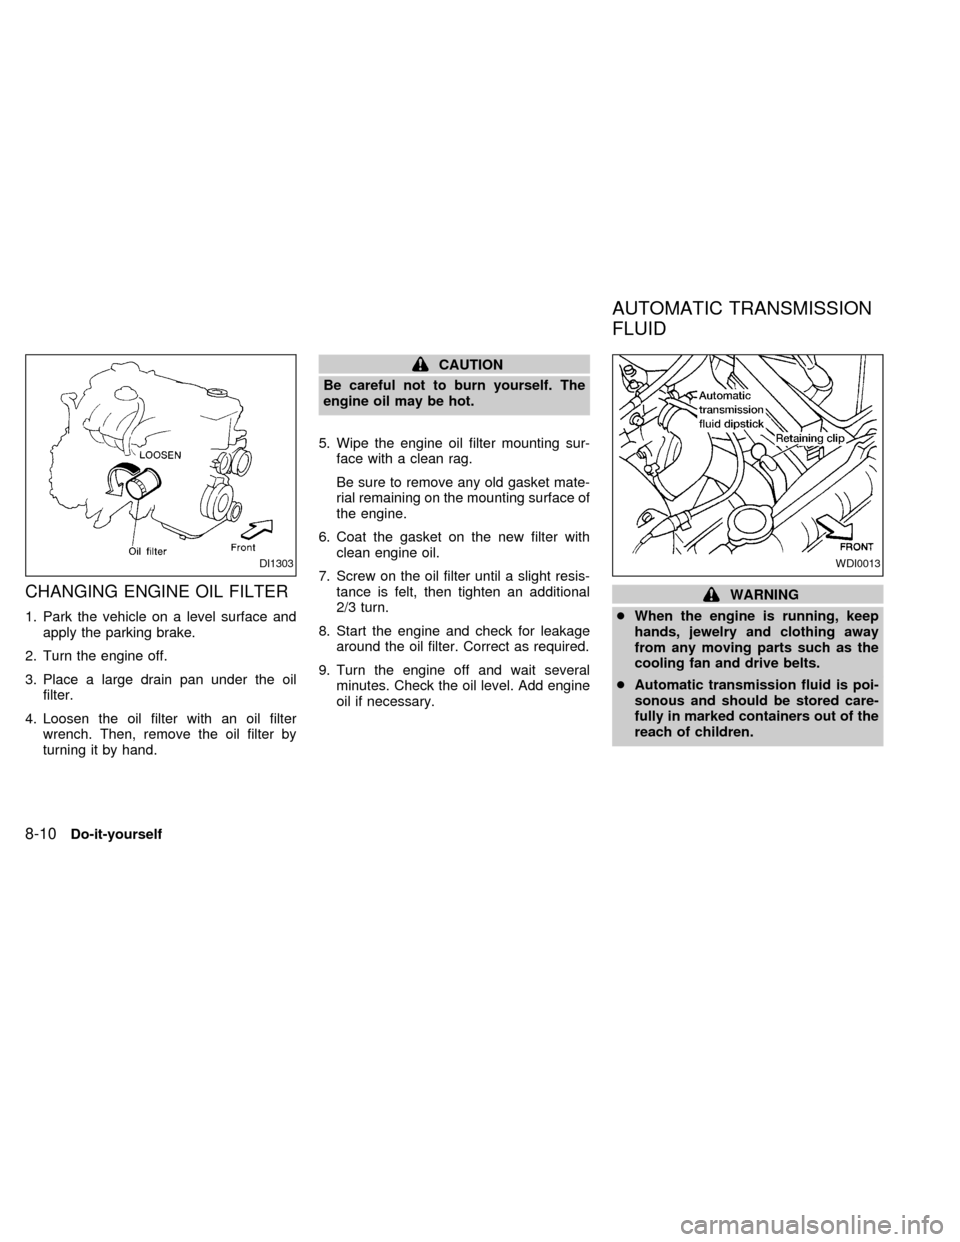
CHANGING ENGINE OIL FILTER
1. Park the vehicle on a level surface and
apply the parking brake.
2. Turn the engine off.
3. Place a large drain pan under the oil
filter.
4. Loosen the oil filter with an oil filter
wrench. Then, remove the oil filter by
turning it by hand.
CAUTION
Be careful not to burn yourself. The
engine oil may be hot.
5. Wipe the engine oil filter mounting sur-
face with a clean rag.
Be sure to remove any old gasket mate-
rial remaining on the mounting surface of
the engine.
6. Coat the gasket on the new filter with
clean engine oil.
7. Screw on the oil filter until a slight resis-
tance is felt, then tighten an additional
2/3 turn.
8. Start the engine and check for leakage
around the oil filter. Correct as required.
9. Turn the engine off and wait several
minutes. Check the oil level. Add engine
oil if necessary.
WARNING
cWhen the engine is running, keep
hands, jewelry and clothing away
from any moving parts such as the
cooling fan and drive belts.
cAutomatic transmission fluid is poi-
sonous and should be stored care-
fully in marked containers out of the
reach of children.
DI1303WDI0013
AUTOMATIC TRANSMISSION
FLUID
8-10Do-it-yourself
ZX
Page 174 of 242
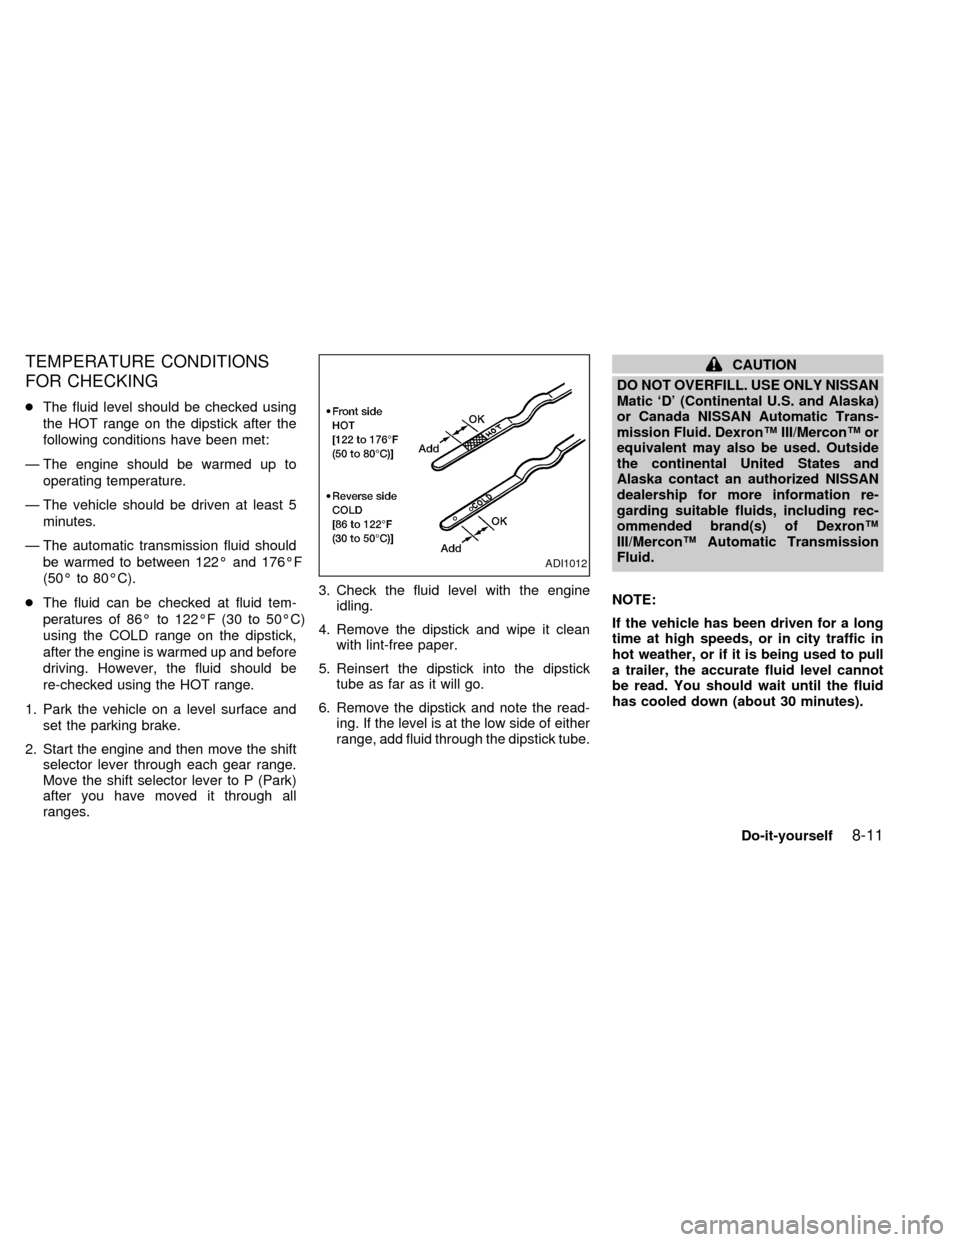
TEMPERATURE CONDITIONS
FOR CHECKING
cThe fluid level should be checked using
the HOT range on the dipstick after the
following conditions have been met:
Ð The engine should be warmed up to
operating temperature.
Ð The vehicle should be driven at least 5
minutes.
Ð The automatic transmission fluid should
be warmed to between 122É and 176ÉF
(50É to 80ÉC).
cThe fluid can be checked at fluid tem-
peratures of 86É to 122ÉF (30 to 50ÉC)
using the COLD range on the dipstick,
after the engine is warmed up and before
driving. However, the fluid should be
re-checked using the HOT range.
1. Park the vehicle on a level surface and
set the parking brake.
2. Start the engine and then move the shift
selector lever through each gear range.
Move the shift selector lever to P (Park)
after you have moved it through all
ranges.3. Check the fluid level with the engine
idling.
4. Remove the dipstick and wipe it clean
with lint-free paper.
5. Reinsert the dipstick into the dipstick
tube as far as it will go.
6. Remove the dipstick and note the read-
ing. If the level is at the low side of either
range, add fluid through the dipstick tube.
CAUTION
DO NOT OVERFILL. USE ONLY NISSAN
Matic `D' (Continental U.S. and Alaska)
or Canada NISSAN Automatic Trans-
mission Fluid. DexronŸ III/MerconŸ or
equivalent may also be used. Outside
the continental United States and
Alaska contact an authorized NISSAN
dealership for more information re-
garding suitable fluids, including rec-
ommended brand(s) of DexronŸ
III/MerconŸ Automatic Transmission
Fluid.
NOTE:
If the vehicle has been driven for a long
time at high speeds, or in city traffic in
hot weather, or if it is being used to pull
a trailer, the accurate fluid level cannot
be read. You should wait until the fluid
has cooled down (about 30 minutes).
ADI1012
Do-it-yourself8-11
ZX
Page 175 of 242
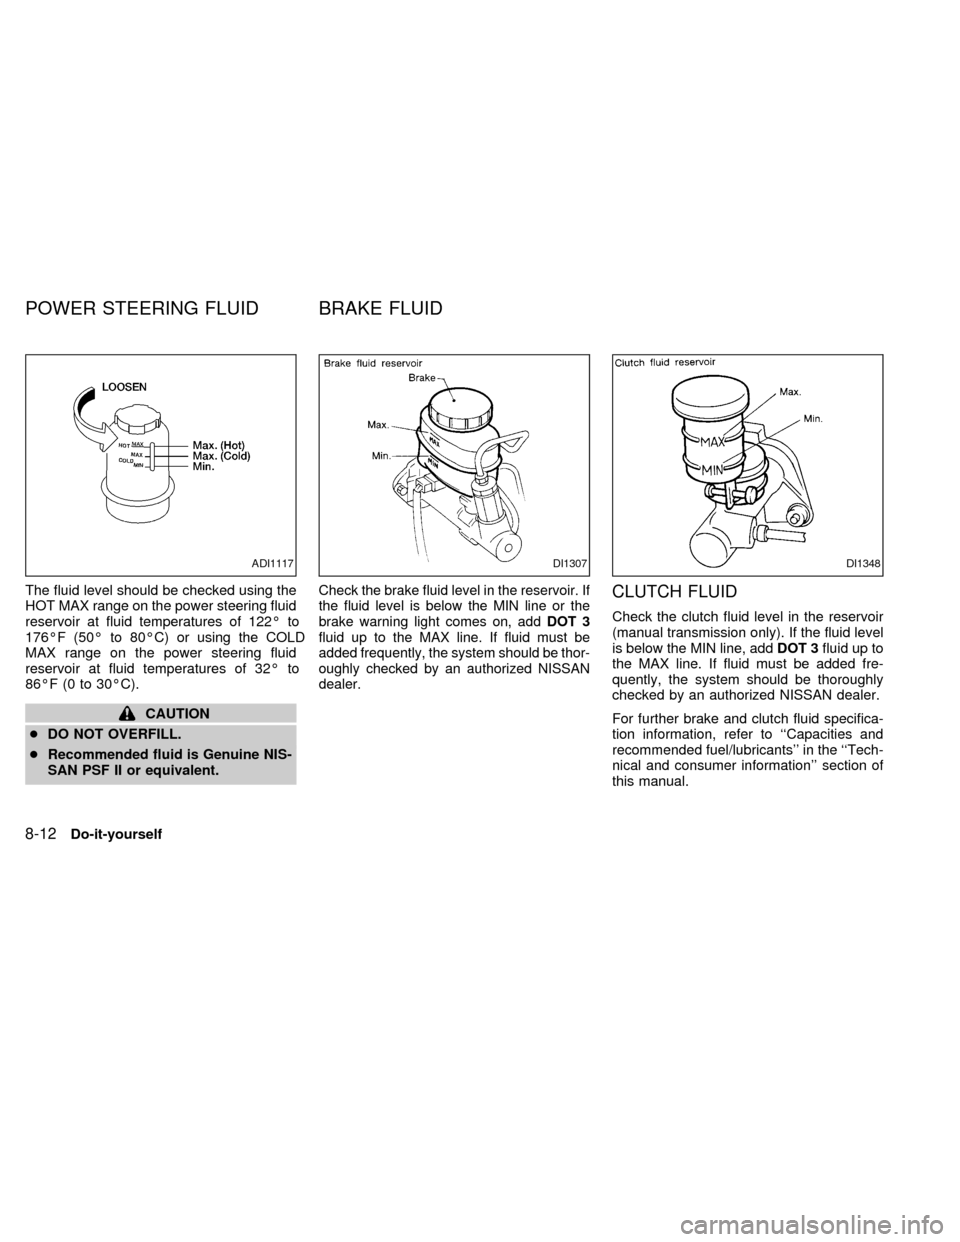
The fluid level should be checked using the
HOT MAX range on the power steering fluid
reservoir at fluid temperatures of 122É to
176ÉF (50É to 80ÉC) or using the COLD
MAX range on the power steering fluid
reservoir at fluid temperatures of 32É to
86ÉF (0 to 30ÉC).
CAUTION
cDO NOT OVERFILL.
cRecommended fluid is Genuine NIS-
SAN PSF II or equivalent.
Check the brake fluid level in the reservoir. If
the fluid level is below the MIN line or the
brake warning light comes on, addDOT 3
fluid up to the MAX line. If fluid must be
added frequently, the system should be thor-
oughly checked by an authorized NISSAN
dealer.CLUTCH FLUID
Check the clutch fluid level in the reservoir
(manual transmission only). If the fluid level
is below the MIN line, addDOT 3fluid up to
the MAX line. If fluid must be added fre-
quently, the system should be thoroughly
checked by an authorized NISSAN dealer.
For further brake and clutch fluid specifica-
tion information, refer to ``Capacities and
recommended fuel/lubricants'' in the ``Tech-
nical and consumer information'' section of
this manual.
ADI1117DI1307DI1348
POWER STEERING FLUID BRAKE FLUID
8-12Do-it-yourself
ZX
Page 176 of 242
WARNING
Use only new fluid from a sealed con-
tainer. Old, inferior, or contaminated
fluid may damage the brake and clutch
systems. The use of improper fluids
can damage the brake system and af-
fect the vehicle's stopping ability.
CAUTION
Do not spill the fluid on painted sur-
faces. This will damage the paint. If
fluid is spilled, immediately wash the
surface with water.
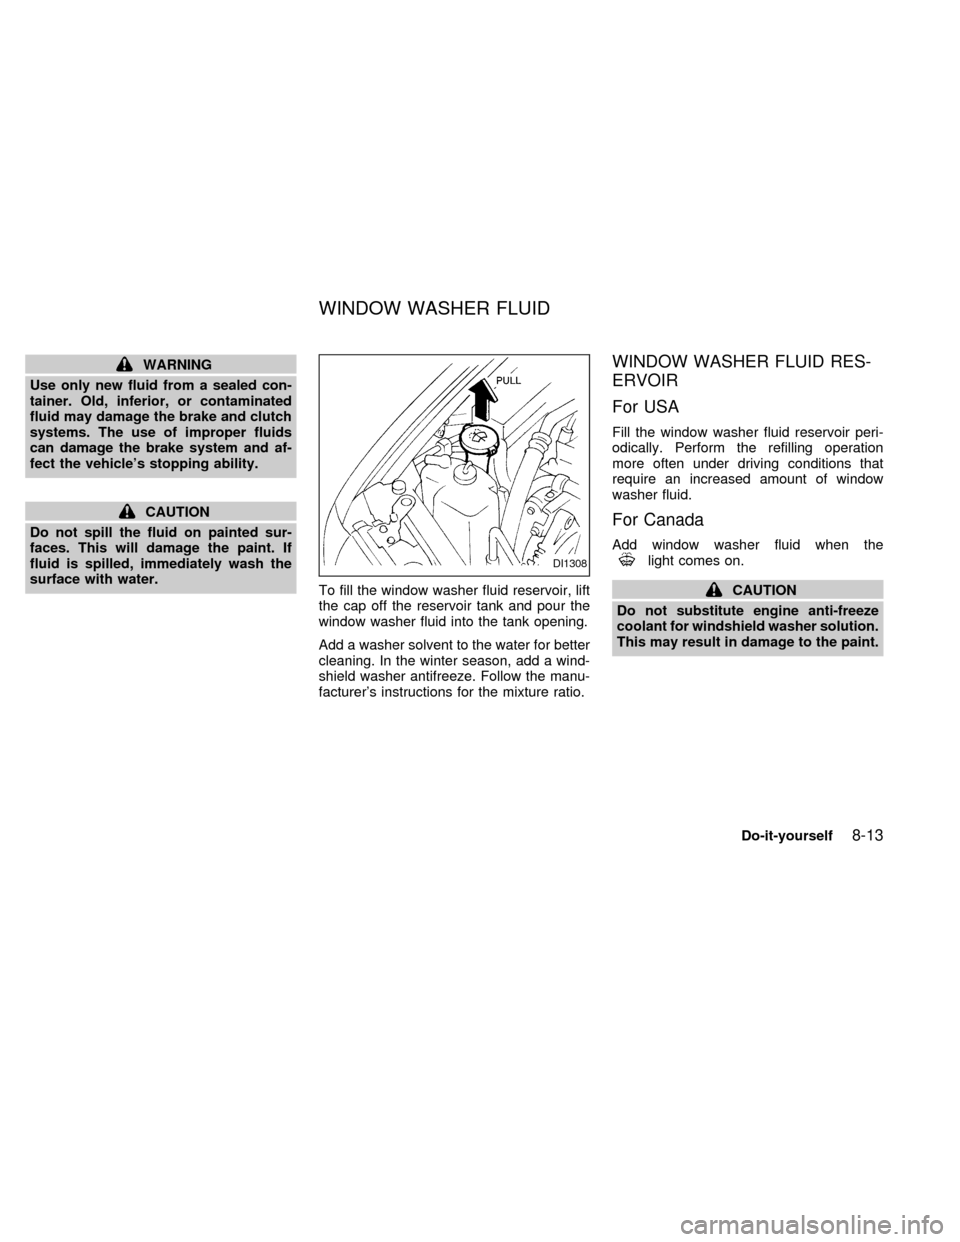
To fill the window washer fluid reservoir, lift
the cap off the reservoir tank and pour the
window washer fluid into the tank opening.
Add a washer solvent to the water for better
cleaning. In the winter season, add a wind-
shield washer antifreeze. Follow the manu-
facturer's instructions for the mixture ratio.
WINDOW WASHER FLUID RES-
ERVOIR
For USA
Fill the window washer fluid reservoir peri-
odically. Perform the refilling operation
more often under driving conditions that
require an increased amount of window
washer fluid.
For Canada
Add window washer fluid when thelight comes on.
CAUTION
Do not substitute engine anti-freeze
coolant for windshield washer solution.
This may result in damage to the paint.
DI1308
WINDOW WASHER FLUID
Do-it-yourself8-13
ZX
Page 177 of 242
cKeep the battery surface clean and dry.
Any corrosion should be washed off with
a solution of baking soda and water.
cMake certain the terminal connections
are clean and securely tightened.
c
If the vehicle is not to be used for 30 days or
longer, disconnect the negative (Ð) battery
terminal cable to prevent discharge.
WARNING
cDo not expose the battery to flames
or electrical sparks. Hydrogen gas
generated by the battery is explo-
sive. Do not allow battery fluid to
contact your skin, eyes, fabrics, or
painted surfaces. After touching a
battery or battery cap, do not touch
or rub your eyes. Thoroughly wash
your hands. If the acid contacts your
eyes, skin or clothing, immediately
flush with water for at least 15 min-
utes and seek medical attention.
cWhen working on or near the battery,
always wear suitable eye protection
and remove all jewelry.cBattery posts, terminals and related
accessories contain lead and lead
compounds. Wash hands after han-
dling.
cKeep the battery out of the reach of
children.
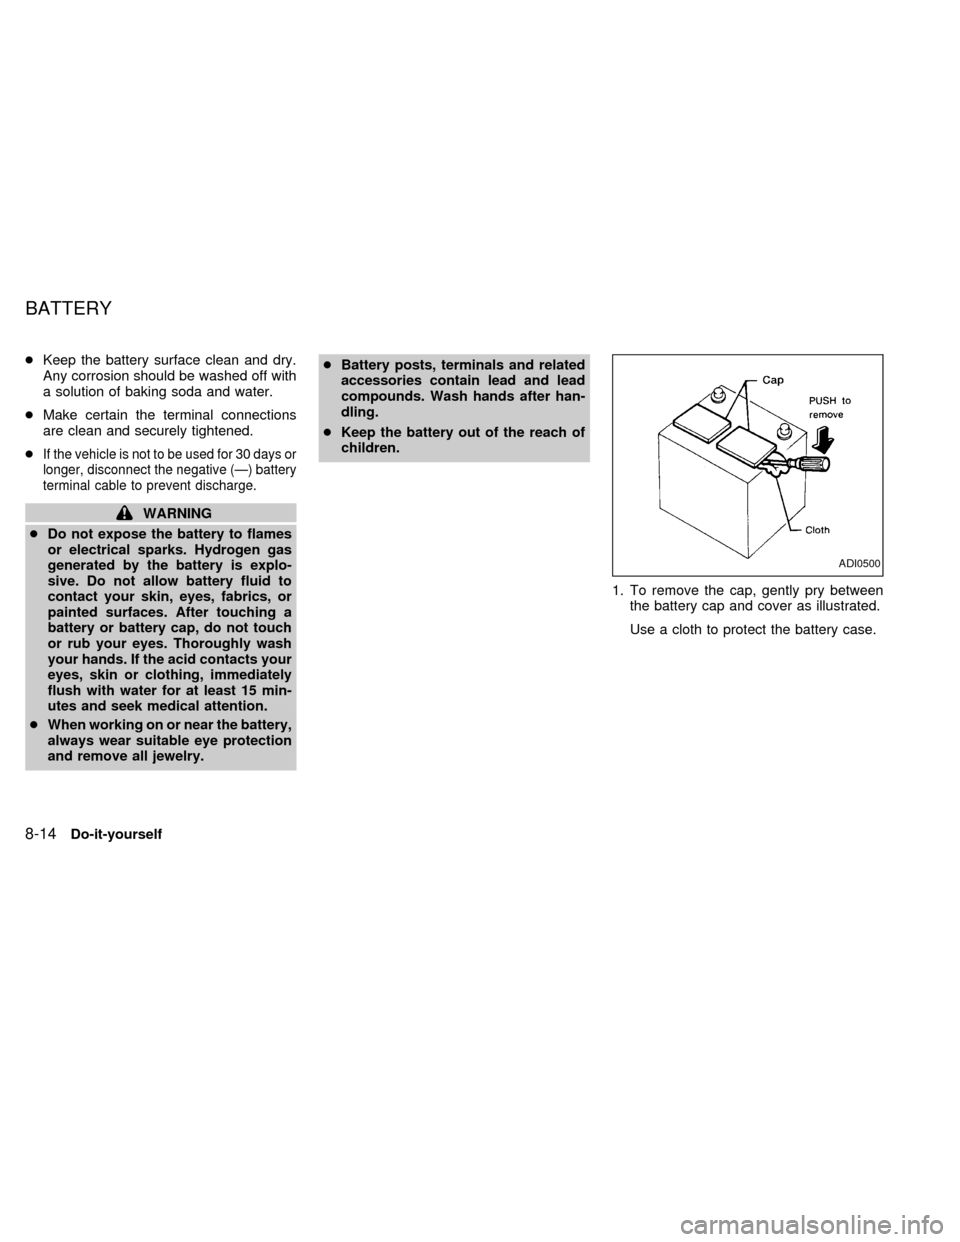
1. To remove the cap, gently pry between
the battery cap and cover as illustrated.
Use a cloth to protect the battery case.
ADI0500
BATTERY
8-14Do-it-yourself
ZX
Page 178 of 242
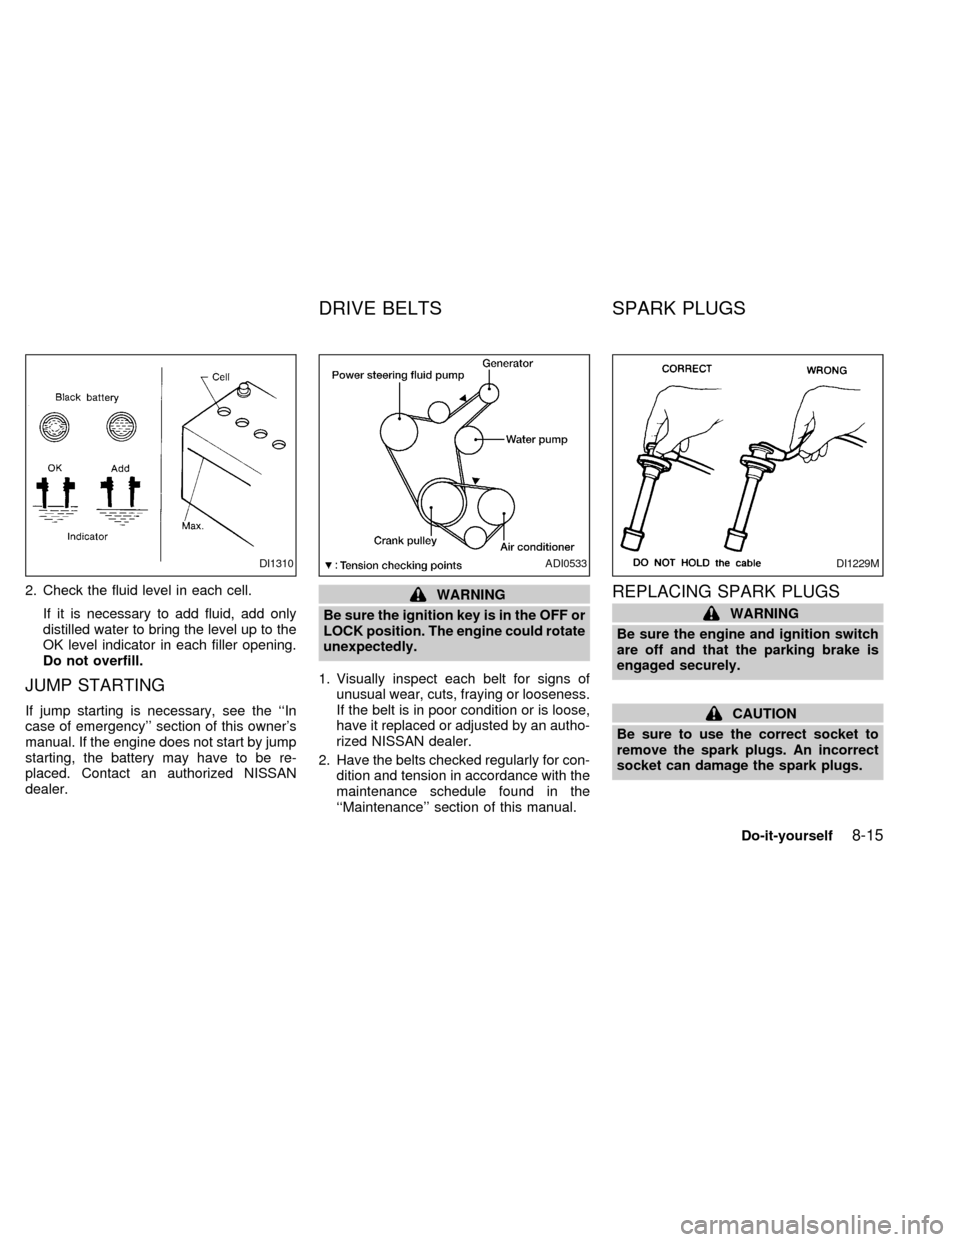
2. Check the fluid level in each cell.
If it is necessary to add fluid, add only
distilled water to bring the level up to the
OK level indicator in each filler opening.
Do not overfill.
JUMP STARTING
If jump starting is necessary, see the ``In
case of emergency'' section of this owner's
manual. If the engine does not start by jump
starting, the battery may have to be re-
placed. Contact an authorized NISSAN
dealer.
WARNING
Be sure the ignition key is in the OFF or
LOCK position. The engine could rotate
unexpectedly.
1. Visually inspect each belt for signs of
unusual wear, cuts, fraying or looseness.
If the belt is in poor condition or is loose,
have it replaced or adjusted by an autho-
rized NISSAN dealer.
2. Have the belts checked regularly for con-
dition and tension in accordance with the
maintenance schedule found in the
``Maintenance'' section of this manual.REPLACING SPARK PLUGS
WARNING
Be sure the engine and ignition switch
are off and that the parking brake is
engaged securely.
CAUTION
Be sure to use the correct socket to
remove the spark plugs. An incorrect
socket can damage the spark plugs.
DI1310ADI0533DI1229M
DRIVE BELTS SPARK PLUGS
Do-it-yourself8-15
ZX
Page 179 of 242

Platinum-tipped spark plugs
It is not necessary to replace platinum-
tipped spark plugs as frequently as conven-
tional type spark plugs because they last
much longer. Follow the maintenance
schedule, but do not reuse the spark plugs
by cleaning or regapping.
cAlways replace spark plugs with rec-
ommended or equivalent ones.
1. Remove brackets as necessary to give
access to the high tension spark plug
cables and spark plugs.2. Disconnect the spark plug cables from
the spark plugs.
When disconnecting, always hold the
boots, not the cables. Mark all cables to
identify their original locations.
3. Remove the spark plugs with a spark
plug socket.
The plug socket has a rubber seal that
holds the spark plug so it does not fall
when it is pulled out. Make sure each
spark plug is snugly fitted into the spark
plug socket.
4. Fit the new plugs, one at a time, into the
spark plug socket and install them.Use
only the specified spark plugs.Turn
each plug several full turns by hand, then
tighten with the spark plug socket to the
correct torque. Do not overtighten.
Spark plug tightening torque:
14 to 22 ft-lb
(20 to 29 Nzm)
5. Holding the boot, reconnect each high
tension cable to its proper spark plug by
pushing it on until you feel a snap.
6. Reinstall all brackets as necessary.The air cleaner filter should not be cleaned
and reused. Replace it according to the
maintenance intervals shown in the ``Main-
tenance'' section of this manual. When re-
placing the filter, wipe the inside of the air
cleaner filter housing and the cover with a
damp cloth.
WDI0005DI1312
AIR CLEANER
8-16Do-it-yourself
ZX
Page 180 of 242
WARNING
cOperating the engine with the air
cleaner removed can cause you or
others to be burned. The air cleaner
not only cleans the air, it stops the
flame if the engine backfires. If it
isn't there, and the engine backfires,
you could be burned. Do not drive
with the air cleaner removed, and be
careful when working on the engine
with the air cleaner removed.
cNever pour fuel into the throttle body
or attempt to start the engine with
the air cleaner removed. Doing so
could result in serious injury.
Do-it-yourself
8-17
ZX