NISSAN ALTIMA 2001 L30 / 2.G Owners Manual
Manufacturer: NISSAN, Model Year: 2001, Model line: ALTIMA, Model: NISSAN ALTIMA 2001 L30 / 2.GPages: 258, PDF Size: 2.09 MB
Page 91 of 258

OPENER OPERATION
The fuel filler lid opener lever is located on
the outside of the driver's seat. To open the
fuel filler lid, push the opener lever down. To
lock, close the fuel filler lid securely.
FUEL FILLER CAP
The fuel filler cap is a ratcheting type.
Tighten the cap clockwise until ratcheting
clicks are heard.
WPD0009WPD0049
FUEL FILLER LID
3-12Pre-driving checks and adjustments
ZX
Page 92 of 258

WARNING
cGasoline is extremely flammable and
highly explosive under certain con-
ditions. You could be burned or se-
riously injured if it is misused or
mishandled. Always stop the engine
and do not smoke or allow open
flames or sparks near the vehicle
when refueling.
c
Fuel may be under pressure. Turn the
cap one-half turn, and wait for any
``hissing'' sound to stop to prevent
fuel from spraying out and possible
personal injury. Then remove the cap.
cDo not attempt to top off the fuel
tank after the fuel pump nozzle shuts
off automatically. Continued refuel-
ing may cause fuel overflow, result-
ing in fuel spray and possibly fire.
cUse only an original equipment type
fuel filler cap as a replacement. It has
a built-in safety valve needed for
proper operation of the fuel system
and emission control system. An in-
correct cap can result in a serious
malfunction and possible injury.
cNever pour fuel into the throttle body
to attempt to start your vehicle.
CAUTION
cIf fuel is spilled on the vehicle body,
flush it away with water to avoid
paint damage.
cTighten until the fuel filler cap clicks.
Failure to tighten the fuel filler cap
properly may cause the
mal-
function indicator lamp (MIL) to illu-
minate. If the
lamp illuminates
because the fuel filler cap is loose or
missing, tighten or install the cap
and continue to drive the vehicle.
The
lamp should turn off after
a few driving trips. If thelamp
does not turn off after a few driving
trips, have the vehicle inspected by
an authorized NISSAN dealer.
cFor additional information, see the
ªMalfunction indicator lamp (MIL)''
in the ªInstrument and controlsº
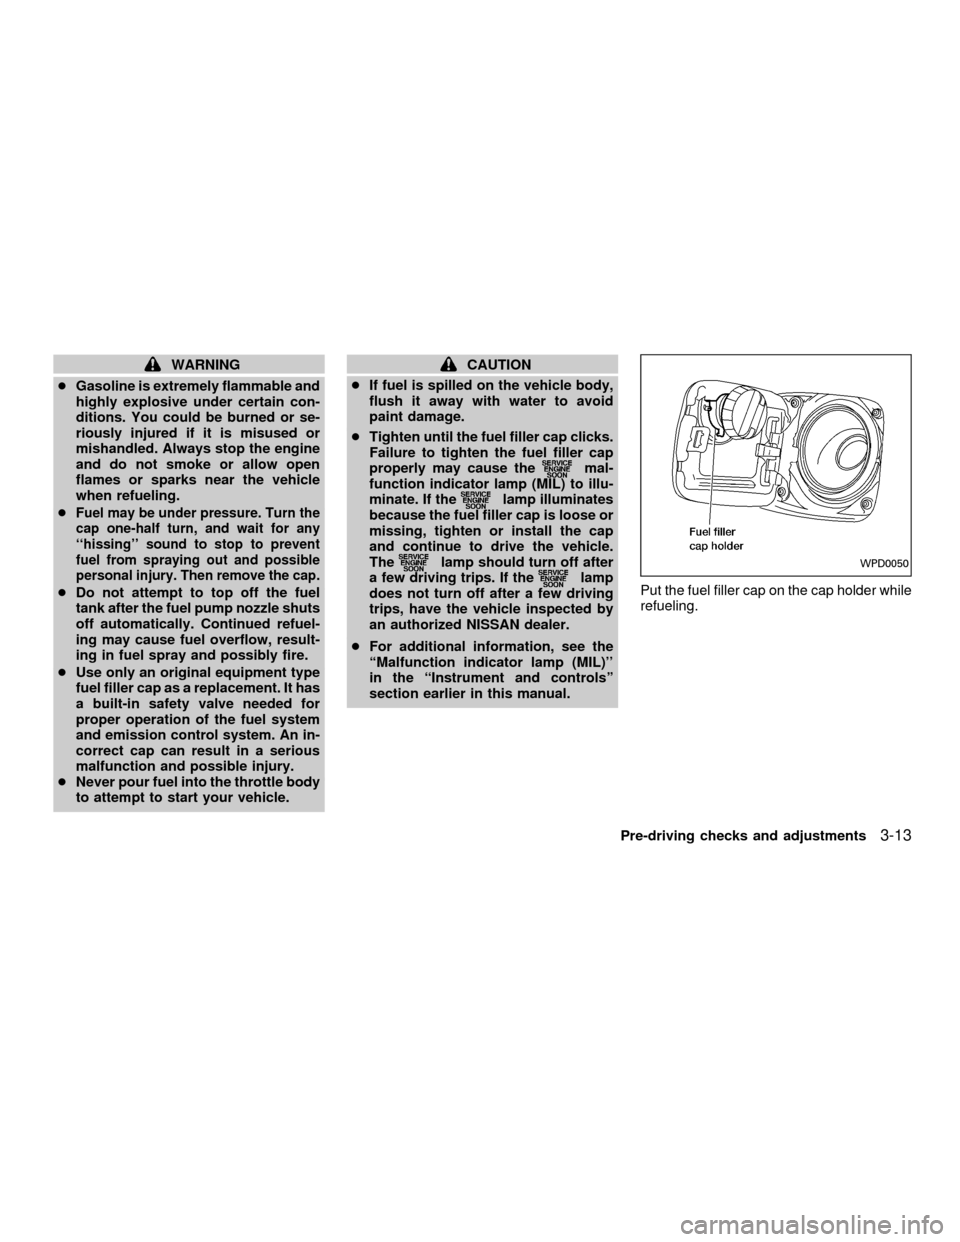
section earlier in this manual.Put the fuel filler cap on the cap holder while
refueling.WPD0050
Pre-driving checks and adjustments3-13
ZX
Page 93 of 258

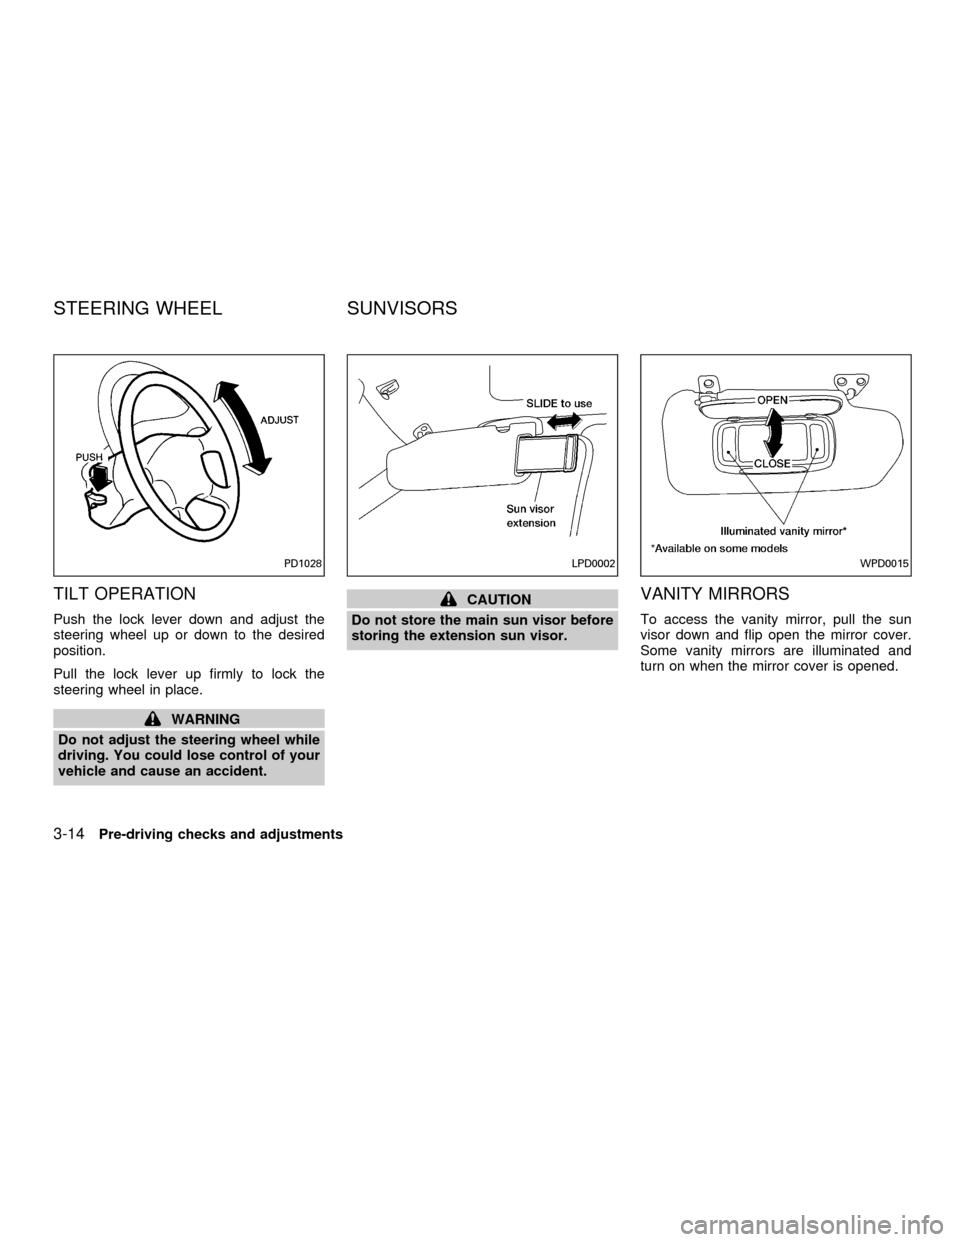
TILT OPERATION
Push the lock lever down and adjust the
steering wheel up or down to the desired
position.
Pull the lock lever up firmly to lock the
steering wheel in place.
WARNING
Do not adjust the steering wheel while
driving. You could lose control of your
vehicle and cause an accident.
CAUTION
Do not store the main sun visor before
storing the extension sun visor.VANITY MIRRORS
To access the vanity mirror, pull the sun
visor down and flip open the mirror cover.
Some vanity mirrors are illuminated and
turn on when the mirror cover is opened.
PD1028LPD0002WPD0015
STEERING WHEEL SUNVISORS
3-14Pre-driving checks and adjustments
ZX
Page 94 of 258

INSIDE MIRROR
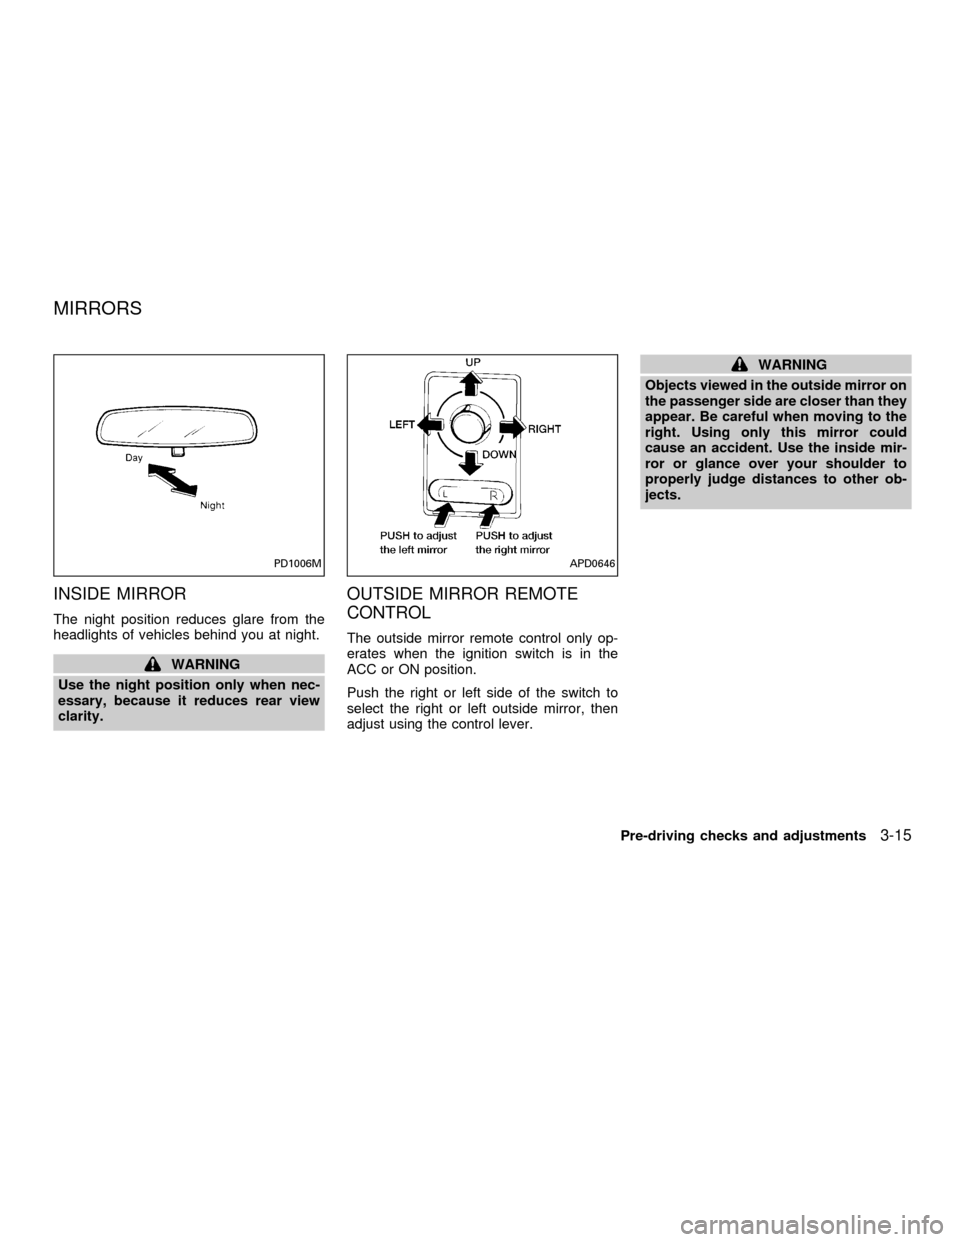
The night position reduces glare from the
headlights of vehicles behind you at night.
WARNING
Use the night position only when nec-
essary, because it reduces rear view
clarity.
OUTSIDE MIRROR REMOTE
CONTROL
The outside mirror remote control only op-
erates when the ignition switch is in the
ACC or ON position.
Push the right or left side of the switch to
select the right or left outside mirror, then
adjust using the control lever.
WARNING
Objects viewed in the outside mirror on
the passenger side are closer than they
appear. Be careful when moving to the
right. Using only this mirror could
cause an accident. Use the inside mir-
ror or glance over your shoulder to
properly judge distances to other ob-
jects.
PD1006MAPD0646
MIRRORS
Pre-driving checks and adjustments3-15
ZX
Page 95 of 258

MEMO
3-16Pre-driving checks and adjustments
ZX
Page 96 of 258

4Heater, air conditioner and audio systems
Ventilators ..............................................................4-2
Center ventilators ..............................................4-2
Side ventilators ..................................................4-2
Heater and air conditioner......................................4-3
Controls .............................................................4-3
Heater operation ................................................4-4
Air conditioner operation
(if so equipped)..................................................4-5
Air flow charts ....................................................4-6
Servicing air conditioner .........................................4-9Audio system ........................................................4-10
FM-AM radio with compact disc (CD)
player ...............................................................4-10
FM-AM radio with cassette player and
compact disc (CD) player ................................4-17
FM-AM radio with compact disc (CD)
changer (if so equipped) .................................4-24
Antenna ...........................................................4-37
Car phone or CB radio .........................................4-37
ZX
Page 97 of 258

CENTER VENTILATORS
Adjust air flow direction by moving the ven-
tilator slide.
SIDE VENTILATORS
You can open or close the side ventilators
by using the dial located at the side of the
ventilators. Adjust air flow direction by mov-
ing the ventilator slide.
: This symbol indicates a vent is closed.
: This symbol indicates a vent is open.
AHA1033AHA1002
VENTILATORS
4-2Heater, air conditioner and audio systems
ZX
Page 98 of 258

WARNING
cThe air conditioner cooling function
operates only when the engine is
running.
c
Do not leave children, impaired adults,
or pets alone in your vehicle. On hot
sunny days, temperatures in a closed
vehicle could quickly become high
enough to cause severe or possibly
fatal injuries to people or animals.
cDo not use the recirculation mode
for long periods as it may cause the
interior air to become stale and the
windows to fog up.
cPositioning of the heating or air con-
ditioning controls should not be
done while driving, so full attention
may be given to vehicle operation.
CONTROLS
Fan control dial
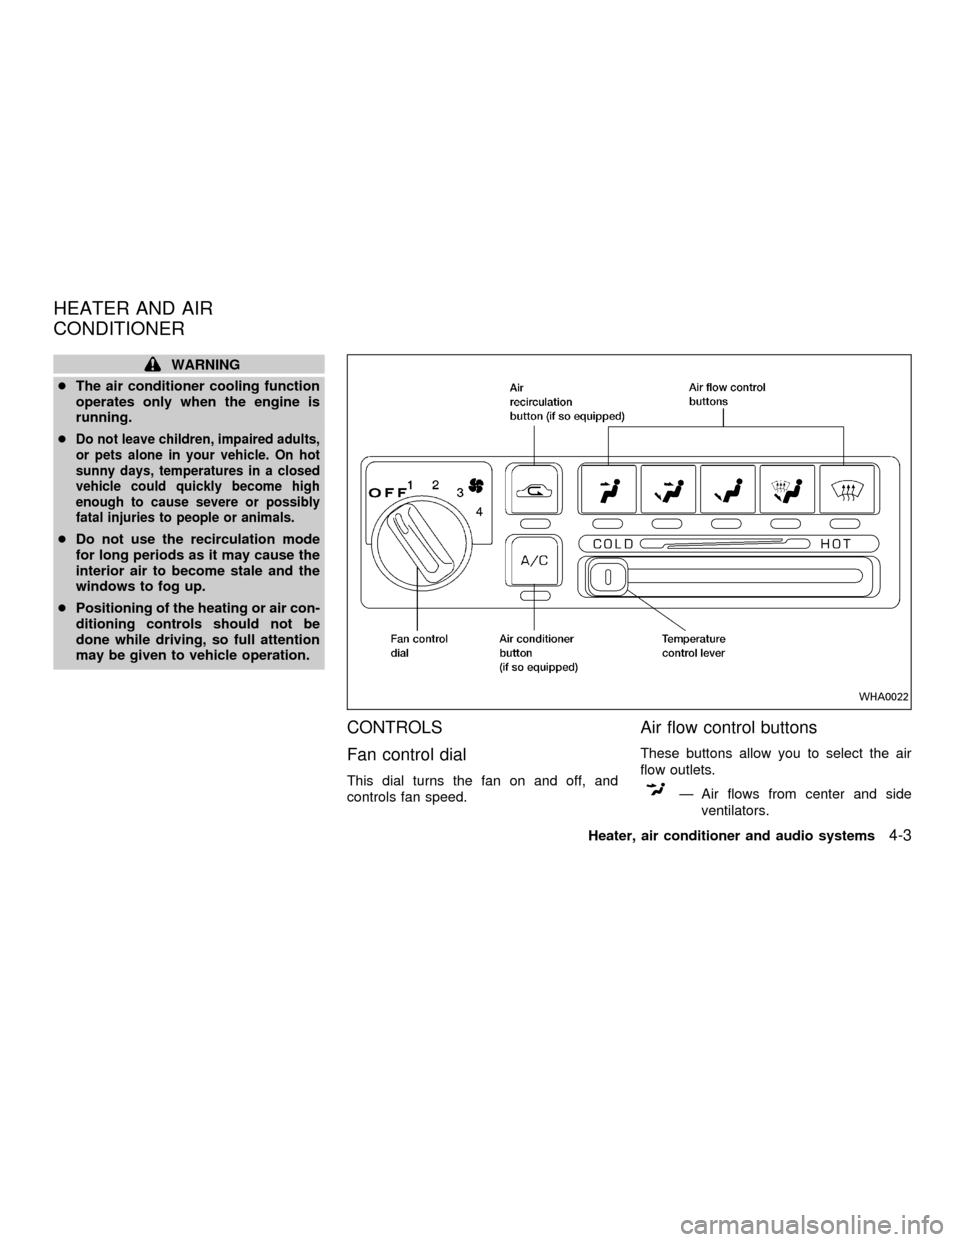
This dial turns the fan on and off, and
controls fan speed.
Air flow control buttons
These buttons allow you to select the air
flow outlets.
Ð Air flows from center and side
ventilators.
WHA0022
HEATER AND AIR
CONDITIONER
Heater, air conditioner and audio systems4-3
ZX
Page 99 of 258

Ð Air flows from center and side
ventilators and foot outlets.
Ð Air flows mainly from foot outlets.
Ð Air flows from defroster outlets
and foot outlets.
Ð Air flows mainly from defroster
outlets.
Temperature control lever
This lever allows you to adjust the tempera-
ture of the outlet air.
Air recirculation button (if so
equipped)
Off position (Indicator light off):
Outside air is drawn into the passenger
compartment and distributed through the
selected outlet.
Use the off position for normal heater or air
conditioner operation.
On position (Indicator light on):
Interior air is recirculated inside the vehicle.
Push the
button to the on position
when:cdriving on a dusty road.
cto avoid traffic fumes.
cfor maximum cooling when using the air
conditioner
Air conditioner button
(if so equipped)
This button is provided only on vehicles
equipped with an air conditioner.
Start the engine, turn the fan control dial to
the desired (1 to 4) position and push the
A/C button to turn on the air conditioner.
The indicator light comes on when the air
conditioner is operating. To stop the air
conditioner, push the switch again.
The air conditioner cooling function op-
erates only when the engine is running.
HEATER OPERATION
Heating
This mode is used to direct heated air to the
foot outlets. Some air also flows from the
defroster outlets.
1. Push the
button to the off position
for normal heating.2. Push the
button in.
3. Move the fan control dial to the desired
position.
4. Move the temperature control lever to the
desired position between the middle and
the HOT position.
Ventilation
This mode directs outside air to the side and
center ventilators.
1. Push the
button to the off position.
2. Push the
button in.
3. Move the fan control dial to the desired
position.
4. Move the temperature control lever to the
desired position.
Defrosting or defogging
This mode is used to defrost/defog the
windows.
1. Push the
button in.
2. Move the fan control dial to the desired
position.
3. Move the temperature control lever to the
4-4Heater, air conditioner and audio systems
ZX
Page 100 of 258

desired position between the middle and
the HOT position.
cTo quickly remove ice or fog from the
windows, turn on the fan control dial to 4
and the temperature control lever to the
full HOT position.
cWhen the
position is selected, the
air conditioner automatically turns on
(however, the indicator light will not illu-
minate). This dehumidifies the air which
helps defog the windshield. The air recir-
culation mode automatically turns off,
allowing outside air to be drawn into the
passenger compartment which helps de-
fog the windshield.
Bi-level heating/cooling
This mode directs air from the side, center
and foot outlets.
1. Push the
button to the off position.
2. Push the
button in.
3. Move the fan control dial to the desired
position.
4. Move the temperature control lever to the
desired position.
Heating and defogging
This mode heats the interior and defogs the
windshield.
1. Push the
button in.
2. Move the fan control dial to the desired
position.
3. Move the temperature control lever to the
desired position between the middle and
the HOT position.
Operating tips
cClear snow and ice from the wiper
blades and air inlet in front of the
windshield. This improves heater op-
eration.
cWhen the
orswitch is selected,
the air recirculation mode automatically
turns off.
Outside air is drawn into the passenger
compartment to improve the defogging
performance.
AIR CONDITIONER OPERATION
(if so equipped)
Start the engine, move the fan control dial to
the desired (1 to 4) position and push in the
A/C button to activate the air conditioner.When the air conditioner is on, cooling and
dehumidifying functions are added to the
heater operation.
The air conditioner cooling function op-
erates only when the engine is running.
Cooling
This mode is used to cool and dehumidify
the air.
1. Push the
button to the off position.
2. Push the
button in.
3. Move the fan control dial to the desired
position.
4. Push on the air conditioner button. The
indicator light comes on.
5. Move the temperature control lever to the
desired position.
cFor quick cooling when the outside tem-
perature is high, push the
button to
the on position (Indicator light on). Be
sure to return the
button to the off
position for normal cooling.
Dehumidified heating
This mode is used to heat and dehumidify.
1. Push the
button to the off position.
Heater, air conditioner and audio systems
4-5
ZX