NISSAN ALTIMA 2001 L30 / 2.G Owners Manual
Manufacturer: NISSAN, Model Year: 2001, Model line: ALTIMA, Model: NISSAN ALTIMA 2001 L30 / 2.GPages: 258, PDF Size: 2.09 MB
Page 101 of 258

2. Push thebutton in.
3. Move the fan control dial to the desired
position.
4. Push on the air conditioner button. The
indicator light comes on.
5. Move the temperature control lever to the
desired position.
Dehumidified defogging
This mode defogs the windows and dehu-
midifies the air.
1. Push the
button in.
When the
position is selected, the
air conditioner automatically turns on
(however, the indicator light will not illu-
minate). This dehumidifies the air which
helps defog the windshield. The air recir-
culation mode automatically turns off,
allowing outside air to be drawn into the
passenger compartment which helps de-
fog the windshield.
2. Move the fan control dial to the desired
position.
3. Move the temperature control lever to the
desired position.Outside air is drawn into the passenger
compartment to improve the defogging per-
formance.
Operating tips
cKeep the windows and sun roof closed
while the air conditioner is in operation.
cAfter parking in the sun, drive for two or
three minutes with the windows open to
vent hot air from the passenger compart-
ment. Then, close the windows. This
allows the air conditioner to cool the
interior more quickly.
cThe air conditioner system should be
operated for approximately ten min-
utes at least once a month. This helps
prevent damage to the system due to
lack of lubrication.
cIf the engine coolant temperature gauge
exceeds the H (hot) position, turn the air
conditioner off. See ``If your vehicle over-
heats'' in the ``In case of emergency''
section of this owner's manual for addi-
tional information.
AIR FLOW CHARTS
The charts on the following pages show the
switch and lever positions forMAXIMUMand QUICKheating, cooling, or defrosting.
4-6Heater, air conditioner and audio systems
ZX
Page 102 of 258

WHA0017WHA0018
Heater, air conditioner and audio systems4-7
ZX
Page 103 of 258

WHA0021WHA0019
4-8Heater, air conditioner and audio systems
ZX
Page 104 of 258

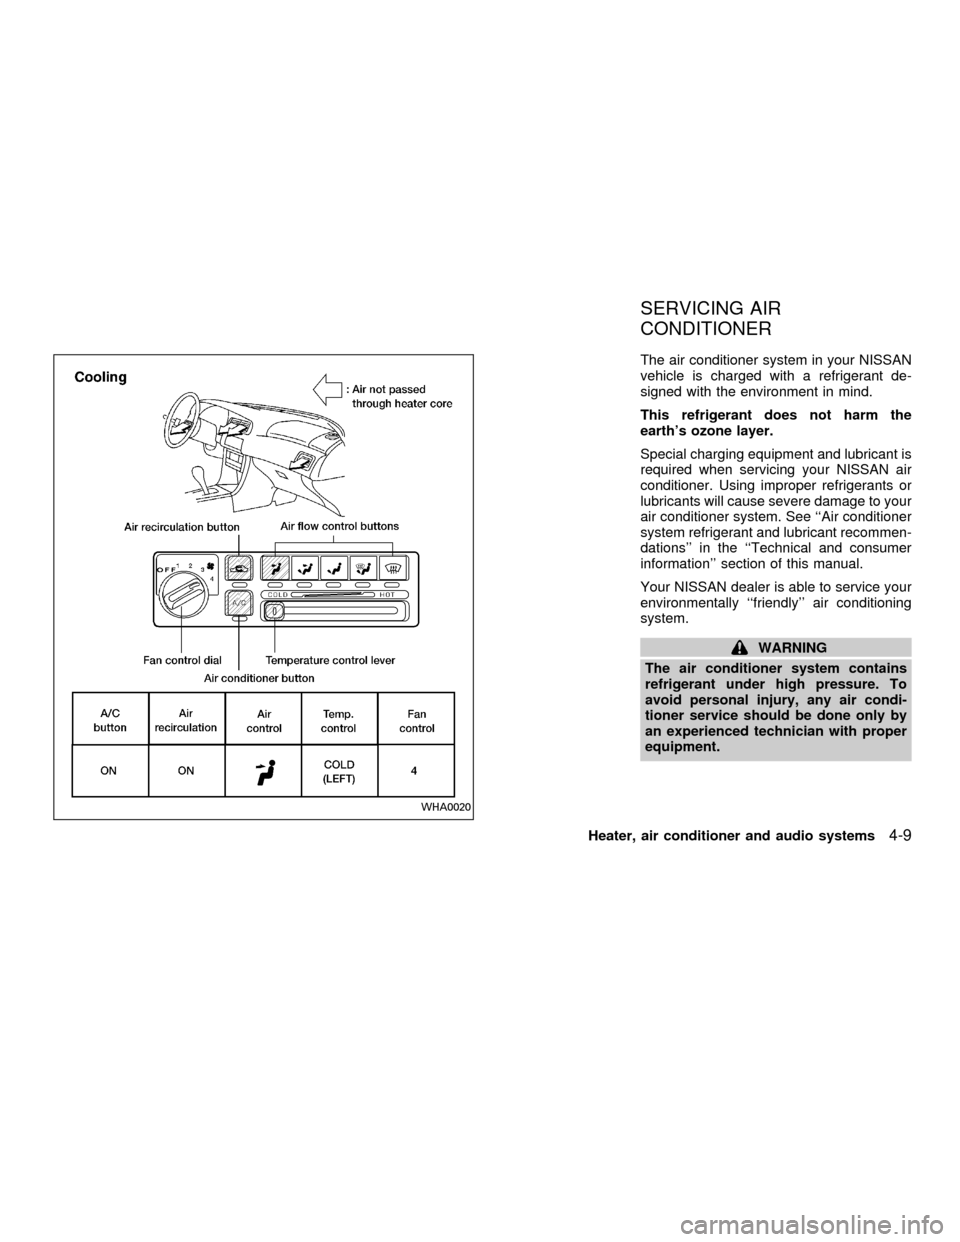
The air conditioner system in your NISSAN
vehicle is charged with a refrigerant de-
signed with the environment in mind.
This refrigerant does not harm the
earth's ozone layer.
Special charging equipment and lubricant is
required when servicing your NISSAN air
conditioner. Using improper refrigerants or
lubricants will cause severe damage to your
air conditioner system. See ``Air conditioner
system refrigerant and lubricant recommen-
dations'' in the ``Technical and consumer
information'' section of this manual.
Your NISSAN dealer is able to service your
environmentally ``friendly'' air conditioning
system.
WARNING
The air conditioner system contains
refrigerant under high pressure. To
avoid personal injury, any air condi-
tioner service should be done only by
an experienced technician with proper
equipment.
WHA0020
SERVICING AIR
CONDITIONER
Heater, air conditioner and audio systems4-9
ZX
Page 105 of 258

FM-AM RADIO WITH COMPACT
DISC (CD) PLAYER
Audio main operation
To turn the radio on, turn the ignition key to
ACC or ON. If you listen to the radio with the
engine not running, turn the key to the ACC
position.
Radio reception is affected by station signal
strength, distance from radio transmitter,
buildings, bridges, mountains and other ex-
ternal influences. Intermittent changes in
reception quality normally are caused by
these external influences.
Using a cellular phone in or near the
vehicle may influence radio reception
quality.
Power/Volume control
Turn the ignition key to ACC or ON, then
push the power/volume control knob. The
mode (radio or CD) which was playing im-
mediately before the system was turned off
resumes playing. When no CD is loaded,
the radio comes on. Pushing the
power/volume control knob again turns the
system off.
LHA0002
AUDIO SYSTEM
4-10Heater, air conditioner and audio systems
ZX
Page 106 of 258

Turn the power/volume control knob to the
right to increase volume or to the left to
decrease volume.
Adjusting tone quality and speaker bal-
ance
To adjust Bass, Treble, Fader or Balance,
press the
knob for less than 1.5 sec-
onds. A beep signals entry into the audio
adjustment mode and BASS will appear in
the display. Rotate the
knob to adjust
Bass (BASS) to the desired level.
Press the
knob a second time and
TREB appears in the display. Rotate the
knob to adjust Treble (TREB) to the
desired level.
Press the
knob a third time and FAD
appears in the display. Fader (FAD) adjusts
the sound between the front and rear
speaker. Rotate the
knob to adjust
Fader (FAD) to the desired level.
Press the
knob a fourth time and BAL
appears in the display. Balance (BAL) ad-
justs the sound between the right and left
speakers. Rotate the
knob to adjust
Balance (BAL) to the desired level.
After 10 seconds, the radio or CD displaywill reappear. Once the sound quality is set
to the desired level, press the
knob
repeatedly until the radio or CD display
reappears.
Heater, air conditioner and audio systems
4-11
ZX
Page 107 of 258

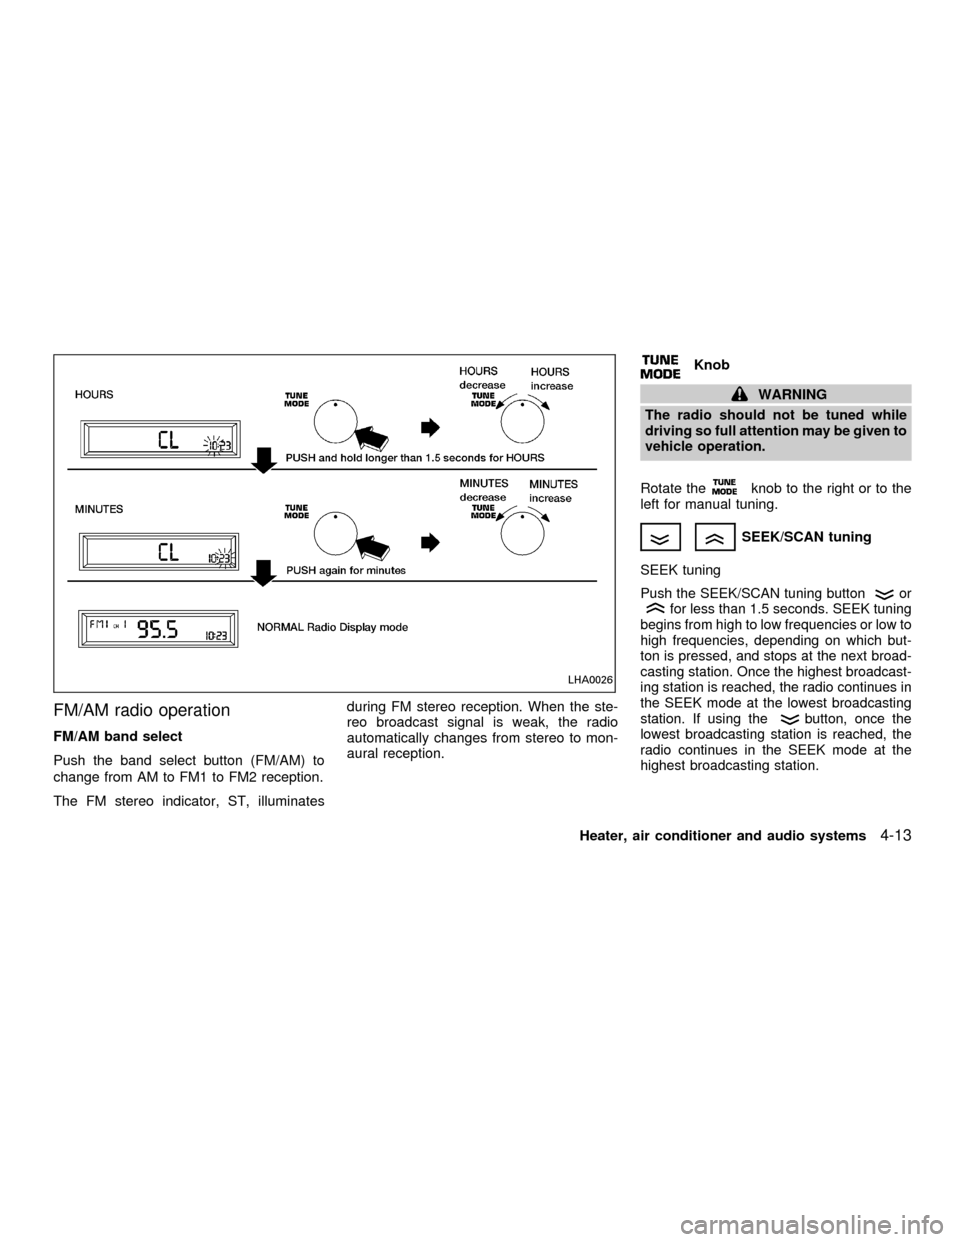
Clock operation
The clock is on in the display regardless of
what mode, media, or function the radio is in
as long as the ignition is in ACC or ON.
Clock set
To adjust the clock, press the
knob
for longer than 1.5 seconds. A beep signals
entry into the clock adjustment mode and
CL appears in the display. The hours will be
blinking. Rotate the
knob to adjust
the hours to the desired level.
Press the
knob a second time and
the minutes will start to blink. Rotate the
knob to adjust the minutes to the
desired level.
After 10 seconds, the radio or CD display
will reappear. Once the clock is set to the
desired level, press the
knob repeat-
edly until the radio or CD display reappears.
LHA0025
4-12Heater, air conditioner and audio systems
ZX
Page 108 of 258

FM/AM radio operation
FM/AM band select
Push the band select button (FM/AM) to
change from AM to FM1 to FM2 reception.
The FM stereo indicator, ST, illuminatesduring FM stereo reception. When the ste-
reo broadcast signal is weak, the radio
automatically changes from stereo to mon-
aural reception.
Knob
WARNING
The radio should not be tuned while
driving so full attention may be given to
vehicle operation.
Rotate the
knob to the right or to the
left for manual tuning.
SEEK/SCAN tuning
SEEK tuning
Push the SEEK/SCAN tuning buttonorfor less than 1.5 seconds. SEEK tuning
begins from high to low frequencies or low to
high frequencies, depending on which but-
ton is pressed, and stops at the next broad-
casting station. Once the highest broadcast-
ing station is reached, the radio continues in
the SEEK mode at the lowest broadcasting
station. If using the
button, once the
lowest broadcasting station is reached, the
radio continues in the SEEK mode at the
highest broadcasting station.
LHA0026
Heater, air conditioner and audio systems4-13
ZX
Page 109 of 258

SCAN tuning
Push the SEEK/SCAN tuning button
or
for more than 1.5 seconds. SCAN ap-
pears in the display window. SCAN tuning
begins from high to low frequencies or low
to high frequencies, depending on which
button is pressed. SCAN tuning stops at
each broadcasting station for five seconds.
Pushing the button again during this five
second period stops SCAN tuning and the
radio remains tuned to that station.
Station memory operations
Six stations can be set for the AM band. 12
stations can be set for the FM band (six for
FM1, six for FM2).
1. Push band select button (FM/AM) to se-
lect AM, FM1, or FM2. The selected band
illuminates in the display.
2. Tune to the desired station.
3. Push the desired station select button for
more than 1.5 seconds. The radio mutes
when the select button is pushed.
4. When the indicator illuminates in the
display and the sound resumes, memo-
rizing is complete.5. Other station select buttons can be set in
the same manner.If the battery cable is disconnected, or if the
radio fuse opens, the radio memory is can-
celled. In that case, reset the desired stations.
COMPACT DISC (CD) player op-
eration
Turn the ignition key to the ACC or ON
position, and carefully insert the compact
disc into the slot with the label side up. The
compact disc is automatically pulled into the
slot and starts to play.
If the radio is already operating, it automati-
cally turns off and the compact disc begins
to play.
CAUTION
Do not force the compact disc into the
slot. This could damage the player.
CD button
When this button is pushed with the compact
disc loaded and the radio playing, the radio
turns off and the compact disc starts to play.
When power/volume control knob is pushedwhile the compact disc is playing, the com-
pact disc stops playing.
FF (Fast forward), REW
(Rewind)
When the
orbutton is pushed
while the compact disc is playing, the com-
pact disc plays at an increased speed while
fast forwarding or rewinding. When the but-
ton is released, the compact disc returns to
normal play speed.
APS (Automatic Program
Search) FF, APS REW
When thebutton is pushed while the
compact disc is playing, the selection fol-
lowing the present one starts to play from
the beginning. Push or hold the
but-
ton several times to skip several selections.
Each time the button is pushed, the CD
advances one selection. (When the last
selection on the compact disc is skipped,
the first selection is played.)
When thebutton is pushed, the selec-
tion being played returns to the beginning.
Push or hold the
button several
times to skip back several selections. Each
4-14Heater, air conditioner and audio systems
ZX
Page 110 of 258

time the button is pushed, the CD moves
back one selection.
RPT (Repeat)
When the
repeat button is pushed
while the compact disc is playing, the play
pattern changes as follows.
1: The current selection is repeated.
MIX: Selections are played at random, not
following the sequence on the compact
disc. The same program may be repeated
twice.
Normal(no symbol): All selections are
played in sequence, and the compact disc
stops when the last selection is finished.
When a new compact disc is inserted,
the play pattern automatically changes
to the ``Normal'' play pattern.
CD EJECT
When the
button is pushed with a com-
pact disc loaded, the compact disc ejects.
When the
button is pushed while the
compact disc is playing, the compact disc
ejects and the system turns off.
If the compact disc ejects and is notremoved within 10 seconds, it is pulled
back into the slot.
DISC indicator light
CD IN appears on the display when a CD is
loaded with the system ON.
CD care and cleaning
cHandle a CD by its edges. Never touch
the surface of the disc. Do not bend the
disc.
cAlways place the discs in the storage
case when they are not being used.
cTo clean a disc, wipe the surface from
the center to the outer edge using a
clean, soft cloth. Do not wipe the disc
using a circular motion.
Do not use a conventional record cleaner
or alcohol intended for industrial use.
LHA0049
Heater, air conditioner and audio systems4-15
ZX