lights NISSAN ALTIMA 2001 L30 / 2.G User Guide
[x] Cancel search | Manufacturer: NISSAN, Model Year: 2001, Model line: ALTIMA, Model: NISSAN ALTIMA 2001 L30 / 2.GPages: 258, PDF Size: 2.09 MB
Page 73 of 258
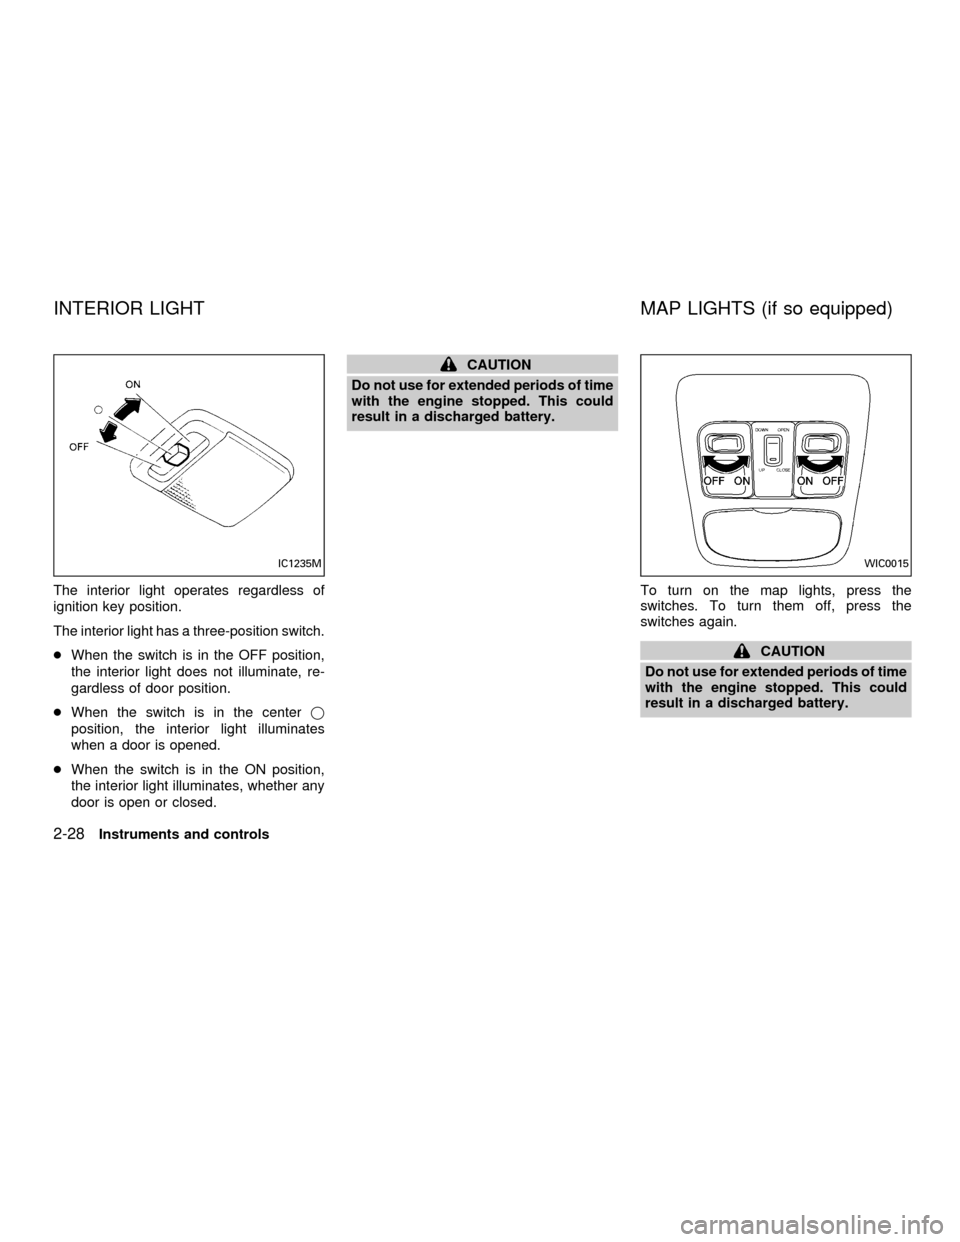
The interior light operates regardless of
ignition key position.
The interior light has a three-position switch.
cWhen the switch is in the OFF position,
the interior light does not illuminate, re-
gardless of door position.
cWhen the switch is in the centerj
position, the interior light illuminates
when a door is opened.
cWhen the switch is in the ON position,
the interior light illuminates, whether any
door is open or closed.
CAUTION
Do not use for extended periods of time
with the engine stopped. This could
result in a discharged battery.
To turn on the map lights, press the
switches. To turn them off, press the
switches again.
CAUTION
Do not use for extended periods of time
with the engine stopped. This could
result in a discharged battery.
IC1235MWIC0015
INTERIOR LIGHT MAP LIGHTS (if so equipped)
2-28Instruments and controls
ZX
Page 84 of 258
CHILD SAFETY REAR DOOR
LOCK
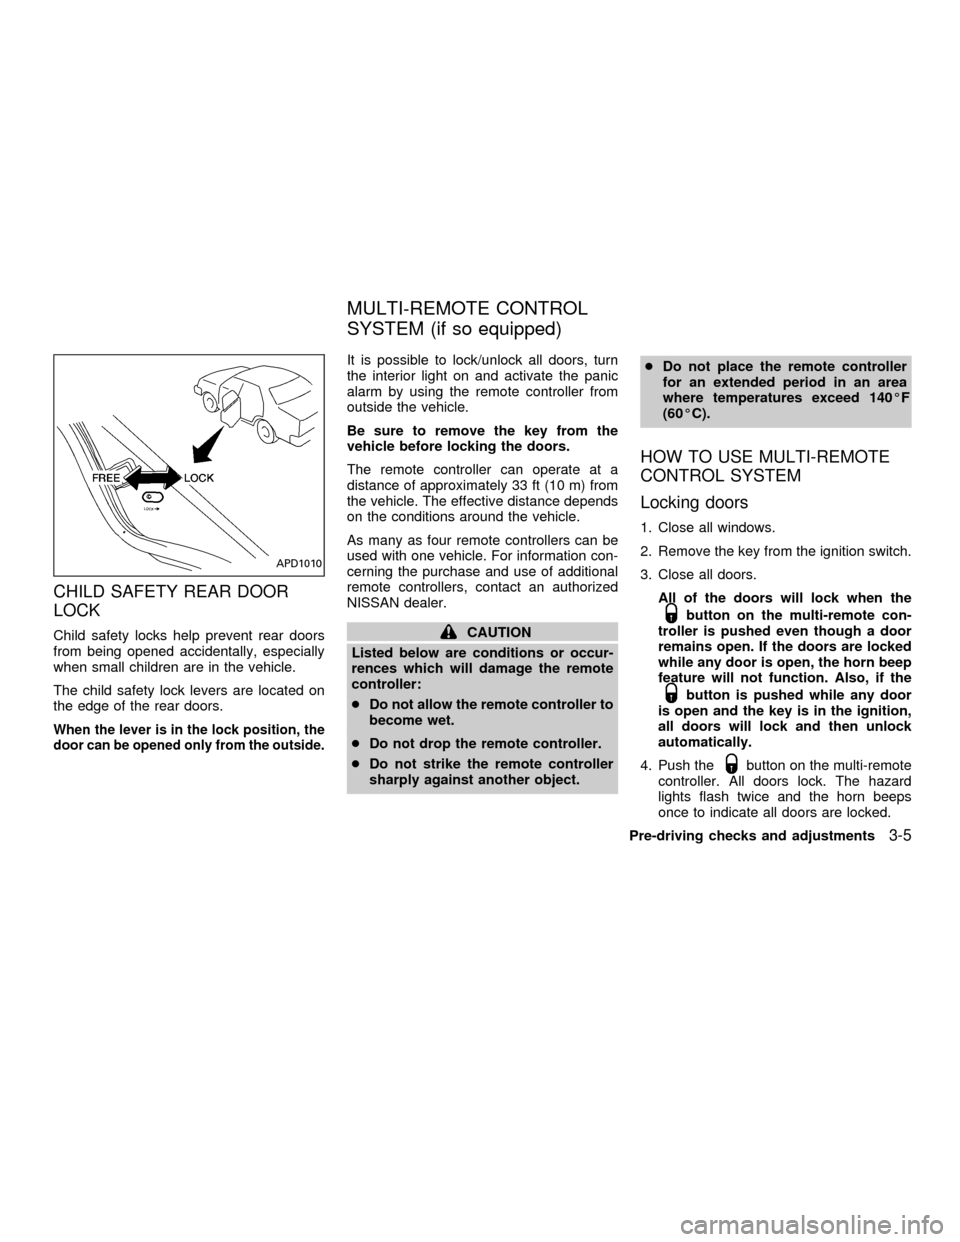
Child safety locks help prevent rear doors
from being opened accidentally, especially
when small children are in the vehicle.
The child safety lock levers are located on
the edge of the rear doors.
When the lever is in the lock position, the
door can be opened only from the outside.
It is possible to lock/unlock all doors, turn
the interior light on and activate the panic
alarm by using the remote controller from
outside the vehicle.
Be sure to remove the key from the
vehicle before locking the doors.
The remote controller can operate at a
distance of approximately 33 ft (10 m) from
the vehicle. The effective distance depends
on the conditions around the vehicle.
As many as four remote controllers can be
used with one vehicle. For information con-
cerning the purchase and use of additional
remote controllers, contact an authorized
NISSAN dealer.
CAUTION
Listed below are conditions or occur-
rences which will damage the remote
controller:
cDo not allow the remote controller to
become wet.
cDo not drop the remote controller.
cDo not strike the remote controller
sharply against another object.cDo not place the remote controller
for an extended period in an area
where temperatures exceed 140ÉF
(60ÉC).
HOW TO USE MULTI-REMOTE
CONTROL SYSTEM
Locking doors
1. Close all windows.
2. Remove the key from the ignition switch.
3. Close all doors.
All of the doors will lock when the
button on the multi-remote con-
troller is pushed even though a door
remains open. If the doors are locked
while any door is open, the horn beep
feature will not function. Also, if the
button is pushed while any door
is open and the key is in the ignition,
all doors will lock and then unlock
automatically.
4. Push the
button on the multi-remote
controller. All doors lock. The hazard
lights flash twice and the horn beeps
once to indicate all doors are locked.
APD1010
MULTI-REMOTE CONTROL
SYSTEM (if so equipped)
Pre-driving checks and adjustments3-5
ZX
Page 85 of 258

cWhen thebutton is pushed with all
doors locked, the hazard lights flash
twice and the horn beeps once as a
reminder that the doors are already
locked.
The horn may or may not beep once.
Refer to ``Silencing the horn beep fea-
ture'' later in this section for details.
Unlocking doors
1. Push thebutton on the multi-
remote controller. Only the driver's side
door unlocks.
2. Push the
button on the multi-
remote controller again within five sec-onds. The passenger doors unlock.
3. The interior light comes on and stays on
for 30 seconds when the light switch is in
the O position.Releasing the trunk lid
1. Push the trunk button on the multi-
WPD0004
3-6Pre-driving checks and adjustments
ZX
Page 86 of 258

remote controller for longer than 0.5 sec-
ond. The trunk release button on the
multi-remote controller will not operate
when the ignition switch is in the ON
position.
2. The trunk lid opens.
Using the panic alarm
If you are near your vehicle and feel threat-
ened, you may activate the alarm to call
attention as follows:
1. Push and hold the
button on the
remote controller forlonger than 1.5
seconds.
2. The theft warning alarm and headlights
will stay on for 30 seconds.
3. The panic alarm stops when:
cit has run for 30 seconds, or
cany button is pressed on the multi-
remote controller.
Silencing the horn beep feature
If desired, the horn beep feature can be
deactivated using the multi-remote control-
ler. The instructions are on the back of the
multi-remote controller.
To deactivate:Press and hold the
andbuttonsfor at least two seconds.
The hazard lights will flash three times to
confirm that the horn beep feature has been
deactivated.
To activate:Press and hold the
andbuttonsfor at least two seconds
once more.The hazard lights will flash three times to
confirm that the horn beep feature has been
reactivated.
Deactivating the horn feature does not si-
lence the horn if the alarm is triggered.
Using the interior light
The interior light can be turned off without
waiting 30 seconds by inserting the key into
the ignition or locking the doors with the
multi-remote controller or pushing the inte-
rior light button to OFF.
WPD0005
Pre-driving checks and adjustments3-7
ZX
Page 87 of 258

BATTERY REPLACEMENT
Replace the battery in the multi-remote con-
troller as follows:
1. Open the lid using a coin.
2. Replace the battery with a new one.Recommended battery: Sanyo CR2025
or equivalent.
3. Close the lid securely.
4. Press the
button, then thebut-
ton two or three times to check themulti-remote controller operation.
Each time the
button is pressed, the
hazard lights flash once.
If the battery is removed for any reason
other than replacement, perform step 4.
cAn improperly disposed battery can
hurt the environment. Always confirm
local regulations for battery disposal.
cThe multi-remote controller is water-
resistant; however, if it does get wet,
immediately wipe completely dry.
cThe operational range of the multi-
remote controller extends to approxi-
mately 33 ft (10 m) from the vehicle.
This range may vary with conditions.
FCC Notice:
Changes or modifications not expressly
approved by the manufacturer for com-
pliance could void the user's authority to
operate the equipment.
This device complies with part 15 of the
FCC Rules and RSS-210 of Industry
Canada.
Operation is subject to the following two
conditions: (1) This device may not
APD1026
3-8Pre-driving checks and adjustments
ZX
Page 94 of 258
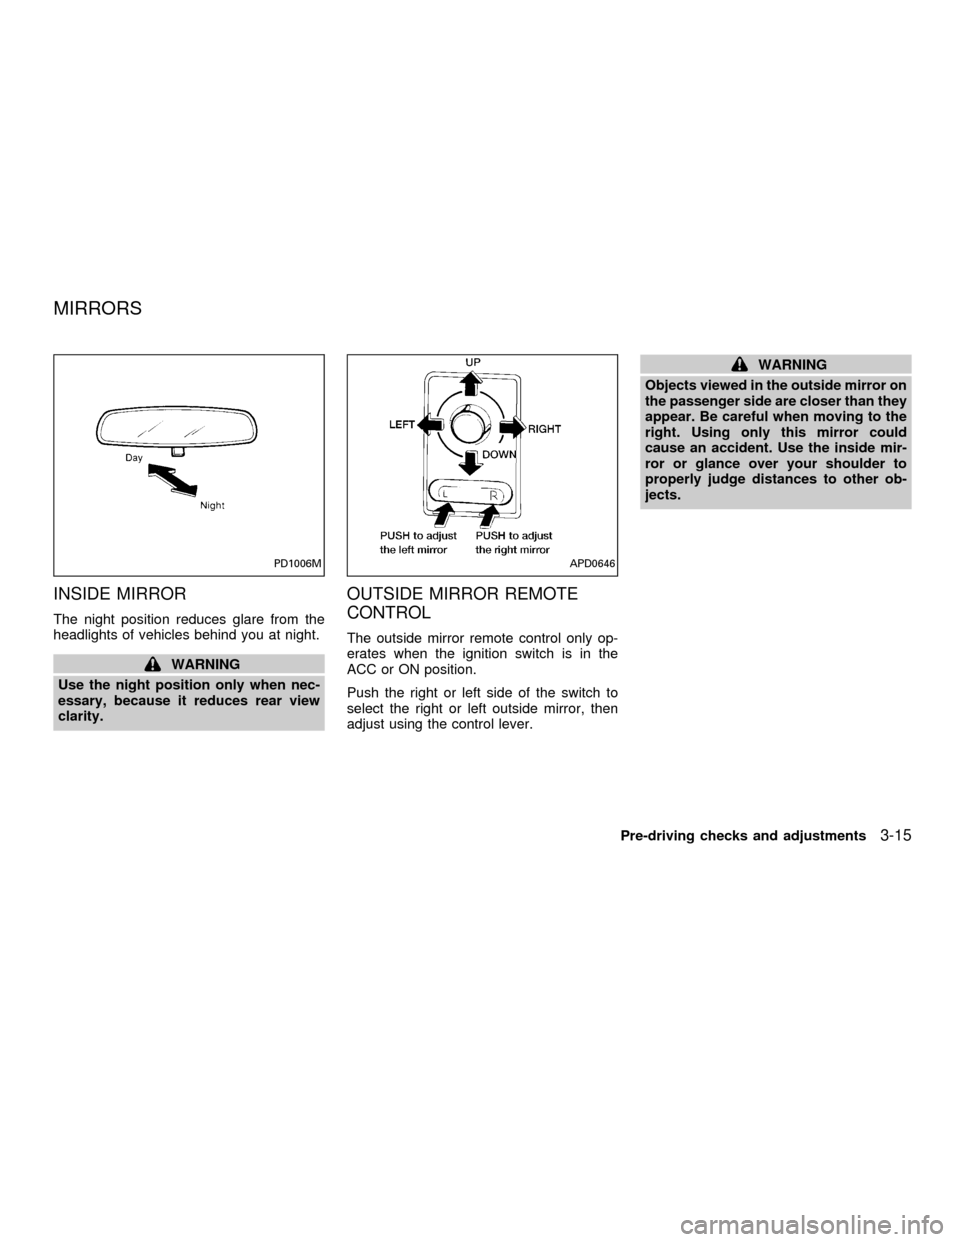
INSIDE MIRROR
The night position reduces glare from the
headlights of vehicles behind you at night.
WARNING
Use the night position only when nec-
essary, because it reduces rear view
clarity.
OUTSIDE MIRROR REMOTE
CONTROL
The outside mirror remote control only op-
erates when the ignition switch is in the
ACC or ON position.
Push the right or left side of the switch to
select the right or left outside mirror, then
adjust using the control lever.
WARNING
Objects viewed in the outside mirror on
the passenger side are closer than they
appear. Be careful when moving to the
right. Using only this mirror could
cause an accident. Use the inside mir-
ror or glance over your shoulder to
properly judge distances to other ob-
jects.
PD1006MAPD0646
MIRRORS
Pre-driving checks and adjustments3-15
ZX
Page 139 of 258

START (4)
This position activates the starter motor,
which starts the engine.
NISSAN VEHICLE IMMOBILIZER
SYSTEM (NVIS)
The Nissan Vehicle Immobilizer System
(NVIS) will not allow the engine to run
without the use of the registered NVIS key.
If the engine fails to run using the registered
NVIS key, it may be due to interference
caused by another NVIS key, an automated
toll road device or automated payment de-
vice on the key ring. Restart the engine
using the following procedures:
1. Leave the ignition switch in the ON posi-
tion for approximately 5 seconds.
2. Turn the ignition switch to the OFF or
LOCK position and wait approximately 5
seconds.
3. Repeat step 1 and 2 again.
4. Restart the engine while holding the de-
vice (which may have caused the inter-
ference) separate from the registered
NVIS key.If this procedure allows the engine to run,
NISSAN recommends placing the regis-
tered NVIS key on a separate key ring to
avoid interference from other devices.cMake sure the area around the vehicle is
clear.
cMaintenance items listed here should be
checked periodically, for example, each
time you check engine oil.
cCheck that all windows and lights are
clean.
cVisually inspect tires for their appearance
and condition. Also check tires for proper
inflation.
cLock all doors.
cPosition seat and adjust head restraints.
cAdjust inside and outside mirrors.
cFasten seat belts and ask all passengers
to do likewise.
cCheck the operation of warning lights
when key is turned to the ON (3) position.
See ``Warning/Indicator lights and
chimes'' in the ``Instruments and con-
trols'' section.
BEFORE STARTING THE
ENGINE
5-6Starting and driving
ZX
Page 164 of 258
cWhenever working on or near a bat-
tery, always wear suitable eye pro-
tectors (for example, goggles or in-
dustrial safety spectacles) and
remove rings, metal bands, or any
other jewelry. Do not lean over the
battery when jump starting.
cDo not attempt to jump start a frozen
battery. It could explode and cause
serious injury.
cYour vehicle has an automatic en-
gine cooling fan. It could come on at
any time. Keep hands and other ob-
jects away from it.
Always follow the instructions below.
Failure to do so could result in damage
to the charging system and cause per-
sonal injury.
1. If the booster battery is in another ve-
hicle, position the two vehicles to bring
their batteries into close proximity to
each other.
Do not allow the two vehicles to
touch.
2. Apply the parking brake. Move the shift
selector lever to N (Neutral) (manual
transmission) or to P (Park) (automatic
transmission). Switch off all unncessaryelectrical systems (lights, heater, air con-
ditioner, etc.).
3. Remove vent caps on the battery (if so
equipped). Cover the battery with an old
cloth to reduce explosion hazard.
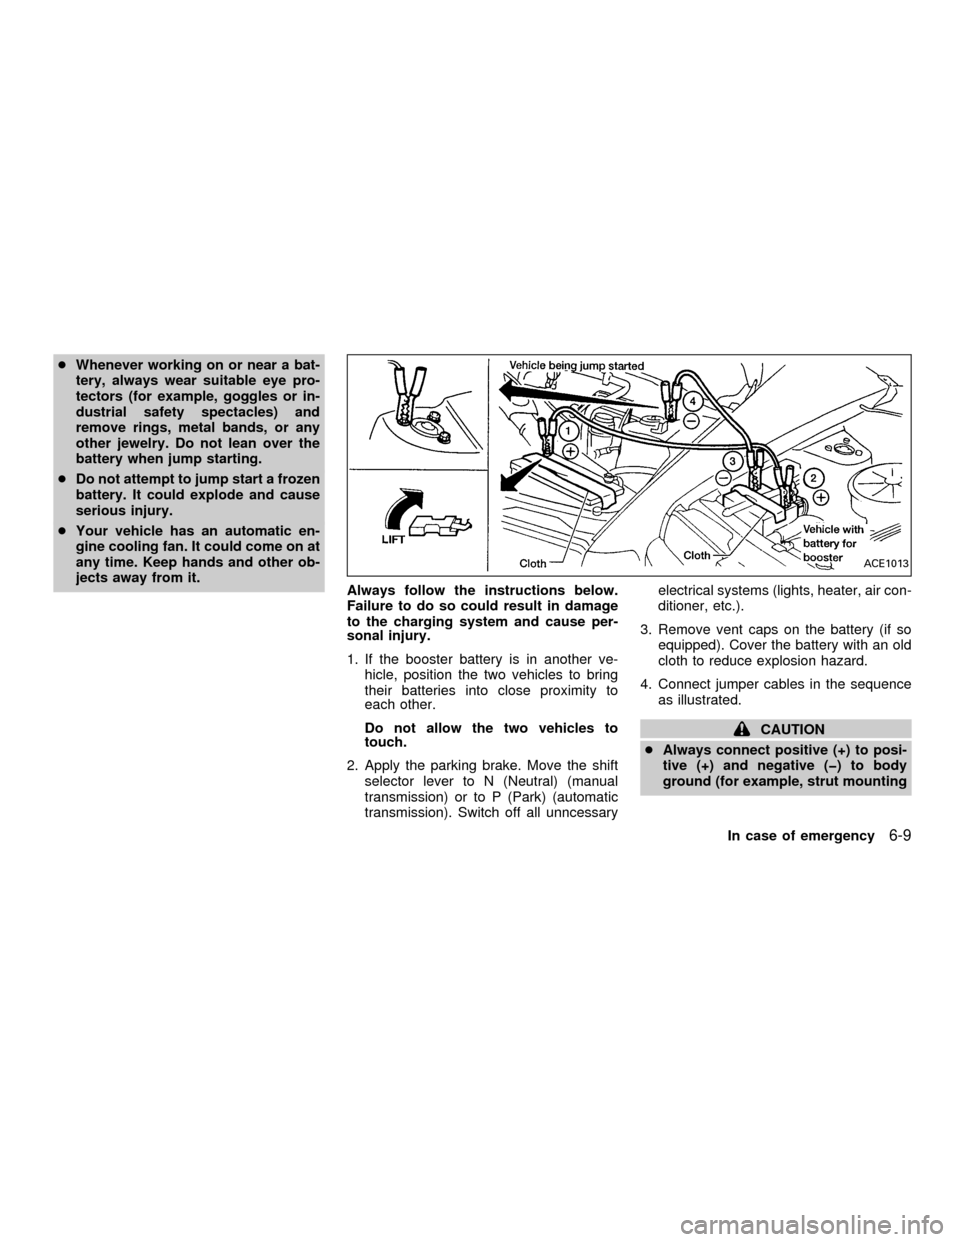
4. Connect jumper cables in the sequence
as illustrated.
CAUTION
cAlways connect positive (+) to posi-
tive (+) and negative (þ) to body
ground (for example, strut mounting
ACE1013
In case of emergency6-9
ZX
Page 177 of 258

8 Do-it-yourself
Maintenance precautions .......................................8-2
Engine compartment check locations ....................8-4
Engine cooling system ...........................................8-5
Checking engine coolant level ..........................8-5
Changing engine coolant ..................................8-6
Engine oil ...............................................................8-8
Checking engine oil level ..................................8-8
Changing engine oil ..........................................8-9
Changing engine oil filter.................................8-10
Automatic transmission fluid ................................8-11
Temperature conditions for checking ..............8-11
Power steering fluid..............................................8-12
Brake and clutch fluid...........................................8-12
Brake fluid........................................................8-12
Clutch fluid .......................................................8-13
Window washer fluid ............................................8-13
Battery ..................................................................8-14
Jump starting ...................................................8-15
Drive belts ............................................................8-15
Spark plugs ..........................................................8-16
Replacing spark plugs .....................................8-16
Air cleaner ............................................................8-17Windshield wiper blades ......................................8-18
Cleaning ..........................................................8-18
Replacing .........................................................8-18
Parking brake and brake pedal ............................8-19
Checking parking brake...................................8-19
Checking brake pedal .....................................8-19
Brake booster ..................................................8-20
Clutch pedal .........................................................8-21
Checking clutch pedal .....................................8-21
Fuses ....................................................................8-21
Engine compartment .......................................8-21
Passenger compartment .................................8-22
Multi-remote controller battery replacement ........8-23
Lights ....................................................................8-24
Headlights ........................................................8-24
Front turn signal lamp .....................................8-28
Front parking and cornering lamp ...................8-28
Front sidemarker lamp ....................................8-29
Fog lights .........................................................8-30
Exterior and interior lights ...............................8-31
Wheels and tires ..................................................8-35
Tire pressure ...................................................8-35
ZX
Page 200 of 258

Replace the battery in the multi-remote con-
troller as follows:
1. Open the lid using a coin.
2. Replace the battery with a new one.Recommended battery: Sanyo CR2025 or
equivalent.
3. Close the lid securely.
4. Press the
button, then thebutton
two or three times to check the multi-remotecontroller operation.
Each time the
button is pressed, the
hazard lights flash once.
If the battery is removed for any reason
other than replacement, perform step 4.
cAn improperly disposed battery can
hurt the environment. Always confirm
local regulations for battery disposal.
cThe multi-remote controller is water-
resistant; however, if it does get wet,
immediately wipe completely dry.
cThe operational range of the multi-
remote controller extends to approxi-
mately 33 ft (10 m) from the vehicle.
This range may vary with conditions.
FCC Notice:
Changes or modifications not expressly
approved by the manufacturer for com-
pliance could void the user's authority to
operate the equipment.
This device complies with part 15 of the
FCC Rules and RSS-210 of Industry
Canada.
APD1026
MULTI-REMOTE CONTROLLER
BATTERY REPLACEMENT
Do-it-yourself8-23
ZX