parking brake NISSAN ALTIMA 2001 L30 / 2.G Owners Manual
[x] Cancel search | Manufacturer: NISSAN, Model Year: 2001, Model line: ALTIMA, Model: NISSAN ALTIMA 2001 L30 / 2.GPages: 258, PDF Size: 2.09 MB
Page 51 of 258
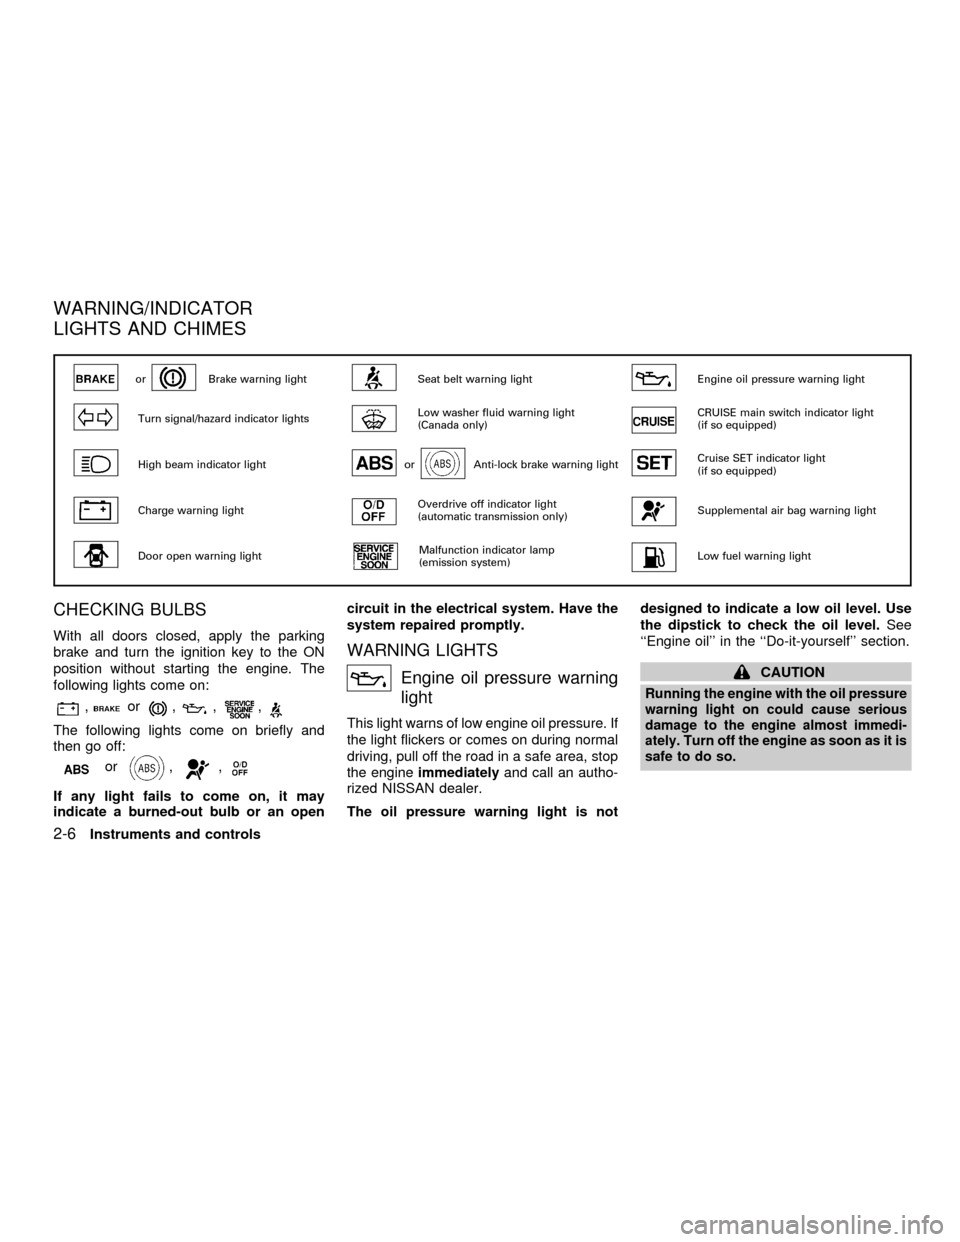
CHECKING BULBS
With all doors closed, apply the parking
brake and turn the ignition key to the ON
position without starting the engine. The
following lights come on:
,or,,,
The following lights come on briefly and
then go off:
or,,
If any light fails to come on, it may
indicate a burned-out bulb or an opencircuit in the electrical system. Have the
system repaired promptly.
WARNING LIGHTS
Engine oil pressure warning
light
This light warns of low engine oil pressure. If
the light flickers or comes on during normal
driving, pull off the road in a safe area, stop
the engineimmediatelyand call an autho-
rized NISSAN dealer.
The oil pressure warning light is notdesigned to indicate a low oil level. Use
the dipstick to check the oil level.See
``Engine oil'' in the ``Do-it-yourself'' section.
CAUTION
Running the engine with the oil pressure
warning light on could cause serious
damage to the engine almost immedi-
ately. Turn off the engine as soon as it is
safe to do so.
orBrake warning lightSeat belt warning lightEngine oil pressure warning light
Turn signal/hazard indicator lightsLow washer fluid warning light
(Canada only)CRUISE main switch indicator light
(if so equipped)
High beam indicator lightorAnti-lock brake warning lightCruise SET indicator light
(if so equipped)
Charge warning lightOverdrive off indicator light
(automatic transmission only)Supplemental air bag warning light
Door open warning lightMalfunction indicator lamp
(emission system)Low fuel warning light
WARNING/INDICATOR
LIGHTS AND CHIMES
2-6Instruments and controls
ZX
Page 52 of 258
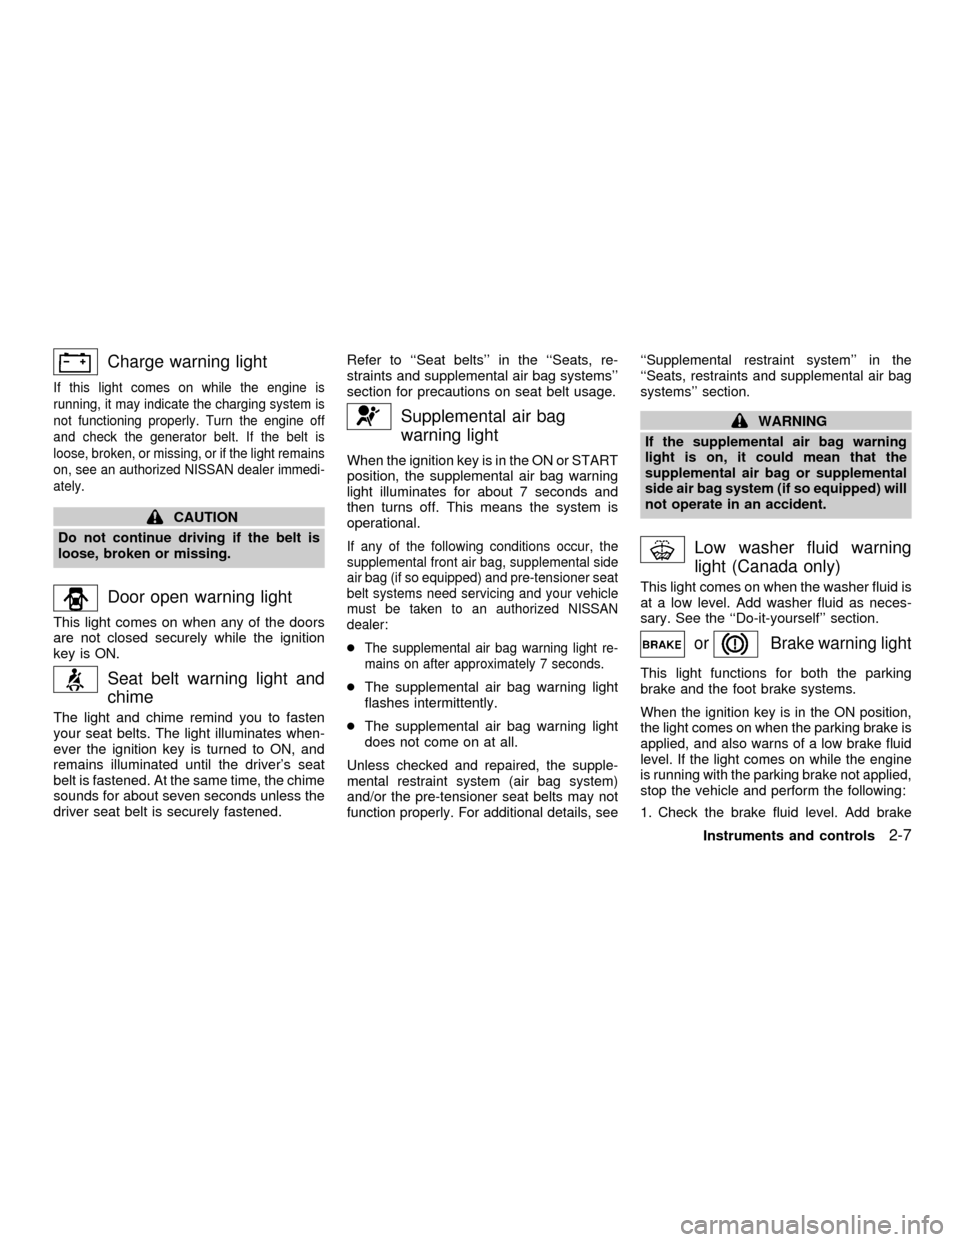
Charge warning light
If this light comes on while the engine is
running, it may indicate the charging system is
not functioning properly. Turn the engine off
and check the generator belt. If the belt is
loose, broken, or missing, or if the light remains
on, see an authorized NISSAN dealer immedi-
ately.
CAUTION
Do not continue driving if the belt is
loose, broken or missing.
Door open warning light
This light comes on when any of the doors
are not closed securely while the ignition
key is ON.
Seat belt warning light and
chime
The light and chime remind you to fasten
your seat belts. The light illuminates when-
ever the ignition key is turned to ON, and
remains illuminated until the driver's seat
belt is fastened. At the same time, the chime
sounds for about seven seconds unless the
driver seat belt is securely fastened.Refer to ``Seat belts'' in the ``Seats, re-
straints and supplemental air bag systems''
section for precautions on seat belt usage.
Supplemental air bag
warning light
When the ignition key is in the ON or START
position, the supplemental air bag warning
light illuminates for about 7 seconds and
then turns off. This means the system is
operational.
If any of the following conditions occur, the
supplemental front air bag, supplemental side
air bag (if so equipped) and pre-tensioner seat
belt systems need servicing and your vehicle
must be taken to an authorized NISSAN
dealer:
cThe supplemental air bag warning light re-
mains on after approximately 7 seconds.
cThe supplemental air bag warning light
flashes intermittently.
cThe supplemental air bag warning light
does not come on at all.
Unless checked and repaired, the supple-
mental restraint system (air bag system)
and/or the pre-tensioner seat belts may not
function properly. For additional details, see``Supplemental restraint system'' in the
``Seats, restraints and supplemental air bag
systems'' section.
WARNING
If the supplemental air bag warning
light is on, it could mean that the
supplemental air bag or supplemental
side air bag system (if so equipped) will
not operate in an accident.
Low washer fluid warning
light (Canada only)
This light comes on when the washer fluid is
at a low level. Add washer fluid as neces-
sary. See the ``Do-it-yourself'' section.
orBrake warning light
This light functions for both the parking
brake and the foot brake systems.
When the ignition key is in the ON position,
the light comes on when the parking brake is
applied, and also warns of a low brake fluid
level. If the light comes on while the engine
is running with the parking brake not applied,
stop the vehicle and perform the following:
1.Check the brake fluid level. Add brake
Instruments and controls2-7
ZX
Page 62 of 258
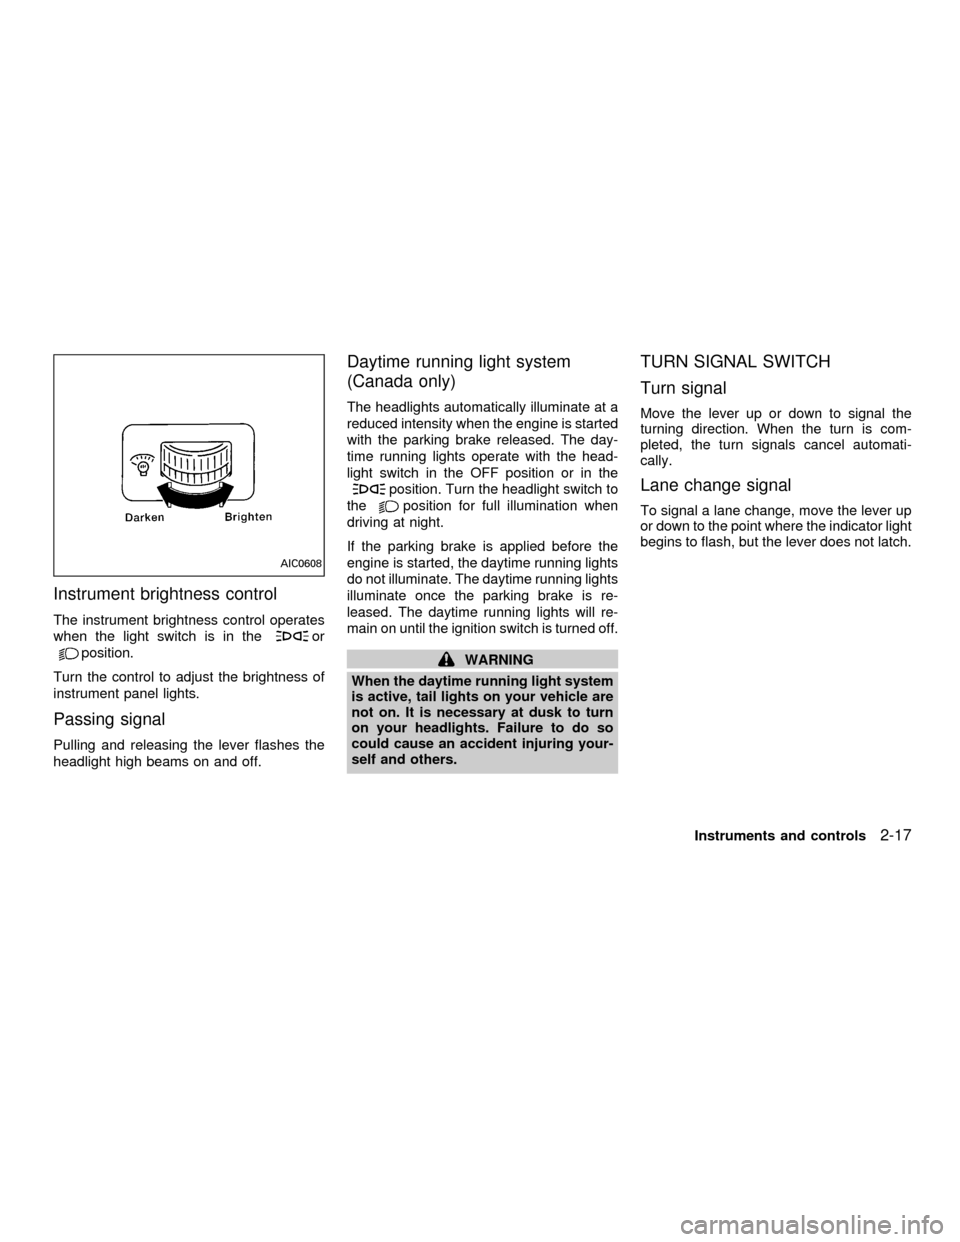
Instrument brightness control
The instrument brightness control operates
when the light switch is in the
or
position.
Turn the control to adjust the brightness of
instrument panel lights.
Passing signal
Pulling and releasing the lever flashes the
headlight high beams on and off.
Daytime running light system
(Canada only)
The headlights automatically illuminate at a
reduced intensity when the engine is started
with the parking brake released. The day-
time running lights operate with the head-
light switch in the OFF position or in the
position. Turn the headlight switch to
the
position for full illumination when
driving at night.
If the parking brake is applied before the
engine is started, the daytime running lights
do not illuminate. The daytime running lights
illuminate once the parking brake is re-
leased. The daytime running lights will re-
main on until the ignition switch is turned off.
WARNING
When the daytime running light system
is active, tail lights on your vehicle are
not on. It is necessary at dusk to turn
on your headlights. Failure to do so
could cause an accident injuring your-
self and others.
TURN SIGNAL SWITCH
Turn signal
Move the lever up or down to signal the
turning direction. When the turn is com-
pleted, the turn signals cancel automati-
cally.
Lane change signal
To signal a lane change, move the lever up
or down to the point where the indicator light
begins to flash, but the lever does not latch.
AIC0608
Instruments and controls2-17
ZX
Page 134 of 258

5 Starting and driving
Precautions when starting and driving ...................5-2
Exhaust gas (carbon monoxide) .......................5-2
Three-way catalyst ............................................5-2
Avoiding collision and rollover ...........................5-3
Drinking alcohol/drugs and driving ....................5-3
Ignition switch .........................................................5-4
Automatic transmission .....................................5-4
Manual transmission..........................................5-5
Key positions .....................................................5-5
Nissan vehicle immobilizer system
(NVIS) ................................................................5-6
Before starting the engine ......................................5-6
Starting the engine .................................................5-7
Driving the vehicle ..................................................5-7
Automatic transmission .....................................5-7
Manual transmission........................................5-11
Parking brake .......................................................5-12
Cruise control (if so equipped) .............................5-13
Precautions on cruise control ..........................5-13Cruise control operations ................................5-14
Break-in schedule ................................................5-15
Increasing fuel economy ......................................5-15
Parking/parking on hills ........................................5-16
Power steering .....................................................5-17
Brake system........................................................5-17
Braking precautions .........................................5-17
Anti-lock brake system (ABS)
(if so equipped)................................................5-18
Cold weather driving ............................................5-19
Freeing a frozen door lock ..............................5-19
Anti-freeze .......................................................5-19
Battery .............................................................5-19
Draining of coolant water ................................5-19
Tire equipment.................................................5-20
Special winter equipment ................................5-20
Driving on snow or ice.....................................5-20
Engine block heater (if so equipped) ..............5-21
ZX
Page 140 of 258
1. Apply the parking brake.
2.Automatic transmission:
Move the shift selector lever to P (Park)
or N (Neutral). (P is recommended.)
The shift selector lever cannot be
moved out of P (Park) and into any of
the other gear positions if the ignition
key is turned to OFF or if the key is
removed.
The starter is designed not to operate
if the shift selector lever is in any of
the driving positions.
Manual transmission:
Move the shift lever to N (Neutral), and
depress the clutch pedal to the floor while
cranking the engine.
The starter is designed not to operate
unless the clutch pedal is fully de-
pressed.
3. Crank the enginewith your foot off the
accelerator pedalby turning the ignition
key to START. Release the key when the
engine starts. If the engine starts, but
fails to run, repeat the above procedure.
Ð If the engine is very hard to start in
extremely cold or hot weather, de-
press and hold the accelerator pedalto help start the engine.
Ð In the summer, when restarting the
engine within 30 minutes after it has
been stopped, keep the accelerator
pedal fully depressed while starting.
CAUTION
Do not operate the starter for more than
15 seconds at a time. If the engine does
not
start, turn the key off and wait 10
seconds before cranking again, other-
wise the starter could be damaged.
4.Warm-up
Allow the engine to idle for at least 30
seconds after starting. Drive at moderate
speed for a short distance first, especially
in cold weather.
AUTOMATIC TRANSMISSION
WARNING
cDo not depress the accelerator pedal
while shifting from P (Park) or N
(Neutral) to R (Reverse), D (Drive), 2
or 1. Always depress the brake pedal
until shifting is completed. Failure to
do so could cause you to lose con-
trol and have an accident.
cCold engine idle speed is high, so
use caution when shifting into a for-
ward or reverse gear before the en-
gine has warmed up.
cNever shift to P (Park) or R (Reverse)
while the vehicle is moving. This
could cause an accident.
CAUTION
c
When stopping the vehicle on an
uphill grade, do not hold the vehicle
by depressing the accelerator pedal.
The foot brake should be used for
this purpose.
cDo not downshift abruptly on slip-
pery roads. This may cause a loss of
control.
STARTING THE ENGINE DRIVING THE VEHICLE
Starting and driving5-7
ZX
Page 142 of 258

Shifting
Push the button to shift into P (Park), R
(Reverse) or from D (Drive) to 2. All other
positions can be selected without pushing
the button.
P (Park):
Use this position when the vehicle is parked
or when starting the engine. Always be sure
the vehicle is at a complete stop. For maxi-
mum safety, depress the brake pedal, then
push in the selector lever button and move
the shift selector lever to the P (Park) posi-
tion. Apply the parking brake. When parkingon a hill, apply the parking brake first, then
move the shift selector lever into the P
(Park) position.
Shifting from P (Park)
If the ignition switch is in the ON position
and the foot brake pedal is depressed, but
the shift selector lever still cannot be moved
out of P (Park), follow these instructions.
1. Turn the ignition key to the lock position
and remove the key.
2. Apply the parking brake.3. Insert the key and turn it to the ACC
position.
4. Depress the foot brake pedal, and move
the selector lever to N (Neutral).
5. Start the engine.
These instructions for starting the vehicle in
N (Neutral) should only be used until service
can be obtained at an authorized NISSAN
dealership.
R (Reverse)
Use this position to back up. Always be sure
the vehicle is at a complete stop before
moving the shift selector lever to the R
(Reverse) position. Check to ensure the
area behind the vehicle is clear. With the
brake pedal depressed, push in the selector
lever button and move the shift selector
lever to the R (Reverse) position.
N (Neutral)
Neither forward nor reverse gear is en-
gaged. The engine can be started in this
position. You may shift to N (Neutral) and
restart a stalled engine while the vehicle is
moving.
ASD0510
Starting and driving5-9
ZX
Page 145 of 258

Suggested up-shift speeds
Shown below are suggested vehicle speeds
for shifting into a higher gear. These sug-
gestions relate to fuel economy and vehicle
performance. Actual shift-up speeds will
vary according to road conditions, the
weather and individual driving habits.
For normal acceleration in low altitude ar-
eas (less than 4,000 ft [1,219 m]):
GEAR
CHANGEACCEL
shift point
MPH (km/h)CRUISE
shift point
MPH (km/h)
1st to 2nd 15 (24) 15 (24)
2nd to 3rd 25 (40) 18 (29)
3rd to 4th 36 (58) 30 (48)
4th to 5th 40 (64) 39 (63)
For quick acceleration in low altitude areas
and high altitude areas (over 4,000 ft [1,219
m]):
GEAR CHANGE MPH (km/h)
1st to 2nd 15 (24)
2nd to 3rd 25 (40)
3rd to 4th 40 (64)
4th to 5th 45 (72)
Suggested maximum speed in each
gear
Downshift to a lower gear if the engine is not
running smoothly, or if you need to accelerate.
Do not exceed the maximum suggested
speed (shown below) in any gear. For level
road driving, use the highest gear sug-
gested for that speed. Always observe
posted speed limits, and drive according to
the road conditions, which will ensure safe
operation. Do not over-rev the engine when
shifting to a lower gear as it may cause
engine damage or loss of vehicle control.
GEAR MPH (km/h)
1st 30 (48)
2nd 60 (96)
3rd 90 (144)
4th þ
5th þTo engage:pull the lever up.
To release:
1. Firmly apply foot brake.
2.Manual transmission models:
Place the shift selector lever in the N
(neutral) position.
Automatic transmission models:
Move the shift selector lever to the P
(park) position.
3. While pulling up on the parking brake
lever slightly, push the button and lower
completely.
ASD1001
PARKING BRAKE
5-12Starting and driving
ZX
Page 146 of 258
4. Before driving, be sure the brake warning
light goes out.
WARNING
cBe sure the parking brake is fully
released before driving. Failure to do
so can cause brake failure and lead
to an accident.
cDo not release the parking brake
from outside the vehicle.
cDo not use the gear shift in place of
the parking brake. When parking, be
sure the parking brake is fully en-
gaged.
c
Do not leave children unattended in a
vehicle. They could release the park-
ing brake and cause an accident.PRECAUTIONS ON CRUISE
CONTROL
cIf the cruise control system malfunctions,
it cancels automatically. The SET indica-
tor light in the instrument panel then
blinks to warn the driver.
cIf the SET indicator light blinks, turn the
cruise control main switch off and have
the system checked by an authorized
NISSAN dealer.
cThe SET indicator light may blink when
the cruise control main switch is turned
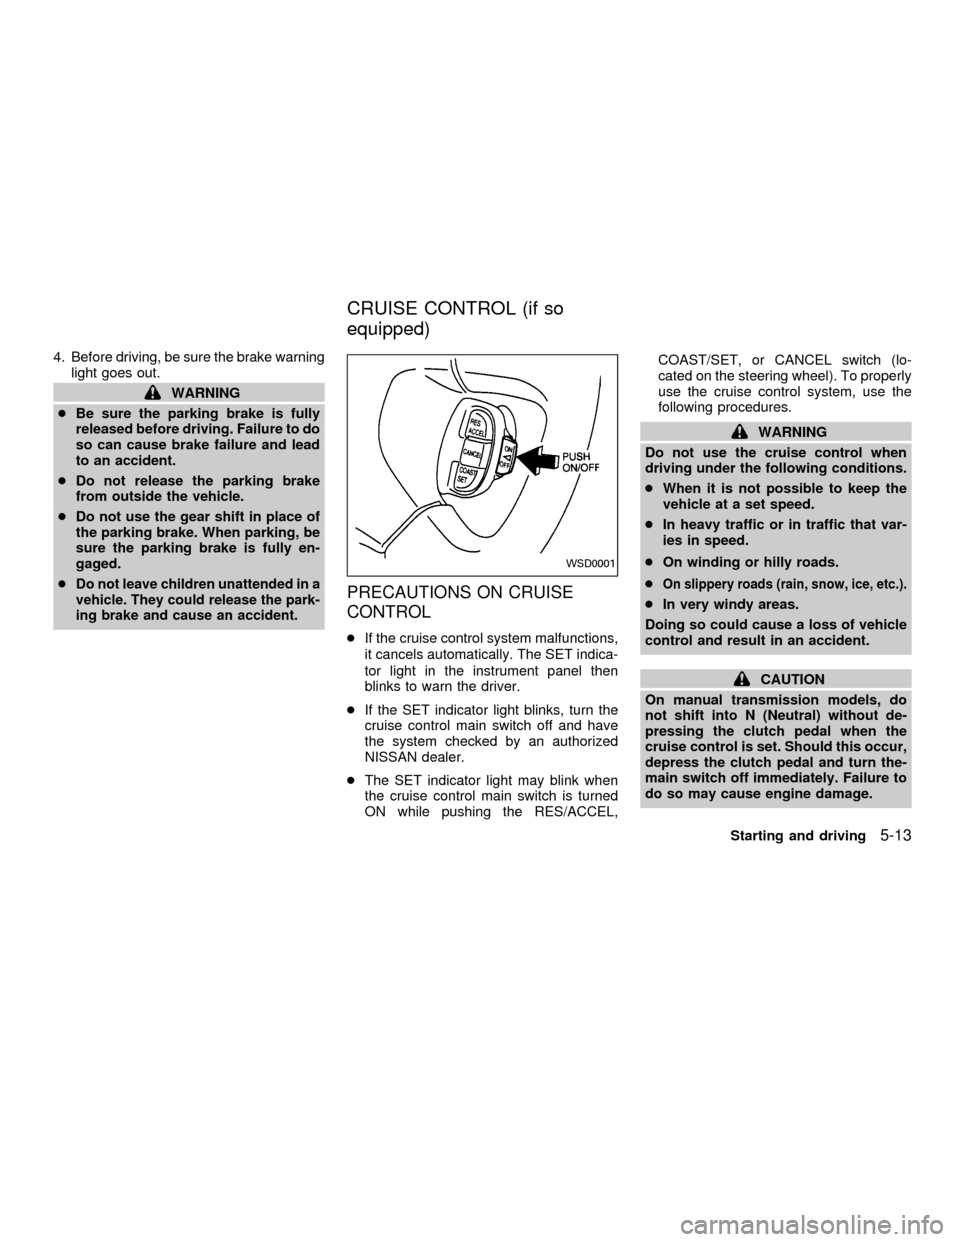
ON while pushing the RES/ACCEL,COAST/SET, or CANCEL switch (lo-
cated on the steering wheel). To properly
use the cruise control system, use the
following procedures.
WARNING
Do not use the cruise control when
driving under the following conditions.
cWhen it is not possible to keep the
vehicle at a set speed.
cIn heavy traffic or in traffic that var-
ies in speed.
cOn winding or hilly roads.
c
On slippery roads (rain, snow, ice, etc.).
cIn very windy areas.
Doing so could cause a loss of vehicle
control and result in an accident.
CAUTION
On manual transmission models, do
not shift into N (Neutral) without de-
pressing the clutch pedal when the
cruise control is set. Should this occur,
depress the clutch pedal and turn the-
main switch off immediately. Failure to
do so may cause engine damage.
WSD0001
CRUISE CONTROL (if so
equipped)
Starting and driving5-13
ZX
Page 149 of 258
WARNING
Do not park the vehicle over flammable
materials such as dry grass, waste pa-
per or rags. They may ignite and cause
a fire.
1. Firmly apply the parking brake.
2.Manual transmission models:
Place the shift lever in the R (Reverse)
position. When parking on an uphill
grade, place the shift lever in 1 (First)
gear.Automatic transmission models:
Move the selector lever to the P (Park)
position.
WARNING
cSafe parking procedures require that
both the parking brake be set and
the transmission placed into P (Park)
for automatic transmission models
or in an appropriate gear for manual
transmission models. Failure to do
so could cause the vehicle to move
unexpectedly or roll away and resultin an accident. Make sure the shift
lever has been pushed as far forward
as it can go and cannot be moved
without depressing the button at the
end of the lever.
cNever leave the engine running while
the vehicle is unattended.
cDo not leave children unattended in-
side the vehicle. They could un-
knowingly activate switches or con-
trols. Unattended children could
become involved in serious acci-
dents.
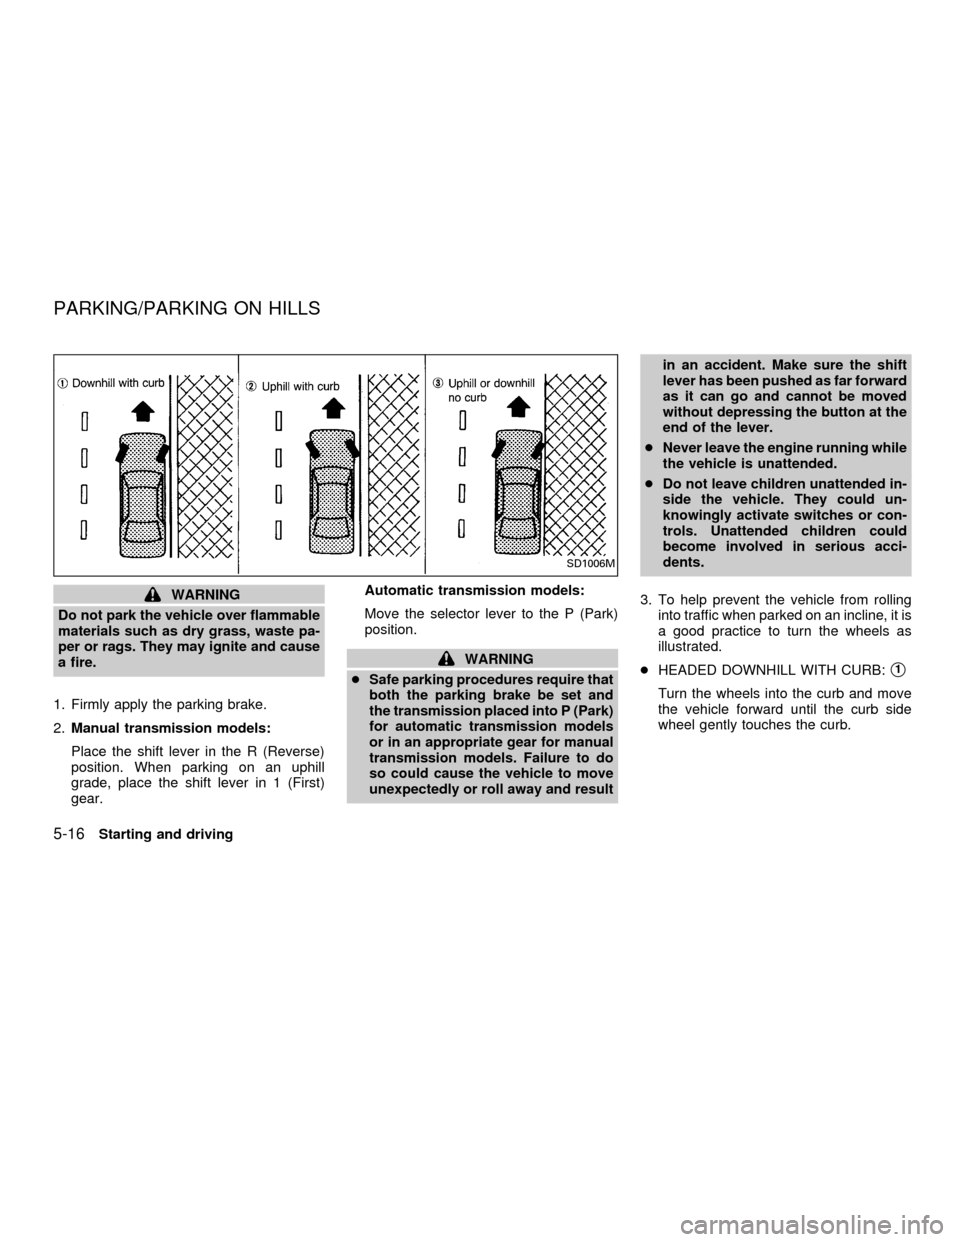
3. To help prevent the vehicle from rolling
into traffic when parked on an incline, it is
a good practice to turn the wheels as
illustrated.
cHEADED DOWNHILL WITH CURB:s1
Turn the wheels into the curb and move
the vehicle forward until the curb side
wheel gently touches the curb.
SD1006M
PARKING/PARKING ON HILLS
5-16Starting and driving
ZX
Page 157 of 258
CHANGING A FLAT TIRE
If you have a flat tire, follow the instructions
below:
Stopping the vehicle
1. Safely move the vehicle off of the road
and away from traffic.
2. Turn on the hazard warning flashers.
3. Park on a level surface and apply the
parking brake. Shift the manual transmis-
sion into R (Reverse), or the automatic
transmission into P (Park).
4. Turn off the engine.
5. Raise the hood to warn other traffic, and
to signal professional road assistance
personnel that you need assistance.
6. Have all passengers get out of the ve-
hicle and stand in a safe place, away
from traffic and clear of the vehicle.
WARNING
cMake sure the parking brake is se-
curely applied and the manual trans-
mission is shifted into R (Reverse),
or the automatic transmission into P
(Park).
cNever change tires when the vehicle
is on a slope, ice or slippery areas.
This is hazardous.
cNever change tires if oncoming traf-
fic is close to your vehicle. Wait for
professional road assistance.
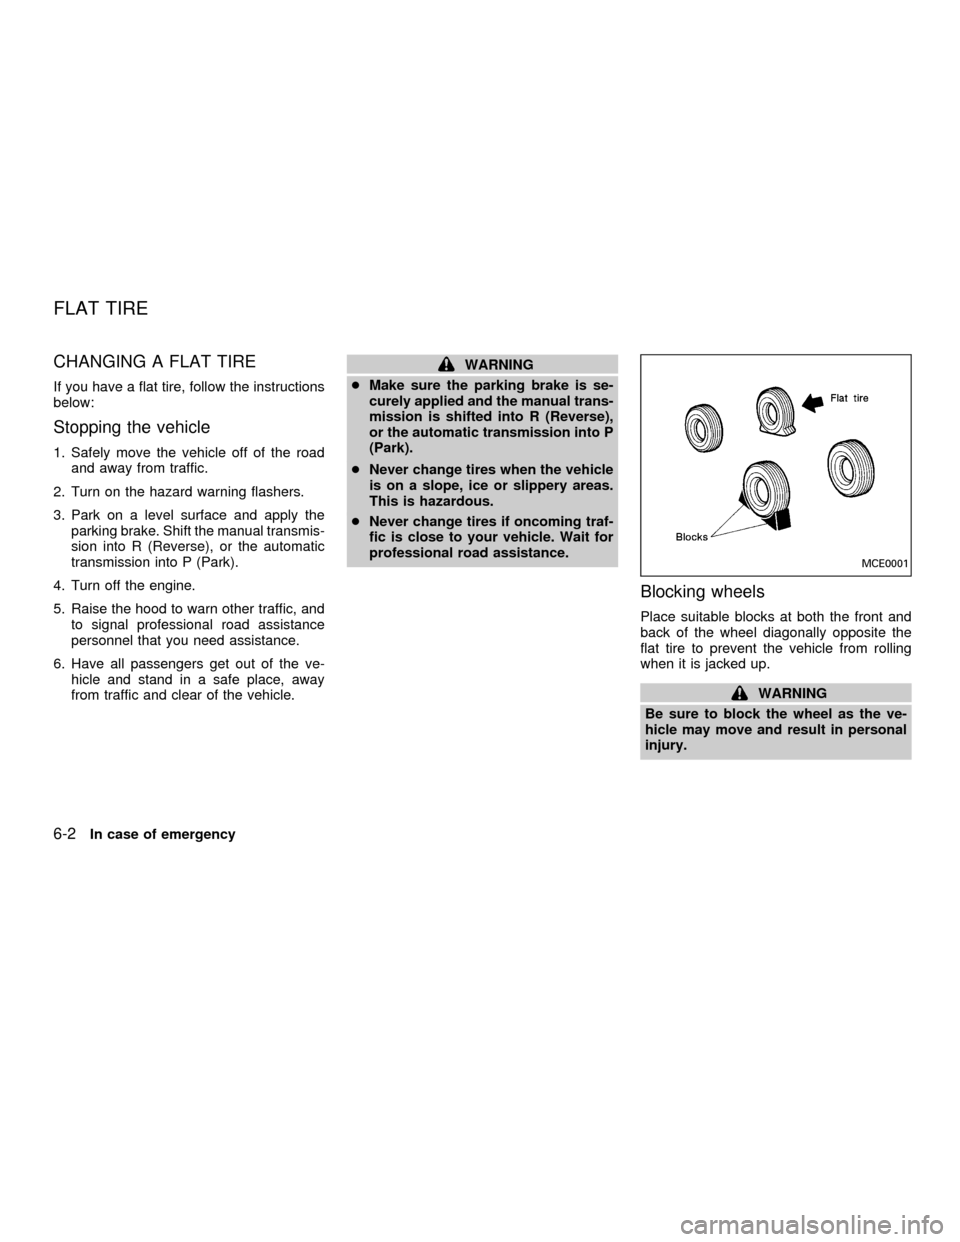
Blocking wheels
Place suitable blocks at both the front and
back of the wheel diagonally opposite the
flat tire to prevent the vehicle from rolling
when it is jacked up.
WARNING
Be sure to block the wheel as the ve-
hicle may move and result in personal
injury.
MCE0001
FLAT TIRE
6-2In case of emergency
ZX