clock NISSAN ALTIMA 2005 L31 / 3.G Owners Manual
[x] Cancel search | Manufacturer: NISSAN, Model Year: 2005, Model line: ALTIMA, Model: NISSAN ALTIMA 2005 L31 / 3.GPages: 304, PDF Size: 4.91 MB
Page 47 of 304
6. Check that the retractor is in the automaticlocking mode by trying to pull more seat belt
out of the retractor. If you cannot pull any
more belt webbing out of the retractor, the
retractor is in the automatic locking mode.
7. Check to make sure the child restraint is properly secured prior to each use. If the
seat belt is not locked, repeat steps 3
through 6.
8. Turn the ignition to the ON position. The passenger air bag status light should say
“PASS AIR BAG OFF”
oror. If this light is not illuminated it may
indicate a malfunction. Move the child re-
straint to another seating position.
Have the system checked by a NISSAN
dealer.
After the child restraint is removed and the seat
belt is fully retracted, the automatic locking mode
(child restraint mode) is canceled.
PRECAUTIONS ON BOOSTER
SEATS
WARNING
c Infants and small children should al-
ways be placed in an appropriate child
restraint while riding in the vehicle.
Failure to use a child restraint or
booster seat can result in serious injury
or death.
c Infants and small children should never
be carried on your lap. It is not possible
for even the strongest adult to resist the
forces of a severe accident. The child
could be crushed between the adult and
parts of the vehicle. Also, do not put the
same seat belt around both your child
and yourself.
c NISSAN recommends that the booster
seat be installed in the rear seat. Ac-
cording to accident statistics, children
are safer when properly restrained in
the rear seat than in the front seat. c
A booster seat must only be installed in
a seating position that has a
lap/shoulder belt. Failure to use a
three-point type seat belt with a
booster seat can result in a serious in-
jury in sudden stop or collision.
c An improperly installed booster seat
could lead to serious injury or death in
an accident.
BOOSTER SEATS
Safety—Seats, seat belts and supplemental restraint system1-29
ZREVIEW COPYÐ2005 Altima (l30)
Owners ManualÐUSA_English (nna)
08/23/04Ðarosenma
X
Page 123 of 304
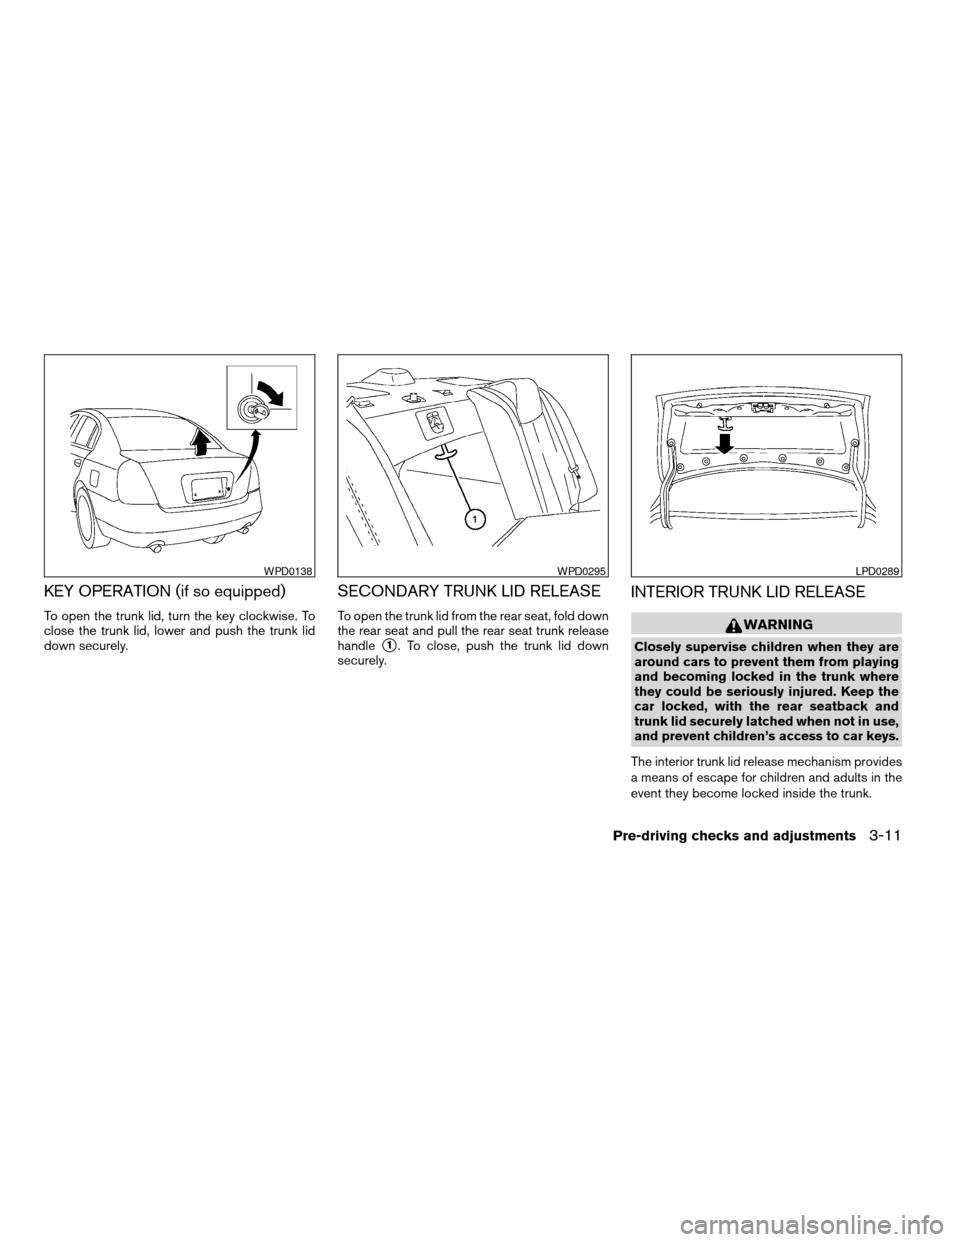
KEY OPERATION (if so equipped)
To open the trunk lid, turn the key clockwise. To
close the trunk lid, lower and push the trunk lid
down securely.
SECONDARY TRUNK LID RELEASE
To open the trunk lid from the rear seat, fold down
the rear seat and pull the rear seat trunk release
handle
s1. To close, push the trunk lid down
securely.
INTERIOR TRUNK LID RELEASE
WARNING
Closely supervise children when they are
around cars to prevent them from playing
and becoming locked in the trunk where
they could be seriously injured. Keep the
car locked, with the rear seatback and
trunk lid securely latched when not in use,
and prevent children’s access to car keys.
The interior trunk lid release mechanism provides
a means of escape for children and adults in the
event they become locked inside the trunk.
WPD0138WPD0295LPD0289
Pre-driving checks and adjustments3-11
ZREVIEW COPYÐ2005 Altima (l30)
Owners ManualÐUSA_English (nna)
06/28/04Ðtbrooks
X
Page 124 of 304
To open the trunk from the inside, pull the illumi-
nated release handle until the lock releases and
push up on the trunk lid. The release handle is
made of a material that glows in the dark after a
brief exposure to ambient light.
The handle is located inside the trunk compart-
ment on the interior of the trunk lid.
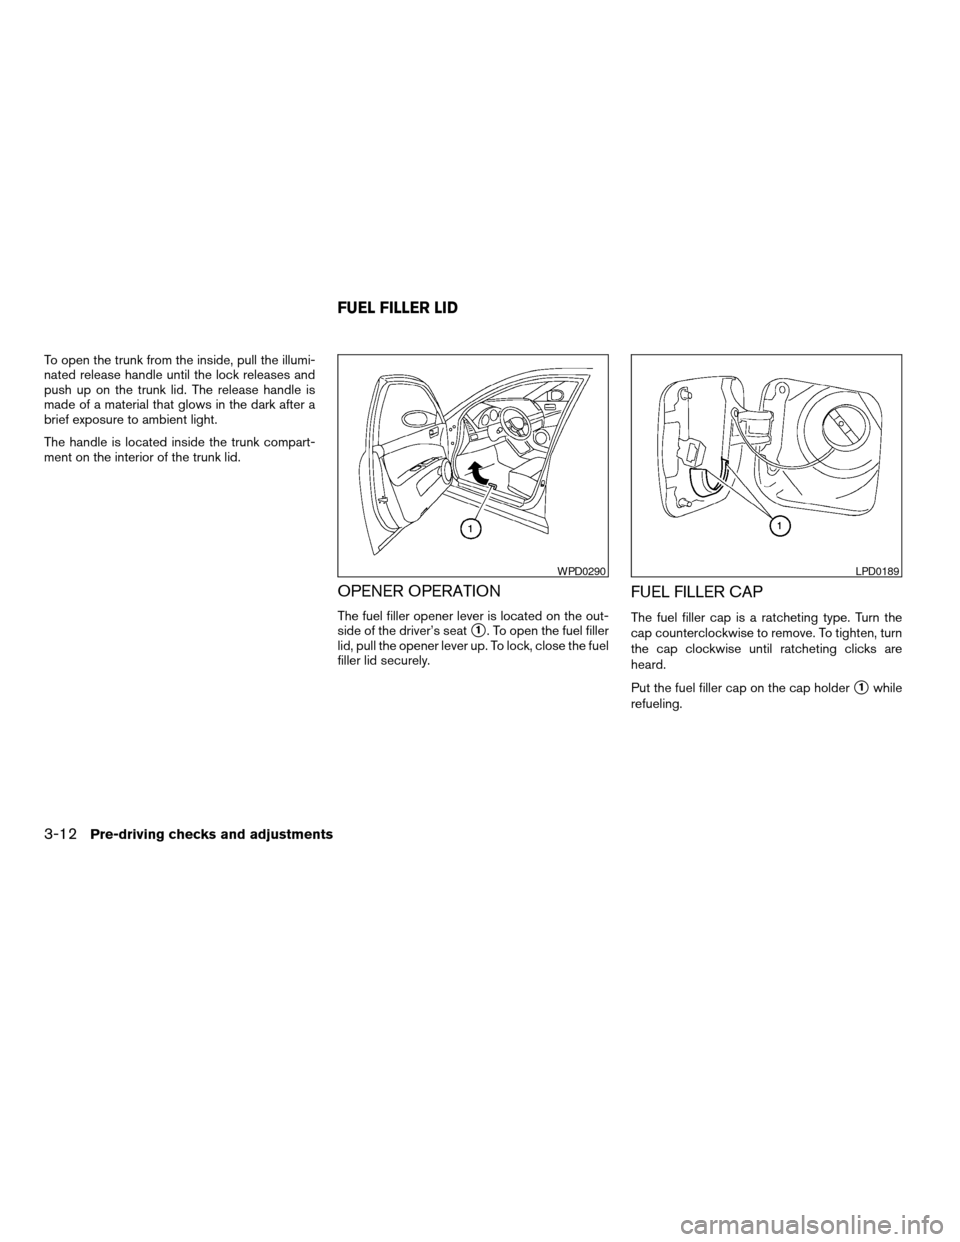
OPENER OPERATION
The fuel filler opener lever is located on the out-
side of the driver’s seat
s1. To open the fuel filler
lid, pull the opener lever up. To lock, close the fuel
filler lid securely.
FUEL FILLER CAP
The fuel filler cap is a ratcheting type. Turn the
cap counterclockwise to remove. To tighten, turn
the cap clockwise until ratcheting clicks are
heard.
Put the fuel filler cap on the cap holder
s1while
refueling.
WPD0290LPD0189
FUEL FILLER LID
3-12Pre-driving checks and adjustments
ZREVIEW COPYÐ2005 Altima (l30)
Owners ManualÐUSA_English (nna)
06/28/04Ðtbrooks
X
Page 134 of 304
The “MAINTENANCE NOTICE” screen displays
each time the key is turned ON until one of the
following conditions are met:c “RESET” is selected.
c “Display Maintenance and Notification” is
set OFF.
c the maintenance interval is set again.
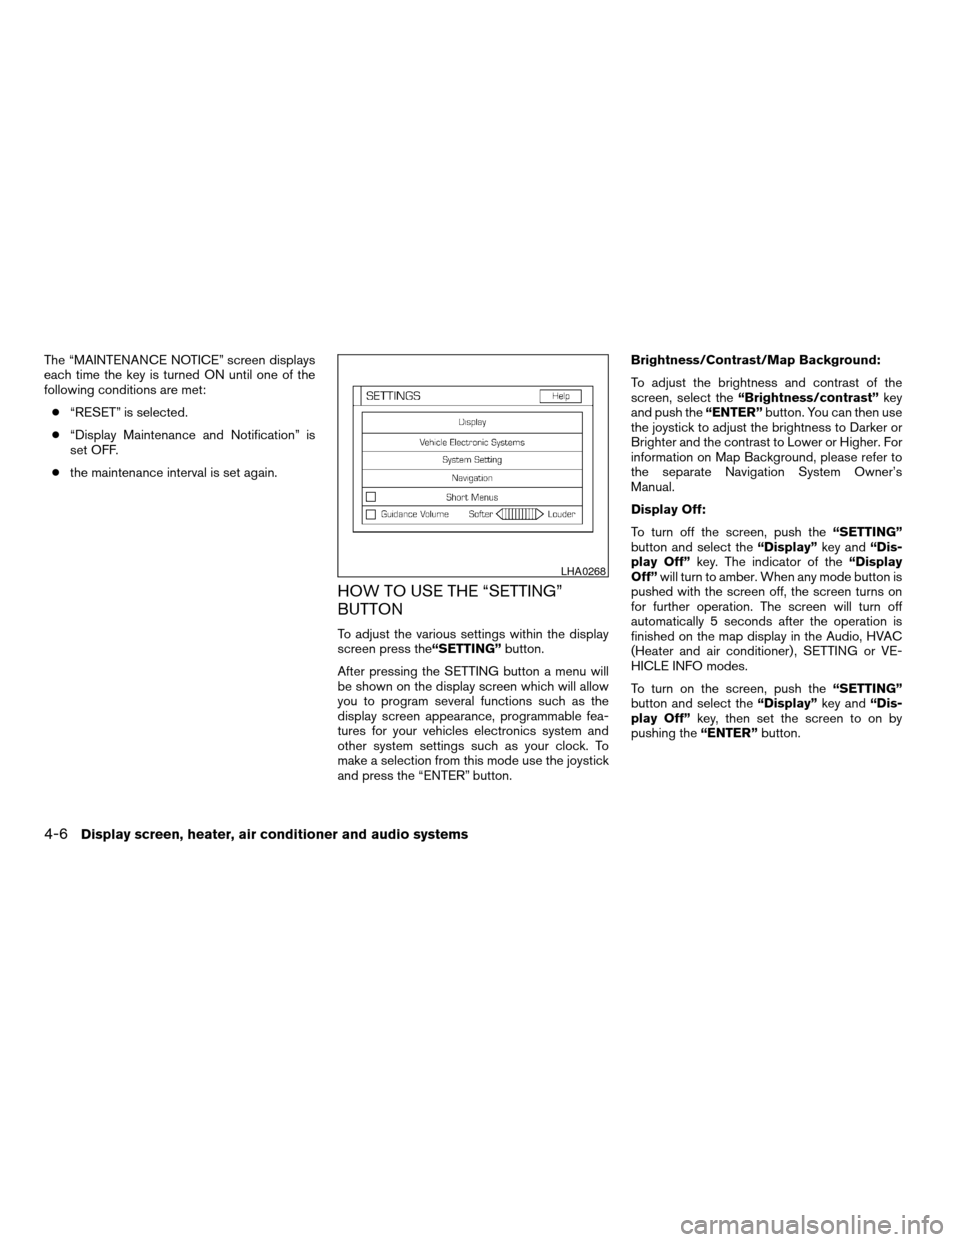
HOW TO USE THE “SETTING”
BUTTON
To adjust the various settings within the display
screen press the “SETTING”button.
After pressing the SETTING button a menu will
be shown on the display screen which will allow
you to program several functions such as the
display screen appearance, programmable fea-
tures for your vehicles electronics system and
other system settings such as your clock. To
make a selection from this mode use the joystick
and press the “ENTER” button. Brightness/Contrast/Map Background:
To adjust the brightness and contrast of the
screen, select the
“Brightness/contrast” key
and push the “ENTER”button. You can then use
the joystick to adjust the brightness to Darker or
Brighter and the contrast to Lower or Higher. For
information on Map Background, please refer to
the separate Navigation System Owner’s
Manual.
Display Off:
To turn off the screen, push the “SETTING”
button and select the “Display”key and“Dis-
play Off” key. The indicator of the “Display
Off” will turn to amber. When any mode button is
pushed with the screen off, the screen turns on
for further operation. The screen will turn off
automatically 5 seconds after the operation is
finished on the map display in the Audio, HVAC
(Heater and air conditioner) , SETTING or VE-
HICLE INFO modes.
To turn on the screen, push the “SETTING”
button and select the “Display”key and“Dis-
play Off” key, then set the screen to on by
pushing the “ENTER”button.
LHA0268
4-6Display screen, heater, air conditioner and audio systems
ZREVIEW COPYÐ2005 Altima (l30)
Owners ManualÐUSA_English (nna)
07/09/04Ðbetty
X
Page 136 of 304
Auto re-lock time:
This key allows you to set the length of time
before doors auto re-lock.
Sensitivity of automatic headlights:
This key allows you to set the sensitivity of the
automatic headlights:c Lower- less sensitive, automatic headlights
will take longer to come on when the head-
light sensor senses less ambient light.
c Higher- more sensitive, automatic head-
lights will come on quicker when the head-
light sensor senses less ambient light.
Automatic headlights off delay:
This key allows you to set the length of time
before the automatic headlights turn off after
exiting the vehicle.
Speed dependent wiper:
This key allows you to turn on or turn off the
driving speed dependent intermittent wiper func-
tion.
Return all settings to default:
When this key is selected and turned on using
the “ENTER” button, all settings made by VE-
HICLE ELECTRONICS will return to the default
settings.
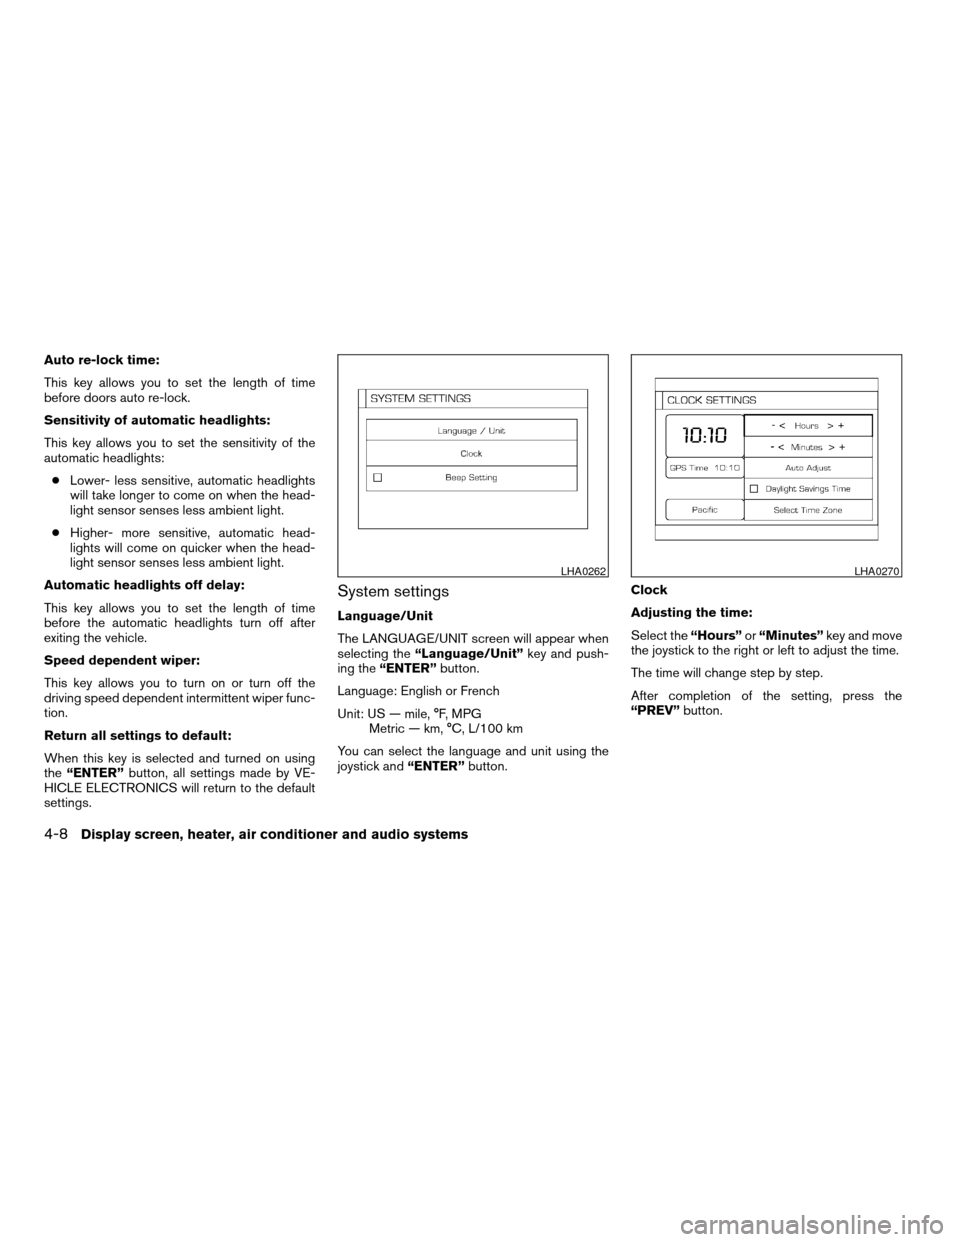
System settings
Language/Unit
The LANGUAGE/UNIT screen will appear when
selecting the “Language/Unit” key and push-
ing the “ENTER” button.
Language: English or French
Unit: US — mile, °F, MPG Metric — km, °C, L/100 km
You can select the language and unit using the
joystick and “ENTER”button. Clock
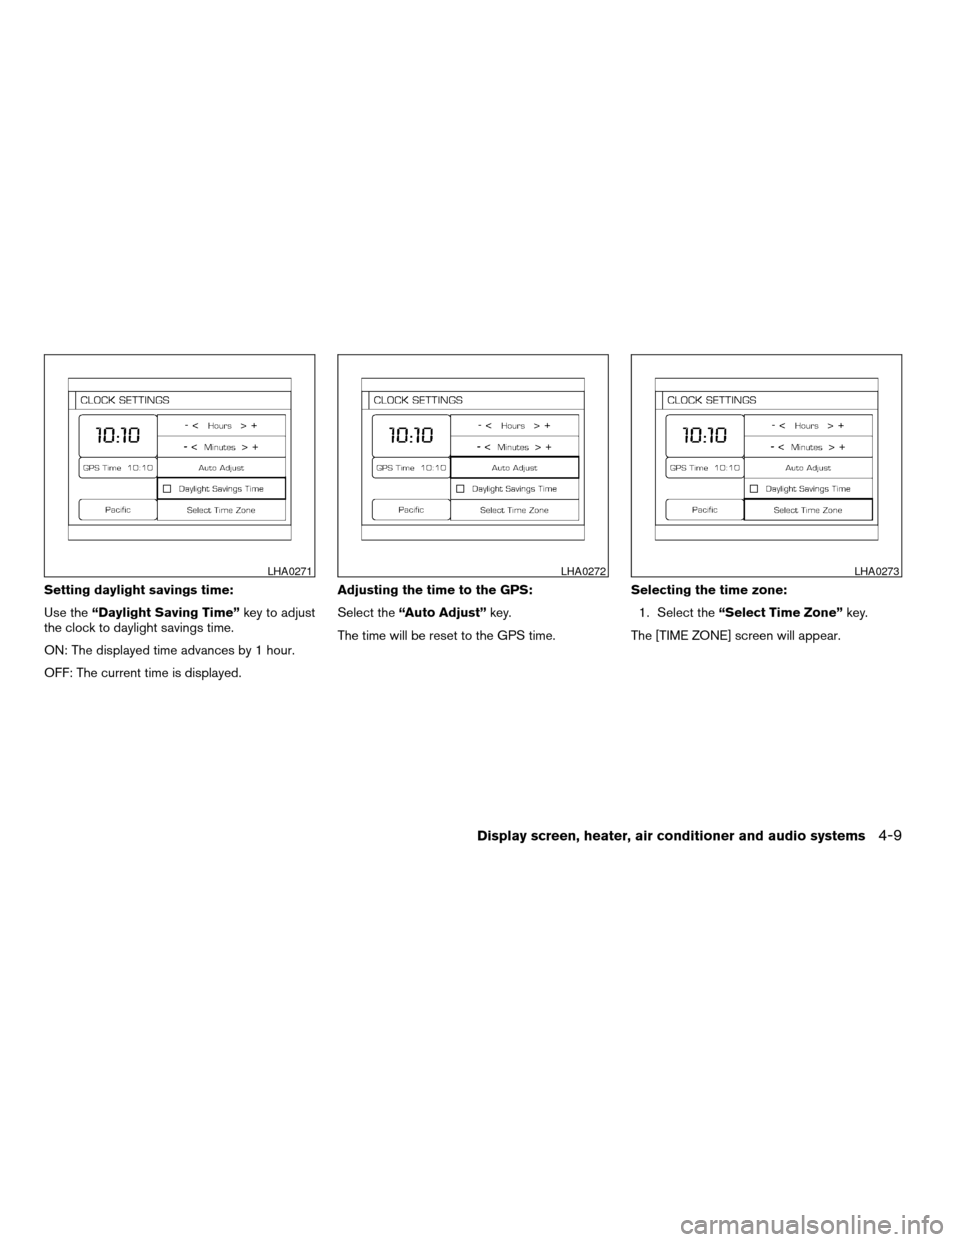
Adjusting the time:
Select the
“Hours”or“Minutes” key and move
the joystick to the right or left to adjust the time.
The time will change step by step.
After completion of the setting, press the
“PREV” button.
LHA0262LHA0270
4-8Display screen, heater, air conditioner and audio systems
ZREVIEW COPYÐ2005 Altima (l30)
Owners ManualÐUSA_English (nna)
07/09/04Ðdebbie
X
Page 137 of 304
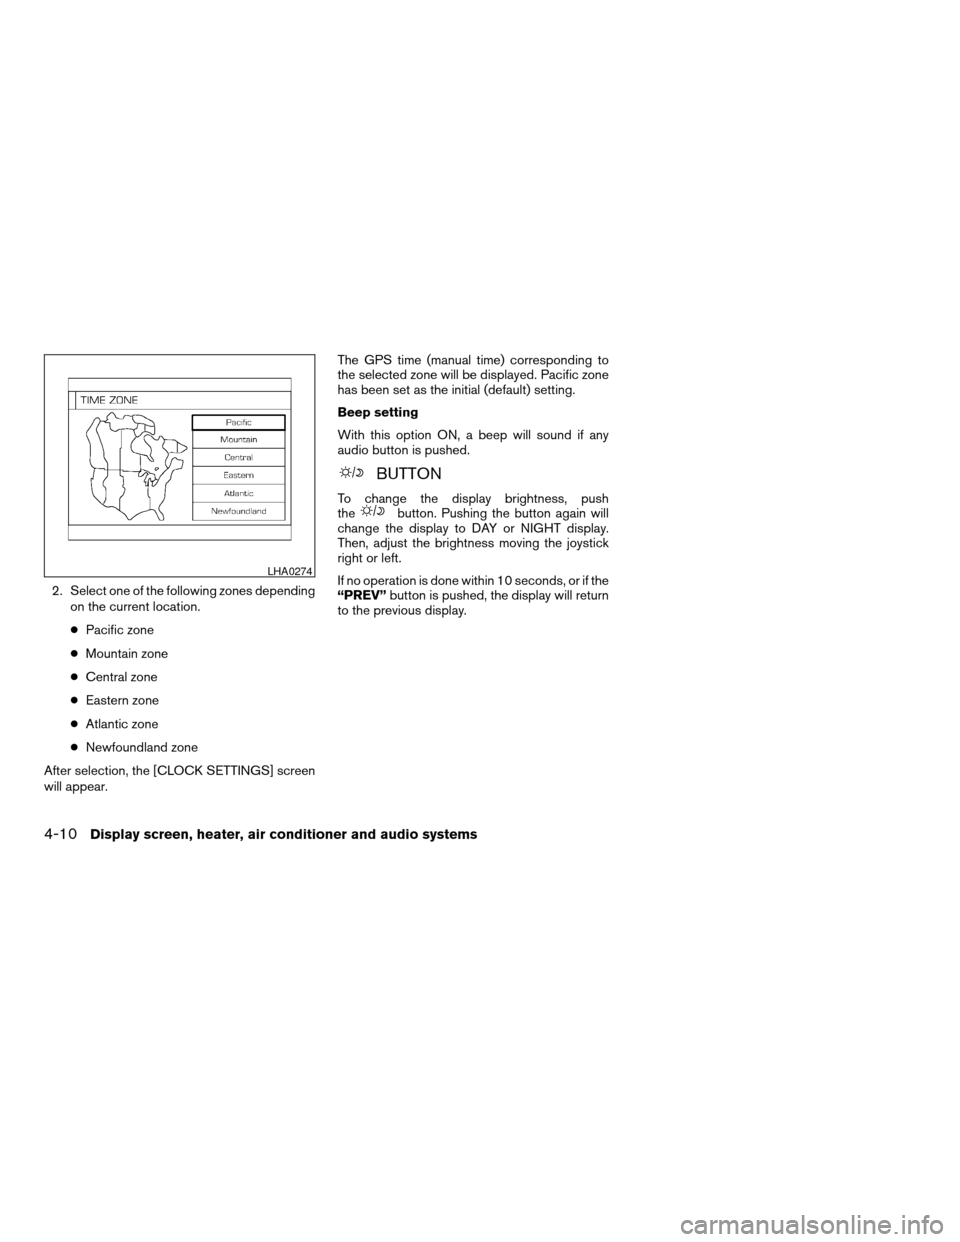
Setting daylight savings time:
Use the“Daylight Saving Time” key to adjust
the clock to daylight savings time.
ON: The displayed time advances by 1 hour.
OFF: The current time is displayed. Adjusting the time to the GPS:
Select the
“Auto Adjust” key.
The time will be reset to the GPS time. Selecting the time zone:
1. Select the “Select Time Zone” key.
The [TIME ZONE] screen will appear.
LHA0271LHA0272LHA0273
Display screen, heater, air conditioner and audio systems4-9
ZREVIEW COPYÐ2005 Altima (l30)
Owners ManualÐUSA_English (nna)
07/09/04Ðdebbie
X
Page 138 of 304
2. Select one of the following zones dependingon the current location.
c Pacific zone
c Mountain zone
c Central zone
c Eastern zone
c Atlantic zone
c Newfoundland zone
After selection, the [CLOCK SETTINGS] screen
will appear. The GPS time (manual time) corresponding to
the selected zone will be displayed. Pacific zone
has been set as the initial (default) setting.
Beep setting
With this option ON, a beep will sound if any
audio button is pushed.
BUTTON
To change the display brightness, push
thebutton. Pushing the button again will
change the display to DAY or NIGHT display.
Then, adjust the brightness moving the joystick
right or left.
If no operation is done within 10 seconds, or if the
“PREV” button is pushed, the display will return
to the previous display.
LHA0274
4-10Display screen, heater, air conditioner and audio systems
ZREVIEW COPYÐ2005 Altima (l30)
Owners ManualÐUSA_English (nna)
07/09/04Ðdebbie
X
Page 154 of 304
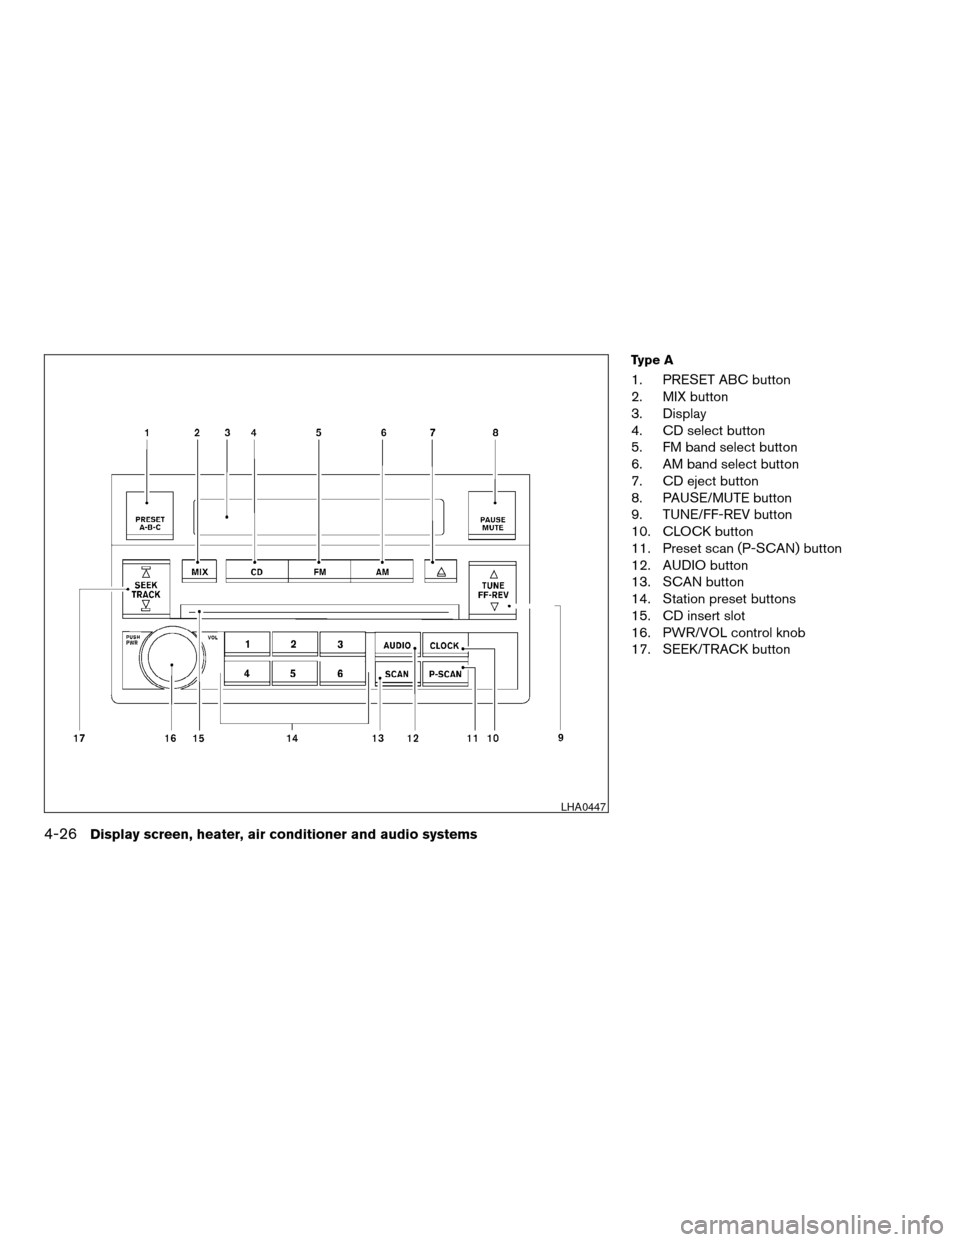
Type A
1. PRESET ABC button
2. MIX button
3. Display
4. CD select button
5. FM band select button
6. AM band select button
7. CD eject button
8. PAUSE/MUTE button
9. TUNE/FF-REV button
10. CLOCK button
11. Preset scan (P-SCAN) button
12. AUDIO button
13. SCAN button
14. Station preset buttons
15. CD insert slot
16. PWR/VOL control knob
17. SEEK/TRACK button
LHA0447
4-26Display screen, heater, air conditioner and audio systems
ZREVIEW COPYÐ2005 Altima(l30)
Owners ManualÐUSA_English (nna)
06/28/04Ðtbrooks
X
Page 155 of 304
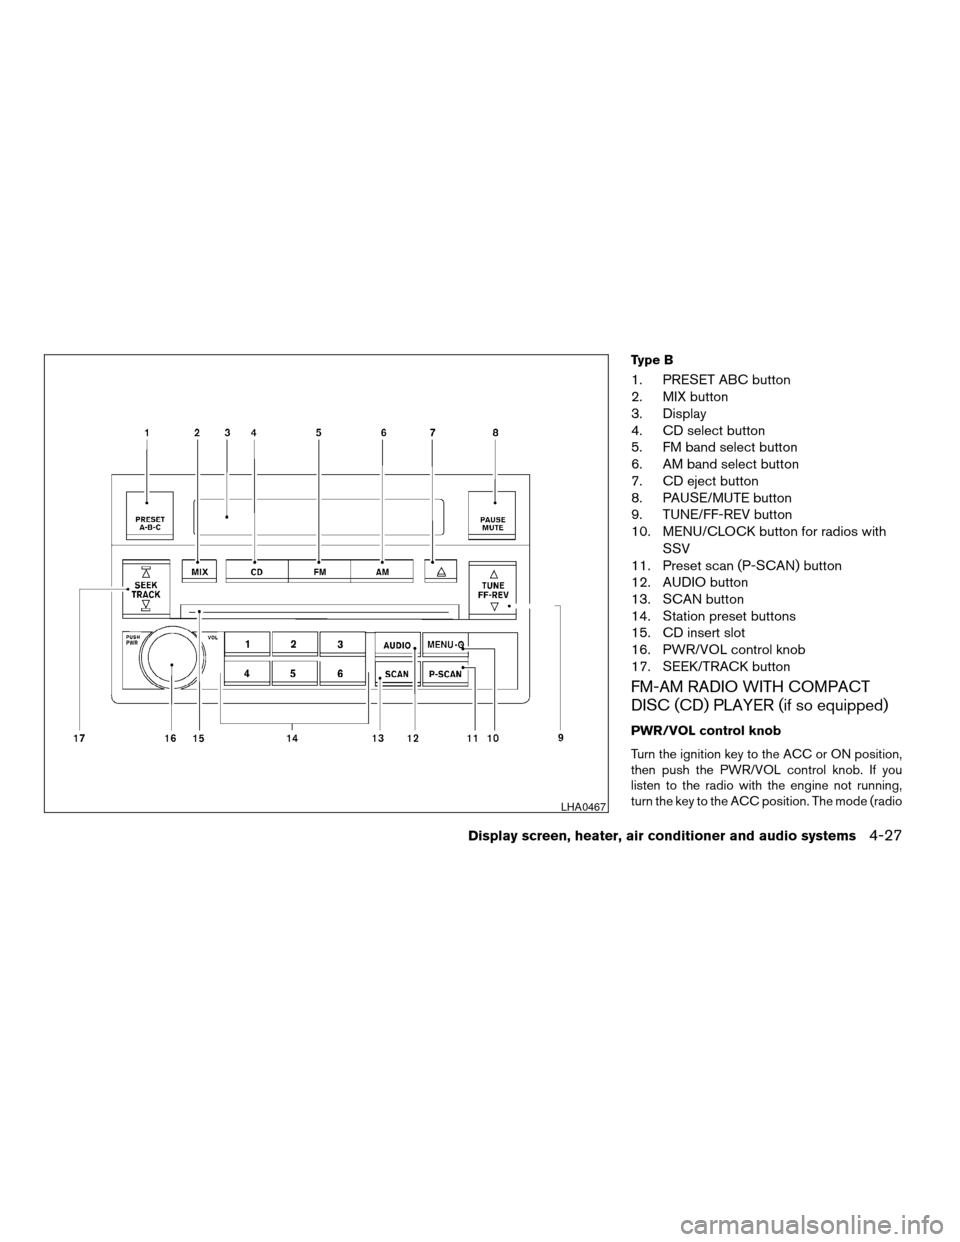
Type B
1. PRESET ABC button
2. MIX button
3. Display
4. CD select button
5. FM band select button
6. AM band select button
7. CD eject button
8. PAUSE/MUTE button
9. TUNE/FF-REV button
10. MENU/CLOCK button for radios withSSV
11. Preset scan (P-SCAN) button
12. AUDIO button
13. SCAN button
14. Station preset buttons
15. CD insert slot
16. PWR/VOL control knob
17. SEEK/TRACK button
FM-AM RADIO WITH COMPACT
DISC (CD) PLAYER (if so equipped)
PWR/VOL control knob
Turn the ignition key to the ACC or ON position,
then push the PWR/VOL control knob. If you
listen to the radio with the engine not running,
turn the key to the ACC position. The mode (radio
LHA0467
Display screen, heater, air conditioner and audio systems4-27
ZREVIEW COPYÐ2005 Altima (l30)
Owners ManualÐUSA_English (nna)
06/28/04Ðtbrooks
X
Page 156 of 304
or CD) that was playing immediately before the
system was turned off resumes playing.
When no CD is loaded, the radio comes on.
Pushing the PWR/VOL control knob again turns
the system off.
Turn the PWR/VOL control knob to the right to
increase volume or to the left to decrease volume.
Adjusting tone quality and speaker balance
Press the AUDIO button to enter the audio adjust
mode:
Bass!Mid !Treb !Fade !Bal
Press the TUNE/FF-REV (
or)or
SEEK/TRACK (or) to adjust to the
desired levels. The display will return to the regu-
lar radio display after 10 seconds, or you may
press the AUDIO button again to return to the
regular radio display.
Clock operation
Pressing the MENU or CLOCK button displays
the clock with the radio on or off. Press the MENU
or CLOCK button again to turn off the clock
display.
Clock set
1. Press and hold the MENU or CLOCK button until it beeps (longer than 2 seconds) . 2. The hours will start flashing. Press
TUNE/FF-REV (
or)or
SEEK/TRACK (or) to adjust
the hours.
3. Press the MENU or CLOCK button to switch to the minute adjustment.
4. Press TUNE/FF-REV (
or)or
SEEK/TRACK (or) to adjust
the minutes.
5. Press the MENU or CLOCK button again to exit the clock set mode.
The display will return to the regular clock display
after 10 seconds, or you may press the MENU or
CLOCK button again to return to the regular
clock display.
FM-AM radio operation
FM-AM band select
Push the AM or the FM button to change from AM
to FM reception.
The FM stereo indicator, ST, illuminates during
FM stereo reception. When the stereo broadcast
signal is weak, the radio automatically changes
from stereo to monaural reception.
TUNE/FF—REV
WARNING
The radio should not be tuned while driv-
ing so full attention may be given to ve-
hicle operation.
Use the
andbuttons for manual
tuning. To move quickly through the channels,
hold the tuning buttons down.
SEEK tuning
Push SEEK/TRACK (
or) . SEEK
tuning begins from low to high frequencies or
high to low frequencies, depending on which
button is pressed, and stops at the next broad-
casting station. If using the up button, once the
highest broadcasting station is reached, the ra-
dio continues in the SEEK mode at the lowest
broadcasting station. If using the down button,
once the lowest broadcasting station is reached,
the radio continues in the SEEK mode at the
highest broadcasting station.
SCAN tuning
Push the SCAN button. SCAN illuminates in the
display window. SCAN tuning begins from low to
high frequencies. SCAN tuning stops for 5 sec-
onds at each broadcasting station that has suffi-
cient signal strength. When scanning, SCAN
4-28Display screen, heater, air conditioner and audio systems
ZREVIEW COPYÐ2005 Altima (l30)
Owners ManualÐUSA_English (nna)
06/28/04Ðtbrooks
X