display NISSAN ALTIMA 2008 L32A / 4.G Quick Reference Guide
[x] Cancel search | Manufacturer: NISSAN, Model Year: 2008, Model line: ALTIMA, Model: NISSAN ALTIMA 2008 L32A / 4.GPages: 36, PDF Size: 2.85 MB
Page 2 of 36
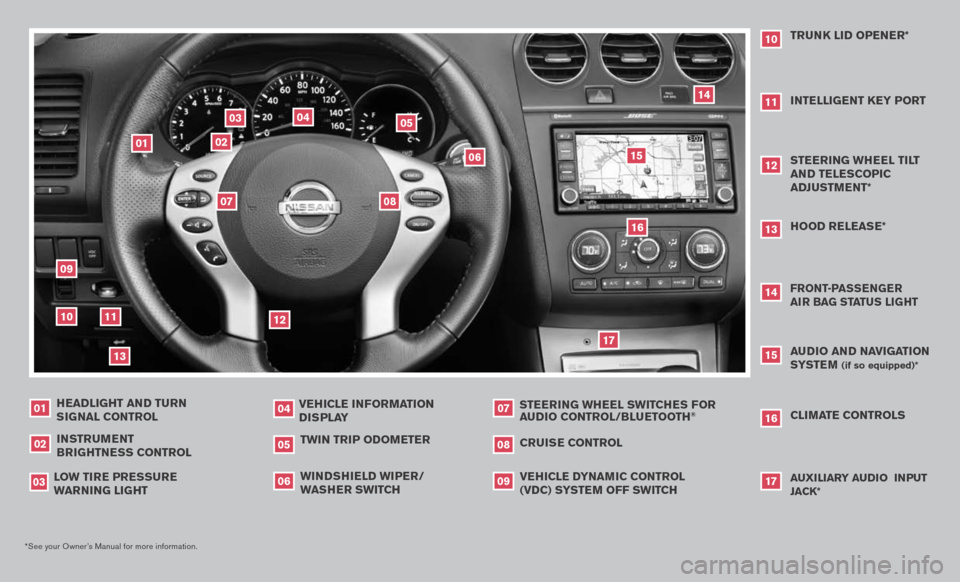
VEHICLE INFORMATION
DISPLAY
04
HEADLIGHT AND TURN SIGNAL CONTROL
07
01
STEERING WHEEL SWITCHES FOR
AUDIO CONTROL/bLUETOOTH
®
03
09
06
*See your Owner’s Manual for more information.
TWIN TRIP ODOMETER
CRUISE CONTROL
INSTRUMENT
bRIGHTNESS CONTROL
02
08
05
CLIMATE CONTROLS
L OW TIRE PRESSURE
W ARNING LIGHT VEHICLE D
YNAMIC CONTROL
(VDC) SYSTEM OFF SWITCH
WINDSHIELD WIPER/WASHER SWITCH
AUDIO AND NAVIGATION SYSTEM
(if so equipped)*
15
AUXILIARY AUDIO INPUT JACK*
161714
FRONT-PASSENGER
AIR bAG STATUS LIGHTHOOD RELEASE*
05
08
0307
14
02
15
04
06
13
16
12
09
01
17
10
11
131012
TRUNK LID OPENER*
11
STEERING WHEEL TILT AND TELESCOPIC
ADJUSTMENT*INTELLIGENT KEY PORT
Page 3 of 36
TAB LE O F C O NTE NTS
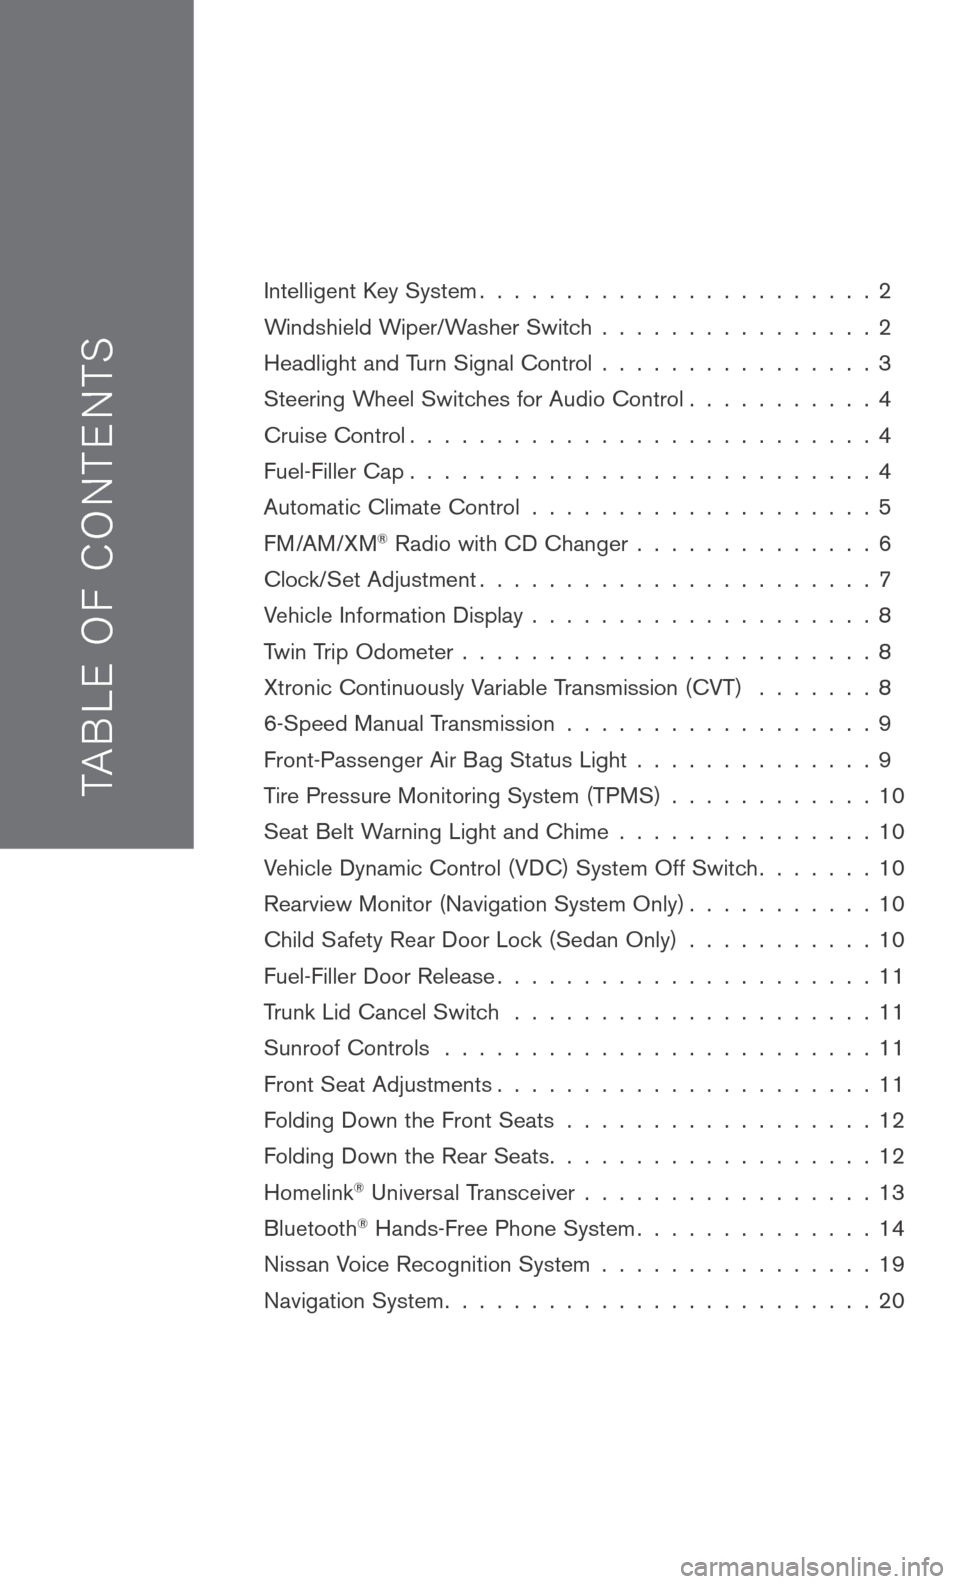
Intelligent Key System. . . . . . . . . . . . . . . . . . . . . . . 2
Windshield Wiper/Washer Switch . . . . . . . . . . . . . . . . 2
Headlight and Turn Signal Control . . . . . . . . . . . . . . . . 3
Steering Wheel Switches for Audio Control . . . . . . . . . . . 4
Cruise Control . . . . . . . . . . . . . . . . . . . . . . . . . . . 4
Fuel-Filler Cap . . . . . . . . . . . . . . . . . . . . . . . . . . . 4
Automatic Climate Control . . . . . . . . . . . . . . . . . . . . 5
FM/AM/XM® Radio with CD Changer . . . . . . . . . . . . . . 6
Clock/Set Adjustment . . . . . . . . . . . . . . . . . . . . . . . 7
Vehicle Information Display . . . . . . . . . . . . . . . . . . . . 8
Twin Trip Odometer . . . . . . . . . . . . . . . . . . . . . . . . 8
Xtronic Continuously Variable Transmission (CVT) . . . . . . . 8
6-Speed Manual Transmission . . . . . . . . . . . . . . . . . . 9
Front-Passenger Air Bag Status Light . . . . . . . . . . . . . . 9
Tire Pressure Monitoring System (TPMS) . . . . . . . . . . . . 10
Seat Belt Warning Light and Chime . . . . . . . . . . . . . . . 10
Vehicle Dynamic Control (VDC) System Off Switch . . . . . . . 10
Rearview Monitor (Navigation System Only) . . . . . . . . . . . 10
Child Safety Rear Door Lock (Sedan Only) . . . . . . . . . . . 10
Fuel-Filler Door Release . . . . . . . . . . . . . . . . . . . . . . 11
Trunk Lid Cancel Switch . . . . . . . . . . . . . . . . . . . . . 11
Sunroof Controls . . . . . . . . . . . . . . . . . . . . . . . . . 11
Front Seat Adjustments . . . . . . . . . . . . . . . . . . . . . . 11
Folding Down the Front Seats . . . . . . . . . . . . . . . . . . 12
Folding Down the Rear Seats . . . . . . . . . . . . . . . . . . . 12
Homelink® Universal Transceiver . . . . . . . . . . . . . . . . . 13
Bluetooth® Hands-Free Phone System . . . . . . . . . . . . . . 14
Nissan Voice Recognition System . . . . . . . . . . . . . . . . 19
Navigation System . . . . . . . . . . . . . . . . . . . . . . . . . 20
Page 4 of 36
INTELLIGENT K EY SYSTEM
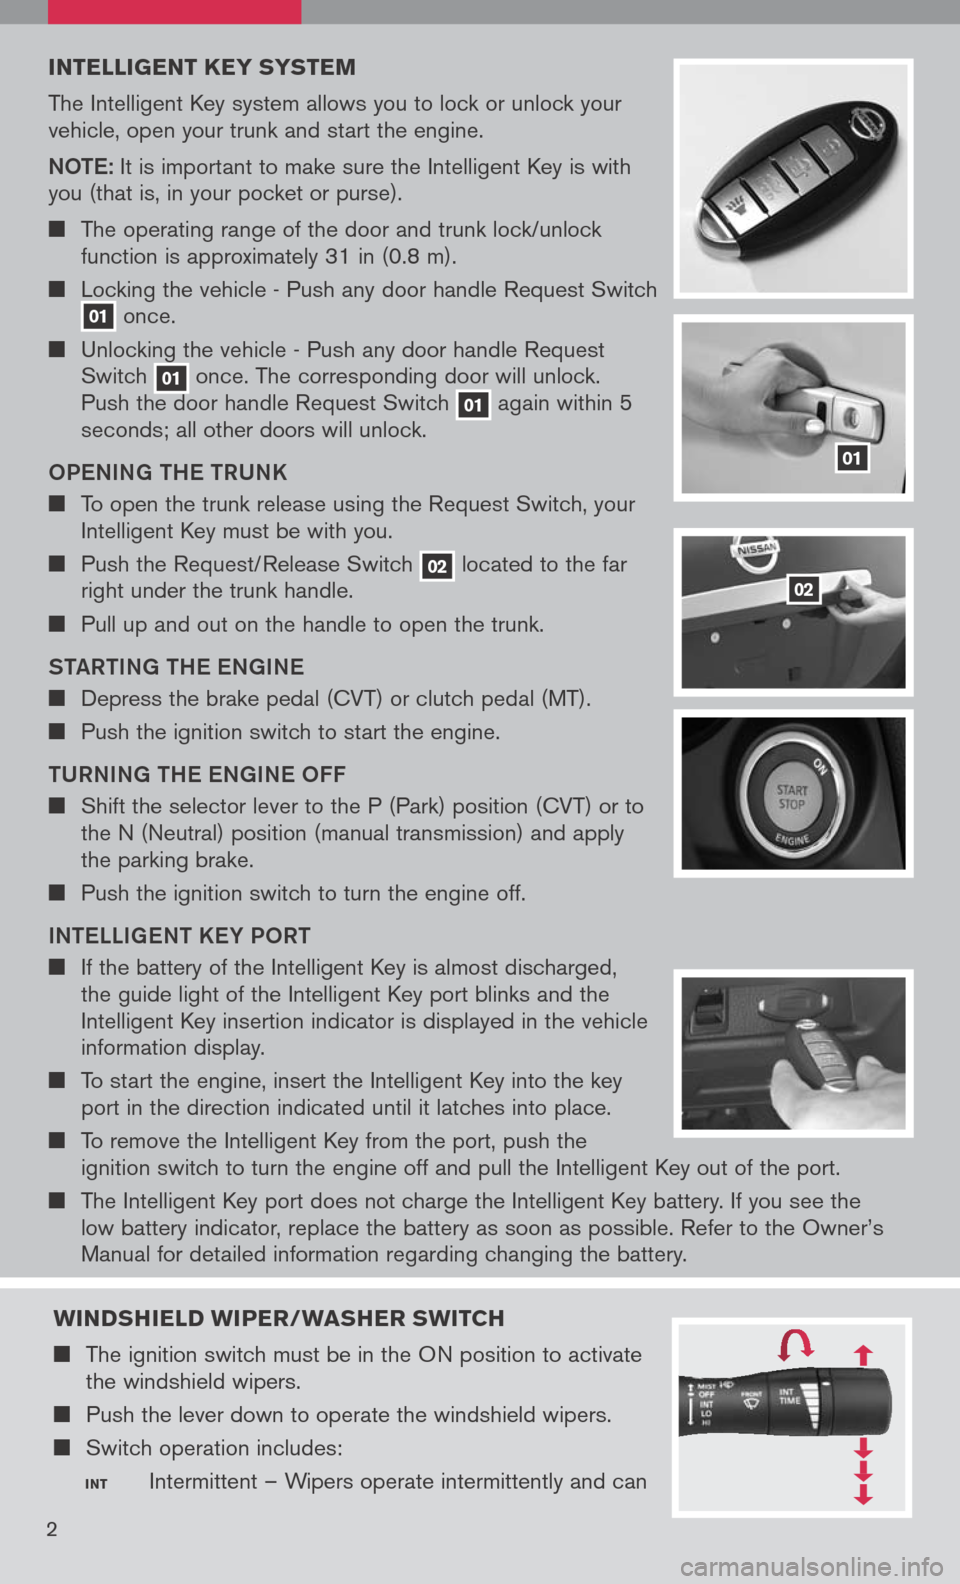
The Intelligent Key system allows you to lock or unlock your vehicle, open your trunk and start the engine.
Note: It is important to make sure the Intelligent Key is with you (that is, in your pocket or purse).
The operating range of the door and trunk lock/unlock function is approximately 31 in (0.8 m).
Locking the vehicle - Push any door handle Request Switch 01 once.
Unlocking the vehicle - Push any door handle Request Switch 01 once. The corresponding door will unlock. Push the door handle Request Switch 01 again within 5 seconds; all other doors will unlock.
o Pe NING tH e tRUNK
To open the trunk release using the Request Switch, your Intelligent Key must be with you.
Push the Request/Release Switch 02 located to the far right under the trunk handle.
Pull up and out on the handle to open the trunk.
S tAR tING tH e eNGIN e
Depress the brake pedal (CVT) or clutch pedal (MT).
Push the ignition switch to start the engine.
t URNING tH e eNGIN e oFF
Shift the selector lever to the P (Park) position (CVT) or to the N (Neutral) position (manual transmission) and apply the parking brake.
Push the ignition switch to turn the engine off.
IN te LLIG eN t K eY P oRt
If the battery of the Intelligent Key is almost discharged, the guide light of the Intelligent Key port blinks and the Intelligent Key insertion indicator is displayed in the vehicle information display.
To start the engine, insert the Intelligent Key into the key port in the direction indicated until it latches into place.
To remove the Intelligent Key from the port, push the ignition switch to turn the engine off and pull the Intelligent Key out of the port.
The Intelligent Key port does not charge the Intelligent Key battery. If you see the low battery indicator, replace the battery as soon as possible. Refer to the Owner’s
Manual for detailed information regarding changing the battery.
01
02
2
WINDSHIELD WIPER/WASHER SWITCH
The ignition switch must be in the ON position to activate the windshield wipers.
Push the lever down to operate the windshield wipers.
Switch operation includes:
INT Intermittent – Wipers operate intermittently and can
Page 8 of 36
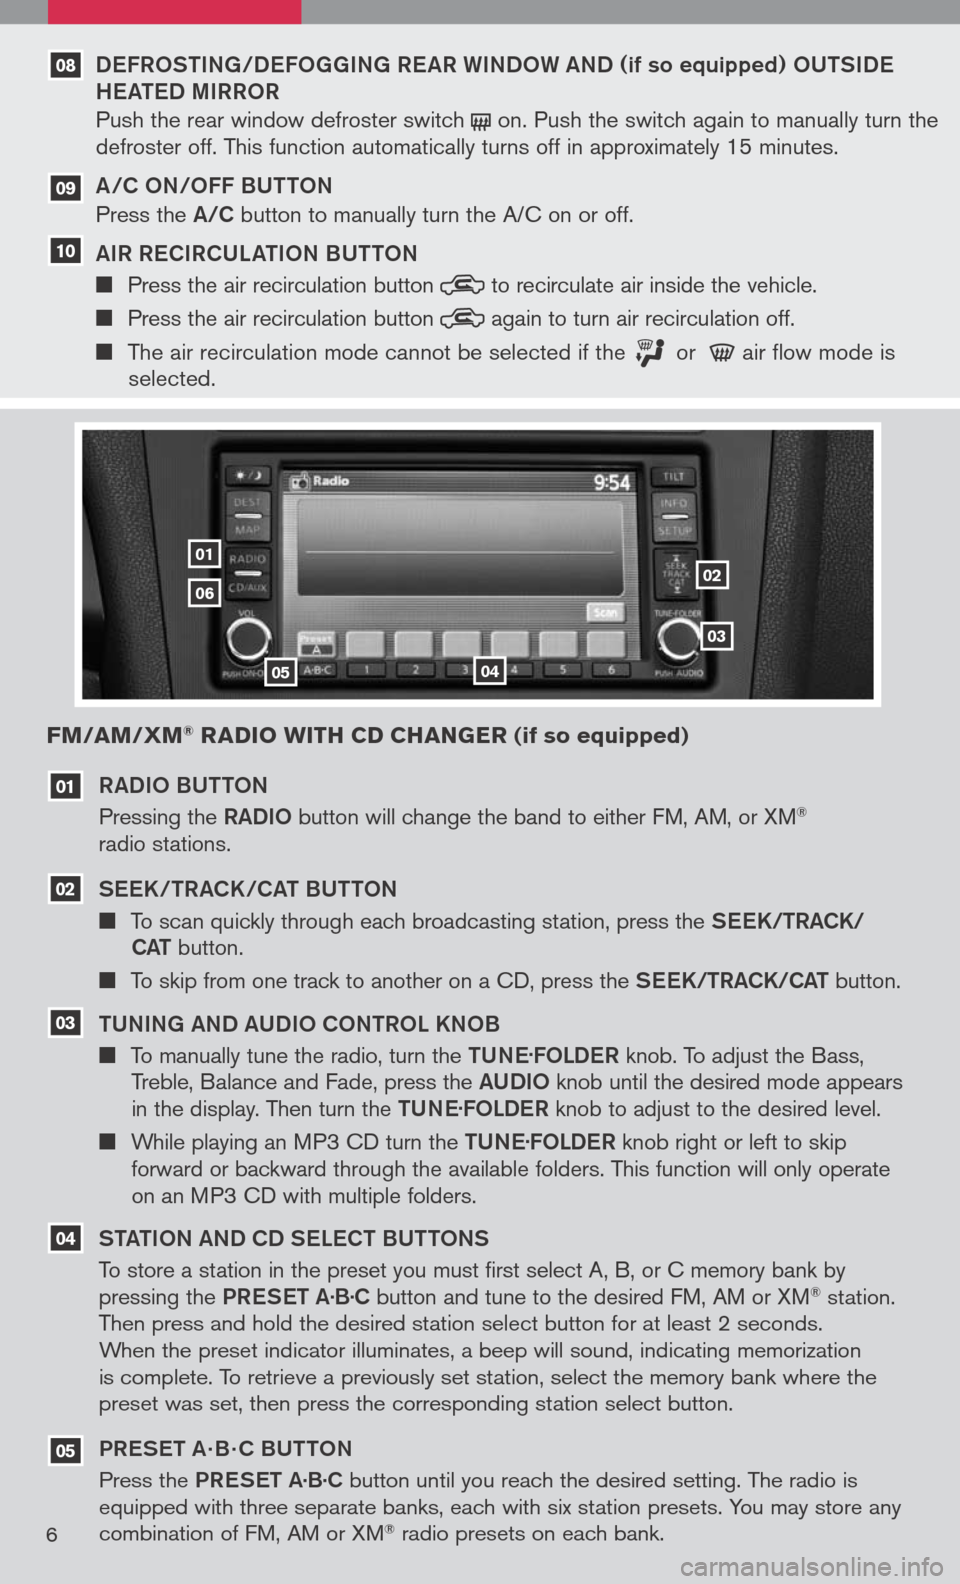
RADIo BU tto N
Pressing the RADIo button will change the band to either FM, AM, or XM® radio stations.
See K/tRACK/CA t BU tto N
To scan quickly through each broadcasting station, press the See K/tRACK/
CA t button.
To skip from one track to another on a CD, press the See K/tRACK/CA t button.
t UNING AND AUDI o C oNtR o L KN oB
To manually tune the radio, turn the tUN e.
F o LD eR knob. To adjust the Bass, Treble, Balance and Fade, press the AUDIo knob until the desired mode appears in the display. Then turn the tUN e.
F o LD eR knob to adjust to the desired level.
While playing an MP3 CD turn the tUN e.
F o LD eR knob right or left to skip forward or backward through the available folders. This function will only operate on an MP3 CD with multiple folders.
S tA tIo N AND CD S eLe C t BU tto NS
To store a station in the preset you must first select A, B, or C memory bank by pressing the PReS et A·B·C button and tune to the desired FM, AM or XM® station. Then press and hold the desired station select button for at least 2 seconds. When the preset indicator illuminates, a beep will sound, indicating memorization is complete. To retrieve a previously set station, select the memory bank where the preset was set, then press the corresponding station select button.
PR eS et A · B · C BU ttoN
Press the PReS et A·B·C button until you reach the desired setting. The radio is equipped with three separate banks, each with six station presets. You may store any combination of FM, AM or XM® radio presets on each bank.
03
02
01
0102
03
0405
06
FM/AM/XM® RADIO WITH CD CHANGER (if so equipped)
04
05
6
DeFR oStING/D eFo GGING R eAR WIND oW AND (if so equipped) oUtSID e
H eAte D MIRR oR
Push the rear window defroster switch on. Push the switch again to manually turn the defroster off. This function automatically turns off in approximately 15 minutes.
A/C oN/ oFF BU ttoN
Press the A/C button to manually turn the A/C on or off.
AIR R eCIRCULA tIo N BU ttoN
Press the air recirculation button to recirculate air inside the vehicle.
Press the air recirculation button again to turn air recirculation off.
The air recirculation mode cannot be selected if the or air flow mode is selected.
09
10
08
Page 9 of 36
06
Refer to the Owner’s Manual for detailed information regarding the audio system.
XM® presets are only available on XM® Satellite Radio equipped vehicles.
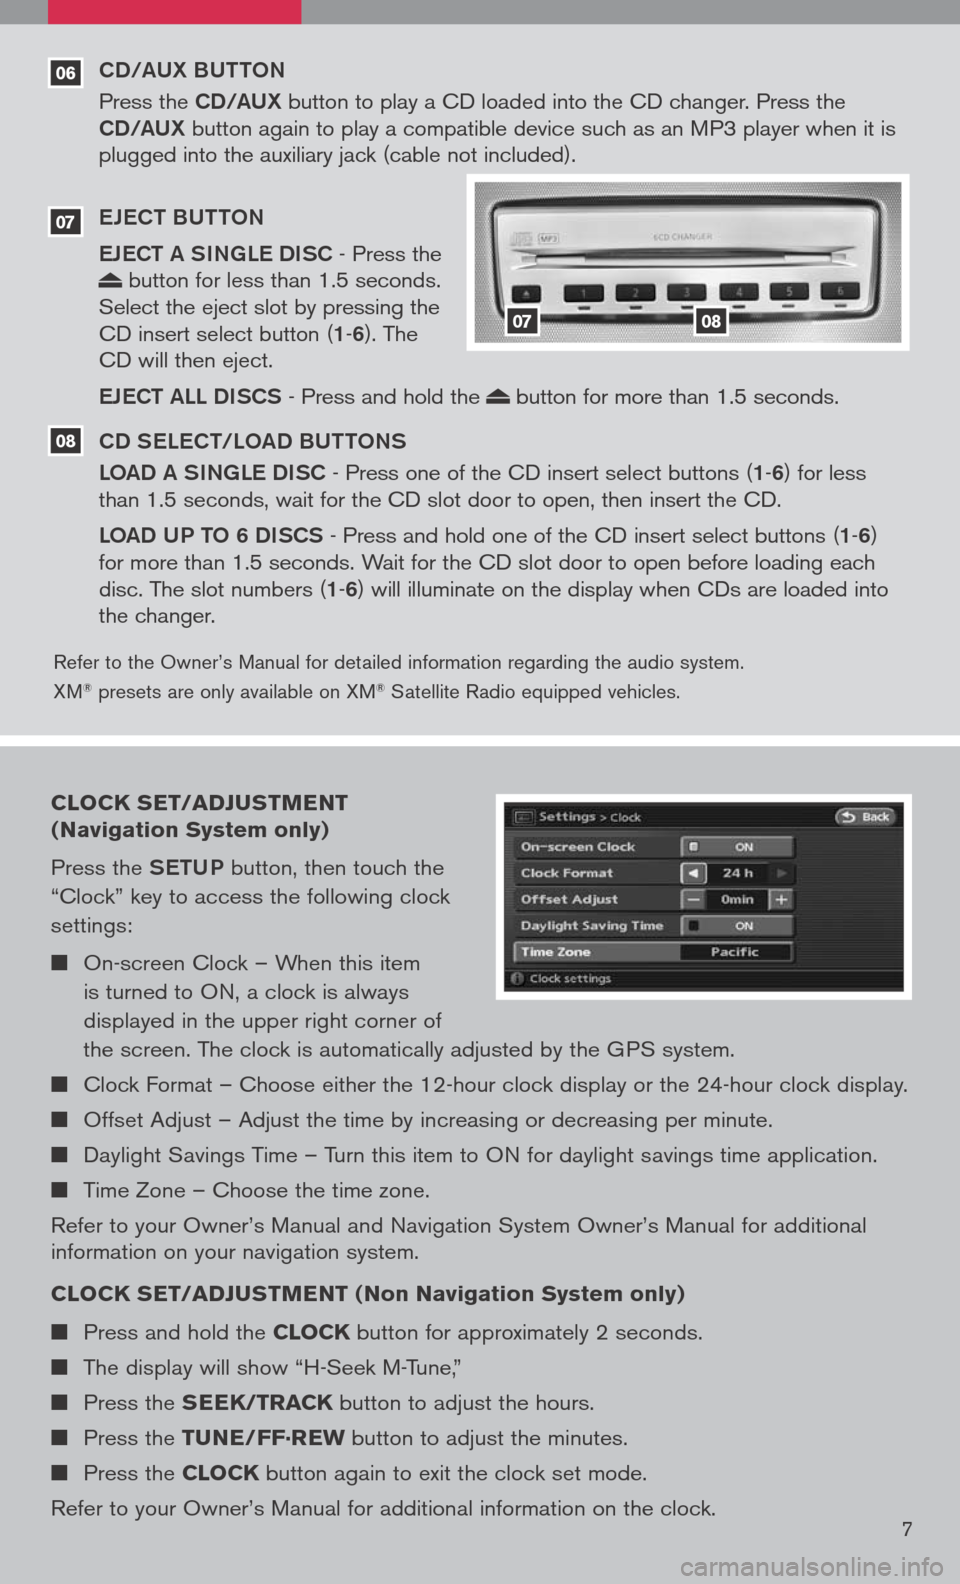
CD/AUX BUttoN
Press the CD/AUX button to play a CD loaded into the CD changer. Press the CD/AUX button again to play a compatible device such as an MP3 player when it is plugged into the auxiliary jack (cable not included).
e Je C t BU tto N
e Je C t A SINGL e DISC
- Press the button for less than 1.5 seconds. Select the eject slot by pressing the CD insert select button (1-6). The CD will then eject.
eJe C t ALL DISCS
- Press and hold the button for more than 1.5 seconds.
CD S eLe C t/L oAD BU ttoNS
L o AD A SINGL e DISC
- Press one of the CD insert select buttons (1-6) for less than 1.5 seconds, wait for the CD slot door to open, then insert the CD.
Lo AD UP to 6 DISCS
- Press and hold one of the CD insert select buttons (1-6) for more than 1.5 seconds. Wait for the CD slot door to open before loading each disc. The slot numbers (1-6) will illuminate on the display when CDs are loaded into the changer.
07
08
0708
CLOCK SET/ADJUSTMENT
(Navigation System only)
Press the SetUP button, then touch the
“Clock” key to access the following clock
settings:
On-screen Clock – When this item
is turned to ON, a clock is always
displayed in the upper right corner of
the screen. The clock is automatically adjusted by the GPS system.
Clock Format – Choose either the 12-hour clock display or the 24-hour clock display.
Offset Adjust – Adjust the time by increasing or decreasing per minute.
Daylight Savings Time – Turn this item to ON for daylight savings time application.
Time Zone – Choose the time zone.
Refer to your Owner’s Manual and Navigation System Owner’s Manual for additional information on your navigation system.
CLOCK SET/ADJUSTMENT (Non Navigation System only)
Press and hold the CLOCK button for approximately 2 seconds.
The display will show “H-Seek M-Tune,”
Press the SEEK/TRACK button to adjust the hours.
Press the TUNE/FF·REW button to adjust the minutes.
Press the CLOCK button again to exit the clock set mode.
Refer to your Owner’s Manual for additional information on the clock.7
Page 10 of 36
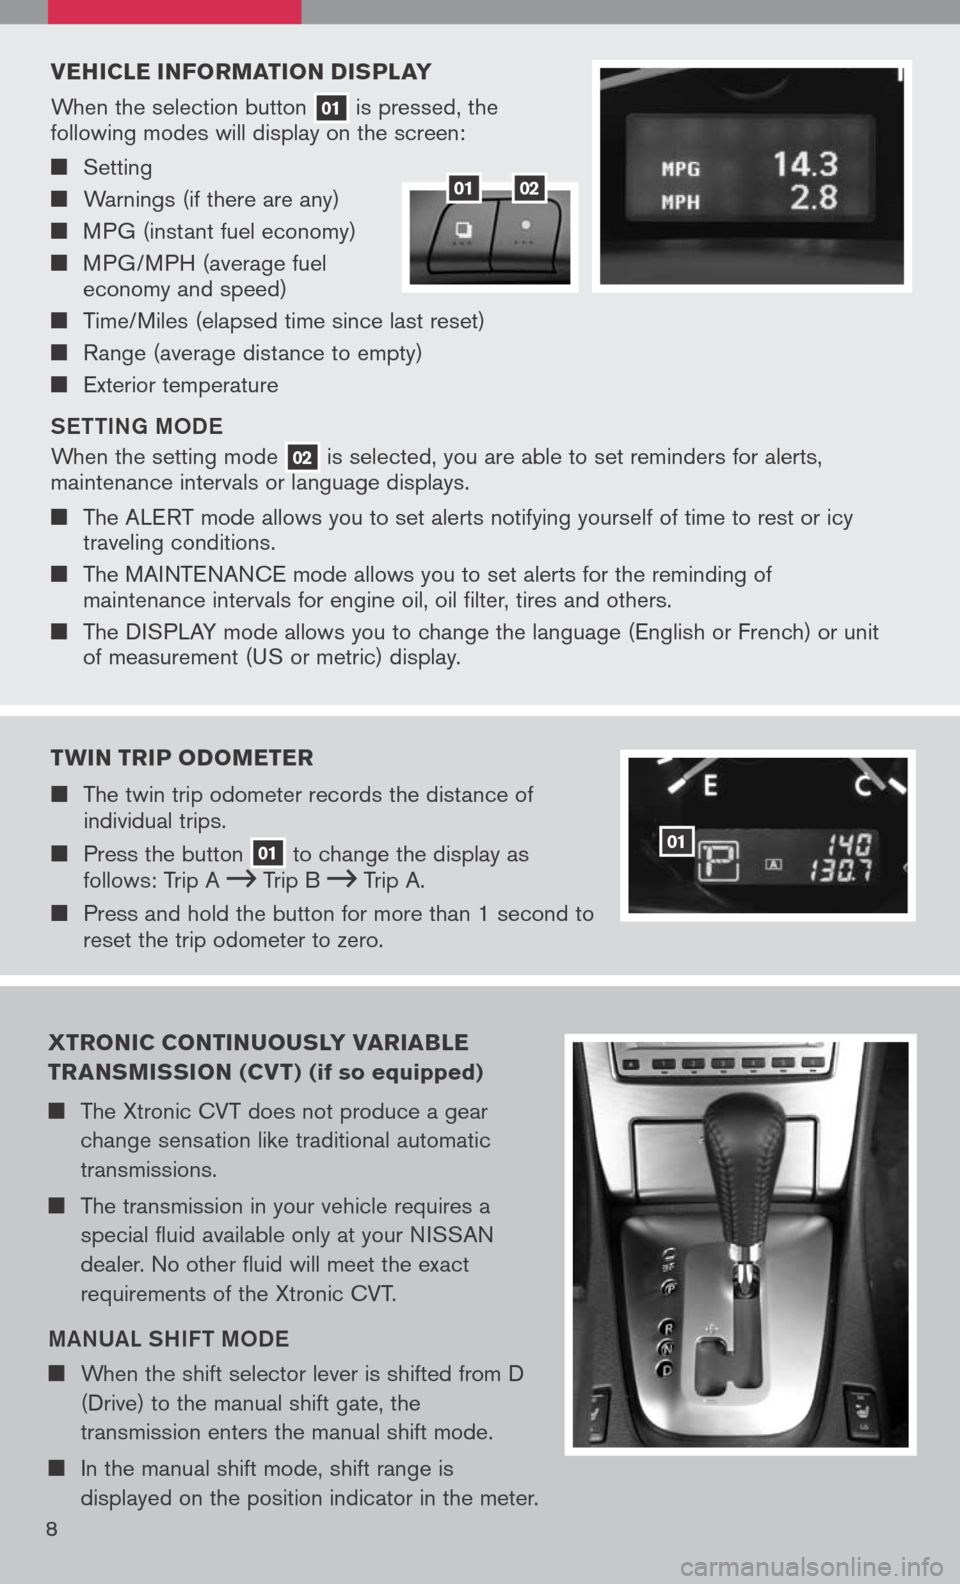
VEHICLE INFORMATION DISPLAY
When the selection button 01 is pressed, the following modes will display on the screen:
Setting
Warnings (if there are any)
MPG (instant fuel economy)
MPG/MPH (average fuel economy and speed)
Time/Miles (elapsed time since last reset)
Range (average distance to empty)
Exterior temperature
S ett ING M oDe
When the setting mode 02 is selected, you are able to set reminders for alerts, maintenance intervals or language displays.
The ALERT mode allows you to set alerts notifying yourself of time to rest or icy traveling conditions.
The MAINTENANCE mode allows you to set alerts for the reminding of maintenance intervals for engine oil, oil filter, tires and others.
The DISPLAY mode allows you to change the language (English or French) or unit of measurement (US or metric) display.
0102
TWIN TRIP ODOMETER
The twin trip odometer records the distance of individual trips.
Press the button 01 to change the display as follows: Trip A Trip B Trip A.
Press and hold the button for more than 1 second to reset the trip odometer to zero.
01
XTRONIC CONTINUOUSLY VARIA bLE
TRANSMISSION (CV T) (if so equipped)
The Xtronic CVT does not produce a gear
change sensation like traditional automatic
transmissions.
The transmission in your vehicle requires a
special fluid available only at your NISSAN
dealer. No other fluid will meet the exact
requirements of the Xtronic CVT.
MANUAL SHIF t MoDe
When the shift selector lever is shifted from D
(Drive) to the manual shift gate, the
transmission enters the manual shift mode.
In the manual shift mode, shift range is
displayed on the position indicator in the meter.
8
Page 12 of 36
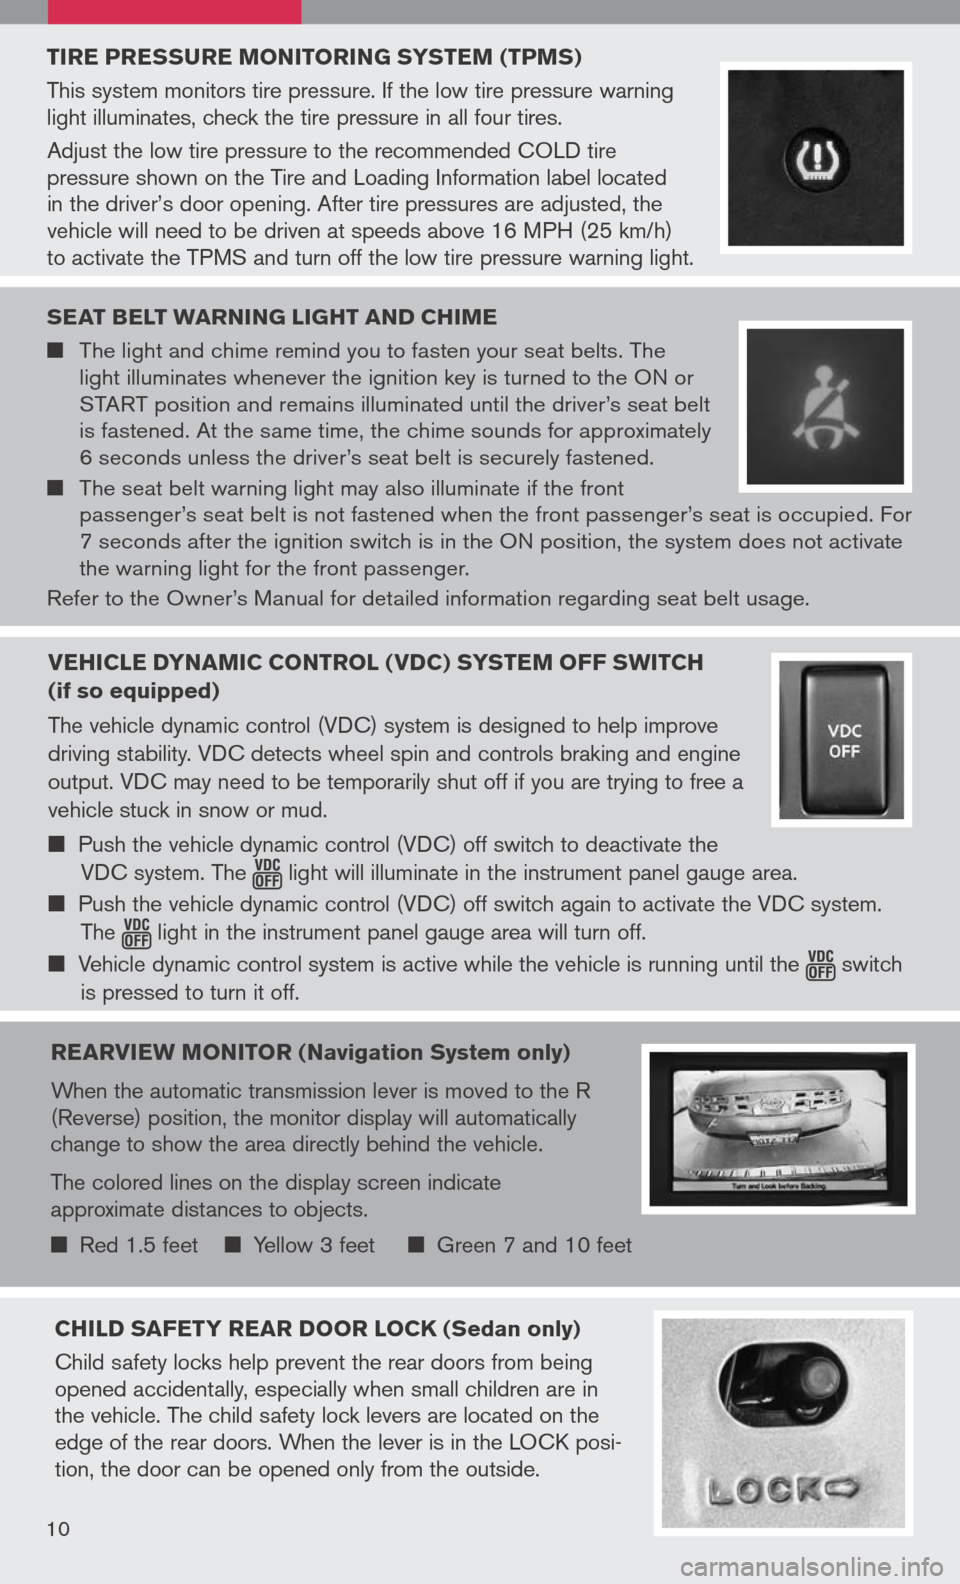
TIRE PRESSURE MONITORING SYSTEM (TPMS)
This system monitors tire pressure. If the low tire pressure warning light illuminates, check the tire pressure in all four tires.
Adjust the low tire pressure to the recommended COLD tire pressure shown on the Tire and Loading Information label located in the driver’s door opening. After tire pressures are adjusted, the vehicle will need to be driven at speeds above 16 MPH (25 km/h) to activate the TPMS and turn off the low tire pressure warning light.
SEAT bELT WARNING LIGHT AND CHIME
The light and chime remind you to fasten your seat belts. The light illuminates whenever the ignition key is turned to the ON or START position and remains illuminated until the driver’s seat belt is fastened. At the same time, the chime sounds for approximately 6 seconds unless the driver’s seat belt is securely fastened.
The seat belt warning light may also illuminate if the front passenger’s seat belt is not fastened when the front passenger’s seat is occupied. For 7 seconds after the ignition switch is in the ON position, the system does not activate the warning light for the front passenger.
Refer to the Owner’s Manual for detailed information regarding seat belt usage.
REARVIEW MONITOR (Navigation System only)
When the automatic transmission lever is moved to the R (Reverse) position, the monitor display will automatically change to show the area directly behind the vehicle.
The colored lines on the display screen indicate approximate distances to objects.
Red 1.5 feet Yellow 3 feet Green 7 and 10 feet
CHILD SAFETY REAR DOOR LOCK (Sedan only)
Child safety locks help prevent the rear doors from being opened accidentally, especially when small children are in the vehicle. The child safety lock levers are located on the edge of the rear doors. When the lever is in the LOCK posi-tion, the door can be opened only from the outside.
10
VEHICLE DYNAMIC CONTROL (VDC) SYSTEM OFF SWITCH
(if so equipped)
The vehicle dynamic control (VDC) system is designed to help improve
driving stability. VDC detects wheel spin and controls braking and engine
output. VDC may need to be temporarily shut off if you are trying to free a
vehicle stuck in snow or mud.
Push the vehicle dynamic control (VDC) off switch to deactivate the
VDC system. The light will illuminate in the instrument panel gauge area.
Push the vehicle dynamic control (VDC) off switch again to activate the VDC system.
The light in the instrument panel gauge area will turn off.
Vehicle dynamic control system is active while the vehicle is running until the switch
is pressed to turn it off.
Page 19 of 36
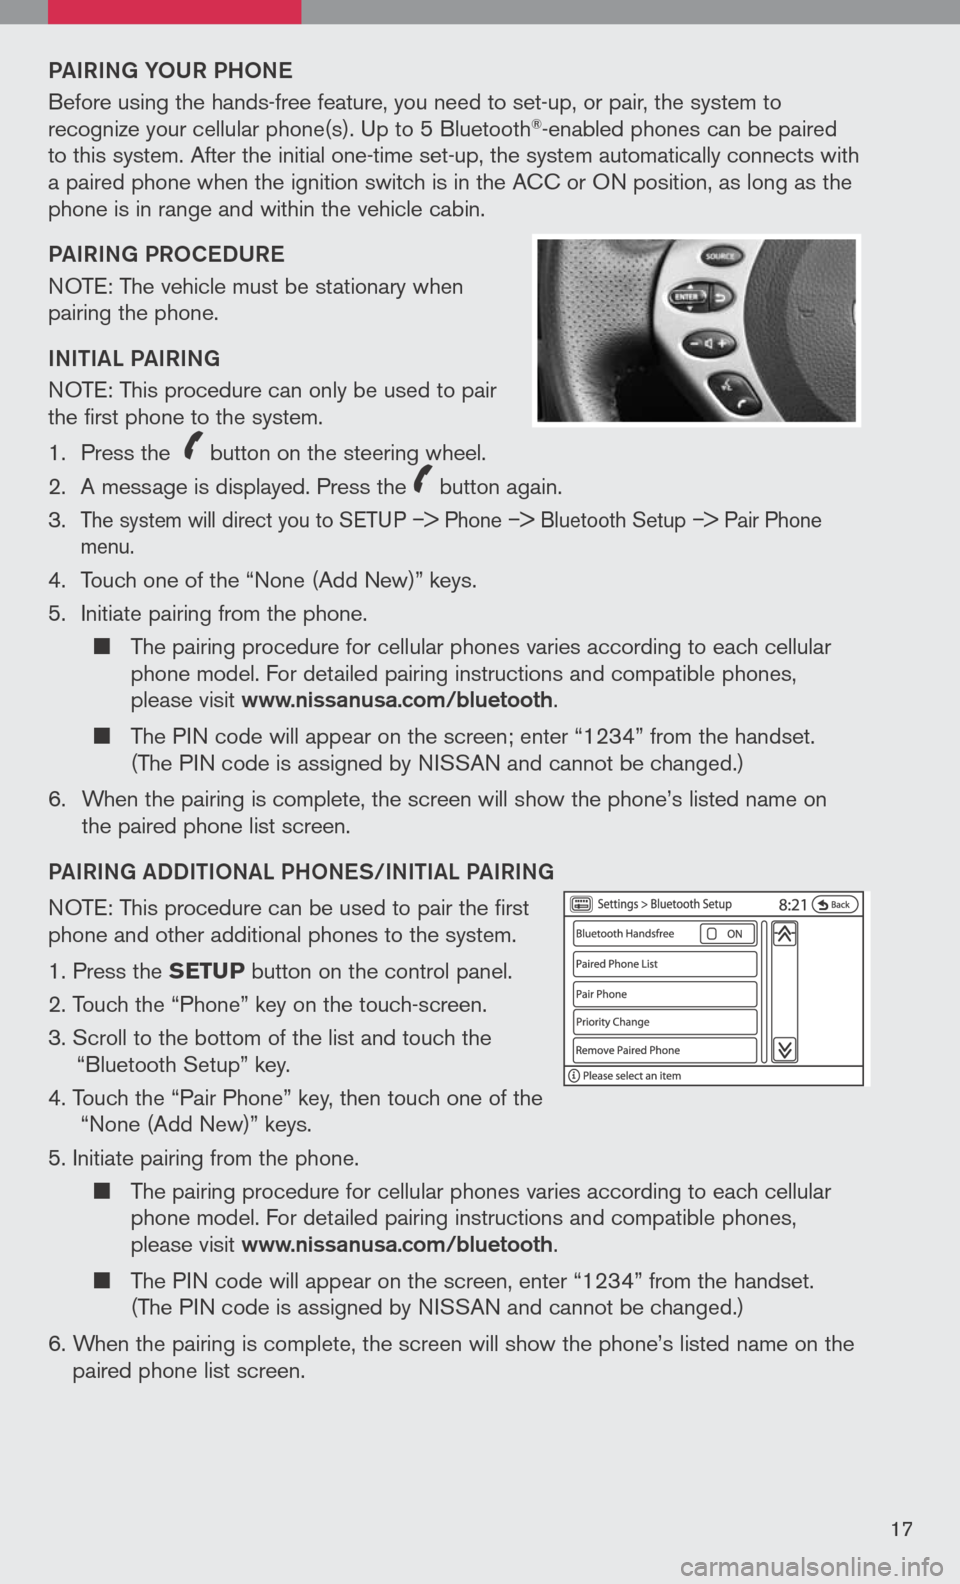
PAIRING YoUR PH oNe
Before using the hands-free feature, you need to set-up, or pair, the system to recognize your cellular phone(s). Up to 5 Bluetooth®-enabled phones can be paired to this system. After the initial one-time set-up, the system automatically connects with a paired phone when the ignition switch is in the ACC or ON position, as long as the phone is in range and within the vehicle cabin.
PAIRING PR oCeDUR e
NOTE: The vehicle must be stationary when pairing the phone.
INItIAL PAIRING
NOTE: This procedure can only be used to pair the first phone to the system.
1. Press the
icon C
button on the steering wheel.
2. A message is displayed. Press the
icon C
button again.
3.
The system will direct you to SETUP –> Phone –> Bluetooth Setup –> Pair Phone menu.
4. Touch one of the “None (Add New)” keys.
5. Initiate pairing from the phone.
The pairing procedure for cellular phones varies according to each cellular phone model. For detailed pairing instructions and compatible phones, please visit www.nissanusa.com/bluetooth.
The PIN code will appear on the screen; enter “1234” from the handset. (The PIN code is assigned by NISSAN and cannot be changed.)
6. When the pairing is complete, the screen will show the phone’s listed name on
the paired phone list screen.
PAIRING ADDIt Io NAL PH oNeS/INIt IAL PAIRING
NOTE: This procedure can be used to pair the first phone and other additional phones to the system.
1. Press the SETUP button on the control panel.
2. Touch the “Phone” key on the touch-screen.
3. Scroll to the bottom of the list and touch the
“Bluetooth Setup” key.
4. Touch the “Pair Phone” key, then touch one of the “None (Add New)” keys.
5. Initiate pairing from the phone.
The pairing procedure for cellular phones varies according to each cellular phone model. For detailed pairing instructions and compatible phones, please visit www.nissanusa.com/bluetooth.
The PIN code will appear on the screen, enter “1234” from the handset. (The PIN code is assigned by NISSAN and cannot be changed.)
6. When the pairing is complete, the screen will show the phone’s listed name on the
paired phone list screen.
17
Page 21 of 36
Ho W to SAY NUMB eRS
NISSAN voice recognition permits numbers to be spoken in a variety of ways.
Say “zero” or “oh” for “0”. Example: 1-800-662-6200 – Say “One eight zero zero six six two six two oh oh.”
Say “Pound” for “#”. Say “star” for “*”. Example: 1-555-1212*123 – Say “One five five five one two one two star one two three.”
Please refer to the NISSAN Owner’s Manual and cellular phone manufacturer owner’s manual for detailed information regarding the Bluetooth® Hands-Free Phone System with Navigation System.
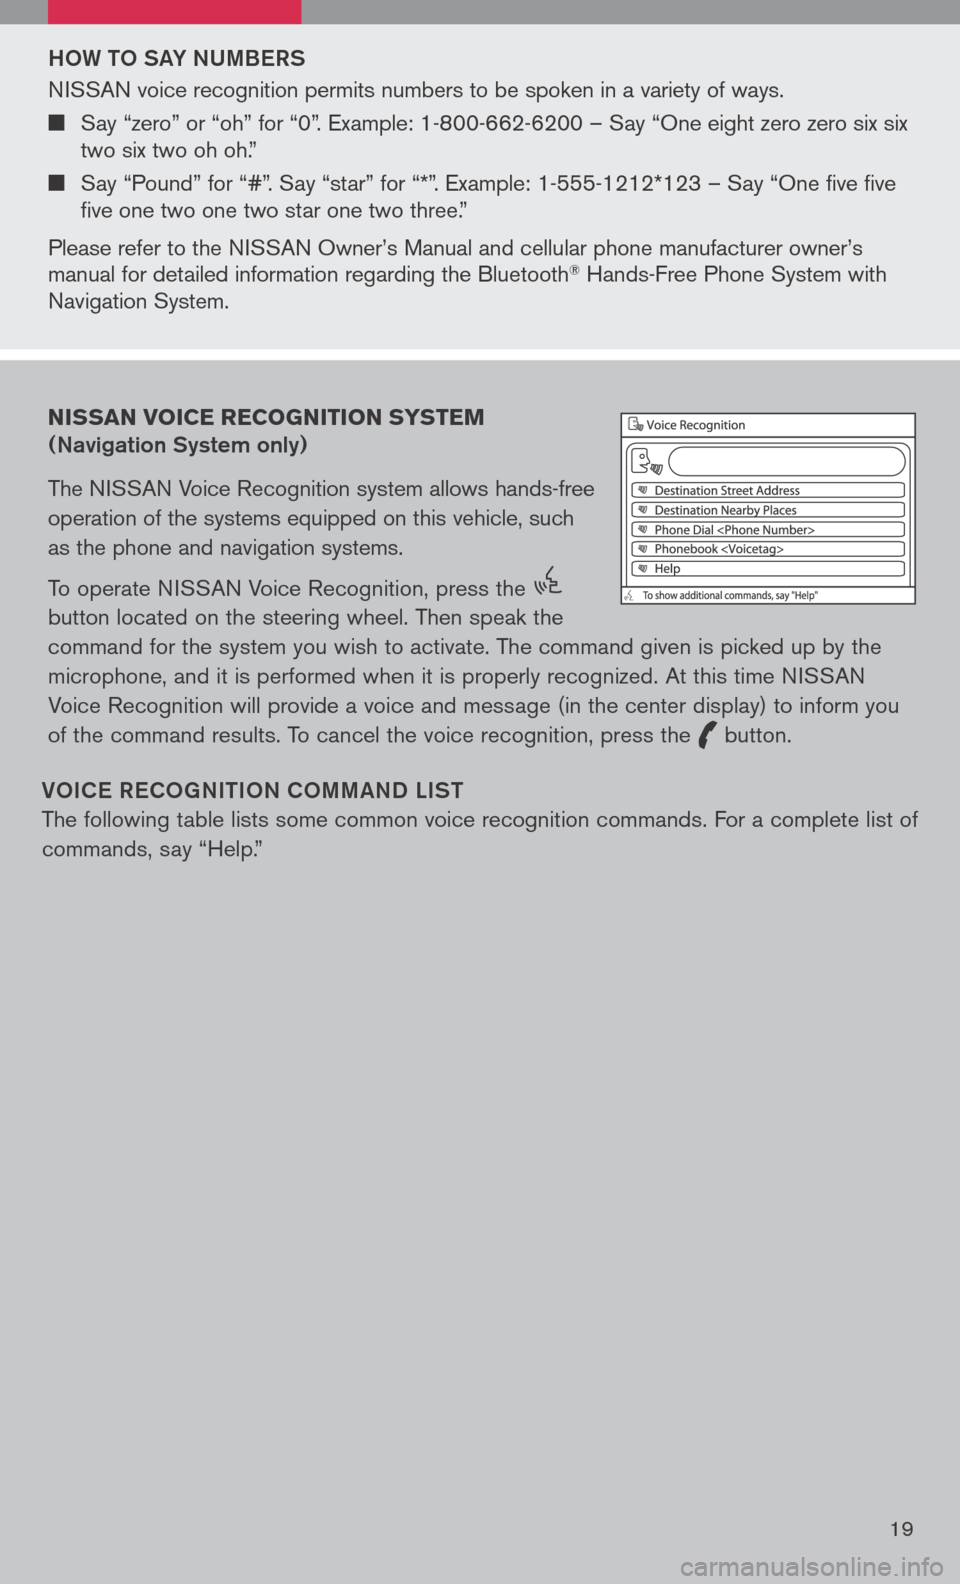
Vo IC e Re Co GNI tIo N Co MMAND LIS t
The following table lists some common voice recognition commands. For a complete list of
commands, say “Help.”
NISSAN VOICE RECOGNITION SYSTEM
(Navigation System only)
The NISSAN Voice Recognition system allows hands-free
operation of the systems equipped on this vehicle, such
as the phone and navigation systems.
To operate NISSAN Voice Recognition, press the
icon C
button located on the steering wheel. Then speak the
command for the system you wish to activate. The command given is picked up by the
microphone, and it is performed when it is properly recognized. At this time NISSAN
Voice Recognition will provide a voice and message (in the center display) to inform you
of the command results. To cancel the voice recognition, press the
icon C
button.
19
Page 23 of 36
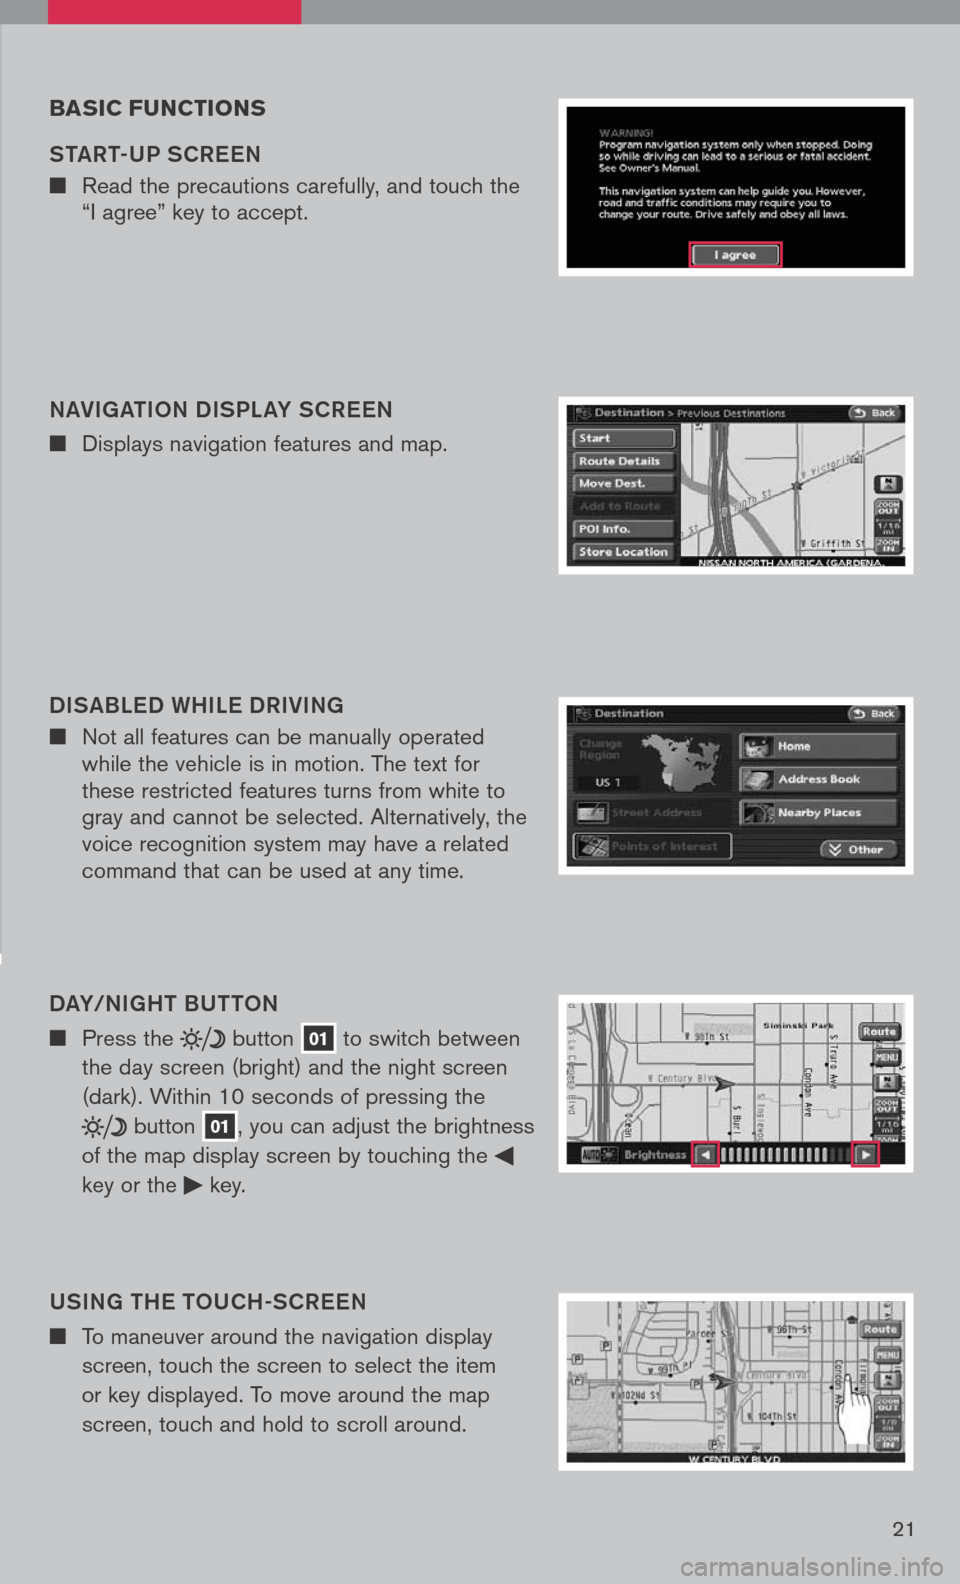
NAVIGAtIo N DISPL AY SCR eeN
n Displays navigation features and map.
DISABL eD WHIL e DRIVING
n Not all features can be manually operated while the vehicle is in motion. The text for these restricted features turns from white to gray and cannot be selected. Alternatively, the voice recognition system may have a related command that can be used at any time.
b ASIC FUNCTIONS
S tAR t-UP SCR eeN
n Read the precautions carefully, and touch the “I agree” key to accept.
DAY/NIGH t BU tto N
n Press the button 01 to switch between
the day screen (bright) and the night screen
(dark). Within 10 seconds of pressing the
button 01, you can adjust the brightness
of the map display screen by touching the
key or the key.
USING tH e to UCH-SCR eeN
n To maneuver around the navigation display
screen, touch the screen to select the item
or key displayed. To move around the map
screen, touch and hold to scroll around.
21