ignition NISSAN ALTIMA 2013 L33 / 5.G Quick Reference Guide
[x] Cancel search | Manufacturer: NISSAN, Model Year: 2013, Model line: ALTIMA, Model: NISSAN ALTIMA 2013 L33 / 5.GPages: 28, PDF Size: 1.92 MB
Page 4 of 28
2
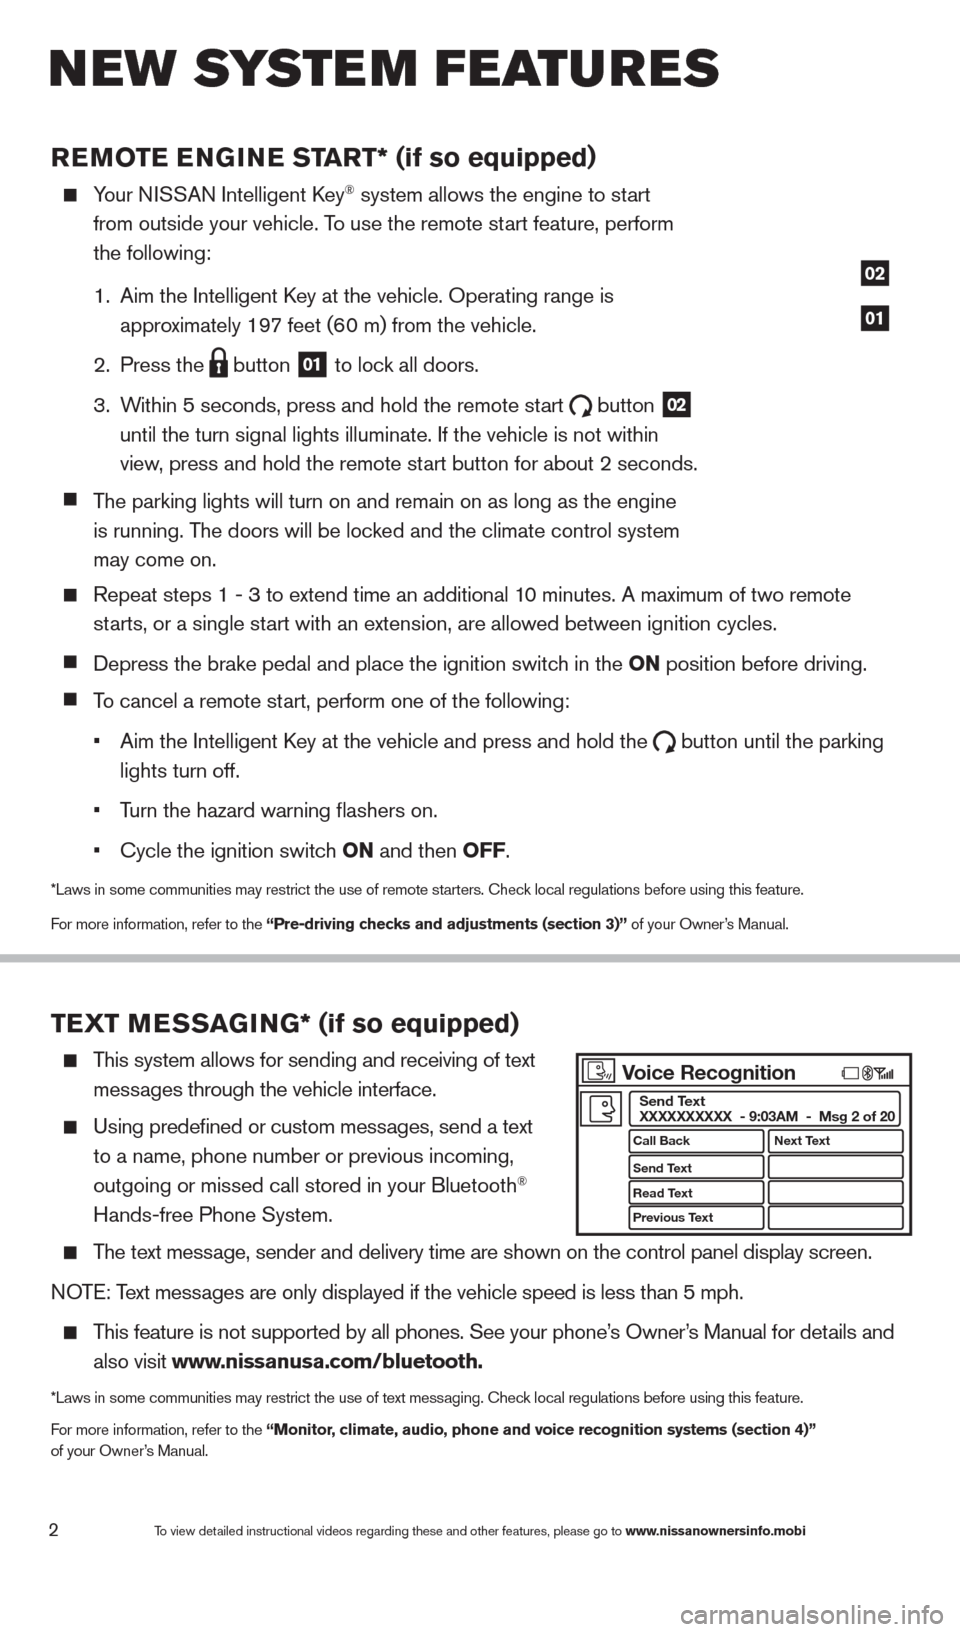
REMOTE ENGINE ST ART* (if so equipped)
Your NISSAN Intelligent key® system allows the engine to start
from outside your vehicle. T
o use the remote start feature, perform
the following:
1.
Aim the Intelligent
k
ey at the vehicle. Operating range
is
appro
ximately 197 feet (60 m) from the vehicle.
2.
Press the button
01 to lock all doors.
3.
W
ithin 5 seconds, press and hold the remote start
button
02
until the turn signal lights illuminate. If the vehicle is not within
view
, press and hold the remote start button for about 2 seconds.
T
he parking lights will turn on and remain on as long as the engine
is running. T
he doors will be locked and the climate control system
may come on.
Repeat steps 1 - 3 to extend time an additional 1 0 minutes. A maximum of two remote
st
arts, or a single start with an extension, are allowed between ignition cycles.
Depress the brake pedal and place the ignition switch in the ON position before driving.
To cancel a remote start, perform one of the following:
•
Aim the Intelligent
k
ey at the vehicle and press and hold the button until the parking
lights turn off.
•
T
urn the hazard warning flashers on.
•
c
ycle the ignition switch ON and then OFF.
*Laws in some communities may restrict the use of remote starters. check local regulations before using this feature.
F or more information, refer to the “Pre-driving checks and adjustments (section 3)” of your Owner’s Manual.
TEXT MESSAGING* (if so equipped)
This system allows for sending and receiving of text
mess
ages through the vehicle interface.
Using predefined or custom mess ages, send a text
to a name, phone number or previous incoming,
outgoing or missed call stored in your Bluetooth®
Hands-free Phone System.
The text message, sender and delivery time are shown on the control panel display scr\
een.
NOTE: Text messages are only displayed if the vehicle speed is less than 5 mph.
This feature is not supported by all phones. See your phone’s Owner’s Manual for details and
also visit
www.nissanusa.com/bluetooth.
*Laws in some communities may restrict the use of text messaging. check local regulations before using this feature.
F or more information, refer to the “Monitor, climate, audio, phone and voice recognition systems (section 4)”
of your Owner’s Manual.
01
02
New system features
To view detailed instructional videos regarding these and other features, please go\
to www.nissanownersinfo.mobi
Voice Recognition
Call Back
Send Text
Read Text
Previous Text Next Text
Send Text
XXXXXXXXXX - 9:03AM - Msg 2 of 20
1482394_13d_AltimaSedan_QRG_030613.indd 23/6/13 1:17 PM
Page 8 of 28
01
TIRE PRESSURE MONITORING SYSTEM (TPMS)
WITH EASY FILL TIRE ALERT
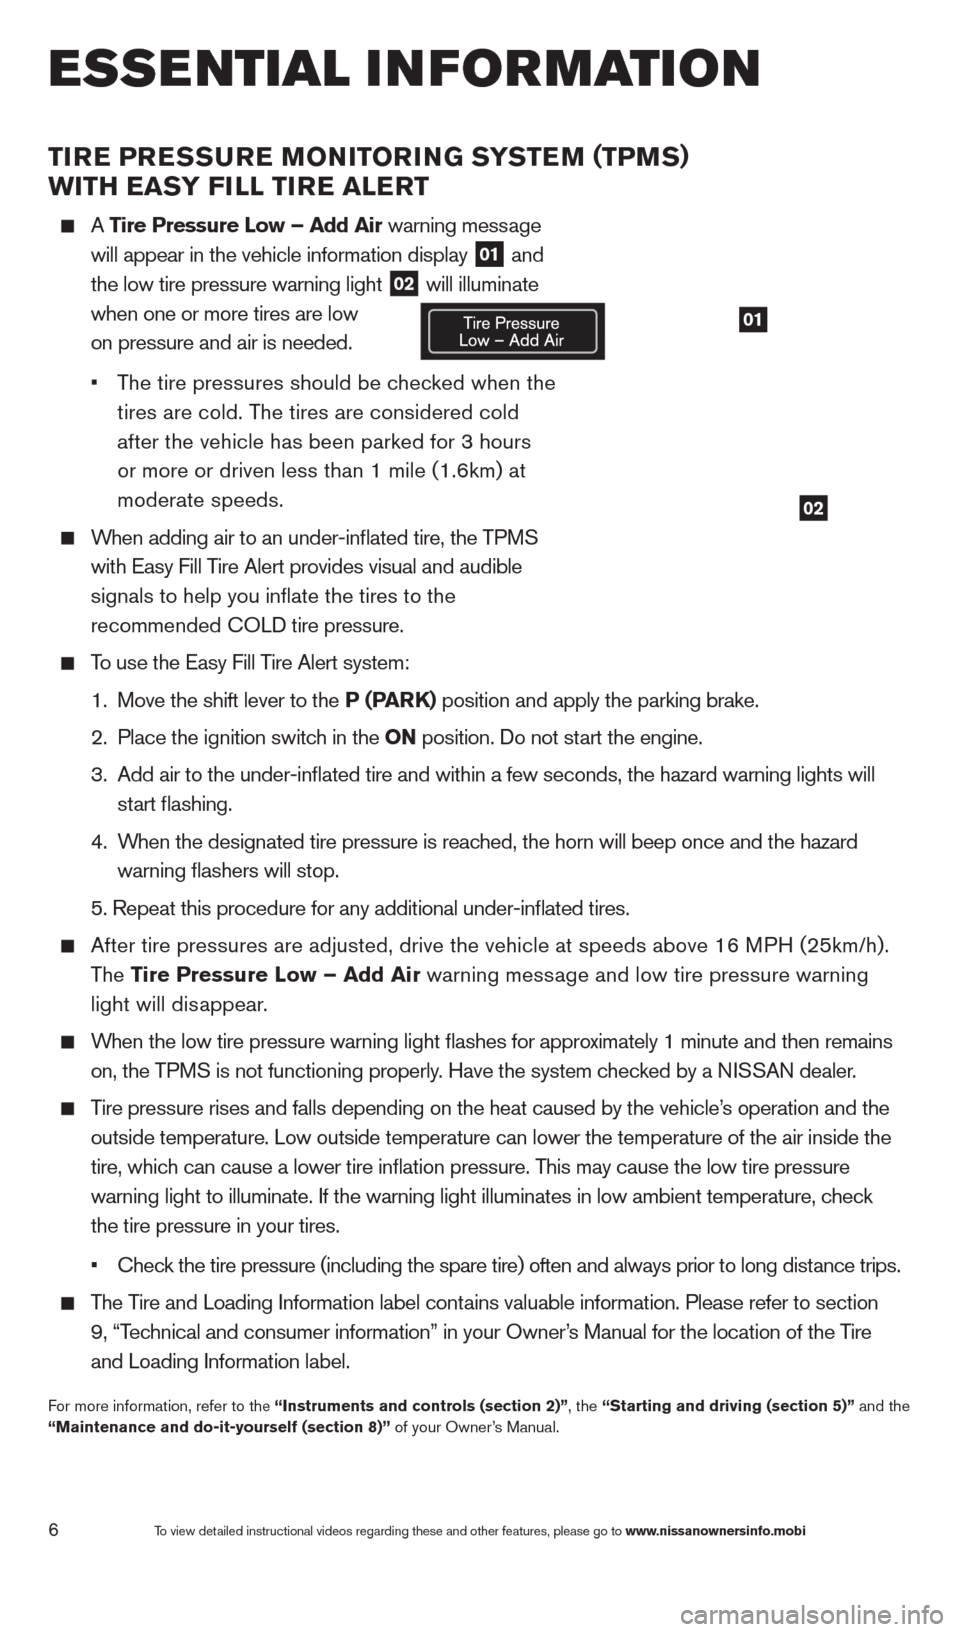
A Tire Pressure Low – Add Air warning message
will appear in the vehicle information display 01 and
the low tire pressure warning light 02 will illuminate
when one or more tires are low
on pressure and air is needed.
•
T
he tire pressures should be checked when the
tires are cold. The tires are considered cold
after the vehicle has been parked for 3 hours
or more or driven less than 1 mile (1.6km) at
moderate speeds.
When adding air to an under-inflated tire, the TPMS
with Easy Fill T
ire Alert provides visual and audible
signals to help you inflate the tires to the
r
ecommended
cO
LD tire pressure.
To use the Easy Fill Tire Alert system:
1.
Move the shift lever to the
P (PARK) position and apply the parking brake.
2.
Place the ignition switc
h in the ON position. Do not start the engine.
3.
Add air to the under-inflated tire and within a few seconds, the hazar\
d warning lights will
st
art flashing.
4.
W
hen the designated tire pressure is reached, the horn will beep once and the hazard
warning flashers will stop.
5. Repeat this procedure for any additional under-inflated tires.
After tire pressures are adjusted, drive the vehicle at speeds above 16 \
M PH (25km/h).
T
he Tire Pressure Low – Add Air warning message and low tire pressure warning
light will dis
appear.
When the low tire pressure warning light flashes for approximately 1 minute and then remains
on, the TP
MS is not functioning properly. Have the system checked by a NISSAN dealer.
Tire pressure rises and falls depending on the heat caused by the vehicle\
’s operation and the
outside temperature. Low outside temperature can lower the temperature o\
f the air inside the
tire, whic
h can cause a lower tire inflation pressure. This may cause the low tire pressure
warning light to illuminate. If the warning light illuminates in low amb\
ient temperature, c
heck
the tire pressure in your tires.
•
c
heck the tire pressure (including the spare tire) often and always prior \
to long distance trips.
The Tire and Loading Information label contains valuable information. Please refer to section
9, “T
echnical and consumer information” in your Owner’s Manual for the location of the Tire
and Loading Information label.
For more information, refer to the “Instruments and controls (section 2)”, the “Starting and driving (section 5)” and the
“Maintenance and do-it-yourself (section 8)” of your Owner’s Manual.
02
6To view detailed instructional videos regarding these and other features, please go\
to www.nissanownersinfo.mobi
esseN tial iNf or matioN
1482394_13d_AltimaSedan_QRG_030613.indd 63/6/13 1:17 PM
Page 10 of 28
NISSAN INTELLIGENT KEY® WITH DOOR AND TRUNK REQUEST
SWITCHES (if so equipped)
The NISSAN Intelligent key® system allows you to lock or unlock your
vehicle, open your trunk and remotely start the engine.
NOTE: It is important to make sure the Intelligent
k
ey is
with you (that is,
in your pocket or purse).
REMOTE ENGINE START (if so equipped)
The remote engine start operating range is approximately 197 feet
(6
0 m) from the vehicle.
To use the remote start feature to start the engine:
1.
Aim the Intelligent
k
ey at the vehicle.
2.
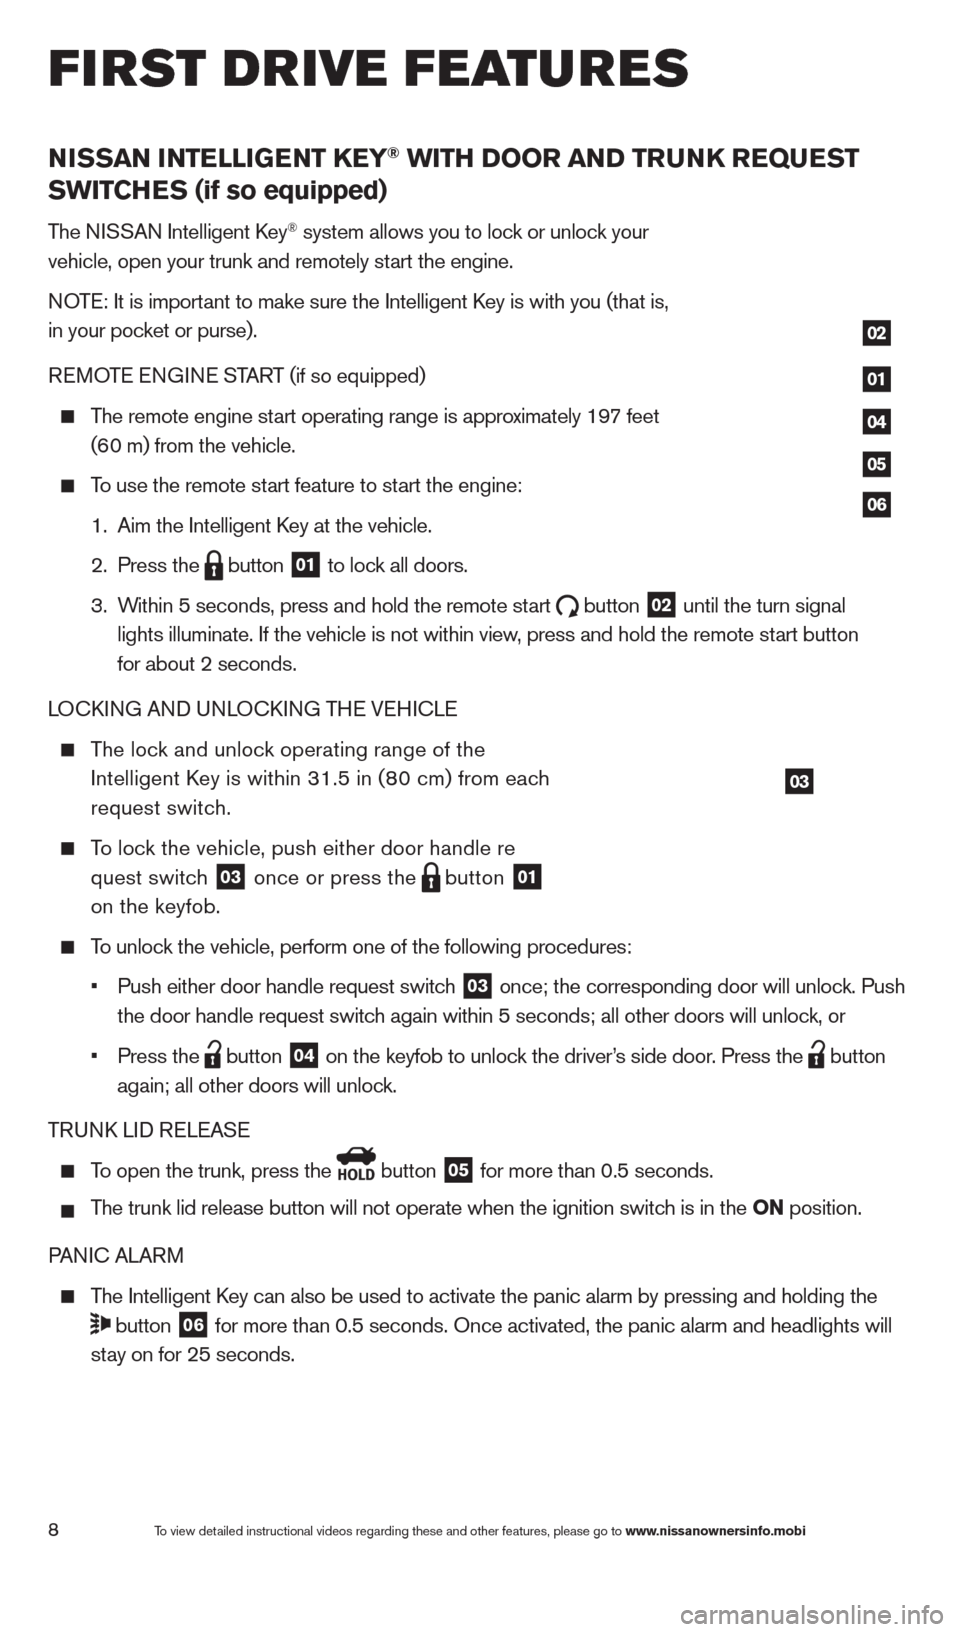
Press the button
01 to lock all doors.
3.
W
ithin 5 seconds, press and hold the remote start
button
02 until the turn signal
lights illuminate. If the vehicle is not within view
, press and hold the remote start button
for about 2 seconds.
LO
ck
ING AND UNLO
ck
ING THE VEHI
c
LE
The lock and unlock operating range of the
Intelligent
k
ey is within 31.5 in (8
0 cm) from each
request switc
h.
To lock the vehicle, push either door handle re
quest switc
h
03 once or press the
button
01
on the keyfob.
To unlock the vehicle, perform one of the following procedures:
•
Push either door handle request switc
h
03 once; the corresponding door will unlock. Push
the door handle request switc
h again within 5 seconds; all other doors will unlock, or
•
Press the button
04 on the keyfob to unlock the driver’s side door. Press the
button
again; all other doors will unloc
k.
TRUN
k
LID RELEASE
To open the trunk, press the
button
05 for more than 0.5 seconds.
T
he trunk lid release button will not operate when the ignition switch is in the ON position.
PANI
c
ALARM
The Intelligent key can also be used to activate the panic alarm by pressing and holding \
the
button
06 for more than 0.5 seconds. Once activated, the panic alarm and headlight\
s will
st
ay on for 25 seconds.
03
01
02
04
05
06
first drive features
8To view detailed instructional videos regarding these and other features, please go\
to www.nissanownersinfo.mobi
1482394_13d_AltimaSedan_QRG_030613.indd 83/6/13 1:17 PM
Page 11 of 28
TRUNK LID RELEASE
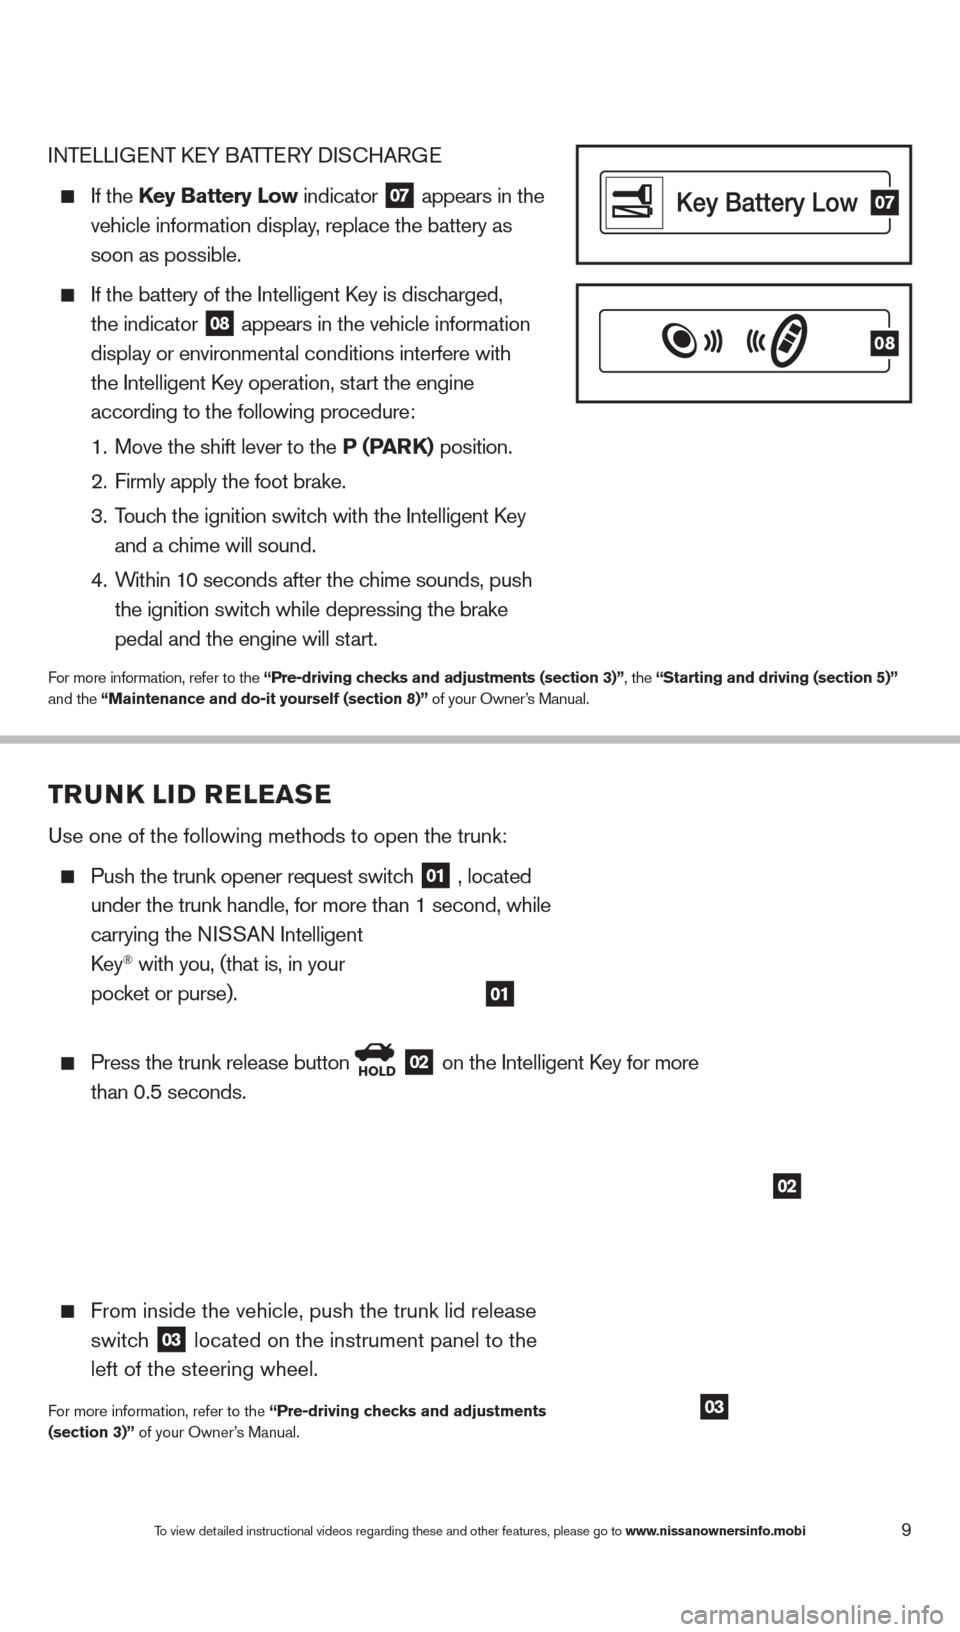
Use one of the following methods to open the trunk:
Push the trunk opener request switch
01 , located
under the trunk handle, for more than 1 second, while
carrying the NI
SSAN
Intelligent
k
ey
® with you, (that is, in your
poc
ket or purse).
Press the trunk release button HOLD 02 on the Intelligent key for more
than 0.5 seconds.
From inside the vehicle, push the trunk lid release
switc
h
03 located on the instrument panel to the
left of the steering wheel.
For more information, refer to the “Pre-driving checks and adjustments
(section 3)” of your Owner’s Manual.
INTELLIGENT kEY BA TTERY DIScHAR GE
If the Key Battery Low indicator
07 appears in the
vehicle information display
, replace the battery as
soon as possible.
If the battery of the Intelligent key is disc harged,
the indicator 08 appears in the vehicle information
display or environment
al conditions interfere with
the Intelligent
k
ey operation, st
art the engine
according to the following procedure:
1.
Move the shift lever to the
P (PARK) position.
2.
Firmly apply the foot brake.
3.
T
ouch the ignition switch with the Intelligent k
ey
and a c
hime will sound.
4.
W
ithin 10 seconds after the chime sounds, push
the ignition switc
h while depressing the brake
pedal and the engine will st
art.
For more information, refer to the “Pre-driving checks and adjustments (section 3)”, the “Starting and driving (section 5)”
and the “Maintenance and do-it yourself (section 8)” of your Owner’s Manual.
07
08
01
02
9To view detailed instructional videos regarding these and other features, please go\
to www.nissanownersinfo.mobi
03
1482394_13d_AltimaSedan_QRG_030613.indd 93/6/13 1:17 PM
Page 12 of 28
POWER SEAT ADJUSTMENTS (if so equipped)
To slide the seat forward or bac kward, push the
control switc
h
01 forward or backward.
To adjust the angle of the seatback, push the switch
02 forward or backward.
S
EA
T
LIFTER
(if so equipped for driver
’s seat)
To adjust the angle and height of the seat cushion,
push the front or rear end of the switc
h
01 up or down.
LUMBAR SUPPORT (if so equipped for driver’s seat)
To adjust the seat lumbar area, push the front or rear end of the switch
03 .
For more information, refer to the “Safety –– Seats, seat belts and supplemental restraint system (section 1)”\
of your
Owner’s Manual.
0102
03
OUTSIDE MIRROR CONTROL SWITCH
To select the right or left side mirror, move the control
switc
h
01 right or left.
To adjust the mirror angle, push the control switch
02
up, down, right or left.
To prevent accidentally moving the mirror,
set the
control switc
h
01 to the middle “neutral” position.
For more information, refer to the “Pre-driving checks and adjustments (section 3)” of your Owner’s Manual.
10
02
01
STARTING/STOPPING THE ENGINE
Depress the brake pedal.
•
If the brake pedal is not depressed, pushing the
ignition switc
h once enters the A
c
c mode.
•
If the ignition is pushed a second time, the vehicle
will enter the O
N mode.
Move the shift lever to P (PARK).
Push the ignition switc h to start the engine.
NOTE: It is important to make sure the NISSAN Intelligent
k
ey
® is with you (that is, in your pocket or purse).
TURNING THE ENGINE OFF
Move the shift lever to the P (PARK) position and apply the parking brake.
Press the ignition switch START/STOP button to turn the engine off.
For more information, refer to the “Starting and driving (section 5)” of your Owner’s Manual.
first drive features
To view detailed instructional videos regarding these and other features, please go\
to www.nissanownersinfo.mobi
1482394_13d_AltimaSedan_QRG_030613.indd 103/6/13 1:17 PM
Page 13 of 28
HEADLIGHT CONTROL SWITCH
HEADLIGHT
c
O
NTROL
Turn the headlight control switch to the position
01 to turn on the front parking, tail, license plate and
instrument panel lights. T urn the switch to the
position
02 to turn on the headlights.
AUTOLIGHT SYSTEM (if so equipped)
The autolight system will automatically turn the headlights on when it is\
dark and off when it is
light. T
he system will keep the headlights on for a period of time after you tur\
n the ignition off
and all doors are closed.
To activate the autolight system, turn the headlight control switch to the AUTO position
03
then push the ignition switc
h to ON. To deactivate the autolight system, turn the headlight
control switc
h to the OFF,
01 or
position
02 .
HIGH BEAM SELE
cT
Push the headlight control switc h forward
04 to
select the high beam function. The blue indicator
light illuminates in the instrument panel. Pull the
headlight control switc h back to the original position
to select the low beam. T
he blue indicator light
goes off.
Pull and release the headlight control switc h
05
to flash the headlight high beams on and off.
FO
G LIGHT SWIT
cH (if so equipped)
N
OTE: The headlights must be on and the low beams
selected for the fog lights to operate.
Turn the switch (inside collar) to the
position
06
to turn the fog lights on.
Turn the switch (inside collar) to the OFF position to
turn the fog lights off.
For more information, refer to the “Instruments and controls (section 2)” of your Owner’s Manual.
01
03
02
04
05
06
To view detailed instructional videos regarding these and other features, please go\
to www.nissanownersinfo.mobi11
1482394_13d_AltimaSedan_QRG_030613.indd 113/6/13 1:17 PM
Page 18 of 28
16
VEHICLE INFORMATION DISPLAY
The vehicle information display 01 displays such items as:
Vehicle settings
Trip computer information
Drive system warnings and settings (if so equipped)
Audio information
Navigation turn by turn
cruise control system information
NISSAN Intelligent key® operation information
Indicators and warnings
Tire pressure information
USING THE VEHI c LE INFORMATION DISPLAY
The vehicle information display can be changed using the
button
02 and the ENTER
buttons
03 located on
the steering wheel.
Press 02 to change the display mode Press
03 to navigate through the mode’s menu Press ENTER
03 to change or select an item
Press 04 to go back to the previous menu
STARTUP DISPLAY
When the ignition is in the A
c
c or ON position, the vehicle information display will support four of
the following modes:
Active system status (if so equipped)
Trip computer
Tire pressure information
Fuel economy
Warnings (if there are any)
RESETTING THE TRIP c
O
MPUTER
1.
Press the button
02 until you reach the trip
computer mode 05.
2.
Press the button again for more than 1.5
seconds to reset the trip computer .
SETTINGS
The setting mode allows you to change the information
displayed in the vehicle information display:
Main Menu Selection Vehicle Settings
Body c olor Language
Maintenance Unit
Alarms Welcome Effects
For more information, refer to the “Instruments and controls (section 2)” of your Owner’s Manual.
01
03
0402
05
system guide
To view detailed instructional videos regarding these and other features, please go\
to www.nissanownersinfo.mobi
1482394_13d_AltimaSedan_QRG_030613.indd 163/6/13 1:17 PM