ECO mode NISSAN ALTIMA 2017 L33 / 5.G Quick Reference Guide
[x] Cancel search | Manufacturer: NISSAN, Model Year: 2017, Model line: ALTIMA, Model: NISSAN ALTIMA 2017 L33 / 5.GPages: 36, PDF Size: 2.33 MB
Page 7 of 36
5
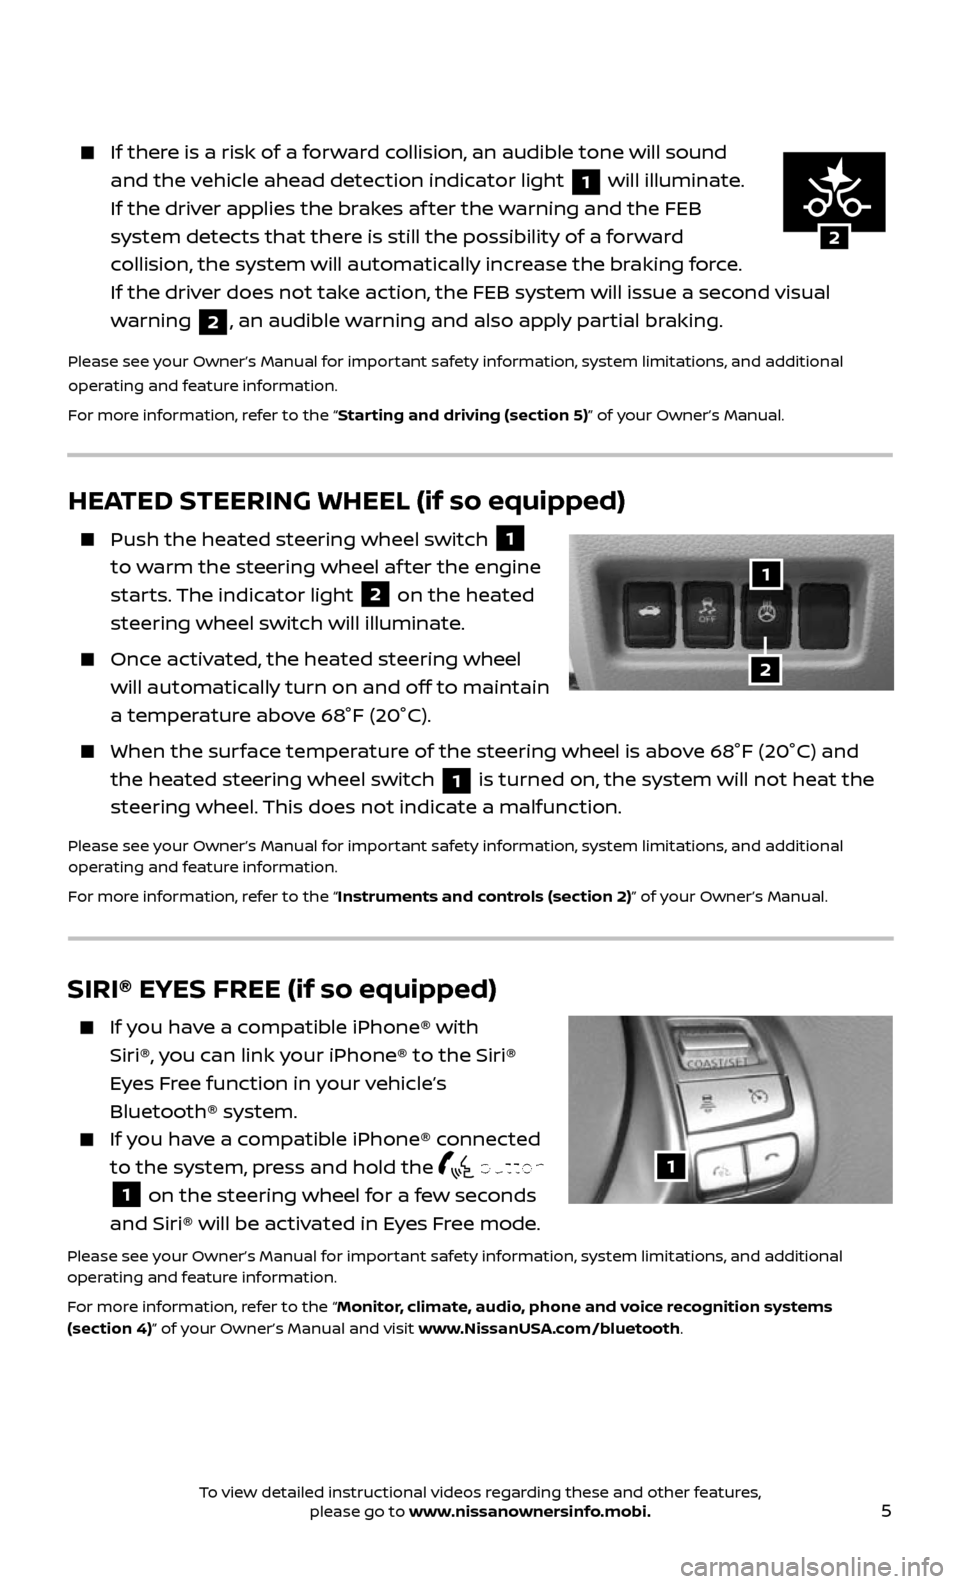
HEATED STEERING WHEEL (if so equipped)
Push the heated steering wheel switch 1
to warm the steering wheel af ter the engine
starts. The indicator light
2 on the heated
steering wheel switch will illuminate.
Once activated, the heated steering wheel
will automatically turn on and off to maintain
a temperature above 68°F (20°C).
When the sur face temperature of the steering wheel is above 68°F (20°C) and
the heated steering wheel switch 1 is turned on, the system will not heat the
steering wheel. This does not indicate a malfunction.
Please see your Owner’s Manual for important safety information, system limitations, and additional
operating and feature information.
For more information, refer to the “Instruments and controls (section 2)” of your Owner’s Manual.
1
2
2
1
2
If there is a risk of a forward collision, an audible tone will sound
and the vehicle ahead detection indicator light 1 will illuminate.
If the driver applies the brakes af ter the warning and the FEB
system detects that there is still the possibility of a forward
collision, the system will automatically increase the braking force.
If the driver does not take action, the FEB system will issue a second visual
warning
2, an audible warning and also apply partial braking.
Please see your Owner’s Manual for important safety information, system limitations, and additional
operating and feature information.
For more information, refer to the “Starting and driving (section 5)” of your Owner’s Manual.
SIRI® EYES FREE (if so equipped)
If you have a compatible iPhone® with
Siri®, you can link your iPhone® to the Siri®
Eyes Free function in your vehicle’s
Bluetooth® system.
If you have a compatible iPhone® connected
to the system, press and hold the button
1 on the steering wheel for a few seconds
and Siri® will be activated in Eyes Free mode.
Please see your Owner’s Manual for important safety information, system limitations, and additional
operating and feature information.
For more information, refer to the “Monitor, climate, audio, phone and voice recognition systems
(section 4)” of your Owner’s Manual and visit www.NissanUSA.com/bluetooth.
1
To view detailed instructional videos regarding these and other features, please go to www.nissanownersinfo.mobi.
Page 9 of 36
7
ESSENTIAL INFORMATION
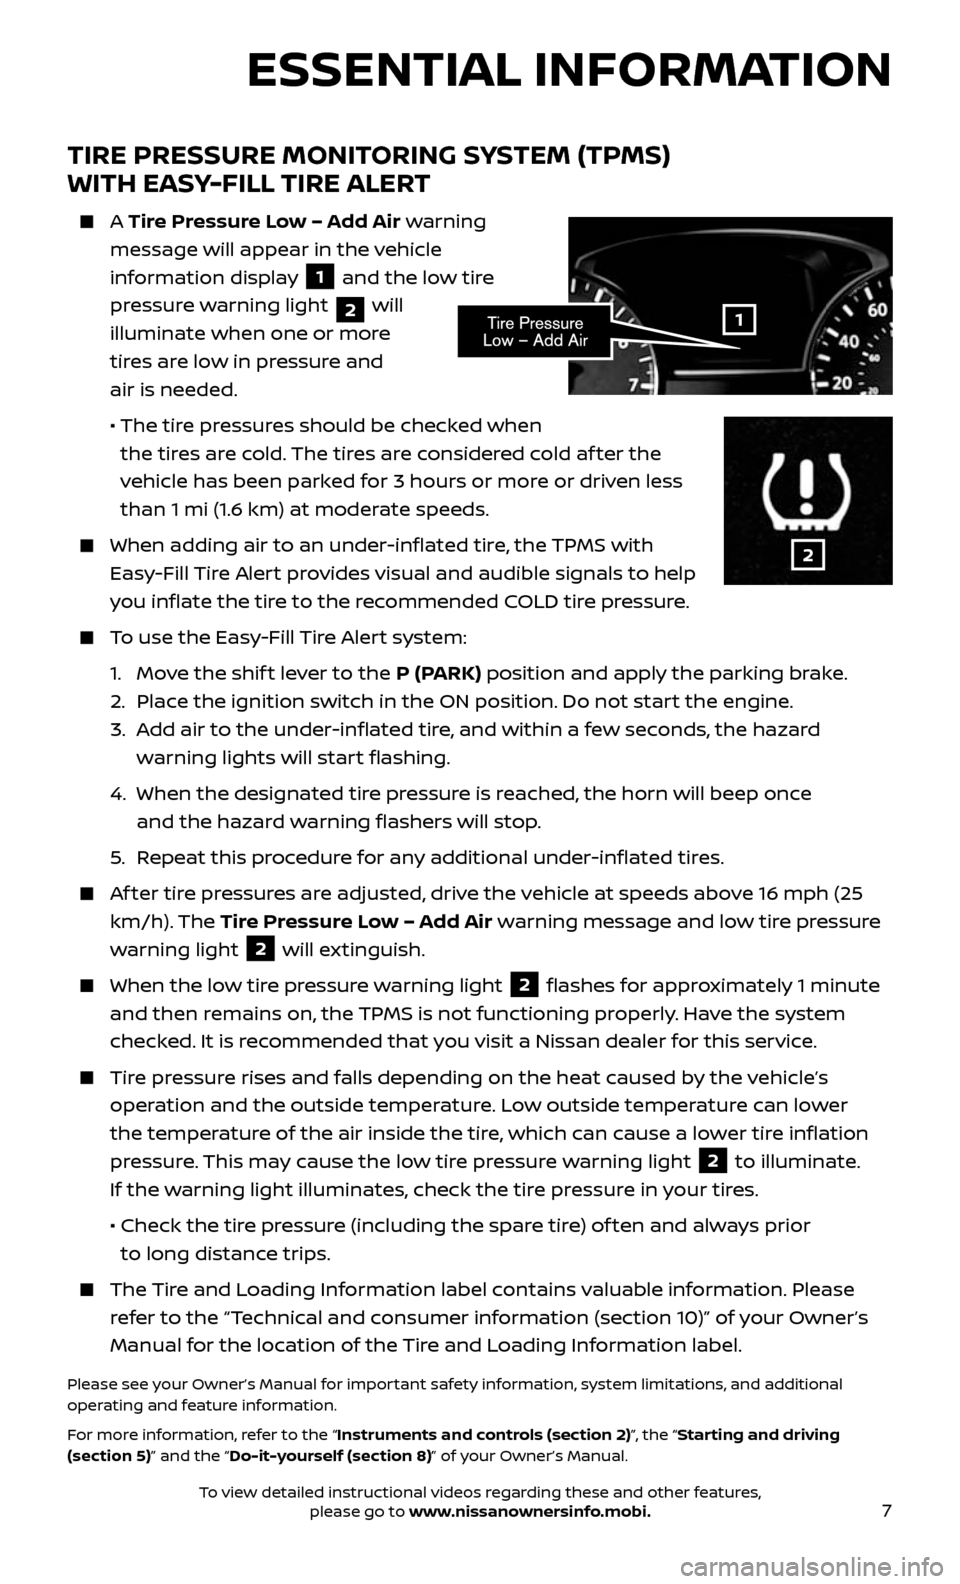
TIRE PRESSURE MONITORING SYSTEM (TPMS)
WITH EASY-FILL TIRE ALERT
A Tire Pressure Low – Add Air warning
message will appear in the vehicle
information display
1 and the low tire
pressure warning light
2 will
illuminate when one or more
tires are low in pressure and
air is needed.
• The tir e pressures should be checked when
the tires are cold. The tires are considered cold af ter the
vehicle has been parked for 3 hours or more or driven less
than 1 mi (1.6 km) at moderate speeds.
When adding air to an under -inflated tire, the TPMS with
Easy-Fill Tire Alert provides visual and audible signals to help
you inflate the tire to the recommended COLD tire pressure.
To use the Easy-Fill Tire Alert system:
1. Move the shif t lever to the P (PARK) position and apply the parking brake.
2. Place the ignition switch in the ON position. Do not start the engine.
3. Add air to the under-inflated tire, and within a few seconds, the hazard
warning lights will start flashing.
4. When the designated tir e pressure is reached, the horn will beep once
and the hazard warning flashers will stop.
5. Repeat this procedure for any additional under-inflated tires.
Af ter tire pressures are adjusted, drive the vehicle at speeds above 16 mph (25
km/h). The Tire Pressure Low – Add Air warning message and low tire pressure
warning light
2 will extinguish.
When the lo w tire pressure warning light 2 flashes for approximately 1 minute
and then remains on, the TPMS is not functioning properly. Have the system
checked. It is recommended that you visit a Nissan dealer for this service.
Tire pressure rises and falls depending on the heat caused by the vehicle’s
operation and the outside temperature. Low outside temperature can lower
the temperature of the air inside the tire, which can cause a lower tire inflation
pressure. This may cause the low tire pressure warning light
2 to illuminate.
If the warning light illuminates, check the tire pressure in your tires.
• Check the tir e pressure (including the spare tire) of ten and always prior
to long distance trips.
The Tire and Loading Information label contains valuable information. Please
refer to the “Technical and consumer information (section 10)” of your Owner’s
Manual for the location of the Tire and Loading Information label.
Please see your Owner’s Manual for important safety information, system limitations, and additional
operating and feature information.
For more information, refer to the “Instruments and controls (section 2)”, the “Starting and driving
(section 5)” and the “Do-it-yourself (section 8)” of your Owner’s Manual.
1
2
To view detailed instructional videos regarding these and other features, please go to www.nissanownersinfo.mobi.
Page 11 of 36
9
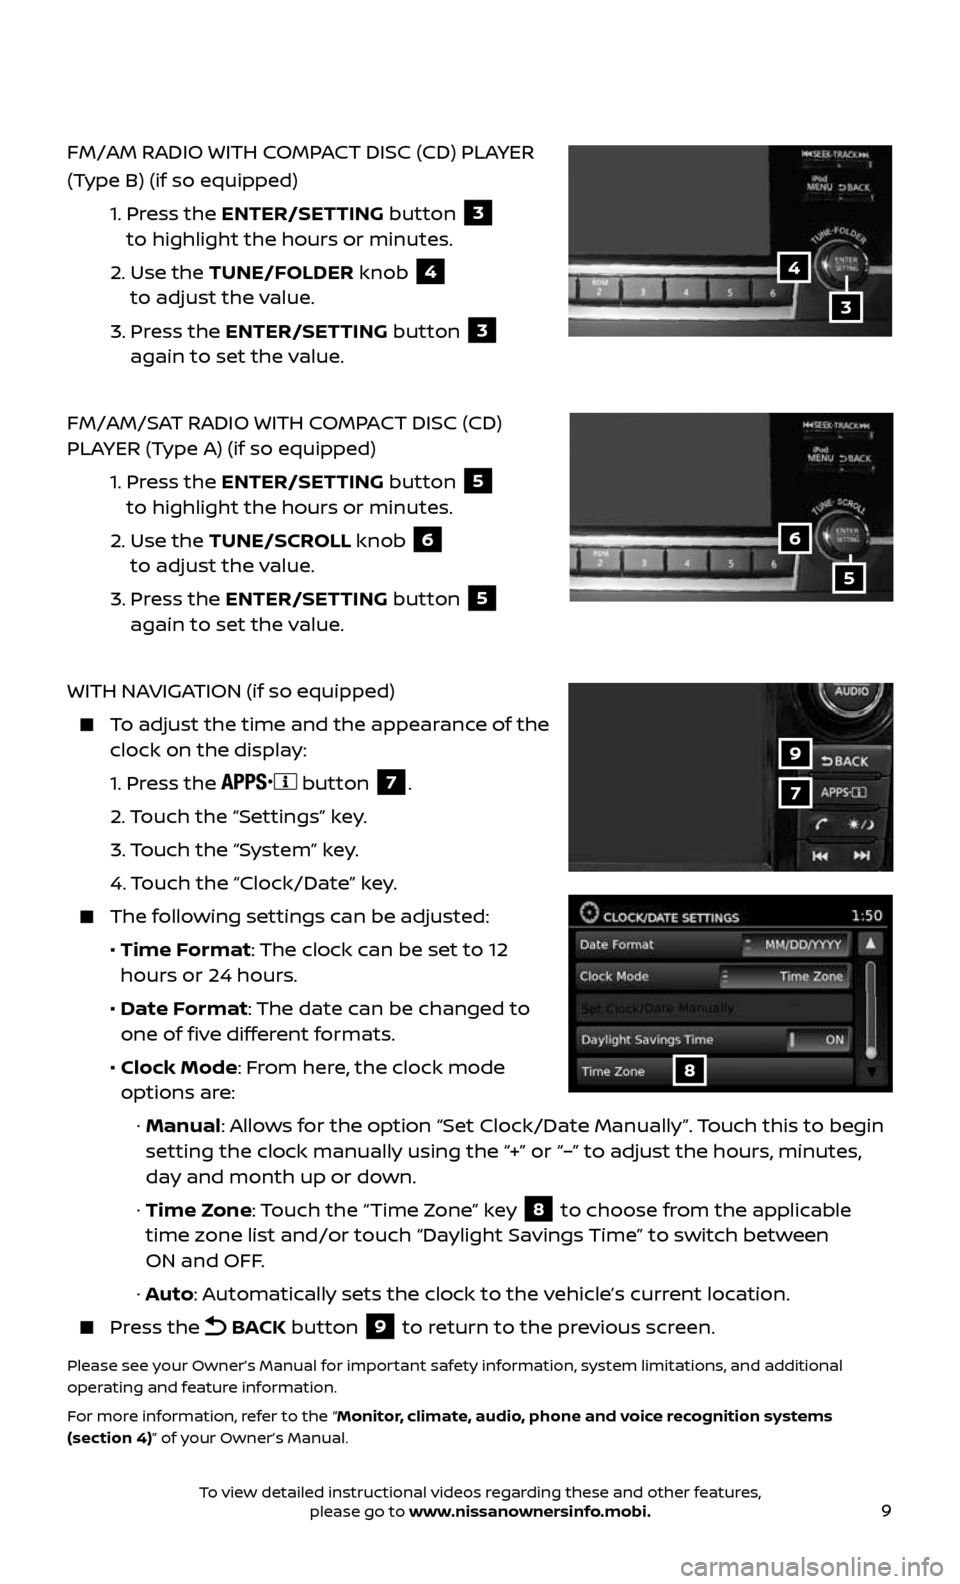
FM/AM RADIO WITH COMPACT DISC (CD) PLAYER
(Type B) (if so equipped)
1. Press the ENTER/SETTING button 3
to highlight the hours or minutes.
2. Use the TUNE/FOLDER knob 4
to adjust the value.
3. Press the ENTER/SETTING button 3
again to set the value.
FM/AM/SAT RADIO WITH COMPACT DISC (CD)
PLAYER (Type A) (if so equipped)
1. Press the ENTER/SETTING button 5
to highlight the hours or minutes.
2. Use the TUNE/SCROLL knob 6
to adjust the value.
3. Press the ENTER/SETTING button 5
again to set the value.
WITH NAVIGATION (if so equipped)
To adjust the time and the appearance of the clock on the display:
1. Press the button 7.
2. Touch the “Settings” key.
3. Touch the “System” key.
4. Touch the “Clock/Date” key.
The following settings can be adjusted:
• Time Format: The clock can be set to 12
hours or 24 hours.
• Date Format: The date can be changed to
one of five different formats.
• Clock Mode: From here, the clock mode
options are:
· Manual: Allows for the option “Set Clock/Date Manually”. Touch this to begin
setting the clock manually using the “+” or “–” to adjust the hours, minutes,
day and month up or down.
· Time Zone: Touch the “Time Zone” key 8 to choose from the applicable
time zone list and/or touch “Daylight Savings Time” to switch between
ON and OFF.
· Auto: Automatically sets the clock to the vehicle’s current location.
Press the BACK button 9 to return to the previous screen.
Please see your Owner’s Manual for important safety information, system limitations, and additional
operating and feature information.
For more information, refer to the “Monitor, climate, audio, phone and voice recognition systems
(section 4)” of your Owner’s Manual.
7
9
8
4
6
3
5
To view detailed instructional videos regarding these and other features, please go to www.nissanownersinfo.mobi.
Page 19 of 36
17
1
6
4
5
3
2
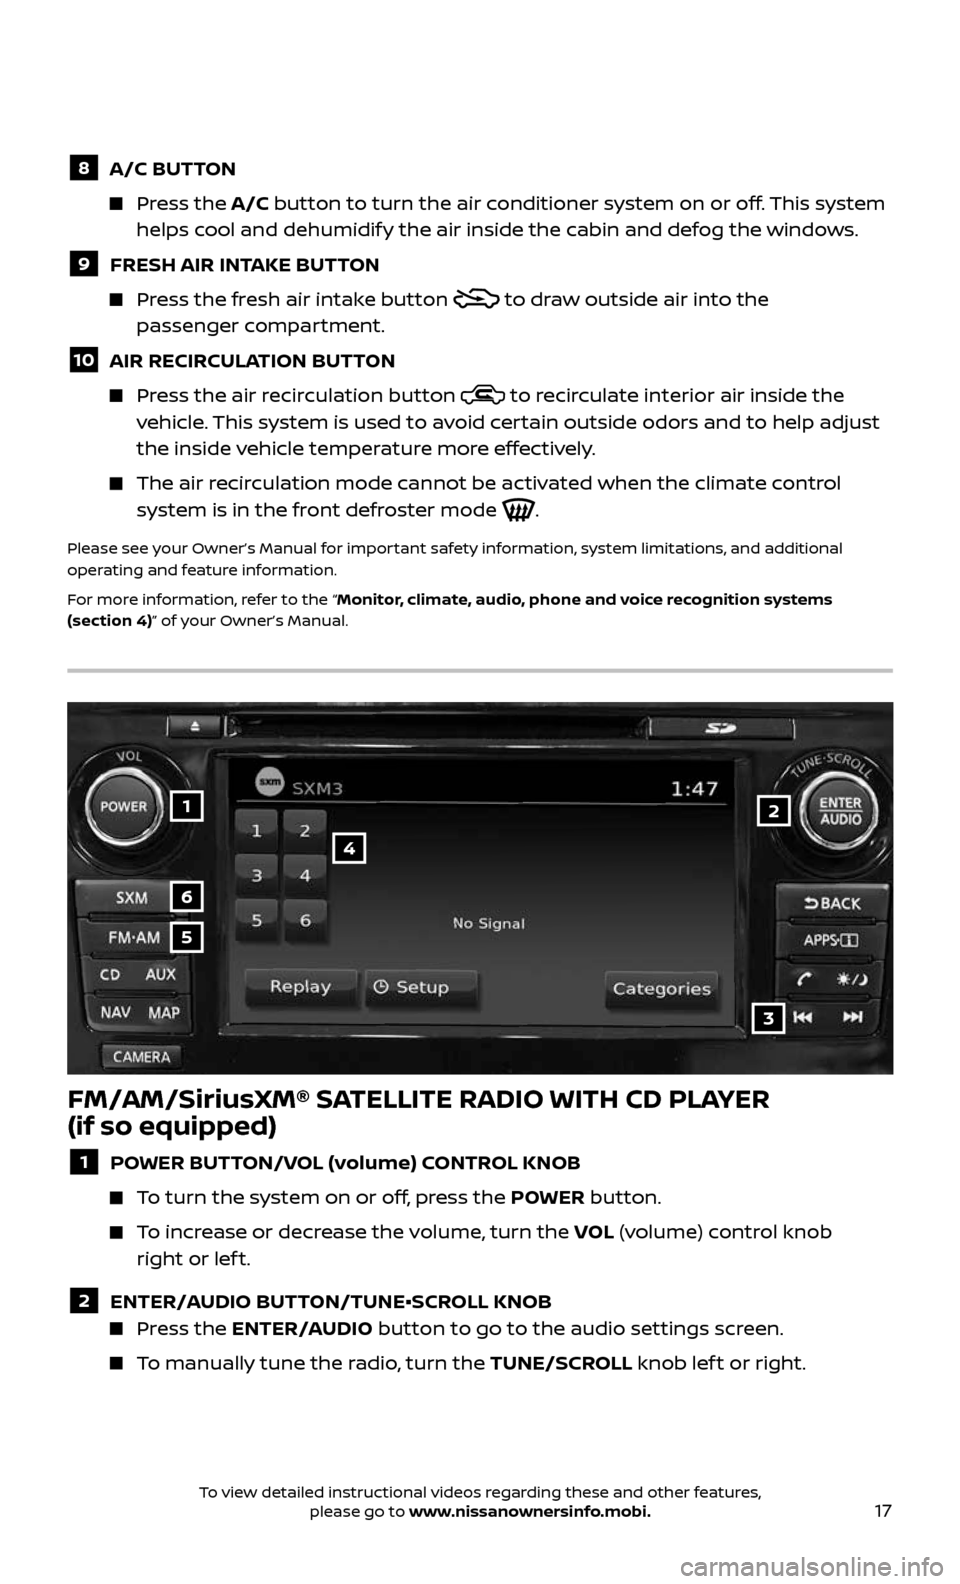
FM/AM/SiriusXM® SATELLITE RADIO WITH CD PLAYER
(if so equipped)
1 POWER BUTTON/VOL (volume) CONTROL KNOB
To turn the system on or off, press the POWER button.
To increase or decrease the volume, turn the VOL (volume) control knob
right or lef t.
2 ENTER/AUDIO BUTTON/TUNE•SCROLL KNOB Press the ENTER/AUDIO button to go to the audio settings screen.
To manually tune the radio, turn the TUNE/SCROLL knob lef t or right.
8 A/C BUTTON
Press the A/C button to turn the air conditioner system on or off. This system
helps cool and dehumidify the air inside the cabin and defog the windows.
9 FRESH AIR INTAKE BUTTON
Press the fresh air intake button to draw outside air into the
passenger compartment.
10 AIR RECIRCULATION BUTTON
Press the air recirculation button to recirculate interior air inside the vehicle. This system is used to avoid certain outside odors and to help adjust
the inside vehicle temperature more effectively.
The air recirculation mode cannot be activated when the climate control system is in the front defroster mode .
Please see your Owner’s Manual for important safety information, system limitations, and additional
operating and feature information.
For more information, refer to the “Monitor, climate, audio, phone and voice recognition systems
(section 4)” of your Owner’s Manual.
To view detailed instructional videos regarding these and other features, please go to www.nissanownersinfo.mobi.
Page 23 of 36
21
VEHICLE INFORMATION DISPLAY
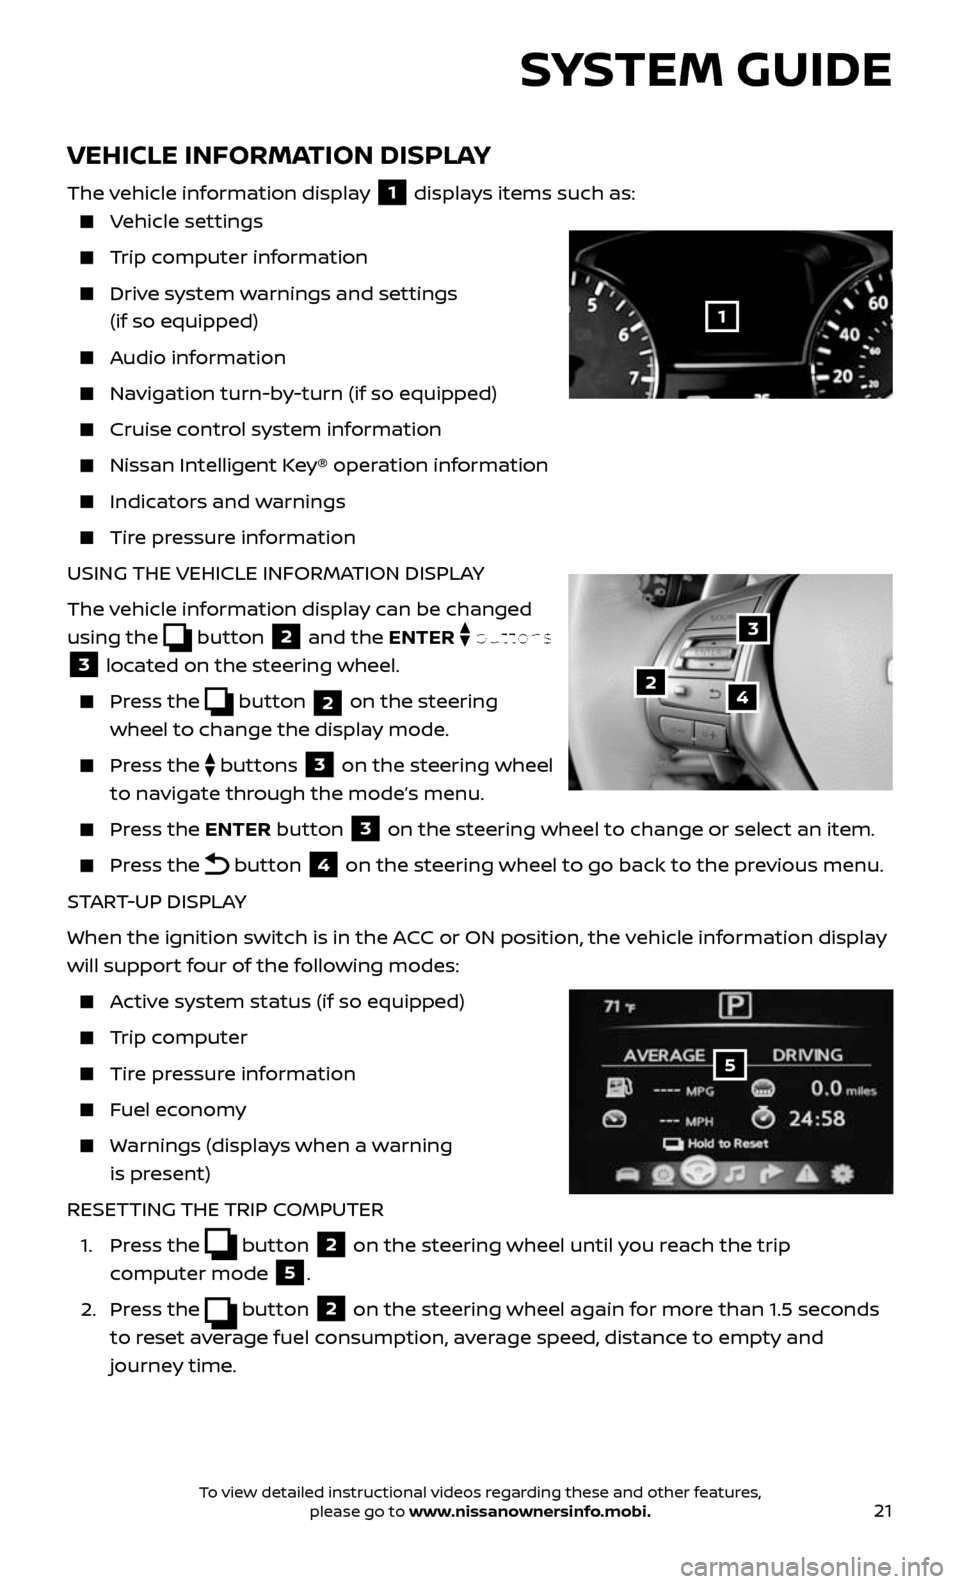
The vehicle information display 1 displays items such as:
Vehicle settings
Trip computer information
Drive system warnings and settings
(if so equipped)
Audio information
Navigation turn-by-turn (if so equipped)
Cruise control system information
Nissan Intel ligent Key® operation information
Indicators and warnings
Tire pressure information
USING THE VEHICLE INFORMATION DISPLAY
The vehicle information display can be changed
using the
button 2 and the ENTER buttons
3 located on the steering wheel.
Press the button 2 on the steering
wheel to change the display mode.
Press the buttons 3 on the steering wheel
to navigate through the mode’s menu.
Press the ENTER button 3 on the steering wheel to change or select an item.
Press the button 4 on the steering wheel to go back to the previous menu.
START-UP DISPLAY
When the ignition switch is in the ACC or ON position, the vehicle information display
will support four of the following modes:
Active system status (if so equipped)
Trip computer
Tire pressure information
Fuel economy
Warnings (displays when a warning
is present)
RESETTING THE TRIP COMPUTER
1. Press the button 2 on the steering wheel until you reach the trip
computer mode
5.
2. Press the button 2 on the steering wheel again for more than 1.5 seconds
to reset average fuel consumption, average speed, distance to empty and
journey time.
3
42
5
SYSTEM GUIDE
1
To view detailed instructional videos regarding these and other features, please go to www.nissanownersinfo.mobi.
Page 26 of 36
24
BLUETOOTH® SYSTEM WITHOUT NAVIGATION*
(if so equipped)
CONNECTING PROCEDURE WITHOUT NAVIGATION
(Type A) (if so equipped)
1. Press the button on the steering wheel.
2. Af ter the command, say “Connect Phone”.
3. The system wil l confirm your command. Af ter
the tone, say “Add Phone”, and then follow the
voice prompts to complete the connecting
procedure from your handset.
• The connecting procedure varies according
to each cellular phone. See your cellular
phone’s Owner’s Manual for details and also
visit www.NissanUSA.com/bluetooth.
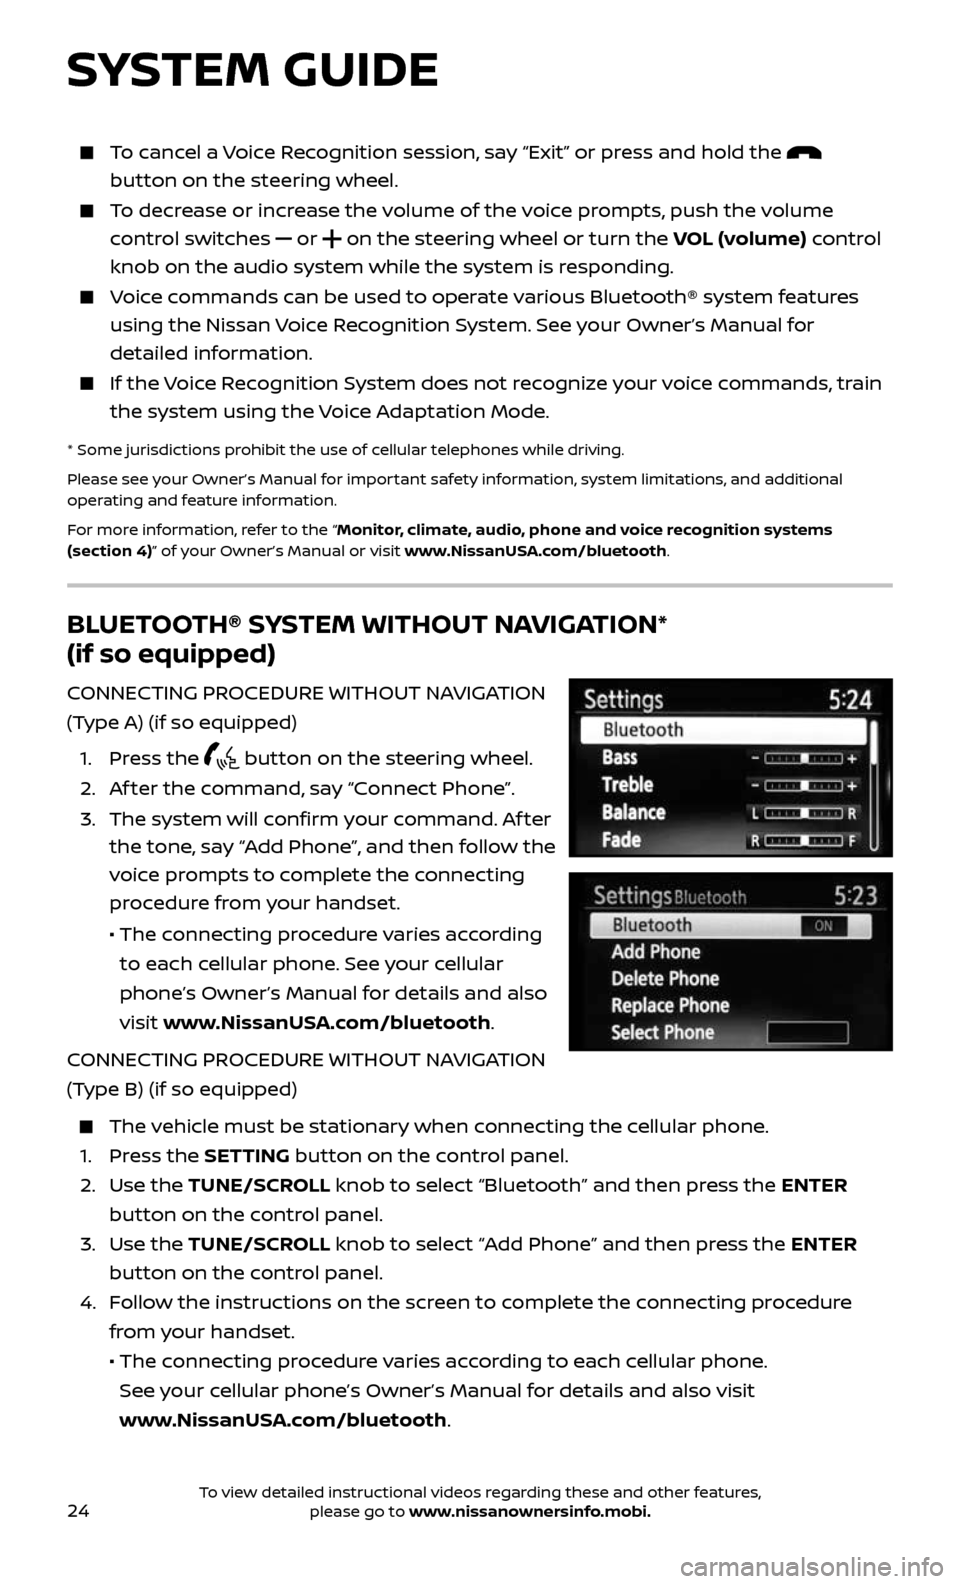
CONNECTING PROCEDURE WITHOUT NAVIGATION
(Type B) (if so equipped)
The vehicle must be stationary when connecting the cellular phone.
1. Press the SETTING button on the control panel.
2. Use the TUNE/SCROLL knob to select “Bluetooth” and then press the ENTER
button on the control panel.
3. Use the TUNE/SCROLL knob to select “Add Phone” and then press the ENTER
button on the control panel.
4. Follow the instructions on the screen to complete the connecting procedure
from your handset.
• The c onnecting procedure varies according to each cellular phone.
See your cellular phone’s Owner’s Manual for details and also visit
www.NissanUSA.com/bluetooth.
SYSTEM GUIDE
To cancel a Voice Recognition session, say “Exit” or press and hold the
button on the steering wheel.
To decrease or increase the volume of the voice prompts, push the volume
control switches or on the steering wheel or turn the VOL (volume) control
knob on the audio system while the system is responding.
Voice commands can be used to operate various Bluetooth® system features
using the Nissan Voice Recognition System. See your Owner’s Manual for
detailed information.
If the Voice Recognition System does not recognize your voice commands, train
the system using the Voice Adaptation Mode.
* Some jurisdictions prohibit the use of cellular telephones while driving.
Please see your Owner’s Manual for important safety information, system limitations, and additional
operating and feature information.
For more information, refer to the “Monitor, climate, audio, phone and voice recognition systems
(section 4)” of your Owner’s Manual or visit www.NissanUSA.com/bluetooth.
To view detailed instructional videos regarding these and other features, please go to www.nissanownersinfo.mobi.
Page 30 of 36
28
SYSTEM GUIDE
These functions will become available again when the vehicle speed is reduced
to 5 mph (8 km/h). Voice commands may be available for some of the restricted
functions. For more information, refer to the “Monitor, climate, audio, phone and
voice recognition systems (section 4)” of your Owner’s Manual.
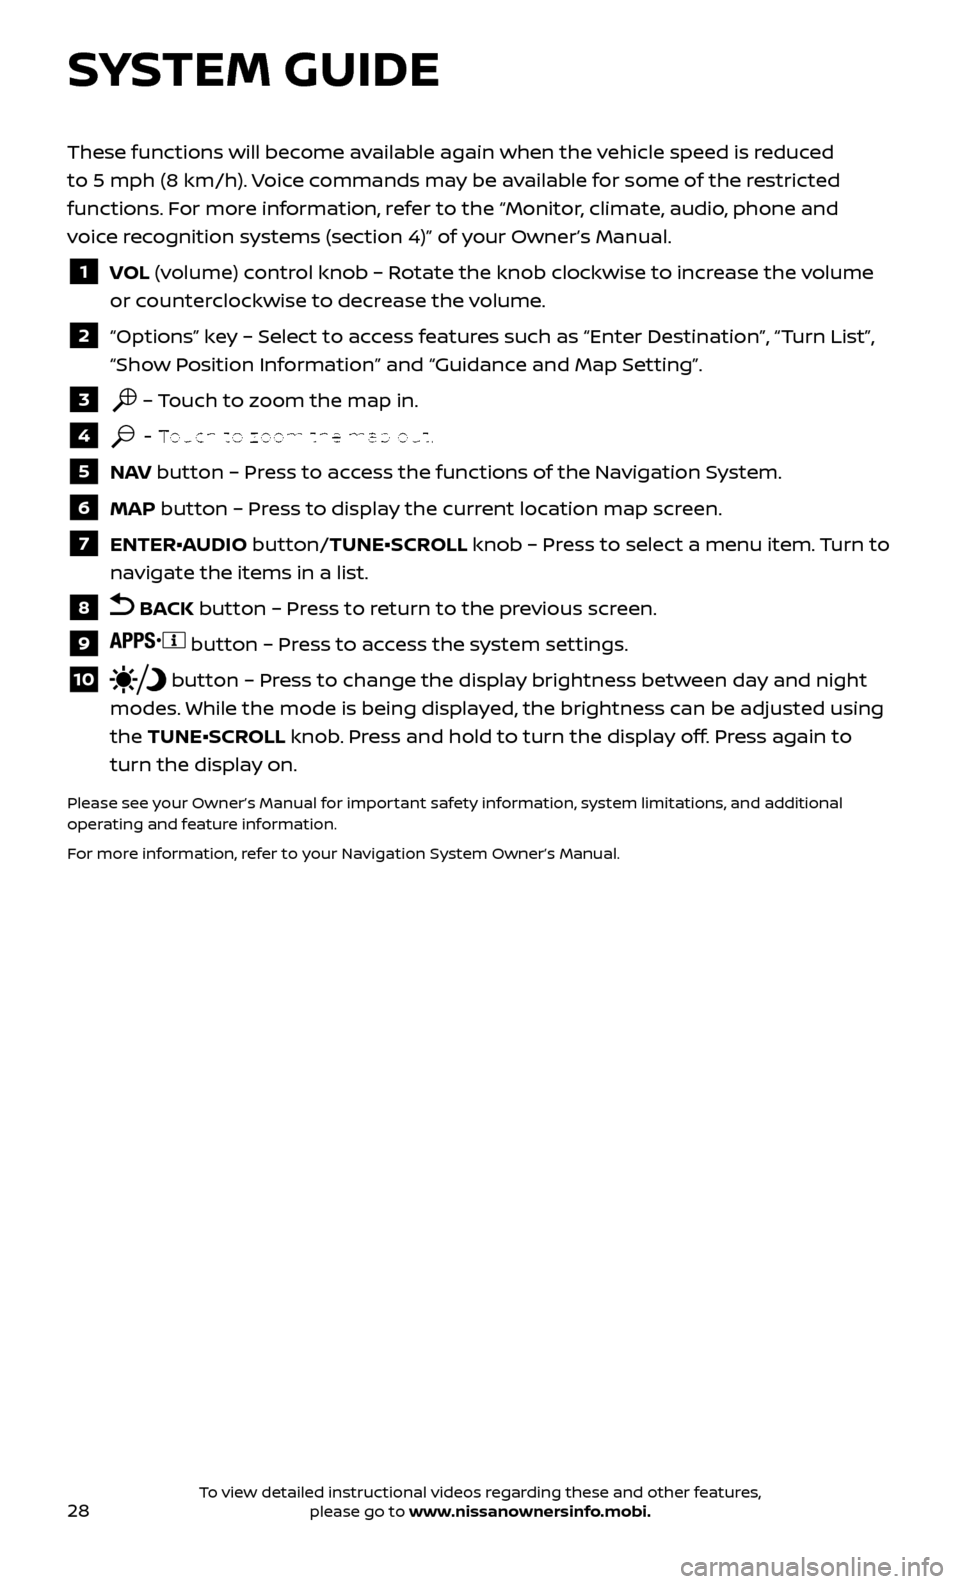
1 VOL (volume) control knob – Rotate the knob clockwise to increase the volume
or counterclockwise to decrease the volume.
2 “Options” key – Select to access features such as “Enter Destination”, “Turn List”,
“Show Position Information” and “Guidance and Map Setting”.
3 – Touch to zoom the map in.
4 – Touch to zoom the map out.
5 NAV button – Press to access the functions of the Navigation System.
6 MAP button – Press to display the current location map screen.
7 ENTER•AUDIO button/TUNE•SCROLL knob – Press to select a menu item. Turn to
navigate the items in a list.
8 BACK button – Press to return to the previous screen.
9 button – Press to access the system settings.
10 button – Press to change the display brightness between day and night
modes. While the mode is being displayed, the brightness can be adjusted using
the TUNE•SCROLL knob. Press and hold to turn the display off. Press again to
turn the display on.
Please see your Owner’s Manual for important safety information, system limitations, and additional
operating and feature information.
For more information, refer to your Navigation System Owner’s Manual.
To view detailed instructional videos regarding these and other features, please go to www.nissanownersinfo.mobi.