park NISSAN ALTIMA 2023 Owners Manual
[x] Cancel search | Manufacturer: NISSAN, Model Year: 2023, Model line: ALTIMA, Model: NISSAN ALTIMA 2023Pages: 644, PDF Size: 4.12 MB
Page 15 of 644
16. Electronic parking brake switch(if so equipped) (P. 5-25)
Automatic brake hold switch
(if so equipped) (P. 5-27)
17. Push-button ignition switch (P. 5-13)
18. Cruise control switches (if so equipped)
(P. 5-68)
Intelligent Cruise Control (ICC) switches
(if so equipped) (P. 5-71)
Bluetooth® Hands-free Phone System*
ProPILOT Assist Switch (if so equipped)
(P. 5-94)
19. Driver supplemental knee airbag
(P. 1-47)
20. Hood release (P. 3-22) Fuel-filler door release (P. 3-25)
Tilt/telescopic steering wheel controls
(P. 3-27)
21. Trip computer reset switch (P. 2-4) Instrument brightness control (P. 2-62)
Steering assist switch (for vehicles with
ProPILOT Assist) (if so equipped)
(P. 2-66)
Trunk opener (P. 3-22)
*: For additional information, refer to the
separate NissanConnect® Owner's
Manual.
Refer to the page number indicated in
parentheses for operating details.
Illustrated table of contents0-7
Page 18 of 644
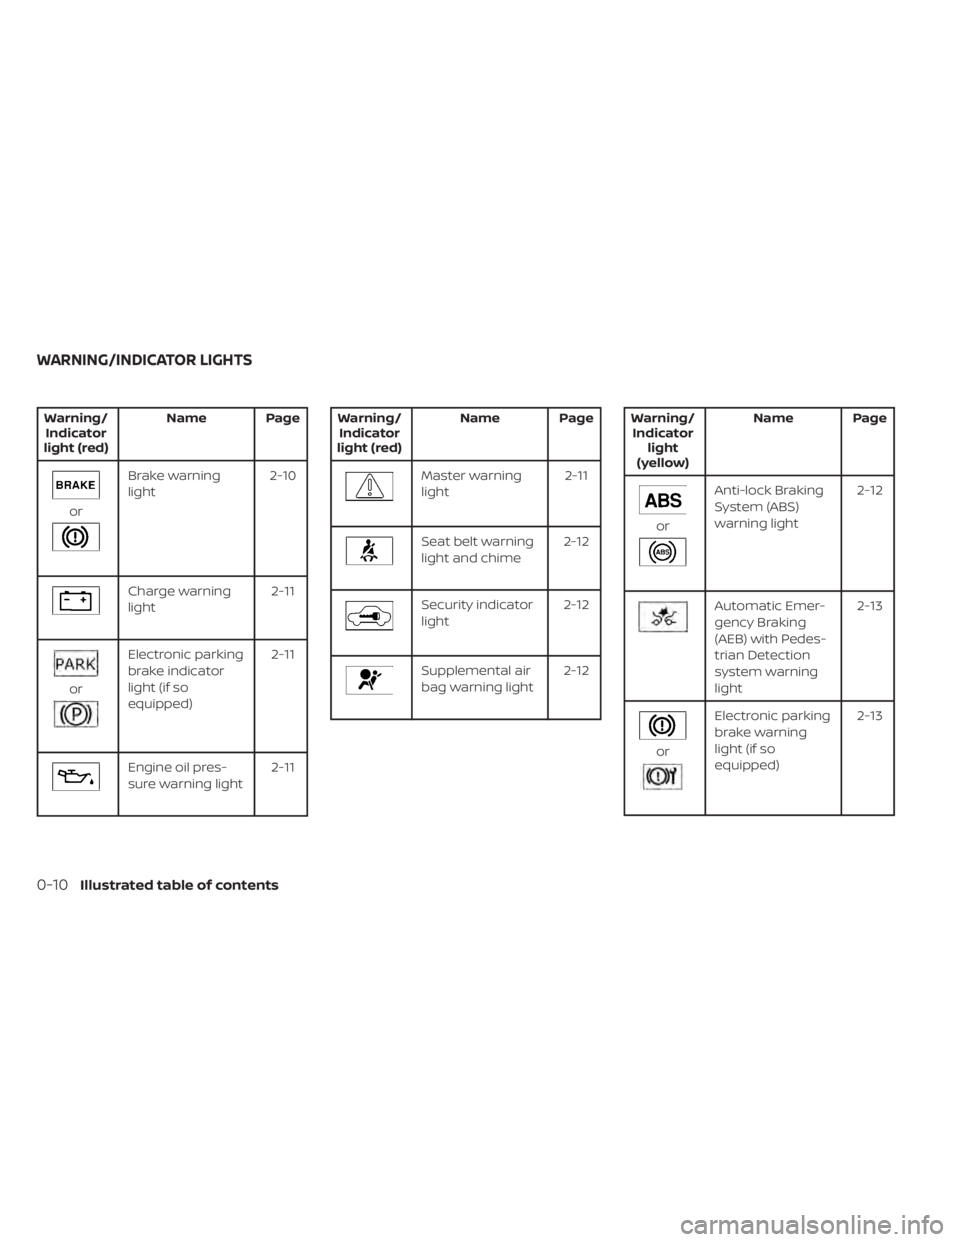
Warning/Indicator
light (red) Name Page
or
Brake warning
light
2-10
Charge warning
light 2-11
or
Electronic parking
brake indicator
light (if so
equipped)2-11
Engine oil pres-
sure warning light
2-11
Warning/
Indicator
light (red) Name Page
Master warning
light
2-11
Seat belt warning
light and chime2-12
Security indicator
light2-12
Supplemental air
bag warning light2-12
Warning/
Indicator light
(yellow) Name Page
or
Anti-lock Braking
System (ABS)
warning light
2-12
Automatic Emer-
gency Braking
(AEB) with Pedes-
trian Detection
system warning
light 2-13
or
Electronic parking
brake warning
light (if so
equipped)
2-13
WARNING/INDICATOR LIGHTS
0-10Illustrated table of contents
Page 23 of 644
CAUTION
When adjusting the seat positions, be
sure not to contact any moving parts to
avoid possible injuries and/or damage.
FRONT MANUAL SEAT
ADJUSTMENT (if so equipped)
Your vehicle seats can be adjusted manu-
ally. For additional information about ad-
justing the seats, refer to the steps outlined
in this section.
WARNING
Before driving the vehicle, return the
seatback to an upright seating position
af ter manually releasing it. Also, make
sure the seat is locked in place. Failure
to do so may cause the seat to move in
a collision or sudden stop. This may re-
sult in damage to the seat or personal
injury.
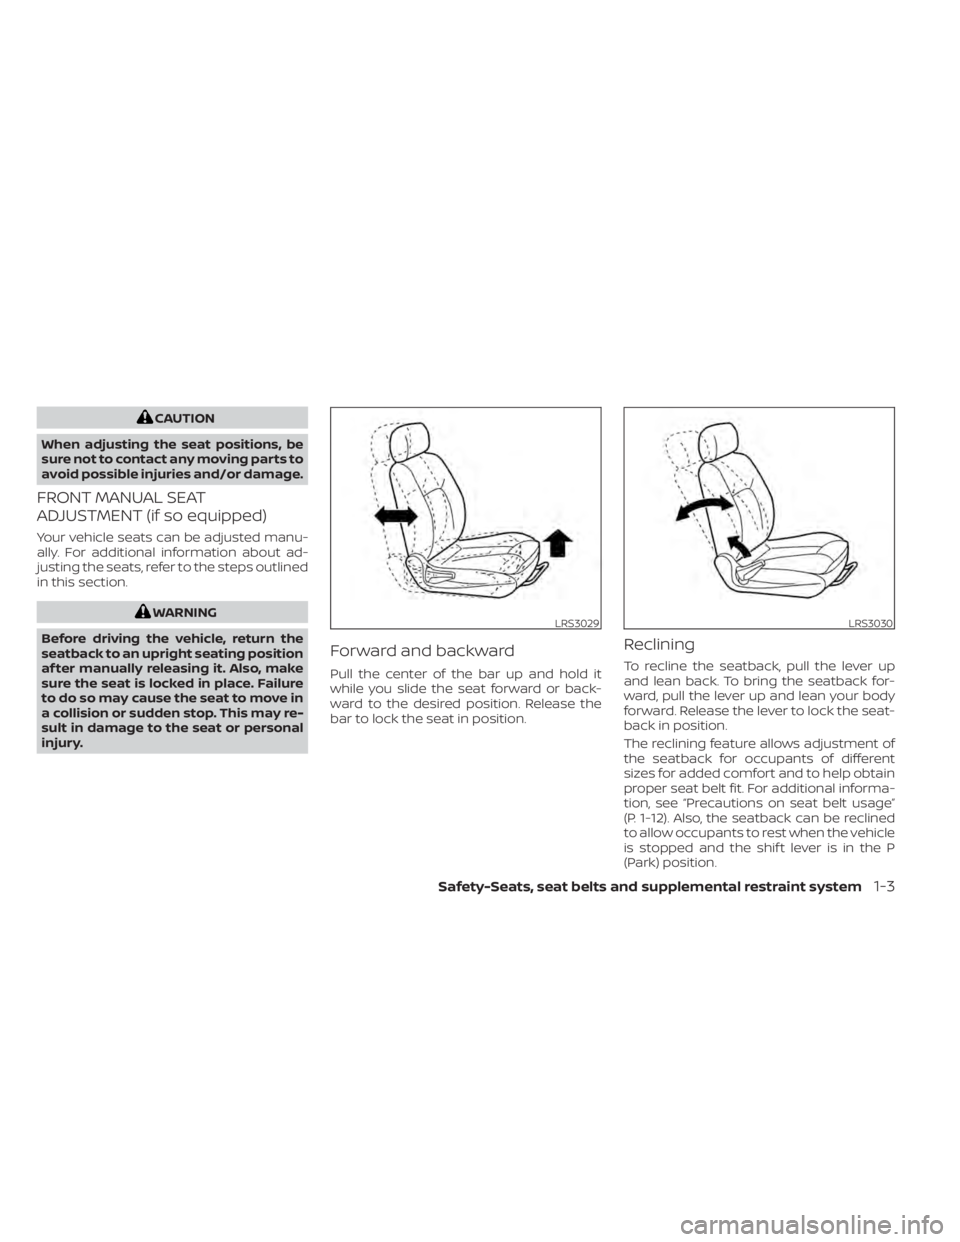
Forward and backward
Pull the center of the bar up and hold it
while you slide the seat forward or back-
ward to the desired position. Release the
bar to lock the seat in position.
Reclining
To recline the seatback, pull the lever up
and lean back. To bring the seatback for-
ward, pull the lever up and lean your body
forward. Release the lever to lock the seat-
back in position.
The reclining feature allows adjustment of
the seatback for occupants of different
sizes for added comfort and to help obtain
proper seat belt fit. For additional informa-
tion, see “Precautions on seat belt usage”
(P. 1-12). Also, the seatback can be reclined
to allow occupants to rest when the vehicle
is stopped and the shif t lever is in the P
(Park) position.
LRS3029LRS3030
Safety-Seats, seat belts and supplemental restraint system1-3
Page 25 of 644
The reclining feature allows adjustment of
the seatback for occupants of different
sizes for added comfort and to help obtain
proper seat belt fit. For additional informa-
tion, see “Precautions on seat belt usage”
(P. 1-12). Also, the seatback can be reclined
to allow occupants to rest when the vehicle
is stopped and the shif t lever is in the P
(Park) position.
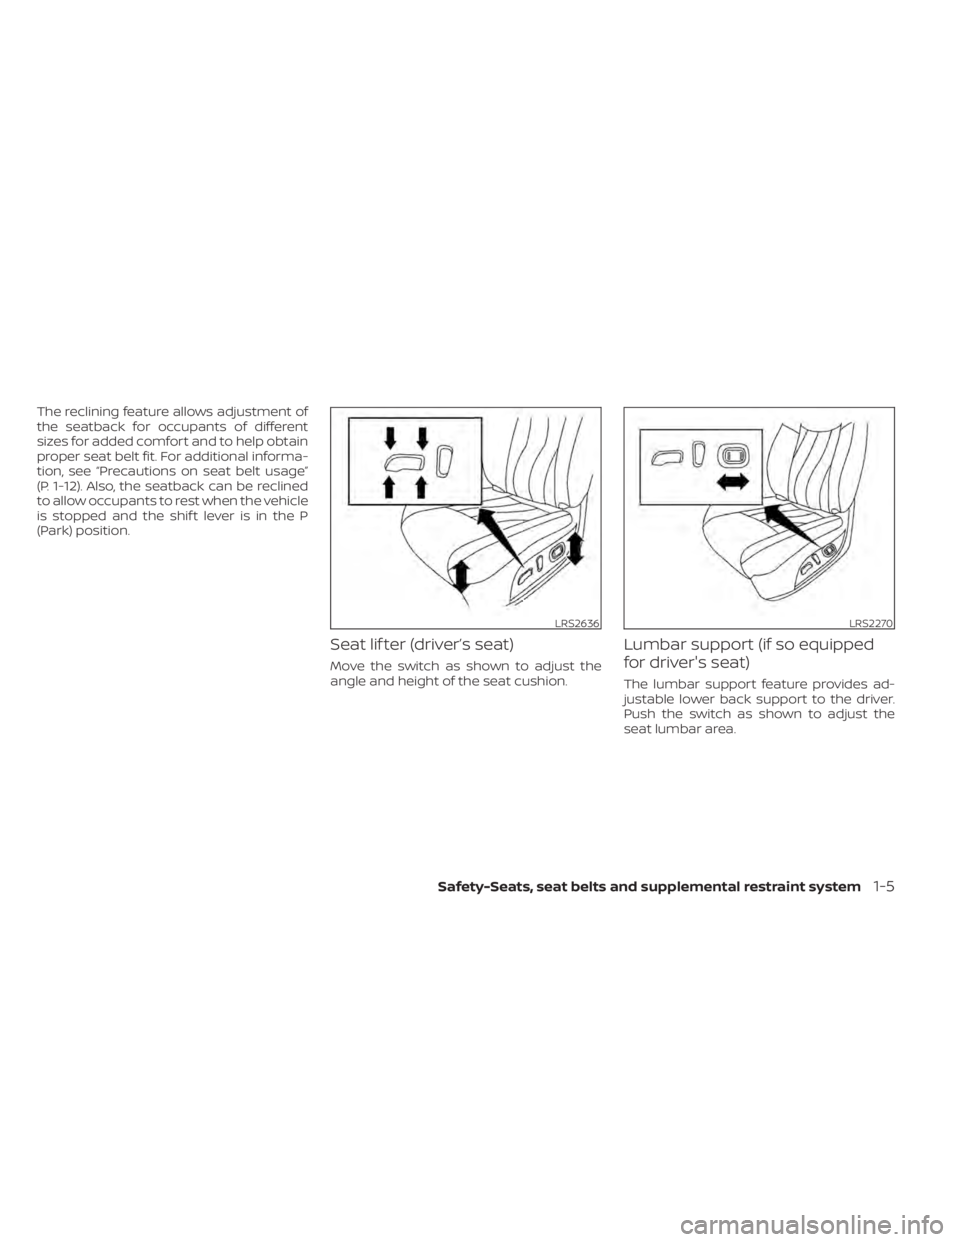
Seat lif ter (driver’s seat)
Move the switch as shown to adjust the
angle and height of the seat cushion.
Lumbar support (if so equipped
for driver's seat)
The lumbar support feature provides ad-
justable lower back support to the driver.
Push the switch as shown to adjust the
seat lumbar area.
LRS2636LRS2270
Safety-Seats, seat belts and supplemental restraint system1-5
Page 35 of 644
• The front passenger’s seat belt is not fas-tened and the seat is occupied by a
passenger.
• The front passenger’s seat belt is not fas- tened and objects or external force on
the passenger seat change the seat belt
reminder classification to Occupied.
The seat belt warning light will flash under
the conditions shown above until the nec-
essary seat belt is securely fastened.
A warning chime will sound for approxi-
mately 90 seconds or until one of the fol-
lowing conditions is met:
• The unbuckled front occupant’s seat belt is securely fastened.
• The seat belt reminder function in the front passenger seat no longer detects
that the front passenger seat is occupied.
• The ignition is turned off or the vehicle is placed in P (Park).
The below situations could result in the
seat belt reminder light being illuminated
and the chime sounding, even with no oc-
cupant present in the passenger seat:
• Heavy objects placed on the seat.
• Someone pushing or pulling on the front passenger seat. • An object placed under the front passen-
ger seat.
• An object placed between the seat cush- ion and center console or between the
seat cushion and the door.
• An object hanging on the seat or placed in the seatback pocket.
• A child restraint or other object pressing against the rear of the seatback.
PREGNANT WOMEN
NISSAN recommends that pregnant
women use seat belts. The seat belt should
be worn snug and always position the lap
belt as low as possible around the hips, not
the waist. Place the shoulder belt over your
shoulder and across your chest. Never run
the lap/shoulder belt over your abdominal
area. Contact your doctor for specific
recommendations.
INJURED PERSONS
NISSAN recommends that injured persons
use seat belts. Check with your doctor for
specific recommendations.
THREE-POINT TYPE SEAT BELT
WITH RETRACTOR
WARNING
• Every person who drives or rides in
this vehicle should use a seat belt at
all times. Children should be in the
rear seats and in an appropriate
restraint.
• Do not ride in a moving vehicle when
the seatback is reclined. This can be
dangerous. The shoulder belt will not
be against your body. In an accident,
you could be thrown into it and re-
ceive neck or other serious injuries.
You could also slide under the lap belt
and receive serious internal injuries.
• For the most effective protection
when the vehicle is in motion, the
seat should be upright. Always sit
well back and upright in the seat with
both feet on the floor and adjust the
seat belt properly.
Safety-Seats, seat belts and supplemental restraint system1-15
Page 36 of 644
•Do not allow children to play with the
seat belts. Most seating positions are
equipped with Automatic Locking
Retractor (ALR) mode seat belts. If
the seat belt becomes wrapped
around a child’s neck with the ALR
mode activated, the child can be se-
riously injured or killed if the seat belt
retracts and becomes tight. This can
occur even if the vehicle is parked.
Unbuckle the seat belt to release the
child. If the seat belt cannot be un-
buckled or is already unbuckled, re-
lease the child by cutting the seat
belt with a suitable tool (such as a
knife or scissors) to release the seat
belt.
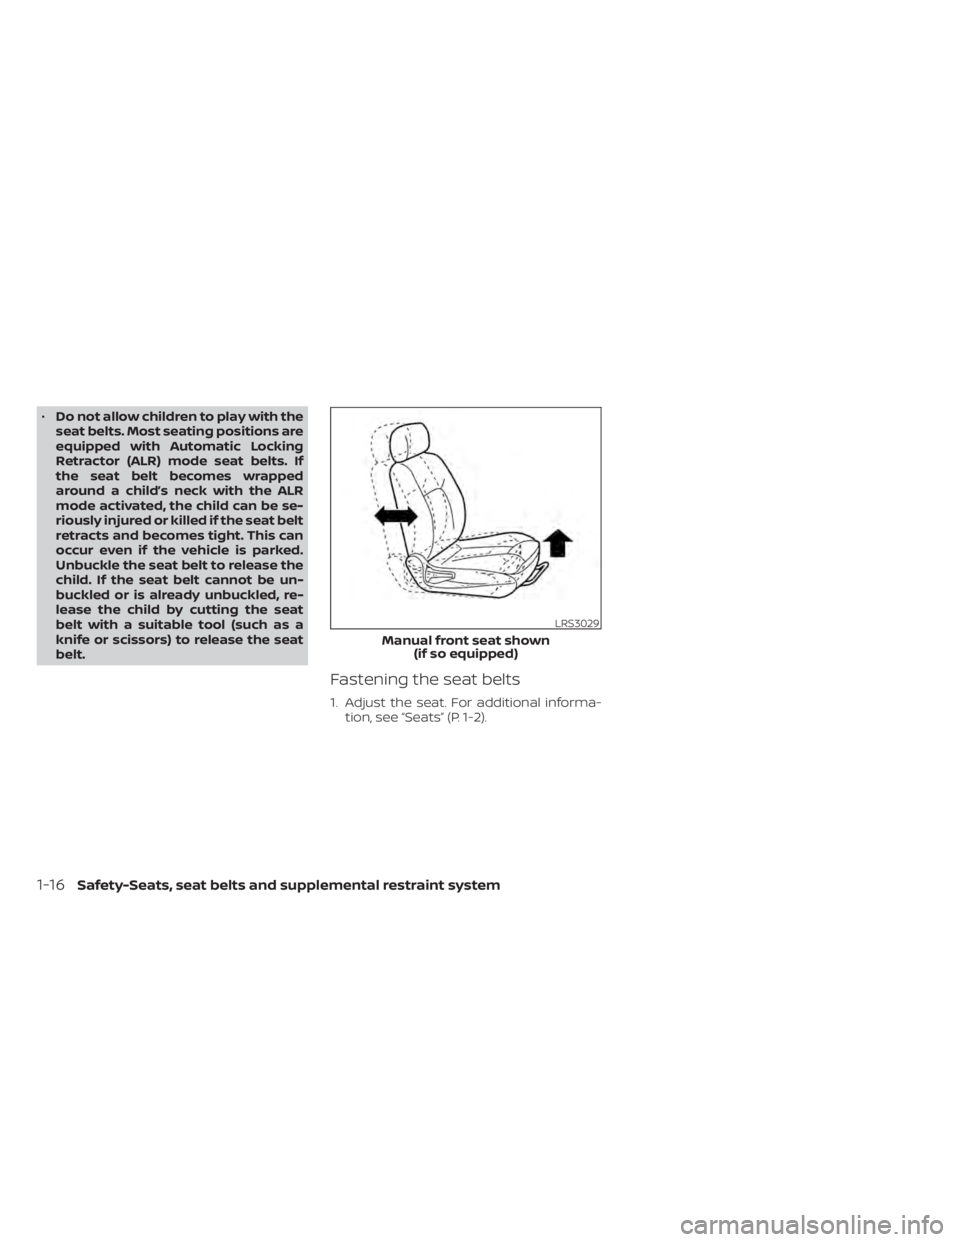
Fastening the seat belts
1. Adjust the seat. For additional informa- tion, see “Seats” (P. 1-2).
LRS3029
Manual front seat shown (if so equipped)
1-16Safety-Seats, seat belts and supplemental restraint system
Page 41 of 644
WARNING
Do not allow children to play with the
seat belts. Most seating positions are
equipped with Automatic Locking Re-
tractor (ALR) mode seat belts. If the seat
belt becomes wrapped around a child’s
neck with the ALR mode activated, the
child can be seriously injured or killed if
the seat belt retracts and becomes
tight. This can occur even if the vehicle
is parked. Unbuckle the seat belt to re-
lease the child. If the seat belt cannot
be unbuckled or is already unbuckled,
release the child by cutting the seat
belt with a suitable tool (such as a knife
or scissors) to release the seat belt.
Children need adults to help protect
them. They need to be properly
restrained.
In addition to the general information in
this manual, child safety information is
available from many other sources, includ-
ing doctors, teachers, government traffic
safety offices, and community organiza-
tions. Every child is different, so be sure to
learn the best way to transport your child.
There are three basic types of child re-
straint systems: • Rear-facing child restraints
• Forward-facing child restraints
• Booster seats
The proper restraint depends on the child's
size. Generally, infants up to about 1 year
and less than 20 lbs. (9 kg) should be placed
in rear-facing child restraints. Forward-
facing child restraints are available for chil-
dren who outgrow rear-facing child re-
straints and are at least 1 year old. Booster
seats are used to help position a vehicle
lap/shoulder belt on a child who can no
longer use a forward-facing child restraint.
WARNING
Infants and children need special pro-
tection. The vehicle's seat belts may
not fit them properly. The shoulder belt
may come too close to the face or neck.
The lap belt may not fit over their small
hip bones. In an accident, an improp-
erly fitting seat belt could cause serious
or fatal injury. Always use appropriate
child restraints.
All U.S. states and Canadian provinces or
territories require the use of approved child
restraints for infants and small children. For
additional information, see “Child re-
straints” (P. 1-23). A child restraint may be secured in the ve-
hicle by using either the LATCH (Lower An-
chors and Tethers for CHildren) system or
with the vehicle seat belt. For additional
information, see “Child restraints” (P. 1-23).
NISSAN recommends that all pre-teens
and children be restrained in the rear
seat. Studies show that children are
safer when properly restrained in the
rear seat than in the front seat.
This is especially important because
your vehicle has a supplemental re-
straint system (air bag system) for the
front passenger. For additional informa-
tion, see “Supplemental Restraint Sys-
tem (SRS)” (P. 1-47).
INFANTS
Infants up to at least 1 year old should be
placed in a rear-facing child restraint.
NISSAN recommends that infants be
placed in child restraints that comply with
Federal Motor Vehicle Safety Standards or
Canadian Motor Vehicle Safety Standards.
You should choose a child restraint that fits
your vehicle and always follow the manu-
facturer's instructions for installation and
use.
CHILD SAFETY
Safety-Seats, seat belts and supplemental restraint system1-21
Page 93 of 644
16. Electronic parking brake switch(if so equipped) (P. 5-25)
Automatic brake hold switch
(if so equipped) (P. 5-27)
17. Push-button ignition switch (P. 5-13)
18. Cruise control switches (if so equipped)
(P. 5-68)
Intelligent Cruise Control (ICC) switches
(if so equipped) (P. 5-71)
Bluetooth® Hands-free Phone System*
ProPILOT Assist Switch (if so equipped)
(P. 5-94)
19. Driver supplemental knee airbag
(P. 1-47)
20. Hood release (P. 3-22) Fuel-filler door release (P. 3-25)
Tilt/telescopic steering wheel controls
(P. 3-27)
21. Trip computer reset switch (P. 2-4) Instrument brightness control (P. 2-62)
Steering assist switch (for vehicles with
ProPILOT Assist) (if so equipped)
(P. 2-66)
Trunk opener (P. 3-22)
*: For additional information, refer to the
separate NissanConnect® Owner's
Manual.
Refer to the page number indicated in
parentheses for operating details.
Instruments and controls2-3
Page 99 of 644
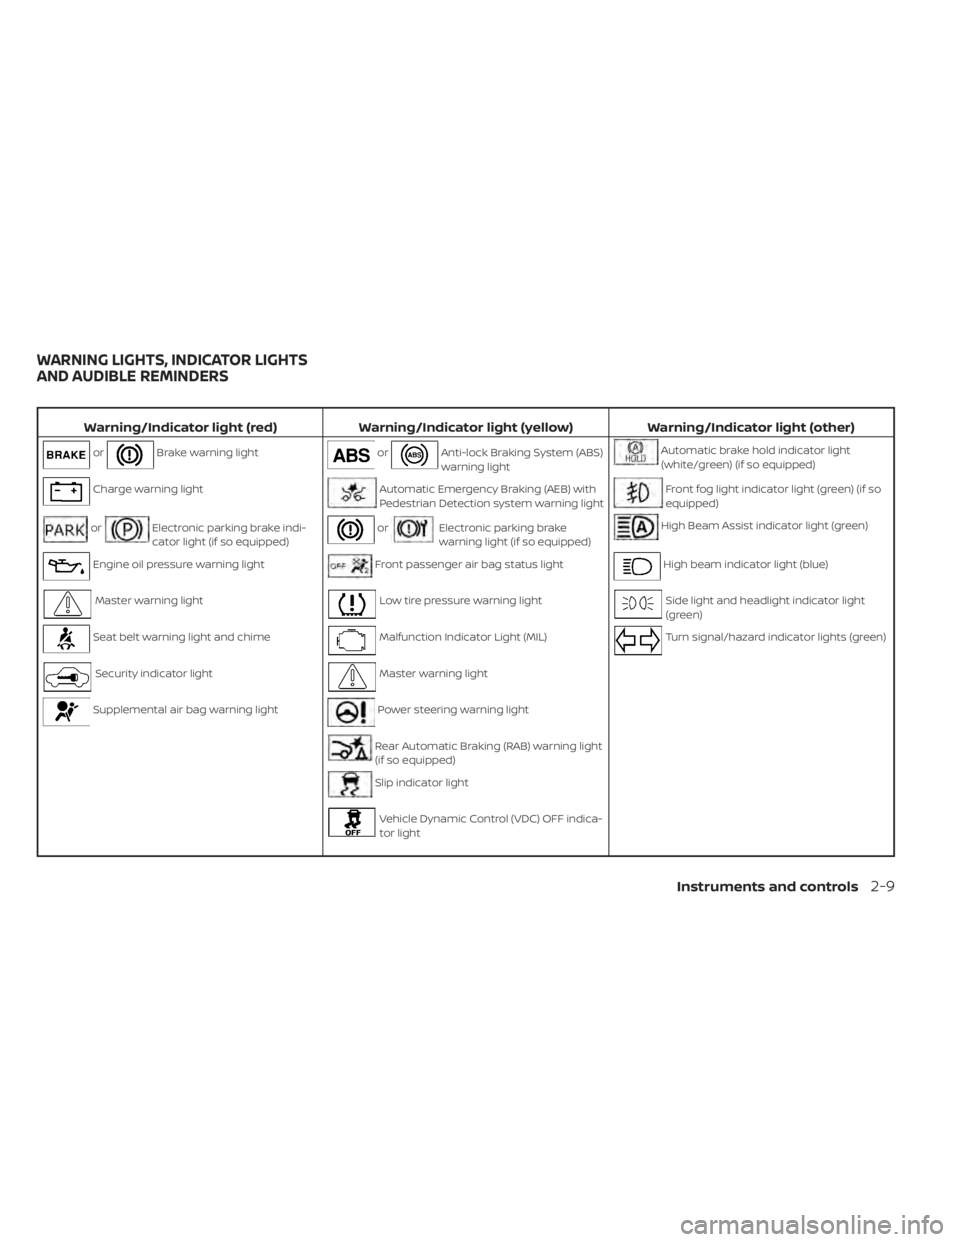
Warning/Indicator light (red)Warning/Indicator light (yellow) Warning/Indicator light (other)
orBrake warning lightorAnti-lock Braking System (ABS)
warning lightAutomatic brake hold indicator light
(white/green) (if so equipped)
Charge warning lightAutomatic Emergency Braking (AEB) with
Pedestrian Detection system warning lightFront fog light indicator light (green) (if so
equipped)
orElectronic parking brake indi-
cator light (if so equipped)orElectronic parking brake
warning light (if so equipped)High Beam Assist indicator light (green)
Engine oil pressure warning lightFront passenger air bag status lightHigh beam indicator light (blue)
Master warning lightLow tire pressure warning lightSide light and headlight indicator light
(green)
Seat belt warning light and chimeMalfunction Indicator Light (MIL)Turn signal/hazard indicator lights (green)
Security indicator lightMaster warning light
Supplemental air bag warning lightPower steering warning light
Rear Automatic Braking (RAB) warning light
(if so equipped)
Slip indicator light
Vehicle Dynamic Control (VDC) OFF indica-
tor light
WARNING LIGHTS, INDICATOR LIGHTS
AND AUDIBLE REMINDERS
Instruments and controls2-9
Page 100 of 644
CHECKING LIGHTS
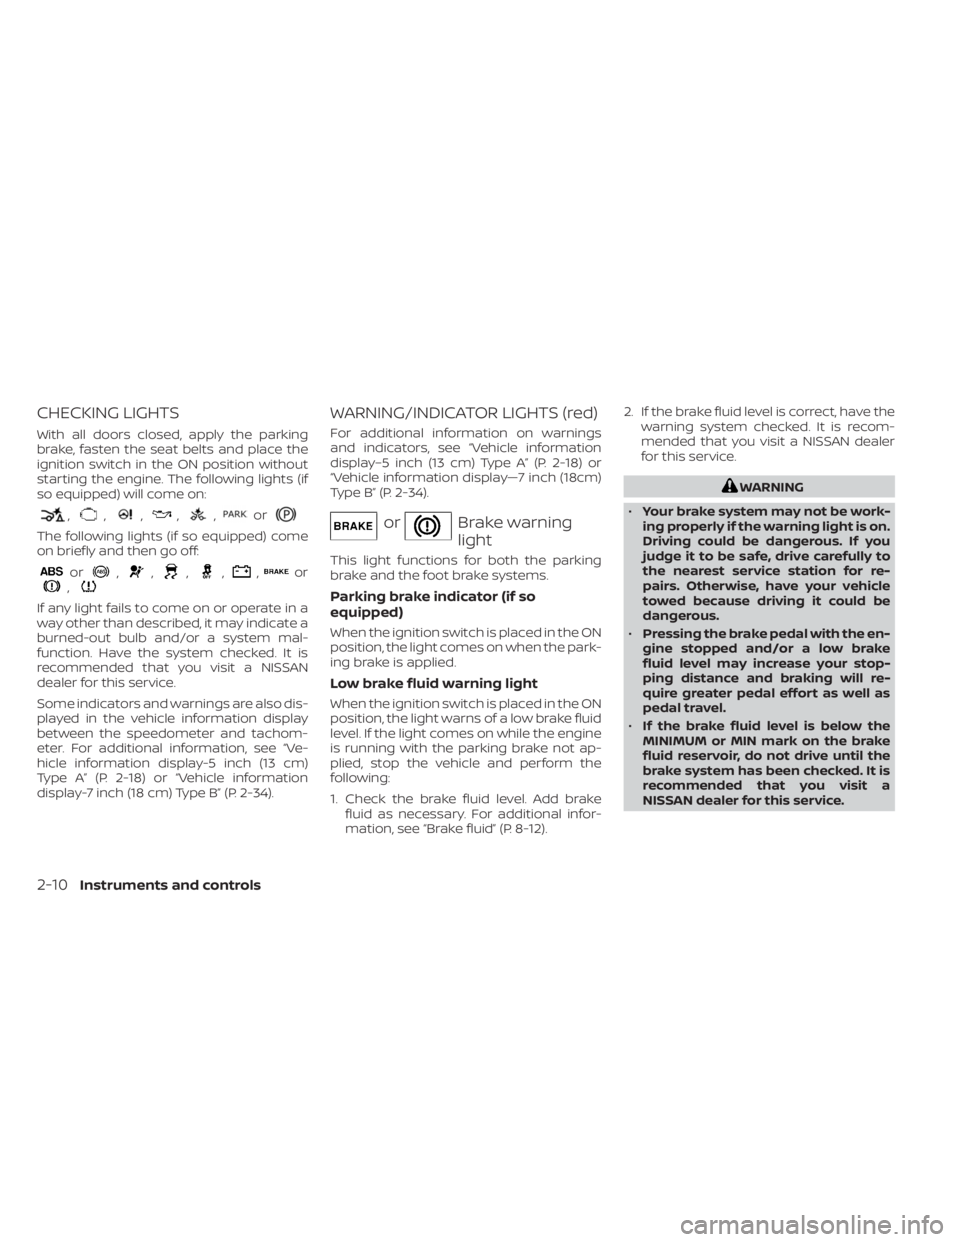
With all doors closed, apply the parking
brake, fasten the seat belts and place the
ignition switch in the ON position without
starting the engine. The following lights (if
so equipped) will come on:
,,,,,or
The following lights (if so equipped) come
on briefly and then go off:
or,,,,,or,
If any light fails to come on or operate in a
way other than described, it may indicate a
burned-out bulb and/or a system mal-
function. Have the system checked. It is
recommended that you visit a NISSAN
dealer for this service.
Some indicators and warnings are also dis-
played in the vehicle information display
between the speedometer and tachom-
eter. For additional information, see “Ve-
hicle information display-5 inch (13 cm)
Type A” (P. 2-18) or “Vehicle information
display-7 inch (18 cm) Type B” (P. 2-34).
WARNING/INDICATOR LIGHTS (red)
For additional information on warnings
and indicators, see “Vehicle information
display–5 inch (13 cm) Type A” (P. 2-18) or
“Vehicle information display—7 inch (18cm)
Type B” (P. 2-34).
orBrake warning
light
This light functions for both the parking
brake and the foot brake systems.
Parking brake indicator (if so
equipped)
When the ignition switch is placed in the ON
position, the light comes on when the park-
ing brake is applied.
Low brake fluid warning light
When the ignition switch is placed in the ON
position, the light warns of a low brake fluid
level. If the light comes on while the engine
is running with the parking brake not ap-
plied, stop the vehicle and perform the
following:
1. Check the brake fluid level. Add brakefluid as necessary. For additional infor-
mation, see “Brake fluid” (P. 8-12). 2. If the brake fluid level is correct, have the
warning system checked. It is recom-
mended that you visit a NISSAN dealer
for this service.
WARNING
• Your brake system may not be work-
ing properly if the warning light is on.
Driving could be dangerous. If you
judge it to be safe, drive carefully to
the nearest service station for re-
pairs. Otherwise, have your vehicle
towed because driving it could be
dangerous.
• Pressing the brake pedal with the en-
gine stopped and/or a low brake
fluid level may increase your stop-
ping distance and braking will re-
quire greater pedal effort as well as
pedal travel.
• If the brake fluid level is below the
MINIMUM or MIN mark on the brake
fluid reservoir, do not drive until the
brake system has been checked. It is
recommended that you visit a
NISSAN dealer for this service.
2-10Instruments and controls