clock setting NISSAN ALTIMA COUPE 2012 D32 / 4.G Owners Manual
[x] Cancel search | Manufacturer: NISSAN, Model Year: 2012, Model line: ALTIMA COUPE, Model: NISSAN ALTIMA COUPE 2012 D32 / 4.GPages: 454, PDF Size: 3.21 MB
Page 175 of 454
To turn the screen on:● Press the SETTING button and select the
“Display” key and then select the “Display
ON” key, or
● Press the
button and the message
“resuming display” will appear and the “Dis-
play ON” key will be automatically turned on
(no amber indicator) .
Background color:
Select the “Background Color” key; the display
color changes between day and night.
The new settings are automatically saved when
you exit the setting screen by selecting the
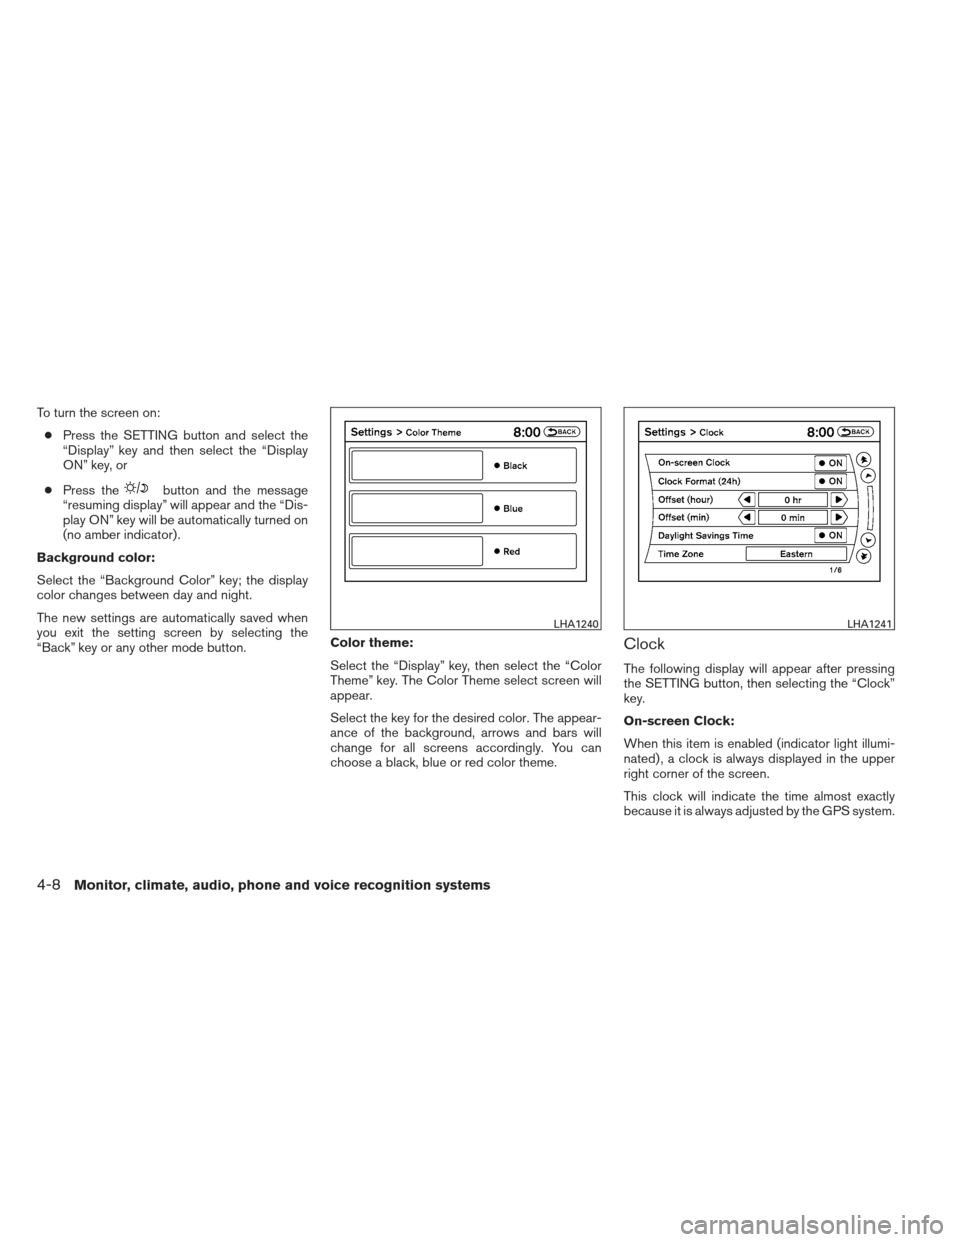
“Back” key or any other mode button. Color theme:
Select the “Display” key, then select the “Color
Theme” key. The Color Theme select screen will
appear.
Select the key for the desired color. The appear-
ance of the background, arrows and bars will
change for all screens accordingly. You can
choose a black, blue or red color theme.
Clock
The following display will appear after pressing
the SETTING button, then selecting the “Clock”
key.
On-screen Clock:
When this item is enabled (indicator light illumi-
nated) , a clock is always displayed in the upper
right corner of the screen.
This clock will indicate the time almost exactly
because it is always adjusted by the GPS system.
LHA1240LHA1241
4-8Monitor, climate, audio, phone and voice recognition systems
Page 176 of 454
Clock Format (24h):
When this item is enabled (indicator light illumi-
nated) , the clock format will change from the
default 12-hour display to a 24-hour display.
Offset (hour):
Adjust the time by increasing or decreasing the
hours.
Offset (minute):
Adjust the time by increasing or decreasing the
minutes.
Daylight Savings Time:
When this item is enabled (indicator light illumi-
nated) , daylight savings time is on. To turn off the
daylight savings time, touch the “ON” key; the
amber indicator light will go out.Time Zone:
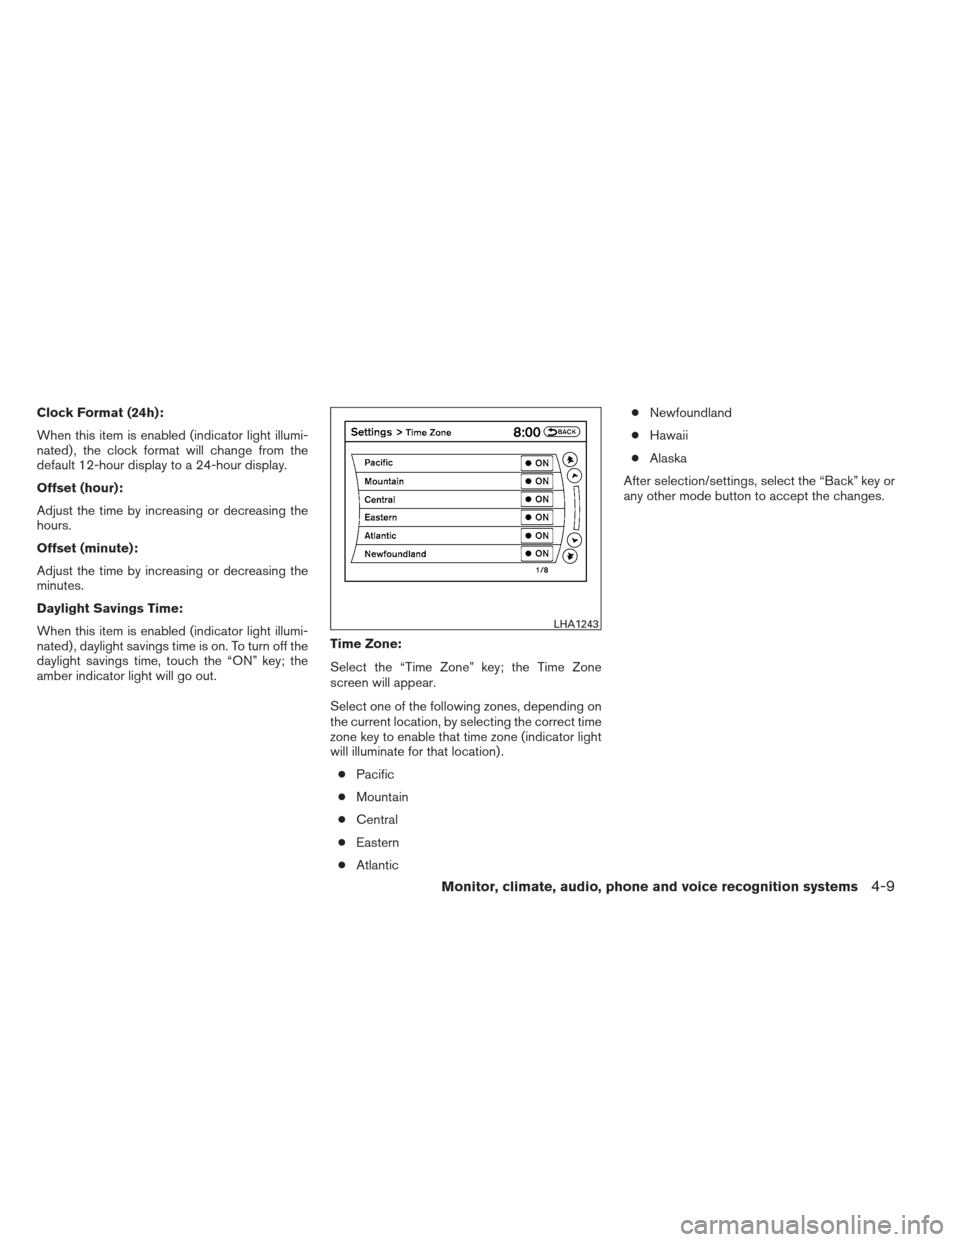
Select the “Time Zone” key; the Time Zone
screen will appear.
Select one of the following zones, depending on
the current location, by selecting the correct time
zone key to enable that time zone (indicator light
will illuminate for that location) .
● Pacific
● Mountain
● Central
● Eastern
● Atlantic ●
Newfoundland
● Hawaii
● Alaska
After selection/settings, select the “Back” key or
any other mode button to accept the changes.
LHA1243
Monitor, climate, audio, phone and voice recognition systems4-9
Page 216 of 454
To turn the system off, press the VOL/ON·OFF
control knob.
Turn the VOL/ON·OFF control knob to adjust the
volume.
This vehicle may be equipped with Speed Sen-
sitive Volume (SSV) for audio. When this feature
is active, the audio volume changes as the driving
speed changes.
Setting control knob (Audio, Display and
Clock):
Press the SETTING button to adjust the audio,
display and clock settings as follows:
Bass→Treble →Fade →Balance →Speed
Sensitive Volume (SSV) →Brightness →Con-
trast →On-screen Clock →Clock Adjust →
Bass
Once the desired setting is displayed on the
screen, turn the SCROLL/TUNE knob left or right
to adjust the chosen setting. Press the SETTING
button to move to the next setting or wait approxi-
mately five seconds to exit the setting adjustment
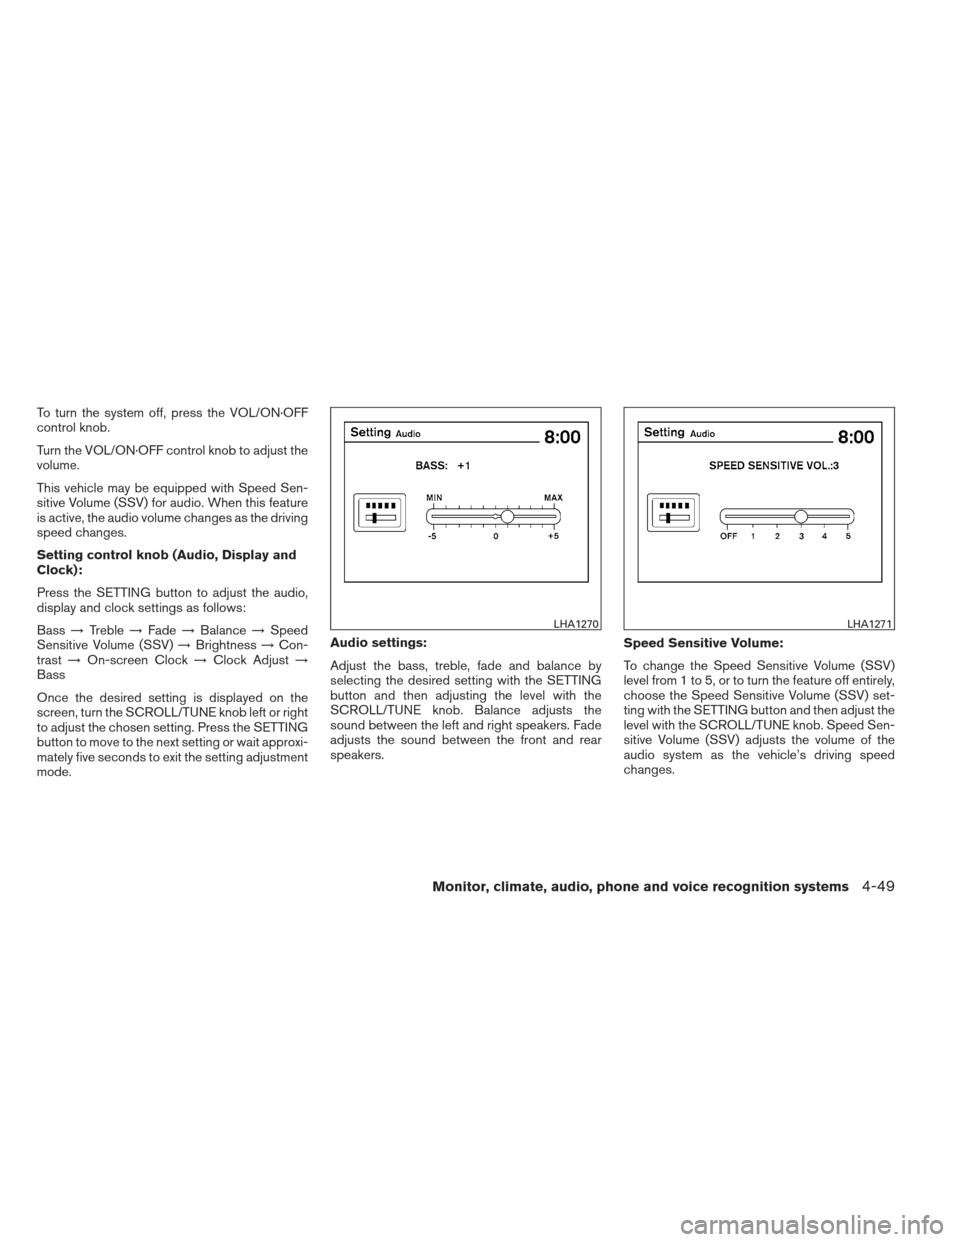
mode. Audio settings:
Adjust the bass, treble, fade and balance by
selecting the desired setting with the SETTING
button and then adjusting the level with the
SCROLL/TUNE knob. Balance adjusts the
sound between the left and right speakers. Fade
adjusts the sound between the front and rear
speakers.
Speed Sensitive Volume:
To change the Speed Sensitive Volume (SSV)
level from 1 to 5, or to turn the feature off entirely,
choose the Speed Sensitive Volume (SSV) set-
ting with the SETTING button and then adjust the
level with the SCROLL/TUNE knob. Speed Sen-
sitive Volume (SSV) adjusts the volume of the
audio system as the vehicle’s driving speed
changes.
LHA1270LHA1271
Monitor, climate, audio, phone and voice recognition systems4-49
Page 217 of 454
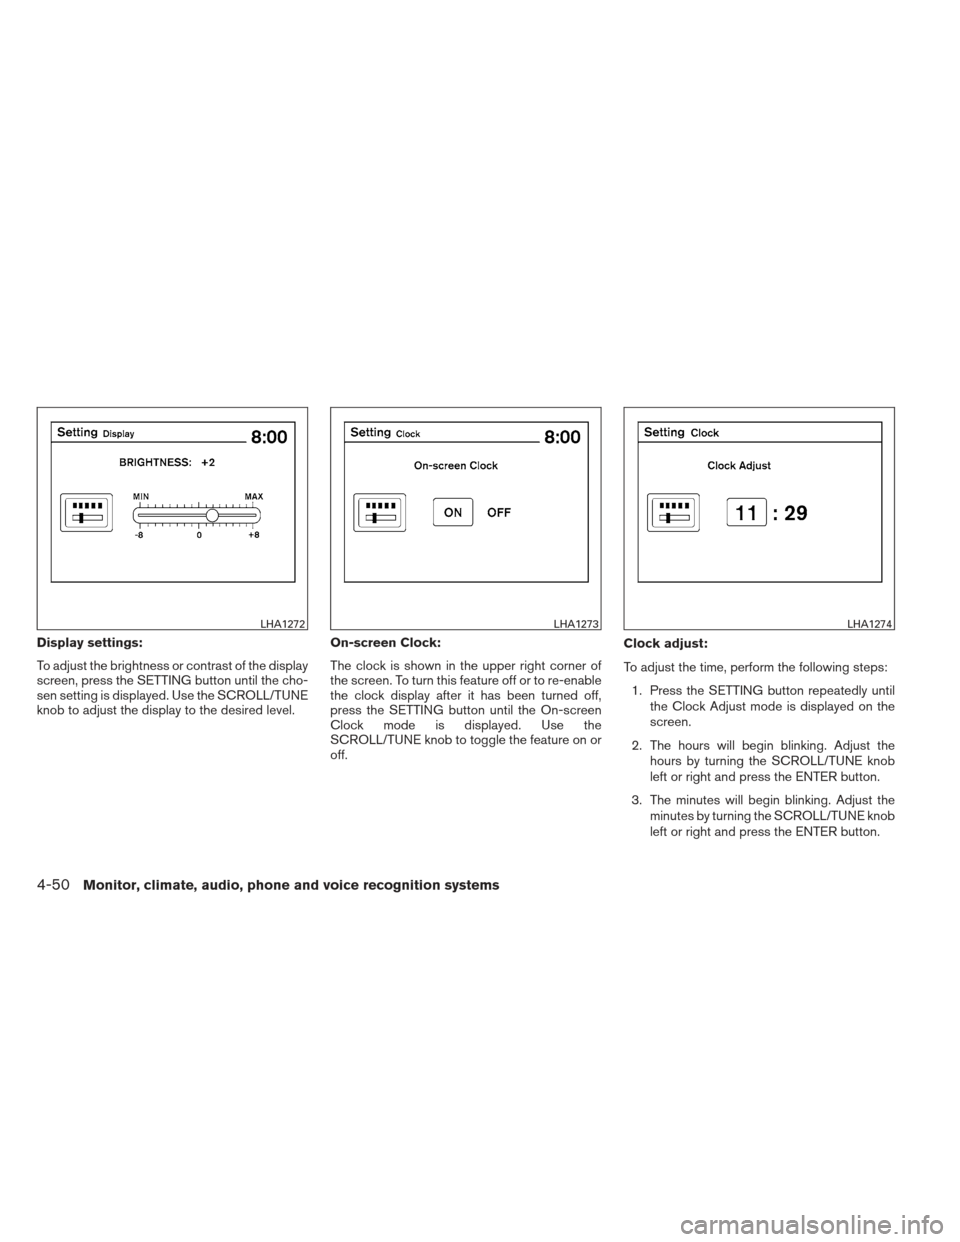
Display settings:
To adjust the brightness or contrast of the display
screen, press the SETTING button until the cho-
sen setting is displayed. Use the SCROLL/TUNE
knob to adjust the display to the desired level.On-screen Clock:
The clock is shown in the upper right corner of
the screen. To turn this feature off or to re-enable
the clock display after it has been turned off,
press the SETTING button until the On-screen
Clock mode is displayed. Use the
SCROLL/TUNE knob to toggle the feature on or
off.Clock adjust:
To adjust the time, perform the following steps:
1. Press the SETTING button repeatedly until the Clock Adjust mode is displayed on the
screen.
2. The hours will begin blinking. Adjust the hours by turning the SCROLL/TUNE knob
left or right and press the ENTER button.
3. The minutes will begin blinking. Adjust the minutes by turning the SCROLL/TUNE knob
left or right and press the ENTER button.
LHA1272LHA1273LHA1274
4-50Monitor, climate, audio, phone and voice recognition systems
Page 222 of 454
Audio main operation
Head unit:
The auto loudness circuit enhances the low and
high frequency ranges automatically in both radio
reception and CD playback.
PWR/Volume control:
Place the ignition switch in the ACC or ON
position, and then press the PWR button to turn
the audio system on. The mode (the radio or CD
player for example) that was playing immediately
before the audio system or vehicle was turned off
resumes playing. While the system is on, press-
ing the PWR button turns the system off.
Turn the VOL control knob to adjust the volume.
SETTING button:
The settings screen appears when the SETTING
button is pressed.
The following items are available in the settings
screen.● Bass, Treble, Balance and Fade
Adjusts the sound of the audio system. Bal-
ance adjusts the sound between the left and
right speakers. Fade adjusts the sound be-
tween the front and rear speakers.
Turn the TUNE·SCROLL control dial to se-
lect the Bass, Treble, Balance or Fade and then press the ENTER button. Turn the
TUNE·SCROLL control dial again to adjust
the Bass, Treble, Balance and Fade to the
preferred level.
● Speed Sensitive Volume (Speed Sens Vol.)
To change the Speed Sensitive Volume
(Speed Sens Vol.) level from 0 (off) to 5, turn
the TUNE·SCROLL control dial until the de-
sired level is displayed and press the ENTER
button.
● AUX Vol.
Controls the volume level of incoming sound
when an auxiliary device is connected to the
system. Choose a setting between 1 and 3
or choose 0 to turn the feature off.
● Brightness and Contrast
Adjust the brightness and contrast of the
screen.
Select the Bass, Treble, Balance or Fade
and then press the ENTER button. Turn the
TUNE·SCROLL control dial to adjust the
brightness and contrast of the screen to the
preferred level.
● Clock Adjust
Adjust the clock using the following proce-
dure.
1. Select Clock Adjust and then press the EN- TER button. 2. Adjust the hour with the TUNE·SCROLL
control dial and then press the ENTER but-
ton.
3. Adjust the minute with the TUNE·SCROLL control dial and then press the ENTER but-
ton.
24 hour clock is not available.
● On-Screen Clock
When this item is turned on, the clock is
displayed on the screen.
Select the On-Screen Clock and then press
the ENTER button. You can toggle between
ON and OFF using the TUNE·SCROLL con-
trol dial.
● RDS Display
When this has been set to ON, RDS (radio
data system) information will be shown on
the display. Select RDS Display and then
press the ENTER button. You can toggle
between ON and OFF using the
TUNE·SCROLL control dial.
● iPod Menu language
The iPod menu language can be set to Eng-
lish, French or Spanish. Select iPod menu
language and then press the ENTER button.
Use the TUNE·SCROLL control dial to se-
lect the preferred language.
Monitor, climate, audio, phone and voice recognition systems4-55
Page 447 of 454
Precautions on child
restraints.........1-22,1-28,1-33,1-37
Top tether strap anchor point locations . .1-26
Child safety rear door lock ............3-6
Chimes, audible reminders ...........2-16
Cleaningexteriorandinterior...........7-2
Clock ...................4-45,4-50 (models with navigation system) .......4-8
(models without navigation system) ....4-45
Clockset..................4-8,4-45
Clutch Clutchfluid..................8-15
C.M.V.S.S. certification label ..........9-10
Cold weather driving ..............5-28
Compact disc (CD) player ........4-46,4-52,
4-63, 4-69
Compass display .................2-6
Console box ...................2-41
Console light ...................2-49
Continuously Variable Transmission (CVT). . .5-12 Continuously Variable Transmission
(CVT) fluid ..................8-13
Driving with Continuously Variable
Transmission (CVT) .............5-12
Transmission shift selector lock release . .5-16
Controlpanelbuttons...............4-2 Brightness/contrast button .........4-12
Enterbutton..................4-2
Setting button .................4-6
Controls Heater and air conditioner
controls ................4-19,4-26
Coolant Capacities and recommended
fuel/lubricants .................9-2
Changing engine coolant ...........8-9 Checking engine coolant level
........8-9
Engine coolant temperature gauge .....2-5
Corrosion protection ...............7-6
Cruisecontrol..................5-20
Cupholders................2-39,2-40
D
Daytime running light system (Canada only) . .2-32
Defroster switch Rear window and outside mirror defroster
switch.....................2-28
Digital Versatile Disc (DVD) player .......4-68
Dimensionsandweights.............9-8
Dimmer switch for instrument panel ......2-33
Display controls (see control panel buttons) . .4-2
Door locks .....................3-4
Drive belt .....................8-18
Driving Cold weather driving ............5-28
Driving with Continuously Variable
Transmission (CVT) .............5-12
Driving with manual transmission ......5-17
Precautions when starting and driving ....5-2
E
Economy - fuel ..................5-22
Emission control information label .......9-11
Emission control system warranty .......9-25
Engine Before starting the engine ..........5-10
Block heater .................5-29 Capacities and recommended
fuel/lubricants
.................9-2
Changingenginecoolant...........8-9
Changingengineoil.............8-11
Changing engine oil filter ..........8-12
Checking engine coolant level ........8-9
Checking engine oil level ..........8-10
Engine compartment check locations ....8-6
Engine coolant temperature gauge .....2-5
Engine cooling system ............8-8
Engine
oil ...................8-10
Engine oil and oil filter recommendation . . .9-5
Engine oil pressure warning light ......2-12
Engine oil viscosity ..............9-5
Engine serial number ............9-10
Engine specifications .............9-7
Starting the engine .............5-11
Enterbutton....................4-2
Eventdatarecorders ..............9-26
Exhaust gas (Carbon monoxide) .........5-2
Extended storage switch ............8-26
Eyeglass case ..................2-38
F
Flashers
(See hazard warning flasher switch) ......2-34
Flat tire .......................6-2
Floor mat positioning aid .............7-5
Fluid Brake fluid ..................8-14
Capacities and recommended
fuel/lubricants .................9-2
Clutch fluid ..................8-15
10-2