lock NISSAN ALTIMA HYBRID 2007 L32A / 4.G Dismantling Guide
[x] Cancel search | Manufacturer: NISSAN, Model Year: 2007, Model line: ALTIMA HYBRID, Model: NISSAN ALTIMA HYBRID 2007 L32A / 4.GPages: 22, PDF Size: 1.17 MB
Page 6 of 22

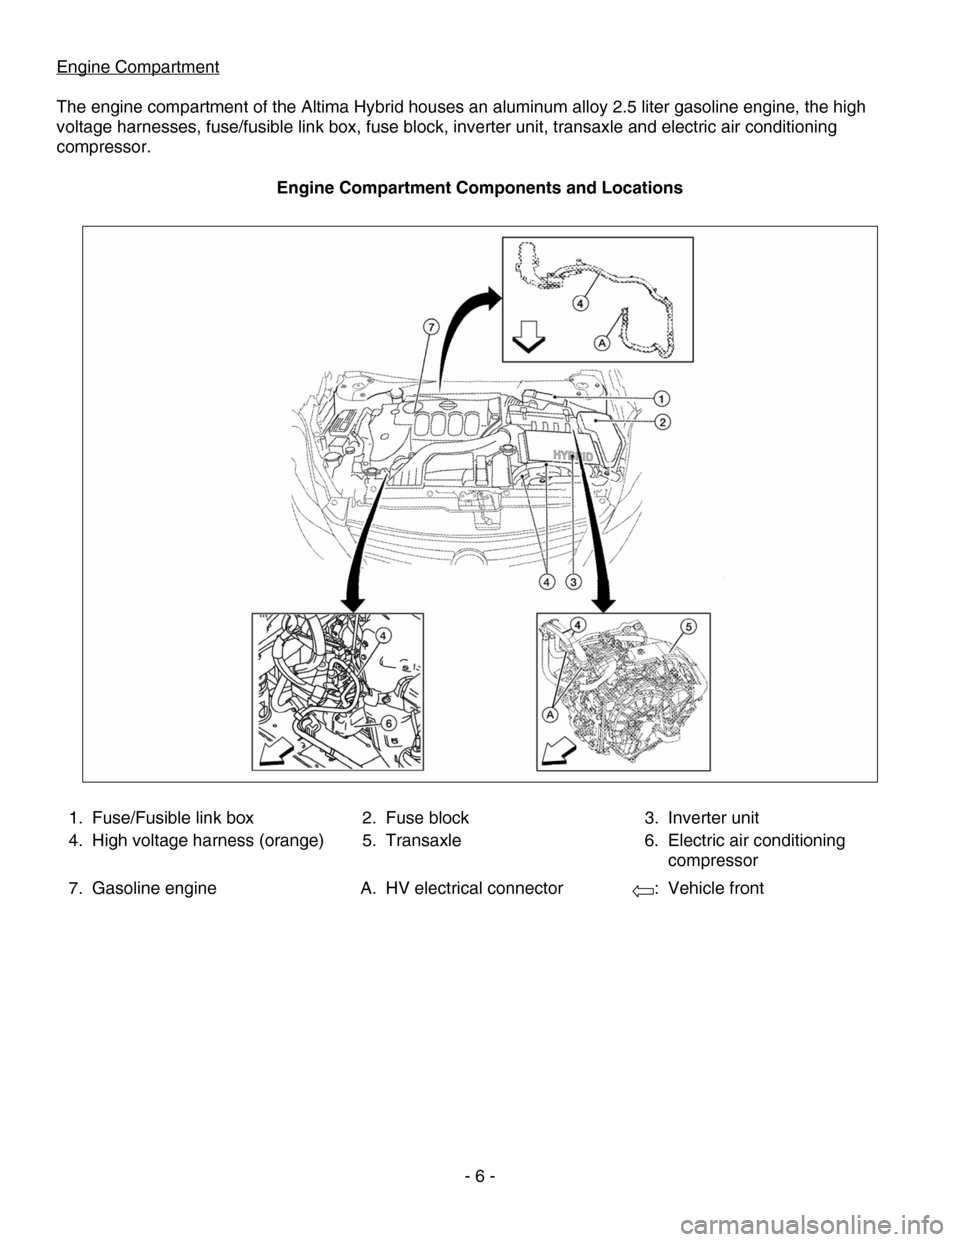
Engine Compartment
The engine compartment of the Altima Hybrid houses an aluminum alloy 2.5 liter gasoline engine, the high
voltage harnesses, fuse/fusible link box, fuse block, inverter unit, transaxle and electric air conditioning
compressor.
Engine Compartment Components and Locations
1. Fuse/Fusible link box 2. Fuse block3.Inverter unit
4. High voltage harness (orange) 5. Transaxle 6.Electric air conditioning
compressor
7. Gasoline engine A. HV electrical connector :Vehicle front
- 6 -
Page 17 of 22

• Trunk release handle:
a. Remove the door key from the keyfob as
shown.
b. Fold down the rear center seat
armrest/cup holder to reveal the trunk
compartment access panel. Use the door
key to unlock and open the access panel.
Pull the trunk release handle (1).
3. Disconnect the negative (-) 12 volt battery cable by performing the following:
a. Open the access panel (1) inside the lower right-
hand side of the trunk to access the negative (-)
battery cable (2).
b. Disconnect the negative (-) 12 volt battery cable (2)
from the 12 volt battery (3).
- 17 -
Page 20 of 22

Removal of HV Battery
1. Remove the rear seat cushion trim and pad.
• : Vehicle Front
a. Pull the lock (1) at the front bottom of the seat
cushion forward (one for each side), and pull the seat
cushion upward to release the wire (3) from the
plastic hook (2), then pull the seat cushion forward to
remove.
b. Remove the seatback hinge anchor bolts.
c. Lift the seatback off rear parcel panel front hangers
and remove the seatback assembly.
2. Release the rear kicking plate plastic clips (A) and pawls
(B), then remove the rear kicking plates (1).
3. Release the rear body side welts (2) from the body
opening, then remove the rear body side welts.
4. Remove the screw covers (4) and screws from the rear
pillar finishers (3).
5. Release the rear pillar finisher plastic clips (C) and metal
clips (D), then remove the rear pillar finishers.
6. Disconnect the high mounted stop lamp electrical
connector and remove the high mounted stop lamp (1),
(if equipped).
7. Release the rear parcel shelf trim clips (A), then remove
the rear parcel shelf trim (2).
8. Remove the trunk trim from the trunk room.
9. Remove the lower inlet duct bolts (1) and clip (3).
10. Remove lower inlet duct (2) from the upper inlet duct and
HV battery blower motor (4).
- 20 -
Page 21 of 22

11. Remove the outlet duct bolts (1), then remove the outlet
duct (2) from the HV battery (3).
12. Disconnect the HV battery blower motor connector (1)
from the HV battery blower (2).
13. Remove the HV battery blower motor harness clips and
HV battery blower motor harness from the HV battery.
14. Remove the lock (1) from the RH cover (6) on the HV
battery (7) using the service plug grip (2).
15. Remove the nuts (3), bolts (4) and ground wires (5) from
the RH cover (6).
16. Remove the RH cover (6) from the HV battery (7).
17. Remove the terminal cover and 12 volt terminal nut (1),
then remove the terminal cable (2) and 12 volt harness
from the HV battery.
18. Remove the battery shield contact (4), HV wire nuts (6)
and HV wires (5) from the HV battery.
19. Disconnect the body harness connector (3) from the HV
battery.
- 21 -
rom 20. Disconnect the EPS DC/DC converter connector (7) f
the HV battery.
21. Remove the harnesses from the HV battery.