ESP NISSAN ALTIMA HYBRID 2007 L32A / 4.G Quick Reference Guide
[x] Cancel search | Manufacturer: NISSAN, Model Year: 2007, Model line: ALTIMA HYBRID, Model: NISSAN ALTIMA HYBRID 2007 L32A / 4.GPages: 28, PDF Size: 5.15 MB
Page 6 of 28
54
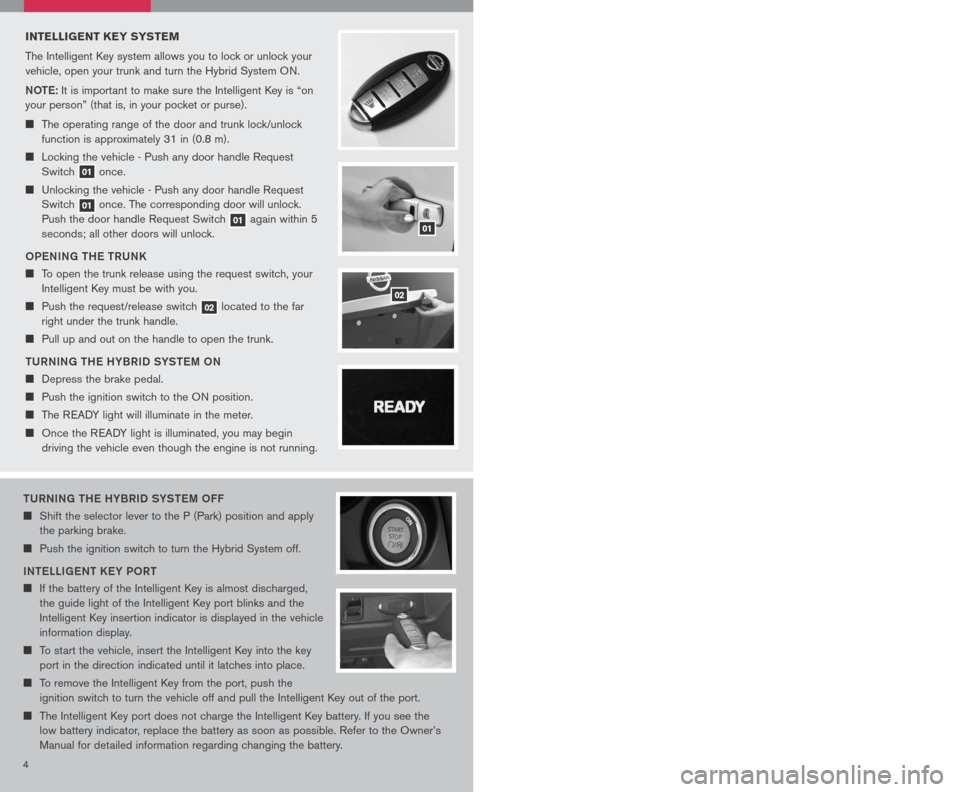
tURNING tH e HYBRID SYS teM oFF
Shift the selector lever to the P (Park) position and apply
the parking brake.
Push the ignition switch to turn the Hybrid System off.
IN te LLIG eN t K eY P oRt
If the battery of the Intelligent Key is almost discharged,
the guide light of the Intelligent Key port blinks and the
Intelligent Key insertion indicator is displayed in the vehicle
information display.
To start the vehicle, insert the Intelligent Key into the key
port in the direction indicated until it latches into place.
To remove the Intelligent Key from the port, push the
ignition switch to turn the vehicle off and pull the Intelligent Key out of the port.
The Intelligent Key port does not charge the Intelligent Key battery. If you see the
low battery indicator, replace the battery as soon as possible. Refer to the Owner’s
Manual for detailed information regarding changing the battery.
INTELLIGENT K EY SYSTEM
The Intelligent Key system allows you to lock or unlock your
vehicle, open your trunk and turn the Hybrid System ON.
Note: It is important to make sure the Intelligent Key is “on
your person” (that is, in your pocket or purse).
The operating range of the door and trunk lock/unlock
function is approximately 31 in (0.8 m).
Locking the vehicle - Push any door handle Request
Switch 01 once.
Unlocking the vehicle - Push any door handle Request
Switch 01 once. The corresponding door will unlock.
Push the door handle Request Switch 01 again within 5
seconds; all other doors will unlock.
o Pe NING tH e t RUNK
To open the trunk release using the request switch, your
Intelligent Key must be with you.
Push the request/release switch 02 located to the far
right under the trunk handle.
Pull up and out on the handle to open the trunk.
t URNING tH e HYBRID SYS teM oN
Depress the brake pedal.
Push the ignition switch to the ON position.
The READY light will illuminate in the meter.
Once the READY light is illuminated, you may begin
driving the vehicle even though the engine is not running.
HEADLIGHT AND TURN SIGNAL CONTROL
HeADLIGH t SWI tCH
Turn the headlight switch to the position to turn
on the front parking, tail, license plate and instrument
panel lights.
Turn the headlight switch to the position to turn
on the headlights. All other lights remain on.
HIGH B eAM
Push the headlight switch forward to select the high beam function. The blue
indicator light illuminates. Pull the headlight switch back to the original position to
select the low beam. The blue indicator light goes off.
Pull and release the headlight switch to flash the headlight high beams on and off.
t URN SIGNAL SWI tCH
Move the headlight control switch up or down to signal the turning direction. When
the turn is completed, the turn signals cancel automatically.
To signal a lane change, move the headlight control switch up or down to the point
where the indicator light begins to flash, but the headlight control switch does not latch.
F o G LIGH t o Pe R A tIo N (if so equipped)
N OTE:
The headlights must be on and the low beams selected for the fog lights to
operate.
Turn the switch to the position to turn on the fog lights.
Turn the switch to the oFF position to turn off the fog lights.
01
02
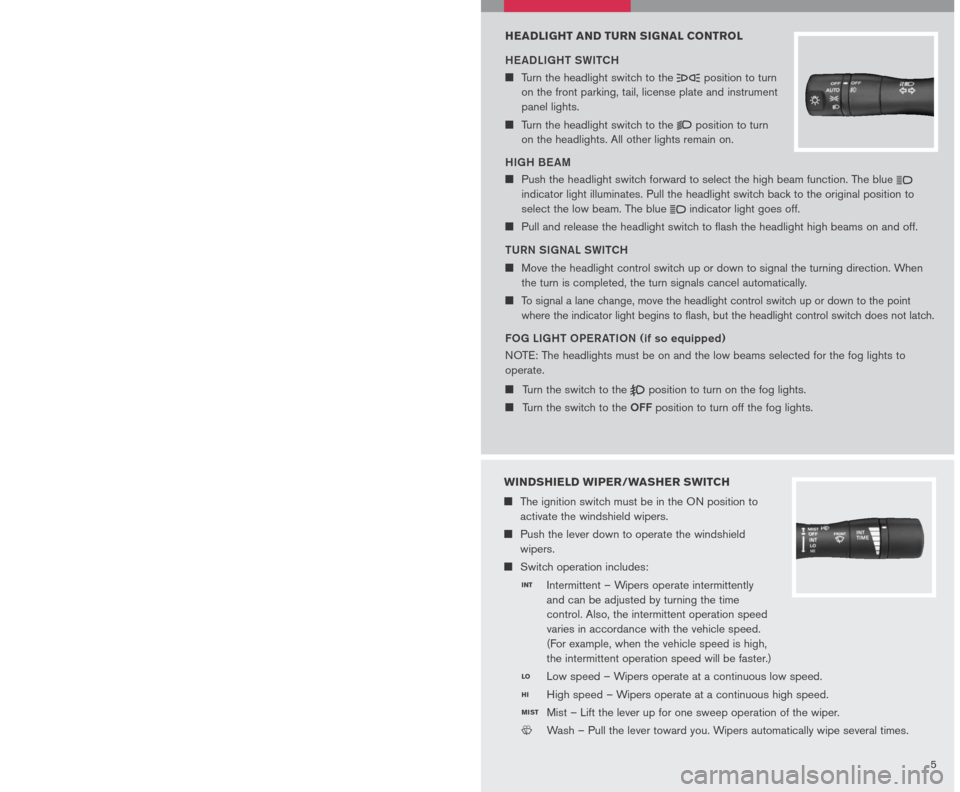
WINDSHIELD WIPER/WASHER SWITCH
The ignition switch must be in the ON position to
activate the windshield wipers.
Push the lever down to operate the windshield
wipers.
Switch operation includes:
Intermittent – Wipers operate intermittently
and can be adjusted by turning the time
control. Also, the intermittent operation speed
varies in accordance with the vehicle speed.
(For example, when the vehicle speed is high,
the intermittent operation speed will be faster.)
Low speed – Wipers operate at a continuous low speed.
High speed – Wipers operate at a continuous high speed.
Mist – Lift the lever up for one sweep operation of the wiper.
LCN0042
Wash – Pull the lever toward you. Wipers automatically wipe several times.
INT
LO
HI
MIST
Page 7 of 28
54
tURNING tH e HYBRID SYS teM oFF
Shift the selector lever to the P (Park) position and apply
the parking brake.
Push the ignition switch to turn the Hybrid System off.
IN te LLIG eN t K eY P oRt
If the battery of the Intelligent Key is almost discharged,
the guide light of the Intelligent Key port blinks and the
Intelligent Key insertion indicator is displayed in the vehicle
information display.
To start the vehicle, insert the Intelligent Key into the key
port in the direction indicated until it latches into place.
To remove the Intelligent Key from the port, push the
ignition switch to turn the vehicle off and pull the Intelligent Key out of the port.
The Intelligent Key port does not charge the Intelligent Key battery. If you see the
low battery indicator, replace the battery as soon as possible. Refer to the Owner’s
Manual for detailed information regarding changing the battery.
INTELLIGENT K EY SYSTEM
The Intelligent Key system allows you to lock or unlock your
vehicle, open your trunk and turn the Hybrid System ON.
Note: It is important to make sure the Intelligent Key is “on
your person” (that is, in your pocket or purse).
The operating range of the door and trunk lock/unlock
function is approximately 31 in (0.8 m).
Locking the vehicle - Push any door handle Request
Switch 01 once.
Unlocking the vehicle - Push any door handle Request
Switch 01 once. The corresponding door will unlock.
Push the door handle Request Switch 01 again within 5
seconds; all other doors will unlock.
o Pe NING tH e t RUNK
To open the trunk release using the request switch, your
Intelligent Key must be with you.
Push the request/release switch 02 located to the far
right under the trunk handle.
Pull up and out on the handle to open the trunk.
t URNING tH e HYBRID SYS teM oN
Depress the brake pedal.
Push the ignition switch to the ON position.
The READY light will illuminate in the meter.
Once the READY light is illuminated, you may begin
driving the vehicle even though the engine is not running.
HEADLIGHT AND TURN SIGNAL CONTROL
HeADLIGH t SWI tCH
Turn the headlight switch to the position to turn
on the front parking, tail, license plate and instrument
panel lights.
Turn the headlight switch to the position to turn
on the headlights. All other lights remain on.
HIGH B eAM
Push the headlight switch forward to select the high beam function. The blue
indicator light illuminates. Pull the headlight switch back to the original position to
select the low beam. The blue indicator light goes off.
Pull and release the headlight switch to flash the headlight high beams on and off.
t URN SIGNAL SWI tCH
Move the headlight control switch up or down to signal the turning direction. When
the turn is completed, the turn signals cancel automatically.
To signal a lane change, move the headlight control switch up or down to the point
where the indicator light begins to flash, but the headlight control switch does not latch.
F o G LIGH t o Pe R A tIo N (if so equipped)
N OTE:
The headlights must be on and the low beams selected for the fog lights to
operate.
Turn the switch to the position to turn on the fog lights.
Turn the switch to the oFF position to turn off the fog lights.
01
02
WINDSHIELD WIPER/WASHER SWITCH
The ignition switch must be in the ON position to
activate the windshield wipers.
Push the lever down to operate the windshield
wipers.
Switch operation includes:
Intermittent – Wipers operate intermittently
and can be adjusted by turning the time
control. Also, the intermittent operation speed
varies in accordance with the vehicle speed.
(For example, when the vehicle speed is high,
the intermittent operation speed will be faster.)
Low speed – Wipers operate at a continuous low speed.
High speed – Wipers operate at a continuous high speed.
Mist – Lift the lever up for one sweep operation of the wiper.
LCN0042
Wash – Pull the lever toward you. Wipers automatically wipe several times.
INT
LO
HI
MIST
Page 10 of 28
89
0102
03
0405
06
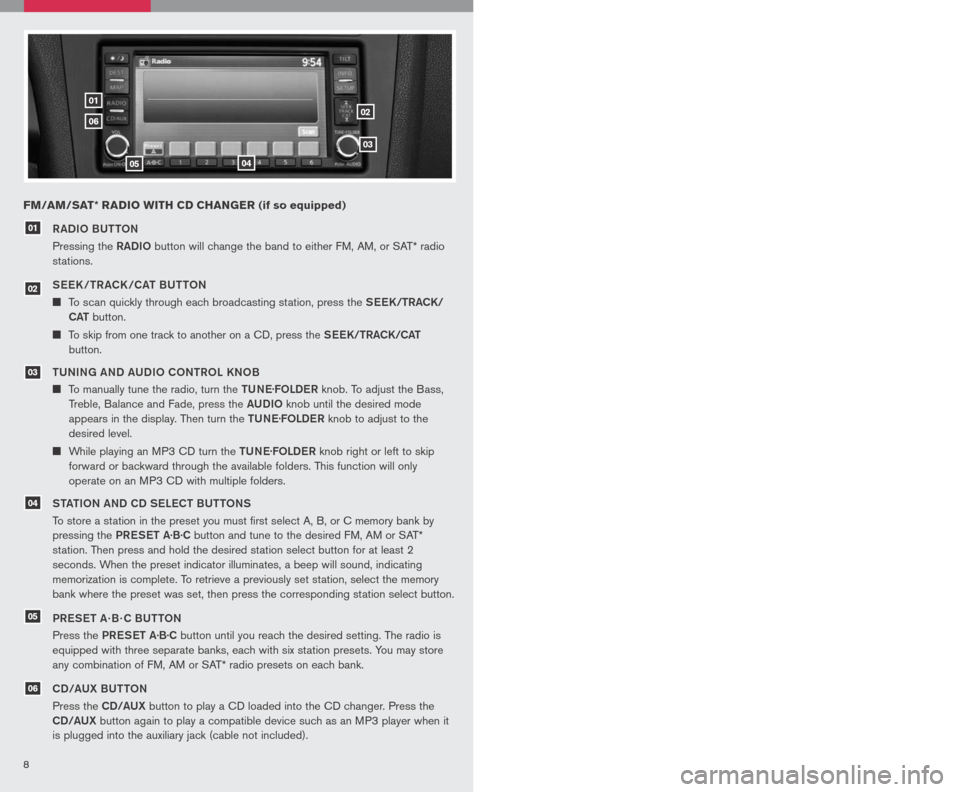
RADIo BU ttoN
Pressing the RADIo button will change the band to either FM, AM, or SAT* radio
stations.
See K /tR ACK /CA t BU tto N
To scan quickly through each broadcasting station, press the See K/tRACK/
CA t
button.
To skip from one track to another on a CD, press the See K/tRACK/CA t
button.
tUNING AND AUDI o C oNtR o L KN oB
To manually tune the radio, turn the tUNe.
FoLDe R knob. To adjust the Bass,
Treble, Balance and Fade, press the AUDIo knob until the desired mode
appears in the display. Then turn the tUNe.
FoLDe R knob to adjust to the
desired level.
While playing an MP3 CD turn the tUNe.
FoLDe R knob right or left to skip
forward or backward through the available folders. This function will only
operate on an MP3 CD with multiple folders.
S tA tIo N AND CD S eLe C t BU ttoNS
To store a station in the preset you must first select A, B, or C memory bank by
pressing the PReS et A·B·C button and tune to the desired FM, AM or SAT*
station. Then press and hold the desired station select button for at least 2
seconds. When the preset indicator illuminates, a beep will sound, indicating
memorization is complete. To retrieve a previously set station, select the memory
bank where the preset was set, then press the corresponding station select button.
PR eS et A · B · C BU ttoN
Press the PReS et A·B·C button until you reach the desired setting. The radio is
equipped with three separate banks, each with six station presets. You may store
any combination of FM, AM or SAT* radio presets on each bank.
CD/AUX BU ttoN
Press the CD/AUX button to play a CD loaded into the CD changer. Press the
CD/AUX button again to play a compatible device such as an MP3 player when it
is plugged into the auxiliary jack (cable not included).
01
FM/AM/SAT* RADIO WITH CD CHANGER (if so equipped)
Refer to the Owner’s Manual for detailed information regarding the audio system.
* SAT presets are only available on SAT equipped vehicles.
eJe C t BU ttoN
e JeC t A SINGL e DISC
- Press
the button for less than 1.5
seconds. Select the eject slot
by pressing the CD insert select
button (1-6). The CD will then eject.
e JeC t ALL DISCS
- Press and hold the button for more than 1.5 seconds.
CD S eLe C t/L oAD BU ttoNS
L o AD A SINGL e DISC
- Press one of the CD insert select buttons (1-6) for less
than 1.5 seconds, then insert the CD.
Lo AD UP to 6 DISCS
- Press and hold one of the CD insert select buttons (1-6)
for more than 1.5 seconds. The slot numbers (1-6) will illuminate on the display
when CDs are loaded into the changer.
07
08
0708
03
05
04
06
02
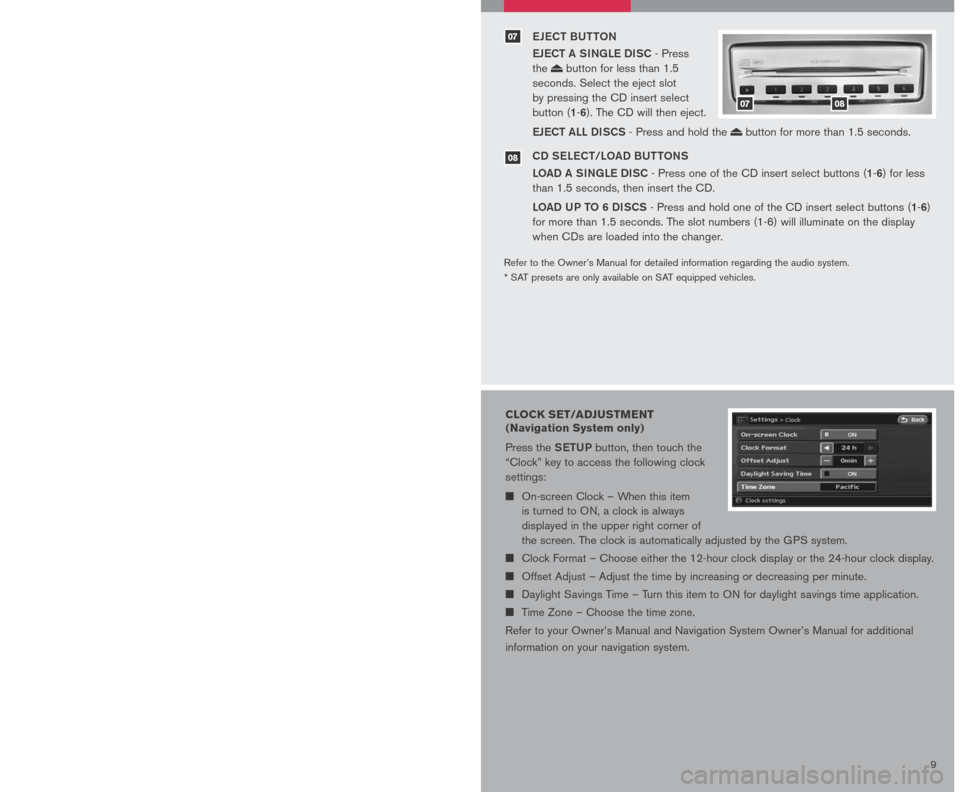
CLOCK SET/ADJUSTMENT
(Navigation System only)
Press the SetUP button, then touch the
“Clock” key to access the following clock
settings:
On-screen Clock – When this item
is turned to ON, a clock is always
displayed in the upper right corner of
the screen. The clock is automatically adjusted by the GPS system.
Clock Format – Choose either the 12-hour clock display or the 24-hour clock display.
Offset Adjust – Adjust the time by increasing or decreasing per minute.
Daylight Savings Time – Turn this item to ON for daylight savings time application.
Time Zone – Choose the time zone.
Refer to your Owner’s Manual and Navigation System Owner’s Manual for additional
information on your navigation system.
Page 11 of 28
89
0102
03
0405
06
RADIo BU ttoN
Pressing the RADIo button will change the band to either FM, AM, or SAT* radio
stations.
See K /tR ACK /CA t BU tto N
To scan quickly through each broadcasting station, press the See K/tRACK/
CA t
button.
To skip from one track to another on a CD, press the See K/tRACK/CA t
button.
tUNING AND AUDI o C oNtR o L KN oB
To manually tune the radio, turn the tUNe.
FoLDe R knob. To adjust the Bass,
Treble, Balance and Fade, press the AUDIo knob until the desired mode
appears in the display. Then turn the tUNe.
FoLDe R knob to adjust to the
desired level.
While playing an MP3 CD turn the tUNe.
FoLDe R knob right or left to skip
forward or backward through the available folders. This function will only
operate on an MP3 CD with multiple folders.
S tA tIo N AND CD S eLe C t BU ttoNS
To store a station in the preset you must first select A, B, or C memory bank by
pressing the PReS et A·B·C button and tune to the desired FM, AM or SAT*
station. Then press and hold the desired station select button for at least 2
seconds. When the preset indicator illuminates, a beep will sound, indicating
memorization is complete. To retrieve a previously set station, select the memory
bank where the preset was set, then press the corresponding station select button.
PR eS et A · B · C BU ttoN
Press the PReS et A·B·C button until you reach the desired setting. The radio is
equipped with three separate banks, each with six station presets. You may store
any combination of FM, AM or SAT* radio presets on each bank.
CD/AUX BU ttoN
Press the CD/AUX button to play a CD loaded into the CD changer. Press the
CD/AUX button again to play a compatible device such as an MP3 player when it
is plugged into the auxiliary jack (cable not included).
01
FM/AM/SAT* RADIO WITH CD CHANGER (if so equipped)
Refer to the Owner’s Manual for detailed information regarding the audio system.
* SAT presets are only available on SAT equipped vehicles.
eJe C t BU ttoN
e JeC t A SINGL e DISC
- Press
the button for less than 1.5
seconds. Select the eject slot
by pressing the CD insert select
button (1-6). The CD will then eject.
e JeC t ALL DISCS
- Press and hold the button for more than 1.5 seconds.
CD S eLe C t/L oAD BU ttoNS
L o AD A SINGL e DISC
- Press one of the CD insert select buttons (1-6) for less
than 1.5 seconds, then insert the CD.
Lo AD UP to 6 DISCS
- Press and hold one of the CD insert select buttons (1-6)
for more than 1.5 seconds. The slot numbers (1-6) will illuminate on the display
when CDs are loaded into the changer.
07
08
0708
03
05
04
06
02
CLOCK SET/ADJUSTMENT
(Navigation System only)
Press the SetUP button, then touch the
“Clock” key to access the following clock
settings:
On-screen Clock – When this item
is turned to ON, a clock is always
displayed in the upper right corner of
the screen. The clock is automatically adjusted by the GPS system.
Clock Format – Choose either the 12-hour clock display or the 24-hour clock display.
Offset Adjust – Adjust the time by increasing or decreasing per minute.
Daylight Savings Time – Turn this item to ON for daylight savings time application.
Time Zone – Choose the time zone.
Refer to your Owner’s Manual and Navigation System Owner’s Manual for additional
information on your navigation system.
Page 14 of 28
12 13
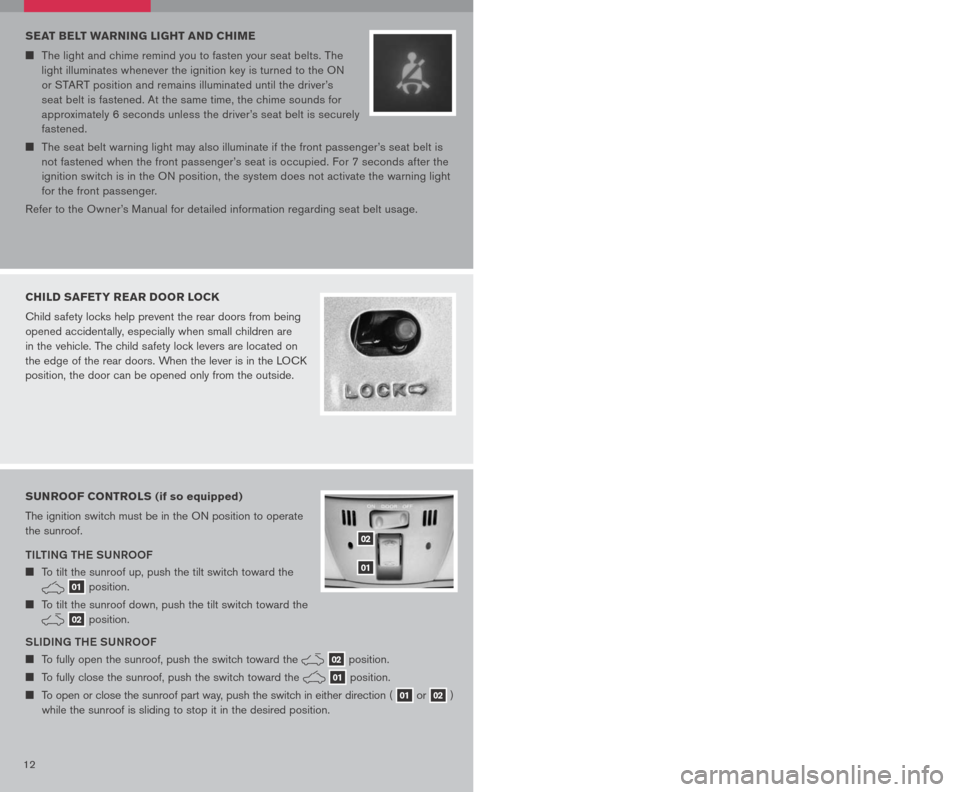
SEAT BELT WARNING LIGHT AND CHIME
The light and chime remind you to fasten your seat belts. The
light illuminates whenever the ignition key is turned to the ON
or START position and remains illuminated until the driver’s
seat belt is fastened. At the same time, the chime sounds for
approximately 6 seconds unless the driver’s seat belt is securely
fastened.
The seat belt warning light may also illuminate if the front passenger’s seat belt is
not fastened when the front passenger’s seat is occupied. For 7 seconds after the
ignition switch is in the ON position, the system does not activate the warning light
for the front passenger.
Refer to the Owner’s Manual for detailed information regarding seat belt usage.
CHILD SAFETY REAR DOOR LOCK
Child safety locks help prevent the rear doors from being
opened accidentally, especially when small children are
in the vehicle. The child safety lock levers are located on
the edge of the rear doors. When the lever is in the LOCK
position, the door can be opened only from the outside.
SUNROOF CONTROLS (if so equipped)
The ignition switch must be in the ON position to operate
the sunroof.
TILTING THE SUNROOF
To tilt the sunroof up, push the tilt switch toward the
01 position.
To tilt the sunroof down, push the tilt switch toward the
02 position.
SLIDING THE SUNROOF
To fully open the sunroof, push the switch toward the 02 position.
To fully close the sunroof, push the switch toward the 01 position.
To open or close the sunroof part way, push the switch in either direction ( 01 or 02 )
while the sunroof is sliding to stop it in the desired position.
02
01
FRONT SEAT ADJUSTMENTS
With Manual Seats (passenger’s seat):
F ORW aRD a ND back WaRD
Pull up on the lever under the front of the seat and slide backward or forward.
Release the lever to lock the seat in position.
R Ec LINING
Lift the lever on the side of the seat to adjust your seatback forward or backward;
release the lever when you have found a comfortable angle and the seat belt fits
properly.
With power Seats (driver’s seat):
F ORW aRD a ND back WaRD
Move the control 01 forward or backward
to adjust the seat cushion forward or
backward.
Pull up on the control 01 to raise the
driver’s seat cushion; press down to lower
the cushion.
R Ec LINING
Pull the switch 02 forward to move the seatback forward; push it back to move the
seatback backward.
L UM baR S Upp ORT
(driver’s seat):
Your driver’s seat has a lumbar support; adjust it by pushing the switch 03 forward
or backward.
010203
HOMELINK® UNIVERSAL TRANSCEIVER (if so equipped)
SYSTEM O pER aTING TI pS
Garage doors, electrical gates, entry doors, etc. will be activated during programming.
To avoid injury, make sure that people and objects are clear of all doors or gates
during programming. Your vehicle’s engine should be turned off while programming
the HomeLink® Transceiver. Refer to your Owner’s Manual for complete details.
To program your HomeLink® Transceiver to operate a garage door, gate, or entry door
opener, home or office lighting, you need to be at the same location as the device.
NOTE: Garage door openers (manufactured after 1996) have “rolling code
protection”. To program a garage door opener equipped with “rolling code
protection”, you will need to use a ladder to get up to the garage door opener
motor to be able to access the “smart or learn” program button.
Page 15 of 28
12 13
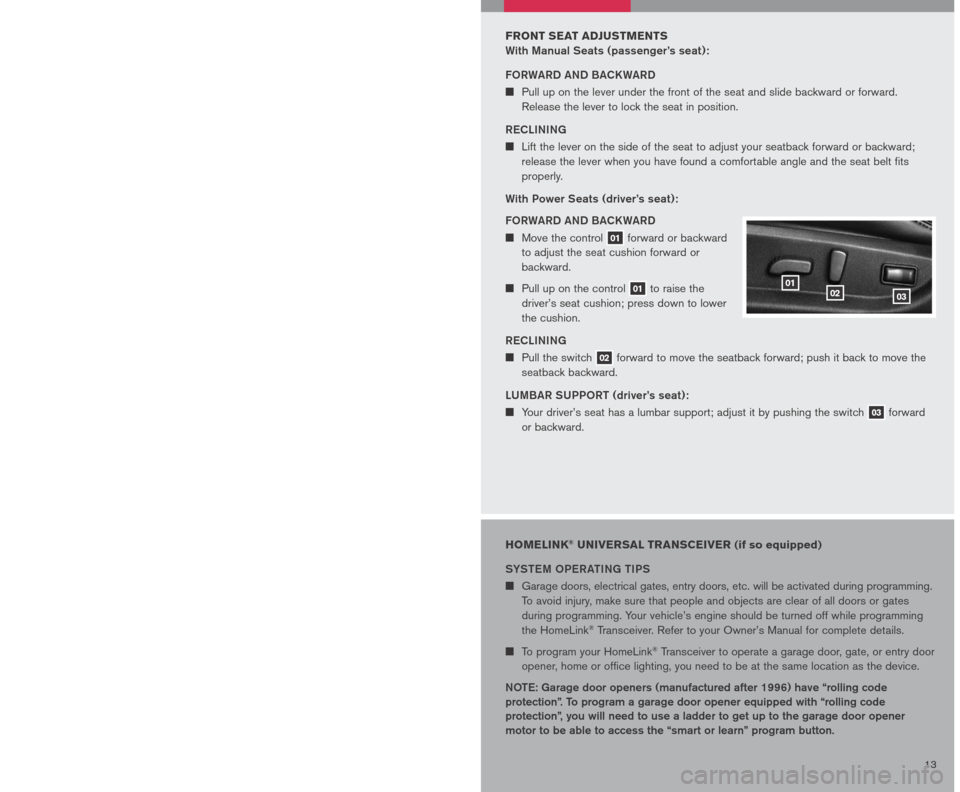
SEAT BELT WARNING LIGHT AND CHIME
The light and chime remind you to fasten your seat belts. The
light illuminates whenever the ignition key is turned to the ON
or START position and remains illuminated until the driver’s
seat belt is fastened. At the same time, the chime sounds for
approximately 6 seconds unless the driver’s seat belt is securely
fastened.
The seat belt warning light may also illuminate if the front passenger’s seat belt is
not fastened when the front passenger’s seat is occupied. For 7 seconds after the
ignition switch is in the ON position, the system does not activate the warning light
for the front passenger.
Refer to the Owner’s Manual for detailed information regarding seat belt usage.
CHILD SAFETY REAR DOOR LOCK
Child safety locks help prevent the rear doors from being
opened accidentally, especially when small children are
in the vehicle. The child safety lock levers are located on
the edge of the rear doors. When the lever is in the LOCK
position, the door can be opened only from the outside.
SUNROOF CONTROLS (if so equipped)
The ignition switch must be in the ON position to operate
the sunroof.
TILTING THE SUNROOF
To tilt the sunroof up, push the tilt switch toward the
01 position.
To tilt the sunroof down, push the tilt switch toward the
02 position.
SLIDING THE SUNROOF
To fully open the sunroof, push the switch toward the 02 position.
To fully close the sunroof, push the switch toward the 01 position.
To open or close the sunroof part way, push the switch in either direction ( 01 or 02 )
while the sunroof is sliding to stop it in the desired position.
02
01
FRONT SEAT ADJUSTMENTS
With Manual Seats (passenger’s seat):
F ORW aRD a ND back WaRD
Pull up on the lever under the front of the seat and slide backward or forward.
Release the lever to lock the seat in position.
R Ec LINING
Lift the lever on the side of the seat to adjust your seatback forward or backward;
release the lever when you have found a comfortable angle and the seat belt fits
properly.
With power Seats (driver’s seat):
F ORW aRD a ND back WaRD
Move the control 01 forward or backward
to adjust the seat cushion forward or
backward.
Pull up on the control 01 to raise the
driver’s seat cushion; press down to lower
the cushion.
R Ec LINING
Pull the switch 02 forward to move the seatback forward; push it back to move the
seatback backward.
L UM baR S Upp ORT
(driver’s seat):
Your driver’s seat has a lumbar support; adjust it by pushing the switch 03 forward
or backward.
010203
HOMELINK® UNIVERSAL TRANSCEIVER (if so equipped)
SYSTEM O pER aTING TI pS
Garage doors, electrical gates, entry doors, etc. will be activated during programming.
To avoid injury, make sure that people and objects are clear of all doors or gates
during programming. Your vehicle’s engine should be turned off while programming
the HomeLink® Transceiver. Refer to your Owner’s Manual for complete details.
To program your HomeLink® Transceiver to operate a garage door, gate, or entry door
opener, home or office lighting, you need to be at the same location as the device.
NOTE: Garage door openers (manufactured after 1996) have “rolling code
protection”. To program a garage door opener equipped with “rolling code
protection”, you will need to use a ladder to get up to the garage door opener
motor to be able to access the “smart or learn” program button.
Page 16 of 28
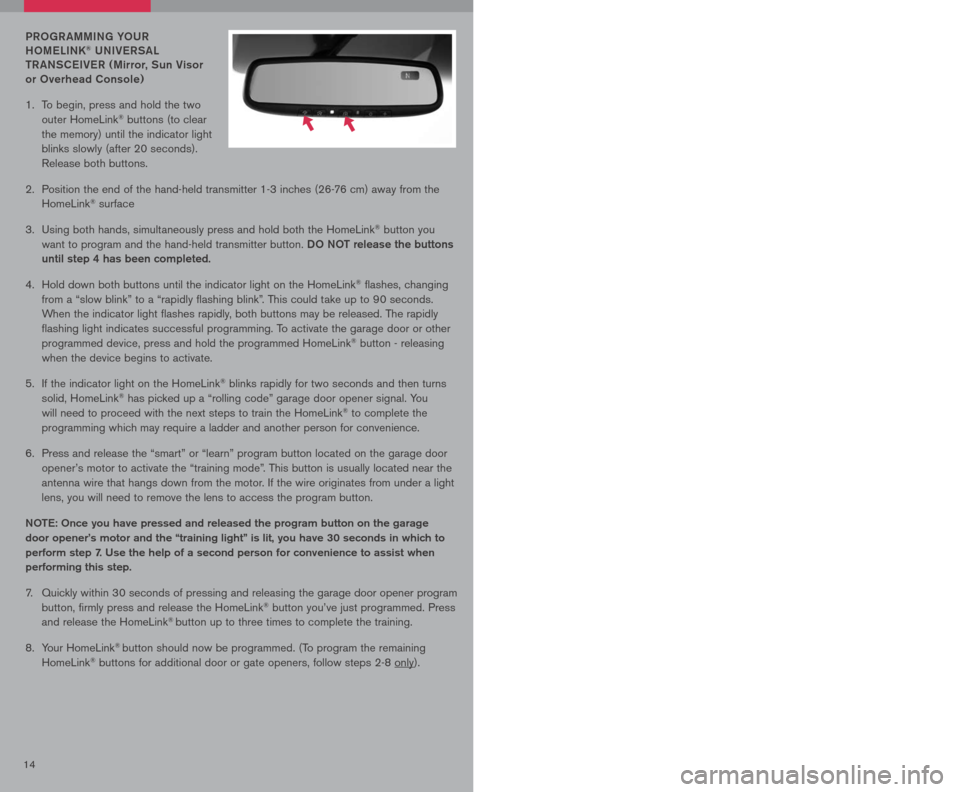
1415
PRoGR AMMING Y oUR
H o M eLINK® UNIV eRSAL
t R ANSC eIV eR ( Mirror, Sun Visor
or overhead Console)
1. To be
gin, press and hold the two
outer HomeLink® buttons (to clear
the memory) until the indicator light
blinks slowly (after 20 seconds).
Release both buttons.
2. Position the end of the hand-held transmitter 1-3 inches (26-76 cm) away from the
HomeLink® surface
3. Using both hands, simultaneously press and hold both the HomeLink
® button you
want to program and the hand-held transmitter button. Do Not release the buttons
until step 4 has been completed.
4. Hold down both buttons until the indicator light on the HomeLink
® flashes, changing
from a “slow blink” to a “rapidly flashing blink”. This could take up to 90 seconds.
When the indicator light flashes rapidly, both buttons may be released. The rapidly
flashing light indicates successful programming. To activate the garage door or other
programmed device, press and hold the programmed HomeLink® button - releasing
when the device begins to activate.
5. If the indicator light on the HomeLink
® blinks rapidly for two seconds and then turns
solid, HomeLink® has picked up a “rolling code” garage door opener signal. You
will need to proceed with the next steps to train the HomeLink® to complete the
programming which may require a ladder and another person for convenience.
6. Press and release the “smart” or “learn” program button located on the garage door
opener’s motor to activate the “training mode”. This button is usually located near the
antenna wire that hangs down from the motor. If the wire originates from under a light
lens, you will need to remove the lens to access the program button.
Note : o nce you have pressed and released the program button on the garage
door opener’s motor and the “training light” is lit, you have 30 seconds in which to
perform step 7. Use the help of a second person for convenience to assist when
performing this step.
7. Quickly within 30 seconds of pressing and releasing the garage door opener program
button, firmly press and release the HomeLink® button you’ve just programmed. Press
and release the HomeLink® button up to three times to complete the training.
8. Your HomeLink
® button should now be programmed. (To program the remaining
HomeLink® buttons for additional door or gate openers, follow steps 2-8 only).
BLUETOOTH® HANDS-FREE PHONE SYSTEM
(if so equipped)
With an overhead microphone and sound
transmitted through the audio system
speaker, the Bluetooth® Hands-Free Phone
System utilizes Bluetooth® wireless technology,
touch-screen and voice recognition to provide hands-free
cellular phone communication.
SYS teM oPe R A tING tIPS
Close all windows. Surrounding noises may interfere with
system operation.
Press the icon C button on the steering wheel to activate voice recognition.
Wait for the “Please say a command” prompt and the listening tone before speaking.
Begin speaking a command within 3.5 seconds of the listening tone.
To cancel a voice recognition session, press and hold the button.
To increase or decrease the volume of the voice prompts, press the VOL (volume)
control button on the steering wheel or turn the POWER/VOLUME knob on the audio
system while the system is responding.
Speak in a clear and natural voice without pausing between words.
Some commands are not available while the vehicle is in motion.
The “Help” command will bring up the voice recognition command list.
For recommended phones and detailed instructions, please visit
www.nissanusa.com/bluetooth
PAIRING Y oUR PH oNe
To use the hands-free feature, you need to set-up, or pair, the system to recognize your
cellular phone(s). Up to 5 Bluetooth®-enabled phones can be paired to this system. After
the initial one-time set-up, the system automatically connects with a paired phone when
the ignition switch is in the ACC or ON position, as long as the phone is in range and
within the vehicle cabin.
PAIRING PR oCeDUR e
NOTE: The vehicle must be stationary when pairing
the phone.
INItIAL PAIRING
NOTE: This procedure can only be used to pair the first phone to the system.
1. Press the
button on the steering wheel.
2. A message is displayed. Press the
button again.
Page 17 of 28
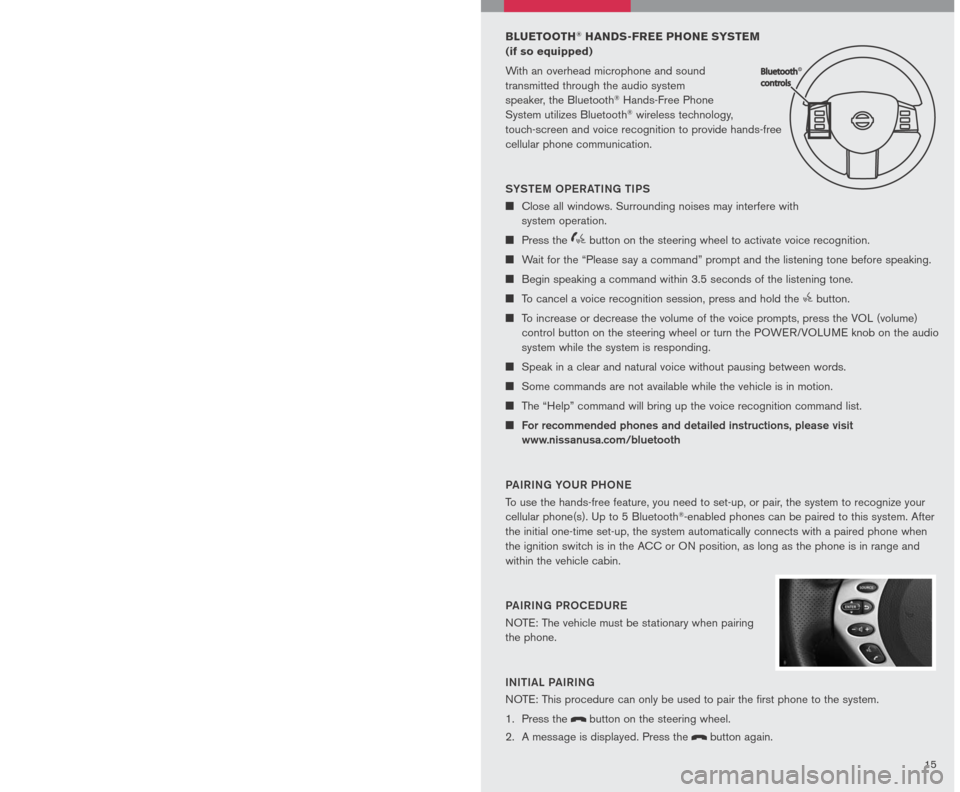
1415
PRoGR AMMING Y oUR
H o M eLINK® UNIV eRSAL
t R ANSC eIV eR ( Mirror, Sun Visor
or overhead Console)
1. To be
gin, press and hold the two
outer HomeLink® buttons (to clear
the memory) until the indicator light
blinks slowly (after 20 seconds).
Release both buttons.
2. Position the end of the hand-held transmitter 1-3 inches (26-76 cm) away from the
HomeLink® surface
3. Using both hands, simultaneously press and hold both the HomeLink
® button you
want to program and the hand-held transmitter button. Do Not release the buttons
until step 4 has been completed.
4. Hold down both buttons until the indicator light on the HomeLink
® flashes, changing
from a “slow blink” to a “rapidly flashing blink”. This could take up to 90 seconds.
When the indicator light flashes rapidly, both buttons may be released. The rapidly
flashing light indicates successful programming. To activate the garage door or other
programmed device, press and hold the programmed HomeLink® button - releasing
when the device begins to activate.
5. If the indicator light on the HomeLink
® blinks rapidly for two seconds and then turns
solid, HomeLink® has picked up a “rolling code” garage door opener signal. You
will need to proceed with the next steps to train the HomeLink® to complete the
programming which may require a ladder and another person for convenience.
6. Press and release the “smart” or “learn” program button located on the garage door
opener’s motor to activate the “training mode”. This button is usually located near the
antenna wire that hangs down from the motor. If the wire originates from under a light
lens, you will need to remove the lens to access the program button.
Note : o nce you have pressed and released the program button on the garage
door opener’s motor and the “training light” is lit, you have 30 seconds in which to
perform step 7. Use the help of a second person for convenience to assist when
performing this step.
7. Quickly within 30 seconds of pressing and releasing the garage door opener program
button, firmly press and release the HomeLink® button you’ve just programmed. Press
and release the HomeLink® button up to three times to complete the training.
8. Your HomeLink
® button should now be programmed. (To program the remaining
HomeLink® buttons for additional door or gate openers, follow steps 2-8 only).
BLUETOOTH® HANDS-FREE PHONE SYSTEM
(if so equipped)
With an overhead microphone and sound
transmitted through the audio system
speaker, the Bluetooth® Hands-Free Phone
System utilizes Bluetooth® wireless technology,
touch-screen and voice recognition to provide hands-free
cellular phone communication.
SYS teM oPe R A tING tIPS
Close all windows. Surrounding noises may interfere with
system operation.
Press the icon C button on the steering wheel to activate voice recognition.
Wait for the “Please say a command” prompt and the listening tone before speaking.
Begin speaking a command within 3.5 seconds of the listening tone.
To cancel a voice recognition session, press and hold the button.
To increase or decrease the volume of the voice prompts, press the VOL (volume)
control button on the steering wheel or turn the POWER/VOLUME knob on the audio
system while the system is responding.
Speak in a clear and natural voice without pausing between words.
Some commands are not available while the vehicle is in motion.
The “Help” command will bring up the voice recognition command list.
For recommended phones and detailed instructions, please visit
www.nissanusa.com/bluetooth
PAIRING Y oUR PH oNe
To use the hands-free feature, you need to set-up, or pair, the system to recognize your
cellular phone(s). Up to 5 Bluetooth®-enabled phones can be paired to this system. After
the initial one-time set-up, the system automatically connects with a paired phone when
the ignition switch is in the ACC or ON position, as long as the phone is in range and
within the vehicle cabin.
PAIRING PR oCeDUR e
NOTE: The vehicle must be stationary when pairing
the phone.
INItIAL PAIRING
NOTE: This procedure can only be used to pair the first phone to the system.
1. Press the
button on the steering wheel.
2. A message is displayed. Press the
button again.
Page 22 of 28
2021
Vo IC e K eY
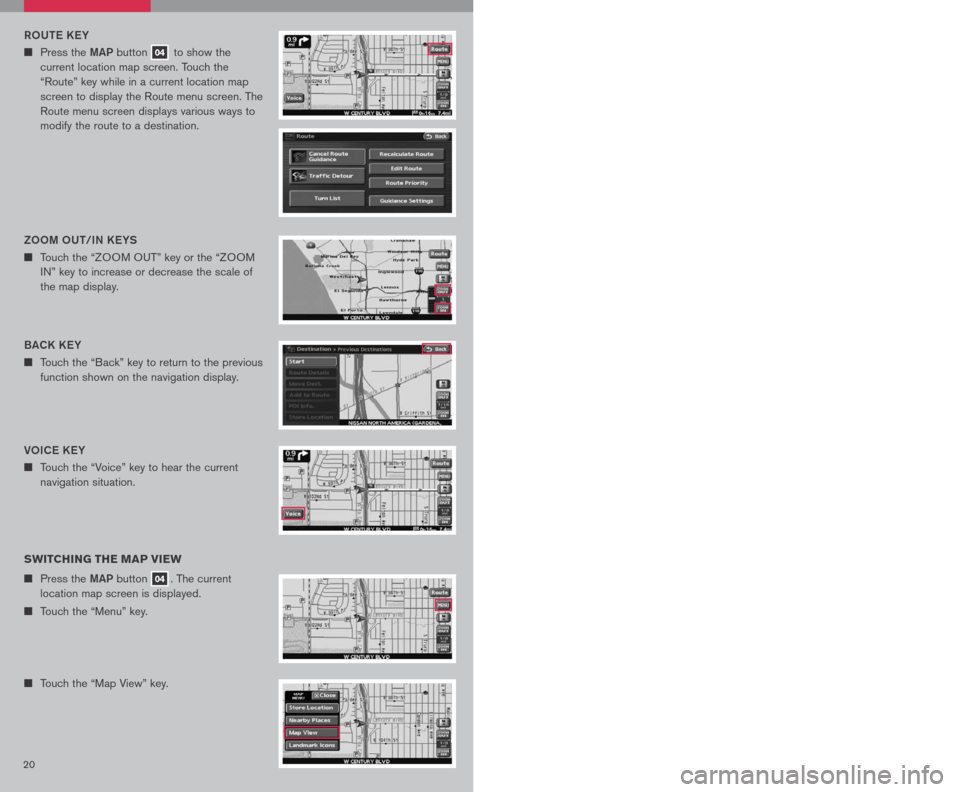
n Touch the “Voice” key to hear the current
navigation situation.
R o Ute KeY
n Press the MAP button 04 to show the
current location map screen. Touch the
“Route” key while in a current location map
screen to display the Route menu screen. The
Route menu screen displays various ways to
modify the route to a destination.
SWITCHING THE MAP VIEW
n Press the MAP button 04. The current
location map screen is displayed.
n Touch the “Menu” key.
n Touch the “Map View” key.
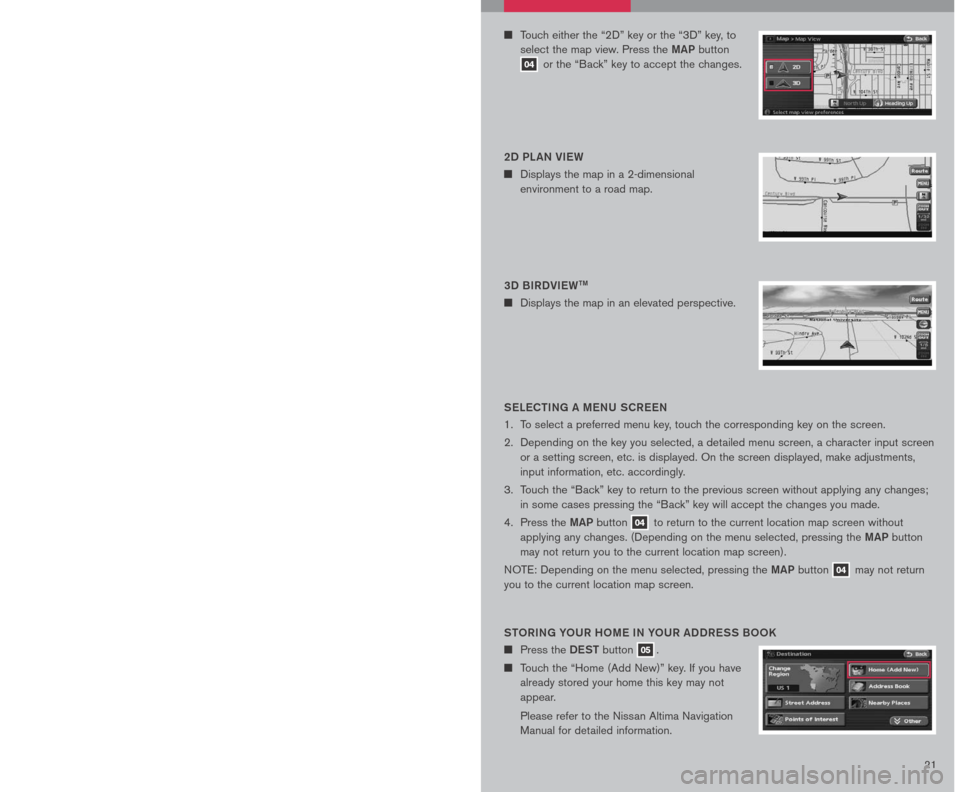
n Touch either the “2D” key or the “3D” key, to
select the map view. Press the MAP button
04 or the “Back” key to accept the changes.
SeLe C tING A M eNU SCR eeN
1. To select a preferred menu key, touch the corresponding key on the screen.
2. Depending on the key you selected, a detailed menu screen, a character input screen
or a setting screen, etc. is displayed. On the screen displayed, make adjustments,
input information, etc. accordingly.
3. Touch the “Back” key to return to the previous screen without applying any changes;
in some cases pressing the “Back” key will accept the changes you made.
4. Press the
MAP button 04 to return to the current location map screen without
applying any changes. (Depending on the menu selected, pressing the MAP button
may not return you to the current location map screen).
NOTE: Depending on the menu selected, pressing the MAP button 04 may not return
you to the current location map screen.
S to RING Y oUR H oM e IN Y oUR ADDR eSS B ooK
n Press the DeSt button 05.
n Touch the “Home (Add New)” key. If you have
already stored your home this key may not
appear.
Please refer to the Nissan Altima Navigation
Manual for detailed information.
BACK K eY
n Touch the “Back” key to return to the previous
function shown on the navigation display.
Zoo M oUt/IN K eYS
n Touch the “ZOOM OUT” key or the “ZOOM
IN” key to increase or decrease the scale of
the map display.3D BIRDVI eWtM
n Displays the map in an elevated perspective.
2D PL AN VI
eW
n Displays the map in a 2-dimensional
environment to a road map.
Page 23 of 28
2021
Vo IC e K eY
n Touch the “Voice” key to hear the current
navigation situation.
R o Ute KeY
n Press the MAP button 04 to show the
current location map screen. Touch the
“Route” key while in a current location map
screen to display the Route menu screen. The
Route menu screen displays various ways to
modify the route to a destination.
SWITCHING THE MAP VIEW
n Press the MAP button 04. The current
location map screen is displayed.
n Touch the “Menu” key.
n Touch the “Map View” key.
n Touch either the “2D” key or the “3D” key, to
select the map view. Press the MAP button
04 or the “Back” key to accept the changes.
SeLe C tING A M eNU SCR eeN
1. To select a preferred menu key, touch the corresponding key on the screen.
2. Depending on the key you selected, a detailed menu screen, a character input screen
or a setting screen, etc. is displayed. On the screen displayed, make adjustments,
input information, etc. accordingly.
3. Touch the “Back” key to return to the previous screen without applying any changes;
in some cases pressing the “Back” key will accept the changes you made.
4. Press the
MAP button 04 to return to the current location map screen without
applying any changes. (Depending on the menu selected, pressing the MAP button
may not return you to the current location map screen).
NOTE: Depending on the menu selected, pressing the MAP button 04 may not return
you to the current location map screen.
S to RING Y oUR H oM e IN Y oUR ADDR eSS B ooK
n Press the DeSt button 05.
n Touch the “Home (Add New)” key. If you have
already stored your home this key may not
appear.
Please refer to the Nissan Altima Navigation
Manual for detailed information.
BACK K eY
n Touch the “Back” key to return to the previous
function shown on the navigation display.
Zoo M oUt/IN K eYS
n Touch the “ZOOM OUT” key or the “ZOOM
IN” key to increase or decrease the scale of
the map display.3D BIRDVI eWtM
n Displays the map in an elevated perspective.
2D PL AN VI
eW
n Displays the map in a 2-dimensional
environment to a road map.